Axis AXIS 232D+ Installationsanleitung
- Kategorie
- Kameragehäuse
- Typ
- Installationsanleitung


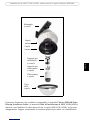
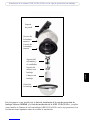
Installing the AXIS 231D+/232D+ in the Videotec DBH24K Dome Housing
ENGLISH
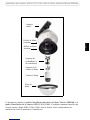
This document is an addendum to the Videotec DBH24K Dome Housing Installation
Guide and the AXIS 231D+/232D+ Installation Guide and describes how to install an
AXIS 231D+/232D+ Network Dome Camera in the housing. Please read through these
instructions before proceeding with the installation.
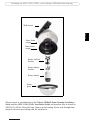
Heater and fan
Dome camera
Dome camera
Inner dome
casing
Outer dome
casing
Wall mount
bracket
bracket
Dome
glass

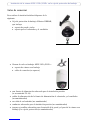
Installing the AXIS 231D+/232D+ in the Videotec DBH24K Dome Housing
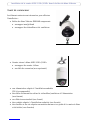
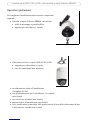
Before you begin
The following is needed to complete the installation:
• Videotec DBH24K Dome Housing including:
• wall/ceiling mount
• heater and fan bracket
• AXIS 231D+/232D+ Network Dome Camera
• dome camera bracket
• connection cable (not displayed)
• a power supply suitable for the intended installation
(PS-24 recommended)
• power cables from the power supply to the heater/fan
(not supplied)
• a standard network cable (not supplied)
• conduits suitable for the intended installation (not supplied)
• plugs and screws suitable for the wall material and for the weight of the dome cam-
era and housing (not supplied)

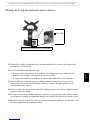
Installing the AXIS 231D+/232D+ in the Videotec DBH24K Dome Housing
ENGLISH
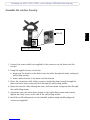
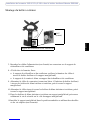
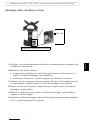
Assemble the outdoor housing
1. Connect the power cables (not supplied) to the connector on the heater and fan
bracket.
2. Using the supplied screws, attach the:
• heater and fan bracket to the dome (route the cables through the dome casing and
wall/ceiling mount).
• dome camera bracket to the heater and fan bracket
3. Route the connection cable (white connector inside the dome casing) through the
inner and outer dome casing and then through the wall/ceiling mount.
4. Route the network cables through the inner and outer dome casing and then through
the wall/ceiling mount.
5. Attach the outer and inner dome casings to the wall/ceiling mount and securely
tighten the safety screw on the side of the wall/ceiling mount.
6. Install the wall/ceiling mount in the intended position using suitable plugs and
screws (not supplied).
24V~IN
Heater and fan bracket

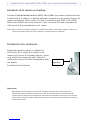
Installing the AXIS 231D+/232D+ in the Videotec DBH24K Dome Housing
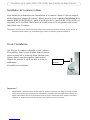
Install the dome camera
Refer to the AXIS 231D+/232D+ Installation Guide for information on how to install the
dome camera using the exterior ceiling mount (dome camera bracket). The AXIS
231D+/232D+ Installation Guide is available from the Axis Web site at www.axis.com or
from the AXIS Network Video CD supplied with the camera.
Note: Remove the plastic dome glass from the AXIS 231D+/232D+ once the camera has been installed in the
dome casing. Be careful not to damage the camera or lens during the installation.
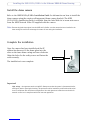
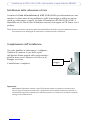
Complete the installation
Once the camera has been installed and the IP
address has been set, fit the dome glass into the
slots on the inner dome casing and turn clockwise.
Align the holes for the safety screw and fasten the
screw securely.
The installation is now complete.
Important!
High voltage - the apparatus works on 230V AC. Always ensure that the power is disconnected before
starting any work or opening the housing. This product should be installed by certified electrical techni-
cians in compliance with local laws and regulations. Use cable glands and cables that are suitable for
external use and are in compliance with local laws and regulations.
safety screw

Installation de la caméra AXIS 231D+/232D+ dans le boîtier du dôme Videotec DBH24K
FRANCAIS
Ce document complète le guide d'installation du boîtier du dôme Videotec DBH24K et le
guide d'installation de la caméra AXIS 231D+/232D+. Il explique comment installer une
caméra réseau à dôme AXIS 231D+/232D+ dans le boîtier. Lisez attentivement ces
instructions avant de poursuivre l'installation.
Support du
Support de la
Caméra à dôme
Boîtier de dôme
intérieur
Boîtier de dôme
extérieur
Support
réchauffeur et
caméra à dôme
Vitre du
dôme
du ventilateur
mural

Installation de la caméra AXIS 231D+/232D+ dans le boîtier du dôme Videotec
Avant de commencer
Les éléments suivants sont nécessaires pour effectuer
l'installation :
• Boîtier de dôme Videotec DBH24K comprenant :
• un support mur/plafond
• un support de réchauffeur et de ventilateur
• Caméra réseau à dôme AXIS 231D+/232D+
• un support de caméra à dôme
• un câble de connexion (non représenté)
• une alimentation adaptée à l'installation souhaitée
(PS-24 recommandée)
• des câbles d'alimentation reliant le réchauffeur/ventilateur à l'alimentation
(non fournis)
• un câble réseau standard (non fourni)
• des conduits adaptés à l'installation souhaitée (non fournis)
• des chevilles et des vis adaptées au matériau du mur et au poids de la caméra à dôme
et du boîtier (non fournies)

Installation de la caméra AXIS 231D+/232D+ dans le boîtier du dôme Videotec DBH24K
FRANCAIS
Montage du boîtier extérieur
7. Branchez les câbles d'alimentation (non fournis) au connecteur sur le support du
réchauffeur et du ventilateur.
8. À l'aide des vis fournies, fixez :
• le support du réchauffeur et du ventilateur au dôme (acheminez les câbles à
travers le boîtier du dôme et le support mur/plafond).
• le support de la caméra à dôme au support du réchauffeur et du ventilateur
9. Acheminez le câble de connexion (connecteur blanc à l'intérieur du boîtier du dôme)
à travers les boîtiers de dôme intérieur et extérieur, puis à travers le support
mur/plafond.
10.Acheminez le câble réseau à travers les boîtiers de dôme intérieur et extérieur, puis à
travers le support mur/plafond.
11.Fixez les boîtiers de dôme intérieur et extérieur au support mur/plafond, puis serrez
solidement la vis de sécurité sur le côté du support mur/plafond.
12.Installez le support mur/plafond dans la position souhaitée en utilisant des chevilles
et des vis adaptées (non fournies).
24 V
Support de réchauffeur et de ventilateur
(entrée)

Installation de la caméra AXIS 231D+/232D+ dans le boîtier du dôme Videotec
Installation de la caméra à dôme
Pour obtenir des informations sur l'installation de la caméra à dôme à l'aide du support
plafond extérieur (support de caméra à dôme), reportez-vous au guide d'installation de la
caméra AXIS 231D+/232D+. Le guide d'installation de la caméra AXIS 231D+/232D+ est
disponible sur le site Web d'Axis (www.axis.com) ou sur le CD du produit vidéo réseau
Axis fourni avec la caméra.
Remarque: Une fois que la caméra AXIS 231D+/232D+ est installée dans le boîtier du dôme, enlevez la vitre en
plastique du dôme. Veillez à ne pas endommager la caméra ou l'objectif pendant l'installation.
Fin de l'installation
Une fois que la caméra est installée et que l'adresse
IP est définie, fixez la vitre du dôme dans les fentes
qui se trouvent sur le boîtier de dôme intérieur, puis
tournez dans le sens des aiguilles d'une montre.
Alignez les trous de la vis de sécurité et serrez-la
solidement.
L'installation est terminée.
Important !
Haute tension : l'appareil fonctionne sous 230 V CA. Avant de commencer une tâche ou d'ouvrir le boîtier,
assurez-vous toujours que l'alimentation est débranchée. Ce produit doit être installé par des électriciens
agréés conformément aux lois et dispositions locales en vigueur. Utilisez des presse-étoupe et des câbles
adaptés à un usage extérieur et conformes aux lois et dispositions locales en vigueur.
vis de
sécurité

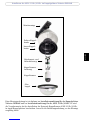
Installieren der AXIS 231D+/232D+ im Kuppelgehäuse Videotec DBH24K
DEUTSCH
Diese Montageanleitung ist ein Anhang zur Installationsanleitung für das Kuppelgehäuse
Videotec DBH24K und zur Installationsanleitung für die AXIS 231D+/232D+. Es wird
die Vorgehensweise bei der Installation der Netzwerk-Kuppelkamera AXIS 231D+/232D+
in einem Kuppelgehäuse beschrieben. Lesen Sie die Bedienungsanleitung vor der Montage
sorgfältig durch.
Heizelement- und
Kuppelkamera-
Kuppelkamera
Innere Kuppel-
haube
Äußere Kuppel-
haube
Wandmontage
Lüfterhalterung
halterung
Glas-
kuppel

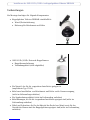
Installieren der AXIS 231D+/232D+ im Kuppelgehäuse Videotec DBH24K
Vorbereitungen
Zur Montage benötigen Sie folgende Komponenten:
• Kuppelgehäuse Videotec DBH24K einschließlich:
• Wand-/Deckenhalterung
• Halterung für Heizelement und Lüfter
• AXIS 231D+/232D+ Netzwerk-Kuppelkamera
• Kuppelkamerahalterung
• Verbindungskabel (nicht abgebildet)
• Ein Netzteil, das für die vorgesehene Installation geeignet ist
(empfohlener Typ: PS-24)
• Kabel zum Anschließen von Heizelement und Lüfter an die Stromversorgung
(nicht im Lieferumfang enthalten)
• Ein Standardnetzwerkkabel (nicht im Lieferumfang enthalten)
• Kabelführungen, die für die vorgesehene Installation geeignet sind (nicht im
Lieferumfang enthalten)
• Dübel und Schrauben, die für das Material der Decke bzw. Wand sowie für das
Gewicht der Kamera und des Kuppelgehäuses geeignet sind (nicht im Lieferumfang
enthalten)

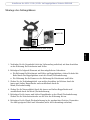
Installieren der AXIS 231D+/232D+ im Kuppelgehäuse Videotec DBH24K
DEUTSCH
Montage des Außengehäuses
1. Verbinden Sie die Stromkabel (nicht im Lieferumfang enthalten) mit dem Anschluss
an der Halterung für Heizelement und Lüfter.
2. Befestigen Sie folgende Elemente mit den mitgelieferten Schrauben:
• Die Halterung für Heizelement und Lüfter am Kuppelgehäuse; ziehen Sie dabei die
Kabel durch das Kuppelgehäuse sowie die Wand-/Deckenhalterung.
• Die Halterung für die Kamera an der Halterung für Heizelement und Lüfter.
3. Ziehen Sie das Verbindungskabel vom weißen Anschluss im Gehäuse durch die
innere und äußere Kuppelhaube und anschließend durch die
Wand-/Deckenhalterung.
4. Ziehen Sie die Netzwerkkabel durch die innere und äußere Kuppelhaube und
anschließend durch die Wand-/Deckenhalterung.
5. Befestigen Sie die innere und äußere Kuppelhaube an der Wand-/Deckenhalterung.
Ziehen Sie die Sicherheitsschraube an der Seite der Halterung fest an.
6. Befestigen Sie die Wand-/Deckenhalterung in der gewünschten Position. Verwenden
Sie dabei geeignete Dübel und Schrauben (nicht im Lieferumfang enthalten).
24 V~IN
Halterung für Heizelement und Lüfter

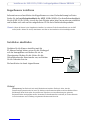
Installieren der AXIS 231D+/232D+ im Kuppelgehäuse Videotec DBH24K
Kuppelkamera installieren
Informationen zur Installation der Kuppelkamera an einer Deckenhalterung im Freien
finden Sie im Installationshandbuch der AXIS 231D+/232D+. Das Installationshandbuch
für die AXIS 231D+/232D+ ist auf der Axis-Website unter http://www.axis.com erhältlich
und befindet sich auch auf der mitgelieferten CD für Axis-Netzwerkvideoprodukte.
Hinweis: Wenn die Kamera in der Kuppelhaube installiert ist, entfernen Sie die Kunststoffhaube von der AXIS
231D+/232D+. Achten Sie darauf, dass Kamera und Linse bei der Installation nicht beschädigt werden.
Installation abschließen
Nachdem Sie die Kamera installiert und die
IP-Adresse festlegt haben, setzen Sie die Glaskuppel
auf das Innengehäuse und drehen Sie sie im
Uhrzeigersinn. Richten Sie die Löcher für die
Sicherheitsschraube übereinander aus, und drehen
Sie die Schraube fest ein.
Die Installation ist damit abgeschlossen.
Wichtig!
Hochspannung: Das Gerät wird mit 230 V Wechselstrom betrieben. Stellen sie sicher, dass die
Stromversorgung unterbrochen ist, bevor Sie Arbeiten an der Kamera durchführen oder das Gehäuse öffnen.
Die Montage dieses Geräts sollte von qualifizierten Technikern und unter Beachtung der geltenden
Rechtsvorschriften durchgeführt werden. Verwenden Sie Anschlussmuffen und Kabel, die für den Gebrauch
im Freien bestimmt und im Einklang mit geltenden Rechtsvorschriften sind.
Sicherheits-
schraube

Installazione di AXIS 231D+/232D+ nella custoida a cupola Videotec DBH24K
ITALIANO
Il presente documento, che costituisce un'appendice al manuale Videotec DBH24K Dome
Housing Installation Guide e al manuale Guida all'installazione di AXIS 231D+/232D+,
descrive come installare la videocamera di rete a cupola AXIS 231D+/232D+ nel proprio
alloggiamento. Leggere attentamente le istruzioni prima di procedere con l'installazione.
Supporto per
Supporto per
Videocamera
Cupola
interna
Cupola
esterna
Montaggio
riscaldatore
videocamera
Vetro
della
a parete
e ventola
a cupola
a cupola
cupola

Installazione di AXIS 231D+/232D+ nella custoida a cupola Videotec DBH24K
Operazioni preliminari
Per completare l’installazione sono necessari i componenti
seguenti:
• Custodia a cupola Videotec DBH24K che include:
• staffa di montaggio a parete/soffitto
• supporto per riscaldatore e ventola
• Videocamera di rete a cupola AXIS 231D+/232D+
• supporto per videocamera a cupola
• cavo di connessione (non mostrato)
• un alimentatore adatto all'installazione
(consigliato PS-24)
• cavi di alimentazione per il riscaldatore e la ventola
(non forniti)
• un cavo di rete standard (non fornito)
• passanti adatti all'installazione (non forniti)
• viti e tasselli adatti al materiale della parete nonché al peso della videocamera di rete
e della relativa custodia (non forniti)

Installazione di AXIS 231D+/232D+ nella custoida a cupola Videotec DBH24K
ITALIANO
Montaggio della custodia per esterni
19.Collegare i cavi di alimentazione (non forniti) al connettore presente sul supporto del
riscaldatore e della ventola.
20.Mediante le viti fornite, montare:
• il supporto per riscaldatore e ventola alla cupola (passare i cavi attraverso la
cupola e la staffa di montaggio a parete/soffitto).
• la staffa per videocamera a cupola al supporto per riscaldatore e ventola
21.Passare il cavo di connessione (connettore bianco all'interno della cupola) attraverso
la cupola interna, la cupola esterna e la staffa di montaggio a parete/soffitto.
22.Passare i cavi di rete attraverso la cupola interna, la cupola esterna e la staffa di
montaggio a parete/soffitto.
23.Montare le cupole, interna ed esterna, alla staffa di montaggio a parete/soffitto e
stringere le viti di fissaggio.
24.Installare la staffa di montaggio a parete/soffitto nella posizione desiderata mediante
le viti e i tasselli appropriati (non forniti).
24 V~IN
Supporto per riscaldatore e ventola

Installazione di AXIS 231D+/232D+ nella custoida a cupola Videotec DBH24K
Installazione della videocamera di rete
Consultare la Guida all'installazione di AXIS 231D+/232D+ per informazioni su come
installare la videocamera di rete mediante la staffa di montaggio a soffitto per esterni
(staffa per videocamera a cupola). La Guida all'installazione di AXIS 231D+/232D+ è
disponibile sul sito Web di Axis all’indirizzo www.axis.com oppure sul CD fornito con il
prodotto.
Nota: Rimuovere la plastica di protezione dalla videocamera AXIS 231D+/232D+ una volta installata nella cupola.
Fare attenzione a non danneggiare la videocamera o l'obiettivo durante l'installazione.
Completamento dell'installazione
Una volta installata la videocamera e configurato
l'indirizzo IP, montare il vetro della cupola
nell'apposite fessure presenti sulla cupola interna e
girare in senso orario. Allineare i fori alla vite di
fissaggio e avvitare.
L'installazione è completata.
Importante
Alta tensione: l'apparecchio funziona a 230 V CA. Accertarsi sempre di scollegare la corrente prima di
aprire la cupola ed eseguire eventuali lavori. Il prodotto deve essere installato da elettricisti certificati in
conformità alle leggi e alle normative locali. Utilizzare passacavi e cavi adatti ad un uso esterno e conformi
alle leggi e alle normative locali.
vite di
fissaggio

Instalación de la cámara AXIS 231D+/232D+ en la caja de protección de burbuja
ESPAÑOL
Este documento es un apéndice de la Guía de instalación de la caja de protección de
burbuja Videotec DBH24K y la Guía de instalación de la AXIS 231D+/232D+, y explica
cómo instalar la Cámara de red con burbuja AXIS 231D+/232D+ en la caja protectora. Lea
las instrucciones siguientes antes de realizar la instalación.
Soporte del
Soporte de
Cámara con
Carcasa de
Carcasa de
Soporte
cámara con
Cristal de
la burbuja
burbuja
burbuja
calentador y
el ventilador
de pared
la burbuja
la burbuja
exterior
interior

Instalación de la cámara AXIS 231D+/232D+ en la caja de protección de burbuja
Antes de comenzar
Para realizar la instalación deberá disponer de lo
siguiente:
• Caja de protección de burbuja Videotec DBH24K,
que incluye:
• soporte de pared o techo
• soporte para el calentador y el ventilador
• Cámara de red con burbuja AXIS 231D+/232D+:
• soporte de cámara con burbuja
• cable de conexión (no aparece)
• una fuente de alimentación adecuada para la instalación prevista
(se recomienda PS-24)
• cables de alimentación de la fuente de alimentación al calentador y el ventilador
(no suministrados)
• un cable de red estándar (no suministrado)
• conductos adecuados para la instalación prevista (no suministrados)
• tapones y tornillos adecuados para el material de la pared y el peso de la cámara con
burbuja y la caja de protección (no suministrados)
Seite wird geladen ...
Seite wird geladen ...
Seite wird geladen ...
-
 1
1
-
 2
2
-
 3
3
-
 4
4
-
 5
5
-
 6
6
-
 7
7
-
 8
8
-
 9
9
-
 10
10
-
 11
11
-
 12
12
-
 13
13
-
 14
14
-
 15
15
-
 16
16
-
 17
17
-
 18
18
-
 19
19
-
 20
20
-
 21
21
-
 22
22
-
 23
23


Axis AXIS 232D+ Installationsanleitung
- Kategorie
- Kameragehäuse
- Typ
- Installationsanleitung
in anderen Sprachen
- English: Axis AXIS 232D+ Installation guide
- français: Axis AXIS 232D+ Guide d'installation
- español: Axis AXIS 232D+ Guía de instalación