
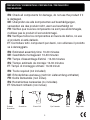
Product Manual
UV LED FLOOD LIGHT
MODEL:
G20UV D50UV
D100UV

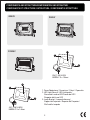
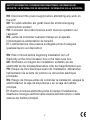
1. Cover/Abdeckung / Couverture / Cubrir / Coperchio
2. LED Light Source / LED-Lichtquelle /
Source de Lumière LED/Fuente de LED /
Sorgente della luce LED
3. Lamp Bracket / Lampenhalterung /
Support duProjecteur / Soporte del Proyector /
Staffa della lampada
2
COMPONENTS AND STRUCTURE/KOMPONENTEN UND STRUKTUR/
COMPOSANTS ET STRUCTURE / ESTRUCTURA / COMPONENTI E STRUTTURA`
D100UV
D50UV
G20UV
(UK) 1.5M (4.92ft)
H05RN-F 3 x 1.0mm
²
1
2
3
1
2
3
(EU) 1.5M (4.92ft)
H05RN-F 3 x 1.0mm
²

3
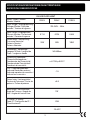
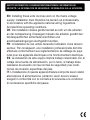
SPECIFICATIONS/SPEZIFIKATIONEN/CARACTÉRISTIQUES/
ESPECIFICACIONES/SPECIFICHE
t
a
120°
-20-40°C
Model / Modell / Modèle
Modelo / Modello
Input Voltage / Eingangspannung /
Voltage d’Entrée / Voltaje de
entrada / Tensione di ingresso
Input Current / Eingangsstrom /
Courant d’Entrée / Corriente de
entrada / Corrente di ingresso
Rated Power / Nennleistung /
Puissance Nominale /
Potencia Nominal /
Potenza Nominale
Wavelength / Wellenlänge /
Longueur d'Onde / Longitud de
Onda / Lunghezza d'onda
Chromaticity coordinate /
Chromatizitätskoordinate /
Coordonnées de Chromaticité /
Coordenada de Cromaticidad /
Coordinata di cromaticità
CRI / Farbwiedergabeindex /
Indice de Rendu des couleurs /
Índice de reproducción cromática /
Indice di resa cromatica
Power factor / Leistungsfaktor /
Facteur de Puissance / Factor de
potencia / Fattore di potenza
Beam Angle / Abstrahlwinkel /
Angle de Faisceau / Angulo de
Haz / Angolo del fascio di luce
IP Rating / IP Rating /
Code IP / Clasificación del IP /
Classificazione IP
G20UV D50UV D100UV
0.22A
50W
0.11A
20W
0.45A
100W
220-240V50Hz
385-400nm
x=0.1763 y=0.0317
≥0.9
IP66
-1.9
UV LED FLOOD LIGHT

4
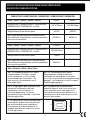
Model / Modell / Modèle / Modelo / Modello
SPECIFICATIONS/SPEZIFIKATIONEN/CARACTÉRISTIQUES/
ESPECIFICACIONES/SPECIFICHE
W
H
L
Weight/Gewicht/Poids/Peso/Il peso
Max Projected Area/Maximale Projektionsfläche/
Zone Maximale Projectée/Área máxima proyectada/
Area massima proiettata
EN: The intended purpose of this special
purpose product: This light is used to
create atmosphere. It is not suitable
for household room illuminationthe
light source is not intended for use in
other applications.
DE: Der Verwendungszweck dieses
Spezialprodukts: Diese Leuchte wird
verwendet, um Atmosphäre zu schaffen.
es ist nicht für die haushaltsraumbeleuchtung
geeignetdie lichtquelle ist nicht für andere
anwendungen geeignet.
FR: L’ usage spécial pour ce produit: cette
lumière est utilisée pour créer une
atmosphère. Il ne convient pas à
l'éclairage domestique. La source
lumineuse n'est pas destinée à l’utilisation
d'autres applications.
IT: lo scopo previsto di questo prodotto per
scopi speciali: questa luce viene utilizzata
per creare atmosfera.non è adatto per
l'illuminazione di ambienti domestici ,la
sorgente luminosa non è destinata all'uso
in altre applicazioni.
ES: El propósito de este producto de
propósito especial: esta luz se utiliza para
crear atmósfera.no es adecuado para la
iluminación de habitaciones domésticas, la
fuente de luz no está diseñada para su uso
en otras aplicaciones.
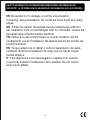
DIMENSIONS / ABMESSUNGEN / DIMENSIONS /
DIMENSIONES / DIMENSIONILxHxW
DIMENSIONS / ABMESSUNGEN / DIMENSIONS / DIMENSIONES / DIMENSIONI
Note / Hinweise / Noter / Nota / Nota
0.41KG
0.0105 m²
153*91*28mm
1.55KG
0.0616 m²
329*208*35mm
Model / Modell / Modèle / Modelo / Modello
Weight/Gewicht/Poids/Peso/Il peso
Max Projected Area/Maximale Projektionsfläche/
Zone Maximale Projectée/Área máxima proyectada/
Area massima proiettata
DIMENSIONS / ABMESSUNGEN / DIMENSIONS /
DIMENSIONES / DIMENSIONILxHxW
G20UV
0.95KG
0.0265 m²
258*168*40mm
D50UV
D100UV

5
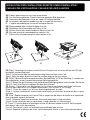
EN: Check all components for damage, do not use the product if it
is damaged.
DE: Überprüfen sie alle komponenten auf beschädigungen,
verwenden sie das produkt nicht, wenn es beschädigt ist.
FR: Vérifiez que tous les composants ne sont pas endommagés,
n'utilisez pas le produit s'il est endommagé.
ES: Verifique todos los componentes en busca de daños, no use
el producto si está dañado.
IT: Controllare tutti i componenti per danni, non utilizzare il prodotto
se è danneggiato.
EN: Estimated assembly time: 10-30 minutes
DE: Geschätzte montagezeit: 10-30 minuten
FR: Temps d’Assemblage Estimé : 10-30 minutes
ES: Tiempo estimado de montaje: 10-30 minutos
IT: Tempo di montaggio stimato: 10-30 minuti
EN: Tools required (not included)
DE: Erforderliches werkzeug (nicht im Lieferumfang enthalten)
FR: Outils Demandés (non inclus)
ES: Herramientas necesarias (no incluidas)
IT: Strumenti richiesti (non inclusi)
Flathead
Screwdriver
Screwdriver Electric Drill Eye Protection Pliers Step Ladder
PREPARATION / VORBEREITUNG / PRÉPARATION / PREPARACIÓN /
PREPARAZIONE

6
EN: Risk of shock-before beginning installation,turn off
Electricity at the circuit breaker box or the main fuse box.
DE: Stoßrisiko-vor beginn der installation, schalten sie die
elektrizität an der kreislaufbremsbox oder der hauptfutterbox aus.
FR: Risque de choc électrique avant de l'installation, débrancher
l'alimentation de la boîte de jonction ou de la boîte électrique
principale.
ES: Riesgo de choque-antes de comenzar la instalación, apague la
electricidad en la caja de disyuntores o en la caja de fusibles
principal.
IT: Rischio di scosse elettriche-prima di iniziare l'installazione,
disattivare l'energia elettrica nella scatola dell'interruttore o della
scatola dei fusibili principali.
EN: Disconnect the power supply before attempting any work on
the unit!
DE: Vor allen arbeiten am gerät muss die stromversorgung
unterbrochen werden!
FR: Il a besoin de la déconnexion avant tous les opération sur
l’appareil!
ES: ¡antes de comenzar cualquier trabajo en el aparato,
Interrúmpase la alimentación de tensión!
IT: L'alimentazione deve essere scollegata prima di eseguire
qualsiasi lavoro sul dispositivo!
SAFETY INFORMATION / SICHERHEITSINFORMATIONEN / INFORMATION DE
SÉCURITÉ / LA INFORMACIÓN DE SEGURIDAD / INFORMAZIONI SULLA SICUREZZA

SAFETY INFORMATION / SICHERHEITSINFORMATIONEN / INFORMATION DE
SÉCURITÉ / LA INFORMACIÓN DE SEGURIDAD / INFORMAZIONI SULLA SICUREZZA
7
EN: Installing these units involves work on the mains voltage
supply; installation must therefore be carried out professionally
In accordance with the appliance national wiring regulations
And electrical operating conditions.
DE: Die installation dieses geräts handelt es sich um die arbeiten
an der netzspannung. Deswegen müssen die arbeiten gemäß den
länderspezifischen sicherheitsvorschriften und
anschlussbedingungen durchgeführt werden.
FR: L'installation de ces unités nécessite l'utilisation d'une tension
secteur. Par conséquent, une installation professionnelle doit être
effectuée conformément aux réglementations de câblage du pays
local pour les appareils électriques et le fonctionnement électrique.
ES: La instalación de este equipo implica trabajo relacionado con el
voltaje de la fuente de alimentación, por lo tanto, el trabajo debe
realizarse de acuerdo con las normas de seguridad y las condi-
ciones de conexión específicas del país.
IT: L'installazione di questa apparecchiatura comporta lavori relativi
alla tensione di alimentazione, pertanto i lavori devono essere
eseguiti in conformità con le normative di sicurezza e le condizioni
di connessione specifiche del paese.

SAFETY INFORMATION / SICHERHEITSINFORMATIONEN / INFORMATION DE
SÉCURITÉ / LA INFORMACIÓN DE SEGURIDAD / INFORMAZIONI SULLA SICUREZZA
EN: Be careful not to damage or cut the wire insulation
(Covering) during installation. Do not let the wires touch any sharp
edges.
DE: Achten sie darauf, die kabelisolierung (abdeckung) während
der installation nicht zu beschädigen oder zu schneiden. Lassen sie
die kabel keine scharfen kanten berühren.
FR: Veillez à ne pas endommager ou couper l'isolation des fils
(revêtement) lors de l'installation. Ne laissez pas les fils toucher les
bords tranchants.
ES: Tenga cuidado de no dañar o cortar el aislamiento del cable
(cubierta) durante la instalación. No deje que los cables toquen
bordes afilados.
IT: Fare attenzione a non danneggiare o tagliare il filo isolante
(copertura) durante l'installazione. Non lasciare che i fili toccino
alcun bordo affilato.
8

9
EN: Recommended to be installed no higher than 5m
DE: Empfohlene Installationshöhe nicht höher als 5m
FR: Hauteur d'installation recommandée ne dépassant pas 5m
ES: Altura de instalación recomendada no superior a 5m
IT: Altezza di installazione consigliata non superiore a 5m
EN: Product appearance may vary from image shown
DE: Das Erscheinungsbild des Produkts kann vom gezeigten Bild abweichen
FR: L'apparence du produit peut varier par rapport à l'image présentée
ES: La apariencia del producto puede variar de la imagen que se muestra
IT: L'aspetto del prodotto può variare dall'immagine mostrata
INSTALLATION STEPS / INSTALLATIONS SCHRITTE / ETAPES D'INSTALLATION /
PASSAGGI PER L'INSTALLAZIONE / PASSAGGI PER L'INSTALLAZIONE
EN: Step 1: According to the space (see the“A”part of the picture of two screw bits on the LED Light
bracketdrill two mounting holes.
Step 2: Put the bracket onto the prepared mounting holes and then screw it on.
Step 3: Adjust the beam direction as you like,and then plug into the main socket.
DE: Schritt 1:Bohren Sie bitte entsprechend dem Abstand(Siehe Teil“A”der Abbildung 1) von den zwei
Schraubenlöcher auf der Lampenhalterung zwei Befestigungslöcher.
Schritt 2:Setzen Sie die Halterung auf die vorbereiteten Befestigungslöcher und schrauben Sie sie fest.
Schritt 3: Nach Ihren Wunsch regulieren Sie den Abstrahlwinkel.
FR: Étape 1 : Percez deux trous de montage sur la surface de montage en fonction de la distance
entre les deux têtes de vis sur le support du projecteur. (Voir la partie "A" sur l'image)
Étape 2 : Placez les supports sur les trous de montage préparés et serrez.
Étape 3 : Ajustez la direction du faisceau selon votre besoin, puis branchez le projecteur dans la prise
principale.
ES: Paso 1:Seqún el espacio(vea la parte"A"de la imagen) de dos brocas de tornillo en el soporte del
foco,taladre dos aqujeros de montaie
Paso 2: Coloque el soporte en los orificios de montaje preparados y luego atornillelo.
Paso 3: Ajuste la dirección del haz como desee y luego conéctelo a la toma principal
IT: Passo 1: Praticare due fori di montagaio in base alla distanza(vedere la parte"A" dell'immagine)
delle due viti nella staffa del proiettore.
Passo 2: Posizionare a staffa sui fori dimontagaio predisposti epoi avvitarla
Passo 3: Regolare la direzione del fascio a piacimentoquindi inserire la spina nella presa principale.

Manufacturer / Hersteller:
ShenZhenShiMengZhiTuoKeJiYouXianGongSi
Address: qianwanyilu1haoAdong201shiqianhaishenganghezuoquShenZhen,Guang
Dong, 518000,CN
[email protected] www.onforuleds.com
69 Aberdeen Avenue, Cambridge CB2 8DL,
United Kingdom | [email protected]
EU REP MDH LIGHTING LTD
Suite 302, 292 Strovolos Avenue, 2048 Strovolos
Nicosia, Cyprus | [email protected]
Made in China
UK REP MDH LIGHTING LTD
-
 1
1
-
 2
2
-
 3
3
-
 4
4
-
 5
5
-
 6
6
-
 7
7
-
 8
8
-
 9
9
-
 10
10


in anderen Sprachen
- français: ONFORU G20UV Manuel utilisateur
- español: ONFORU G20UV Manual de usuario
- italiano: ONFORU G20UV Manuale utente


