CONDTROL XP4 Pro Benutzerhandbuch
- Kategorie
- Messung
- Typ
- Benutzerhandbuch


23
XP4 Pro CONDTROLXP4 Pro CONDTROL
DESTINATION DE L’APPAREIL 48
COMPOSANTS 48
CARACTERISTIQUES TECHNIQUES 48
DESCRIPTION DE L’APPAREIL 50
MANIPULATION DE L’APPAREIL 51
MESURES 54
CALCULS 58
CODES D’ERREUR 66
CONSIGNES DE SECURITE 67
MAINTENANCE ET EXPLOITATION 68
MISE HORS SERVICES 68
OBLIGATION DE GARANTIE 69
FR SOMMAIRE
НАЗНАЧЕНИЕ ПРИБОРА 70
КОМПЛЕКТАЦИЯ 70
ТЕХНИЧЕСКИЕ ХАРАКТЕРИСТИКИ 70
ОПИСАНИЕ ПРИБОРА 72
РАБОТА С ПРИБОРОМ 73
ИЗМЕРЕНИЯ 76
ВЫЧИСЛЕНИЯ 80
КОДЫ СООБЩЕНИЙ 88
УКАЗАНИЯ ПО ТЕХНИКЕ БЕЗОПАСНОСТИ 89
УХОД И ЭКСПЛУАТАЦИЯ 90
УТИЛИЗАЦИЯ 90
ГАРАНТИЙНЫЕ ОБЯЗАТЕЛЬСТВА 91
RU СОДЕРЖАНИЕ
INTENDED USE 4
SET 4
TECHNICAL SPECIFICATIONS 4
PRODUCT DESCRIPTION 6
OPERATION 7
MEASUREMENTS 9
CALCULATIONS 14
MESSAGE CODES 22
SAFETY REGULATIONS 23
CARE AND MAINTENANCE 24
UTILIZATION 24
WARRANTY 25
EN CONTENT
BESTIMMUNGSGEMAESSER GEBRAUCH 26
LIEFERUMFANG 26
TECHNISCHE DATEN 26
PRODUKTBESCHREIBUNG 28
GERAETEBEDIENUNG 29
MESSUNGEN 32
BERECHNUNGEN 36
FEHLERCODES 44
SICHERHEITSHINWEISE 45
PFLEGE 46
ENTSORGUNG 46
GARANTIE 46
WARTUNG UND REPARATUR 47
DE INHALT

User manual
LASER DISTANCE METER
4
EN
5
User manual
LASER DISTANCE METER
EN
XP4 Pro CONDTROL XP4 Pro CONDTROL
Congratulations on your purchase of laser distance meter CONDTROL XP4 Pro.
Safety instructions can be found in the end of this user manual and should be
carefully read before you use the product for the first time.
INTENDED USE
Laser distance meter XP4 Pro is intended to measure distance, to stake out a line,
to calculate area and volume of measured objects as well as perform calculations
by tilt sensor and Pythagoras’ Theorem and able to transmit measuring results
via Bluetooth. The product is suitable for use at both indoor and outdoor building
areas.
SET
1. Laser distance meter– 1pc.
2. Carry pouch with a strap - 1 pc.
3. User manual – 1 pc.
4. Batteries (AAA) – 3 pcs.
5. USB charger– 1 pc.
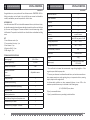
TECHNICAL SPECIFICATIONS
Working range* 0,05– 150 m
Measuring accuracy ** ± 1,5 mm
Smallest unit displayed 1 mm
Automatic shutdown
- Laser
- Instrument
Adjustable in menu
Display backlight +
Reference point setting +
Continuous measurement (tracking) +
Max./min. value +
Addition/subtraction +
Area/volume/triangle area/trapezium area +
Calculations by tilt sensor +
Calculations by Pythagoras’ Theorem +
Stake-out function +
Digital viewfinder +
Bluetooth +
Digital vial +
Timer +
Memory up to 50 values
Laser type Class II, 635 nm, power <1 mW
Working temperature –10 °С ... +50 °С
Storage temperature –20 °С ... +60 °С
Dust and water protection IP54
Dimensions 136х59х28 mm
Weight 170 g
Power supply 3 х battery AAA 800 mAh
1.2V Ni-MH
* Use a reflector to increase the measurement range during daylight or if the
target has poor reflection properties.
** Accuracy can decrease in unfavorable conditions, such as intense sunshine or
when measurements are made against glossy or transparent surfaces, moving
objects, objects with rough surface.
In unfavourable conditions or when measured distance is over 100 m the
maximum permissible accuracy is calculated in the following way:
± (Y + 0,25хDх10-3) mm, where
D (mm) - measured distance
Y (mm) - permissible accuracy according to technical data.

User manual
LASER DISTANCE METER
6
EN
7
User manual
LASER DISTANCE METER
EN
XP4 Pro CONDTROL XP4 Pro CONDTROL
1
2
3
4
8
10
5
7
9
16
14
1315 6
11 12
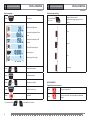
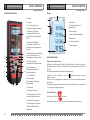
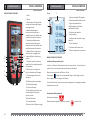
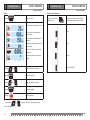
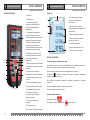
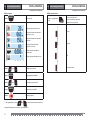
1. Display
2. Keyboard
3. Turn on the product/turn
on laser beam/single distance
measurement/continuous
measurement
4. Addition/up/increase the value/
flip through measuring results in
memory (forward)
5. Subtraction/down/decrease
the value/flip through measuring
results in memory (backwards)
6. Menu/choose menu option/
activate setting of menu function/
scroll measuring results down
7. Area/volume/triangle area/
trapezium area
8. Calculations by tilt sensor and
Pythagoras’ Theorem
9. Timer/reference point setting
10. Memory/digital vial
11. Bluetooth/stake-out function
12. Digital viewfinder
13. Turn off the product / clear/
exit menu/exit mode
14. Strap location
15. End-piece
16. Mini-USB connector for
charging
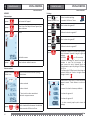
Display
1. Main line
2. Additional lines
3. Mode indicator
4. Charge level indicator
5. Unit of measurement
6. Laser beam indicator
7. Reference point
2
7
6
4
5
1
3
OPERATION
Install/charge batteries
Insert batteries observing correct polarity. Use nickel metal-hydride batteries.
Charge level is shown on display. Charge batteries when symbol appears on
the display. Use USB charger delivered in the set.
Don’t use the product while charging.
It takes approximately 4 hours to fully charge the batteries.
Turn on/off
Turn on: press .
Turn off: press and hold for 1 second.
PRODUCT DESCRIPTION

User manual
LASER DISTANCE METER
8
EN
9
User manual
LASER DISTANCE METER
EN
XP4 Pro CONDTROL XP4 Pro CONDTROL
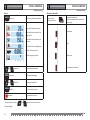
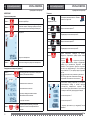
Menu navigation
Press Enter menu
Display backlight timer
Automatic shutdown of laser
beam
Automatic shutdown of the
product
Turn on/off sound signal
Measuring unit
Measuring unit of angle
Press or Choose menu option
Press Confirm the choice
Press or Menu option setting*
Press Confirm the setting
Press Exit menu
* If press and hold or the speed is increased.
Reference point setting
Press and hold
for 1 sec.
Change reference point
Appropriate image appears on the
display.
Front
Tripod
Rear
End-piece
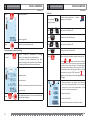
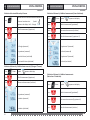
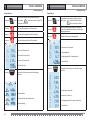
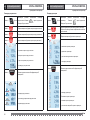
MEASUREMENTS
Single distance measurement
Press Turn on the product.
Press Turn on laser beam. Aim the product at measured
object.

User manual
LASER DISTANCE METER
10
EN
11
User manual
LASER DISTANCE METER
EN
XP4 Pro CONDTROL XP4 Pro CONDTROL
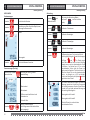
Press Take measurement.
– measuring result
Press Delete the last measuring result.
Continuous measurement (tracking)
Press and hold
for 1 sec.
Activate continuous measurement (tracking)
function. Laser beam turns on simultaneously.
The product will take measurements one after
another, showing the last measured value. Besides it
will show maximal and minimal measured values.
– maximal value
– minimal value
– difference between maximal and minimal values
– current value
Press or Stop taking measurements. The last measured values
are shown on the display .
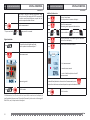
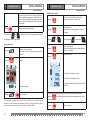
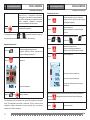
Stake out
Press and hold
during 2 seconds
Activate stake out function. Symbol
appears on the display.
Press or Set the value of distance А*.
Press Confirm the value of distance A.
Press or Set the value of distance В*.
Press Confirm the value of distance B.
Press Start taking measurements. Laser beam is blinking.
Move the product slowly along the stake-out line.
Arrows and shown on the display indicate
in what direction it is required to move the product
in order to reach stake-out point. If sound signal is
on, when approaching the stake-out point to ±0,1
m the product emits sound signal. When reaching
the stake-out point to ±0,001 m symbol
appears on the display and sound signal tonality is
changed.
distance between the object and stake-out
point of last measured distance. This value will
increase after each next measurement by the
value of last taken measurement
– value of distance A
– value of distance В
– current distance to the next stake-out point
–

User manual
LASER DISTANCE METER
12
EN
13
User manual
LASER DISTANCE METER
EN
XP4 Pro CONDTROL XP4 Pro CONDTROL
Mark point А and go on moving the product along
stake-out line until you reach point B. If it is necessary
to transfer several equal distances, repeat the last
operation required number of times.
Press Stop the measurement.
* If press and hold or the speed is increased.
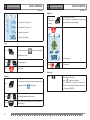
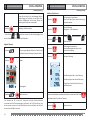
Digital viewfinder
Press Activate function of digital viewfinder.
Aim the product at measured object.*
Press Take measurement.
- measuring result
Press or Exit the mode.
*At distance less than 20 m laser dot can be out of the cross hair on the display. It
is calibrated to distances over 20m and will be exactly in the center in the range of
20m-150m, so, it helps to aim at the object
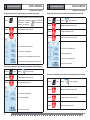
Addition/Subtraction
Press Turn on laser beam.
Aim the product at measured object.
Press Take first measurement.
Measuring result appears in the main line.
Press or Activate addition / subtraction .
Press Turn on laser beam. First measuring result moves to
the line 2 on the display.
Press Take the second measurement.
– first measurement
– second measurement
– result of addition/subtraction of 2
measurements
To do addition/subtraction of more than 2 measurements press
and perform the above mentioned operations required number of times.
Press Exit the mode.

User manual
LASER DISTANCE METER
14
EN
15
User manual
LASER DISTANCE METER
EN
XP4 Pro CONDTROL XP4 Pro CONDTROL
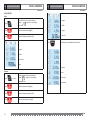
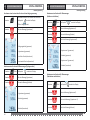
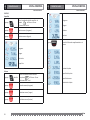
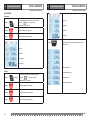
CALCULATIONS
Area
Press
Activate function of area calculation.
Symbol appears on the display.
Laser beam is on.
Press Take first measurement (length).
Press Take second measurement (width).
– length
– width
– perimeter
– area
Volume
Press 2 times
Activate function of volume calculation.
Symbol appears on the display.
Laser beam is on.
Press Take first measurement (length).
Press Take second measurement (width).
Press Take third measurement (height).
– length
– width
– height
– volume
Press Scroll down to view additional information:
- volume
- area
- wall area
- perimeter

User manual
LASER DISTANCE METER
16
EN
17
User manual
LASER DISTANCE METER
EN
XP4 Pro CONDTROL XP4 Pro CONDTROL
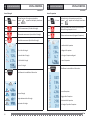
Area of triangle
Press 3 times
Activate function of triangle area calculation.
Symbol appears on the display. Laser beam
is on.
Press Take first measurement (first side of triangle).
Press Take second measurement (second side of triangle).
Press Take third measurement (third side of triangle).
– first side of triangle
– second side of triangle
– third side of triangle
– area of triangle
Press Scroll down to view additional information:
- area of triangle
- angle between sides of triangle
- perimeter of triangle
Area of trapezium
Press 4 times
Activate function of trapezium area calculation.
Symbol appears on the display. Laser beam
is on.
Press Take first measurement (smaller side of trapezium).
Value of tilt angle appears in line 3.
Press Take second measurement (diagonal of trapezium).
– smaller side of trapezium
– diagonal of trapezium
– tilt angle of trapezium diagonal
– area of trapezium
Press Scroll down to view additional information:
- area of trapezium
- bigger side of trapezium
- bottom side of trapezium
- tilt angle of top side of trapezium

User manual
LASER DISTANCE METER
18
EN
19
User manual
LASER DISTANCE METER
EN
XP4 Pro CONDTROL XP4 Pro CONDTROL
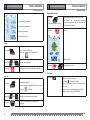
Calculation of horizontal distance by tilt sensor
Press
Activate function of horizontal distance calculation by
tilt sensor. Laser beam is on. Symbol
appears on the display. Line 1 – tilt angle.
Press Take first measurement (hypotenuse).
Press
– tilt angle (measured)
– hypotenuse (measured)
– vertical distance (calculated)
– horizontal distance (calculated)
Calculation of distance by 2 additional measurements (Pythagoras’ Theorem)
Press 2 times Symbol appears on the display.
Press Take first measurement (hypotenuse).
Press Take second measurement (cathetus).
– hypotenuse (measured)
– cathetus (measured)
– cathetus (calculated)
Calculation of distance by 3 additional measurements (Sum of cathetuses)
Press 3 times Symbol appears on the display.
Press Take first measurement (hypotenuse 1).
Press Take second measurement (cathetus).
Press Take third measurement (hypotenuse 2).
– hypotenuse 1 (measured)
– cathetus (measured)
– hypotenuse 2 (measured)
– cathetus (calculated)
Calculation of distance by 3 additional measurements
(Subtraction of 2 cathetuses)
Press 4 times Symbol appears on the display.
Press Take first measurement (hypotenuse 1).
Press Take second measurement (hypotenuse 2).
Press Take third measurement (cathetus).

User manual
LASER DISTANCE METER
20
EN
21
User manual
LASER DISTANCE METER
EN
XP4 Pro CONDTROL XP4 Pro CONDTROL
– hypotenuse 1 (measured)
– hypotenuse 2 (measured)
– cathetus (measured)
– cathetus (calculated)
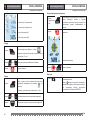
Timer
Press Activate timer. Symbol appears on the display.
Default value is 5 sec.
Press or Set response time.
Press Start timer.
Memory
Press Enter memory. A number of saved measuring results is
reflected on symbol on the display.
Press or Flip through saved measuring results.
Press Scroll down to view additional information about
measurement.
Digital vial
Press
and hold for
1 second
Activate digital vial function
Aim the product in appropriate direction using
angle readings shown on the display.
Press Take measurement.
– measuring result
Press or Exit the mode.
Bluetooth
Press Activate Bluetooth function.
Symbol appears on the display.
Turn on Bluetooth in your phone, tablet PC or
laptop. For further operation please use application
Smart Measure CONDTROL.

User manual
LASER DISTANCE METER
22
EN
23
User manual
LASER DISTANCE METER
EN
XP4 Pro CONDTROL XP4 Pro CONDTROL
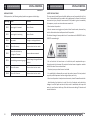
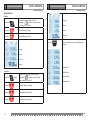
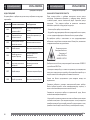
MESSAGE CODES
While operation, the following codes/symbols may appear on the display:
Message Cause Solution
ERR 1 Laser signal is too weak Use a reflector
ERR 2 Laser signal is too strong Use a reflector
ERR 3 Low power Change or recharge batteries
ERR 4 Failure of memory Please contact service center
ERR 5 Failure of calculation by
Pythagoras Theorem Please redo measurement
ERR 6 Exceed design measuring range Please change to longer distance
product
ERR 7 Failure of camera Please contact service center
ERR 8 Failure of tilt sensor Please contact service center
SAFETY REGULATIONS
The user manual should be read carefully before you use the product for the first
time. Unintended use of the product can be dangerous for human’s health and
cause serious injury. Keep this user manual. If the product is given to somebody
for temporary use, be sure to enclose user manual to it.
- Do not misuse the product
- Do not remove warning signs and protect them from abrasion, because they
contain information about safe operation of the product.
The device belongs to laser product class 2 in accordance with EN 60825-1 with a
630-670 nm wavelength.
- Do not look into the laser beam or its reflection, with unprotected eye or
through an optical instrument. Do not point the laser beam at people or animals
without the need. You can dazzle them.
- To protect your eyes close them or look aside.
- It is prohibited to disassemble or repair the product yourself. Intrust product
repair to qualified personnel and use original spare parts only.
- Do not use the product in explosive environment, close to flammable materials.
- Avoid heating the batteries to avoid the risk of explosion and electrolyte
leakage. In case of liquid contact with skin, wash it immediately with soap and
water. In case of contact with eyes, flush with clean water during 10 minutes and
consult the doctor.

User manual
LASER DISTANCE METER
24
EN
25
User manual
LASER DISTANCE METER
EN
XP4 Pro CONDTROL XP4 Pro CONDTROL
CARE AND MAINTENANCE
Attention! The instrument is a precision device and requires careful handling. The
following recommendations will extend the life of the product:
- Do not point the product at the sun.
- Protect the product from bumps, falls, excessive vibration; do not let liquids,
construction dust and foreign objects get inside the product.
- Do not expose the product to extreme temperatures.
- If liquids get inside the product first remove the batteries, then contact a service
center.
- Do not store or use the product under high humidity conditions for a long time.
- Clean the product with soft wet cloth.
- Keep device optics clean and protect it from mechanical damage.
- Сarry out control measurements occasionally, especially if the product is subject
to excessive mechanical or other impact, before and after taking important
measurements.
UTILIZATION
Expired tools, accessories and package should be passed for waste recycle. Please
send the product to the following address for proper recycle:
CONDTROL GmbH
Wasserburger Strasse 9
84427 Sankt Wolfgang
Germany
Do not throw the product in municipal waste!
According to European directive 2002/96/ЕC expired measuring tools and their
components must be collected separately and submitted to environmentally
friendly recycle of wastes.
WARRANTY
All CONDTROL GmbH products go through post-production control and are
governed by the following warranty terms. The buyer’s right to claim about defects
and general provisions of the current legislation do not expire.
1) CONDTROL GmbH agrees to eliminate all defects in the product, discovered
during the warranty period, that represent the defect in material or workmanship
in full volume and at its own expense.
2) The warranty period is 36 months and starts from the date of purchase by the
end consumer (see the original supporting document).
3) The warranty doesn’t cover defects resulting from wear and tear or improper
use, malfunction of the product caused by failure to observe the instructions of
this user manual, untimely maintenance and service and insufficient care, the use
of non-original accessories and spare parts. Modifications in design of the product
relieves the seller from responsibility for warranty works. The warranty does not
cover cosmetic damage, that doesn’t hinder normal operation of the product.
4) CONDTROL GmbH reserves the right to decide on replacement or repair of the
device.
5) Other claims not mentioned above, are not covered by the warranty.
6) After holding warranty works by CONDTROL GmbH warranty period is not
renewed or extended.
7) CONDTROL GmbH is not liable for loss of profit or inconvenience associated with
a defect of the device, the rental cost of alternative equipment for the period of
repair.
This warranty applies to German law except provision of the United Nations
Convention on contracts for the international sale of goods (CISG).
In warranty case please return the product to retail seller or send it with defect
description to the following address:
CONDTROL GmbH
Wasserburger Strasse 9
84427 Sankt Wolfgang
Germany

26 27
Bedienungsanleitung
LASER-ENTFERNUNGSMESSER
DE
XP4 Pro CONDTROL
Bedienungsanleitung
LASER-ENTFERNUNGSMESSER
DE
XP4 Pro CONDTROL
Herzlichen Glueckwunsch zum Kauf Ihres CONDTROL XP4 Pro.
Die Sicherheitshinweise finden Sie am Ende der deutschen Anleitung.
Bitte lesen Sie diese sorgfaeltig, bevor Sie das Geraet das erste Mal verwenden.
BESTIMMUNGSGEMAESSER GEBRAUCH
Der XP4 Pro ist zum Messen von Distanzen, Abstecken der Linien, Berechnung
von Flaechen und Volumina sowie zum Bestimmen einer Strecke mit
Neigungsmessung und Pythagoras-Satz bestimmt. Das Geraet verfuegt ueber
Bluetooth-Funktion fuer Uebertragung der Werte in Ihre Software. Er ist fuer den
Innen- und Außenbereich geeignet.
LIEFERUMFANG
Der Lieferumfang des XP4 Pro Entfernungsmessers umfasst:
1. Laser-Entfernungsmesser
2. Schutztasche mit Hand-/Gurtschlaufe
3. Bedienungsanleitung
4. 3 x AAA-Akkus
5. USB-Ladegeraet
TECHNISCHE DATEN
Reichweite* 0,05– 150 m
Messgenauigkeit** ± 1,5 mm
Kleinste Anzeige 1 mm
Displaybeleuchtung +
Referenzpunkt bestimmen +
Dauermessung (Tracking) +
Max.-/Min.-Messungen +
Addition/Subtraktion von Abmessungen +
Flaeche / Volumen /Dreiecksflaeche/
Trapezflaeche +
Berechnungen mit Neigungsmessungen +
Messung über den Pythagoras-Satz +
Abstecken +
Digitaler Zielsucher +
Bluetooth +
Digitale Wasserwaage +
Timer +
Integrierter Speicher Bis zu 50 Werte
Lasertyp 635 nm, Laserklasse 2,
Leistung <1 mW
Betriebstemperatur –10 °С ... +50 °С
Lagertemperatur –20 °С ... +60 °С
Wasser- und Staubschutz IP54
Abmessungen 136х59х28 mm
Gewicht 170 g
Batterien 3 х Batterien AAA 800 mAh
1.2V Ni-MH
* Verwenden Sie eine Zieltafel, um die Reichweite bei Tageslicht bei schlechter
Reflexion des Messzieles zu vergroessern.
** Unter unguenstigen Bedingungen wie z.B. direktem Sonnenlicht oder schlecht
reflektierender Oberflaeche, kann die Ungenauigkeit steigen. Es kann zu
Messfehlern kommen wenn Sie gegen reinstes (staubfrei) Glas oder gegen andere
farblose und durchsichtige Stoffe messen. Stark glänzende Oberflächen können
ebenfalls zu Fehlmessungen beitragen; der Laserstrahl wird eventuell abgelenkt.
Unter unguenstigen Bedingungen und bei Entfernungen ueber 100 m betraegt
die zulaessige Abweichung:
± (Y + 0,25хDх10-3)mm:
D (mm) - zu messende Entfernung
Y (mm) - zulaessige Messgeräteabweichung.

28 29
Bedienungsanleitung
LASER-ENTFERNUNGSMESSER
DE
XP4 Pro CONDTROL
Bedienungsanleitung
LASER-ENTFERNUNGSMESSER
DE
XP4 Pro CONDTROL
1
2
3
4
8
10
5
7
9
16
14
1315 6
11 12
1. Display
2. Tastatur
3. Ein /Laseraktivierung/
Einzelmessung /Dauermessung
4. Addieren/ AUF/ Werte
vergrößern/ Durchblaettern
gespeicherter Messergebnisse
(vor)
5. Subtrahieren /AB/Wert
verkleinern / Durchblaettern
gespeicherter Messergebnisse
(zurück)
6. Menue/Menuepunkt waehlen/
Einstell-Menue aktivieren/
Messergebnisse runter scrollen
7. Flaeche/Volumen/
Dreieckflaeche /Trapezflaeche
8. Berechnungen mit
Neigungsmessungen und
Pythagorasfunktion
9. Timer/Wahl des
Referenzpunktes
10. Datenspeicher/digitale
Wasserwaage
11. Bluetooth
12. Digitaler Zielsucher
13. AUS/Loeschtaste/ Menue
verlassen/Modus verlassen
14. Aufnahme Tragschlaufe
15. Aufklappbares Endstueck
16. Mini-USB-Buchse fuer
Ladegeraet
Display
1. Hauptzeile
2. Zusaetzliche Messwert-/
ergebnisszeilen
3. Modusanzeige
4. Akku-Ladezustandsanzeige
5. Messeinheit
6. Laser eingeschaltet
7. Referenzpunkt
2
7
6
4
5
1
3
GERAETEBEDIENUNG
Batterien einsetzten/ laden
Oeffnen Sie das Batteriefach. Setzen Sie die Batterien ein. Achten Sie dabei auf
die richtige Polung. Schliessen. Verwenden Sie nur Nickelmetallhybrid-Batterien
(NiMh).
Der Akku-Ladezustand wird auf dem Display angezeigt.
Ersetzen Sie die Batterien, wenn das Symbol permanent auf dem
Bildschirm blinkt.
Benutzen Sie das mitgelieferte Ladegeraet, um Ihren Laserentfernungsmesser
aufzuladen.
Das Geraet kann waehrend des Ladens nicht verwendet werden. Das Geraet wird
in ca. 4 Stunden voellig aufgeladen.
Ein- /Ausschalten
Einschalten: die Taste druecken.
Ausschalten: die Taste druecken und 1 Sekunde gedrueckt halten.
PRODUKTBESCHREIBUNG

30 31
Bedienungsanleitung
LASER-ENTFERNUNGSMESSER
DE
XP4 Pro CONDTROL
Bedienungsanleitung
LASER-ENTFERNUNGSMESSER
DE
XP4 Pro CONDTROL
Menue
druecken Aktivierung des Menuemodus;le
Timer der Displaybeleuchtung
Automatisches Ausschalten des
Laserstrahls
Automatisches Ausschalten des
Geraetes
Ein-/Ausschalten des Signaltones
Einheit Distanz einstellen
Einheit Neigung einstellen
oder druecken Menuepunkt auswaehlen
druecken Die Auswahl bestaetigen
oder druecken Menuepunkt einstellen *
druecken Die Einstellung aktivieren
druecken Menuepunkt verlassen
* Beim Halten der Tasten oder gedrueckt erhoeht sich die
Geschwindigkeit.
Messebene einstellen
Druecken und
1 Sekunde halten
Bezugsebene waehlen.
Das entsprechende Bild erscheint auf
dem Display.
Vorderkante
Stativ
Hinterkante
Ausklappbares Endstueck

32 33
Bedienungsanleitung
LASER-ENTFERNUNGSMESSER
DE
XP4 Pro CONDTROL
Bedienungsanleitung
LASER-ENTFERNUNGSMESSER
DE
XP4 Pro CONDTROL
MESSUNGEN
Einzelmessungen
Druecken Einschalten des Geraetes.
Druecken Laseraktivierung. Zielen Sie auf das Objekt, dessen
Entfernung Sie messen wollen.
Druecken Messen.
- Messergebnis
Druecken Den letzten Messwert loeschen.
Dauermessungen (Tracking)
Druecken und 1 Sekunde
gedrueckt halten
Aktivierung des Tracking - Modus.
Laseraktivierung.
- Maximalwert
- Minimalwert
- Differenz zwischen Maximal- und
Minimalwerten
- Aktueller Wert
Druecken oder Tracking – Modus verlassen.
Der letzte gemessene Wert wird auf dem
Display angezeigt.
–
Absteckung
Druecken und
2 Sekunden halten
Aktivierung des Absteckung-Modus.
Das Symbol erscheint auf dem
Display.
Druecken oder Die Strecke А* bestimmen.
Druecken Die Strecke А bestaetigen.
Druecken oder Die Strecke В* bestaetigen.
Druecken Die Strecke В bestaetigen.
Druecken Die Messung beginnen. Der Laserstrahl blinkt.
Gerät langsam entlang der Abstecklinie bewegen.
Die Zeiger und im Display zeigen
darauf, dasss man das Geraet in dieser Richtung
bewegen muss, um den abzusteckenden Punkt
zu erreichen. Im Abstand von ± 0,1 m zu der
abzusteckenden Station gibt das Geraet ein
Signal, wenn die Signalton – Funktion aktiviert ist.
Wenn das Geraet sich von der abzusteckenden
Station im Abstand von ± 0,01 m befindet,
erscheint auf dem Display das Symbol und das
Signal ändert seine Tonart.
die Distanz zwischen dem Objekt, ab dem die
Messung gemacht wird und dem Grenzpunkt
der letzten gemessenen Strecke. Diese Distanz
erhoeht sich nach jeder weiteren Messung um
das vorherige Messergebnis
- Messergebnis der Strecke А
- Messergebnis der Strecke В
- Aktuelle Distanz bis zu der nächsten
abzusteckenden Station

34 35
Bedienungsanleitung
LASER-ENTFERNUNGSMESSER
DE
XP4 Pro CONDTROL
Bedienungsanleitung
LASER-ENTFERNUNGSMESSER
DE
XP4 Pro CONDTROL
Stecken Sie den Punkt А ab und bewegen Sie das
Geraet entlang der Anrisslinie, um den Punkt B zu
erreichen. Wiederholen Sie die letzte Option, um
mehrere gleiche Distanzen zu vermerken.
Druecken Absteckung – Modus verlassen.
* Beim Halten oder gedrueckt erhoeht sich die Geschwindigkeit, mit
der sich Messwerte der Strecken A und B aendern.
Digitaler Zielsucher
Druecken Aktivierung des digitalen Zielsucher. Zielen Sie auf
das Objekt, dessen Entfernung Sie messen wollen.*
Druecken Messen.
- Messergebnis
Druecken oder Modus verlassen.
*Im Abstand von 20 m kann der Laserpunkt auf dem Okularstrichkreuz
verschoben sein. Bei Distanzmessungen im Bereich von 20-150 m kalibriert sich
der Leserpunkt und wird sich auf dem Okularstrichkreuz befinden, das hilft auf
das zu messende Objekt zu zielen.
Addieren/Subtrahieren
Druecken
Aktivierung des Laserstrahles.
Zielen Sie auf das Objekt, dessen Entfernung
Sie messen wollen.
Druecken
Die erste Messung.
Das Ergebnis - in der Hauptzeile.
Druecken oder
Addieren - oder Subtrahieren -
Modus aktivieren.
Druecken Aktivierung des Laserstrahles.
Das letzte Messergebnis wird nun in der
zweiten Zeile angezeigt.
Druecken Die zweite Messung.
– das Messergebnis der ersten Messung
– das Messergebnis der zweiten Messung
– Ergebnis der Addition/ Subtraktion von
zwei Messwerten
Um mehrere Messwerte zu addieren/subtrahieren, druecken Sie die Taste
und wiederholen Sie die letzten Optionen.
Druecken Modus verlassen.

36 37
Bedienungsanleitung
LASER-ENTFERNUNGSMESSER
DE
XP4 Pro CONDTROL
Bedienungsanleitung
LASER-ENTFERNUNGSMESSER
DE
XP4 Pro CONDTROL
BERECHNUNGEN
Flaeche
Druecken
Flaechenberechnung-Modus aktiveren.
Das Symbol erscheint auf dem Display.
Der Laserstrahl ist aktiviert.
Druecken Die erste Messung (Laenge).
Druecken Die zweite Messung (Breite).
– Laenge
– Breite
– Umfang
– Flaeche
Volumen
Druecken 2 Mal
Volumenenberechnung - Modus aktiveren.
Das Symbol erscheint auf dem Display.
Der Laserstrahl ist aktiviert.
Druecken Die erste Messung (Laenge).
Druecken Die zweite Messung (Breite).
Druecken Die dritte Messung (Hoehe).
– Laenge
– Breite
– Hoehe
– Volumen
Druecken Zusaetzliche Informationen zu den Messungen
aufrufen:
- Raumflaeche
- Wandflaeche
- Raumumfang
- Raumvolumen

38 39
Bedienungsanleitung
LASER-ENTFERNUNGSMESSER
DE
XP4 Pro CONDTROL
Bedienungsanleitung
LASER-ENTFERNUNGSMESSER
DE
XP4 Pro CONDTROL
Dreieckflaeche
Druecken 3 Mal
Dreieckflaechenberechnung - Modus aktiveren.
Das Symbol erscheint auf dem Display. Der
Laserstrahl ist aktiviert.
Druecken Die erste Messung (die erste Dreieckseite).
Druecken Die zweite Messung(die zweite Dreieckseite).
Druecken Die dritte Messung (die dritte Dreieckseite).
– die erste Dreieckseite
– die zweite Dreieckseite
– die dritte Dreieckseite
– Dreieckflaeche
Druecken Zusaetzliche Informationen zu den Messungen
aufrufen:
- Dreieckflaeche
- Winkel zwischen den Dreieckseiten
- Dreieckumfang
Trapezflaeche
Druecken 4 Mal
Trapezflaechenberechnung - Modus aktiveren.
Das Symbol erscheint auf dem Display.
Der Laserstrahl ist aktiviert.
Druecken Die erste Messung (die kuerzeste Trapezseite)
In der dritten Zeile auf dem Display erscheint der
Neigungswinkelwert.
Druecken Die zweite Messung (Trapezdiagonale).
– die kuerzeste Trapezseite
– Trapezdiagonale
– Neigungswinkel der Trapezdiagonale
– Trapezflaeche
Druecken Zusaetzliche Informationen zu den Messungen
aufrufen:
- die laengere Trapezseite
- die untere Trapezseite
- der Neigungswinkel der oberen Trapezseite
- Trapezflaeche
Seite wird geladen ...
Seite wird geladen ...
Seite wird geladen ...
Seite wird geladen ...
Seite wird geladen ...
Seite wird geladen ...
Seite wird geladen ...
Seite wird geladen ...
Seite wird geladen ...
Seite wird geladen ...
Seite wird geladen ...
Seite wird geladen ...
Seite wird geladen ...
Seite wird geladen ...
Seite wird geladen ...
Seite wird geladen ...
Seite wird geladen ...
Seite wird geladen ...
Seite wird geladen ...
Seite wird geladen ...
Seite wird geladen ...
Seite wird geladen ...
Seite wird geladen ...
Seite wird geladen ...
Seite wird geladen ...
Seite wird geladen ...
Seite wird geladen ...
-
 1
1
-
 2
2
-
 3
3
-
 4
4
-
 5
5
-
 6
6
-
 7
7
-
 8
8
-
 9
9
-
 10
10
-
 11
11
-
 12
12
-
 13
13
-
 14
14
-
 15
15
-
 16
16
-
 17
17
-
 18
18
-
 19
19
-
 20
20
-
 21
21
-
 22
22
-
 23
23
-
 24
24
-
 25
25
-
 26
26
-
 27
27
-
 28
28
-
 29
29
-
 30
30
-
 31
31
-
 32
32
-
 33
33
-
 34
34
-
 35
35
-
 36
36
-
 37
37
-
 38
38
-
 39
39
-
 40
40
-
 41
41
-
 42
42
-
 43
43
-
 44
44
-
 45
45
-
 46
46
-
 47
47


CONDTROL XP4 Pro Benutzerhandbuch
- Kategorie
- Messung
- Typ
- Benutzerhandbuch
in anderen Sprachen
- français: CONDTROL XP4 Pro Manuel utilisateur
Verwandte Artikel
-
CONDTROL XP4 Benutzerhandbuch
-
-
CONDTROL SMART 40 Benutzerhandbuch
-
-
-
CONDTROL XP3 Benutzerhandbuch
-
-
-
-
CONDTROL 1-4-104 Benutzerhandbuch