
-Please read this assembly manual carefully prior to assembling this product.
- Lesen Sie sich vor der Montage des Produkts diese Montageanleitung sorgfältig durch.
- Veuillez lire attentivement le présent manuel d’assemblage avant de monter ce produit.
- Lees deze montagehandleiding zorgvuldig voordat u dit product in elkaar gaat zetten.
- Leggere attentamente questo manuale di montaggio prima di montare il prodotto.
- Antes de montar este producto, lea atentamente este manual de montaje.
- Läs den här monteringshandboken noggrant före användning av den här produkten.
- Lue tämä asennusohje huolellisesti ennen tämän tuotteen asennusta.
Attention, Achtung, Attention, Attentie, Attenzione, Atención, Giv akt, Huomio
Assembly manual
Montageanleitung
Manuel d’assemblage
Montagehandleiding
Manuale di montaggio
Manual de montaje
Monteringshandbok
Asennusohje
GET YOUR
COMPLETE
USER MANUAL
ONLINE
http://manuals.tunturi.com
WWW
IMPORTANT
FEEL BETTER EVERY DAY
www.tunturi.com
GB
DE
FR
NL
IT
ES
SV
SU
i
TRAINING
Download Free
Tunturi Training App
TRAINING
WB50 MID WIDTH WEIGHT BENCH
15 - 18
19 - 23
24 - 28
29 - 33
34 - 38
39 - 43
44 - 47
48 - 51


3
WB50 Mid Width Weight Bench
A

4
WB50 Mid Width Weight Bench
B
i

5
WB50 Mid Width Weight Bench
60 cm
60 cm
60 cm
60 cm
167 cm
169 cm
104 cm
C
D-0

6
WB50 Mid Width Weight Bench
9# Qty 2
10# Qty:1
12# M10*90
M10*25
Qty:2
Qty:2
Qty:432#
Qty:227#
30#
M10*70 Qty:431#
42# Qty:8
10
8:ytQ#74 M10
D-1

7
WB50 Mid Width Weight Bench
Qty:129#2:ytQ#64 M6
Qty:153#
11# Qty:2
Qty:228#
D-2

8
WB50 Mid Width Weight Bench
14# Qty:2 37#
Qty:125#
Qty:3
M10*90
8:ytQ#24 10
5:ytQ#74 M10
1# Qty:1
5# Qty:1
2# Qty:1
M10*70Qty:2
31#
D-3

9
WB50 Mid Width Weight Bench
38#
40#
2:ytQ#63 M10*70
Qty:1
M10*150
Qty:1
M12*150
3# Qty:1
6# Qty:2
8# Qty:1
5:ytQ#24 10
43# Qty:2
12
44# Qty:2
nylon12
2:ytQ#74 M10
1:ytQ#84 M12
2:ytQ#94 12
DO NOT TIGHTEN BOLTS
AND NUTS IN THIS STEP
D-4

10
WB50 Mid Width Weight Bench
Qty:2
Qty:4
Qty:2
13#
20# M6*45
M6*16
Qty:1
M8*45
34#
35#
Qty:1
33#
2:ytQ#14 8
6:ytQ#54 6
51#
50# Qty:1
52#
Qty:1
Qty:1
DO TIGHTEN ALL BOLTS AND
NUTS IN THIS STEP AND BOLTS
AND NUTS OF FORMER STEPS
D-5

11
WB50 Mid Width Weight Bench
4# Qty:1
7# Qty:3
21#
22#
19#
39#
43#
Qty:6
Qty:1
Qty:1
Qty:1
M12*85
Qty:2
12
1:ytQ#84 M12
2:ytQ#94 12
D-6

12
WB50 Mid Width Weight Bench
USE #2
70° 50°
35°
20°
0°
USE #7
U-2
U-7

13
WB50 Mid Width Weight Bench
USE #9
USE #9
USE #10
U-9
U-10

14
WB50 Mid Width Weight Bench
W-1
W-1

15
English
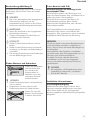
USER MANUAL ON OUR WEBSITE
To reduce the impact on the environment,
you will only find the assembly steps in this manual.
To learn how to use and maintain this product,
please download the user manual from:
manuals.tunturi.com
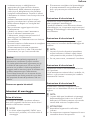
Welcome
Important Safety Instructions
This manual is an essential part of your training
equipment please read all instructions in this
manual before you start using this equipment. The
following precautions must always be followed:
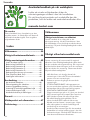
Index
Welcome ����������������������������������������� 15
Important safety notice ������������������ 15
Important assembly information ���� 16
Before you start ��������������������������������������������16
Description illustration A ������������������������������16
Description illustration B ������������������������������16
Description illustration C ������������������������������16
Description illustration D ������������������������������16
Fasten Nuts and Bolts ����������������������������������16
Free area (Fig� D-0) ��������������������������������������� 17
Additional information ���������������������������������17
Use�������������������������������������������������� 17
Using weight plates ��������������������������������������17
Weight plate storage bars ����������������������������17
Adjusting the backrest inclination ����������������17
Adjusting the arm curl pad height� �������������18
Adjusting the spotters height ����������������������18
Use the spotters hooks ��������������������������������18
Warranty ����������������������������������������� 18
Weight capacity and dimension ������ 18
Disclaimer ��������������������������������������� 18
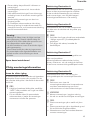
Important safety notice
This exercise equipment is built for optimum
safety. However, certain precautions apply
whenever you operate a piece of exercise
equipment. Be sure to read the entire manual
before you assemble or operate your equipment.
In particular, note the following safety precautions:
- Keep children and pets away from the
equipment at all times. DO NOT leave
children unattended in the same room with the
equipment.
- Only one person at a time should use the
equipment.
- If the user experiences dizziness, nausea, chest
pain, or any other abnormal symptoms, STOP
the workout at once. CONSULT A PHYSICIAN
IMMEDIATELY.
Position the equipment on a clear, levelled
surface. DO NOT use the equipment near water
or outdoors.
- Keep hands away from all moving parts.
- Always wear appropriate workout clothing
when exercising. DO NOT wear robes or other
clothing that could become caught in the
equipment. Running or aerobic shoes are also
required when using the equipment.
Use the equipment only for its intended
use as described in this manual. DO NOT
use attachments not recommended by the
manufacturer.
- Do not place any sharp object around the
equipment.
- Disabled person should not use the equipment.
- Before using the equipment to exercise, always
do stretching exercises to properly warm up.
- Never operate the equipment if the equipment
is not functioning properly.

16
English
- A spotter is recommended during exercise.
- This equipment is designed and intended
for home and consumer use only, not for
commercial use.
Warning:
Before beginning any exercise program, consult
your physician. This is especially important for
individuals over the age of 35 or persons with
pre-existing health problems.
Read all instructions before using any fitness
equipment.
Tunturi New fitness bv. assumes no
responsibility for personal injury or property
damage sustained by or through the use of this
product.
Save these instructions!
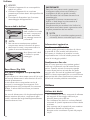
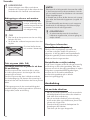
Important assembly information
Before you start
We recommend to use two adjustable wrenches
to assemble your product. If you have metric sized
wrenches in correct size this is fine too.
‼ NOTE
• Suitable (adjustable) wrenches are “NOT”
provided with the product, neither included
in the assembly kit.
• It is strongly recommended that this
equipment is assembled by two or more
people to avoid possible injury.
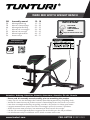
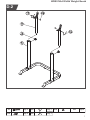
Description illustration A
The illustration shows what the trainer will looks
like after the assembly is completed.
You can use this as a reference during your
assembly, but do follow the assembly steps
always in the correct sequence as showed in the
illustrations.
Description illustration B
The illustration shows what components and parts
you should find when un-boxing your product.
‼ NOTE
• Small parts can be hidden/ packed in hollow
spaces in the Styrofoam product protection
• If a part is missing, contact your dealer.
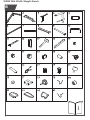
Description illustration C
The illustration shows the hardware kit that comes
with your product.
The hardware kit contains bolts, washers, screws,
nuts etc. and the required tools to properly fit
your trainer.
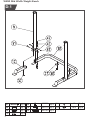
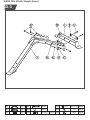
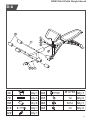
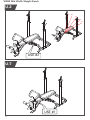
Description illustration D
The illustrations shows you in the correct following
order how to assembly your trainer best.
‼ NOTE
• Part numbers shown in the assembly steps
are commencing with the spare part drawing
that can be found in the online full version
user manual.
⚠ WARNING
• Assemble the equipment in the given order.
• Carry and move the equipment with at least
two persons.
⚠ CAUTION
• Place the equipment on a firm, level surface.
• Place the equipment on a protective base to
prevent damage to the floor surface.
• Refer to the illustrations for the correct
assembly of the equipment.
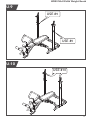
Fasten Nuts and Bolts
Securely tighten all
Nuts and Bolts after all
components have been
assembled in current
and previous steps.
‼ NOTE
• Do not over tighten any component with
pivoting function.
• Make sure all pivoting components are able
to move freely.

17
English
Do not tighten all Nuts
and Bolts in this step.
Free area (Fig� D-0)
Adequate space is a prerequisite for use�
The free area should be no less than 0.6m greater
than the *training area in the directions from
which the equipment is accessed.
The free area must also include the area for
emergency dismount. Where equipment is
positioned adjacent to each other, the value of
the free area may be shared.
*Training area is the maximum length/width/
height of the trainer, including moving parts, been
measured to its maximum length/ width/ height
during use.
IMPORTANT
Because your trainer will/ can set in the first
using hours, we recommend you do a quick
check on the hardware you have fitted during
your assembly.
We suggest tightening all bolts and nuts once
again after the first few workout sessions
(approximate 10 hours).
Just to assure the bolts and nuts are
still tightened well for your trainer’s best
performance.
‼ NOTE
• We recommend checking the hardware
regularly, at least once every 3 months.
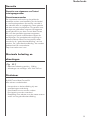
Additional information
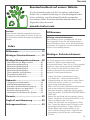
Packaging disposal
Government guidelines ask that we reduce the
amount of waste material disposed of in land fill
sites. We therefore ask that you dispose of all
packaging waste responsibly at public recycling
centres.
End of life disposal
We at Tunturi hope you enjoy many years of
enjoyable use from your fitness trainer. However,
a Time will come when your fitness trainer will
come to the end of its useful life. Under ‘European
WEEE Legislation you are responsible for the
appropriate disposal of your fitness trainer to a
recognised public collection facility.
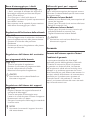
Use
Using weight plates
- When using weight plates, do make sure to
use sufficient locking supports to secure your
weight plates at all times before use.
- When using weight plates on a barbell bar, do
make sure you divide the weigh-plates evenly
over left and right side.
- Never exceed the maximum weight capacity of
the barbell bar and or bench.
To take not of your own body weight too.
Weight plate storage bars
- When using the weight-plates storage bars for
weight plates, do make sure to use sufficient
locking supports to secure your weight plates
at all times.
- When store weight-plates on the storage bars,
do make sure you divide the weigh-plates
evenly over left and right side.
- Never exceed the maximum weight capacity of
the weight plate storage bar.
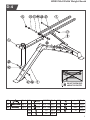
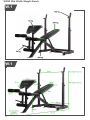
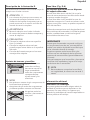
Adjusting the backrest inclination
(Fig� U-2)
- Tilt the backrest slightly and tilt the adjusting
bar out of the toothed plates.
- Move the backrest into the required position.
- Position the adjusting bar in the toothed plates
to secure it.

18
English
Adjusting the arm curl pad height�
(Fig� U-7)
- Pull the adjustment knob.
- Move the arm curl pad to the required position.
- Release the adjustment knob.
⚠ WARNING
• Never leave a barbell bar stored on the
spotters unattended.
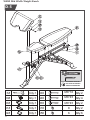
Adjusting the spotters height
(Fig� U-9)
- Adjust the spotters height by loosening the
locking knob.
- Pull the locking knob outwards so that the
spotter can be moved freely up and down.
- Tighten the locking knob by turning it
clockwise.
‼ NOTE
• Make sure both spotters are in the same
height setting.
Use the spotters hooks
(Fig� U-10)
The hooks on top of the spotters are there to
secure a barbell bar when stored on the spotters.
To secure the barbell bar�
- Put the barbell bar on top ( centred ) of the
spotters.
- Turn the hooks so they are over the barbell bar
on both sides.
To release the barbell bar�
- Turn the hooks so they are no longer over the
barbell bar on both sides.
- Take off the barbell bar freely.
⚠ WARNING
• Never leave a barbell bar stored on the
spotters unattended.
Warranty
Tunturi purchaser‘s warranty
Warranty terms
The consumer is entitled to the applicable legal
rights stated in the national legislation concerning
the commerce of consumer goods. This warranty
does not restrict these rights. The Purchaser’s
Warranty is only valid if the item is used in an
environment approved by Tunturi New Fitness BV,
and is maintained as instructed for that particular
equipment. The product-specific approved
environment and maintenance instructions are
stated in the “user manual” of the product. The
“user manual” can be downloaded from our
website.
http://manuals.tunturi.com
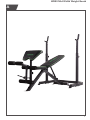
Weight capacity and dimension
(Fig� W-1)
- Maximum load weight: 200 kg.
Assembled Dimension: 167x 104x 169 cm.
Disclaimer
© 2020 Tunturi New Fitness BV
All rights reserved.
- The product and the manual are subject to
change.
- Specifications can be changed without further
notice.
- Check our website for the latest user manual
version.

19
Deutsch
Deutsch
Diese deutsche Bedienungsanleitung ist eine
Übersetzung des englischen Textes. Es können
keine Rechte auf diese Übersetzung abgeleitet
werden.
Index
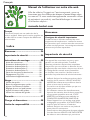
Benutzerhandbuch auf unserer Website
Um die Auswirkungen auf die Umwelt zu reduzieren,
finden Sie in dieser Anleitung nur die Montageschritte.
Um zu erfahren, wie Sie dieses Produkt verwenden
und warten,laden Sie bitte das Benutzerhandbuch von
folgender Seite herunter:
manuals.tunturi.com
Willkommen
Wichtige sicherheitshinweise
Diese Anleitung ist ein unerlässlicher Teil Ihres
Trainingsgeräts: Lesen Sie alle Anweisungen in
diesem Handbuch durch, bevor Sie dieses Gerät
verwenden. Die folgenden Vorsichtsmaßnahmen
müssen immer befolgt werden.
Wichtiger Sicherheitshinweis
Das Trainingsgerät ist für optimale Sicherheit
konstruiert. Jedoch gelten bestimmte
Vorsichtsmaßnahmen, wenn Sie ein Trainingsgerät
betreiben. Lesen Sie das gesamte Handbuch
durch, bevor Sie das Gerät montieren oder
betreiben. Beachten Sie insbesondere die
folgende Sicherheitsmaßnahmen:
- Halten Sie Kinder und Haustiere immer
vom Gerät fern. Lassen Sie Kinder NICHT
unbeaufsichtigt mit dem Gerät in einem Raum.
- Das Gerät darf nur jeweils von einer Person
gleichzeitig verwendet werden.
- Wenn sich Schwindel, Übelkeit, Brustschmerzen
oder andere abnorme Symptome beim
Benutzer einstellen, sollte das Training sofort
beendet werden. SUCHEN SIE SOFORT EINEN
ARZT AUF.
- Stellen Sie das Gerät auf eine saubere, ebene
Fläche. Verwenden Sie das Gerät NICHT in der
Nähe von Wasser oder im Freien.
- Halten Sie die Hände von beweglichen Teilen
fern. Tragen Sie während des Trainings immer
geeignete Sportkleidung. Tragen Sie keine
langen Röcke oder andere Kleidung, die
sich im Gerät verfangen kann. Tragen Sie bei
Verwendung des Geräts Lauf- oder Aerobic-
Schuhe.
Willkommen ������������������������������������ 19
Wichtiger Sicherheitshinweis ���������� 19
Wichtige Montageinformationen ���� 20
Das sollten Sie vor Beginn wissen ����������������20
Beschreibung Abbildung A ��������������������������20
Beschreibung Abbildung B ���������������������������20
Beschreibung Abbildung C ��������������������������20
Beschreibung Abbildung D ��������������������������21
Ziehen Muttern und Schrauben �������������������21
Freier Bereich (Abb D-0) ������������������������������� 21
Zusätzliche Informationen ����������������������������21
Gebrauch ���������������������������������������� 22
Umgang mit Hantelscheiben ������������������������22
Hantelscheibenablagestangen ���������������������22
Einstellen der Rückensehnenneigung ����������22
Einstellen der arm curl pad Höhe� ��������������22
Einstellen der Spotter-Höhe ������������������������� 22
Verwenden Sie die Haken der Spotter ��������22
Garantie ������������������������������������������ 23
Tragkraft und Abmessung �������������� 23
Haftungsausschluss ������������������������� 23

20
Deutsch
- Verwenden Sie das Gerät nur für den
beabsichtigten Gebrauch wie in diesem
Handbuch beschrieben. Verwenden Sie
keine Anbauteile, die NICHT vom Hersteller
empfohlen sind.
- Stellen Sie keine spitzen Gegenstände rund um
das Gerät auf.
- Behinderte Personen dürfen das Gerät nicht
ohne Beaufsichtigung durch eine qualifizierte
Person oder einen Arzt benutzen.
- Machen Sie vor Verwendung des Geräts immer
Deh-nübungen, um sich aufzuwärmen.
- 11. Verwenden Sie das Gerät nicht, wenn es
nicht richtig funktioniert.
- Für das Training wird ein Helfer empfohlen.
- Stecken Sie den Gewichtsauswahlstift nicht
hinein, während sich der Gewichtsstapel oder
die obere Platte in einer erhöhten Position
befinden.
- Achten Sie darauf, dass der Auswahlstift
vollständig hineingesteckt ist.
- Verwenden Sie keine Hanteln oder andere
Mittel, um den Gewichtswiderstand zu erhöhen.
Verwenden Sie nur vom Hersteller gelieferte
Gewichtsplatten.
- Das Gerät ist für den privaten Gebrauch und
nicht für den gewerblichen Gebrauch gedacht.
Warnung:
Ziehen sie vor Durchführung eines
Übungsprogramms ihren Arzt zu rate. dies gilt
insbesondere für Personen über 35 Jahre oder
für Personen mit bestehenden gesundheitlichen
Problemen.
lesen sie vor Verwendung von Fitnessgeräten
die gesamte Anleitung durch.
Tunturi New Fitness bv übernimmt keine
Verantwortung für Verletzungen oder
Sachschäden, die durch dieses Produkt oder
durch Verwendung dieses Produkts entstehen.
Bewahren sie diese Anleitung auf!
Wichtige Montageinformationen
Das sollten Sie vor Beginn wissen
Wir empfehlen die Verwendung von zwei
verstellbaren Schraubenschlüsseln für die
Montage Ihres Produkts. Wenn Sie metrische
Schraubenschlüssel in der richtigen Größe haben,
ist das auch in Ordnung.
‼ HINWEIS
• Geeignete (verstellbare) Schraubenschlüssel
werden “NICHT” mit dem Produkt geliefert
und sind auch nicht im Montagesatz
enthalten.
• Dieses Gerät sollte unbedingt von
mindestens zwei Personen montiert werden,
um Verletzungen zu vermeiden.
Beschreibung Abbildung A
Die Abbildung zeigt, wie das Gerät nach der
Montage aussehen wird.
Sie können diese bei der Montage als Referenz
verwenden, befolgen Sie die Montageschritte
aber immer in der richtigen Reihenfolge, wie in
den Abbildungen gezeigt.
Beschreibung Abbildung B
Die Abbildung zeigt, welche Komponenten und
Teile in der Lieferung enthalten sein sollen.
‼ HINWEIS
• Kleinteile können in Hohlräumen im Styropor-
Produktschutz versteckt/verpackt werden
• Fehlt ein Teil, wenden Sie sich an Ihren
Händler.
Beschreibung Abbildung C
Die Abbildung zeigt den Zubehörsatz, der mit
Ihrem Produkt geliefert wird.
Er enthält Schrauben, Unterlegscheiben, Muttern
usw. sowie die erforderlichen Werkzeuge zur
ordnungsgemäßen Montage Ihres Trainers.
Seite wird geladen ...
Seite wird geladen ...
Seite wird geladen ...
Seite wird geladen ...
Seite wird geladen ...
Seite wird geladen ...
Seite wird geladen ...
Seite wird geladen ...
Seite wird geladen ...
Seite wird geladen ...
Seite wird geladen ...
Seite wird geladen ...
Seite wird geladen ...
Seite wird geladen ...
Seite wird geladen ...
Seite wird geladen ...
Seite wird geladen ...
Seite wird geladen ...
Seite wird geladen ...
Seite wird geladen ...
Seite wird geladen ...
Seite wird geladen ...
Seite wird geladen ...
Seite wird geladen ...
Seite wird geladen ...
Seite wird geladen ...
Seite wird geladen ...
Seite wird geladen ...
Seite wird geladen ...
Seite wird geladen ...
Seite wird geladen ...
Seite wird geladen ...
-
 1
1
-
 2
2
-
 3
3
-
 4
4
-
 5
5
-
 6
6
-
 7
7
-
 8
8
-
 9
9
-
 10
10
-
 11
11
-
 12
12
-
 13
13
-
 14
14
-
 15
15
-
 16
16
-
 17
17
-
 18
18
-
 19
19
-
 20
20
-
 21
21
-
 22
22
-
 23
23
-
 24
24
-
 25
25
-
 26
26
-
 27
27
-
 28
28
-
 29
29
-
 30
30
-
 31
31
-
 32
32
-
 33
33
-
 34
34
-
 35
35
-
 36
36
-
 37
37
-
 38
38
-
 39
39
-
 40
40
-
 41
41
-
 42
42
-
 43
43
-
 44
44
-
 45
45
-
 46
46
-
 47
47
-
 48
48
-
 49
49
-
 50
50
-
 51
51
-
 52
52


in anderen Sprachen
- français: Tunturi WB50
- español: Tunturi WB50
- italiano: Tunturi WB50
- Nederlands: Tunturi WB50
- svenska: Tunturi WB50
Verwandte Artikel
-
Tunturi WB40 Manual Concise
-
-
-
-
-
-
-
-
Tunturi WB20 Bedienungsanleitung
-