Maxview MXL056/KIT1 Bracket Fixing Kit Benutzerhandbuch
- Typ
- Benutzerhandbuch

Installation Instructions
MXL056/KIT1
UK contact:
Helpline: +44 (0)1553 811000
Email: suppor[email protected]o.uk
Web: www.maxview.co.uk
Address: Maxview Ltd, Garage Lane, Setchey,
King’s Lynn, Norfolk. PE33 0AT. UK
Maxview reserve the right to change specifications without prior notice
9111445 Iss 1
Bracket Fixing Kit/Dachhalterung
DE Kontakt:
Tel: 08145 / 996 998 - 0
Email: [email protected]
Web: www.maxview.de
Technische Änderungen vorbehalten
Anbauanleitung
Roam Campervan

Introduction/Anleitung
The Roam Campervan Bracket Fitting Kit gives the flexibility to mount your 3G/4G
Antenna anywhere on your roof without entering the cables directly below the Antenna.
This allows you to route the cables to your preferred location using the supplied
extension cables and cable entry cover. Alternatively you can utilise an existing cable
entry you may already have on your roof.
Please also refer to your Roam Campervan Installation and User Instructions at all times.
2
Safety Warnings/Sicherheitshinweise
See Page 9
Siehe Seite 10
Die Roam Campervan kann mit dieser Dachhalterung flexibel auf dem Dach Ihres Fahrzeugs
montiert werden, ohne die Kabel direkt unterhalb der Antenne in das Fahrzeuginnere zu
führen. Auf diese Weise können Sie die Kabel der Antenne auf dem Dach dahin verlegen wo
der beste Ort für die Kabeldurchführung ist. Idealerweise dort wo sich auch der Router im
Fahrzeuginneren befindet.
Alternativ können Sie auch eine schon vorhandene Dachdurchführung verwenden.
Bitte beachten Sie hierfür auch die Bedienungsanleitung der Roam Campervan.

Tools required/Benötigtes Werkzeug
- Power Drill
- 2.5mm Drill Bit
- 12mm Drill Bit (Cable Entry)
- Cleaning Cloth
- Pozi Screwdriver (optional)
- Flexible Adhesive (optional)
- Self - Amalgamiting Tape
(Recommended in some installations)
3
- Bohrmaschine
- 2,5 mm Bohrer
- 12 mm Bohrer
- Kreuzschlitz-Schraubendreher
- Kleber Sikaflex oder Dekalin
Typical Installation/Installation
1 x Dachhalterung
1 x Dachdurchführung
2 x Koaxial-Verlängerungskabel
1 x Befestigungsmutter
1 x M18 Zahnscheibe
4 x Befestigungsschrauben für Dachhalterung
8 x Kabel-Clips
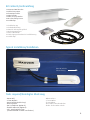
Kit Contents/Lieferumfang
1 x Antenna Roof Bracket
1 x Cable Entry Cover
2 x Extension Cables
1 x M18 Full Nut
1 x M18 Security Washer
4 x Bracket fixing Screws
8 x Cable Clips
Front of vehicle
Fahrtrichtung

1. Positioning your Roam.
Please refer to page 6 of your Roam Installation Instructions to find the best position.
Positionierung der Roam.
Siehe hierzu Seite 6 der Montageanleitung
2. Positioning your Bracket
The Bracket can be used on flat roofs and most ridge roofs.
Positionierung der Dachhalterung
Die Halterung kann auf den meisten Dächern mit Sicken oder ebnen Dächern verwendet werden.
Installing Your Bracket and Roam/Aufbau der Dachhalterung und der Roam
Campervan
Uneven Roof/Unebenes Dach
If installing on an uneven surface such as a chequer
grid plate please ensure adequate sealant is used
around the mounting holes to prevent water ingress.
Bei unebenen Dächer z.B. bei begehbaren Dach mit
Edelstahlplatte muss genügend Dichtmittel
respektive Kleber aufgetragen werden um
Undichtigkeiten zu vermeiden.
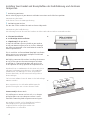
C - Sloped Roof/Schräges Dach
In some installations you may find that you need to
install your Roam Campervan on an incline, although
we always recommend a flat installation to maximise
Antenna performance.
This is useful for an Elevated Roof (Pop Top) installation
where you may use your Roam Campervan with both
the Roof flat and at an incline.
We highly recommend that when installing the Antenna
on any incline you test the Roam Campervan before
installation in a horizontal position and again in the
incline position to satisfy yourself of the performance.
Manchmal kann es vorkommen das die Roam auf einem
schrägen Dach montiert werden muss. Wir empfehlen
jedoch immer eine Montage auf einer waagrechten
ebenen Oberfläche, um die Antennenleistung nicht zu
beeinträchtigen.
Z.B. bei einem Alkoven kann die Roam in der Dachschräge
montiert werden.
Bitte vergewissern Sie sich vorher ob die Roam die
gleiche Leistung hat wie auf einer ebenen Fläche.
4
A - Flat Roof Installation
B - Inside Ridge Roof Installation
A
B
C

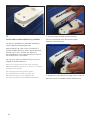
5. Clean the surface where the bracket and the cable
entry will be installed, ensuring it is free from debris
and grease.
Reinigen Sie die Fläche wo die Dachhalterung und die
Kabeldurchführung angebracht wird von Schmutz und
Fett.
6A. If you wish to screw the bracket to your roof you
must do this before you fit the antenna.
4. Once you have selected a suitable position for
your Roam Antenna select the cable entry location.
Option 1 – Use supplied Cable Entry Cover
Option 2 – Use Existing Entry*
*You may prefer to use an existing cable entry
Once you have a preferred entry point it is important
to check the Extension Cables will fit your chosen
installation.
Mark the position of the Cable Entry on the roof.
Sobald Sie die geeignet Position des Dachhalters
gefunden haben wählen Sie den Kabeleinführungsort.
Idealerweise dort wo sich direkt unterhalb der Router
befindet.
Option1- Verwenden Sie die mitgelieferte
Kabeldurchführung
Option 2 - Verwenden Sie eine vorhandene
Kabeldurchführung
Wenn Sie den geeignet Ort für die Kabeldurchführung
gefunden haben, vergewissern Sie sich ob Sie mit den
3m Kabel bis zum Router kommen. Sollte dies nicht der
Fall sein können noch Verlängerungskabel in
verschiedenen Längen nachgekauft werden.
Markieren Sie nun die Bohrung für den Kabeleintritt.
Die Halterung wird an den vier Bohrungen am Boden der
Halterung fixiert.
3. Once you have a suitable position mark on
the roof the position of the bracket.
NOTE: Remember to position the bracket so
the short edge is facing the front of the vehicle.
Wenn der Ideale Platz für die Halterung gefunden
wurde markieren Sie diesen auf dem Dach.
HINWEIS: Denken Sie daran, die Halterung so zu
positionieren, dass die schmale Seite nach vorne zeigt.
5
Front of vehicle
Fahrtrichtung
6. The bracket can be fitted with the screws provided
in the 4 positions or with a Flexible Adhesive.
Screw Fixing Method/Schraubbefestigungsmethode
Secure to the roof in 4 places using the mounting
screws provided. Ensure you place a small amount of
flexible sealant in each mounting hole before
screwing to the roof.
Nun kann die Halterung mit Sikafelx und den vier
Kreuzschlitzschrauben auf dem Dach fixiert werden.
Wenn Sie die Dachhalterung nur verschrauben möchten
dann empfehlen wir auf die Schrauben etwas Sikafelx
aufzubringen damit die Verschraubung
wasserdicht ist.
Die Halterung kann mit den 4 mitgelieferten Schrauben
auf dem Dach fixiert werden oder verklebt werden.

7. Pass the cables through the bracket hole.
Führen Sie die Kabel durch die mittlere große
Bohrung in der Halterung
6
6B.
Flexible Adhesive Method/Halterung verkleben
If using this method we recommend completing
steps 7-10 before fixing to your roof.
Alternatively the bracket can be secured with a
suitable flexible adhesive sealant. We recommend
Sikaflex-512 caravan, Sikaflex 221i oder 252i.
For full guidelines and curing times please refer to
the manufacturer’s instructions.
For safety we always recommend using screws in
addition to flexible adhesive.
Wenn Sie die Halterung auf dem Dach verkleben
möchten empfehlen wir Ihnen die Schritte 7-10 vor der
Verklebung auszuführen.
Die Halterung kann auch geklebt werden.
Wir empfehlen dazu Sikaflex 221i oder 252i.
Vor Gebrauch lesen Sie bitte sorgfältig die
Verarbeitungsrichtlinien des Klebemittelhersteller.
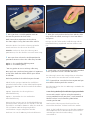
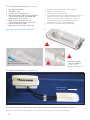
8. Remove the self-adhesive backing from the 3M seal
Entfernen Sie die Schutzfolie von der 3M-Dichtung

!
IMPORTANT - Ensure the position of the
antenna is central to your markings,
as once stuck down, the antenna is not
designed to be removed.
WICHTIG! Vergewissern Sie sich das
die Bohrung der Dachhalterung mit der
Befestigungsschraube übereinstimmt,
die Antenne kann, wenn sie klebt, nicht
mehr abgenommen werden.
9. Fit the Roam Antenna to the Bracket - Press firmly
around the edges of the antenna to
ensure a watertight seal has been achieved
Drücken Sie nun die Roam auf die Dachhalterung
10. Attach the securing washer and nut from the
underside of the bracket.
Turn clockwise onto the thread protruding from the
bottom of the antenna and continue to tighten using
the correct tool until there is slight compression to the
seal underneath the antenna. Do not over tighten.
Befestigen Sie die Roam an der Unterseite der
Halterung. Legen Sie die Zahnscheibe über den
Gewindestutzen und schrauben Sie die Mutter auf.
Ziehen Sie im Uhrzeigersinn die Mutter fest.
Bitte achten Sie darauf das Sie die Mutter nicht
überziehen.
7
11. Extension Cables.
When using the Extension cables take care to ensure
the pins are aligned correctly before tightening the
connectors together.
The Roam Campervan comes with 0.3m or 0.8m
cables as standard. If the chosen cable entry point is
further than 0.8m away from the Roam Antenna the
join will be external and exposed on the roof. With
this installation it is important to make sure the join
is waterproofed. We recommend to use
Self- Amalgamating Tape (not supplied).
Ensure join is waterproofed.
Verlängerungskabel
Achten Sie bei der Verwendung der
Verlängerungskabel darauf, dass die Pins vor dem
Festziehen in der Mitte exakt ausgerichtet sind.
Die Roam wird standardmäßig mit 0,3m oder 0,8 m
Koaxial-Kabel ausgeliefert. Wenn der Router oder der
Kabeldurchführungspunkt auf dem Dach weiter als
0,8m entfernt ist benötigen Sie ein
Verlängerungskabel. Bei der Verwendung von
Verlängerungskabeln ist darauf zu achten das diese fest
verschraubt (Handfest) und am besten mit
selbstverschweißenden Klebeband abgedichtet
werden.
Vergewissern Sie sich, dass die Verbindung
wasserdicht ist.
12. Route the cables along the roof securing with
the cable clips provided in equal spacing.
Verlegen Sie die Koaxial-Kabel auf dem Dach unter
Verwendung der mitgelieferten Kabelclipse oder einem
Kabelkanal.
!
!

8
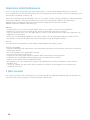
14. Complete Installation/Installationsbeispiel
15. Internally route the cables to your router. Refer to page 6 of your Roam Installation Instructions
Verlegen Sie die Kabel im Fahrzeuginneren zum Router. Siehe hierzu Seite 6 der Roam-Anleitung
13. Install Cable Entry Cover/Einbauanleitung
1. Plan your installation
2. Drill hole in roof
3. Prepare surface for adhesion
4. We recommend to add sealant around the
cables that go through the roof to add
protection for water ingress.
5. Apply sealant as shown A, B & C
(we recommend Sikaflex-512 Caravan)
6. Position cable entry cover
7. Wipe excess sealant with a dry cloth
1. Wählen Sie den idealen Ort für die Montage
2. Bohren Sie durch das Dach
3. Vorbereiten des Klebebereichs
4. Wir empfehlen Ihnen die Kabel abzudichten, damit ein
möglicher Wassereintritt verhindert werden kann.
5. Tragen Sie das Klebemittel großzügig auf die zu
verklebende Stellen (Wir empfehlen Sikafelx)
6. Positionieren Sie die Dachdurchführung
7. Entfernen Sie überschüssiges Klebemittel
!
!= Generously apply
wet seal adhesive
= tragen Sie den
Klebstoff großzügig auf
A
B
Direction of travel
(front of vehicle) Fahrtrichtung
Applying sealant example/Klebeflächen:
!
Front of vehicle
Fahrtrichtung
C

9
General Safety Warnings
Read these instructions carefully and become familiar with your Maxview product. Understand the application,
limitations and any hazards involved with the installation and operation.
Failure to follow all instructions may result in damage to your vehicle and/or serious injury. Maxview declines
all responsibility in the event of incident or accident if they are due to a non observation of the installation
instructions or the way the product is used.
No modifications to the product are permissible.
Installation
• Always consider the additional height the product you install adds to the vehicle
• Always follow manufacturer’s operating instructions before using tools and equipment.
• Take care when working at heights. Keep work area clean and tidy to avoid trip hazards
• Use creeper boards where necessary to ensure roof construction can support your weight
• All electrical work should be carried out by a competent person
Operation
• The maximum speed of vehicle with product mounted on roof is 81mph (130km/h)
Servicing & Support
• Any inspection or repair must be carried out by Maxview or an appointed representative of the manufacturer
• No regular maintenance required on the product
• Do not dismantle product
• Do not use solvent or abrasive cleaning agents on the product
• Only use a suitable mild detergent to clean the product
• Do not pressure wash the product
• We recommend you check the mechanical integrity of a roof mounted product at least once a year
• If in the event that you do experience a problem with the product, call Maxview Customer Service
+44 (0)1553 811000
2 year guarantee
This Bracket is guaranteed against defective parts or workmanship for 2 year from the time of purchase.
This excludes any malfunction caused by improper use, accidental or malicious damage.
This does not affect your statutory rights. Please keep your receipt of proof of purchase.

10
Allgemeine Sicherheitshinweise
Lesen Sie sich diese Anweisungen gut durch und machen Sie sich mit Ihrem Produkt von Maxview vertraut.
Es ist erforderlich, dass Ihnen die Anwendung, die Einschränkungen und die Gefahren, die bei der Montage und im
Betrieb auftreten können, bekannt sind.
Wenn Sie die Anweisungen nicht befolgen, kann es zu Schäden an Ihrem Fahrzeug und/oder zu schwerwiegenden
Verletzungen kommen. Maxview übernimmt keine Haftung für Schäden oder Vorfälle, die aufgrund der
Nichtbeachtung der Montageanweisungen oder durch unsachgemäßen Gebrauch entstehen.
Modifizierungen des Produkts sind untersagt.
Montage
• Berücksichtigen Sie stets die zusätzliche Höhe, wenn Sie das Produkt auf dem Fahrzeug montieren.
• Befolgen Sie stets die Herstelleranweisungen, bevor Sie Werkzeuge und Geräte einsetzen.
• Seien Sie vorsichtig, wenn Sie in der Höhe arbeiten. Halten Sie den Arbeitsbereich sauber und aufgeräumt, um
Stolperfallen zu vermeiden.
• Nutzen Sie, falls erforderlich, Rollbretter, um sicherzustellen, dass die Dachkonstruktion Ihr Gewicht aushält.
• Alle Arbeiten an der Elektrik sollten von einer fachkundigen Person durchgeführt werden.
Betrieb
• Die Roam hält bei Dachmontage einer Höchstgeschwindigkeit von 130 km/h stand.
Wartung und Support
• Jegliche Inspektionen oder Reparaturen müssen durch Maxview oder einen benannten Vertreter des Herstellers
durchgeführt werden.
• Der Artikel benötigt keine regelmäßige Wartung.
• Der Artikel darf nicht zerlegt werden.
• Reinigen Sie den Artikel nicht mit Lösungsmitteln oder scheuernden Reinigungsmitteln.
• Verwenden Sie ausschließlich milde Reinigungsmittel, um den Artikel zu säubern.
• Säubern Sie den Artikel nicht per Hochdruckwäsche.
• Wir empfehlen, dass die mechanische Integrität von dachmontierten Artikeln mindestens einmal jährlich
überprüft wird.
• Falls Sie ein Problem mit dem Artikel haben, wenden Sie sich bitte an den Kundenservice von Maxview.
+49 (0)8145-996998-0
2 Jahre Garantie
Die Garantie gilt zwei Jahre ab Kaufdatum. Die Garantie schließt unsachgemäße Montage oder Verwendung aus.
Bitte bewahren Sie die Rechnung als Garantienachweis sorgfältig auf.

11

12
Certification and Environment
Designed, constructed and marketed in compliance with the safety and product requirements of the
relevant EEC Directives.
Products marked with the crossed out wheely bin must not be disposed of with normal household
waste but made available for separate household collection. Separate collection of used products
and their packaging allows materials to be recycled and used again. Re use of recycled materials
helps prevent environmental pollution and reduces the demand for raw materials.
UK Conformity Assessed (UKCA) marking is a certification mark that indicates conformity with
the applicable requirements for products sold within Great Britain.
-
 1
1
-
 2
2
-
 3
3
-
 4
4
-
 5
5
-
 6
6
-
 7
7
-
 8
8
-
 9
9
-
 10
10
-
 11
11
-
 12
12


