
1 | ENGLISH
Telescope Instruction Manual
Model: 91078
V2

911
10
2 | ENGLISH
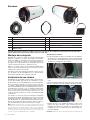
Mounting the Astrograph
The RASA 36 cm has a CGE dovetail mounting rail. This is compatible with mounts that
accept a CGE or Losmandy-D style dovetail. The astrograph itself weighs 75 lb., so a mount
with a load capacity more than that is recommended. This will ensure good performance of
the mount when a camera and any accessories are added.
Because of its size and weight, moving and lifting the RASA 36 cm onto a mount will take
two people. Use the handles on the rear cell as needed.
For custom mounting applications, there are two sets of two M8x1.25 mounting holes in the
rear cell. These utilize threaded inserts for extra reinforcement.
Installing a Camera
The supplied M48 camera adapter can be used to attach a DSLR camera. It will require a 48
mm “wide T-ring” for your make of DSLR to connect to the adapter.
If you are using an astronomical camera with a smaller than “full frame” (43 mm diagonal)
sensor, you may also be able to use the supplied M48 camera adapter. This likely will require
utilizing optional adapters, such as an M48-to-M42 adapter along with M48 extension rings,
to connect your camera and place your camera’s sensor at the proper backfocus distance.
The backfocus distance when using the M48 adapter is 55 mm.
Cameras with larger sensors will require a custom camera adapter to best illuminate the sen-
sor. Refer to the “Camera Adapter Requirements” drawing on Celestron’s website, located on the
36 cm Rowe-Ackermann Schmidt Astrograph webpage under the “Support and Downloads”
tab, to determine the design needed for your camera.
Note: Due to the steep light cone provided by the f/2.2 optical system, camera housings
can be a source of vignetting. Despite the astrograph having a large illuminated fi eld,
vignetting can occur with large sensor cameras when the sensor is deeply recessed within
the camera body. This is common with full-frame DSLR sensors.
To attach your camera:
1. Place the knurled retaining ring over the camera adapter and loosely thread it onto the lens
group housing. The Tefl on washer goes between the retaining ring and the camera adapter.
2. Thread the camera body onto the camera adapter.
3. Carefully hold hold the camera so the camera adapter seats fl atly against the lens group housing.
4. Finish threading the retaining ring onto the lens group housing. Rotate the ring
until the camera adapter is snug against the housing. Do not over tighten! Camera
orientation can be adjusted later.
Caution: Overtightening the retaining ring can cause the lens assembly to rotate rela-
tive to the Schmidt corrector. Keep the camera adapter snug against the lens cell, but
do not overtighten the ring.
Adjusting Camera Orientation
Once the camera is installed, you can adjust its orientation by slightly loosening the retaining
ring. Loosen the ring no more than 1/8th turn, rotate the camera as desired, and retighten the
ring. Remember not to overtighten the ring.
Knurled
retaining
ring
1
34
2
5
7
6
8
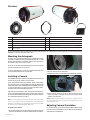
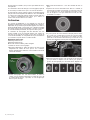
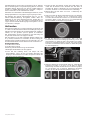
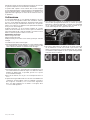
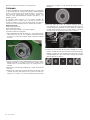
Overview
1 Lens group 7 Cooling fan
2 Schmidt corrector 8 12V DC jack for cooling fan
3 Lens group housing 9 M48 camera adapter
4 Dovetail mounting rail 10 Retaining ring with tefl on washer
5 Dovetail accessory rail 11 8 x AA battery pack (batteries not included)
6 Focus knob
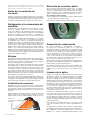
The 36 cm Rowe-Ackermann Schmidt Astrograph (RASA 36 cm) delivers a fl at fi eld with no coma or astigmatism across a large (60 mm) image circle and extended spectral range
(400-900 nm). The astrograph can only be used with a camera.

3 | ENGLISH
Cooling Down and Fan Operation
Optical performance of the RASA 36 cm will be best when it has reached thermal
equilibrium with the outside air. The greater the temperature difference between the
astrograph and the outdoors, the longer it will take to cool down. It is a good idea to store
the astrograph in a cool area, and to keep it outside for an hour or so before imaging.
The RASA 36 cm rear cell is equipped with a cooling system containing a fan to facilitate
cooling the optics to the ambient temperature. The fan pulls air through the mesh vents
located on the perimeter of the rear cell. The mesh prevents dust from entering the
astrograph. The supplied battery pack powers the fan. It requires 8x AA batteries (not
included). Install the batteries as indicated in the plastic mold of the battery holder. Plug
the battery pack into the jack near the fan to turn it on. When the optics have cooled down
and you are ready to image, unplug the battery pack to turn the fan off.
Focusing
The focuser moves the primary mirror within the rear cell. The RASA 36 cm V2 uses the
Ultra-Stable Focus System (USFS) that minimizes unwanted shifting of the primary mirror
when focusing and during long exposures.
To focus, turn the focus knob until the image appears sharp in your camera. If the knob
will no longer turn, the focuser has reached the end of its travel. In this case, rotate the
knob in the opposite direction until focus is achieved. If you turn the focus knob too
quickly, you may go right through focus without seeing the image. To avoid this problem,
try fi rst focusing on a bright star so the image is visible even when out of focus.
An essential accessory you’ll likely want to add is a focus motor. The Celestron Focus
Motor is fully compatible with the RASA 36 cm V2. Please visit the focus motor webpage
at celestron.com for more information.
Attaching Accessories
The RASA 36 cm includes a CGE dovetail accessory rail that is also compatible with most
accessories which work on Losmandy-D plates. The dovetail accessory rail can be used to
mount an optional guidescope.
A Celestron fi ndescope can be attached using the pairs of threaded holes in the rear cell of
the astrograph. These holes have Phillips-head screws in them when not in use.
Mounting
holes for
fi nderscope
Removing the Optical Window
If using a fi lter somewhere in the light path, or if the camera has an optical window, we
recommend that you remove the optical window in the front lens cell. This will maintain
the best optical performance of the astrograph. The optical window utilizes M110 x 0.75
threads on the exterior of its housing.
To remove the optical window:
1. With the camera and camera adapter removed, carefully grab hold of the knurled cell
of the optical window.
2. Carefully unthread and remove the optical window.
Knurled cell of
optical window
Dew Prevention
The Schmidt corrector is especially susceptible to condensation forming because the glass is
exposed to the outside air. If the temperature of the astrograph drops below the dew point,
dew may form on the corrector within minutes. The easiest way to prevent dew is to add an
optional 14” dew shield which shrouds and insulates the corrector. If conditions are more
severe, a dew heater can be added to apply slight heat to the corrector lens to keep it
dry all night.
Celestron has a full suite of dew prevention products that are fully compatible with the RASA
36 cm. Visit celestron.com for more information.
Do not store the astrograph if covered in dew. Allow it to dry fi rst without the dust cover on.
Storing optics when wet promotes mold growth on the optical surfaces.
Cleaning of the Optics
Dust, debris, and fi ngerprints on the optics will generally have little effect on imaging with the
RASA 36 cm. However, if the external surfaces of the Schmidt corrector and the lens group
become excessively dirty, they should be cleaned. Dust can be removed with a blower bulb or
a camel hair brush. Then, use optical cleaning solution and lens cleaning tissue to remove any
remaining debris or stains. Apply the solution to the tissue and then apply the tissue to the lens.
Low pressure strokes should go from the center of the corrector to the outer edge. Use a new
tissue for each stroke so as not to spread any oils or debris. Do not rub in circles.
You can use a commercially made lens cleaning solution or mix your own. A good cleaning
solution is isopropyl alcohol (99% pure) mixed with distilled water. The solution should be 3
parts isopropyl alcohol and 2 parts distilled water. You can also use soft white tissue instead of
lens cleaning tissue, as long it doesn’t have added lotions or perfumes.
To minimize the need to clean your astrograph, replace the dust cap once you have
fi nished using it.
Cleaning the internal optical surfaces should only be done by the Celestron repair department.
If your RASA 36 cm needs internal cleaning, please contact Celestron at celestron.com/pages/
technical-support for a return authorization number and price quote.
Collimation
The RASA 36 cm optics are factory aligned, and should not normally need collimation
adjustments. However, adjustments can be made to the tilt of the lens assembly, if needed,
to collimate the entire optical system. The primary mirror and corrector are permanently
aligned at the factory, and cannot be adjusted.
The astrograph must be collimated with a camera installed. Using a camera that does not
obstruct the light path (i.e. the aperture of the Schmidt corrector) is recommended, as this
makes it easier to see concentricity when stars are defocused.
Equipment needed:
2 mm Hex key
3 mm Hex key
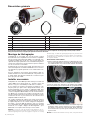
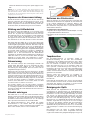
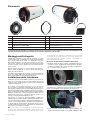
Mount and camera setup, ready to image
1. Install the camera on the astrograph.
2. Slightly loosen the retaining ring and rotate the camera adapter so the three slotted
openings allow access to the collimation screws. Retighten the retaining ring.
Collimation
screws

4 | ENGLISH
Specifications
Optical Design Rowe-Ackermann Schmidt
Aperture 355.6 mm
Focal Length 790 mm
Focal Ratio f/2.2
Central Obstruction 158 mm (44% of aperture diameter)
Optical Coatings Enhanced aluminum, Starbright XLT multi-coatings
Optical Window 104 mm Ø, removeable
Focuser Ultra-Stable Focus System (USFS), mimimizes focus shift
Cooling Fan 12V DC, MagLev
Tube Dimensions 42.5 inches length, 16 inches diameter
Tube Weight 75 lb
Back focus (from top of lens group housing) 77.5 mm
Back focus (with M48 camera adapter) 55 mm
Spot size < 6.3 μm RMS across FOV
Wavelength Range 400 – 900 nm
Off-axis Illumination 83% at 30 mm off-axis
Image Circle 60.1 mm Ø , 4.3 degrees
Usable Field 70 mm Ø, 5.1°, only minimal performance loss at edge of FOV
3. Point the astrograph at a bright star and focus the camera. Center the star in the camera’s
field of view. Use Polaris, if possible, as it won’t move much over time.
4. Defocus the star by about 1 turn of the focus knob.
5. Inspect the defocused star pattern. When collimated, the pattern should look like a
concentric doughnut. If the pattern is concentric, no adjustment is necessary. If the
“donut hole” is not centered within the pattern, then some adjustment is needed.
6. There are three pairs of collimation screws. Each pair works together as a push-pull tilt
adjustment. Adjust the collimation by loosening and tightening one of the pairs of
collimation screws. Always loosen one of the screws first, then tighten the other one.
Adjust one pair of screws at a time.
7. If the star pattern is thin on one side, adjust the collimation screws so that the star moves
towards the thin side, then adjust the position of the astrograph to re-center the star. Repeat
this until the defocused star image is concentric.
3 mm
Hex key
2 mm
Hex key
FCC NOTE: This equipment has been tested and found to comply with the limits
for a Class B digital device, pursuant to part 15 of the FCC Rules. These limits
are designed to provide reasonable protection against harmful interference in a
residential installation. This equipment generates, uses, and can radiate radio
frequency energy and, if not installed and used in accordance with the instructions,
may cause harmful interference to radio communications. However, there is
no guarantee that interference will not occur in a particular ninstallation. If this
equipment does cause harmful interference to radio or television reception, which
can be determined by turning the equipment off and on, the user is encouraged
to try to correct the interference by one or more of the following measures:
• Reorient or relocate the receiving antenna.
• Increase the separation between the equipment and receiver.
• Connect the equipment into an outlet on a circuit different from that to which the
receiver is connected.
• Consult the dealer or an experienced radio/TV technician for help.
This product is designed and intended for use by those 14 years of age and older.
WARRANTY
celestron.com/support/warranties
© 2022 Celestron • All rights reserved
celestron.com/pages/technical-support
2835 Columbia Street • Torrance, CA 90503 USA
0222

5 | FRANÇAIS
Mode d'emploi du télescope
Modèle : 91078
V2

911
10
6 | FRANÇAIS
Montage de l'Astrographe
Le RASA 36 cm est équipé d’un rail de monture à queue
d’aronde CGE. Il est compatible avec les montures compatibles
avec les queues d’aronde de type CGE ou Losmandy-D. L’as-
trographe lui-même pèse 75lb, alors une monture offrant une
capacité de charge supérieure est recommandée. Cela garanti-
ra les bonnes performances de la monture lorsque la caméra et
tous les accessoires sont installés.
Compte-tenu de son poids et de sa taille, deux personnes sont
nécessaires déplacer et installer le RASA 36cm sur une mon-
ture. Utilisez les poignées présentes sur la cellule arrière si né-
cessaire.
Pour les applications de montures personnalisées, deux en-
sembles de deux trous de monture M8x1,25 sont présents sur
la cellule arrière. Ces derniers utilisent des connections à pas
de vis pour plus de solidité.
Installer une caméra
L’adaptateur de caméra M48 peut être utilisé pour monter une
caméra DSLR. Vous devrez utiliser un « anneau T large » de
48mm conçu pour votre DSLR pour effectuer la connexion.
Si vous utilisez une caméra astronomique possédant un cap-
teur plus petit que «plein cadre» (diagonale de 43mm), vous
pourriez également pouvoir utiliser un adaptateur M48. Ceci
nécessitera probablement l’utilisation d’adaptateurs optionnels,
comme un adaptateur M48 à M42, avec des anneaux d’exten-
sion M48, pour connecter votre caméra et positionner le cap-
teur de la caméra à la distance de mise au point arrière correcte.
La distance de mise au point arrière lors de l’utilisation d’un
adaptateur M48 est de 55mm.
Les caméras équipées de capteurs plus larges nécessiteront
un adaptateur de caméra personnalisé pour illuminer au mieux
le capteur. Reportez-vous au schéma «Exigences d’adaptateur
de caméra» sur le site Web de Celestron, que vous trouverez
sur la page Web de l’astrographe Rowe-Ackermann Schmidt
de 36 cm, sous l’onglet «Support et téléchargement», pour
déterminer la conception nécessaire pour votre caméra.
Remarque: À cause du cône de lumière serré délivré par le sys-
tème optique f/2.2 et les boîtiers de la caméra peut causer un
effet de vignetage. Puisque l’astrographe comporte un champ
illuminé large, un effet de vignetage peut peut se produire avec
les caméras à capteur large, lorsque le capteur est installé pro-
fondément dans le boîtier de la caméra. Ceci est courant avec
les capteurs DLSR.
Pour attacher votre caméra:
1. Placez l’anneau de maintien rainuré sur l’adaptateur de camé-
ra et vissez-le légèrement sur le boîtier du groupe de lentilles.
La rondelle en tefl on se positionne entre l’anneau de maintien
et l’adaptateur de caméra.
2. Vissez le boîtier de la caméra sur l’adaptateur de caméra.
3. Tenez la caméra avec précautions de manière que l’adapta-
teur pour le placer à plat contre le boîtier du groupe de lentilles.
4. Finissez de visser l’anneau de maintien sur le boîtier du groupe
de lentilles. Faites tourner l’anneau jusqu’à que l’adaptateur
de caméra soit positionné contre le boîtier. Ne le serrez pas
excessivement! Vous pourrez ajuster l'orientation de la camé-
ra par la suite.
Attention: Si l’anneau de maintien est trop serré, cela peut faire en
Anneau
de maintien
rainuré
1
34
2
5
7
6
8
Présentation générale
1 Groupe de lentilles 7 Ventilateur de refroidissement
2 Correcteur Schmidt 8 Jack 12V CC pour ventilateur de refroidissement
3 Boîtier du groupe de lentilles 9 Adaptateur de caméra M48
4 Rail de monture à queue d’aronde 10 Anneau de maintien avec rondelle en tefl on
5 Rail d’accessoires à queue d’aronde 11 Bloc de piles 8 x AA (piles non incluses)
6 Molette de mise au point
L’astrographe Rowe-Ackermann Schmidt 36 cm (RASA 36 cm) offre un champ plat sans coma ni astigmatisme sur une large image circulaire (60mm) et étend le
champ spectral (400-900 nm). L'astrographe peut également être utilisé avec une caméra.

7 | FRANÇAIS
sorte que l’assemblage des lentilles se déplace en même temps
que le correcteur Schmidt. Maintenez l’adaptateur de caméra à
niveau contre la cellule de la lentille, mais ne serrez pas exces-
sivement l’anneau.
Ajuster l'orientation de la caméra
Une fois la caméra installée, vous pouvez ajuster l'orientation de
la caméra en desserrant légèrement l'anneau de tenue. Ne pas
desserrer l'anneau de plus de 1/8ème de tour, faites tourner la
caméra comme désiré, puis resserrez l'anneau. Souvenez-vous
de ne pas serrer excessivement l’anneau.
Refroidissement et utilisation du
ventilateur
Les performances optiques du RASA 36 cm seront améliorées
si sa température la même que la température ambiante. Plus
grand est le différentiel de température entre l’astrographe et
la température ambiante, plus longtemps il mettra à se refroidir.
Il est recommandé de stocker l’astrographe dans un lieu frais,
et de le placer en extérieur pendant environ une heure avant de
l’utiliser.
La cellule arrière du RASA 36 cm est équipé d’un système
de refroidissement équipé d’un ventilateur facilitant le
refroidissement des optiques à la température ambiante.
Le ventilateur aspire l'air depuis les ouvertures grillagées
situées sur le pourtour de la cellule arrière. Le grillage permet
d'empêcher à la poussière de pénétrer dans l'astrographe. Le
bloc de piles inclus alimente le ventilateur. Il nécessite 8 piles
AAA (non incluses). Installez les piles comme indiqué sur le
moulage du support de pile. Branchez le bloc de piles au port
d'alimentation situé près du ventilateur pour l'allumer. Lorsque
les optiques ont refroidit et que vous êtes prêt à capturer des
images, débranchez le bloc de piles pour éteindre le ventilateur.
Mise au point
Le système de mise au point déplace le miroir principal au sein
de la cellule arrière. Le RASA 36cm V2 utilise un système de
mise au point ultra stable (USFS) qui minimise le risque de
décalage du miroir principal lors de la mise au point ou pendant
les longues expositions.
Pour mettre au point, faites tourner la molette de mise au point
jusqu'à ce que l'image soit nette dans votre caméra. Si la
molette ne peut plus être tournée, cela veut dire qu’elle a atteint
son bout de course. Dans ce cas, faites tourner la molette
dans la direction opposée, jusqu'à ce que la mise au point soit
correcte. Si vous faites tourner la molette de mise au point trop
rapidement, vous pourriez dépasser le point de mise au point
sans voir l’image. Pour éviter ce problème, essayez d'abord de
faire la mise au point sur une étoile lumineuse, même si elle n'est
pas mise au point.
Un accessoire essentiel que vous voudrez probablement ajouter
est un moteur de mise au point. Le moteur de mise au point
Celestron est pleinement compatible avec le RASA 36cm V2.
Veuillez visiter la page Web du moteur de mise au point sur
celestron.com pour obtenir plus d’informations.
Attacher les accessoires
Le RASA 36 cm comporte un rail d’accessoires à queue
d’aronde qui est également compatible avec la majorité des
accessoires compatibles avec les plaque Losmandy-D. Le rail
d’accessoires à queue d’aronde peut être utilisé pour monter
un guideur optionnel.
Vous pouvez attacher un chercheur Celestron dans la paire
de pas de vis situés sur la cellule arrière de l’astrographe. Ces
trous comportent des vis cruciformes lorsqu'ils sont inutilisés.
Trous de
monture pour
chercheur
Retirer la fenêtre optique
Si vous utilisez un fi ltre à un point ou un autre du chemin de la
lumière, ou si la caméra comporte une fenêtre optique, nous
vous recommandons de retirer la fenêtre optique de la cellule
avant. Cela permettra de préserver les meilleures performances
optiques de l’astrographe. La fenêtre optique comporte des
fi letages M110 x 0,75 sur l’extérieur de son boîtier.
Pour retirer la fenêtre optique:
1. Une fois la caméra et l'adaptateur de caméra retirés, saisissez
avec précaution la cellule rainurée de la fenêtre optique.
2. Dévissez et retirez avec précaution la fenêtre optique.
Cellule rainurée de
la fenêtre optique
Prévention de la rosée
Le correcteur Schmidt est particulièrement sensible à la
formation de condensation car le verre est exposé à l'air
extérieur. Si la température de l'astrographe tombe en-dessous
du point de rosée, de la rosée peut se former sur le correcteur
en quelques minutes. Le moyen le plus simple d'empêcher la
rosée est d'ajouter un pare-buée optionnel de 14 pouces qui
enveloppe et isole le correcteur. Si les conditions sont plus
sérieuses, un chauffage anti-buée peut être ajouté pour chauffer
légèrement la lentille correctrice afi n de la garder au sec toute
la nuit.
Celestron propose une gamme complète de produits anti-rosée
entièrement compatibles avec le RASA 36 cm. Visitez celestron.
com pour plus d'informations.
Ne pas ranger l'astrographe s'il est couvert de rosée. Laissez-le
d'abord sécher, puis mettez le cache-poussière. Le stockage
des optiques lorsqu'elles sont humides favorise la prolifération
de moisissures sur les surfaces optiques.
Nettoyer les éléments optiques
La poussière, les débris et les empreintes digitales sur l'optique
auront généralement peu d'effet sur l'imagerie avec le RASA
36 cm. Cependant, si les surfaces externes du correcteur de
Schmidt et du groupe de lentilles deviennent excessivement
sales, elles doivent être nettoyées. La poussière peut être
enlevée avec une poire souffl ante ou une brosse en poils de
chameau. Utilisez ensuite une solution de nettoyage d'optiques
et un papier de nettoyage de lentille pour retirer les débris ou
les taches éventuelles. Appliquez la solution sur le tissu, puis
le papier sur la lentille. Effectuez des mouvements légers du
centre du correcteur vers les bordures extérieures. Utilisez un
nouveau papier pour chaque mouvement, de manière à ne pas
étaler de graisses ou de débris. Ne frottez pas en cercles.
Vous pouvez utiliser une solution de nettoyage pour objectif
du commerce ou faire votre propre mélange. Un bon produit
de nettoyage est l'alcool isopropylique (pur à 99 %) mélangé
à de l'eau distillée. La solution doit être composée de 3 parties
d'alcool isopropylique et de 2 parties d'eau distillée. Vous
pouvez également utiliser du tissu blanc doux au lieu du tissu

8 | FRANÇAIS
de nettoyage pour lentilles, tant qu'il n'est pas imbibé de lotions
ni de parfums.
Pour minimiser le besoin de nettoyer votre astrographe, replacez
le cache anti-poussière une fois que vous avez fini de l'utiliser.
Le nettoyage des surfaces optiques internes ne doit être effectué
que par le service de réparation de Celestron. Si votre RASA 36
cm a besoin d'un nettoyage interne, veuillez contacter Celestron
sur celestron.com/pages/technical-support pour obtenir un
numéro d'autorisation de retour et un devis.
Collimation
Les optiques du RASA 36 cm sont alignées en usine et ne
devraient normalement pas nécessiter de réglages de collimation.
Cependant, des ajustements peuvent être apportés à l'inclinaison
de l'ensemble de lentille, si nécessaire, pour collimater l'ensemble
du système optique. Le miroir primaire et le correcteur sont alignés
en usine de manière permanente, et ne peuvent être ajustés.
La collimation de l'astrographe doit être effectuée avec une
caméra installée. Il est recommandé d'utiliser une caméra qui
n'obstrue pas le trajet de la lumière (c'est-à-dire l'ouverture du
correcteur de Schmidt), car cela permet de voir plus facilement la
concentricité lorsque les étoiles sont défocalisées.
Équipement nécessaire:
Clef hexagonale de 2 mm
Clef hexagonale de 3 mm
Monture et caméra installées, prêt à l’imagerie
1. Installez la caméra sur l'astrographe.
2. Desserrez légèrement la bague de retenue et faites pivoter
l'adaptateur de caméra de sorte que les trois ouvertures
fendues permettent d'accéder aux vis de collimation. Resserrez
l’anneau de maintien.
Vis de
collimation
3. Pointez l'astrographe vers une étoile brillante, et mettez la
caméra au point. Centrez l'étoile dans le champ de vision de
la caméra. Utilisez Polaris, si possible, car il ne bougera pas
beaucoup avec le temps.
4. Défocalisez l'étoile d'environ 1 tour de la molette de mise au
point.
5. Inspectez le motif en étoile défocalisé. Une fois collimaté, le
motif devrait ressembler à un beignet concentrique. Si le motif
est concentrique, alors aucun ajustement n'est requis. Si le «
Trou du doughnut » n'est pas centré dans le motif, alors des
ajustements sont requis.
6. Il y a trois paires de vis de collimation. Chaque paire est utilisé
de concert pour un effet de pousser-tirer pour ajuster l'angle.
Réglez la collimation en desserrant et en serrant l'une des
paires de vis de collimation. Desserrez toujours l'une des vis en
premier avant de serrez l'autre. Ajustez une paire de vis à la fois.
7. Si le motif en étoile est fin d'un côté, ajustez les vis de collimation
pour que l'étoile se déplace vers le côté fin, puis ajustez la
position de l'astrographe pour recentrer l'étoile. Répétez ces
étapes jusqu'à ce que l'image de l'étoile soit concentrique.
Clef hexagonale
de 3mm
Clef hexagonale
de 2mm

9 | FRANÇAIS
Spécifications
Type d'optiques Rowe-Ackermann Schmidt
Ouverture 355,6 mm
Distance focale 790 mm
Ratio de focale f/2.2
Obstruction centrale 158 mm (44% du diamètre d'ouverture)
Revêtements optiques Aluminium amélioré, multi-traitement Starbright XLT
Fenêtre optique 104 mm Ø, amovible
Système de mise au point Système de mise au point ultra stable (USFS), minimise le
décalage de mise au point
Ventilateur de refroidissement CD 12 V, MagLev
Dimensions du tube 42,5 pouces de longueur, 16 pouces de diamètre
Poids du tube 75 lb
Mise au point arrière (du dessus du boîtier du groupe de
lentilles)
77,5 mm
Mise au point arrière (avec adaptateur de caméra M48) 55 mm
Dimension du point < 6,3 μm RMS sur le CDV (Champ de vision)
Plage de longueur d'onde 400 – 900 nm
Illumination hors-axe 83% à 30 mm hors-axe
Cercle d'image 60,1 mm Ø , 4,3 degrees
Champ d'utilisation 70 mm Ø, 5,1°, avec perte de performances minimales en
bordure du CDV
NOTE DE LA FCC: Cet équipement a été testé et jugé conforme aux limites
établies pour un dispositif numérique de classe B, conformément à la partie
15 de la réglementation de la FCC. Ces limites sont conçues pour fournir
une protection raisonnable contre les interférences nuisibles dans une
installation résidentielle. Cet équipement génère, utilise et peut émettre une
énergie de fréquence radio et, s’il n’est pas installé et utilisé conformément
aux instructions, peut causer des interférences nuisibles aux communications
radio. Cependant, il n'y a aucune garantie que des interférences ne se
produiront pas dans une installation particulière. Si cet équipement cause des
interférences nuisibles à la réception radio ou de télévision, ce qui peut être
déterminé en éteignant et en rallumant l'équipement, l'utilisateur est encouragé
à essayer de corriger l'interférence par une ou plusieurs des mesures suivantes:
• Réorientez ou déplacez l'antenne de réception.
• Augmentez la séparation entre l'équipement et le récepteur.
• Branchez l'équipement dans une prise sur un circuit différent de celui auquel le
récepteur est connecté.
• Consulter le revendeur ou un technicien radio / TV expérimenté pour obtenir de
l'aide.
Ce produit est conçu et prévu pour être utilisé par des personnes âgées de 14
ans et plus.
GARANTIE
celestron.com/support/warranties
© 2022 Celestron • Tous droits réservés.
celestron.com/pages/technical-support
2835 Columbia Street • Torrance, CA 90503 USA
0222

10 | DEUTSCH
Teleskop-Bedienungsanleitung
Modellnr.: 91078
V2

911
10
11 | DEUTSCH
Montage des Astrographen
Der RASA 36 cm verfügt über eine CGE-Schwal-
benschwanz-Montageschiene. Diese ist mit Montierungen kom-
patibel, die einen CGE- oder Losmandy-D-Schwalbenschwanz
aufnehmen können. Der Astrograph selbst wiegt 34 kg, daher
wird eine Montierung mit höherer Belastbarkeit empfohlen. Dies
gewährleistet eine gute Leistung der Montierung, wenn eine
Kamera und anderes Zubehör hinzugefügt werden.
Aufgrund seiner Größe und seines Gewichts sind zum Bewe-
gen und Anheben des RASA 36 cm auf eine Montierung zwei
Personen erforderlich. Benutzen Sie ggf. die Griffe an der hin-
teren Zelle.
Für eine kundenspezifi sche Montage sind in der hinteren Zelle
zwei Sätze von zwei M8x1,25-Montagelöcher vorhanden. Diese
sind zur zusätzlichen Verstärkung mit Gewindeeinsätzen verse-
hen.
Kamera installieren
Der mitgelieferte M48-Kameraadapter kann zur Befestigung ei-
ner DSLR-Kamera verwendet werden. Für den Anschluss an
den Adapter ist ein 48 mm „breiter T-Ring“ für Ihre DSLR-Kame-
ramarke erforderlich.
Wenn Sie eine Astronomiekamera mit einem kleineren als dem
„Vollbild“-Sensor (43 mm Diagonale) verwenden, können Sie
möglicherweise auch den mitgelieferten M48-Kameraadapter
verwenden. In diesem Fall müssen Sie wahrscheinlich optionale
Adapter verwenden, z. B. einen M48-auf-M42-Adapter zusam-
men mit M48-Zwischenringen, um Ihre Kamera anzubringen und
den Sensor Ihrer Kamera mit dem korrekten Aufl agemaß-Abs-
tand zu platzieren. Der Aufl agemaß-Abstand bei Verwendung
des M48-Adapters beträgt 55 mm.
Für Kameras mit größeren Sensoren ist ein spezieller Kameraa-
dapter erforderlich, um den Sensor optimal zu auszuleuchten.
Schauen Sie sich die Zeichnung „Anforderungen an den Kame-
raadapter“ auf der Celestron-Website an, die Sie auf der Web-
seite des 36 cm Rowe-Ackermann Schmidt Astrographen unter
der Registerkarte „Unterstützung und Downloads“ fi nden, um
das für Ihre Kamera erforderliche Design zu ermitteln.
Hinweis: Aufgrund des steilen Lichtkegels der f/2.2-Optik kann
das Kameragehäuse eine Vignettierungsquelle sein. Trotz eines
großen beleuchteten Feldes des Astrographen kann es bei Ka-
meras mit großem Sensor zu Vignettierung kommen, wenn der
Sensor tief in das Kameragehäuse eingelassen ist. Dies ist bei
Vollbild-DSLR-Sensoren häufi g der Fall.
So bringen Sie Ihre Kamera an:
1. Setzen Sie den gerändelten Haltering über den Kameraa-
dapter und schrauben Sie ihn lose auf das Linsengruppen-
gehäuse. Die Tefl on-Unterlegscheibe befi ndet sich zwischen
Haltering und Kameraadapter.
2. Schrauben Sie das Kameragehäuse auf den Kameraadapter.
3. Halten Sie die Kamera vorsichtig so, dass der Kameraadapter
fl ach auf dem Linsengruppengehäuse sitzt.
4. Schrauben Sie den Sicherungsring vollständig auf das
Gehäuse der Linsengruppe. Drehen Sie den Ring, bis der
Kameraadapter fest auf dem Gehäuse sitzt. Nicht zu fest an-
Gerändelter
Halte-
Ring
1
34
2
5
7
6
8
Übersicht
1 Linsengruppe 7 Kühllüfter
2 Schmidt-Korrekturlinse 8 12-VDC-Buchse für Kühlventilator
3 Gehäuse der Linsengruppe 9 M48 Kameraadapter
4 Schwalbenschwanz-Schiene 10 Sicherungsring mit Tefl on-Unterlegscheibe
5 Schwalbenschwanz-Zubehörschiene 11 Batteriepack mit 8 AA (Batterien nicht im Lieferumfang enthalten)
6 Fokussierknopf
Der 36-cm-Rowe-Ackermann-Schmidt-Astrograph (RASA 36 cm) liefert ein Flachfeld frei von Koma oder Astigmatismus über einen großen Bildkreis (60 mm) und
einen erweiterten Spektralbereich (400-900 nm). Der Astrograph kann nur mit einer Kamera verwendet werden.

12 | DEUTSCH
ziehen! Die Kameraausrichtung kann später angepasst wer-
den.
Vorsicht: Ein zu starkes Anziehen des Sicherungsrings kann
dazu führen, dass sich die Objektivbaugruppe relativ zur Sch-
midt-Korrekturlinse dreht. Halten Sie den Kameraadapter eng
am Gehäuse der Linsengruppe, ziehen Sie jedoch den Siche-
rungsring nicht zu fest an.
Anpassen der Kameraausrichtung
Sobald die Kamera installiert ist, können Sie ihre Ausrichtung
anpassen, indem Sie den Sicherungsring leicht lösen. Lösen
Sie den Ring nicht mehr als 1/8 Umdrehung, drehen Sie die
Kamera wie gewünscht und ziehen Sie den Ring wieder fest.
Achten Sie darauf, das Sie den Ring nicht zu fest anziehen.
Kühlung und Lüfterbetrieb
Die optische Leistung des RASA 36 cm ist am besten, wenn
das Gerät ein thermisches Gleichgewicht mit der Außenluft
erreicht hat. Je größer der Temperaturunterschied zwischen
dem Aufbewahrungsort des Astrographen und der Umgebung
ist, desto länger dauert die Abkühlung. Es ist ratsam, den
Astrographen an einem kühlen Ort aufzubewahren und ihn vor
den Aufnahmen für etwa eine Stunde im Freien aufzustellen.
Die hintere Zelle des RASA 36 cm ist mit einem Kühlsystem
ausgestattet, das einen Lüfter enthält, der die Kühlung der Optik
auf die Umgebungstemperatur erleichtert. Der Lüfter saugt die
Luft durch die Gitteröffnungen an, die sich am Außenrand der
hinteren Zelle befi nden. Das Gitter verhindert das Eindringen
von Staub in den Astrographen. Das mitgelieferte Batteriepack
versorgt den Lüfter mit Strom. Es werden 8 x AA-Batterien
benötigt (nicht im Lieferumfang enthalten). Setzen Sie die
Batterien wie in der Kunststoffschale des Batteriehalters
angegeben ein. Schließen Sie das Batteriepack an die Buchse
neben dem Lüfter an, um ihn einzuschalten. Wenn die Optik
abgekühlt ist und Sie bereit sind, Aufnahmen zu machen,
entfernen Sie das Batteriesatz, um den Lüfter auszuschalten.
Fokussierung
Der Fokussierer bewegt den Primärspiegel innerhalb der
hinteren Zelle. Der RASA 36 cm V2 verwendet das Ultra-
Stabile Fokussiersystem (USFS), das die unerwünschte
Verschiebung des Hauptspiegels beim Fokussieren und bei
Langzeitbelichtungen minimiert.
Drehen Sie zum Fokussieren den Fokussierknopf, bis das Bild
in der Kamera scharf erscheint. Wenn sich der Knopf nicht mehr
dreht, hat der Fokussierer seinen Anschlag erreicht. Drehen Sie
in diesem Fall den Knopf in die entgegengesetzte Richtung, bis
das Bild scharf ist. Wenn Sie den Fokussierknopf zu schnell
drehen, können Sie die Scharfstellung verpassen, ohne ein Bild
zu sehen. Um dieses Problem zu vermeiden, versuchen Sie
zunächst, einen hellen Stern zu fokussieren, damit er im Bild
auch dann sichtbar ist, wenn es unscharf ist.
Ein wichtiges Zubehör, das Sie wahrscheinlich hinzufügen
möchten, ist ein Fokussiermotor. Der Celestron Fokussiermotor
ist vollständig kompatibel mit dem RASA 36 cm V2. Weitere
Informationen fi nden Sie auf der Webseite des Fokussiermotors
unter celestron.com.
Zubehör anbringen
Der RASA 36 cm ist mit einer CGE-Schwalbenschwanz-
Zubehörschiene ausgestattet, die auch mit dem meisten Zubehör
kompatibel ist, das auf Losmandy-D-Platten funktioniert. Die
Schwalbenschwanz-Zubehörschiene kann für die Montage
eines optionalen Sucherfernrohres verwendet werden.
Ein Celestron-Sucherfernrohr kann mithilfe der beiden
Schraubenlöcher in der hinteren Zelle des Astrographen
montiert werden. In diesen Schraubenlöchern befi nden sich
Kreuzschlitzschrauben, wenn es nicht verwendet wird.
Befestigungs-
löcher für
Sucherfernrohr
Entfernen des Glasfensters
Wenn Sie irgendwo im Lichtweg einen Filter verwenden oder
die Kamera ein Glasfenster hat, empfehlen wir, das Glasfenster
in der vorderen Objektivzelle zu entfernen. Dadurch wird
die beste optische Leistung des Astrographen beibehalten.
Das Glasfenster verfügt über M110 x 0,75 Gewinde an der
Außenseite des Gehäuses.
So entfernen Sie das Glasfenster:
1. Ergreifen Sie bei abgenommenem Kameraadapter vorsichtig
die gerändelte Zelle des Glasfensters.
2. Schrauben Sie das Glasfenster vorsichtig ab und entfernen
Sie es.
Gerändelte Zelle des
Glasfensters
Tauprävention
Die Schmidt-Korrekturlinse ist besonders anfällig für
Kondenswasserbildung, da das Glas dem Nachthimmel
ausgesetzt ist, wie die Windschutzscheibe Ihres Autos. Wenn
die Temperatur des Astrographen unter den Taupunkt sinkt,
kann sich innerhalb von Minuten Tau auf der Korrekturlinse
bilden. Am einfachsten lässt sich Tau verhindern, indem man
einen optionalen 14-Zoll-Betauungsschutz anbringt, der die
Korrekturlinse abschirmt und isoliert. Wenn die Bedingungen
schwerwiegender sind, kann eine Tauheizung hinzugefügt
werden, um die Korrekturlinse leicht zu erwärmen, damit sie die
ganze Nacht trocken bleibt.
Celestron bietet eine ganze Reihe von Produkten zur
Tauprävention an, die vollständig mit dem RASA 36 cm
kompatibel sind. Besuchen Sie celestron.com für weitere
Informationen.
Lagern Sie den Astrographen nicht, wenn er mit Tau bedeckt
ist. Lassen Sie ihn zuerst trocknen, ohne die Staubschutzhülle
aufzusetzen. Die Lagerung von Optiken in nassem Zustand
fördert die Schimmelbildung auf Glasoberfl ächen.
Reinigung der Optik
Staub, Schmutz und Fingerabdrücke auf der Optik haben
normalerweise nur geringen Einfl uss auf die Bildgebung mit
dem RASA 36 cm. Wenn jedoch die Außenfl ächen der Schmidt-
Korrekturlinse und der Linsengruppe übermäßig verschmutzt
sind, müssen sie gereinigt werden. Staub kann mit einem
Puster oder einer Kamelhaarbürste entfernt werden. Verwenden
Sie dann eine Glas-Reinigungslösung und ein Objektiv-
Reinigungstuch, um verbleibende Rückstände oder Flecken zu
entfernen. Tragen Sie die Lösung auf das Tuch auf und legen
es dann auf das Objektiv. Reinigen Sie die Korrekturlinse
mit geringer Druckanwendung von der Mitte nach außen.
Verwenden Sie für jeden Schritt ein neues Tuch, um keine Öle
oder Fremdkörper zu verteilen. Nicht mit einer Kreisbewegung
reiben.
Die Reinigung kann mit einem im Handel erhältlichen
Linsenreiniger oder einer selbst hergestellten Mischung
vorgenommen werden. Eine geeignete Reinigungslösung ist mit

13 | DEUTSCH
destilliertem Wasser vermischter Isopropylalkohol (99 %). Nehmen
Sie zur Herstellung der Lösung 3 Teile Isopropylalkohol und 2 Teile
destilliertes Wasser. Sie können auch weiches, weißes Papiertuch
anstelle von Objektiv-Reinigungstüchern verwenden, solange es
keine zusätzlichen Lotionen oder Duftstoffe enthält.
Setzen Sie nach dem Gebrauch die Staubkappe wieder auf, um den
Reinigungsbedarf Ihres Astrographen möglichst gering zu halten.
Das Reinigen der internen Glasoberflächen darf nur von der
Celestron-Reparaturabteilung durchgeführt werden. Wenn Ihr
RASA 36 cm eine interne Reinigung benötigt, wenden Sie sich
bitte an Celestron, um sich unter celestron.com/pages/technical-
support eine Rücksende-Genehmigungsnummer geben zu lassen
und den Preis zu erfragen.
Kollimation
Die Optik des RASA 36 cm wurde werksseitig ausgerichtet und
es sollten normalerweise keine Kollimationseinstellungen nötig sein.
Allerdings kann die Neigung der Linsenbaugruppe ggf. angepasst
werden, um das gesamte optische System zu kollimieren.
Der Primärspiegel und die Korrekturlinse sind werksseitig fest
ausgerichtet und können nicht angepasst werden.
Der Astrograph muss mit einer installierten Kamera kollimiert sein.
Es ist ratsam, eine Kamera zu verwenden, die den Lichtweg (d.h.
die Öffnung der Schmidt-Korrekturlinse) nicht behindert, da so die
Konzentrizität bei defokussierten Sternen leichter zu erkennen ist.
Benötigte Hilfsmittel:
2-mm-Sechskantschlüssel
3-mm-Sechskantschlüssel
Montierung und Kameraeinrichtung, aufnahmebereit
1. Befestigen Sie die Kamera am Astrographen.
2. Lösen Sie den Haltering etwas und drehen Sie den
Kameraadapter, sodass die drei geschlitzten Öffnungen den
Zugang zu den Kollimationsschrauben ermöglichen. Ziehen Sie
den Sicherungsring wieder fest.
Kollimations-
schrauben
3. Richten Sie den Astrographen auf Sie einen hellen Stern und
stellen Sie die Kamera scharf. Zentrieren Sie den Stern im
Sichtfeld der Kamera. Verwenden Sie nach Möglichkeit den
Polarstern, da dieser sich im Laufe der Zeit nicht viel bewegt.
4. Defokussieren Sie den Stern um etwas 1 Umdrehung des
Fokussierknopfes.
5. Untersuchen Sie die defokussierten Sternmuster. Im kollimierten
Zustand muss das Muster wie ein konzentrischer Donut
aussehen. Wenn das Muster konzentrisch ist, ist keine Einstellung
erforderlich. Wenn sich das „Donut-Loch“ nicht in der Mitte des
Musters befindet, ist eine Anpassung erforderlich.
6. Es gibt drei Kollimationsschrauben-Paare. Jedes Paar wirkt
zusammen als eine Push-Pull-Neigungsverstellung. Passen Sie
die Kollimation an, indem Sie eines der Kollimationsschrauben-
Paare lösen und wieder anziehen. Lösen Sie stets zuerst eine der
Schrauben und ziehen Sie dann die andere an. Stellen Sie jeweils
ein Schraubenpaar ein.
7. Wenn das Sternmuster auf einer Seite dünner ist, stellen Sie die
Kollimationsschrauben so ein, dass sich der Stern zur dünnen
Seite bewegt und stellen Sie dann die Position des Astrographen
ein, um den Stern neu zu zentrieren. Wiederholen Sie diesen
Vorgang, bis das defokussierte Sternenbild konzentrisch ist.
3-mm-
Sechskantschlüssel
2-mm-
Sechskantschlüs-
sel

14 | DEUTSCH
Technische Daten
Optisches Design Rowe-Ackermann Schmidt
Blendenöffnung 355,6 mm
Brennweite 790 mm
Öffnungsverhältnis f/2,2
Zentrale Obstruktion 158 mm (44 % des Durchmessers der Blendenöffnung)
Optische Vergütung Verbesserte Aluminium-Beschichtung, Starbright XLT Mehrfach-
vergütung
Glasfenster 104 mm Ø, abnehmbar
Fokussierer Ultra-Stabiles Fokussiersystem (USFS), minimiert Fokus-Drift
Kühllüfter 12 VDC, MagLev
Tubus-Abmessungen 108 cm Länge, 40,5 cm Durchmesser
Tubus-Gewicht 34 kg
Auflagemaß (von der Oberkante des Linsengruppenge-
häuses)
77,5 mm
Auflagemaß (mit M48-Kameraadapter) 55 mm
Spotgröße < 6,3 μm RMS über das Bildfeld
Wellenlängenbereich 400 - 900 nm
Ausleuchtungs-Abstand von der Achse 83 % bei 30 mm Abstand von der Achse
Bildkreis 60,1 mm Ø, 4,3°
Nutzbares Feld 70 mm Ø, 5,1°, nur minimaler Leistungsabfall am Rand des
Bildfelds
FCC-ERKLÄRUNG: Dieses Gerät wurde getestet und entspricht den
Grenzwerten für digitale Geräte der Klasse B in Übereinstimmung mit Artikel 15
der FCC-Bestimmungen. Diese Grenzwerte sind so ausgelegt, dass sie einen
angemessenen Schutz gegen schädliche Störungen in einer Wohnanlage bieten.
Dieses Gerät erzeugt und verwendet Hochfrequenzenergie und kann diese
abstrahlen und kann, wenn es nicht in Übereinstimmung mit den Anweisungen
installiert und verwendet wird, Störungen im Funkverkehr verursachen. Dennoch
gibt es keine Garantie, dass bei einer bestimmten Installation keine Störungen
auftreten können. Wenn dieses Gerät den Radio- oder Fernsehempfang stört, was
ermittelt werden kann, indem man das Gerät ein- und ausschaltet, so sollte der
Benutzer die Störungen auf eine oder mehrere der folgenden Maßnahmen beheben:
• Neuausrichtung oder Neuplatzierung der Empfangsantenne.
• Den Abstand zwischen dem Gerät und dem Empfänger vergrößern.
• Schließen Sie das Gerät an eine Steckdose an, die nicht an den Stromkreis des
Empfängers angeschlossen ist.
• Wenden Sie sich an den Händler oder einen erfahrenen Radio- oder
Fernsehtechniker.
Dieses Produkt wurde für den Gebrauch durch Personen von 14 Jahren oder älter
entworfen und bestimmt.
GARANTIE
celestron.com/support/warranties
© 2022 Celestron • Alle Rechte Vorbehalten
celestron.com/pages/technical-support
2835 Columbia Street • Torrance, CA 90503 USA
0222

15 | ITALIANO
Manuale di istruzioni telescopio
Modello: 91078
V2

911
10
16 | ITALIANO
Montaggio dell'astrografo
Il RASA 36 cm è dotato di una guida di montaggio a coda di
rondine di tipo CGE, compatibile con montature che accettano
una coda di rondine di tipo CGE o Losmandy-D. L’astrografo
pesa 34 kg, pertanto si consiglia una montatura con una capa-
cità di carico superiore. Ciò garantisce buone prestazioni della
montatura quando vengono aggiunti una fotocamera ed even-
tuali accessori.
Date le dimensioni e il peso, occorrono due persone per spos-
tare e sollevare il RASA 36 cm. All’occorrenza, utilizzare le ma-
niglie sulla cella posteriore.
Per opzioni di montaggio personalizzate, sono presenti due set
di fori di montaggio M8 x 1,25 sulla cella posteriore. Questi uti-
lizzano inserti fi lettati per una resistenza aggiuntiva.
Installazione della fotocamera
L’adattatore per fotocamera M48 in dotazione può essere uti-
lizzato per il montaggio di una fotocamera DSLR. Occorre un
“anello a T largo” da 48 mm per la specifi ca marca di DSLR da
collegare all’adattatore.
Se si utilizza una fotocamera astronomica con un sensore più
piccolo rispetto al “full-frame” (diagonale da 43 mm), è possi-
bile utilizzare l’adattatore per fotocamera M48 in dotazione. Ciò
potrebbe richiedere l’utilizzo di adattatori opzionali, come ad es-
empio un adattatore da M48 a M42 insieme ad anelli adattatori
M48, per collegare la fotocamera e sistemare il relativo sensore
alla distanza di back focus corretta. La distanza di back focus
quando si utilizza l’adattatore M48 è 55 mm.
Fotocamere con sensori più grandi potrebbero richiedere un
adattatore per fotocamera specifi co per illuminare meglio il sen-
sore. Fare riferimento al disegno “Requisiti per adattatore foto-
camera” sul sito web Celestron, disponibile sulla pagina relati-
va all’astrografo Rowe-Ackermann Schmidt da 36 cm sotto la
scheda “Assistenza e download”, per stabilire la confi gurazione
necessaria con la propria fotocamera.
Nota: a causa del cono di luce inclinato proveniente dal siste-
ma ottico f/2.2, l’alloggiamento della fotocamera può provoca-
re vignettatura. Nonostante l’astrografo abbia un ampio campo
visivo illuminato, può verifi carsi la vignettatura con fotocamere
con grandi sensori quando il sensore si trova ben all’interno del
corpo della fotocamera. Questo si verifi ca comunemente con
sensori di DSLR “full-frame”.
Per fi ssare la fotocamera, procedere come segue.
1. Sistemare l'anello di ritegno zigrinato sull'adattatore per foto-
camera e avvittarlo leggermente sull’alloggiamento del grup-
po lenti. La rondella in tefl on va posizionata tra l’anello di rite-
gno e l’adattatore per fotocamera.
2. Avvitare il corpo della fotocamera sull'apposito adattatore.
3. Sostenere con cautela la fotocamera in modo che l’adattatore
poggi orizzontalmente sull’alloggiamento del gruppo lenti.
4. Finire di serrare l’anello di ritegno sull’alloggiamento del
gruppo lenti. Ruotare l’anello fi no a quando l’adattatore del-
Anello
di ritegno
zigrinato
1
34
2
5
7
6
8
Panoramica
1 Gruppo lenti 7 Ventola di raffreddamento
2 Correttore Schmidt 8 Jack 12 V CC per ventola di raffreddamento
3 Alloggiamento gruppo lenti 9 Adattatore fotocamera M48
4 Guida di montaggio a coda di rondine 10 Anello di ritegno con rondella in tefl on
5 Guida accessorio a coda di rondine 11 Gruppo batterie AA x 8 (batterie non in dotazione)
6 Manopola di messa a fuoco
L’astrografo Rowe-Ackermann Schmidt da 36 cm (RASA 36 cm) fornisce un campo visivo piano senza coma o astigmatismo su un ampio cerchio dell’immagine (60 mm)
e un esteso intervallo spettrale (400-900 nm). L'astrografo può essere utilizzato esclusivamente con una fotocamera.

17 | ITALIANO
la fotocamera è premuto contro l’alloggiamento. Non serrare
eccessivamente. L'orientamento della fotocamera può essere
regolato in un secondo momento.
Attenzione: un serraggio eccessivo dell’anello di ritegno può pro-
vocare la rotazione del gruppo lenti rispetto al correttore Sch-
midt. Mantenere l'adattatore per fotocamera premuto contro la
cella delle lenti, ma non serrare eccessivamente l'anello.
Regolazione dell'orientamento del-
la fotocamera
Una volta installata la fotocamera, è possibile regolarne l'orien-
tamento allentando leggermente l'anello di ritegno. Non allen-
tare l'anello per più di 1/8 di giro, ruotare la fotocamera come
desiderato e serrare nuovamente l'anello. Ricordare di non ser-
rare eccessivamente l'anello.
Raffreddamento e funzionamento
della ventola
Le prestazioni ottiche del RASA 36 cm sono ottimali quando ha
raggiunto un equilibrio termico rispetto all'aria circostante. Quanto
maggiore è la differenza di temperatura tra l'astrografo e l'esterno,
tanto maggiore sarà il tempo necessario per il raffreddamento.
È una buona idea conservare l'astrografo in un ambiente
fresco e portarlo all’esterno circa un'ora prima di utilizzarlo.
La cella posteriore del RASA 36 cm è dotata di un impianto
di raffreddamento che impiega una ventola per facilitare il
raffreddamento delle ottiche fi no a raggiungere la temperatura
ambiente. La ventola aspira l'aria attraverso le grate poste sul
perimetro della cella posteriore. La grata previene l'ingresso di
polvere nell'astrografo. Il gruppo batterie fornito in dotazione
fornisce l'alimentazione alla ventola. Sono necessarie 8 batterie
di tipo AA (non fornite in dotazione). Installare le batterie
come indicato nell'alloggiamento in plastica del portabatterie.
Collegare il gruppo batterie al jack vicino alla ventola per
accenderla. Quando le ottiche si sono raffreddate e si è pronti
per catturare le prime immagini, scollegare il gruppo batterie per
spegnere la ventola.
Messa a fuoco
Il focheggiatore sposta lo specchio primario all'interno della
cella posteriore. Il RASA 36 cm V2 utilizza il sistema USFS
(Ultra-Stable Focus System - sistema di messa a fuoco ultra
stabile) che riduce al minimo lo spostamento dello specchio
primario durante la messa a fuoco e durante lunghe esposizioni.
Per mettere a fuoco, ruotare l'apposita manopola fi no a quando
l'immagine non appare nitida nella fotocamera. Se la manopola
non ruota ulteriormente, il focheggiatore ha raggiunto il suo
fi ne corsa. In tal caso ruotare la manopola in direzione opposta
fi no a raggiungere la messa a fuoco. Se si ruota la manopola di
messa a fuoco troppo velocemente, si potrebbe non riuscire a
vedere l'immagine. Per evitare tale problema, provare a mettere
a fuoco una stella luminosa in modo che l'immagine sia visibile
anche se non è messa a fuoco.
Un accessorio essenziale che si potrebbe volere aggiungere è il
motore di messa a fuoco. Il motore di messa a fuoco Celestron
è completamente compatibile con il RASA 36 cm V2. Visitare la
pagina web del motore di messa a fuoco su celestron.com per
maggiori informazioni.
Montaggio degli accessori
Il RASA 36 cm comprende come accessorio una guida a coda
di rondine di tipo CGE che è compatibile anche con gran parte
degli accessori che funzionano con le piastre Losmandy-D. La
guida a coda di rondine può essere utilizzata per montare un
telescopio guida opzionale.
È possibile collegare un cercatore Celestron mediante le
coppie di fori fi lettati sulla cella posteriore dell'astrografo. Tali
fori presentano delle viti con testa a croce quando non in uso.
Fori di
montaggio per
cercatore
Rimozione della fi nestra ottica
Se si utilizza un fi ltro in qualsiasi posizione lungo il percorso
della luce, oppure se la fotocamera è dotata di una fi nestra
ottica, si consiglia di rimuovere la fi nestra ottica dalla cella
anteriore delle lenti. Ciò garantisce prestazioni ottiche ottimali
dell'astrografo. La fi nestra ottica utilizza fi lettature M110 x 0,75
sulla parte esterna dell’alloggiamento.
Per rimuovere la fi nestra ottica procedere come segue.
1. Dopo avere rimosso la fotocamera e l’apposito adattatore,
afferrare con cautela la cella zigrinata della fi nestra ottica.
2. Svitare con attenzione e rimuovere la fi nestra ottica.
Cella zigrinata della
fi nestra ottica
Prevenzione della rugiada
Il correttore Schmidt è particolarmente soggetto a formazione
di condensa poiché il vetro è esposto all’aria aperta. Se la
temperatura dell'astrografo scende al di sotto del punto di
rugiada, potrebbe formarsi della rugiada sul correttore entro
pochi minuti. Il modo più semplice per prevenire la formazione
della rugiada è aggiungere uno schermo contro la rugiada
opzionale da 14", che protegge e isola il correttore. In condizioni
ancora più rigide, è possibile aggiungere un sistema riscaldante
anticondensa che applichi un leggero calore alla lente del
correttore e lo mantenga asciutto durante la notte.
Celestron dispone di una gamma completa di prodotti per
la prevenzione della rugiada compatibili con il RASA 36 cm.
Visitare celestron.com per maggiori informazioni.
Non conservare l'astrografo se è presente della rugiada. Lasciare
asciugare senza sistemare la copertura antipolvere. Conservare
le ottiche quando sono umide favorisce la formazione di muffa
sulle superfi ci ottiche.
Pulizia delle ottiche
Polvere, detriti e impronte sulle ottiche hanno in genere uno
scarso impatto sulle immagini prodotte dal RASA 36 cm. Tuttavia,
se le superfi ci esterne del correttore Schmidt o del gruppo lenti
diventano eccessivamente sporche, occorre pulirle. È possibile
rimuovere la polvere mediante un soffi atore o un pennello di peli
di cammello. Quindi utilizzare una soluzione di pulizia ottica e
un panno per la pulizia delle lenti per rimuovere eventuali detriti
o impronte rimanenti. Applicare la soluzione al panno e quindi
applicare il panno alle lenti. Fare piccole pressioni spostandosi
dal centro del correttore verso il bordo esterno. Utilizzare un
nuovo panno per ogni colpetto, in modo da non diffondere unto
o detriti. Non strofi nare in modo circolare.
È possibile utilizzare una soluzione detergente per lenti
disponibile in commercio o utilizzare la propria miscela. Una
buona soluzione di pulizia è alcol isopropilico (puro al 99%)
mescolato ad acqua distillata. La soluzione deve essere
composta da 3 parti di alcol isopropilico e 2 parti di acqua
distillata. È possibile utilizzare un panno bianco morbido al
posto di un panno per la pulizia delle lenti, se non contiene
lozioni o profumi.

18 | ITALIANO
Per ridurre al minimo la necessità di pulire l’astrografo, riposizionare
la copertura antipolvere una volta terminato di utilizzarlo.
La pulizia delle superfici ottiche interne deve essere eseguita
esclusivamente dal reparto assistenza Celestron. Se il RASA 36 cm
necessita di pulizia interna, contattare Celestron su celestron.com/
pages/technical-support per un numero di autorizzazione al reso e
un preventivo.
Collimazione
Le ottiche del RASA 36 cm sono allineate in fabbrica e, di solito,
non necessitano di regolazioni relative alla collimazione. Tuttavia,
possono essere effettuate regolazioni all'inclinazione del gruppo
lenti, se necessario, per collimare l'intero sistema ottico. Lo specchio
primario e il correttore sono allineati in modo permanente in fabbrica
e non possono essere regolati.
Collimare l'astrografo con la fotocamera installata. Si consiglia
l'utilizzo di una fotocamera che non ostruisca il percorso della luce
(vale a dire l'apertura del correttore Schmidt); ciò facilita la visione
della concentricità quando le stelle sono sfuocate.
Attrezzatura necessaria:
Chiave a brugola da 2 mm
Chiave a brugola da 3 mm
Predisposizione per montatura e fotocamera, pronte per catturare
immagini
1. Installare la fotocamera sull'astrografo.
2. Allentare leggermente l'anello di ritegno e ruotare l'adattatore della
fotocamera in modo che le tre aperture consentano l'accesso alle
viti di collimazione. Serrare nuovamente l'anello di ritegno.
Viti di collimazione
3. Puntare l'astrografo verso una stella luminosa e mettere a fuoco la
fotocamera. Centrare la stella nel campo visivo della fotocamera.
Utilizzare la Stella Polare, se possibile, poiché non si sposta
eccessivamente nel tempo.
4. Sfuocare la stella di circa un giro con la manopola di messa a
fuoco.
5. Ispezionare la figura della stella sfuocata. Una volta effettuata la
collimazione, la figura appare come una ciambella concentrica.
Se la figura è concentrica, non occorre alcuna regolazione.
Se il "foro della ciambella" non è centrato con la figura, allora
occorrono delle regolazioni.
6. Sono presenti tre coppie di viti di collimazione. Ciascuna coppia
lavora insieme per regolare l'inclinazione con sistema "push-pull".
Regolare la collimazione allentando o serrando una coppia delle
viti di collimazione. Allentare sempre prima una delle viti, poi
serrare l'altra. Regolare una coppia di viti alla volta.
7. Se la figura della stella è più debole da una parte, regolare le
viti di collimazione in modo che la stella si sposti verso il lato
debole, quindi regolare la posizione dell'astrografo per centrare
nuovamente la stella. Ripetere ciò fino a quando l'immagine della
stella sfuocata è concentrica.
Chiave a brugola da 3 mm
Chiave a brugola
da 2 mm

19 | ITALIANO
Specifiche
Design ottico Rowe-Ackermann Schmidt
Apertura 355,6 mm
Lunghezza focale 790 mm
Rapporto focale f/2,2
Ostruzione centrale 158 mm (44% del diametro di apertura)
Rivestimenti ottici Alluminio di qualità, multi-rivestimento Starbright XLT
Finestra ottica 104 mm Ø, removibile
Dispositivo di messa a fuoco USFS (Ultra-Stable Focus System), riduce al minimo lo sposta-
mento della messa a fuoco
Ventola di raffreddamento 12 V CC, MagLev
Dimensioni del tubo Lunghezza 108 cm (42,5”), diametro 40,64 cm (16”)
Peso del tubo 34 g (75 lb)
Back focus
(dalla parte superiore dell'alloggiamento lenti)
77,5 mm
Back focus
(con adattatore per fotocamera M48)
55 mm
Dimensioni immagini stellari < 6,3 μm RMS lungo il campo visivo
Intervallo lunghezza d'onda 400 – 900 nm
Illuminazione fuori asse 83% 30 mm fuori asse
Cerchio immagine 60,1 mm Ø , 4,3°
Campo di impiego 70 mm Ø, 5,1°, solo perdita minima di prestazioni sul bordo del
campo visivo
NOTA FCC: La presente apparecchiatura è stata testata ed è risultata
conforme ai limiti imposti per i dispositivi digitali di Classe B, ai sensi della Parte
15 delle Normative FCC. Tali limiti sono stati ideati per fornire un’adeguata
protezione nei confronti di interferenze dannose in installazioni residenziali.
La presente apparecchiatura genera, utilizza e può irradiare energia in radio
frequenza e, se non installata e utilizzata conformemente alle istruzioni,
può causare interferenze dannose alle radiocomunicazioni. Tuttavia, non
esiste alcuna garanzia che l’interferenza non si verifichi in una particolare
installazione. Nel caso in cui la presente apparecchiatura causi interferenze
dannose alla ricezione radio o televisiva, il che potrebbe essere determinato
dall'accensione e dallo spegnimento dell'apparecchiatura, l'utente è incoraggiato
a tentare di correggere l'interferenza mediante una o più delle misure seguenti:
• Riorientare o riposizionare l’antenna di ricezione.
• Aumentare la distanza tra l'apparecchiatura e il ricevitore.
• Collegare l’apparecchiatura a una presa su un circuito diverso da quello a cui è
collegato il ricevitore.
• Collegare il dispositivo a una presa su un circuito diverso da quello a cui è
collegato il ricevitore.
Questo prodotto è progettato per essere utilizzato da persone di età uguale o
superiore ai 14 anni.
GARANZIA
celestron.com/support/warranties
© 2022 Celestron • Tutti i diritti riservati.
celestron.com/pages/technical-support
2835 Columbia Street • Torrance, CA 90503 Stati Uniti
0222

20 | ESPAÑOL
Manual de instrucciones del telescopio
Modelo: 91078
V2
Seite wird geladen ...
Seite wird geladen ...
Seite wird geladen ...
Seite wird geladen ...
-
 1
1
-
 2
2
-
 3
3
-
 4
4
-
 5
5
-
 6
6
-
 7
7
-
 8
8
-
 9
9
-
 10
10
-
 11
11
-
 12
12
-
 13
13
-
 14
14
-
 15
15
-
 16
16
-
 17
17
-
 18
18
-
 19
19
-
 20
20
-
 21
21
-
 22
22
-
 23
23
-
 24
24


in anderen Sprachen
- English: Celestron 91078 User manual
- français: Celestron 91078 Manuel utilisateur
- español: Celestron 91078 Manual de usuario
- italiano: Celestron 91078 Manuale utente
Verwandte Artikel
-
Celestron 94050 Benutzerhandbuch
-
Celestron 22470 Benutzerhandbuch
-
-
Celestron AstroMaster EQ Telescope Series Benutzerhandbuch
-
Celestron 22065 Benutzerhandbuch
-
Celestron PowerSeeker 50AZ Bedienungsanleitung
-
Celestron Power Seeker 80eq Benutzerhandbuch
-
Celestron 21063 Bedienungsanleitung
-
-
