
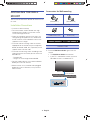
For further information, refer to the Web Manual.
Web manual : www.Samsung.com Support
Product name search
HW-K360
User Manual
HW-K360

· 1 · English
SAFETY INFORMATION
SAFETY WARNINGS
TO REDUCE THE RISK OF ELECTRIC SHOCK, DO NOT REMOVE THE COVER (OR BACK).
NO USER-SERVICEABLE PARTS ARE INSIDE. REFER SERVICING TO QUALIFIED SERVICE PERSONNEL.
CAUTION
RISK OF ELECTRIC SHOCK
DO NOT OPEN.
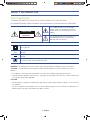
This symbol indicates that high voltage is
present inside. It is dangerous to make any
kind of contact with any internal part of this
product.
This symbol indicates that this product has
included important literature concerning
operation and maintenance.
Class II product : This symbol indicates that it does not require a safety connection to electrical
earth (ground).
AC voltage : This symbol indicates that the rated voltage marked with the symbol is AC
voltage.
DC voltage : This symbol indicates that the rated voltage marked with the symbol is DC
voltage.
Caution, Consult Instructions for use : This symbol instructs the user to consult the user
manual for further safety related information.
WARNING : To reduce the risk of fire or electric shock, do not expose this appliance to rain or moisture.
CAUTION : TO PREVENT ELECTRIC SHOCK, MATCH WIDE BLADE OF PLUG TO WIDE SLOT, FULLY
INSERT.
• This apparatus shall always be connected to a AC outlet with a protective grounding connection.
• To disconnect the apparatus from the mains, the plug must be pulled out from the mains socket, therefore the
mains plug shall be readily operable.
CAUTION
• Do not expose this apparatus to dripping or splashing. Do not put objects filled with liquids, such as vases on
the apparatus.
• To turn this apparatus off completely, you must pull the power plug out of the wall socket. Consequently, the
power plug must be easily and readily accessible at all times.

· 2 · English
PRECAUTIONS
1. Ensure that the AC power supply in your house complies with the power requirements listed on the identification
sticker located on the back of your product. Install your product horizontally, on a suitable base (furniture), with
enough space around it for ventilation (7~10 cm). Make sure the ventilation slots are not covered. Do not place the
unit on amplifiers or other equipment which may become hot. This unit is designed for continuous use. To fully turn
off the unit, disconnect the AC plug from the wall outlet. Unplug the unit if you intend to leave it unused for a long
period of time.
2. During thunderstorms, disconnect the AC plug from the wall outlet. Voltage peaks due to lightning could damage
the unit.
3. Do not expose the unit to direct sunlight or other heat sources. This could lead to overheating and cause the unit
to malfunction.
4. Protect the product from moisture (i.e. vases), and excess heat (e.g. a fireplace) or equipment creating strong
magnetic or electric fields. Disconnect the power cable from the AC supply if the unit malfunctions. Your product is
not intended for industrial use. It is for personal use only. Condensation may occur if your product has been stored
in cold temperatures. If transporting the unit during the winter, wait approximately 2 hours until the unit has reached
room temperature before using.
5. The batteries used with this product contain chemicals that are harmful to the environment.
Do not dispose of batteries in the general household trash. Do not dispose of batteries in a fire. Do not short circuit,
disassemble, or overheat the batteries. There is a danger of explosion if the battery is incorrectly replaced. Replace
only with the same or equivalent type.
WARNING, DO NOT INGEST BATTERY, CHEMICAL BURN HAZARD,
The remote control supplied with this product contains a coin/button cell battery. If the coin/button cell battery is
swallowed, it can cause severe internal burns in just 2 hours and can lead to death. Keep new and used batteries
away from children. If the battery compartment does not close securely, stop using the product and keep it away from
children. If you think batteries might have been swallowed or placed inside any part of the body, seek immediate
medical attention.
AH68-02608K-HW-K360-EN-ENG-01-0630.indd 2 2016/7/5 14:05:21

· 3 · English
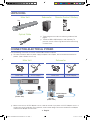
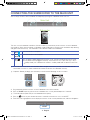
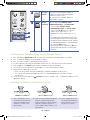
UNPACKING
Main Unit Subwoofer Remote Control / Battery
Optical Cable
c The package also includes wall mounting hardware. See
page 8.
c The Micro USB to USB adapter is sold separately. To
purchase, contact a Samsung Service Center or Samsung
Customer Care.
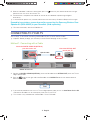
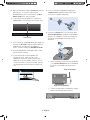
CONNECTING ELECTRICAL POWER
Use the following accessories to connect the Soundbar to electrical power.
c For more information about the power supply and power consumption, refer to the label attached to the
product. (Label : Bottom of main unit)
Main Unit Subwoofer
Power Cord AC/DC Adapter
Power Cord AC/DC Adapter
DIGITAL AUDIO IN
(OPTICAL)
USB (5V 0.5A)
AUX IN
DC 19V
DC 19V
AC/DC Adapter
DC 19V
(Power Jack)
DC 19V
(Power Jack)
AC/DC Adapter
c Make sure to rest the AC/DC Adapters flat on a table or the floor. If you place an AC/DC Adapter so that it is
hanging with the AC cord input facing upwards, water or other foreign substances could enter the Adapter
and cause the Adapter to malfunction.
Top
AH68-02608K-HW-K360-EN-ENG-01-0630.indd 3 2016/7/5 14:05:22

· 4 · English
CONNECTING THE SUBWOOFER TO THE MAIN UNIT
You can enjoy rich bass tones and better sound quality by linking the subwoofer to the main unit.
Main Unit
Subwoofer
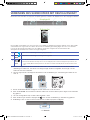
The main unit and subwoofer should link (connect wirelessly) automatically when the main unit and subwoofer
are turned on. When auto-connection is complete, the blue indicator on the rear of the subwoofer stops blinking
and glows blue continuously. The subwoofer's LED indicator modes are listed below:
1
blue
Auto-connection is complete.
2
blue
blinking
Auto-connection is not complete.
3
blue
is not lit
a. Is the power cord plugged into the outlet? If not, connect the power plug to the outlet.
b. If the power cord is plugged in correctly, check the main unit. If your main unit is off (in
standby mode), the subwoofer will also be in standby mode and the blue LED won't be
lit.
c If the indicator on the rear of the subwoofer does not glow continuously in blue, the subwoofer has not
connected. If this occurs, follow the directions below to connect the subwoofer manually.
c Important: Before you begin, put the battery into the remote. See page 12 for instructions.
1. Plug the power cords of the main unit and subwoofer into an AC wall outlet.
2. Press the ID SET button on the rear of the subwoofer with a small, pointed object for 5 seconds.
c The LINK indicator (Blue LED) on the subwoofer blinks quickly.
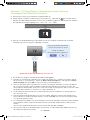
3. Press the button on your remote control for 5 seconds while the main unit is turned OFF.
4. The ID SET message appears on the display of the main unit for a short period of time, and then disappears.
ID SET
AH68-02608K-HW-K360-EN-ENG-01-0630.indd 4 2016/7/5 14:05:24

· 5 · English
5. While the subwoofer's indicator is blinking blue, press the button on your remote control or on the right
side of the main unit to turn on the main unit.
6. The connection is complete if the indicator on the rear of the subwoofer stops blinking and glows
continuously.
c If the connection process fails, the blue indicator will flash continuously. Go back to Step 2 and start again.
Expand to true wireless surround sound by connecting the Samsung Wireless Rear
Speaker Kit (SWA-8000S) to your Soundbar. (Sold separately)
c For further information, refer to the Web Manual.
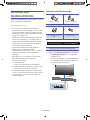
CONNECTING TO YOUR TV
You can enjoy TV sound after connecting the Soundbar to your TV with or without a cable.
c Important: Before you begin, put the battery into the remote. See page 12 for instructions.
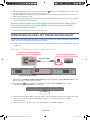
Method 1. Connecting with a Cable
DIGITAL AUDIO IN
(OPTICAL)
USB (5V 0.5A)
AUX IN
DC 19V
OPTICAL OUT
DIGITAL AUDIO IN
(OPTICAL)
Optical Cable
Bottom of main unit
Check the DIGITAL AUDIO IN (OPTICAL)
port of the main unit.
Check the OPTICAL OUT
port of your TV.
1. Connect the DIGITAL AUDIO IN (OPTICAL) jack on the Soundbar to the OPTICAL OUT jack of the TV with
a digital optical cable.
2. Press the
button on the right side of the Soundbar or the SOURCE button on the remote control to
select the D.IN mode.
D.IN
c If you have connected the main unit to a TV with a digital optical cable, you can set Auto Power Link to ON
and have the Soundbar turn on automatically when you turn the TV on.
c This function is only available when the Soundbar is in the D.IN mode.

· 6 · English
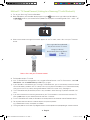
Method 2. TV SoundConnect (Linking to a Samsung TV with Bluetooth)
1. Turn on your Samsung TV and the Soundbar.
2. Select TV mode in your Soundbar display by pressing the button on the right side of the Soundbar or
the SOURCE button on your remote control. (Modes are displayed in the following order: D.IN → AUX → BT
→ TV → USB.)
3. When the connection message shown below appears on the TV screen, select <Yes> with your TV remote
control.
Samsung Audio Device detected.
Do you want to hear TV sound
through this device?
Device Name: [Samsung] Sound...
Yes
No
Select <Yes> with your TV remote control.
4. The Soundbar outputs TV sound.
c If the TV SoundConnect linking process fails, navigate to SoundConnect in the TV's Sound menu, select Add
New Device, and set Add New Device to ON. Then, try again.
c If your Soundbar is connected to your TV through TV SoundConnect, you can conveniently control the volume
with the Soundbar's remote or the TV's remote. You can also have the Soundbar turn on and off automatically
when you turn the TV on or off by setting the Bluetooth POWER On function to On. See page 12.
c The TV SoundConnect (Soundshare) function is only available in some Samsung TV products released since
2012.
c If you want to disconnect the existing connection to your TV and establish a new connection to another TV,
press the p button on your remote control for more than 5 seconds.
c In the TV SoundConnect mode, the Soundbar cannot be paired or connected to another Bluetooth device.
c Do not place electronic devices or metallic objects on top of the product.
e.g., Wired/wireless router, set-top box, or modem.
c Placing the product on the floor may degrade wireless network performance, depending on the floor material.
AH68-02608K-HW-K360-EN-ENG-01-0630.indd 6 2016/7/5 14:05:25

· 7 · English
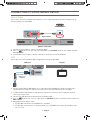
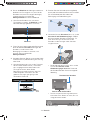
CONNECTING TO AN EXTERNAL DEVICE
Optical Cable
You can enjoy sound from separate external devices such as a BD player/game console/set-top box, etc. by
connecting them to your Soundbar.
DIGITAL AUDIO IN
(OPTICAL)
USB (5V 0.5A)
AUX IN
DC 19V
DIGITAL AUDIO IN
(OPTICAL)
OPTICAL OUT
Bottom of Soundbar
External Device
Optical Cable
1. Connect an Optical Cable as shown in the picture above.
2. Press the
button on the right side of your Soundbar or the SOURCE button on your remote control to
select D.IN mode.
3. The Soundbar shows D.IN on its display and outputs sound from the connected device.
USB
You can play music files located on USB storage devices through the Soundbar.
Micro USB to USB
adapter (not
supplied)
DIGITAL AUDIO IN
(OPTICAL)
USB (5V 0.5A)
AUX IN
DC 19V
USB (5V 0.5A)
Display
USB port
1. Connect a Micro USB to USB adapter with a male USB 2.0 Micro USB plug (Type B) on one end and a
standard female 2.0 USB jack (Type A) on the other end to the micro USB jack on your Soundbar.
c The Micro USB to USB adapter is sold separately. To purchase, contact a Samsung Service Centre or
Samsung Customer Care.
2. Connect your USB device to the female end of the adapter cable.
3. Press the
button on the main unit’s right side or the SOURCE button on the remote control to select the
USB mode.
4. USB appears on the display screen.
•
The Soundbar connection to the USB device is complete.
•
The Soundbar automatically turns off (Auto Power Off) if no USB device has been connected for more
than 5 minutes.

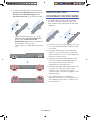
· 8 · English
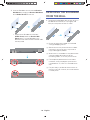
INSTALLING THE WALL
MOUNT
You can use the wall mount bracket to mount this unit
on a wall.
I nstallation Precautions
• Install on a vertical wall only.
• For the installation, avoid a location with high
temperature or humidity, or a wall that cannot
sustain the weight of the set.
• Check the strength of the wall. If the wall is not
strong enough to support the unit, reinforce the
wall or install the unit on a different wall that can
support the unit's weight.
• Purchase and use the fixing screws or anchors
appropriate for the kind of wall you have (plaster
board, iron board, wood, etc.). If possible, fix the
support screws into wall studs.
• Purchase wall mounting screws according to the
type and thickness of the wall you will mount the
Soundbar on.
- Diameter: M5
- Length: 35 mm or longer recommended.
• Connect cables from the unit to external devices
before you install it on the wall.
• Make sure the unit is turned off and unplugged
before you install it. Otherwise, it may cause an
electric shock.
Accessories for Wall-mounting
(Wall Mount L) (Wall Mount R)
Bracket-Wall Mount (2 EA)
Holder-Screw (2 EA) Screw (2 EA)
Wall Mount Guide
1. Place the Wall Mount Guide against the wall
surface.
• The Wall Mount Guide must be level.
• If your TV is mounted on the wall, install the
Soundbar at least 5 cm below the TV.
5 cm or more

· 9 · English
2. Align the Wall Mount Guide's Centre Line with the
centre of your TV (if you are mounting the
Soundbar below your TV), and then fix the Wall
Mount Guide to the wall using tape.
c If you are not mounting below a TV, place the
Centre Line in the centre of the installation area.
Centre Line
3. Push a pen tip or sharpened pencil tip through the
centre of the B-TYPE images on each end of the
Guide to mark the holes for the supporting
screws, and then remove the Wall Mount Guide.
4. Using an appropriately sized drill bit, drill a hole in
the wall at each marking.
c If the markings do not correspond to the
positions of studs, make sure you insert
appropriate anchors or mollies into the holes
before you insert the support screws. If you use
anchors or mollies, make sure the holes you drill
are large enough for the anchors or mollies you
use.
5. Push a screw (not supplied) through each
Holder-Screw, and then screw each screw
firmly into a support screw hole.
6. Use the two Screws (M4 x L14) to attach both
Bracket-Wall Mount L and R to the Soundbar's
bottom. For a proper fit, make sure to align the
bumps on the Soundbar to the holes on the
brackets.
• When assembling, make sure the hanger part
Bracket-Wall Mounts are located behind
the rear of the Soundbar. See the illustration
below.
Rear of Soundbar
Right end of Soundbar
• The left and right mounts are different shapes.
Make sure to position them correctly.
Wall Mount LWall Mount R

· 10 · English
7. Install the Soundbar with the attached Bracket-
Wall Mount by hanging the Bracket-Wall Mount
on the Holder-Screws on the wall.
• Slightly tilt the Soundbar to insert both
Holder-Screw heads into Bracket-Wall
Mount holes. Push the Soundbar in the
direction of the arrow to make sure both sides
are firmly fixed.
D ETACHING THE SOUNDBAR
FROM THE WALL
1. To separate the Soundbar from the wall, push it in
the direction of the arrow, tilt it up slightly, and
then pull it away from the wall as shown.
c Do not hang onto the installed unit and avoid
striking or dropping the unit.
c Secure the unit firmly to the wall so that it does
not fall off. If the unit falls off, it may cause an
injury or damage the product.
c When the unit is installed on a wall, please make
sure that children do not pull any of the
connecting cables, as this may cause it to fall.
c For the optimal performance of a wall mount
installation, install the speaker system at least
5 cm below the TV, if the TV is mounted on the
wall.
c For your safety, if you do not mount the unit on
the wall, install it on a secure, flat surface where it
is unlikely to fall.

· 11 · English
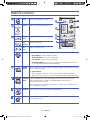
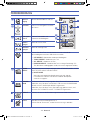
REMOTE CONTROL
1
Power
Turns the Soundbar on and off.
2
Volume
Adjusts the volume level of the unit.
3
Play /
Pause
Plays and pauses a file.
Skip
Forward
Selects the next file.
Skip
Back
Selects the previous file.
Repeat
Press to set the Repeat function during music playback from a USB device.
• OFF-REPEAT : Cancels Repeat Playback.
• TRACK-REPEAT : Plays a track repeatedly.
• ALL-REPEAT : Plays all tracks repeatedly.
• RANDOM-REPEAT : Plays tracks in random order repeatedly. (A track that
has already been played may be played again.)
4
SOUND
EFFECT
You can select from 6 sound modes: STANDARD, MUSIC, CLEAR VOICE, SPORTS,
MOVIE, and NIGHT MODE.
c NIGHT MODE
When changing a channel or music source, the volume difference between
different music input sources is automatically adjusted to be suitable for listening.
5
SURROUND
SOUND
The Surround Sound function adds depth and a sense of space to sound.
Each time you press this button, ON-SURROUND SOUND and OFF-
SURROUND SOUND alternate.
Each time you press and hold this button for 5 seconds, ON-TV REMOTE and
OFF-TV REMOTE alternate.
6
SOURCE
Press to select a source connected to the Soundbar.
7
Mute
Sets the volume temporarily to 0.
Press again to cancel.
1
2
3
4
5
6
7
AH68-02608K-HW-K360-EN-ENG-01-0630.indd 11 2016/7/5 14:05:29

· 12 · English
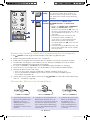
Installing the Battery in the Remote Control
1. Use a suitable coin to turn
the remote control's battery
cover counterclockwise to
remove it as shown in the
figure above.
2. Insert a 3V lithium battery. Keep the
positive (+) pole facing up when
inserting the battery. Put the battery
cover on, and then align the '●'
marks side by side as shown in the
figure above.
3. Use a suitable coin to turn
the remote control battery
cover clockwise as far as it
will go to fix it in place.
Controlling the Soundbar using Your TV Remote Control
1. Press and hold the SOUND button for more than 5 seconds while the Soundbar is turned on.
2. "ON - TV REMOTE" appears on the Soundbar's display.
3. In the TV's menu, set the TV speaker to external speaker.
c TV menus differ by manufacturer and model. Refer to the TV's user manual for further information.
c Only the VOL +/- and MUTE buttons will be available to control the Soundbar.
c This function is not available when the Soundbar is in the TV SoundConnect mode.
c Manufacturers supporting this function:
• VIZIO, LG, Sony, Sharp, PHILIPS, PANASONIC, TOSHIBA, GRUNDIG, Hisense, RCA
• This function may not be compatible with your TV's remote depending on the remote control's
manufacturer.
c To turn off this function, press the SOUND button for 5 seconds. "OFF - TV REMOTE" appears on the
Soundbar's display.
8
Bluetooth
POWER
Press to turn the Bluetooth POWER On
function on and off. When the Bluetooth
POWER On function is on,
ON - BLUETOOTH POWER appears in
the Soundbar’s display.
9
SOUND
CONTROL
You can select from TREBLE, BASS,
SUBWOOFER LEVEL, or AUDIO SYNC.
• Press to select TREBLE, BASS,
SUBWOOFER LEVEL, or AUDIO SYNC.
Then, use the , buttons to adjust the
Treble or Bass volume from -6 ~ +6,
SUBWOOFER LEVEL volume from -12, -6 ~
+6.
• If the video and audio between the TV and
your Soundbar are not synchronized, select
the AUDIO SYNC in Sound Control, and then
set audio delay between 0~300 milliseconds
by using the , buttons.
• Each time you press and hold this button,
ON-POWER LINK and OFF-POWER LINK
alternate.
8
9
AH68-02608K-HW-K360-EN-ENG-01-0630.indd 12 2016/7/5 14:05:30

· 13 · English
TROUBLESHOOTING
Before seeking assistance, check the following.
The unit will not turn on.
Is the power cord plugged into the outlet?
½ Connect the power plug to the outlet.
A function does not work when the button is
pressed.
Is there static electricity in the air?
½ Disconnect the power plug and connect it again.
Sound is not produced.
Is the Mute function on?
½
Press the (Mute) button to cancel the function.
Is the volume set to minimum?
½ Adjust the Volume.
The remote control does not work.
Are the batteries drained?
½ Replace with new batteries.
Is the distance between the remote control and main
unit too far?
½ Move closer to the unit.
The TV SoundConnect (TV pairing) failed.
Does your TV support TV SoundConnect?
½ TV SoundConnect is supported by some
Samsung TVs released from 2012 on. Check
your TV to see if it supports TV SoundConnect.
Is your TV firmware the latest version?
½ Update your TV with the latest firmware.
Does an error occur when connecting?
½ Contact the Samsung Call Centre.
Reset the TV mode and connect again.
½ Press and hold the & button for 5 seconds to
reset the TV SoundConnect connection.
The blue indicator on the rear of the subwoofer
is not lit and the subwoofer is not producing
sound.
Is the main unit power on?
½ Check the power cord. If the power cord is
plugged in correctly, check the main unit. If your
main unit is off (in standby mode), the subwoofer
will also be in standby mode and the blue LED
won't be lit.
Your subwoofer may not be connected to the main
unit of the product.
½ Try to connect your subwoofer again.
LICENSE
Manufactured under license from Dolby
Laboratories. Dolby, Dolby Audio, Pro Logic, and
the double-D symbol are trademarks of Dolby
Laboratories.
For DTS patents, see http://patents.dts.com.
Manufactured under license from DTS Licensing
Limited. DTS, the Symbol, DTS in combination with
the Symbol, and DTS 2.0 Channel are registered
trademarks or trademarks of DTS, Inc. in the United
States and/or other countries. © DTS, Inc. All Rights
Reserved.

· 14 · English
OPEN SOURCE LICENCE NOTICE
To send inquiries and requests regarding open sources, contact Samsung via Email ([email protected]).
IMPORTANT NOTE ABOUT SERVICE
• Figures and illustrations in this User Manual are provided for reference only and may differ from actual product
appearance.
• An administration fee may be charged if either
a. an engineer is called out at your request and there is no defect with the product (i.e. where the user manual
has not been read).
b. you bring the unit to a repair centre and there is no defect with the product (i.e. where the user manual has
not been read).
• You will be informed of the administration fee amount before a technician visits.
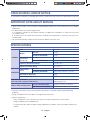
SPECIFICATIONS
GENERAL
USB
5V / 0.5A
Weight
Main Unit
1.5 Kg
Subwoofer (PS-WK360)
2.9 Kg
Dimensions
(W x H x D)
Main Unit
907.5 x 53.5 x 70.5 mm
Subwoofer (PS-WK360)
155.0 x 300.0 x 293.0 mm
Operating Temperature Range
+5°C to +35°C
Operating Humidity Range
10 % to 75 %
AMPLIFIER
Rated Output
Power
Main Unit
35 W/CH x 2, 6 ohm, THD=10%, 1 kHz
Subwoofer (PS-WK360)
60 W, 3 ohm, THD=10%, 100 Hz
S/N Ratio (Analog Input)
65 dB
Separation (1kHz)
65 dB
Supported play formats
(DTS 2.0 sound is played in DTS format.)
LPCM 2ch, Dolby Audio™ (supporting
Dolby® Digital), DTS
Wireless device output power
BT max transmitter power
100mW at 2.4GHz – 2.4835GHz
SRD max transmitter power
25mW at 2405.35MHz – 2477.35MHz
• Distortion, and usable sensitivity are based on measurements using AES (Audio Engineering Society)
guidelines.
• Design and specifications are subject to change without prior notice.
• Nominal specification
– Samsung Electronics Co., Ltd reserves the right to change the specifications without notice.
– Weight and dimensions are approximate.
– For more information about the power supply and power consumption, refer to the label attached to the
product.

· 15 · English
• Hereby, Samsung Electronics, declares that this equipment is in compliance with
Directive 2014/53/EU.
The full text of the EU declaration of conformity is available at the following internet
address: http://www.samsung.com go to Support > Search Product Support and
enter the model name.
This equipment may be operated in all EU countries.
[Correct disposal of batteries in this product]
(Applicable in countries with separate collection systems)
This marking on the battery, manual or packaging indicates that the
batteries in this product should not be disposed of with other household
waste at the end of their working life. Where marked, the chemical
symbols Hg, Cd or Pb indicate that the battery contains mercury, cadmium
or lead above the reference levels in EC Directive 2006/66.
If batteries are not properly disposed of, these substances can cause harm
to human health or the environment.
To protect natural resources and to promote material reuse, please
separate batteries from other types of waste and recycle them through
your local, free battery return system.
Correct Disposal of This Product
(Waste Electrical & Electronic Equipment)
(Applicable in countries with separate collection systems)
This marking on the product, accessories or literature indicates that
the product and its electronic accessories (e.g. charger, headset, USB
cable) should not be disposed of with other household waste at the
end of their working life. To prevent possible harm to the environment
or human health from uncontrolled waste disposal, please separate
these items from other types of waste and recycle them responsibly to
promote the sustainable reuse of material resources.
Household users should contact either the retailer where they purchased
this product, or their local government office, for details of where and how
they can take these items for environmentally safe recycling.
Business users should contact their supplier and check the terms and
conditions of the purchase contract. This product and its electronic
accessories should not be mixed with other commercial wastes for disposal.
For information on Samsung’s environmental commitments and product specific regulatory obligations e.g. REACH, WEEE, Batteries, visit:
http://www.samsung.com/uk/aboutsamsung/samsungelectronics/corporatecitizenship/data_corner.html

· 1 · Deutsch
SICHERHEITSINFORMATIONEN
SICHERHEITSHINWEISE
ZUR VERMEIDUNG VON STROMSCHLÄGEN DARF DIESES GERÄT NICHT GEÖFFNET WERDEN.
IM INNEREN BEFINDEN SICH KEINE VOM BENUTZER ZU WARTENDEN TEILE. LASSEN SIE REPARATUREN
NUR VON QUALIFIZIERTEM FACHPERSONAL DURCHFÜHREN.
ACHTUNG
GEFAHR ELEKTRISCHER
SCHLÄGE! GERÄT NICHT
ÖFFNEN!
Dieses Symbol zeigt an, dass im Inneren
Hochspannung vorhanden ist. Es ist gefährlich,
Teile im Inneren dieses Bildschirms zu
berühren.
Dieses Symbol weist darauf hin, dass diesem
Gerät wichtige Anweisungen zum Betrieb und
zur Wartung beigefügt sind.
Produkt der Klasse II: Dieses Symbol zeigt an, dass kein Schutzkontakt für die Erdung
erforderlich ist.
Wechselspannung: Dieses Symbol zeigt an, dass es sich bei der angegebenen
Nennspannung um Wechselspannung handelt.
Gleichspannung: Dieses Symbol zeigt an, dass es sich bei der angegebenen Nennspannung
um Gleichspannung handelt.
Achtung, vor der Benutzung die Bedienungsanleitung lesen: Dieses Symbol weist den
Benutzer darauf hin, die Bedienungsanleitung für Informationen bezüglich der Sicherheit zu
lesen.
WARNUNG: Schützen Sie das Gerät vor Regen und Feuchtigkeit, um die Gefahr von Bränden oder
Stromschlägen zu verringern.
ACHTUNG: UM STROMSCHLÄGE ZU VERMEIDEN, STECKEN SIE DEN STECKER FEST UND VOLLSTÄNDIG
IN DIE STECKDOSE.
• Dieses Gerät muss stets an geerdete Steckdosen angeschlossen werden.
• Entfernen Sie den Stecker aus der Steckdose, um das Gerät vollständig abzuschalten. Aus diesem Grund
sollte sich der Netzstecker in Reichweite befinden.
ACHTUNG
• Das Gerät keinem Spritz- oder Tropfwasser aussetzen. Keine mit Flüssigkeiten gefüllten Behälter, wie Vasen,
auf das Gerät stellen.
• Um das Gerät vollständig auszuschalten, muss der Netzstecker aus der Steckdose gezogen werden. Somit
muss der Netzstecker immer bequem erreichbar sein.

· 2 · Deutsch
VORSICHTSMASSNAHMEN
1. Stellen Sie sicher, dass die Netzspannung in Ihrem Haushalt mit den auf dem Informationsetikett auf der
Geräterückseite angegebenen Anforderungen übereinstimmt. Stellen Sie Ihr Produkt horizontal auf einer
geeigneten Unterlage (Möbel) auf, sodass rundherum ausreichend Platz (7 - 10 cm) zur Belüftung bleibt. Stellen Sie
sicher, dass die Belüftungsschlitze nicht verdeckt sind. Stellen Sie das Gerät nicht auf Verstärker oder andere
Geräte, die heiß werden können. Das Gerät ist für Dauerbetrieb eingerichtet. Um das Gerät vollständig
auszuschalten, den Stecker aus der Steckdose ziehen. Ziehen Sie den Netzstecker des Geräts, wenn Sie
beabsichtigen, es für längere Zeit nicht zu nutzen.
2. Ziehen Sie bei Gewittern das Stromkabel aus der Steckdose. Durch Blitze verursachte Spannungsspitzen können
zur Beschädigung des Geräts führen.
3. Halten Sie das Gerät von direkter Sonneneinstrahlung oder anderen Wärmequellen fern. Dies kann zu einer
Überhitzung und Fehlfunktion des Geräts führen.
4. Schützen Sie das Produkt vor Feuchtigkeit (z. B. Vasen), übermäßiger Hitze (z. B. Kamine) oder Geräten, die starke
magnetische oder elektrische Felder erzeugen. Ziehen Sie bei einer Fehlfunktion des Geräts das Netzkabel aus der
Steckdose. Ihr Produkt ist nicht für den gewerblichen Einsatz vorgesehen. Dieses Produkt ist nur für den
persönlichen Gebrauch bestimmt. Wenn das Gerät bei kalten Temperaturen aufbewahrt wurde, kann Kondensation
auftreten. Wenn Sie das Gerät bei kalten Temperaturen transportiert haben, warten Sie mit der Inbetriebnahme
circa 2 Stunden, bis das Gerät Raumtemperatur erreicht hat.
5. Die in diesem Produkt verwendeten Batterien enthalten umweltschädliche Chemikalien. Entsorgen Sie die Batterien
nicht über den Hausmüll. Die Batterien nicht ins Feuer werfen. Die Batterien nicht kurzschließen, öffnen oder
überhitzen. Wenn die Batterie falsch ausgewechselt wird, besteht Explosionsgefahr. Verwenden Sie ausschließlich
Batterien des entsprechenden Typs.
WARNUNG, DIE BATTERIE NICHT VERSCHLUCKEN, VERÄTZUNGSGEFAHR.
Die mit diesem Gerät gelieferte Fernbedienung verfügt über eine Knopfzellen-Batterie. Bei Verschlucken der
Knopfzellen-Batterie kann es innerhalb von nur 2 Stunden zu ernsthaften inneren Verätzungen kommen, die zum Tode
führen können. Halten Sie neue und verbrauchte Batterien von Kindern fern. Wenn sich das Batteriefach nicht richtig
schließen lässt, die Benutzung des Geräts einstellen und von Kindern fernhalten. Wenn Sie den Verdacht haben, dass
die Batterien verschluckt oder in irgendeine Körperöffnung eingeführt wurden, sofort einen Arzt aufsuchen.
AH68-02608K-HW-K360-EN-GER-01-0630.indd 2 2016/7/5 14:07:03

· 3 · Deutsch
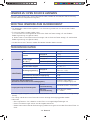
AUSPACKEN
Hauptgerät Subwoofer Fernbedienung / Batterien
Optisches Kabel
c Die Verpackung enthält ebenfalls das Material für die
Wandmontage. Siehe Seite 8.
c Micro-USB-auf-USB-Adapter-Kabel ist nicht im
Lieferumfang enthalten. Um das Kabel zu erwerben,
wenden Sie sich bitte an ein Samsung Service Zentrum
oder den Samsung Kundendienst.
ANSCHLUSS AN DIE STROMVERSORGUNG
Verwenden Sie das folgende Zubehör, um die Soundbar an die Stromversorgung anzuschließen.
c Weitere Informationen zur Stromversorgung und zum Stromverbrauch finden Sie auf dem Etikett am Gerät.
(Beschriftung : Unterseite des Hauptgeräts)
Hauptgerät Subwoofer
Netzkabel Netzteil
Netzkabel Netzteil
DIGITAL AUDIO IN
(OPTICAL)
USB (5V 0.5A)
AUX IN
DC 19V
DC 19V
Netzteil
DC 19V
(Stromanschluss)
DC 19V
(Stromanschluss)
Netzteil
c Stellen Sie sicher, dass das Netzteil gerade auf einer Unterlage oder dem Boden aufliegt. Wenn Sie das
Netzteil so platzieren, dass es mit dem Eingang für das Stromkabel nach oben zeigt, können Wasser oder
andere Fremdkörper in das Netzteil eindringen und eine Fehlfunktion des Netzteils hervorrufen.
Oben
AH68-02608K-HW-K360-EN-GER-01-0630.indd 3 2016/7/5 14:07:04

· 4 · Deutsch
VERBINDEN DES SUBWOOFERS MIT DEM HAUPGERÄT
Sie können einen tiefen Bass und bessere Tonqualität genießen, indem Sie den Subwoofer mit dem Hauptgerät verbinden.
Hauptgerät
Subwoofer
Die Soundbar und der Subwoofer sollten automatisch eine (kabellose) Verbindung zueinander aufbauen, wenn die Soundbar
und der Subwoofer eingeschaltet sind. Wenn die automatische Verbindungsherstellung abgeschlossen ist, hört die blaue
Leuchte auf der Rückseite des Subwoofers auf zu blinken, und leuchtet stetig blau auf. Die Zustände der LED-
Anzeigenleuchte des Subwoofers werden nachfolgend aufgeführt:
1
Blau
Automatische Verbindungsherstellung abgeschlossen.
2
Blau
blinkt
Automatische Verbindungsherstellung wird ausgeführt.
3
Blau
leuchtet
nicht
a. Ist der Netzstecker an eine Steckdose angeschlossen? Falls nicht, den Netzstecker an die Steckdose anschließen.
b. Wenn das Stromkabel korrekt angeschlossen ist, das Hauptgerät prüfen. Wenn das Hauptgerät ausgeschaltet ist (oder
sich im Standby-Modus befindet), befindet sich der Subwoofer ebenfalls im Standby-Modus und die blaue LED leuchtet
nicht.
c Wen die Anzeigeleuchte auf der Rückseite des Subwoofers nicht kontinuierlich blau leuchtet, besteht keine
Verbindung zum Subwoofer. Falls dieser Fall vorliegt, befolgen Sie die nachfolgenden Anweisungen, um den
Subwoofer manuell zu verbinden.
c Wichtig: Legen Sie bevor Sie beginnen die Batterien in die Fernbedienung ein. Die Anleitung dazu finden Sie auf
Seite 12.
1. Stecken Sie die Netzkabel des Hauptgeräts und des Subwoofers in die Steckdose.
2. Halten Sie die ID SET Taste auf der Rückseite des Subwoofers mit einem kleinen spitzen Gegenstand 5 Sekunden
lang gedrückt.
c Die LINK Anzeige (blaue LED) auf dem Subwoofer blinkt schnell.
3. Halten Sie bei ausgeschaltetem Hauptgerät die Taste auf Ihrer Fernbedienung 5 Sekunden lang gedrückt.
4. Die Meldung ID SET erscheint für einen kurzen Moment auf dem Display des Hauptgeräts.
ID SET
AH68-02608K-HW-K360-EN-GER-01-0630.indd 4 2016/7/5 14:07:06
Seite laden ...
Seite laden ...
Seite laden ...
Seite laden ...
Seite laden ...
Seite laden ...
Seite laden ...
Seite laden ...
Seite laden ...
Seite laden ...
Seite laden ...
Seite laden ...
-
 1
1
-
 2
2
-
 3
3
-
 4
4
-
 5
5
-
 6
6
-
 7
7
-
 8
8
-
 9
9
-
 10
10
-
 11
11
-
 12
12
-
 13
13
-
 14
14
-
 15
15
-
 16
16
-
 17
17
-
 18
18
-
 19
19
-
 20
20
-
 21
21
-
 22
22
-
 23
23
-
 24
24
-
 25
25
-
 26
26
-
 27
27
-
 28
28
-
 29
29
-
 30
30
-
 31
31
-
 32
32


in anderen Sprachen
- English: Samsung HW-K360 Quick start guide
Verwandte Papiere
-
Samsung HW-K430 Benutzerhandbuch
-
Samsung HW-K561 Benutzerhandbuch
-
Samsung HW-K450 Benutzerhandbuch
-
Samsung HW-K360 Benutzerhandbuch
-
Samsung SWA-8000S Benutzerhandbuch
-
-
-
Samsung HW-K335 Schnellstartanleitung
-
-