Electrolux EWC1150 Benutzerhandbuch

Kategorie
Waschmaschinen
Typ
Benutzerhandbuch
EWC 1150
EN Washing Machine User Manual 2
DE Waschmaschine Benutzerinformation 27
CONTENTS
1. SAFETY INFORMATION....................................................................................3
2. SAFETY INSTRUCTIONS..................................................................................4
3. PRODUCT DESCRIPTION................................................................................ 6
4. CONTROL PANEL............................................................................................. 7
5. BEFORE FIRST USE......................................................................................... 8
6. DAILY USE......................................................................................................... 9
7. WASHING PROGRAMMES............................................................................. 12
8. CONSUMPTION VALUES................................................................................14
9. HINTS AND TIPS............................................................................................. 15
10. CARE AND CLEANING..................................................................................16
11. TROUBLESHOOTING....................................................................................18
12. TECHNICAL DATA.........................................................................................21
13. INSTALLATION.............................................................................................. 21
14. GUARANTEE ................................................................................................ 25
WE’RE THINKING OF YOU
Thank you for purchasing an Electrolux appliance. You’ve chosen a product that
brings with it decades of professional experience and innovation. Ingenious and
stylish, it has been designed with you in mind. So whenever you use it, you can
be safe in the knowledge that you’ll get great results every time.
Welcome to Electrolux.
Visit our website for:
Get usage advice, brochures, trouble shooter, service information:
www.electrolux.com/webselfservice
Register your product for better service:
www.registerelectrolux.com
Buy Accessories, Consumables and Original spare parts for your appliance:
www.electrolux.com/shop
CUSTOMER CARE AND SERVICE
Always use original spare parts.
When contacting our Authorised Service Centre, ensure that you have the
following data available: Model, PNC, Serial Number.
The information can be found on the rating plate.
Warning / Caution-Safety information
General information and tips
Environmental information
Subject to change without notice.
www.electrolux.com2
1. SAFETY INFORMATION
Before the installation and use of the appliance, carefully
read the supplied instructions. The manufacturer is not
responsible for any injuries or damages that are the
result of incorrect installation or usage. Always keep the
instructions in a safe and accessible location for future
reference.
1.1 Children and vulnerable people safety
This appliance can be used by children aged 8 years
and above and by persons with reduced capabilities
provided that they have been given instruction and/or
supervision regarding the safe use of the appliance
and understand the potential hazards involved.
Do not let children play with the appliance.
Children aged 3 years and under must be kept away
from this appliance when it is in operation at all times.
Keep all packaging away from children and dispose of
it appropriately.
Keep detergents away from children.
Keep children and pets away from the appliance door
when it is open.
Children shall not carry out cleaning and user
maintenance of the appliance without supervision.
1.2 General Safety
Do not change the specification of this appliance.
Do not exceed the maximum load of 3 kg (refer to the
"Programme chart" chapter).
The operating water pressure at the water entry point
from the outlet connection must be between 0.5 bar
(0.05 MPa) and 8 bar (0.8 MPa).
The ventilation opening in the base (if applicable) must
not be covered by a carpet, mat, or any floor covering.
ENGLISH 3
The appliance must be connected to the water mains
using the new supplied hose sets, or other new hose
sets supplied by the Authorised Service Centre.
Old hose sets must not be reused.
If the mains power supply cable is damaged, it must
be replaced by the manufacturer, its Authorised
Service Centre or similarly qualified persons to avoid
an electrical hazard.
Before any maintenance operation, deactivate the
appliance and disconnect the mains plug from the
socket.
Do not use high pressure water sprays and/or steam
to clean the appliance.
Clean the appliance with a moist cloth. Use only
neutral detergents. Do not use abrasive products,
abrasive cleaning pads, solvents or metal objects.
2. SAFETY INSTRUCTIONS
2.1 Installation
Remove all the packaging and the
transit bolts.
Keep the transit bolts in a safe place.
If the appliance is to be moved in
future they must be reattached to lock
the drum to prevent internal damage.
Always take care when moving the
appliance as it is heavy. Always use
safety gloves and enclosed footwear.
Do not install or use a damaged
appliance.
Follow the installation instruction
supplied with the appliance.
Do not install or use the appliance
where the temperature can be less
than 0°C or where it is exposed to the
weather.
The floor area where the appliance is
to be installed must be flat, stable,
heat resistant and clean.
Make sure that there is air circulation
between the appliance and the floor.
Adjust the feet to have the necessary
space between the appliance and the
flooring.
Do not install the appliance where the
appliance door cannot be fully
opened.
Do not put a container to collect
possible water leakage under the
appliance. Contact the Authorised
Service Centre to ensure which
accessories can be used.
2.2 Electrical connection
The appliance must be earthed.
Always use a correctly installed
shockproof socket.
Make sure that the electrical
information on the rating plate agrees
with the power supply. If not, contact
an electrician.
Do not use multi-plug adapters and
extension cables.
Make sure not to cause damage to
the mains plug and to the mains
cable. Should the mains cable need to
be replaced, this must be carried out
by our Authorised Service Centre.
Connect the mains plug to the mains
socket only at the end of the
installation. Make sure that there is
www.electrolux.com4
access to the mains plug after the
installation.
Do not touch the mains cable or the
mains plug with wet hands.
Do not pull the mains cable to
disconnect the appliance. Always pull
the mains plug.
This appliance complies with the
E.E.C. Directives.
2.3 Water connection
Do not cause damage to the water
hoses.
Before connection to new pipes, pipes
not used for a long time, where repair
work has been carried out or new
devices fitted (water meters, etc.), let
the water flow until it is clean and
clear.
Ensure that there are no visible water
leaks during and after the first use of
the appliance.
2.4 Use
WARNING!
Risk of injury, electrical
shock, fire, burns or damage
to the appliance.
This appliance is for household use
only.
Follow the safety instructions on the
detergent packaging.
Do not put flammable products or
items that are wet with flammable
products in, near or on the appliance.
Make sure that all metal objects are
removed from the laundry.
Do not touch the glass door while a
programme is in operation. The glass
can get hot.
2.5 Service
To repair the appliance contact an
Authorised Service Centre.
Use original spare parts only.
2.6 Disposal
WARNING!
Risk of injury or suffocation.
Disconnect the appliance from the
mains electrical and water supplies.
Cut off the mains electrical cable
close to the appliance and dispose of
it.
Remove the door catch to prevent
children or pets from becoming
trapped in the drum.
Dispose of the appliance in
accordance with local requirements
for the disposal of Waste Electrical
and Electronic Equipment (WEEE).
ENGLISH 5
3. PRODUCT DESCRIPTION
3.1 Machine front
1 2
3
4
5
1
Detergent dispenser drawer
2
Control panel
3
Door opening handle
4
Outer door frame
5
Feet for the appliance level
3.2 Machine rear
1
2
4
3
5
1
Drain hose
2
Inlet hose
3
Transit locking devices
4
Electrical lead
5
Feet
www.electrolux.com6
3.3 Detergent dispenser drawer
Compartment for powder or liquid
detergent used for main wash. If
using liquid detergent pour it just
before starting the programme.
When you set a pro‐
gramme with pre‐
wash, put the deter‐
gent for prewashing
phase directly into the
drum.
Compartment for liquid additives
(fabric softener, starch).
Any fabric softener or starching
additives must be poured into the
compartment before starting the
wash programme.
4. CONTROL PANEL
4.1 Control panel description
Baumwolle
Coton
1 76543 82 9
1
Detergent drawer
2
Kurz - Court and Extra Kurz - Extra
Court option button
3
Vorwäsche - Prélavage button
4
Baumwolle Eco - Coton Eco
button
5
Spülen Plus - Rinçage Plus button
6
Start Pause - Marche Pause button
7
Programme progress indicators
8
Schleudern - Essorage reduction
selector
9
Programme selector dial
ENGLISH 7
4.2 Detergent drawer
Detergent drawer has 2 separate
compartments for detergent and fabric
conditioner.
4.3 Time management Kurz -
Court / Extra Kurz - Extra Court
The programme duration can be
decreased from 10 to 30 minutes by
means of this button.
4.4 Vorwäsche - Prélavage
By selecting this option the machine
performs a prewash cycle before the
main wash phase. The washing time will
be prolonged. This option is
recommended for heavily soiled laundry.
4.5 Baumwolle Eco - Coton Eco
You can use this option if you want to
wash normally soiled cottons and
synthetic laundry and save energy at the
same time.
4.6 Spülen Plus - Rinçage Plus
This appliance is designed for saving
energy. If it necessary to rinse the
laundry using an extra quantity of water
(extra rinse), select this option. Some
additional rinses will be performed. This
option is recommended for people who
are allergic to detergents, and in areas
where the water is very soft.
4.7 Start Pause - Marche
Pause
This button allows you to start or to
interrupt the selected programme.
4.8 Indicators
A
B
C
D
E
The light A illuminates when the machine
is performing the washing phase.
The light B illuminates when the machine
is rinsing.
The light C illuminates when the machine
is spinning.
The light D illuminates at the end of the
washing cycle.
The light E indicates if the door can be
opened:
The light is on: the door cannot be
opened.
The light is off: the door can be
opened.
The light is flashing: the door can
soon be opened.
4.9 Spin Reduction Dial
By turning the spin speed selector you
can change the spin speed of the
selected programme or to select
Spülstopp - Arrêt Cuve Pleine or Kein
Schleudern - Sans Essorage option.
4.10 Programme Selector Dial
It allows you to switch the appliance
on/off and/or to select a programme.
5. BEFORE FIRST USE
WARNING!
Remove any material from
the drum.
Run a wash programme without any
load, to clear any residues which may
have been left by the manufacturing
process. Pour approx. 100 ml of
detergent straight into the drum and run
a cotton cycle at 60°C. When the
programme is finished the machine will
be ready to use.
www.electrolux.com8
6. DAILY USE
WARNING!
Refer to Safety chapters.
6.1 Loading the laundry
1. Open the appliance door
2. Put the laundry in the drum, one item
at a time.
3. Shake the items before you put them
in the appliance.
Make sure not to put too much laundry in
the drum.
4. Close the door firmly.
CAUTION!
Make sure that no laundry
stays between the seal and
the door. There is a risk of
water leakage or damage to
the laundry.
6.2 Measure out the detergent
and the fabric softener
Pull out the dispenser drawer until it
stops. Measure out the amount of
detergent required, pour it into the larger
compartment on the left .
If required, pour fabric softener into the
smaller compartment marked (the
amount used must not exceed the
«MAX» mark in the drawer).
Close the drawer gently.
6.3 Select the required
programme by means of the
programme selector dial
Turn the programme selector dial to the
required programme. The selector can
be turned either clockwise or
anticlockwise.
The green light of button Start Pause -
Marche Pause starts to flash
The pilot lights corresponding to all
phases composing the selected
programme are on.
On position Aus - Arrêt the programme is
reset and the machine is switched OFF.
At the end of the programme the selector
dial must be turned to position Aus -
Arrêt to switch the machine off.
If you turn the programme
selector dial to another
programme when the
machine is working, the
lights in the programme
progress display will start to
flash to indicate a wrong
selection. The machine will
not perform the new
selected programme.
ENGLISH 9
6.4 Select the spin speed, rinse
hold or no spin option
Select the spin speed, Rinse Hold option
or No Spin option by turning the spin
speed selector.
The position 1100 rpm for cotton is
equivalent to 900 rpm for the synthetic
and wool programmes and 700 rpm
for the delicate wash programme.
Rinse hold
By selecting this option the water of the
last rinse is not emptied out to prevent
the fabrics from creasing. When the
programme has finished, the lights "D"
and "E" are lit to indicate that the water
must be emptied out (See: 'At the end of
the programme').
No spin
By selecting this option all the spinning
phases are excluded. To be used for
extremely delicate material. The machine
will add some additional rinses to the
cotton and synthetic programmes.
For the maximum spin speed allowed by
each programme, refer to the chapter
'Washing programmes'.
6.5 Select the desired options
Depending on the programme, different
functions can be combined. These must
be selected after choosing the desired
programme and before pressing the
button Start Pause - Marche Pause.
The relevant light will illuminate.
Baumwolle
Coton
If an incorrect option is selected, the
corresponding indicator lamp flashes for
about 2 seconds. For the compatibility of
the options with the washing
programmes, refer to the chapter
'Washing programmes'.
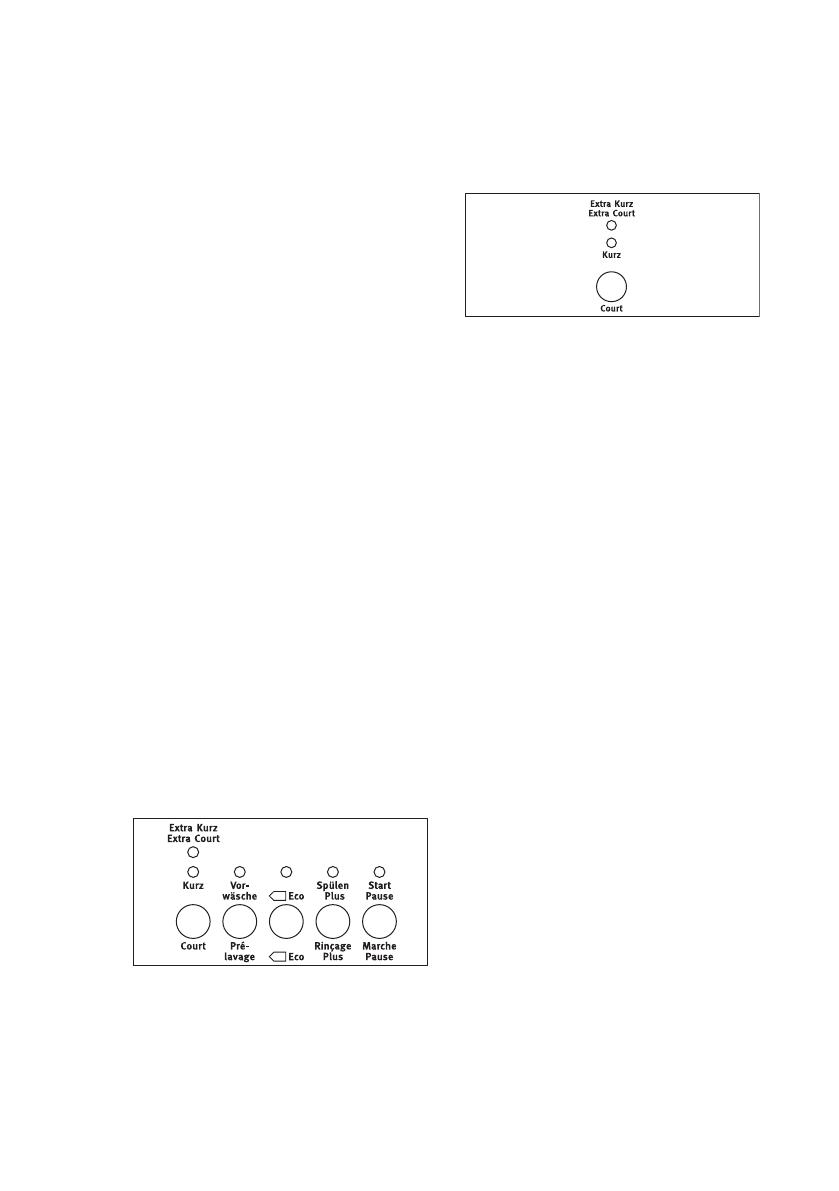
6.6 Select the Quick Options
Before you start the programme you can
decrease the programme duration. Use
this option for items with daily soil. The
related indicator comes on.
By selecting Extra Kurz - Extra Court
the washing time will be reduced approx.
30 minutes for cotton and by 20 minutes
for synthetic. The machine will perform 1
rinse less.
By selecting Kurz - Court the washing
time will be reduced approx. 10 minutes.
This option is recommended for lightly
soiled white-/coloured and synthetic
laundry.
You must select this option after you
have set the programme and before
you press button Start Pause -
Marche Pause.
You can cancel or modify the Quick or
Extra Quick at any moment, before
you press button Start Pause -
Marche Pause.
6.7 Starting the programme
To start the selected programme, press
the button Start Pause - Marche
Pause ; the corresponding pilot light
stops flashing and remains on.
On programme progress display the pilot
lights A and E illuminate to indicate that
the appliance starts operating and the
door is locked.
6.8 Altering an option or a
running programme
It is possible to change any option before
the programme carries it out.
Before you make any change, you must
pause the washing machine by pressing
the button Start Pause - Marche Pause.
www.electrolux.com10
The programme can be changed as long
as the button Start Pause - Marche
Pause has not been pressed. Changing
a running programme is possible only by
resetting it. Turn the programme selector
dial to Aus - Arrêt and then to the new
programme position. Start the new
programme by pressing the button Start
Pause - Marche Pause again.
6.9 Interrupting a programme
Press the button Start Pause - Marche
Pause to interrupt a programme which is
running, the corresponding light starts to
flash. Press the button again to restart
the programme.
6.10 Cancelling a programme
Turn the selector dial to Aus - Arrêt
position to cancel a programme which is
running. Now you can select a new
programme.
6.11 Opening the door after the
programme has started
First set the machine to pause by
pressing the button Start Pause -
Marche Pause.
After some minutes, the door can be
opened, when the following conditions
are observed:
The water temperature is below 55°C.
The water level is below the bottom
edge of the door.
The machine doesn’t spin.
If you cannot open the door but it is
absolutely necessary to open it you have
to switch the machine off by turning the
selector dial to Aus - Arrêt. After few
minutes the door can be opened.(Pay
attention to the water level and
temperature!).
After this procedure, it will be necessary
to set the programme and the options
again and then press the button Start
Pause - Marche Pause.
6.12 At the end of the
programme
The machine stops automatically.
The pilot light D illuminates to indicate
that the programme has finished. The
pilot light E goes out, the door can be
opened and the laundry can be removed.
If at the end of a programme there is
water in the tub (when Spülstopp - Arrêt
Cuve Pleine option has been selected),
to empty out the water follow the
following instructions:
turn the programme selector dial to
Aus - Arrêt
select the Pumpen - Vidange or
Schleudern - Essorage programme
press button Start Pause - Marche
Pause
When the pilot light E goes out, the door
can be opened and the laundry can be
removed.
At the end of the cycle, turn the
programme selector dial to Aus - Arrêt to
switch the machine off.
Remove the laundry from the drum and
carefully check that the drum is empty. If
you do not intend to carry out another
wash, close the water tap.
Leave the door open to prevent the
formation of mildew and unpleasant
smells.
ENGLISH 11
7. WASHING PROGRAMMES
Programme/
Temperature
Type of laundry Available options Description of the
programme
Koch-/Buntwä‐
sche - Couleurs
95°C
White cotton
(heavily and nor‐
mally soiled cotton
items)
Spin reduction/ Kein
Schleudern - Sans
Essorage/ Spül‐
stopp - Arrêt Cuve
Pleine
Extra Kurz - Extra
Court/Kurz - Court
1)
Vorwäsche - Prél‐
avage
Eco
Spülen Plus - Rin‐
çage Plus
Main wash
Rinses
Long spin max.
1100 rpm
Max load 3 kg
Baumwolle Eco -
Coton Eco
2)
60°C - 40°C
White cotton eco
(This programme
can be selected for
slightly or normally
soiled cotton items.
The temperature
will decrease and
the washing time
will be extended.
This allows to ob‐
tain a good washing
efficiency so saving
energy.)
Spin reduction/ Kein
Schleudern - Sans
Essorage/ Spül‐
stopp - Arrêt Cuve
Pleine
Extra Kurz - Extra
Court/Kurz - Court
1)
Vorwäsche - Prél‐
avage
Eco
Spülen Plus - Rin‐
çage Plus
Main wash
Rinses
Long spin max.
1100 rpm
Max load 3 kg
Koch-/Buntwä‐
sche - Couleurs
60°C - Kalt - Froid
Coloured cotton
(normally soiled cot‐
ton items)
Spin reduction/ Kein
Schleudern - Sans
Essorage/ Spül‐
stopp - Arrêt Cuve
Pleine
Extra Kurz - Extra
Court/Kurz - Court
1)
Spülen Plus - Rin‐
çage Plus
Main wash
Rinses
Long spin max.
1100 rpm
Max load 3 kg
www.electrolux.com12
Programme/
Temperature
Type of laundry Available options Description of the
programme
Pflegeleicht - Syn‐
thétique
60°C - 30°C
Synthetic or mixed
fabrics: underwear,
coloured garments,
non-shrink shirts,
blouses.
Spin reduction/ Kein
Schleudern - Sans
Essorage/ Spül‐
stopp - Arrêt Cuve
Pleine
Extra Kurz - Extra
Court/Kurz - Court
1)
Vorwäsche - Prél‐
avage
Eco
Spülen Plus - Rin‐
çage Plus
Main wash
Rinses
Short spin max. 900
rpm
Max Load 1,5 kg
Feinwäsche - Déli‐
cats
40°C - 30°C
Delicate fabrics:
acrylics, viscose,
polyester.
Spin reduction/ Kein
Schleudern - Sans
Essorage/ Spül‐
stopp - Arrêt Cuve
Pleine
Extra Kurz - Extra
Court/Kurz - Court
1)
Vorwäsche - Prél‐
avage
Spülen Plus - Rin‐
çage Plus
Main wash
Rinses
Short spin max. 700
rpm
Max Load 1,5 kg
Wolle - Laine
30°C - Kalt - Froid
Washing pro‐
gramme for ma‐
chine washable
wool.
Spin reduction/ Kein
Schleudern - Sans
Essorage/ Spül‐
stopp - Arrêt Cuve
Pleine
Main wash
Rinses
Short spin max. 900
rpm
Max Load 1 kg
Spülen - Rinçage With this pro‐
gramme it is possi‐
ble to rinse and spin
cotton garments
which have been
washed by hand.
The machine per‐
forms 3 rinses, fol‐
lowed by a final
long spin. The spin
speed can be re‐
duced.
Spin reduction/ Kein
Schleudern - Sans
Essorage/ Spül‐
stopp - Arrêt Cuve
Pleine
Spülen Plus - Rin‐
çage Plus
Rinses
Spin max. 1100 rpm
Max Load 3 kg
Pumpen - Vidange For emptying out
the water of the last
rinse in pro‐
grammes with the
Rinse Hold option
selected.
Draining of water
Max Load 3 kg
ENGLISH 13
Programme/
Temperature
Type of laundry Available options Description of the
programme
Schleudern - Es‐
sorage
Separate spin for
hand washed gar‐
ments and after
programmes with
the Rinse Hold op‐
tion selected. You
can choose the spin
speed by turning
the spin speed se‐
lector to adapt it to
the fabrics to be
spun.
Spin reduction Drain and long spin
Max. spin speed
1100 rpm
Max Load 3 kg
Aus - Arrêt For resetting the programme or switching the machine off
1)
If you select this option, we recommend that you reduce the maximum load. Recommen‐
ded load for cotton is 2 kg. This option cannot be selected together with Economy option.
2)
Standard programmes for the Energy Label consumption values. According to regu‐
lation 1061/2010, these programmes are respectively the «Standard 60 °C cotton pro‐
gramme» and the «Standard 40 °C cotton programme». They are the most efficient pro‐
grammes in terms of combined energy and water consumptions for washing normally soiled
cotton laundry.
8. CONSUMPTION VALUES
The data in this table are approximate. Different variables can affect the
data: the quantity and type of laundry, the water and ambient tempera‐
ture.
Programmes Load
(kg)
Energy
consump‐
tion (kWh)
Water con‐
sumption
(litre)
Approxi‐
mate pro‐
gramme
duration
(minutes)
Remaining
moisture
(%)
1)
Koch-/Buntwäsche
- Couleurs 60°C
3 0,90 45 120 53
Koch-/Buntwäsche
- Couleurs 40°C
3 0,45 45 110 53
Pflegeleicht - Syn‐
thétique 40°C
1,5 0,50 50 80 35
Feinwäsche - Déli‐
cats 40°C
1,5 0,50 52 70 35
Wolle - Laine
30°C
2)
1 0,30 60 75 30
www.electrolux.com14
Programmes Load
(kg)
Energy
consump‐
tion (kWh)
Water con‐
sumption
(litre)
Approxi‐
mate pro‐
gramme
duration
(minutes)
Remaining
moisture
(%)
1)
Standard cotton programmes
Standard 60°C
cotton
3 0,59 42 127 53
Standard 60°C
cotton
1,5 0,54 38 127 53
Standard 40°C
cotton
1,5 0,49 38 137 53
1)
At the end of spin phase.
2)
Not available for some models.
Off Mode (W) Left On Mode (W)
0.10 0.98
The information given in the chart above is compliant with the EU Commission regu‐
lation 1015/2010 implementing directive 2009/125/EC.
9. HINTS AND TIPS
9.1 The laundry load
Divide the laundry in: white, coloured,
synthetics, delicates and wool.
Obey the washing instructions that
are on the laundry care labels.
Do not wash white and coloured items
together.
Some coloured items can discolour
with the first wash. We recommend
that you wash them separately for the
first times.
Button up pillowcases, close zippers,
hooks and poppers. Tie up belts.
Empty the pockets and unfold the
items.
Turn multilayered fabrics, wool and
items with painted illustrations inside
out.
Remove hard stains.
Wash heavy soil stains with a special
detergent.
Be careful with the curtains. Remove
the hooks or put the curtains in a
washing bag or pillowcase.
Do not wash laundry without hems or
with cuts. Use a washing bag to wash
small and/or delicate items (e.g.
underwired bras, belts, tights, etc. ).
A very small load can cause balance
problems with the spin phase. If this
occurs, adjust manually the items in
the tub and start the spin phase
again.
9.2 Stubborn stains
For some stains, water and detergent is
not sufficient.
We recommend that you pre-treat these
stains before you put the items in the
appliance.
Special stain removers are available.
Use the special stain remover that is
applicable to the type of stain and fabric.
ENGLISH 15
9.3 Detergents and additives
Only use detergents and additives
specially made for washing machines:
powder detergents for all types of
fabric,
powder detergents for delicate
fabrics (40 °C max) and woollens,
liquid detergents, preferably for
low temperature wash
programmes (60 °C max) for all
types of fabric, or special for
woollens only.
Do not mix different types of
detergents.
To help the environment, do not use
more than the correct quantity of
detergent.
Obey the instructions that you find on
the on packaging of these products.
Use the correct products for the type
and colour of the fabric, the
programme temperature and the level
of soil.
If your appliance does not have the
detergent dispenser with the flap
device, add the liquid detergents with
a dosing ball (supplied by the
detergent's manufacturer).
9.4 Ecological hints
Set a programme without the prewash
phase to wash laundry with normal
soil.
Always start a washing programme
with the maximum load of laundry
allowed.
If necessary, use a stain remover
when you set a programme with a low
temperature.
To use the correct quantity of
detergent, check the water hardness
of your domestic system. Refer to
"Water hardness".
9.5 Water hardness
If the water hardness in your area is high
or moderate, we recommend that you
use a water softener for washing
machines. In areas where the water
hardness is soft it is not necessary to use
a water softener.
To know the water hardness in your
area, contact your local water authority.
Use the correct quantity of the water
softener. Obey the instructions that you
find on the packaging of the product.
10. CARE AND CLEANING
WARNING!
Refer to Safety chapters.
10.1 External cleaning
Clean the appliance with soap and warm
water only. Fully dry all the surfaces.
CAUTION!
Do not use alcohol, solvents
or chemical products.
10.2 Descaling
If the water hardness in your area is high
or moderate, we recommend that you
use a water descaling product for
washing machines.
Regularly examine the drum to prevent
limescale and rust particles.
To remove rust particles use only special
products for washing machines. Do this
separately from the laundry wash.
Always obey the instructions
that you find on the
packaging of the product.
10.3 Maintenance wash
With the low temperature programmes it
is possible that some detergent stays in
the drum. Perform a maintenance wash
regularly. To do this:
Remove all laundry from the drum.
www.electrolux.com16
Select the cotton programme with the
highest temperature with a small
quantity of detergent.
10.4 Door seal
Regularly examine the seal and remove
all objects from the inner part.
10.5 Cleaning the dispenser
drawer
The washing powder and additive
dispenser drawer should be cleaned
regularly.
1. If necessary, the whole detergent
drawer can be taken out of the
machine for cleaning. You need to
pull it firmly outwards, so that it
comes free of retaining stop.
2. To remove the siphon at the inside
edge of the drawer for cleaning, you
need to press it inwards and pull it
upwards at the same time. Flush it
out under a tap, to remove any traces
of accumulated powder. When you
put it back, press it downwards until
you hear a distinct click.
10.6 Cleaning the drawer
recess
Having removed the drawer, use a small
brush to clean the recess, ensuring that
all washing powder residue is removed
from the upper and lower part of the
recess.
Replace the drawer and run the rinse
programme without any clothes in the
drum.
ENGLISH 17
10.7 Cleaning the inlet hose and the valve filter
1.
1
2
3
2.
3. 4.
45°
20°
10.8 The dangers of freezing
If the machine is exposed to
temperatures below 0°C, certain
precautions should be taken.
Turn off the water supply.
Unscrew the inlet hose from the
supply tap.
Select a wash programme, start the
machine and let the programme run
for a short time.
Interrupt the programme by turning
the programme selector to Aus - Arrêt
position.
Place the end of inlet and drain hoses
down low, into the waste gully (floor
drain) set into the floor. Make sure
that the end of the hose does not go
below the water level in the gully's
(drain's) water tap.
Select the programme "Drain" and let
it run until it is finished.
Turn the programme selector to Aus -
Arrêt position. When you intend to
start the machine up again, make
sure that the room temperature is
above 0 °C.
The appliance is only to be used and
stored indoors at normal room
temperature. The manufacturer is not
responsible for any frost damage.
11. TROUBLESHOOTING
WARNING!
Refer to Safety chapters.
11.1 Introduction
Certain problems are due to lack of
simple maintenance or oversights, which
can be solved easily without calling out
an engineer. Before contacting your
www.electrolux.com18
Authorised Service Centre, please carry
out the checks listed below.
During machine operation it is possible
that the End pilot light blinks to indicate
that the machine is not working:
1 flash: problem with the water
supply.
2 flashes: problem with the water
draining.
4 flashes: door open.
Once the problem has been eliminated,
press the button START to restart the
programme. If after all checks, the
problem persists, contact your
Authorised Service Centre.
11.2 Possible failures
Problem Possible cause/Solution
The machine does not
start:
The door has not been closed.
Close the door firmly.
The plug is not properly inserted in the power socket.
Insert the plug into the power socket.
There is no power at the socket.
Please check your domestic electrical installation.
The main fuse has blown.
Replace the fuse.
The selector dial is not correctly positioned and the but‐
ton Start has not been pressed.
Please turn the selector dial and press the button
Start again.
The machine does not
fill:
The water tap is closed.
Open the water tap.
The inlet hose is squashed or kinked.
Check the inlet hose connection.
The filter in the inlet hose is blocked.
Clean the water inlet hose filter.
The door is not properly closed.
Close the door firmly.
The machine fills then
empties immediately:
The end of the drain hose is too low.
Refer to relevant paragraph in «Installation» chapter.
The machine does not
empty and/or does not
spin:
The drain hose is squashed or kinked.
Check the drain hose connection.
An option or a programme that ends with the water still
in the tub or that eliminates all the spinning phases has
been selected.
Select the draining or spinning programme.
The laundry is not evenly distributed in the drum.
Redistribute the laundry.
ENGLISH 19
Problem Possible cause/Solution
There is water on the
floor:
Too much detergent or unsuitable detergent (creates too
much foam) has been used.
Reduce the detergent quantity or use another one.
Check whether there are any leaks from one of the inlet
hose fittings. It is not always easy to see this as the wa‐
ter runs down the hose; check to see if it is damp.
Check the water inlet hose connection.
The drain or inlet hose is damaged.
Change it with a new one.
Unsatisfactory washing
results:
Too little detergent or unsuitable detergent has been
used.
Increase the detergent quantity or use another one.
Stubborn stains have not been treated prior to washing.
Use commercial products to treat the stubborn stains.
The correct temperature was not selected.
Check if you have selected the correct temperature.
Excessive laundry load.
Reduce the laundry load.
The door will not open: The programme is still running.
Wait the end of washing cycle.
The door lock has not been released.
Wait until the indicator light for door locked has gone
out.
There is water in the drum.
Select drain or spin programme to empty out the wa‐
ter.
The machine vibrates is
noisy:
The transit bolts and packing have not been removed.
Check the correct installation of the appliance.
The support feet have not been adjusted
Check the correct levelling of the appliance.
The laundry is not evenly distributed in the drum.
Redistribute the laundry.
Maybe there is very little laundry in the drum.
Load more laundry.
www.electrolux.com20
  • Page 1 1
  • Page 2 2
  • Page 3 3
  • Page 4 4
  • Page 5 5
  • Page 6 6
  • Page 7 7
  • Page 8 8
  • Page 9 9
  • Page 10 10
  • Page 11 11
  • Page 12 12
  • Page 13 13
  • Page 14 14
  • Page 15 15
  • Page 16 16
  • Page 17 17
  • Page 18 18
  • Page 19 19
  • Page 20 20
  • Page 21 21
  • Page 22 22
  • Page 23 23
  • Page 24 24
  • Page 25 25
  • Page 26 26
  • Page 27 27
  • Page 28 28
  • Page 29 29
  • Page 30 30
  • Page 31 31
  • Page 32 32
  • Page 33 33
  • Page 34 34
  • Page 35 35
  • Page 36 36
  • Page 37 37
  • Page 38 38
  • Page 39 39
  • Page 40 40
  • Page 41 41
  • Page 42 42
  • Page 43 43
  • Page 44 44
  • Page 45 45
  • Page 46 46
  • Page 47 47
  • Page 48 48
  • Page 49 49
  • Page 50 50
  • Page 51 51
  • Page 52 52
  • Page 53 53
  • Page 54 54
  • Page 55 55
  • Page 56 56

Electrolux EWC1150 Benutzerhandbuch

Kategorie
Waschmaschinen
Typ
Benutzerhandbuch

in anderen Sprachen