POLYTRON HDI 2 SDI Bedienungsanleitung
- Kategorie
- Videoschalter
- Typ
- Bedienungsanleitung

1
HD IP Decoder – 2x IP/ASI in 2x SDI + IP
HD IP Decoder – 2x IP/ASI into 2x SDI + IP
HDI 2 SDI
Bedienungsanleitung
User Manual
0902162

2
Montage- und Sicherheitshinweise

3
Mounting and safety instructions

4
ACHTUNG
Diese Baugruppe enthält ESD-Bauteile! (ESD = Elektrostatisch empfindliches Bauteil)
Eine elektrostatische Entladung ist ein elektrischer Stromimpuls, der, ausgelöst durch große
Spannungsdifferenz, auch über ein normalerweise elektrisch isolierendes Material fließen kann.
Um die Zuverlässigkeit von ESD-Baugruppen gewährleisten zu können, ist es notwendig, beim Umgang damit die
wichtigsten Handhabungsregeln zu beachten:
Elektrostatisch empfindliche Baugruppen dürfen nur an elektrostatisch geschützten Arbeitsplätzen (EPA) verarbeitet
werden!
Auf ständigen Potenzialausgleich achten!
Personenerdung über Handgelenk- und Schuherdung sicherstellen!
Elektrostatisch aufladbare Materialien wie normales PE, PVC, Styropor, etc. vermeiden!
Elektrostatische Felder >100 V/cm vermeiden!
Nur gekennzeichnete und definierte Verpackungs- und Transportmaterialien einsetzen!
Schäden durch fehlerhaften Anschluss und/oder unsachgemäße Handhabung sind von jeglicher Haftung
ausgeschlossen.
Entsorgung
Elektronische Geräte gehören nicht in den Hausmüll, sondern müssen, gemäß Richtlinie 2002/96/EG des
Europäischen Parlaments und des Rates vom 27. Januar 2003 über Elektro- und Elektronik-Altgeräte (WEEE),
fachgerecht entsorgt werden. Der Verbraucher ist gesetzlich verpflichtet, elektrische und elektronische Geräte sowie
Batterien am Ende ihrer Lebensdauer an den dafür eingerichteten, öffentlichen Sammelstellen oder an die
Verkaufsstelle zurückzugeben.
WEEE-Reg.-Nr. DE 51035844
ALLGEMEINE HINWEISE ZUR BEDIENUNGSANLEITUNG
Alle Parameterangaben sind lediglich beispielhaft.
Technisch realisierbare Parameter sind frei wählbar.
Menüansichten können je nach Software-Stand leicht variieren; die Bedienbarkeit ändert sich dadurch nicht.
Die Bilder in dieser Anleitung dienen lediglich als Illustrationen.

5
ATTENTION
This module contains ESD components! (ESD = Electrostatic Sensitive Device).
An electrostatic discharge is an electrical current pulse, which can flow also through an electrically
insulated material, when triggered by large voltage difference.
To ensure the reliability of ESD components, it is necessary to consider their most important handling rules:
Electrostatic sensitive components can be processed only on electrostatic protected area (EPA)!
Pay attention permanently to potential equalization (equipotential bonding)!
Use wrist straps, approved footwear for personnel grounding!
Avoid electrostatically chargeable materials such as normal PE, PVC, polystyrene!
Avoid electrostatic fields >100 V/cm !
Use only labeled and defined packing and transportation materials!
Damage caused by faulty connections and / or improper handling are excluded from any liability.
Waste disposal
Electronic equipment does not belong in household waste, but must be disposed of properly in accordance with
Directive 2002/96/EC of the European Parliament and of the Council of 27 January 2003 on waste electrical and
electronic equipment (WEEE). Consumers are required by law to return electrical and electronic equipment and
batteries at the end of their service life to the designated public collection points or to the point of sale.
WEEE-Reg.-Nr. DE 51035844
GENERAL INFORMATION ON THE OPERATING INSTRUCTIONS
All parameter data are exemplary only.
Technically realizable parameters are freely selectable.
Menu views can vary slightly depending on the software version; the operability does not change as a result.
The images in this manual are for illustration purposes only.

6
Inhaltsverzeichnis / Directory
Kapitel 1 - Produktübersicht / Chapter 1 - Product overview…………………………………………….. 7
1.1 Beschreibung / Description…………………………………………………………………………………… 7
1.2 Hauptmerkmale / Key features………………………………………………………………………………. 7
1.3 Blockdarstellung / Principle chart……………………………………………………………………………. 7
1.4 Technische Daten / Technical data………………………………………………………………………….. 8
Kapitel 2 - Gehäuse und Anschlüsse / Chapter 2 - Housing and connections………………………... 9
2.1 Darstellung der Frontseite / Front view……………………………………………………………………… 9
2.2 Darstellung der Rückseite / Rear view…………………………………………………………….………… 9
Kapitel 3 - Installationsanleitung / Chapter 3 - Installation guide……………………………………….. 10
3.1 Lieferumfang / Scope of delivery…………………………………………………………………………….. 10
3.2 Vorbereitung der Installation / Installation preparation…………………………………………………….. 10
3.2.1 Installationsschema und Verkabelung / Installation flow chart and wiring…………………………... 10
Kapitel 4 - Webbasiertes Netzwerkmanagement-System / Chapter 4 - Web NMS management…… 11
4.1 Anmeldung / Login…………………………………………………………………………………………….. 11
4.2 Betrieb / Operation…………………………………………………………………………………………….. 12
4.2.1 Zusammenfassung / Summary........................................................................................................... 12
4.2.2 Einstellungen / Settings……………………………………………………………………………… 13

7
Kapitel 1 - Produktübersicht / Chapter 1 - Product overview
1.1 Beschreibung / Description
Der HDI 2 SDI ist ein HD IP Decoder im 19“-Gehäuse und zeichnet sich durch einen kleinen Formfaktor (1 HE),
hohe Leistung sowie geringe Kosten aus. Das Gerät unterstützt eingangsseitig IP- und ASI-Signale. Nach dem
Dekodierungsprozess werden zwei Videokanäle mit HD/SD-SDI-Signalen und an jedem Anschluss zwei
Stereo-Audiosignale ausgegeben. Ausserdem verfügt der Decoder auch über einen IP-Ausgang (MPTS) und ist mit
zwei bidirektionalen ASI-Anschlüssen für Ein- und Ausgang ausgestattet.
The HDI 2 SDI is a HD IP decoder in a 19" housing and is characterized by a small form factor (1 RU), high
performance and low cost. The device supports IP and ASI signals on the input side. After decoding, two video
channels are generated with HD/SD-SDI signals and two stereo audio signals are provided at each port. The decoder
also offers an IP output (MPTS) and two bidirectional ASI ports for input and output.
1.2 Hauptmerkmale / Key features
2x IP-Eingang und 1x IP-Ausgang, RJ45-Schnittstelle / 2x IP input and 1x IP output, RJ45 interface
2x bidirektionale ASI-Anschlüsse mit Ein- und Ausgang, wahlweise
2x bi-directional ASI ports with input and output, optional
2x HD/SD-SDI-Dekodierung mit zwei Stereo-Audiosignalen, die in jedem Anschluss eingebettet sind
2x HD/SD-SDI decoding out with dual stereo audios embedded in each port
MPEG-2 und MPEG-4 AVC/H.264 Video-Dekodierung / MPEG-2 and MPEG-4 AVC/H.264 Decoding for video
MPEG-1 Layer2, LC-AAC, HE-AAC, AC3 (2.0/5.1), AC3-Durchschleifung für Audio
MPEG-1 Layer2, LC-AAC, HE-AAC, AC3 (2.0/5.1), AC3 Passthrough for audio
Unterstützung von CC/Untertitel / Supports CC/Subtitle
Unterstützt webbasiertes Netzwerkmanagement / Supports Web-based Network management
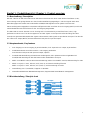
1.3 Blockdarstellung / Principle chart
Decode
SDI Out 1
IP Output
Video
ASI 1
IP 1
Stereo Audio 1
ASI 2
IP 2
Stereo Audio 2
Decode
SDI Out 2
Video
Stereo Audio 1
Stereo Audio 2

8
1.4 Technische Daten / Technical data
Eingang / Input
IP
2x IP (MPTS/SPTS, 100M/1000M Ethernet RJ45,
UDP-Protokoll / UDP protocol, Unicast/multicast)
ASI
2x ASI bidirektional / ASI bidirectional, BNC 75 Ω
Decoder
Videoformat / Video format
MPEG-2, MPEG-4 AVC/H.264
Schnittstelle / Interface
2x SDI (SD / HD)
Videoauflösung
Video resolution
480i, 480p, 576i, 576p, 720p@50/59.94/60,
1080i@50/59.94/60
Audioformat / Audio format
MPEG-1 Layer2, LC-AAC, HE-AAC, AC3 (2.0/5.1),
AC3-Durchschleifung / AC3 Passthrough
Audiokanal / Audio channel
2x Stereo-Audiosignale, die in jedem SDI-Anschluss
eingebettet sind
2x Stereo audio signals embedded in each SDI port
Ausgang / Output
SDI
2x SDI-Dekodierausgang (SD / HD)
2x SDI decoding out (SD / HD)
ASI
0 - 2x ASI-Ausgang / ASI output
IP
1x IP-Ausgang (UDP-Protokoll)
1x IP output (UDP protocol)
System
Unterstützt Netzwerkmanagement-Software (NMS)
Network management software (NMS) supporting
Allgemein
General
Abmessungen (B x H x T)
Dimensions (W x H x L)
482 x 45 x 328 mm
Gewicht / Weight
2,5 kg
Temperatur / Temperature
0…45 °C (Betrieb / Operation)
Netzanschluss
Power Supply
AC 100…240 V±10%, 50/60 Hz
Leistungsaufnahme
Consumption
<25 W

9
Kapitel 2 - Gehäuse und Anschlüsse / Chapter 2 - Housing and connections
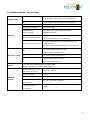
2.1 Darstellung der Frontseite / Front view
1
NMS: Netzwerk-Management-Anschluss / Network management port
2
DATA: IP-Eingang und -Ausgang / IP input and output
3
Netzkontroll-LED / Mains control LED
4
CH1-CH2: LED leuchtet, wenn das Programm dekodiert wurde.
CH1-CH2: LED lights up when the program has been decoded.
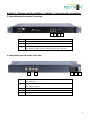
2.2 Darstellung der Rückseite / Rear view
5
SDI-Ausgang 1/2
SDI output 1/2
6
ASI-Eingang bzw. Ausgang 1/2
ASI input or output 1/2
7
Netzschalter / Power switch
8
Netzanschluss / AC Power Socket
9
Erdungsanschluss / Grounding connection
1
2
5
6
7
8
3
4
9

10
Kapitel 3 - Installationsanleitung / Chapter 3 - Installation guide
3.1 Lieferumfang / Scope of delivery
1 x HDI 2 SDI HD IP Decoder
1 x Bedienungsanleitung / User manual
1 x Netzanschlusskabel / Power cord
3.2 Vorbereitung der Installation / Installation preparation
Bei der Installation bitte den folgenden Ablauf und die Hinweise beachten.
Please observe the following procedure and notes during installation.
Das Gerät und die Anschlusskabel vor Installation auf Beschädigungen prüfen.
Check the device and the connecting cables for damage before installation.
Den Einsatzort entsprechend vorbereiten. / Preparing relevant environment for installation.
Den Decoder installieren. / Install the decoder.
Die Signalkabel anschließen. / Connecting signal cables.
Den NMS-Ethernet-Anschluss belegen, falls benötigt. / Connecting NMS-Ethernet port, if necessary.
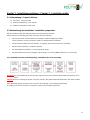
3.2.1 Installationsschema und Verkabelung / Installation flow chart and wiring
Achtung: Bevor das Netzkabel an den Decoder angeschlossen wird, sollte der Netzschalter auf Stellung "OFF"
stehen.
Caution: Before connecting the power cord to the decoder, the power switch should be set to the “OFF” position.
Die Signalverbindungen umfassen den Anschluss der Eingangs- und Ausgangssignalleitung.
The signal connections include the connection of the input and output signal lines.

11
Kapitel 4 - Webbasiertes Netzwerkmanagement-System
Chapter 4 - Web NMS management
Alle Geräteeinstellungen werden über das webbasierte Netzwerkmanagement-System vorgenommen.
All device settings are made via the web-based network management system.
4.1 Anmeldung / Login
Den PC / das Notebook durch ein Standard-Netzwerkkabel mit der NMS-Buchse verbinden.
Falls ein Proxyserver verwendet wird, so ist dieser in den Netzwerkverbindungen zu deaktivieren.
Der verwendete PC muss sich im gleichen Netzwerk befinden wie das HDI-Gerät.
In der Grundeinstellung hat das Gerät die IP-Adresse 192.168.0.136. Dem PC muss somit die IP-Adresse
192.168.0.xxx zugewiesen werden. Nicht erlaubt sind die Ziffern 0, 255 oder bereits verwendete IP-Adressen. Diese
Einstellung kann unter „Netzwerkverbindungen“ -> „LAN-Verbindung“ vorgenommen werden.
Connect the PC / notebook to the NMS socket using a standard network cable.
If a proxy server is used, it must be deactivated in the network connections.
The PC used must be in the same network as the HDI device.
By default, the device has the IP address 192.168.0.136. Therefore, the IP address 192.168.0.xxx must be assigned to
the PC. The digits 0,255 or already used IP addresses are not allowed. This setting can be made under "Network
connections" -> "LAN connection".
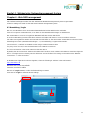
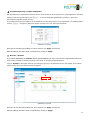
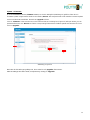
Im Webbrowser folgende IP-Adresse eingeben / Enter the following IP address in the web browser:
http://192.168.0.136
Benutzername / Username: admin
Passwort / Password: admin
Danach auf „Login“ klicken, um die Geräteeinstellung zu starten.
Then click on “Login” to start the device settings.
Abbildung / Figure-1

12
4.2 Betrieb / Operation
4.2.1 Zusammenfassung / Summary
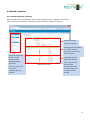
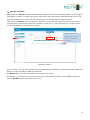
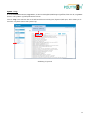
Nach Bestätigung der Anmeldedaten wird die folgende Menüansicht als Abbildung-2 angezeigt.
After confirming the credentials, the following menu view will be displayed as Figure-2.
Abbildung / Figure-2
Auf einen Menüpunkt
klicken, um die
entsprechende
Bedienoberfläche
aufzurufen.
Click on a menu item
to open the
corresponding user
interface.
Ausgangsstatus der
beiden ASI-Streams,
des IP-Streams und
des Decoders.
Output status of the
two ASI streams, the
IP stream and the
decoder.
Eingangsstatus der beiden
IP- und ASI-Streams.
Input status of the two IP
and ASI streams.
Systeminformation
System information

13
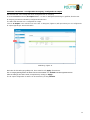
4.2.2 Einstellungen / Settings
Parameter / Parameters -> Decoder:
In der Auswahlleiste links auf „Decoder“ klicken, so wird ein Dialogfeld geöffnet, über das folgende Parameter
konfiguriert werden: ASI-Eingang bzw. -Ausgang / Mux / Allgemein / PID PASS / Decoder / System.
In the selection bar on the left, click on "Decoder" to open a dialog box where the following parameters can be
configured: ASI input or output / Mux / General / PID PASS / Decoder / System.
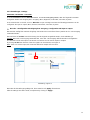
Decoder -> Konfiguration ASI-Eingang bzw. -Ausgang / Configuration ASI input or output:
Der Decoder verfügt über zwei ASI-Eingänge. Die beiden ASI-Anschlüsse können jeweils als Ein- oder Ausgang
verwendet werden.
Durch Klicken auf "In-Out" kann die Richtung der ASI-Signale ausgewählt werden, siehe Abbildung-3.
Hinweis: Wenn ASI 1 als Eingang verwendet wird, muss ASI 2 als Ausgang definiert werden und umgekehrt.
The decoder has two ASI inputs. The two ASI connectors can be used as inputs or outputs.
By clicking "In-Out" the direction of the ASI signals can be selected, see Figure-3.
Note: If ASI 1 is used as input, ASI 2 must be defined as output and vice versa.
Abbildung / Figure-3
Nachdem die Einstellungen getätigt sind, diese mit Klick auf „Apply“ übernehmen.
After the settings have been made, accept them by clicking on “Apply”.

14
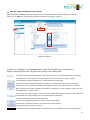
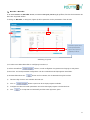
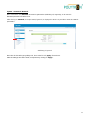
Decoder -> Mux-Einstellungen / Mux settings:
Nach einem Klick auf “Mux” werden die entsprechenden Einstellmöglichkeiten gemäß Abbildung-4 angezeigt.
After a click on "Mux" the corresponding settings are displayed according to Figure-4.
Abbildung / Figure-4
Einstellen von “Eingangs- und Ausgangsbereich” mithilfe der Bedienfelder im „Einstellbereich“.
Setting "Input and Output area" using the control panels in the “Setting area”.
CA-Filterfunktion aktivieren/deaktivieren (Störungen durch die Verschlüsselungsfunktion vermeiden)
Enable/disable CA filter function to avoid interference from the device's encryption function
PID-Remapping aktivieren/deaktivieren / Enable/disable PID remapping
Aktualisierung der Programminformation am Eingang / To refresh the input program information
Aktualisierung der Programminformation am Ausgang / To refresh the output program information
Nach Auswahl eines Eingangsprogramms auf dieses Feld klicken, um das jeweilige Programm in den
Ausgangsbereich zu übernehmen
After selecting an input program, click on this field to transfer the respective program to the output area
Ausgewählte Programme wieder aus dem Ausgangsbereich entfernen /
Remove selected programs from the output area
Anwahl aller Eingangsprogramme / To select all the input programs
Anwahl aller Ausgangsprogramme / To select all the output programs
Programmanalyse / To parse programs
Zeitbegrenzung der eingangsseitigen Programmanalyse / Time limitation of parsing input programs
4 Auswahlmöglichkeiten / Options
Eingangsbereich / Input Area
Ausgangsbereich / Output Area
Einstellbereich / Setting area

15
Programmanpassung / Program modification
Die gemultiplexten Programminformationen können durch Anklicken des Programms im „Ausgangsbereich“ geändert
werden. Klickt man beispielsweise auf „ “, so wird ein Dialogfeld (Abbildung-5) geöffnet, in dem neue
Informationen eingeben werden können.
The multiplexed program information can be modified by clicking the program in the ”output area”. For example, when
clicking “ “, it triggers a dialog box (Figure-5) where users can input new information.
Abbildung / Figure-5
Nachdem die Einstellungen getätigt sind, diese mit Klick auf „Apply“ übernehmen.
After the settings have been made, accept them by clicking on “Apply”.
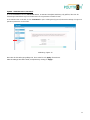
Decoder -> General:
In der oberen Menüleiste auf “General” klicken (gemäß Abbildung-6). Über das daraufhin eingeblendete Untermenü
können die Parameter für die ASI-Ausgänge 1/2 und den IP-Ausgang eingestellt werden.
Click on "General" in the upper menu bar (according to Figure-6). The parameters for the ASI outputs 1/2 and the IP
output can be set via the submenu that then appears.
Abbildung / Figure-6
Nachdem die Einstellungen getätigt sind, diese mit Klick auf „Apply“ übernehmen.
After the settings have been made, accept them by clicking on “Apply”.

16
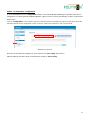
Decoder -> PID Pass:
Nach Klicken auf „PID Pass“ wird das Eingabefenster angezeigt, in dem PIDs hinzugefügt werden, um am Ausgang
ausgegeben zu werden. In einigen Fällen gibt es PIDs, welche keinem Programm zugeordnet werden können (z.B.
EPG, NIT-Tabellen, usw.). Diese sollen aber am Ausgang ohne Veränderungen ausgegeben werden.
After clicking on "PID Pass", the input window is displayed, in which PIDs are added to be issued at the output. In
some cases there are PIDs which cannot be assigned to a program (e. g. EPG, NIT tables, etc.). However, these
should be available at the output without changes.
Abbildung / Figure-7
Durch einen Klick auf können weitere PIDs ausgewählt werden (Abbildung-7). Nachdem alle PIDs ausgewählt
wurden, sind diese mit Klick auf „Set“ zu übernehmen.
Auf „Del-All“ klicken, um alle ausgewählten PIDs auf einmal zu löschen.
By clicking on further PIDs can be selected (Figure-7). After selecting all PIDs, click on "Set" to apply them.
Click on "Del-All" to delete all selected PIDs at once.
Anklicken, um weitere Zeilen zum
Hinzufügen von PIDs zu generieren.
Click this button to generate more
rows to add PIDs.

17
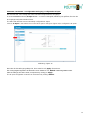
Decoder -> Decoder:
In der Auswahlleiste auf „Decoder“ klicken, so wird ein Dialogfeld (Abbildung-8) geöffnet, über das die Parameter des
Decoders eingestellt werden.
If clicking on "Decoder", a dialog box (Figure-8) will be opened to set the parameters of the decoder.
Abbildung / Figure-8
1) Es stehen zwei Dekodierkanäle zur Verfügung: Decoder 1/2.
2) Auf die Schaltfläche klicken, um alle verfügbaren Programme am Eingang zu analysieren.
3) Die Video- und Audioparameter konfigurieren und das zu dekodierende Zielprogramm auswählen.
4) Zur Datenübernahme auf klicken und kurz warten, bis die Statusleuchte grün leuchtet.
1) Two decoding channels are available: Decoder 1/2.
2) Click on button to parse out all the input programs available.
3) Configure the video and audio parameters and select the target program to be decoded out.
4) Click to accept data and wait briefly until the status light turns green.
Auswahl der Programme, die vom
Decoder gemultiplext werden.
Selection of the programs to be
multiplexed by the decoder.

18
Decoder -> System:
Durch einen Klick auf den Menüpunkt „System“ werden die aktuellen Moduldaten angezeigt, siehe Abbildung-9.
Click on the menu item "System" to display the current module data, see Figure-9.
Abbildung / Figure-9

19
Parameter / Parameters -> Konfiguration IP-Eingang / Configuration IP input:
Der Decoder HDI 2 SDI verfügt über zwei individuell konfigurierbare IP-Eingänge.
In der Auswahlleiste links auf „IP Input“ klicken – es wird ein Dialogfeld (Abbildung-10) geöffnet, über das die
IP-Eingänge konfiguriert werden können.
The HDI 2 SDI decoder has two individually configurable IP inputs.
Click on "IP Input" in the selection bar on the left to open a dialog box (Figure-10) to configure the IP inputs.
Abbildung / Figure-10
Nachdem die Einstellungen getätigt sind, diese mit Klick auf „Apply“ übernehmen.
Die IP-Eingangskonfiguration ab Werk kann durch Anklicken von „Default“ wiederhergestellt werden.
After the settings have been made, accept them by clicking on “Apply”.
The IP input configuration ex works can be restored by clicking "Default".

20
Parameter / Parameters -> Konfiguration IP-Ausgang / Configuration IP output:
Der Decoder HDI 2 SDI verfügt über einen konfigurierbaren IP-Ausgang.
In der Auswahlleiste links auf „IP Output“ klicken – es wird ein Dialogfeld (Abbildung-11) geöffnet, über das der
IP-Ausgang (IP-Stream und MPTS) konfiguriert werden kann.
The HDI 2 SDI decoder has a configurable IP output.
Click on "IP Output" in the selection bar on the left - a dialog box (Figure 11) will open where you can configure the
IP output regarding IP stream and MPTS.
Abbildung / Figure-11
Nachdem die Einstellungen getätigt sind, diese mit Klick auf „Apply“ übernehmen.
Die IP-Ausgangskonfiguration ab Werk kann durch Anklicken von „Default“ wiederhergestellt werden.
After the settings have been made, accept them by clicking on “Apply”.
The IP output configuration ex works can be restored by clicking "Default".
Seite wird geladen ...
Seite wird geladen ...
Seite wird geladen ...
Seite wird geladen ...
Seite wird geladen ...
Seite wird geladen ...
Seite wird geladen ...
Seite wird geladen ...
-
 1
1
-
 2
2
-
 3
3
-
 4
4
-
 5
5
-
 6
6
-
 7
7
-
 8
8
-
 9
9
-
 10
10
-
 11
11
-
 12
12
-
 13
13
-
 14
14
-
 15
15
-
 16
16
-
 17
17
-
 18
18
-
 19
19
-
 20
20
-
 21
21
-
 22
22
-
 23
23
-
 24
24
-
 25
25
-
 26
26
-
 27
27
-
 28
28


POLYTRON HDI 2 SDI Bedienungsanleitung
- Kategorie
- Videoschalter
- Typ
- Bedienungsanleitung
in anderen Sprachen
Verwandte Artikel
-
POLYTRON HDI 32 C Bedienungsanleitung
-
-
-
-
-
-