SENSEO® HD7892/01 Benutzerhandbuch
- Kategorie
- Kaffeemaschinen
- Typ
- Benutzerhandbuch

HD7892

1
3
4
5
2
9
7
10
11
12
13
14
15
16
8
6
1


English
Introduction
Congratulations on your purchase and welcome to Philips! To fully benefit from the support that
Philips offers, register your product at www.philips.com/welcome.
Clean cold water
Use clean cold water every day. If you have not used the coffee machine for one day, you have to
flush it with clean cold water before you use it again. To flush the machine, fill the water reservoir with
clean cold water, place a bowl (with a capacity of at least 1500 ml) or 2 cups under the coffee spout
and press the 2-cup button a few times to brew hot water until the water reservoir is empty.
Fresh filter coffee
To brew a jug of delicious coffee use good-quality pre-ground coffee . Always use a paper filter size
102.
You can brew up to 7 cups of coffee in the jug.
Fresh coffee pods
Use good-quality fresh coffee pods in this machine for a full, round taste. To keep the pods fresh
longer, store them in a storage container.
Important
Read this user manual carefully before you use the machine and save it for future reference.
Danger
-
Never immerse the machine in water or any other liquid.
Warning
-
Connect the machine to an earthed wall socket.
-
Check if the voltage indicated on the bottom of the machine
corresponds to the local mains voltage before you connect the
machine.
-
This machine can be used by children aged from 8 years and
above and persons with reduced physical, sensory or mental
capabilities or lack of experience and knowledge if they have
been given supervision or instruction concerning use of the
machine in a safe way and understand the hazards involved.
Children shall not play with the machine. Cleaning and user
maintenance shall not be made by children unless they are 8
years and above and supervised.
6
English

-
Keep the machine and its cord out of the reach of children aged
less than 8 years.
-
Do not use the machine if the plug, the mains cord or the machine
itself is damaged.
-
If the mains cord is damaged, you must have it replaced by
Philips, a service center authorized by Philips or similarly qualified
persons in order to avoid a hazard.
Caution
-
Always return the machine to a service center authorized by
Philips for examination or repair. Do not attempt to repair the
machine yourself, otherwise your warranty becomes invalid.
-
After unpacking the machine, never put the machine on its side.
Always keep it in upright position, also during transport.
-
Never put normal ground coffee or use torn pods in the pod
holders of this machine, as this causes the pod holders to
become blocked.
-
Do not use the machine in combination with a transformer, as this
could cause hazardous situations.
-
Always put the machine on a flat and stable surface.
-
Do not place the machine on a hotplate, directly next to a hot
oven, heater or similar source of heat.
-
Descale the machine at least every 3 months. Not doing so may
cause the machine to stop working properly. In this case, repair is
not covered under your guarantee.
-
Do not use the machine at altitudes higher than 2200 meters
above sea level.
-
Do not use the machine at a temperature below 0°C. Water left in
the machine may freeze and cause damage.
-
Never pour any other liquid than clean cold water into the water
reservoir.
-
Never flush the machine or let it brew coffee when the spout is
not in place.
7
English

-
Flush the coffee machine with fresh water before you use it for
the first time (see chapter ‘First use’). This causes the system to fill
with water, which is essential for the machine to work properly.
-
Never interrupt the descaling process.
-
Never use a descaling agent based on mineral acids such as
sulphuric acid, hydrochloric acid, sulphamic acid and acetic acid
(e.g. vinegar). These descaling agents may damage the machine.
-
The machine is intended for normal household use only. It is not
intended for use in environments such as staff kitchens of shops,
offices, farms or other work environments, nor is it intended to be
used by clients in hotels, motels, bed and breakfast and other
residential environments.
-
Do not disassemble the insulated jug.
-
Never immerse the insulated jug in water or any other liquid, as
this could cause water to enter between the walls of the jug.
-
The insulated jug is not dishwasher-proof.
-
When the jug is filled with coffee, keep it in upright position to
prevent leakage.
-
During brewing and until the light stops blinking, the filter holder
is filled with hot coffee.
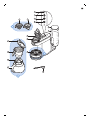
General description
1 1-cup pod holder
2 2-cup pod holder
3 Distribution disk
4 Collector ring
5 Drip tray
6 CALC light
7 Jug button
8 2-cup button
9 1-cup button
10 Water reservoir lid
11 Water reservoir
12 Filter holder lid
13 Filter holder
14 Insulated jug lid
15 Insulated jug
16 Measuring spoon
8
English

Electromagnetic fields
This Philips machine complies with all applicable standards and regulations regarding exposure to
electromagnetic fields.
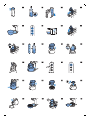
First use
The machine starts an automatic flushing cycle when you switch it on for the first time, no matter
which button you press.
1 Put the plug in an earthed wall socket.
2 Remove the water reservoir from the machine and remove the lid from the water reservoir (Fig. 2).
3 Clean the water reservoir thoroughly in hot water, if necessary with some washing-up liquid.
4 Fill the water reservoir with clean cold water up to the MAX indication (Fig. 3).
5 Put the lid back onto the water reservoir and put the water reservoir back onto the machine (Fig. 4).
6 Place the 1-cup pod holder in the coffee machine. Close the lid and make sure it is properly locked
(Fig. 5).
7 Remove the drip tray from the platform and put a bowl (with a capacity of at least 1 liter) or the jug
under the coffee outflow (Fig. 6).
8 Press one of the buttons on the control panel. All three lights start flashing (Fig. 7).
9 The flushing cycle starts. During the flushing cycle the system fills itself with water from the water
reservoir. The machine produces more noise than during a regular brewing cycle.
10 The machine switches off when the water tank is empty (Fig. 8).
11 After the first flushing cycle, clean the collector ring and the pod holder with hot water and some
washing-up liquid or in the dishwasher. Rinse the insulated jug under the tap.
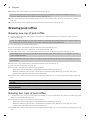
Brewing a jug of drip-filter coffee
1 Open the lid of the machine (Fig. 9).
2 Remove the pod holder, if present (Fig. 10).
3 Remove the drip tray, if present.
4 Fill the water reservoir with clean cold water up to the level required for the number of cups of
coffee you wish to brew and put the water reservoir back onto the machine (Fig. 11).
5 Rinse the insulated jug with hot tap water to preheat it .
Tip: To obtain the tastiest and hottest coffee, brew at least half a jug of coffee.
6 Place the filter holder on top of the insulated jug (Fig. 12).
7 Open the lid of the filter holder.
8 Put a paper filter size 102 in the filter holder. Make sure that you fold the sealed edges to ensure
that the paper filter stays upright during brewing (Fig. 13).
9 Use the measuring spoon to put the required amount of pre-ground coffee in the filter (Fig. 14).
Tip: Use one measuring spoon of pre-ground coffee for each cup. Use a heaped measuring spoon
for strong coffee and a level measuring spoon for mild coffee.
10 Close the lid of the filter holder.
11 Slide the insulated jug on the platform of the machine (Fig. 15).
12 Press the jug button to start the brewing process (Fig. 16).
-
The light in the jug button starts flashing and the brewing process starts. (Fig. 17)
-
When all the water from the water reservoir has passed through the filter, the light in the jug
button goes out and the machine switches off automatically.
13 You can now remove the insulated jug from the machine (Fig. 18).
9
English

14 Remove the filter holder from the insulated jug (Fig. 19).
Tip: You can place the filter holder on the drip tray to prevent coffee from leaking onto your
worktop while you pour out coffee from the jug (Fig. 20).
15 Place the jug lid on the insulated jug and turn it to the keep-warm position (closed lock symbol)
(Fig. 21).
16 Push the lever of the jug lid to pour coffee into one or more cups, (Fig. 22)
Brewing pod coffee
Brewing one cup of pod coffee
1 Fill the water reservoir with clean cold water up to the MAX indication and put it back onto the
machine (Fig. 3).
Note: The MIN indication on the water reservoir indicates the minimum amount of water required
for brewing pod coffee. Always fill the water reservoir beyond the MIN level.
2 Put the plug in an earthed wall socket.
3 Open the lid of the machine by moving the lever upwards (Fig. 9).
4 Place the drip tray on the platform of the machine (Fig. 23).
5 Place one pod in the 1-cup pod holder with the convex side pointing downwards (Fig. 24).
Note: Make sure that the pod holder is clean and the sieve in the center is not clogged, e.g. with
loose coffee grounds.
Note: Make sure that the coffee in the pod is distributed evenly and press the pod lightly into the
pod holder.
6 Place the 1-cup pod holder in the machine and close the lid (Fig. 5).
7 Place a cup on the drip tray (Fig. 25).
8 Press the 1-cup button to brew coffee. (Fig. 26)
-
The button starts flashing and the machine starts heating up (Fig. 27).
-
When the heating-up process is finished, the machine starts brewing coffee (Fig. 28). After
brewing, the machine switches off automatically.
9 Remove the coffee pod after use by lifting the pod holder out of the machine and emptying it (Fig.
10).
Caution: Be careful when you do this, for there may still be some hot water/coffee on the coffee
pod(s).
Caution: Never put normal ground coffee or use torn pods in the machine, as this causes it to
become blocked.
Brewing two cups of pod coffee
1 To brew two cups of pod coffee,place the deeper 2-cup pod holder in the machine. Place two pods
in the 2-cup pod holder (Fig. 29).
2 Press the 2-cup button to brew coffee (Fig. 30).
-
The button starts flashing and the machine starts heating up (Fig. 31).
-
When the heating-up process is finished, the machine starts brewing coffee (Fig. 32). After
brewing, the machine switches off automatically.
3 Remove the coffee pods after use by lifting the pod holder out of the machine and emptying it (Fig.
33).
10
English

Note: Instead of two pods, you can also place a cappuccino pod, a hot chocolate pod or a special pod
for a mug of strong coffee in the 2-cup pod holder and place a mug under the coffee spout. In this
case, press the 1-cup button instead of the 2-cup button to brew your beverage.
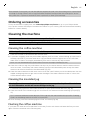
Ordering accessories
To buy accessories or spare parts, visit www.shop.philips.com/service or go to your Philips dealer.
You can also contact the Philips Consumer Care Center in your country (see the international warranty
leaflet for contact details).
Cleaning the machine
Never immerse the machine in water or any other liquid.
Never clean the machine by flushing it with the lid open.
Cleaning the coffee machine
Warning: Always unplug the machine before you clean it.
1 Clean the outside of the machine with a moist cloth.
2 To prevent clogging, clean the pod holders regularly with hot water, some washing-up liquid and a
washing-up brush. If you have used the 2-cup pod holder to brew cappuccino or hot chocolate,
make sure to clean it thoroughly immediately after use to remove any milk residues.
Note: You can disassemble the pod holders for more thorough cleaning (Fig. 34).
3 Clean the collector ring, the pod holders, the drip tray, the water reservoir and the water reservoir
lid in hot water, if necessary with some washing-up liquid. All detachable parts except the water
reservoir can also be cleaned in the dishwasher (Fig. 35).
4 Clean the water distribution disk with a moist cloth. Be careful when you do this. Make sure that the
rubber sealing ring does not get stuck under the edge of the water distribution disk. If it does, the
coffee machine starts to leak.
Cleaning the insulated jug
Warning: Do not immerse the insulated jug in water or any other liquid and do not clean
it in the dishwasher as this will cause damage to the jug.
1 To remove the jug lid, turn the lid anticlockwise to 'open' position and remove it (Fig. 36).
2 Clean the inside of the insulated jug with a soft brush, hot water and some washing-up liquid (Fig.
37).
Tip: To remove stubborn brown deposits, fill the jug with hot water and add a spoonful of baking
soda. Let the baking soda do its work for some time.
3 After cleaning, rinse the insulated jug with fresh, hot water (Fig. 38).
Flushing the coffee machine
If you have not used the coffee machine for one day, flush it with clean cold water before you use it
again. Flush the machine in the following way:
11
English

1 Fill the water reservoir with clean cold water up to the MAX indication and put it back onto the
machine.
2 Put the 1-cup pod holder or the 2-cup pod holder in the machine without pod(s).
3 Put a bowl (with a capacity of at least 1000ml) or the jug under the coffee spout to collect the
water.
4 Press the 2-cup button, wait until the machine has heated up and brewed an amount of hot water.
Then press the 2-cup button several times until the water reservoir is empty.
Descaling the machine
When to descale
Scale builds up inside the machine during use. It is essential to descale the machine when the CALC
light goes on.
Why to descale
Your reasons to descale:
-
It prolongs the life of your coffee machine
-
It ensures maximum cup volume
-
It ensures maximum coffee temperature
-
The machine produces less sound during brewing
-
It prevents malfunctioning
If the descaling procedure is not performed correctly, scale residue remains behind in the machine.
This causes scale to build up more quickly and may cause permanent and irreparable damage to the
machine.
Use the correct descaler
Only citric acid-based descalers are suitable for descaling the machine. This type of descaler descales
the machine without damaging it. For the correct amount, see under ‘Descaling procedure’ below.
Each descaling mixture can be used only once. Use a new descaling mixture each time. We advise you
to use the special SENSEO® Descaler (HD7012/HD7011/HD7006). Read the instruction leaflet in the
package. For more information on why it is important to descale, how to descale or which descaler to
use, visit our website at www.philips.com/descale-senseo.
Warning: Never use a descaler based on mineral acids such as sulphuric acid,
hydrochloric acid, sulphamic acid and acetic acid (e.g. vinegar). These descalers may
damage your coffee machine.
Descaling procedure
The descaling procedure consists of a descaling cycle and two flushing cycles. Do not interrupt the
descaling cycle and do not switch off the machine before you have performed the two flushing cycles.
1 Fill the water reservoir with clean cold water up to the MAX indication and pour the water into a
bowl (Fig. 39).
2 Mix 50 grams of citric acid with the water in the bowl. Stir until the powder has dissolved (Fig. 40).
3 Fill the water reservoir with the descaling mixture and place it back on the machine (Fig. 41).
4 Remove the drip tray. Put a bowl with a capacity of at least 1.5 liters under the spout to collect the
descaling mixture (Fig. 6).
12
English

5 Place the 1-cup pod holder with a used coffee pod in it in the coffee machine. Close the lid and
make sure it is properly locked.
Note: Always put a used coffee pod in the pod holder when you descale the machine. This pod
serves as a ‘filter’ to prevent the sieve or hole in the pod holder from getting clogged with scale
residue.
Warning: Make sure that the lid is closed properly and the lid lever is locked before
you start descaling the machine.
6 Press the 1-cup button and the 2-cup button simultaneously.
7 The CALC light, the 1-cup button and the 2-cup button start flashing (Fig. 43) slowly.
-
During the descaling cycle, the water comes out of the machine in intervals.When the descaling
mixture in the water reservoir has been used up, the 1-cup button and the 2-cup button start
flashing quickly while the CALC light continues to flash slowly.
8 Empty the bowl and place it back.
9 To clean the water reservoir, rinse it thoroughly with cold clean tap water a few times (Fig. 44).
10 Fill the water reservoir with clean cold water up to the MAX indication and put it back onto the
machine.
-
The 1-cup button and the 2-cup button light up continuously. The CALC light continues to flash
slowly.
11 Press the 1-cup button and the 2-cup button simultaneously. The 1-cup button and the 2-cup
button start flashing slowly. The CALC light continues to flash slowly.
-
During the flushing cycle, the water comes out of the machine in intervals.When the water
reservoir is empty, the 1-cup button and the 2-cup button start flashing quickly while the CALC
light continues to flash slowly.
12 When all the water in the water reservoir has been used up, the 1-cup button and the 2-cup button
start flashing quickly while the CALC light continues to flash slowly.
13 Repeat steps 8 to 12.
-
When all the water in the water reservoir has been used up, the machine switches off and all the
lights go out to indicate that the descaling procedure has ended.
Troubleshooting
This chapter summarizes the most common problems you could encounter with the appliance. If you
are unable to solve the problem with the information below, visit www.philips.com/support for a list
of frequently asked questions or contact the Consumer Care Center in your country.
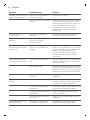
Problem
Possible cause Solution
My coffee cup overflows
with cold coffee
You did not flush the machine
before first use.
Flush the machine before first
use.When the machine has emptied a
complete water reservoir, you can start
to make a new coffee.
The light in the button you
pressed flashes slowly.
The machine is heating up. If heating up takes longer than two
minutes, contact the Philips Consumer
Care Center in your country.
When you are brewing drip
filter coffee, the light flashes
slowly during brewing.
The brewing cycle last approximately
90 seconds, wait until the brewing
cycle has finished.
13
English

Problem Possible cause Solution
The light in the button you
pressed flashes quickly.
There is not enough water in
the water reservoir.
Fill the water reservoir.
The float in the water reservoir
is stuck.
Empty the water reservoir and shake it
a few times to release the float. Clean
the water reservoir with hot water and
some washing-up liquid or in the
dishwasher. If this does not help,
descale the machine (see chapter
‘Descaling’).
The CALC light is on
continuously.
You need to descale the
machine.
Perform the descaling procedure as
described in chapter ‘Descaling’.
I cannot close the lid
properly.
Perhaps a used coffee pod is
sticking to the water
distribution disk.
If this is the case, remove the used pod.
The coffee machine
produces less pod coffee
than before.
Perhaps the sieve in the
center of the pod holder is
clogged.
If the sieve is clogged, use a washingup
brush to unclog the sieve. If you cannot
unclog it properly with the washing-up
brush, put the pod holder in the
machine and descale the machine.
Descale the machine (see chapter
‘Descaling’).
The temperature of the
coffee decreases quickly.
You use the wrong type of
cups.
Use thin-walled cups. Thin-walled cups
absorb less heat from the coffee than
thick-walled cups.
The cups are cold. Rinse the cups with hot water. You can
preheat the coffee machine and cup by
brewing a cup of hot water first without
placing a coffee pod in the pod holder.
You have added cold milk to
the coffee.
Do not use cold milk straight from the
refrigerator.
The filter coffee is not hot
enough.
You have not brewed a full jug. Coffee stays hot longer if you brew a
full jug of coffee to ensure that that the
coffee has the right temperature.
You have not removed the
pod holder.
If you do not remove te pod holder, this
can lead to a longer brewing time.
You have not preheated the
insulated jug.
Rinse the insulated jug with hot tap
water to preheat it .
You have added cold milk to
the coffee.
Do not use cold milk straight from the
refrigerator.
Coffee grounds end up in
the insulated jug.
Your paper filter may have
collapsed during brewing.
To prevent the paper filter from
collapsing, fold the sealed edges.
14
English

Problem Possible cause Solution
The coffee is weaker than
expected.
There may have been some
water in the insulated jug
when you started brewing
filter coffee.
Always make sure that there is no
water in the jug before you start
brewing coffee.
You have not used enough
pre-ground coffee.
Use one heaped measuring spoon of
pre-ground coffee per cup for stronger
coffee.
Water leaks from the
coffee machine.
You overfilled the water
reservoir.
Do not fill the water reservoir beyond
MAX level.
The sieve in the center of the
pod holder may be clogged.
Check the pod holder. If the sieve is
clogged, use a washing-up brush to
unclog the sieve. If you cannot clean it
properly with the washing-up brush,
put the pod holder in the machine and
descale the machine (see chapter
'Descaling').
The sealing ring may be stuck
under the edge of the
distribution disk.
Check if the sealing ring is stuck under
the edge of the distribution disk. If it is,
pull it out from under the distribution
disk carefully.
You forgot to place the
collector ring.
If you forget to place the collector ring,
water comes out of the lid of the
machine instead of passing through the
pod.
I cannot open the lid. A vacuum has formed under
the lid.
Switch of the coffee machine. Pull up
the lever and wait 24 hours before you
open the lid. You may need to use
some force.
Always make sure the pod holders are
clean and the center of the sieve is not
clogged to prevent a vacuum.
It takes longer than before
to brew filter coffee.
You have to descale the
machine.
To descale the machine, follow the
instructions in chapter ' Descaling'.
You left a pod holder in the
machine.
Remove the pod holder.
There is still water left in
the water tank, after
brewing filter coffee.
This is normal. The filter coffee brewing process does
not use up all the water in the water
tank.This is normal.
Warranty and support
If you need information or support, please visit www.philips.com/support or read the international
warranty leaflet.
15
English

Recycling
-
This symbol means that this product shall not be disposed of with normal household waste
(2012/19/EU) (Fig. 45).
-
Follow your country's rules for the separate collection of electrical and electronic products. Correct
disposal helps prevent negative consequences for the environment and human health.
16
English

Deutsch
Einführung
Herzlichen Glückwunsch zu Ihrem Kauf und willkommen bei Philips! Um die Unterstützung von Philips
optimal nutzen zu können, sollten Sie Ihr Produkt unter www.philips.com/welcome registrieren.
Sauberes kaltes Wasser
Verwenden Sie täglich sauberes kaltes Wasser. War die Kaffeemaschine einen Tag lang nicht in
Gebrauch, lassen Sie vor dem nächsten Aufbrühen sauberes kaltes Wasser durchlaufen. Um die
Maschine durchzuspülen, füllen Sie den Wassertank mit sauberem kaltem Wasser, stellen Sie eine
Schüssel (mit einem Volumen von mindestens 1500ml) oder zwei Tassen unter den Kaffeeauslauf,
und drücken Sie mehrmals die 2-Tassen-Taste, damit heißes Wasser durchläuft, bis der Wassertank
leer ist.
Frischer Filterkaffee
Um eine Tasse bekömmlichen Kaffee zu brühen, verwenden Sie gemahlenen Kaffee in guter Qualität.
Verwenden Sie immer Papierfiltertüten der Größe 102.
Sie können in der Kanne bis zu 7Tassen Kaffee brühen.
Frische Kaffeepads
Verwenden Sie frische, hochwertige Kaffeepads in dieser Maschine, um einen vollen, abgerundeten
Geschmack zu erhalten. Damit die Pads länger frisch bleiben, sollten Sie sie in einem entsprechenden
Behälter aufbewahren.
Wichtig
Lesen Sie diese Bedienungsanleitung vor dem Gebrauch der Maschine aufmerksam durch, und
bewahren Sie sie für eine spätere Verwendung auf.
Gefahr
-
Tauchen Sie die Maschine niemals in Wasser oder andere
Flüssigkeiten.
Warnhinweis
-
Die Netzsteckdose muss schutzgeerdet sein.
-
Prüfen sie, bevor Sie das Gerät anschließen, ob die
Spannungsangabe am Boden des Geräts mit der örtlichen
Netzspannung übereinstimmt.
17
Deutsch

-
Diese Maschine kann von Kindern ab 8Jahren und Personen mit
eingeschränkten physischen, sensorischen oder geistigen
Fähigkeiten oder ohne Erfahrung und besondere Kenntnisse
verwendet werden, wenn sie beim Gebrauch des Geräts
beaufsichtigt werden oder in den sicheren Gebrauch des Geräts
unterwiesen wurden und die verbundenen Gefahren verstanden
haben. Kinder dürfen nicht mit der Maschine spielen. Reinigung
und Pflege dürfen nicht von Kindern durchgeführt werden, sofern
sie nicht älter als 8Jahre sind und beaufsichtigt werden.
-
Sorgen Sie dafür, dass Kinder unter 8Jahren keinen Zugang zu
der Maschine und zum Kabel der Maschine haben.
-
Verwenden Sie die Maschine nicht, wenn der Netzstecker, das
Netzkabel oder die Maschine selbst defekt oder beschädigt ist.
-
Ist das Netzkabel defekt, darf es nur von einem Philips Service-
Center, einer von Philips autorisierten Werkstatt oder einer
ähnlich qualifizierten Person durch ein Original-Ersatzkabel
ausgetauscht werden, um Gefährdungen zu vermeiden.
Achtung
-
Geben Sie das Gerät zur Überprüfung bzw. Reparatur stets an ein
Philips Service-Center. Versuchen Sie nicht, das Gerät selbst zu
reparieren, da die Garantie sonst verfällt.
-
Legen Sie die Maschine nach dem Auspacken nie auf der Seite
ab. Halten Sie sie stets aufrecht, auch beim Transport.
-
Verwenden Sie keinesfalls normalen gemahlenen Kaffee oder
beschädigte Pads in den Padhaltern dieser Maschine, da dies die
Padhalter verstopfen würde.
-
Aus Sicherheitsgründen darf das Gerät nicht mit einem
Transformator betrieben werden.
-
Stellen Sie die Maschine auf eine ebene und stabile Fläche.
-
Stellen Sie die Maschine nicht auf eine Warmhalteplatte, direkt
neben einen heißen Ofen, eine Heizung oder eine ähnliche
Wärmequelle.
18
Deutsch

-
Entkalken Sie die Maschine mindestens alle drei Monate.
Andernfalls kann der ordnungsgemäße Betrieb der Maschine
nicht gewährleistet werden. In diesem Fall ist auch die Reparatur
von der Gewährleistung ausgeschlossen.
-
Benutzen Sie das Gerät nicht in Höhenlagen von über 2200m.
-
Benutzen Sie das Gerät nicht bei Temperaturen unter 0°C. In der
Maschine verbleibendes Wasser kann gefrieren und Schäden
verursachen.
-
Füllen Sie niemals eine andere Flüssigkeit als sauberes kaltes
Wasser in den Wassertank.
-
Spülen Sie die Maschine nicht durch, und bereiten Sie keinen
Kaffee zu, solange der Kaffeeauslauf nicht eingesetzt ist.
-
Spülen Sie die Kaffeemaschine mit frischem Wasser durch, bevor
Sie sie das erste Mal verwenden (siehe Kapitel „Erste
Anwendung“). Dabei füllt sich das System mit Wasser. Dies ist für
den ordnungsgemäßen Betrieb der Maschine entscheidend.
-
Unterbrechen Sie nie den Entkalkungsvorgang.
-
Verwenden Sie keine Entkalker auf Basis von Mineralsäuren,
beispielsweise Schwefel-, Salz-, Sulfamin- oder Essigsäure (z.B.
Essig). Diese Entkalker könnten die Maschine beschädigen.
-
Die Maschine ist nur für den normalen Hausgebrauch bestimmt.
Sie ist nicht für den Gebrauch in Personalküchen, Büros,
landwirtschaftlichen Betrieben oder anderen gewerblichen
Umgebungen vorgesehen. Ebenso ist sie nicht für die Nutzung
durch Kunden in Hotels, Motels, Unterkünften mit
Frühstücksangebot oder anderen Unterkünften bestimmt.
-
Nehmen Sie die isolierte Thermo-Kanne nicht auseinander.
-
Tauchen Sie die isolierte Thermo-Kanne niemals in Wasser oder
eine andere Flüssigkeit, da dadurch Wasser zwischen die Wände
der Thermo-Kanne gelangen kann.
-
Die Thermo-Kanne ist nicht spülmaschinenfest.
-
Halten Sie die gefüllte Thermo-Kanne senkrecht, damit sie nicht
tropft.
19
Deutsch

-
Während des Brühens bis zum Beenden des Blinkens ist der
Filterhalter mit heißem Kaffee gefüllt.
Allgemeine Beschreibung
1 Padhalter für 1Tasse
2 Padhalter für 2Tassen
3 Sprühkopf
4 Sammelring
5 Abtropfschale
6 CALC-Anzeige
7 Kannentaste
8 2-Tassen-Taste
9 1-Tasse-Taste
10 Deckel des Wasserbehälters
11 Wasserbehälter
12 Deckel des Filterhalters
13 Filterhalter
14 Deckel der isolierten Thermo-Kanne
15 Isolierte Thermo-Kanne
16 Messlöffel
Elektromagnetische Felder
Dieses Philips Gerät erfüllt sämtliche Normen und Vorschriften bezüglich der Exposition in
elektromagnetischen Feldern.
Erste Anwendung
Die Maschine beginnt führt einen automatischen Durchspülvorgang durch, wenn Sie sie zum ersten
Mal einschalten. Dies ist unabhängig von der gedrückten Taste.
1 Stecken Sie den Netzstecker in eine geerdete Steckdose.
2 Entfernen Sie den Wasserbehälter von der Maschine, und nehmen Sie den Deckel des
Wasserbehälters (Abb. 2) ab.
3 Reinigen Sie den Wasserbehälter gründlich in heißem Wasser, dem Sie bei Bedarf etwas Spülmittel
zufügen können.
4 Füllen Sie den Wasserbehälter bis zur Markierung MAX (Abb. 3) mit klarem kaltem Wasser.
5 Setzen Sie den Deckel zurück auf den Wasserbehälter, und setzen Sie den Wasserbehälter wieder
in die Maschine (Abb. 4) ein.
6 Setzen Sie den 1-Tassen-Padhalter in die Kaffeemaschine ein. Schließen Sie den Deckel, und
stellen Sie sicher, dass er fest verschlossen (Abb. 5) ist.
7 Entfernen Sie die Abtropfschale von der Plattform, und setzen Sie eine Schüssel (mit einem
Fassungsvermögen von mindestens 1Liter) oder die Kanne unter den Kaffeeausguss (Abb. 6).
8 Drücken Sie eine der Tasten auf dem Bedienfeld. Alle drei Leuchten beginnen zu blinken (Abb. 7).
9 Der Durchspülvorgang beginnt. Während des Durchspülvorgangs füllt sich das System mit Wasser
aus dem Wasserbehälter. Die Maschine erzeugt lautere Geräusche als während des normalen
Brühvorgangs.
10 Wenn der Wassertank leer (Abb. 8) ist, schaltet sich die Maschine aus.
20
Deutsch

11 Reinigen Sie nach dem ersten Durchspülen den Sammelring und den Padhalter mit heißem Wasser
und etwas Spülmittel oder im Geschirrspüler. Spülen Sie die Thermo-Kanne unter fließendem
Wasser ab.
Eine Kanne Filterkaffee brühen
1 Öffnen Sie den Deckel der Kaffeemaschine (Abb. 9).
2 Entfernen Sie den Padhalter, sofern dieser vorhanden (Abb. 10) ist.
3 Entnehmen Sie die Tropfschale, sofern vorhanden.
4 Füllen Sie den Wasserbehälter mit klarem kaltem Wasser bis zu der Höhe entsprechend der
gewünschten Anzahl Tassen Kaffee, und setzen Sie den Behälter wieder in die Maschine (Abb. 11)
ein.
5 Spülen Sie die Thermo-Kanne zum Vorwärmen mit heißem Leitungswasser aus.
Tipp: Das beste Aroma und den heißesten Kaffee erhalten Sie, wenn Sie mindestens eine halbe
Kanne Kaffee brühen.
6 Setzen Sie den Filterhalter auf die Thermo-Kanne (Abb. 12) auf.
7 Öffnen Sie den Deckel des Filterhalters.
8 Setzen Sie eine Papierfiltertüte der Größe102 in den Filterhalter ein. Falten Sie die geprägten
Ränder um, um sicherzustellen, dass die Filtertüte während des Brühvorgangs (Abb. 13) aufrecht
stehen bleibt.
9 Geben Sie mithilfe des Messlöffels die erforderliche Menge gemahlenen Kaffee in den Filter (Abb.
14).
Tipp: Nehmen Sie einen gestrichenen Messlöffel gemahlenen Kaffee pro Tasse. Nehmen Sie einen
gehäuften Messlöffel für starken Kaffee und einen gestrichenen Messlöffel für milden Kaffee.
10 Schließen Sie den Deckel des Filterhalters.
11 Schieben Sie die Thermo-Kanne auf die Platte der Maschine (Abb. 15).
12 Drücken Sie die Kannentaste, um den Brühvorgang (Abb. 16) zu beginnen.
-
Die Kannentaste beginnt zu blinken, und der Brühvorgang beginnt (Abb. 17).
-
Wenn sämtliches Wasser aus dem Wasserbehälter den Filter durchlaufen hat, erlischt die
Kannentaste, und die Maschine wird automatisch ausgeschaltet.
13 Sie können die Thermo-Kanne nun von der Maschine (Abb. 18) entfernen.
14 Nehmen Sie den Filterhalter von der Thermo-Kanne (Abb. 19) ab.
Tipp: Sie können den Filterhalter auf die Abtropfschale stellen, damit kein Kaffee auf Ihre
Arbeitsfläche fließt, während Sie Kaffee aus der Kanne (Abb. 20) eingießen.
15 Setzen Sie den Deckel auf die Thermo-Kanne auf, und drehen Sie ihn in die Warmhalteposition
(Symbol des geschlossenen Schlosses) (Abb. 21).
16 Drücken Sie den Hebel des Kannendeckels, um Kaffee in Tassen (Abb. 22) einzugießen.
Kaffee mit Kaffeepads brühen
Eine Tasse Kaffee mit einem Kaffeepad brühen
1 Füllen Sie den Wasserbehälter bis zur Markierung MAX mit klarem kaltem Wasser, und setzen Sie
ihn wieder auf die Maschine (Abb. 3).
Hinweis: Die MIN-Anzeige auf dem Wasserbehälter weist auf die Mindestmenge Wasser hin, die für
das Aufbrühen von Kaffee erforderlich ist. Füllen Sie den Wasserbehälter immer bis über die MIN-
Anzeige hinaus.
21
Deutsch

2 Stecken Sie den Netzstecker in eine geerdete Steckdose.
3 Öffnen Sie den Deckel der Maschine, indem Sie den Hebel aufwärts (Abb. 9) bewegen.
4 Setzen Sie die Abtropfschale auf die Platte der Maschine (Abb. 23).
5 Setzen Sie ein Kaffeepad mit der konvexen Seite nach unten (Abb. 24) in den Einzeltassen-
Padhalter.
Hinweis: Vergewissern Sie sich, dass der Padhalter sauber und das Sieb in der Mitte nicht verstopft
ist, z.B. durch loses Kaffeepulver.
Hinweis: Achten Sie darauf, dass der Kaffee in den Pads gleichmäßig verteilt ist, und drücken Sie
die Pads im Padhalter leicht an.
6 Setzen Sie den Einzeltassen-Padhalter in die Maschine ein, und schließen Sie den Deckel (Abb. 5).
7 Stellen Sie eine Tasse auf die Abtropfschale (Abb. 25).
8 Drücken Sie die 1-Tasse-Taste, um Kaffee (Abb. 26) zu brühen.
-
Die Taste beginnt zu blinken, und die Maschine wird aufgeheizt (Abb. 27).
-
Sobald der Heizvorgang abgeschlossen ist, beginnt die Maschine, Kaffee (Abb. 28) zu brühen.
Nach dem Brühen schaltet sich das Gerät automatisch aus.
9 Nehmen Sie nach Gebrauch den Padhalter aus dem Gerät, und entsorgen (Abb. 10) Sie das
Kaffeepad.
Achtung: Seien Sie dabei vorsichtig. Es könnte sich noch heißes Wasser oder Kaffee auf den
Kaffeepads befinden.
Achtung: Verwenden Sie keinesfalls normalen gemahlenen Kaffee oder beschädigte Pads in Ihrer
Kaffeepadmaschine, da dies das Gerät verstopfen würde.
Zwei Tassen Kaffee mit Kaffeepads brühen
1 Um zwei Tassen Kaffee mit Kaffeepads zu brühen, setzen Sie den tieferen Padhalter für 2 Tassen in
die Maschine ein. Legen Sie zwei Pads in den Padhalter für 2Tassen (Abb. 29).
2 Drücken Sie die 2-Tassen-Taste, um Kaffee zu brühen (Abb. 30).
-
Die Taste beginnt zu blinken, und die Maschine wird aufgeheizt (Abb. 31).
-
Sobald der Heizvorgang abgeschlossen ist, beginnt die Maschine, Kaffee zu brühen (Abb. 32).
Nach dem Brühen schaltet sich das Gerät automatisch aus.
3 Nehmen Sie nach Gebrauch den Padhalter aus dem Gerät, und entsorgen (Abb. 33) Sie die
Kaffeepads.
Hinweis: Anstelle von zwei Pads können Sie auch ein Pad für Cappuccino oder Kakao oder ein
Spezialpad für starken Kaffee in den Padhalter für 2Tassen legen und eine Tasse unter den
Kaffeeauslauf stellen. Drücken Sie in diesem Fall die 1-Tasse-Taste anstelle der 2-Tassen-Taste, um
das Getränk zu brühen.
Bestellen von Zubehör
Um Zubehör oder Ersatzteile zu kaufen, gehen Sie auf www.shop.philips.com/service, oder suchen
Sie Ihren Philips Händler auf. Sie können sich auch an ein Philips Service-Center in Ihrem Land
wenden. Die Kontaktdaten finden Sie in der internationalen Garantieschrift.
22
Deutsch
Seite wird geladen ...
Seite wird geladen ...
Seite wird geladen ...
Seite wird geladen ...
Seite wird geladen ...
Seite wird geladen ...
Seite wird geladen ...
Seite wird geladen ...
Seite wird geladen ...
Seite wird geladen ...
Seite wird geladen ...
Seite wird geladen ...
Seite wird geladen ...
Seite wird geladen ...
Seite wird geladen ...
Seite wird geladen ...
Seite wird geladen ...
Seite wird geladen ...
Seite wird geladen ...
Seite wird geladen ...
Seite wird geladen ...
Seite wird geladen ...
Seite wird geladen ...
Seite wird geladen ...
Seite wird geladen ...
Seite wird geladen ...
Seite wird geladen ...
Seite wird geladen ...
Seite wird geladen ...
Seite wird geladen ...
Seite wird geladen ...
Seite wird geladen ...
-
 1
1
-
 2
2
-
 3
3
-
 4
4
-
 5
5
-
 6
6
-
 7
7
-
 8
8
-
 9
9
-
 10
10
-
 11
11
-
 12
12
-
 13
13
-
 14
14
-
 15
15
-
 16
16
-
 17
17
-
 18
18
-
 19
19
-
 20
20
-
 21
21
-
 22
22
-
 23
23
-
 24
24
-
 25
25
-
 26
26
-
 27
27
-
 28
28
-
 29
29
-
 30
30
-
 31
31
-
 32
32
-
 33
33
-
 34
34
-
 35
35
-
 36
36
-
 37
37
-
 38
38
-
 39
39
-
 40
40
-
 41
41
-
 42
42
-
 43
43
-
 44
44
-
 45
45
-
 46
46
-
 47
47
-
 48
48
-
 49
49
-
 50
50
-
 51
51
-
 52
52


SENSEO® HD7892/01 Benutzerhandbuch
- Kategorie
- Kaffeemaschinen
- Typ
- Benutzerhandbuch
in anderen Sprachen
- English: SENSEO® HD7892/01 User manual
- français: SENSEO® HD7892/01 Manuel utilisateur
- Nederlands: SENSEO® HD7892/01 Handleiding
Verwandte Artikel
-
SENSEO® HD7892/21 Benutzerhandbuch
-
SENSEO® HD6591 Benutzerhandbuch
-
SENSEO® HD6592/80 Benutzerhandbuch
-
-
SENSEO® HD7811/98 Benutzerhandbuch
-
SENSEO® HD7860/67 Benutzerhandbuch
-
Senseo HD7862 Benutzerhandbuch
-
SENSEO® HD7810/19 Benutzerhandbuch
-
SENSEO® HD7804/40 Benutzerhandbuch
Andere Dokumente
-
Philips HD7544/56 Bedienungsanleitung
-
-
Philips CSA230/10 Benutzerhandbuch
-
-
 Yoo Digital PICKYOO 100 Bedienungsanleitung
-
-
Tefal CM290838 Bedienungsanleitung
-
-
-
