
USER GUIDE / GUIDE D’UTILISATION
BENUTZERLEITFADEN / ISTRUZIONI PER L’USO
GUÍA DE UTILIZACIÓN / GUIA DE UTILIZAÇÃO
GEBRUIKSGIDS / РУКОВОДСТВО ПОЛЬЗОВАТЕЛЯ
/
ﻝﺎﻤﻌﺘﺳﻹﺍ ﻞﻴﻟﺩ
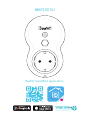
BBP200 EU

BBLP200 EU
BeeWi SmartPad application:

User’s guide
4
9
14
20
26
32
38
44
50
ENGLISH
FRANCAIS
DEUTSCH
ITALIANO
ESPAÑOL
PORTUGUES
NEDERLANDS
PУССКИЙ
ﺔﻴﺑﺮﻌﻟﺍ

4
ENGLISH
INTRODUCTION
The BBP200 Smart Plug, one of the most innovative of its generation, can be fully controlled
remotely using a dedicated Smartphone app. It is fully programmable and can be used
to remotely control AC power source to an external appliance as well as monitoring
motion and temperature in its environment. It is perfectly suited for various types of home
automation applications:
- Turn on and off appliances manually using either included button or app button
- Turn on and off appliances based on time, temperature or motion events
- Monitor histories such as motion events and temperature curves
Compliant with latest Bluetooth 4.0 technology, it is compatible with other Smart ready
devices such as Smartphones and Tablets by means of dedicated applications.
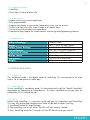
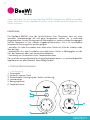
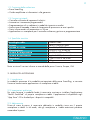
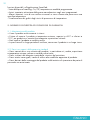
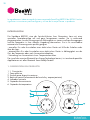
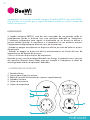
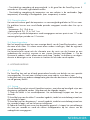
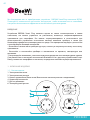
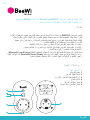
1. PRODUCT DESCRIPTION
1.1. Product Outlook
1. AC Plug
2. AC Socket
3. Control Button (Socket Power On/Off and Pairing)
4. Status Light
5. Motion Sensor
6. Temperature Sensor
Thank you for purchasing the BBP200 SmartPlug from BEEWI. Please read the following
instructions to learn how to configure and use more effectively your product
1
5
2
6
4
3

5
ENGLISH
1.2. Package Content
• SmartPlug
• Quick Start Guide and other info
1.3. Main features
• Remote control your electric appliances
• Fully programmable
• Program your heater to get comfort temperature when you are present
• Switch on a light when you come through or at specific hours
• Get the history of presence and temperature
• Smartphone App support for remote control, monitoring and programming features
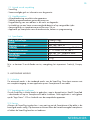
1.4. Specifications
2. STANDALONE MODE
2.1. Introduction
The standalone mode is the default mode for SmartPlug. This corresponds to the local
access via a Smartphone or Tablet app.
2.2. Initial Settings
To use SmartPlug in standalone mode, first download and install the “BeeWi SmartPad”
application on Smartphone or Tablet devices. This app is available on the app stores for
compatible iOS & Android devices.
2.3. Pairing
Before using SmartPlug, it is necessary to securely pair the Smartphone and SmartPlug.
This way, only authorized Smartphone or Table will be able to access the Plug.
1) Download the BeeWi SmartPad app.
2) Plug SmartPlug into a wall socket. The LED will flash once by second.
3) Press SmartPlug button for 2 seconds until the LED flashes twice per second.
Radio technology Bluetooth Smart
Range Class 2, up to 30 meter typical
Output Power Ratings 16A max, up to 3600 W
Power Ratings Input : AC 100-250V, 50-60 Hz
Temperature sensor +/- 1° C from -25° to +85°C
Motion sensor 100° radius, up to 5 meters
Dimensions L124 x W76 x H36.5 mm
Weight 170 g

6
ENGLISH
4) Open the app and press “Add Peripheral” to look for your peripheral and initiate
pairing.
5) Once “BeeWi SmartPlug” is listed, select it to pair it. After successful pairing, a new box
is showing in the app home screen and the LED will turn off.
2.3. Restauration
SmartPlug can be restored in factory preset state including factory firmware version. To
restore the firmware and delete all pairing or status user data, just press the button whilst
plugging SmartPlug into a wall socket.
Restoration is confirmed by means of the Led indicator blinking quickly for a few seconds.
3. USING THE APP
3.1. Home Screen
The home screen is listing all the peripherals paired and connected to the device.
By selecting the peripheral box, it is possible to:
- Reconnect the peripheral in case the connection has been lost
- Access the Control screen when the peripheral is connected
- Drag and move the box when holding the finger on the box
In the peripheral box, you will find the following information and function:
- SmartPlug picture (user defined)
- SmartPlug name (user defined, “BeeWi SmartPlug” by default)
- Connection status and signal strength bar
- Power switch and temperature status
- Manual power switch button (if not in thermostat mode)
- Current mode (manual, presence, timer or thermostat)
It is possible to control the power switch directly from the SmartPlug box without opening
the Control screen.
3.2. Control Screen
In the Control screen, it is possible to program specific behaviors such as:
- Manual switch only.
- Switch power on/off depending on the time: in that case, the user can set up a specific
time slots for power on.
- Switch power on/off depending on presence: in that case the power on switch can be
timed from 5 seconds to 5 minutes.
- Switch power on/off depending on actual temperature to set up eco and comfort
temperature period during the day.
3.3. History Screen
The history screen provides up to 24H history graphs for both temperature and presence.
Both graphs can be set for different period of times, by clicking on them.
- Temperature: 24, 12, and 6H

7
ENGLISH
- Presence: 24, 12, 6, 3 and 1H
Note the temperature is shown in steps of 1° C and presence in slots of 10 minutes
3.4. Edition Screen
The edition screen allows for editing SmartPlug details such as name and picture and
other settings such as presence recording.
The edition screen also includes a button to update SmartPlug with the latest firmware or
to switch it in remote mode. To update the firmware, just press the “Update peripheral”
button in Edition screen, then confirm action and wait for about 6 minutes for the
firmware update to be confirmed.
4. GATEWAY MODE
4.1. Introduction
SmartPlug can also be controlled remotely via the internet using a specific internet
gateway. For more information, see our web site www.bee-wi.com.
In that case, it is necessary to use a different web application as described in the BeeWi
Gateway manual.
4.2. Pairing
In order to list your SmartPlug as part of the HomeBee network, it is necessary to pair it
securely with the Master Gateway. To do this, follow these steps:
1) Fit SmartPlug into a wall socket. The LED will flash once per second
2) Press the SmartPlug button for 2 seconds until the LED flashes twice per second.
3) Press the Gateway button for 1 second until the LED flashes twice per second to
initiate pairing.
4) Once SmartPlug has been successfully paired with the Gateway, the LED will revert
to the connected state flashing once par second and the new peripheral will show in the
web app home screen.
4.3. Web server
Go to the HomeBee portal using a web browser or the web app to access your peripheral.
Using the portal under your own account, it will be possible to access the same functions
supported by the SmartPad app:
- SmartPlug status: On/Off, temperature and current mode.
- Action settings: switch the SmartPlug On and Off manually or depending on time, pres-
ence or temperature.
- Alert settings: send an alert email in case of presence detection or specific temperature
level.
- View history graphs for presence and temperature.

8
ENGLISH
5. CAUTION & WARRANTY EXCEPTIONS
5.1. Taking care of your product
• Use the product indoor only.
• Avoid storage at extreme temperatures, above 45°C (including direct sunlight) or
below -10°C.
• Do not expose the product to rain or moisture.
• When not in use, always store the product in a safe place.
5.2. Damages not covered by standard Warranty
• Damages caused by an improper use of the product such as shocks, drops, exposition
to extreme temperatures, dust, or humidity, or any other cause.
• Damages resulting from any non-respect of manufacturer instructions.
• Cosmetic damages such as scratches, paint, glue or any other alteration made to the
product.
• Damages to the product after an repair or disassembly from non authorized personal.
Copyright and other legal information
BEEWI is a registered trademark. Other trademarks mentioned herewith are owned by
their proprietors. All other product or service names are the property of their respective
owners.
The use of wireless devices and their accessories may be prohibited or restricted in certain
areas. Always obey the laws and regulations on the use of these products.
This product is covered by a 2-year product warranty which is valid from the date of
purchase. Users are not permitted to make changes or modify the device in any way.
Changes or modifications not expressly approved by the party responsible for compliance
will void the user’s warranty.
Please visit our website www.bee-wi.com for more information.
Technical support: [email protected].
© OTIO, 2016.
OTIO-SAS, 719 rue Albert Camus - 31190 Auterive - France

9
FRANÇAIS
INTRODUCTION
La prise connectée BBP200, une des plus avancées de sa génération, peut être
complètement gérée à distance avec une application dédiée sur Smartphone. Elle est
entièrement programmable pour régler l’alimentation d’un dispositif électrique et permet
aussi de contrôler les mouvements et la température dans son environnement proche. Elle
parfaitement adaptée pour différent types d’automatismes :
- Allumer ou éteindre manuellement un dispositif électrique au moyen du bouton physique
ou à partir de l’application
- Allumer ou éteindre un dispositif électrique automatiquement en fonction de l’heure, de
la température ou de la détection de présence
- Gérer les historiques de présence ou de température
Basée sur la dernière technologie Bluetooth Low Energy, elle est compatible avec
l’ensemble des appareils Bluetooth Smart Ready comme les Smartphones et tablettes de
récente génération au moyen d’applications dédiées.
1. DESCRIPTION DU PRODUIT
1.1. Description
1. Prise électrique
2. Socle pour dispositif externe
3. Bouton de contrôle (Alimentation du socle et appairage)
4. Indicateur lumineux
5. Capteur de mouvement
6. Capteur de température
Merci d’avoir choisi la prise connectée SmartPlug BBP200 de BEEWI. Veuillez lire les
instructions suivantes afin de configurer et utiliser au mieux votre produit.
1
5
2
6
4
3

10
FRANÇAIS
1.2. Contenu du pack
• Prise SmartPlug
• Guide simplifié et information de garantie
1.3. Caractéristiques principales
• Contrôle à distance des dispositifs électriques
• Automatismes entièrement programmables
• Programmation d’un radiateur en modes économique et confort
• Allumage d’une lampe sur détection de présence ou à heures spécifiques
• Historiques de présence et de température sur 24 heures
• Application sur Smartphone pour contrôle à distance, gestion et programmation
1.4. Spécifications
2. MODE AUTONOME
2.1. Introduction
Le mode autonome est le mode par défaut de la prise SmartPlug. Cela correspond à un
accès local via une application sur Smartphone ou tablette.
2.2. Réglages préalables
Pour utiliser la prise en mode local, télécharger et installer l’application « BeeWi
SmartPad » sur Smartphone ou tablette. Cette application est disponible sur les « App
Stores » iOS & Android pour les appareils compatibles.
2.3. Appairage
Avant d’utiliser la prise, il est nécessaire de l’apparier en mode sécurisé avec le
Smartphone ou la tablette. De cette manière, seuls les Smartphones ou tablettes autorisés
pourront adresser et commander la prise.
1) Télécharger et installer l’application BeeWi SmartPad
2) Brancher la prise dans le socle mural. L’indicateur clignote une fois par seconde.
Technologie radio Bluetooth Smart
Portée Classe 2, jusqu’à 30 mètres
Puissance de sortie Max 16A, 3600 W
Alimentation 100-250V Alternatif, 50-60 Hz
Capteur de température +/- 1°C de -25° à +85°C
Capteur de mouvement Angle de 100°, distance 5 mètres
Dimensions L124 x l76 x H36.5 mm
Poids 170 g

11
FRANÇAIS
3) Appuyer sur le bouton de la prise pendant 2 secondes jusqu’à ce que l’indicateur
clignote deux fois par seconde..
4) Lancer l’application SmartPad et activer le bouton “Ajouter périphérique » pour
rechercher le périphérique.
5) Dès que la prise « BeeWi SmartPlug » est listée, la sélectionner pour l’apparier. Après
un appairage réussi, un nouveau cartouche est affiché sur l’écran principal et l’indicateur
s’éteint.
2.4. Restauration
La prise SmartPlug peut être restaurée à l’état initial incluant le firmware usine. Pour
restaurer le firmware usine et supprimer les données d’appairage ou d’utilisation,
appuyer sur le bouton tout en branchant la prise sur un socle mural. La restauration est
confirmée par l’indicateur clignotant rapidement pendant quelques seconds.
3. UTILISATION DE L’APPLICATION
Attention: certaines opérations peuvent différer en fonction de l’OS de l’appareil.
3.1. Ecran principal
L’écran principal liste les différents périphériques appariés sous forme de cartouches.
En sélectionnant un cartouche de périphérique, il est possible de :
- Reconnecter le périphérique dans le cas où la connexion a été perdue
- Accéder à l’écran de contrôle lorsque le périphérique est connecté
Dans le cartouche, vous trouverez les informations et les fonctions suivantes:
- Icône de la prise SmartPlug (éditable)
- Nom de la prise SmartPlug (éditable, par défaut “BeeWi SmartPlug”)
- Etat de la connexion et barre de signal
- Etat On/Off et valeur de température
- Bouton interrupteur On/Off (si le mode thermostat n’est pas actif)
- Mode présent (manuel, présence, minuteur ou thermostat)
Il est possible de contrôler le bouton On/Off directement sur le cartouche sans ouvrir
l’écran de contrôle.
3.2. Ecran de contrôle
Dans l’écran de contrôle il est possible de faire les réglages suivants :
- Commutation manuelle uniquement
- Commutation en fonction du temps : dans ce cas, l’utilisateur peut programmer des
plages de temps spécifiques pour l’allumage de la prise.
- Commutation en fonction de la présence : dans ce cas, la prise peut s’allumer pendant
5 secondes jusqu’à 5 minutes.
- Commutation en fonction de la température pour régler un radiateur en modes
économique (température réduite) et confort (température max) durant la journée.
3.3. Ecran d’historiques
L’écran d’historiques affiche les graphes de température et de présence jusqu’à 24

12
FRANÇAIS
heures. Les graphes peuvent être ajustés sur différente périodes en cliquant dessus :
- Température : 24, 12 ou 6 H
- Présence : 24, 12, 6, 3 ou 1H
Noter que la température est affichée avec une précision de 1°C et la présence par
plage de 10 minutes.
3.4. Ecran d’édition
L’écran d’édition permet l’édition de certains détails de la prise SmartPlug tels que
le nom ou l’icône. Cet écran inclus aussi d’autres réglages tells que les fonctions
d’enregistrement de la présence.
L’écran d’édition inclus aussi l’information de version du firmware et un bouton de mise
à jour qui apparait dans le cas où un nouveau firmware est disponible. Pour mettre à
jour le firmware, presser simplement le bouton “Mise à jour” puis confirmer l’action et
attendre environ 6 minutes la fin de la mise à jour.
4. MODE DISTANT
4.1. Introduction
La prise SmartPlug peut aussi être contrôlée à distance en utilisant une passerelle internet
dédiée. Pour plus de renseignements consultez notre site web : www.bee-wi.com.
Dans ce cas, il est nécessaire d’utiliser une application web différente comme décrit dans
le manuel de la passerelle BeeWi.
4.2. Appairage
Pour enregistrer la prise sur le réseau HomeBee, il est nécessaire de l’apparier de manière
sécurisée à la passerelle. Pour ce faire, suivre les étapes suivantes:
1) Brancher la prise dans le socle mural. L’indicateur clignote une fois par seconde.
2) Appuyer sur le bouton de la prise pendant 2 secondes jusqu’à ce que l’indicateur
clignote deux fois par seconde.
3) Appuyer sur le bouton de la passerelle pendant 1 seconde jusqu’à ce que l’indicateur
clignote deux fois par seconde pour initier l’appairage.
4) Dès que la prise est appariée avec succès à la passerelle, l’indicateur clignote une fois
par secondes et le nouveau périphérique s’affiche sur l’écran de l’application web.
4.3. Serveur Web
Aller sur le portail HomeBee en utilisant un navigateur internet ou l’application Web sur
Smartphone et tablette pour accéder au périphérique.
En utilisant le portail avec votre compte utilisateur, il est possible d’accéder à la plupart
des fonctions disponibles sur l’application SmartPad :
- Etats de la prise SmartPlug : On/Off, valeur de température et mode programmé.
- Réglages des actions: activation de la prise manuellement ou selon les heures
programmées.
- Réglages des alertes : envoi d’une alerte par email en cas de présence détectée ou de

13
FRANÇAIS
niveau spécifique de température.
- Visualisation des graphes d’historique de présence ou de température.
5. PRECAUTIONS ET EXCLUSIONS DE GARANTIE
5.1. Entretien du produit
• Utiliser le produit en intérieur uniquement.
• Eviter d’exposer le produit à des températures extrêmes, au-delà de 45°C ou en-deçà
de -10°C pour conserver un fonctionnement et des performances optimales.
• Ne pas exposer le produit à l’humidité ou la moisissure.
• En cas de non utilisation prolongée, entreposer le produit dans un endroit sûr.
5.2. Dommages non couverts par la garantie standard
• Dommages causés par une utilisation inadéquate du produit, notamment choc, chute,
exposition à des températures extrêmes, à la poussière ou l’humidité ou autres causes.
• Dommages résultant du non-respect des instructions du constructeur.
• Dommages cosmétiques tels que, éraflures, traces de colles ou autres changement fait
au produit.
• Dommages consécutifs au démontage du produit ou à une tentative de réparation par
du personnel non autorisé.
Copyright et autres informations
BEEWI est une marque déposée. Les autres marques mentionnées ci-après appartiennent
à leurs propriétaires. Les autres noms de produit ou de service utilisés sont la propriété de
leurs détenteurs respectifs.
L’utilisation d’appareils sans fil et de ses accessoires peuvent être interdite dans certains
endroits. Toujours respecter les réglementations et lois en vigueur.
Ce produit est couvert par une garantie de deux ans s’appliquant à compter de la date
d’achat du matériel. Les utilisateurs n’ont pas l’autorisation de faire quelque changement
ou modification que ce soit. Tout changement ou modification non expressément approuvé
annule la garantie.
Veuillez visiter notre site web www.bee-wi.com pour plus d’information.
Support technique: suppor[email protected].
© OTIO, 2016.
OTIO-SAS, 719 rue Albert Camus - 31190 Auterive - France

14
DEUTSCH
EINLEITUNG
Die Steckdose BBP200, eine der fortschrittlichsten ihrer Generation, kann mit einer
speziellen Smartphone-App voll und ganz ferngesteuert werden. Sie ist umfassend
programmierbar, um die Versorgung eines Elektrogeräts zu steuern und kann Bewegungen
und die Temperatur in ihrer näheren Umgebung überwachen. Sie ist für verschiedene
automatische Steuerungsarten perfekt geeignet:
- manuelles Ein- oder Ausschalten eines elektrischen Geräts mit Hilfe des Schalters oder
über die App,
- automatisches Ein- oder Ausschalten eines elektrischen Geräts in Abhängigkeit von der
Zeit, der Temperatur oder nach Anwesenheitsdetektion,
- Verwaltung von Anwesenheits- bzw. Temperaturberichten.
Da sie auf der neuesten Bluetooth Low Energy-Technologie basiert, ist sie anhand spezieller
Applikationen mit allen Bluetooth Smart Ready-Geräten
1. PRODUKTBESCHREIBUNG
1.1. Beschreibung
1. Stromstecker
2. Sockel für externes Gerät
3. Kontrollschalter (Versorgung des Sockels und Pairing)
4. Leuchtanzeige
5. Bewegungssensor
6. Temperatursensor
Vielen Dank, dass Sie sich für die SmartPlug BBP200 Steckdose von BEEWI entschieden
haben. Bitte lesen Sie die folgenden Hinweise, um Ihr Produkt optimal konfigurieren und
nutzen zu können.
1
5
2
6
4
3

15
DEUTSCH
1.2. Verpackungsinhalt
• SmartPlug-Steckdose
• Kurzleitfaden und Garantieinformation
1.3. Hauptmerkmale
• Fernsteuerung elektrischer Geräte
• Voll programmierbare Automatik
• Programmierung eines Heizkörpers im Modus Economy und Komfort
• Einschalten einer Lampe nach Anwesenheitsdetektion oder zu bestimmten Zeiten
• Anwesenheits- und Temperaturberichte für 24 Stunden
• Smartphone-App für Fernsteuerung, -verwaltung und -programmierung
1.4. Spezifikationen
Hinweis: Je nach Land (Frankreich, Europa, USA) gibt es 3 verschiedene Versionen.
2. AUTONOMER MODUS
2.1. Einleitung
Der autonome Modus ist der Standardmodus der SmartPlug-Steckdose. Dieser entspricht
einem lokalen Zugriff über eine Smartphone- oder Tablet-App.
2.2. Vorherige Einstellungen
Um die Steckdose im lokalen Modus benutzen zu können, ist zunächst die „BeeWi
SmartPad“-App herunterzuladen und auf dem Smartphone oder Tablet zu installieren.
Diese App steht in den iOS- und Android- App Stores für kompatible Geräte zur Verfügung.
2.3. Pairing
Vor der Benutzung muss die Steckdose mit dem Smartphone oder Tablet im abgesicherten
Modus gepairt werden. Damit können nur berechtigte Smartphones oder Tablets auf die
Steckdose zugreifen und diese steuern.
Funktechnologie Bluetooth Smart
Reichweite Klasse 2, bis 30 Meter
Ausgangsleistung max. 16 A, 3600 W
Versorgung 100-250 V Wechselstrom, 50-60 Hz
Temperatursensor +/- 1 °C von -25 bis +85 °C
Bewegungssensor Winkel 100°, Entfernung 5 Meter
Abmessungen L 124 x B 76 x H 36,5 mm
Gewicht 170 g

16
DEUTSCH
1) Laden Sie die BeeWi SmartPad-App herunter und installieren Sie sie.
2) Stecken Sie den Stecker in den Wandsockel. Die Anzeige blinkt im Sekundentakt.
3) Drücken Sie 2 Sekunden auf den Knopf der Steckdose, bis die Anzeige zweimal pro
Sekunde blinkt.
4) Starten Sie die SmartPad-Applikation und aktivieren Sie die Schaltfläche „Periphe-
riegerät hinzufügen“, um die Suche nach dem Peripheriegerät zu starten.
5) Sobald die BeeWi SmartPlug-Steckdose in der Liste erscheint, wählen Sie sie für das
Pairing aus. Nach erfolgreichem Pairing erscheint ein neues Symbol auf dem Haupt-
bildschirm und die Anzeige erlischt.
2.4. Wiederherstellung des Ausgangszustands
Die SmartPlug-Steckdose kann inkl. Werks-Firmware in den Ausgangszustand zurück-
versetzt werden. Zur Wiederherstellung der Werks-Firmware und Löschen der Pairing-
bzw. Benutzerdaten ist die Steckdose mit dem Wandsockel zu verbinden und der Knopf zu
drücken. Der Ausgangszustand ist wiederhergestellt, wenn die Anzeige einige Sekunden
lang schnell blinkt.
3. VERWENDUNG DER APPLIKATION
Achtung: Einige Vorgänge können in Abhängigkeit von der OS des Geräts abweichen.
3.1. Hauptbildschirm
Auf dem Hauptbildschirm sind die verschiedenen gepairten Peripheriegeräte in Form von
Symbolen aufgelistet.
Wenn Sie das Symbol eines Peripheriegeräts wählen, können Sie:
- das Peripheriegerät erneut verbinden, sofern die Verbindung verloren gegangen ist,
- zum Kontrollbildschirm gelangen, wenn das Peripheriegerät verbunden ist.
In dem Symbol finden Sie die folgenden Informationen und Funktionen:
- das Icon der SmartPlug-Steckdoses (editierbar),
- den Namen der SmartPlug-Steckdoses (editierbar, standardmäßig „BeeWi SmartPlug“),
- den Verbindungsstatus und die Signalleiste,
- den Zustand On/Off und den Temperaturwert,
- den On/Off-Schalter (wenn der Thermostatmodus nicht aktiv ist),
- den aktuellen Modus (manuell, Anwesenheit, Timer oder Thermostat).
Der Ein-/Aus-Schalter kann direkt auf dem Symbol gesteuert werden, ohne den Kontroll-
bildschirm öffnen zu müssen.
3.2. Kontrollbildschirm
Auf dem Kontrollbildschirm können die folgenden Einstellungen vorgenommen werden:
- nur manuelle Umschaltung
- zeitabhängige Umschaltung: Der Benutzer kann spezielle Zeitabschnitte program-mieren,
in denen die Steckdose eingeschaltet ist.
- präsenzabhängige Umschaltung: Die Steckdose kann 5 Sekunden bis 5 Minuten
eingeschaltet sein.
- temperaturabhängige Umschaltung, um einen Heizkörper tagsüber im Econo-my-Modus

17
DEUTSCH
(reduzierte Temperatur) und im Komfort-Modus (max. Temperatur) zu steuern.
3.3. Berichtsbildschirm
Der Berichtsbildschirm zeigt die Temperatur- und Anwesenheitskurven bis zu 24 Stunden
an. Die Kurven können durch Anklicken an verschiedene Zeitabschnitte angepasst werden:
- Temperatur: 24, 12 oder 6 Stunden
- Anwesenheit: 24, 12, 6, 3 oder 1 Stunde
Bitte beachten Sie, dass die Temperatur mit einer Genauigkeit von 1 °C und die Anwe-
senheit im 10-Minuten-Rhythmus angezeigt werden.
3.4. Editierbildschirm
Auf dem Editierbildschirm können bestimmte Details der SmartPlug-Steckdose wie Name
oder Icon editiert werden. Dieser Bildschirm umfasst weitere Einstellungen wie die An-
wesenheits-Registrierfunktion.
Der Editierbildschirm umfasst desweiteren Informationen über die Version der Firmware und
eine Update-Schaltfläche, die erscheint, sobald eine neue Firmware zur Verfügung steht.
Um die Firmware zu aktualisieren, müssen Sie nur auf die Schaltfläche „Aktualisieren“
drücken, die Aktion bestätigen und ca. 6 Minuten warten, bis das Update beendet ist.
4. FERNSTEUERUNGS-MODUS
4.1. Einleitung
Die SmartPlug-Steckdose kann auch ferngesteuert werden. Dazu ist ein spezielles Inter-net-
Gateway erforderlich. Für mehr Informationen besuchen Sie bitte unsere Webseite: www.
bee-wi.com.
In diesem Fall ist eine andere Web-Applikation zu verwenden, wie im Handbuch des
BeeWi-Gateways beschrieben.
4.3. Pairing
Zur Registrierung der Steckdose im HomeBee-Netz ist sie mit dem Gateway im abgesi-
cherten Modus zu pairen. Befolgen Sie dazu die folgenden Schritte:
1) Stecken Sie den Stecker in den Wandsockel. Die Anzeige blinkt im Sekundentakt.
2) Drücken Sie 2 Sekunden auf den Knopf der Steckdose, bis die Anzeige zweimal pro
Sekunde blinkt.
3) Drücken Sie 1 Sekund auf den Knopf des Gateways, bis die Anzeige zweimal pro
Sekunde blinkt. Das Pairing beginnt.
4) Sobald die Steckdose erfolgreich mit dem Gateway gepairt ist, blinkt die Anzeige
im Sekundentakt, und das neue Peripheriegerät erscheint auf dem Bildschirm der Web-
Applikation.
4.4. Web-Server
Gehen Sie mit einem Internetbrowser oder der Web-Applikation auf dem Smartphone oder

18
DEUTSCH
Tablet auf die HomeBee-Seite, um zum Peripheriegerät zu gelangen.
Mit Hilfe des Portals und mit Ihrem Benutzerkonto können Sie auf die meisten, in der
SmartPad-Applikation verfügbaren Funktionen zugreifen:
- Zustände der SmartPlug-Steckdose: On/Off, Temperaturwert und programmierter Modus.
- Einstellung der folgenden Aktionen: manuelle Aktivierung der Steckdose oder gemäß den
programmierten Zeiten.
- Einstellung der Alarmmeldungen: Versand einer Alarmmeldung per E-Mail bei Fest-
stellung einer Anwesenheit oder einer speziellen Temperatur.
- Anzeige der Anwesenheits- und Temperatur-Berichtskurven.
5. VORSICHTSMASSNAHMEN UND GARANTIEAUSSCHLÜSSE
5.1. Pflege des Produkts
• Verwenden Sie das Produkt nur in Innenräumen.
• Vermeiden Sie, das Produkt extremen Temperaturen über 45 °C oder unter -10 °C aus-
zusetzen, um dessen optimale Funktions- und Leistungsfähigkeit zu erhalten.
• Das Produkt weder Feuchtigkeit noch Schimmel aussetzen.
• Bei einer längeren Nichtverwendung das Produkt an einem sicheren Ort lagern.
5.2. Schäden, die von der Standardgarantie nicht gedeckt sind
• Schäden, die auf eine unsachgemäße Nutzung des Produkts zurückzuführen sind, vor
allem auf Stoß, Herunterfallen, Aussetzen gegenüber extremen Temperaturen, Staub oder
Feuchtigkeit, sowie auf sonstige Gründe
• Schäden, die auf die Nichteinhaltung der Hinweise des Herstellers zurückzuführen sind
• Kosmetische Schäden wie Kratzer, Klebstoffreste oder andere Veränderungen, die am
Produkt vorgenommen wurden
• Schäden infolge der Demontage des Produkts oder von Reparaturversuchen durch nicht
berechtigte Personen

19
DEUTSCH
Copyright und sonstige Informationen
BEEWI ist eine eingetragene Marke. Die anderen nachfolgend erwähnten Marken stehen
im Eigentum ihrer Eigentümer. Die anderen verwendeten Produkt- oder Servicenamen
stehen im Eigentum ihrer jeweiligen Inhaber.
Die Nutzung von drahtlosen Geräten und ihrem Zubehör kann an bestimmten Orten
verboten sein. Halten Sie immer die geltenden Vorschriften und Gesetze ein.
Die Garantie für dieses Produkt beträgt ab dem Kaufdatum zwei Jahre. Die Benutzer sind
nicht berechtigt, das Produkt zu verändern oder zu modifizieren. Veränderungen oder
Modifi-zierungen, die nicht ausdrücklich genehmigt wurden, führen zum Erlöschen der
Garantie.
Für weitere Informationen besuchen Sie bitte unsere Webseite www.bee-wi.com.
Technischer Support: [email protected].
© OTIO, 2016
OTIO-SAS, 719 rue Albert Camus - 31190 Auterive - France

20
ITALIANO
INTRODUZIONE
La presa intelligente BBP200, una delle più avanzate della sua generazione, può essere
completamente gestita a distanza tramite un’applicazione dedicata su smartphone. La
presa è interamente programmabile per regolare l’alimentazione di un apparecchio
elettrico e permette inoltre di rilevare movimenti e la temperatura ambientale. È ideale per
diversi tipi di automatismi:
- Accendere o spegnere manualmente un apparecchio elettrico tramite pulsante fisico o a
partire dall’applicazione
- Accendere o spegnere automaticamente un apparecchio elettrico, in funzione dell’ora,
della temperatura o della rilevazione di presenza
- Gestire gli storici di presenza o di temperatura
Usando la più recente tecnologia Bluetooth Low Energy, la presa intelligente è compatibile
con tutti i dispositivi Bluetooth Smart Ready, come smartphone e tablet di ultima
generazione, tramite le applicazioni dedicate.
1. DESCRIZIONE DEL PRODOTTO
1.1. Componenti
1. Spina elettrica
2. Presa per apparecchio esterno
3. Pulsante di controllo (alimentazione della presa e abbinamento)
4. Spia luminosa
5. Sensore di movimento
6. Sensore di temperatura
Grazie per aver scelto la presa intelligente SmartPlug BBP200 di BEEWI. Leggi le seguenti
istruzioni per configurare e usare al meglio il prodotto.
1
5
2
6
4
3
Seite wird geladen ...
Seite wird geladen ...
Seite wird geladen ...
Seite wird geladen ...
Seite wird geladen ...
Seite wird geladen ...
Seite wird geladen ...
Seite wird geladen ...
Seite wird geladen ...
Seite wird geladen ...
Seite wird geladen ...
Seite wird geladen ...
Seite wird geladen ...
Seite wird geladen ...
Seite wird geladen ...
Seite wird geladen ...
Seite wird geladen ...
Seite wird geladen ...
Seite wird geladen ...
Seite wird geladen ...
Seite wird geladen ...
Seite wird geladen ...
Seite wird geladen ...
Seite wird geladen ...
Seite wird geladen ...
Seite wird geladen ...
Seite wird geladen ...
Seite wird geladen ...
Seite wird geladen ...
Seite wird geladen ...
Seite wird geladen ...
Seite wird geladen ...
Seite wird geladen ...
Seite wird geladen ...
Seite wird geladen ...
Seite wird geladen ...
-
 1
1
-
 2
2
-
 3
3
-
 4
4
-
 5
5
-
 6
6
-
 7
7
-
 8
8
-
 9
9
-
 10
10
-
 11
11
-
 12
12
-
 13
13
-
 14
14
-
 15
15
-
 16
16
-
 17
17
-
 18
18
-
 19
19
-
 20
20
-
 21
21
-
 22
22
-
 23
23
-
 24
24
-
 25
25
-
 26
26
-
 27
27
-
 28
28
-
 29
29
-
 30
30
-
 31
31
-
 32
32
-
 33
33
-
 34
34
-
 35
35
-
 36
36
-
 37
37
-
 38
38
-
 39
39
-
 40
40
-
 41
41
-
 42
42
-
 43
43
-
 44
44
-
 45
45
-
 46
46
-
 47
47
-
 48
48
-
 49
49
-
 50
50
-
 51
51
-
 52
52
-
 53
53
-
 54
54
-
 55
55
-
 56
56


in anderen Sprachen
- English: BeeWi BBP200-A1 User manual
- français: BeeWi BBP200-A1 Manuel utilisateur
- español: BeeWi BBP200-A1 Manual de usuario
- italiano: BeeWi BBP200-A1 Manuale utente
- русский: BeeWi BBP200-A1 Руководство пользователя
- Nederlands: BeeWi BBP200-A1 Handleiding
- português: BeeWi BBP200-A1 Manual do usuário
Verwandte Artikel
Andere Dokumente
-
 Sensear SmartPlug Benutzerhandbuch
-
Sitecom WLE-1100 Installationsanleitung
-
Sitecom WLE-1000INT Installationsanleitung
-
Braun 9500 Benutzerhandbuch
-
Braun Triumph Professional Care 9500 Benutzerhandbuch
-
Braun Triumph 4000 Benutzerhandbuch
-
-
Kodak WSP801 Schnellstartanleitung
-
Salus RT510SPE Installationsanleitung
