
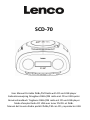
SCD-70
User Manual Portable DAB+/FM Radio with CD and USB player
Gebruiksaanwijzing Draagbare DAB+/FM radio met CD en USB speler
Benutzerhandbuch Tragbares DAB+/FM radio mit CD und USB-player
Mode d’emploi Radio CD USB avec tuner FM PLL et DAB+
Manual del Usuario Radio portátil DAB+/FM con CD y reproductor USB

2
Index
English ……………………………………………………………………………………………………… 3
Nederlands ………………………………………………………………………………………………. 13
Deutsch …………………………………………………………………………………………………… 26
Français ………………………………………………………………………………………………………39
Español …………………………………………………………………………………………………….. 52

3
English
SCD-70
Caution:
Safety instructions
IMPORTANT SAFETY INSTRUCTIONS - READ CAREFULLY BEFORE USE.
CAUTION
RISK OF ELECTRICAL SHOCK
DO NOT OPEN
CAUTION: TO PREVENT AN ELECTRICAL SHOCK, DO NOT REMOVE ANY COVER
SCREWS. THERE ARE NO USER SERVICEABLE PARTS INSIDE. REQUEST A
QUALIFIED SERVICE PERSON TO PERFORM SERVICING.
This symbol indicates that there are important operating maintenance instructions in the user
manual accompanying this device.
This symbol indicates that dangerous voltage is present within this device, constituting a risk
of electric shock or personal injury.
Keep these instructions in mind:
Do not use this device near water.
Clean only with a slightly damp cloth.
Do not cover or block any ventilation opening. When placing the device on a shelf,
leave 5 cm (2”) free space around the whole device.
Install in accordance with the supplied user manual.
Don’t step on or pinch the power cord. Be very careful, particularly near the plugs and
the cable’s exit point. Do not place heavy items on the power cord, which may damage
it.
Keep the entire device out of children’s reach! When playing with the power cable, they
can seriously injure themselves.
Unplug this device during lightning storms or when unused for a long period.
Keep the device away from heat sources such as radiators, heaters, stoves, candles
and other heat-generating products.
Avoid using the device near strong magnetic fields.
Electrostatic interference may interfere with the normal use of this device. If this occurs,
reset the device and restart it according to the instructions in the user manual. During
file transfer, handle with care and in a static-free environment.
WARNING! NEVER INSERT AN OBJECT INTO THE PRODUCT THROUGH THE
VENTS OR OPENINGS. HIGH VOLTAGE FLOWS THRU THE PRODUCT AND
INSERTING AN OBJECT CAN CAUSE ELECTRIC SHOCK AND/OR SHORT
CIRCUIT INTERNAL PARTS. FOR THE SAME REASON, DO NOT SPILL WATER OR
LIQUID ON THE PRODUCT.
Do NOT use in wet or moist areas such as bathrooms, steamy kitchens or near
swimming pools.

4
Do not use this device when condensation may occur.
This device is produced according to all current safety regulations. The following safety tips
should safeguard users against careless use and dangers involved with such use.
Although this device is manufactured with the utmost care and checked several times
before leaving the factory, it is still possible that problems may occur, as with all
electrical appliances. If you notice smoke, an excessive build-up of heat or any other
unexpected phenomena, you should disconnect the plug from the main power socket
immediately.
This device must be well ventilated at all time!
This device must operate on a power source as specified on the specification label. If
you are not sure of the type of power supply used in your home, consult your dealer or
local power company.
The socket outlet must be installed near the equipment and must be easily accessible.
Do not overload AC outlets or extension cords. Overloading can cause fire or electric
shock.
Devices with a Class II adaptor do not need a earthed connection.
Keep away from rodents. Rodents enjoy biting on power cords.
Always hold the plug when pulling it out of the main supply socket. Do not pull the
power cord. This can cause a short circuit.
The screen is made of plastic and can break when damaged. When broken, be careful
with sharp edged plastic splinters to avoid injury.
Avoid placing the device on any surfaces that may be subject to vibrations or shocks.
To protect the device during a thunderstorm, unplug the AC power cable.
When the device is not in use for long periods, unplug the AC power cable for safety
reasons.
Do NOT knock on, press, hit or shake the screen as you may damage the internal
circuits.
To clean the device, use a soft dry cloth. Do NOT use solvents or petrol based fluids.
To remove severe stains, you may use a damp cloth with dilute detergent.
WARNING: Long-term exposure to loud sounds may lead to temporary or permanent hearing
impairment.
Declaration of Conformity
Products with the CE marking comply with the Radio Equipment Directive(RED) 2014/53/EU
issued by the Commission of the European Community.
Do not distribute copyright
Do not distribute copyright-protected material without the permission of the content owners.
Doing this may violate copyright laws. The manufacturer is not liable for any legal issues
caused by the user’s illegal use of copyrighted material.

5
Keep your personal and important data safe
When you want to dispose of your device reset your device to prevent misuse of your
personal information.
Disclaimer
Some content and services accessible through this device belong to third parties and are
protected by copyright, patent content and services are solely provided for your personal and
non may not use any content or services in a manner that has not been authorized by the
content owner or service provider. Without limiting the foregoing, unless expressly authorized
by the applicable content owner or service provider, you may not modify, copy, repub post,
transmit, translate, sell, or create derivative works, exploit, or distribute in any manner or
medium any content or services displayed through this device.
THIRD PARTY CONTENT AND SERVICES ARE PROVIDED ‘AS IS.’ LENCO
DOES NOT WARRANT CONTENT OR SERVICES SO PROVIDED, NEITHER EXPRESSLY
NOR IMPLIED, FOR ANY PURPOSE. LENCO EXPRESSLY DISCLAIMS ANY IMPLIED
WARRANTIES, INCLUDING BUT NOT LIMITED TO, WARRANTIES OF
MERCHANTABILITY OR FITNESS FOR A PARTICULAR PURPOSE. LENCO DOES NOT
GUARANTEE THE ACCURACY, VALIDITY, TIMELINESS, LEGALITY, OR
COMPLETENESS OF ANY CONTENT OR SERVICE MADE AVAILABLE THROUGH THIS
DEVICE. UNDER NO CIRCUMSTANCES, INCLUDING NEGLIGENCE, SHALL LENCO BE
LIABLE. NEITHER IN CONTRACT, NOR TORT, FOR ANY DIRECT, INDIRECT,
INCIDENTAL, SPECIAL OR CONSEQUENTIAL DAMAGES, ATTORNEY FEES,
EXPENSES, OR ANY OTHER DAMAGES ARISING OUT OF, OR IN CONNECTION WITH,
ANY INFORMATION CONTAINED IN, OR AS A RESULT OF THE USE OF ANY CONTENT
OR SERVICE BY YOU OR ANY THIRD PARTY, EVEN IF ADVISED OF THE PO OF SUCH.
Third party services may be terminated or interrupted at any time, and Lenco makes no
representation or warranty that any content or service will remain available for any period.
Content and services are transmitted by third parties by means of networks and transmission
facilities over which Lenco has no control. Without limiting the generality of this disclaimer,
Lenco expressly disclaims any responsibility or liability for any interruption or suspension of
any content or service made available through this device. Lenco is neither responsible nor
liable for customer service related to the content and services. Any question or request for
service relating to the content or services should be made directly to the respective content
and service providers.

6
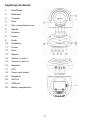
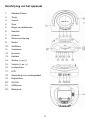
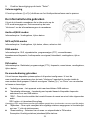
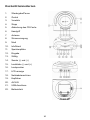
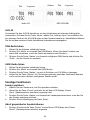
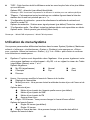
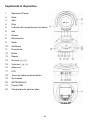
Exploring the device
1. Play/Pause
2. Backward
3. Forward
4. Stop
5. Disc compartment cover
6. Handle
7. Antenna
8. Power
9. Mode
10. Info/Menu
11. Preset
12. Enter
13. Repeat
14. Station (-) and (+)
15. Volume (-) and (+)
16. Speakers
17. LCD
18. Power cord socket
19. Earphone
20. AUX IN
21. USB port
22. Battery compartment

7
Getting Started
Never place the player in direct sunlight. For comfortable viewing, we recommend a soft
light. Place it on a sturdy platform of which the surface should be flat and steady, so the
product can’t fall or hit by any objects. Make sure the product is placed in such a manner
that nothing can fall on top of it, as pressure will damage or break the product. Prevent
insertion of objects into the ventilation slots, or openings in the cabinet at all time.
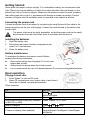
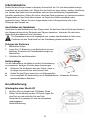
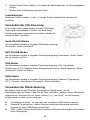
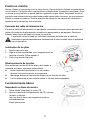
Connecting the power cord
Connect the power cord to the player by connecting the small flat end of the cable to the
power connection on the rear of the player. Connect the wide flat end of the cable to the
power outlet.
The power outlet must be easily accessible, so that the power cord can be easily
disconnected from the outlet when there is a problem with the device.
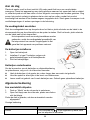
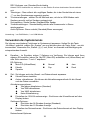
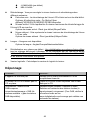
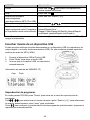
Installing the batteries
1. Open the battery door
2. Follow the polar mark in battery compartment and
insert 6 x C size batteries
3. Close the battery door
Battery maintenance
To maximize the battery and remote control lifetime,
please follow these instructions:
Remove the battery from the player if it is not used
longer than a week.
Always keep the player away from heat sources.
Lenco recommends the use of A-brand batteries. Do not use rechargeable batteries.
Basic operation
Playing a music disc
1. Press “Mode” to choose CD mode
2. Open CD compartment cover, place a disc in and close it.
Once disc is loaded, and play automatically.
Other operation
TO
Do this
Pause Press once. To return to playback, press
this button again
Stop Press once
Select previous/next folder(only available
in MP3 CD or USB)
Press “Station (-)/(+)” once
Select a track/file Press or once
Repeat play(Repeat mode appear every
10 secs on display when enabled)
Press “Repeat” button to select between
Normal/Repeat One/Repeat Folder/Repeat
All/Shuffle

8
Note: Resume play is cancelled when (1)you open the CD compartment or (2)you turn off the
power
Listening to music on a USB device
You can listen to audio files stored on a USB device (a digital music player or USB storage
media). Audio files in MP3 and WMA can be played on this unit.
1. Connect the USB device to the USB port
2. Press “Mode” to choose USB mode
3. Once USB is loaded, it will play automatically.
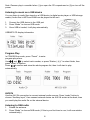
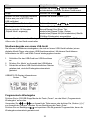
USB/MP3 CD display information
Program Play
In CD/USB Stop mode, press “Preset”, to enter
program play menu.
Use and to select track number, or press “Station (-)/(+)” to select folder, then
press “enter” to confirm.
Press to confirm and store the whole program list, then it will start to play
automatically.
AUX IN
Use the AUX IN connection to connect external audio sources. Press “mode” button to
choose “Auxiliary Input”, then connect external device via AUX IN socket at the back, then
you could play the audio file on the external device.
Listening to DAB radio
1. Extend the antenna.
2. Press “Mode” to choose DAB mode. (If this is your first time to use, it will scan station
automatically.)

9
3. Press “Station” button to choose available DAB stations, press “Enter” to change
station.
Listening to FM radio
1. Extend the antenna.
2. Press “Mode” to choose FM mode.
3. Press “Station” button to move every 0.05MHz
4. Press and hold “Station” button for 2 seconds and then release the button, it will scan
and stop at next broadcast station.
Other Operations
Store Stations
1. Select the station you wish to presets.
2. Press and hold “Preset” button until the LCD display Preset Store.
3. Press “Station” buttons to select which preset number you like.
4. Press “Enter” button to confirm.
Recall Preset Stations
1. Press “Preset” button once, the LCD display Preset Recall.
2. Press “Station” buttons to select which preset station you would recall.
3. Press “Enter” button to confirm.
Volume control
You could press volume (-) or (+) to adjust the speaker loudness.
Using the Info control
It is possible to change the information that is displayed
on the LCD at each mode. To change the information
display, press “Info/menu” button once.
Audio CD/AUX mode
Information cycling through: Power source, time and
date.
MP3 CD/USB mode
Information cycling through: Power source, time, date, album, artist and title.
DAB mode
Information cycling through: DLS, signal strength, programme type(PTY), Ensemble name,
channel number/frequency, signal error rate, bit rate, power source, time and date.
FM mode
Information cycling through: Radio text, programme type(PTY), frequency, Mono/Stereo,
power source, time and date.

10
Using the Menu control
It let you to configure some system option or this product. To change the menu setting,
press and hold “Info/menu” button until entered to menu mode, use “Station(-)/(+)” and
“Enter” to choose and confirm your selection correspondingly.
*Full scan – it will scan available DAB stations.
*Manual tune – manually select a particular channel/frequency for DAB station.
*DRC - This function reduces the difference between the loudest and quietest audio
being broadcast.
DRC options: off(default)/high/low
Note: DRC only works if it is enabled by the broadcaster for a specific station.
*Prune - This removes all invalid stations indicated in the station list with a ‘?’ in front
of the station name.
^Scan setting – select the method of scans and stop at FM mode.
Scan options: Strong stations (default)/All stations
^Audio setting – By default, all stereo stations are reproduced in stereo.
Audio options: Stereo allowed (default)/Forced mono)
Remarks: * DAB mode only, ^ FM mode only
Using the System menu
You could tailor different functions in System menu. Press and hold “Info/menu” and select
“System”, then press “Enter” to login to. Use “Station (-)/(+)” and “Enter” to choose and
confirm your selection correspondingly.
Equaliser – There are 7 options in equalizer. You could also create your own EQ, by
select “My EQ” and adjust (Treble/Bass) from -7 to +7 level.
EQ Options:
My EQ
(Treble/Bass)
Normal Jazz
Classic Pop Rock
Speech
Time – You could tailor your time and date format.
Set Time/Date
Auto update – You could choose the update method of time and date.
Update options:
Update from Any(default)
Update from DAB
Update from FM
No update
Set 12/24 hour – You could change the time format on the display.
Time format options:
Set 24 hour(default)
Set 12 hour

11
Set date format - You could change the date format on the display.
Date format options:
DD-MM-YYYY(default)
MM-DD-YYYY
Backlight – You could adjust the level of backlight in different scenarios.
Timeout – LCD backlight will switch off in corresponding duration.
Timeout options: On(default)/10/20/30/45/60/90/120/180 seconds
On level – It represents the LCD backlight level during working.
On Level options: High(default)/Medium/Low
Dim level – It represents the LCD backlight level during standby mode.
Dim Level options: High(default)/Medium/Low
Language – There have 4 languages option.
Language options: English/French/Dutch/Italian
Factory Reset – A factory reset clears all user defined settings, replacing them with
the original default values, so time/date, preferences/settings, DAB station list and
preset stations are all lost.
SW version – It shows the software version of the player.
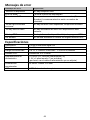
Trouble Shooting
Problem: Solutions:
The device does not turn on Make sure the AC power cord is connected to the
correctly.
The CD player does not play even
when a CD is in place
Place the CD with label side up.
Clean the CD.
FM Hiss/DAB Burbling/intermittent
cut-out/DAB No stations available
message
Check/move antenna. Move radio. Rescan local
(high-strength) stations only. (For DAB, check local
coverage at www.ukdigitalradio.com/coverage then
rescan stations).
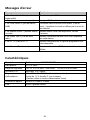
Error messages
Error messages Meaning
‘Service not available’ No DAB reception.
‘Signal error’ The DAB signal has been interrupted.
‘No DAB Station’ The listed station cannot be found. (No Name): The current
station does not broadcast an identity name.
‘No stations found’ No DAB stations are available, check aerial.
‘No Radio Text’ No RDS text information is available on this station.
‘No PTY’ No RDS programme type information is available.
‘No Name’ No RDS station name is being broadcast.

12
Specifications
Description: CD/MP3/DAB/FM Digital Radio
Speaker: 2 x 1W rms
Frequency Ranges: FM: 87.5-108MHz; DAB/DAB+: 174.928-239.200 MHz
LCD Display: 16 x 2 lines display
Power Requirements: 110-240V AC, 50/60Hz (AC power supply)
1.5V x 6 C-size batteries(not included)
(please use our provided power cord)
Approx. Dimensions: 241mm x 120mm x 219mm
USB: USB2.0 Full Speed
Guarantee
Lenco offers service and warranty in accordance with the European law, which means that
in case of repairs (both during and after the warranty period) you should contact your local
dealer.
Important note: It is not possible to send products that need repairs to Lenco directly.
Important note: If this unit is opened or accessed by a non-official service center in any way,
the warranty expires.
This device is not suitable for professional use. In case of professional use, all warranty
obligations of the manufacturer will be voided.
Disclaimer
Updates to Firmware and/or hardware components are made regularly. Therefore some of
the instruction, specifications and pictures in this documentation may differ slightly from
your particular situation. All items described in this guide for illustration purposes only and
may not apply to particular situation. No legal right or entitlements may be obtained from
the description made in this manual.
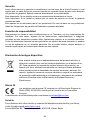
Disposal of the Old Device
This symbol indicates that the relevant electrical product or battery should not be
disposed of as general household waste in Europe. To ensure the correct waste
treatment of the product and battery, please dispose them in accordance to any
applicable local laws of requirement for disposal of electrical equipment or
batteries. In so doing, you will help to conserve natural resources and improve
standards of environmental protection in treatment and disposal of electrical
waste (Waste Electrical and Electronic
Equipment Directive).
CE Marking
Products with the CE marking comply with the Radio Equipment
Directive(RED) 2014/53/EU issued by the Commission of the European
Community.
The declaration of conformity may be consulted via techdoc@lenco.com
Service
For more information and helpdesk support, please visit www.lenco.com
Lenco Benelux BV, Thermiekstraat 1a, 6361 HB, The Netherlands.

13
Nederlands SCD-70
Let op:
Veiligheidsinstructies
BELANGRIJKE VEILIGHEIDSAANWIJZINGEN - LEES ZE VOOR HET GEBRUIK
ZORGVULDIG DOOR.
LET OP
RISICO OP ELEKTRISCHE SCHOK
OPEN HET APPARAAT NIET
LET OP: VERWIJDER GEEN VAN DE SCHROEVEN VAN DE BEHUIZING, OM
ELEKTRISCHE SCHOKKEN TE VOORKOMEN. GEEN INTERNE ONDERDELEN DIE U
ZELF KUNT REPAREREN. VRAAG EEN GEKWALIFICEERDE ONDERHOUDSPERSOON
HET APPARAAT TE REPAREREN.
Dit symbooltje geeft aan dat er belangrijke gebruik- en onderhoudinstructies aanwezig zijn in
de gebruikshandleiding meegeleverd met dit apparaat.
Dit symbooltje waarschuwt op de aanwezigheid van gevaarlijke spanning binnenin dit
apparaat, krachtig genoeg om een risico op elektrische schokken of persoonlijk letsel te
vormen.
Houd rekening met de volgende instructies:
Gebruik dit apparaat niet in de buurt van water.
Reinig het uitsluitend met een licht vochtige doek.
Blokkeer of bedek geen van de ventilatieopeningen. Wanneer u het apparaat op een
schap plaatst, dient u 5 cm (2”) vrije ruimte rondom het gehele apparaat te behouden.
Installeer het product volgens de meegeleverde gebruikshandleiding.
Niet op de voedingskabel stappen of deze indrukken. Ben voornamelijk voorzichtig in
de buurt van de stekkers en het punt waar de kabel uit het apparaat komt. Plaats geen
zware voorwerpen op de voedingskabel waardoor de kabel beschadigd kan raken.
Houd het gehele apparaat buiten bereik van kinderen! Wanneer kinderen met de
voedingskabel spelen, kunnen zij ernstig letsel oplopen.
Haal de stekker uit het stopcontact tijdens onweer of wanneer voor langere tijd niet
gebruikt.
Houd het apparaat uit de buurt van hittebronnen, zoals radiateurs, verwarmingen,
kachels, kaarsen en andere hittegenererende producten.
Gebruik dit apparaat niet in de buurt van krachtige magnetische velden.
Elektrostatische interferentie kan het normale gebruik van dit apparaat aantasten. Stel
het apparaat in dit geval terug en herstart het volgens de instructies in de
gebruikshandleiding. Tijdens overdracht van bestanden, voorzichtig hanteren en in een
omgeving zonder statische interferentie.

14
WAARSCHUWING! STEEK NOOIT EEN VOORWERP IN HET PRODUCT VIA DE
VENTILATIEOPENINGEN OF ANDERE OPENINGEN. HOGE SPANNING AANWEZIG
IN DIT PRODUCT: INSTEKEN VAN VOORWERPEN KAN TOT ELEKTRISCHE
SCHOKKEN EN/OF KORTSLUITING VAN DE INTERNE ONDERDELEN LEIDEN.
MORS OM DEZELFDE REDEN GEEN WATER OF VLOEISTOF OP HET PRODUCT.
Gebruik het toestel NIET in vochtige ruimtes, zoals badkamers, stomerige keukens of in
de buurt van zwembaden.
Gebruik dit apparaat niet wanneer condensatie kan optreden.
Dit apparaat is gefabriceerd in overeenstemming met alle huidige veiligheidsvoorschriften.
De volgende veiligheidtips dienen gebruikers te beschermen tegen onvoorzichtig gebruik en
de gevaren als gevolg van dit soort gebruik.
Al is dit apparaat met grote zorg gefabriceerd en verschillende keren geïnspecteerd
voordat het de fabriek verlaat, het is nog steeds mogelijk dat er problemen optreden,
zoals met alle elektrische apparaten. Als u rook, een overmatige hitteontwikkeling of
enig ander onverwacht verschijnsel, moet u onmiddellijk de stekker van het netsnoer uit
het stopcontact halen.
Dit apparaat moet te allen tijde goed worden geventileerd!
Dit apparaat moet op een voedingsbron werken zoals gespecificeerd op het
specificatieplaatje. Als u twijfelt over het type voeding gebruikt in uw huis, raadpleeg
dan a.u.b. uw dealer of plaatselijk energiebedrijf.
Het stopcontact moet in de buurt van de apparatuur zijn geïnstalleerd en eenvoudig te
bereiken zijn.
Laat AC-stopcontacten of verlengsnoeren nooit overbelast raken. Overbelasting kan
brand of een elektrische schok veroorzaken.
Apparaten met een klasse II adapter vereisen geen massaverbinding.
Houd ze uit de buurt van knaagdieren. Knaagdieren knauwen graag aan
voedingskabels.
Houd altijd de stekker vast wanneer u deze uit het stopcontact trekt. Trek nooit aan de
voedingskabel. Dit kan tot een kortsluiting leiden.
Het scherm is gemaakt van plastic en kan breken wanneer beschadigd. Wanneer
gebroken, ben voorzichtig met scherpe plastic splinters om letsel te voorkomen.
Vermijd om het toestel te plaatsen op een ondergrond die blootgesteld kan worden aan
trillingen of schokken.
Koppel de AC-voedingskabel los om het apparaat te beschermen tijdens onweer.
Wanneer u het apparaat voor langere tijd niet gebruikt, onkoppel om veiligheidsredenen
a.u.b. de AC-voedingskabel.
NIET op het scherm slaan, drukken, kloppen of deze schudden, om beschadiging van
de interne circuits te voorkomen.
Gebruik een zacht, droog doekje om het apparaat te reinigen. Gebruik GEEN
oplosmiddelen of op benzine gebaseerde vloeistoffen. U kunt een vochtig doekje met
verdund schoonmaakmiddel gebruiken om hardnekkige vlekken te verwijderen.
WAARSCHUWING: Langdurige blootstellingh aan luide geluiden kan tot tijdelijke of

15
permanente gehoorbeschadiging leiden.
Conformiteitsverklaring
Producten met de CE-markering voldoen aan de Radioapparatuur Richtlijn (RED)
2014/53/EU gepubliceerd door de Europese Gemeenschap.
Auteursrecht niet distribueren
Auteursrechtelijk beschermde materialen niet distribueren zonder toestemming
van de eigenaren van de inhoud. Hierdoor kunnen auteursrechten worden
overtreden. De fabrikant is niet aansprakelijk voor enigerlei juridische problemen
veroorzaakt door illegaal gebruik van auteursrechtelijk beschermde materialen
door de gebruiker.
Houd uw persoonlijke en belangrijke gegevens veilig
Wanneer u uw apparaat afdankt, stel deze terug om misbruik van uw persoonlijke informatie
te voorkomen.
Disclaimer
Sommige inhoud en services toegankelijk via dit gebruik behoren tot derden en zijn
beschermd door auteursrecht; gepatenteerde inhoud en services zijn uitsluitend voor u
persoonlijk verstrekt. Enigerlei inhoud of services mogen niet worden gebruikt op een wijze
niet geautoriseerd door de eigenaar van de inhoud of door de serviceprovider. Zonder
beperking van het voorgaande, tenzij uitdrukkelijk geautoriseerd door de betreffende
eigenaar van de inhoud of serviceprovider, mag u enigerlei inhoud of services weergegeven
door dit apparaat op geen enkele wijze en via geen enkel medium modificeren, kopiëren,
opnieuw publiceren, overdragen, vertalen, afgeleide werken verkopen of creëren, exploiteren
of distribueren.
INHOUD EN SERVICES VAN DERDEN ZIJN VERSTREKT ZONDER VERDERE
BEWERKING. LENCO
GARANDEERT GEEN INHOUD OF SERVICES OP DEZE WIJZE VERSTREKT,
UITGEDRUKT NOCH GEÏMPLICEERD, VOOR ENIGERLEI DOELEINDE. LENCO WIJST
ENIGERLEI GEÏMPLICEERDE GARANTIES UITDRUKKELIJK AF, INCLUSIEF MAAR NIET
BEPERKT TOT, GARANTIES OP VERKOOPBAARHEID OF GESCHIKTHEID VOOR EEN
BEPAALD DOELEINDE. LENCO GARANDEERT NIET DE NAUWKEURIGHEID,
GELDIGHEID, ACTUALITEIT, LEGITIMITEIT OF VOLLEDIGHEID VAN ENIGERLEI INHOUD
OF SERVICES BESCHIKBAAR GESTELD VIA DIT APPARAAT. LENCO KAN IN GEEN
ENKEL GEVAL, WAARONDER NALATIGHEID, AANSPRAKELIJK WORDEN GESTELD.
NOCH IN CONTRACT, NOCH WEGENS ONRECHTMATIGE DADEN, VOOR ENIGERLEI
DIRECTE, INDIRECTE, INCIDENTELE OF SPECIALE SCHADE, OF GEVOLGSCHADE,
ADVOCAATKOSTEN, ONKOSTEN, OF ENIGERLEI ANDERE SCHADE ALS GEVOLG VAN,
OF IN VERBAND MET, ENIGERLEI INFORMATIE OPGENOMEN IN, OF ALS EEN
RESULTAAT VAN HET GEBRUIK VAN ENIGERLEI INHOUD OF SERVICES DOOR U OF
ENIGERLEI DERDE, ZELFS WANNEER GEADVISEERD OVER DE MOGELIJKHEID

16
HIERVAN.
Services van derden kunnen te allen tijde worden afgebroken of onderbroken, en Lenco
maakt geen verklaring en garandeert niet dat enigerlei inhoud of service beschikbaar zal
blijven voor enigerlei tijdsperiode. Inhoud en services worden door derden overgedragen
d.m.v. netwerken en overdrachtfaciliteiten waarover Lenco geen controle heeft. Zonder
beperking van de algemeenheid van deze disclaimer, wijst Lenco uitdrukkelijk enigerlei
verantwoordelijkheid of aansprakelijkheid af voor enigerlei onderbrekingen of uitstellingen
van enigerlei inhoud of services beschikbaar gesteld door dit apparaat. Lenco is niet
verantwoordelijk noch aansprakelijk voor klantendiensten gerelateerd aan de inhoud en
services. Enigerlei vragen of verzoek om service m.b.t. de inhoud of services dient direct te
worden gesteld aan de providers van de betreffende inhoud en service.

17
Beschrijving van het apparaat
1. Afspelen/Pauze
2. Terug
3. Vooruit
4. Stop
5. Klepje van diskhouder
6. Handvat
7. Antenne
8. Stroomvoorziening
9. Modus
10. Info/Menu
11. Voorkeuze
12. Invoeren
13. Herhaal
14. Station (-) en (+)
15. Volume (-) en (+)
16. Luidsprekers
17. LCD
18. Aansluiting voor voedingskabel
19. Koptelefoon
20. AUX IN
21. USB-poort
22. Batterijvak

18
Aan de slag
Plaats de speler nooit in direct zonlicht. Wij raden zacht licht voor een comfortabele
weergave. Plaats het apparaat op een stevig platform waarvan het oppervlak vlak en stabiel
is, zodat het product niet kan vallen of door enigerlei voorwerpen kan worden gestoten. Zorg
ervoor het product zodanig te plaatsen dat er niets op kan vallen, omdat het product
beschadigd zal worden of kan breken wegens toegepaste druk. Steek geen voorwerpen in de
ventilatieopeningen of andere openingen in de behuizing.
De voedingskabel aansluiten
Sluit de voedingskabel aan op de speler door het kleine, platte uiteinde van de kabel in de
stroomaansluiting op de achterzijde van de speler te steken. Sluit het brede, platte uiteinde
van de kabel aan op het stopcontact.
Het stopcontact moet eenvoudig bereikbaar worden
gehouden, zodat de voedingskabel gemakkelijk van
het stopcontact kan worden losgekoppeld in het
geval dat het apparaat een probleem vertoont.
De batterijen installeren
1. Open het batterijvak
2. Installeer 6 x type C batterijen volgens de
polariteitmarkeringen in de batterijhouder.
3. Sluit het batterijklepje.
Batterijen onderhouden
Om de levensduur van de batterijen en afstandsbediening
te optimaliseren, volg a.u.b. de instructies hieronder:
Haal de batterijen uit de speler als u deze langer dan een week niet gebruikt.
Houd de speler te allen tijde uit de buurt van hittebronnen.
Lenco raadt het gebruik van A-merk batterijen aan. Gebruik geen oplaadbare batterijen.
Algemene bediening
Een muziekdisk afspelen
1. Druk op “Mode” om de cd-modus te selecteren.
2. Open het klepje van de cd-houder, plaats een disk en
sluit het klepje.
Zodra de disk is geladen, zal deze automatisch worden
afgespeeld.
Overige bediening
Functie
Actie
Pauze Druk eenmaal op . Druk nogmaals op deze toets
om het afspelen te hervatten.

19
Stop Druk eenmaal op .
De vorige/volgende folder
selecteren (alleen beschikbaar in de
modus MP3-cd of USB)
Druk eenmaal op “Station (-)/(+)”.
Een track/bestand selecteren. Druk eenmaal op of .
Herhaald afspelen (de
herhaalmodus wordt elke
10 seconden op de display
weergegeven wanneer actief).
Druk op de toets “Repeat” om te wisselen tussen
Normal (Normaal)/
Repeat One (Herhaal Één)/Repeat Folder (Herhaal
Map)/Repeat All (Herhaal Alles)/Shuffle (Willekeurig).
Opmerking: Het afspelen wordt geannuleerd wanneer u (1) de cd-houder opent of (2) het
apparaat uitschakelt.
Naar muziek op een USB-apparaat luisteren
U kunt luisteren naar audiobestanden die zijn opgeslagen op een USB-apparaat (een digitale
muziekspeler of USB-opslagmedium). Dit apparaat kan audiobestanden afspelen in het
formaat MP3 en WMA.
1. Sluit het USB-apparaat aan op de USB-poort.
2. Druk op “Mode” om de USB-modus te selecteren.
3. Zodra de USB is geladen, wordt deze automatisch
afgespeeld.
Weergave-informatie USB/MP3-cd
Geprogrammeerde afspeelmodus
Druk met de cd/USB gestopt op “Preset” om het menu te openen voor de geprogrammeerde
afspeelmodus.
Gebruik en om het gewenste tracknummer te selecteren of druk op “Station (-)/(+)”
om een folder te selecteren, druk vervolgens ter bevestiging op “Enter”.
Druk op om de gehele geprogrammeerde lijst te bevestigen en op te slaan en
vervolgens automatisch af te spelen.
Folder Track

20
AUX IN
Gebruik de “AUX IN”-ingang om externe audiobronnen aan te sluiten. Druk op de toets
“Mode” om “Aux-ingang” te selecteren, sluit vervolgens een extern apparaat aan op de “AUX
IN”-ingang op de achterzijde en u kunt nu de audiobestanden op het externe apparaat
afspelen.
Naar de DAB-radio luisteren
1. Verleng de antenne.
2. Druk op “Mode” om de DAB-modus te selecteren. (als u deze functie voor het eerst
gebruikt, zal het apparaat automatisch naar stations zoeken).
3. Druk op de toets “Station” om beschikbare DAB-stations te selecteren en druk op
“Enter” om van station te wisselen.
Naar de FM-radio luisteren
1. Verleng de antenne.
2. Druk op “Mode” om de FM-modus te selecteren.
3. Druk op de toets “Station” om met stappen van 0,05MHz te scannen.
4. Houd de toets “Station” 2 seconden ingedrukt en laat de toets vervolgens los; het
apparaat zal scannen en stoppen op het volgende station.
Overige bedieningen
Stations opslaan
1. Selecteer het station dat u in het geheugen wilt opslaan.
2. Houd de toets “Preset” ingedrukt tot de LCD-display “Preset Store” (Stationgeheugen
opslaan) weergeeft.
3. Druk op de toets “Station” om het gewenste geheugennummer te selecteren.
4. Druk ter bevestiging op de toets “Enter”.
Voorkeuzezenders oproepen
1. Druk eenmaal op de toets “Preset” totdat de LCD-display “Preset Recall”
(Stationgeheugen herroepen) weergeeft.
2. Druk op de toets “Station” om het stationgeheugen te selecteren dat u wilt herroepen.
Track Programmering
Folder Track Programmering
Audio-cd
MP3-cd/USB
Seite wird geladen ...
Seite wird geladen ...
Seite wird geladen ...
Seite wird geladen ...
Seite wird geladen ...
Seite wird geladen ...
Seite wird geladen ...
Seite wird geladen ...
Seite wird geladen ...
Seite wird geladen ...
Seite wird geladen ...
Seite wird geladen ...
Seite wird geladen ...
Seite wird geladen ...
Seite wird geladen ...
Seite wird geladen ...
Seite wird geladen ...
Seite wird geladen ...
Seite wird geladen ...
Seite wird geladen ...
Seite wird geladen ...
Seite wird geladen ...
Seite wird geladen ...
Seite wird geladen ...
Seite wird geladen ...
Seite wird geladen ...
Seite wird geladen ...
Seite wird geladen ...
Seite wird geladen ...
Seite wird geladen ...
Seite wird geladen ...
Seite wird geladen ...
Seite wird geladen ...
Seite wird geladen ...
Seite wird geladen ...
Seite wird geladen ...
Seite wird geladen ...
Seite wird geladen ...
Seite wird geladen ...
Seite wird geladen ...
Seite wird geladen ...
Seite wird geladen ...
Seite wird geladen ...
Seite wird geladen ...
Seite wird geladen ...
-
 1
1
-
 2
2
-
 3
3
-
 4
4
-
 5
5
-
 6
6
-
 7
7
-
 8
8
-
 9
9
-
 10
10
-
 11
11
-
 12
12
-
 13
13
-
 14
14
-
 15
15
-
 16
16
-
 17
17
-
 18
18
-
 19
19
-
 20
20
-
 21
21
-
 22
22
-
 23
23
-
 24
24
-
 25
25
-
 26
26
-
 27
27
-
 28
28
-
 29
29
-
 30
30
-
 31
31
-
 32
32
-
 33
33
-
 34
34
-
 35
35
-
 36
36
-
 37
37
-
 38
38
-
 39
39
-
 40
40
-
 41
41
-
 42
42
-
 43
43
-
 44
44
-
 45
45
-
 46
46
-
 47
47
-
 48
48
-
 49
49
-
 50
50
-
 51
51
-
 52
52
-
 53
53
-
 54
54
-
 55
55
-
 56
56
-
 57
57
-
 58
58
-
 59
59
-
 60
60
-
 61
61
-
 62
62
-
 63
63
-
 64
64
-
 65
65


in anderen Sprachen
- français: Lenco SCD-70 Manuel utilisateur
- español: Lenco SCD-70 Manual de usuario
- Nederlands: Lenco SCD-70 Handleiding
Verwandte Artikel
-
Lenco PDR-050BU Bedienungsanleitung
-
-
Lenco DAR-040 Bedienungsanleitung
-
-
-
Lenco SCD-720SI Bedienungsanleitung
-
Lenco SCD-685 Benutzerhandbuch
-
-
Lenco 9000-0046-3114 Benutzerhandbuch
-
Lenco DAR-070 Benutzerhandbuch