Lenco LBT-188 Bedienungsanleitung
- Kategorie
- Audio-Plattenspieler
- Typ
- Bedienungsanleitung

Model: LBT-188
User manual - Turntable with bluetooth transmission
Gebruikshandleiding - Platenspeler met Bluetooth-overdracht
Bedienungsanleitung - Plattenspieler mit Bluetooth-Übertragung
Guide d’utilisation - tourne-disque avec transmission Bluetooth
Manual de usuario – Tocadiscos con transmisión Bluetooth

1
Index
English .......................................................................................................... 2
Nederlands................................................................................................. 24
Deutsch ...................................................................................................... 48
Français ...................................................................................................... 73
Español....................................................................................................... 98
Version: 1.0

2
English
LBT-188
CAUTION:
Usage of controls or adjustments or performance of procedures other than
those specified herein may result in hazardous radiation exposure.
This unit should not be adjusted or repaired by anyone except qualified service
personnel.
PRECAUTIONS BEFORE USE
KEEP THESE INSTRUCTIONS IN MIND:
1. Do not use this device near water.
2. Clean only with a slightly damp cloth.
3. Do not cover or block any ventilation openings. When placing the device
on a shelf, leave 5 cm (2”) free space around the whole device.
4. Install in accordance with the supplied user manual.
5. * Don’t step on or pinch the power adaptor. Be very careful, particularly
near the plugs and the cable’s exit point. Do not place heavy items on
the power adaptor, which may damage it. Keep the entire device out of
children’s reach! When playing with the power cable, they can seriously
injure themselves.
6. * Unplug this device during lightning storms or when unused for a long
period.
7. Keep the device away from heat sources such as radiators, heaters,
stoves, candles and other heat-generating products or naked flame.
8. Avoid using the device near strong magnetic fields.
9. Electrostatic discharge can disturb normal usage of this device. If so,
simply reset and restart the device following the instruction manual.
During file transmission, please handle with care and operate in a static-
free environment.

3
10. Warning! Never insert an object into the product through the vents or
openings. High voltage flows through the product and inserting an
object can cause electric shock and/or short circuit internal parts. For
the same reason, do not spill water or liquid on the product.
11. Do not use in wet or moist areas such as bathrooms, steamy kitchens or
near swimming pools.
12. Do not use this device when condensation may occur.
13. Although this device is manufactured with the utmost care and checked
several times before leaving the factory, it is still possible that problems
may occur, as with all electrical appliances. If you notice smoke, an
excessive build-up of heat or any other unexpected phenomena, you
should disconnect the plug from the main power socket immediately.
14. This device must operate on a power source as specified on the
specification label. If you are not sure of the type of power supply used
in your home, consult your dealer or local power company.
15. * The socket outlet must be installed near the equipment and must be
easily accessible.
16. * Do not overload ac outlets or extension cords. Overloading can cause
fire or electric shock.
17. * Devices with class 1 construction should be connected to a main
socket outlet with a protective earthed connection.
18. * Devices with class 2 construction do not require a earthed connection.
19. Keep away from rodents. Rodents enjoy biting on power cords.
20. * Always hold the plug when pulling it out of the main supply socket. Do
not pull the power cord. This can cause a short circuit.
21. Avoid placing the device on any surfaces that may be subject to
vibrations or shocks.

4
22. To clean the device, use a soft dry cloth. Do not use solvents or petrol
based fluids. To remove severe stains, you may use a damp cloth with
dilute detergent.
23. The supplier is not responsible for damage or lost data caused by
malfunction, misuse, modification of the device or battery replacement.
24. Do not interrupt the connection when the device is formatting or
transferring files. Otherwise, data may be corrupted or lost.
25. If the unit has USB playback function, the usb memory stick should be
plugged into the unit directly. Don’t use an usb extension cable because
it can cause interference resulting in failing of data.
26. The apparatus shall not be exposed to dripping or splashing and make
sure that no objects filled with liquids, such as vases, are placed on or
near the apparatus.
27. * To completely disconnect the power input, the mains plug of the
apparatus shall be disconnected from the mains, as the disconnect
device is the mains plug of apparatus.
28. If the unit works with battery, Battery shall not be exposed to excessive
heat such as sunshine, fire or the like.
29. Attention should be drawn to the environmental aspects of battery
disposal.
30. The apparatus can only be used in moderate extremely cold or climates
warm environments should be avoided.
31. The rating label has been marked on the bottom or back panel of the
apparatus.
32. This device is not intended for use by people (including children) with
physical, sensory or mental disabilities, or a lack of experience and
knowledge, unless they’re under supervision or have received
instructions about the correct use of the device by the person who is
responsible for their safety.

5
33. This product is intended for non professional use only and not for
commercial or industrial use.
34. Make sure the unit is adjusted to a stable position. Damage caused by
using this product in an unstable position or by failure to follow any
other warning or precaution contained within this user manual will not
be covered by warranty.
35. Never remove the casing of this apparatus.
36. Never place this apparatus on other electrical equipment.
37. Do not use or store this product in a place where it is subject to direct
sunlight, heat, excessive dust or vibration.
38. Do not allow children access to plastic bags.
39. Only use attachments/accessories specified by the manufacturer.
40. Refer all servicing to qualified service personnel. Servicing is required
when the apparatus has been damaged in any way, such as the power
supply cord or the plug, when liquid has been spilled or objects have
fallen into the apparatus, when the apparatus has been exposed to rain
or moisture, does not operate normally, or has been dropped.
41. *Do not use a damaged power cord or plug or a loose outlet. Doing so
may result in fire or electric shock.
42. Prolonged exposure to loud sounds from personal music players may
lead to temporary or permanent hearing loss.
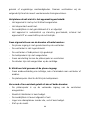
INSTALLATION
• Unpack all parts and remove protective material.
• *Do not connect the unit to the mains before checking the mains voltage
and before all other connections have been made.
* Those instructions are related only to products using power cable or AC
power adaptor.

6
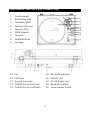
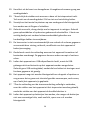
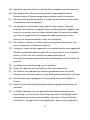
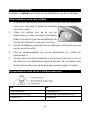
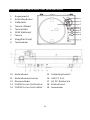
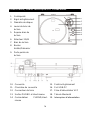
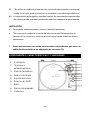
COMPONENTS, FEATURES AND CONNECTIONS
1. Counterweight
2. Anti-skating Stub
3. Turntable Platter
4. Tonearm Lift Lever
5. Tonearm Rest
6. 33/45 Selector
7. Tonearm
8. Stop/Start Knob
9. Cartridge
10. Lid
11. Lid Hinge
12. Ground Connector
13. PHONO & Line Out Jacks
14. PHONO & Line Out Switch
15. Anti-skating Weight
16. USB-PC port
17. AC-DC Power Jack
18. Bluetooth Indicator
19. Power Rocker Switch

7
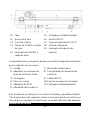
Please check thoroughly and make sure you find the following items that
come along with this package:
1) Unit
2) Adaptor with EU-UK plug-end
3) Counterweight
4) Platter with Belt
5) 45 RPM Adaptor
6) Turntable mat
7) Instruction Manual
8) Cartridge Alignment Protractor
9) USB-PC Cable
10) 2pcs lid spare rubber
11) Anti-skating Weight
This turntable is supplied with a factory fitted and adjusted cartridge.
**The following instructions for adjusting the cartridge are provided in case
the cartridge is replaced by a different model at a later date.
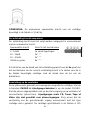
Installing the Lid
Install the Lid carefully over the hinge prongs.
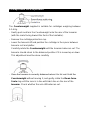
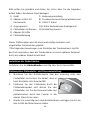
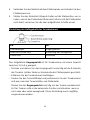
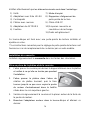
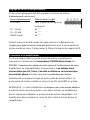
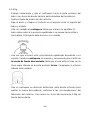
Turntable Platter and Belt Setup
1. Install the drive belt over the inner ring under the platter and make
sure it won’t fall off during the setup.
2. Place the platter through the turntable
spindle, then rotate the platter until you see
the drive motor pulley through the window at
the top left corner.
3. Carefully grab the drive belt and put it
around the slot of motor pulley.
4. Connect the power adapter to the turntable and power on the
turntable.
5. Set the Motor Start/Stop switch to the Start position to see if the
platter motor spins. If the platter does not spin, try the steps listed
above again.

8
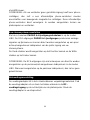
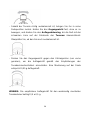
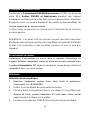
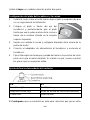
Cartridge Down force Adjustment
The Counterweight supplied is suitable for cartridges weighing between
3.0-6.0g.
- Gently push and turn the Counterweight onto the rear of the tonearm
(with the scale facing toward the front of the turntable).
- Remove the cartridge protection cap.
- Lower the tonearm lift and position the cartridge in the space between
tonearm rest and platter.
Carefully rotate the Counterweight until the tonearm balances out. The
tonearm should return to the balanced position if it is moved up or down.
This adjustment must be done carefully.
- Once the tonearm is correctly balanced return it to its’ rest. Hold the
Counterweight without moving it, and gently rotate the Down force
Scale ring until the zero is in line with black line on the rear of the
tonearm. Check whether the arm still balances out.

9
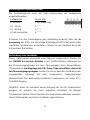
- Rotate the counterweight counter clockwise (seen from the front) to
adjust the down force according to the cartridge manufacturer’s
recommendations. One mark on the scale represents 0.05g of down
force.
NOTE: The recommended down force for the factory fitted cartridge is
3.5±0.5g.
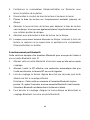
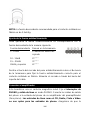
Anti-skating force adjustment
The anti-skating force must be adjusted corresponding to the down force as
follows:
Down force
Groove in the stub
5 - 10mN
1 st from bearing rings
10 - 15mN
15 – 20mN
2 nd " " "
3
rd
" " "
20mN and bigger
4 th " " "
Slip the loop of the anti-skating weight's thread over the 3rd groove of the
stub to set the correct anti-skating force for the factory-fitted cartridge. Feed
the thread through the loop of the wire support.

10
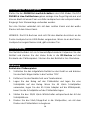
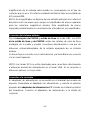
Connection to the Amplifier
This turntable uses a moving magnetic cartridge. Set the PHONO & Line
Out Switch on PHONO mode. Connect the phono out cables to the phono
input on your amplifier of pre-amplifier (phono stage). Line inputs such as
CD, Tuner, Tape, or Video are not suitable for phono inputs. Make sure
the amplification of the selected input matches the type of cartridge being
used. The factory installed cartridge is 47k ohms/MM-input.
NOTE: If your amplifier does not have an input suitable for phono cartridges,
you will need to purchase a separate phono amplifier for moving magnetic
cartridges. This separate phono amplifier will then connect between your
turntable and your amplifier.
Stereo System Connection
Set the PHONO & Line Out Switch on LINE mode. The RCA PHONO &
Line Out Jacks output analog line-level signals and could be connected
directly with a par of active/powered speakers of the appropriate input of
your stereo system.
The Red plug connects with the Right channel and the White plug connects
with the Left channel.
NOTE: The RCA Jacks are not designed to be connected directly to the
passive/unpowered speakers on LINE mode. If connected to the passive
speakers, there is no sound.
Main Power Connection
The power adaptor is in the foam packing material. Unpack the power
adaptor and plug the small end into the DC power jack located at the back
side of the turntable. Plug the power adaptor into your power outlet.

11
Operation
Turntable Operation
1. Connect the included power adapter to unit and press the power
rocker switch to be “ON” position.
2. Remove the needle cover from the cartridge.
3. Place the slipmat on the platter and place a record on the slipmat. If
using 45 RPM records, put the 45 RPM adapter on the center spindle
before placing the record on the platter.
4. Set the 33/45 RPM Selector according to the type of record.
5. Turn the Start/Stop dial to the Start position to begin spinning the
platter.
6. Unlock the arm clip and set the Lift Lever to the up position.
7. Position the tonearm over the desired location (groove) on the record.
8. Move the tonearm lift lever to the down position to move the tonearm
toward the record. Alternatively, place the needle over the desired
location on the record.
9. Carefully lower the tonearm on the record.
10. When you are finished playing the record, raise the tonearm, return it
to rest on the arm clip, and turn the Start/Stop dial to the Stop.
Bluetooth Operation
This unit has a Bluetooth transmitter to send audio to a Bluetooth speaker
wirelessly.
1. Power on your Bluetooth speaker and ensure it is in pairing mode.
2. Power on the unit, the BT will auto search when the unit turn on, the
BT indicated light flashing.
3. When pairing, the light will flash twice per second, then change to be
long lighting when paired;
Note: This unit will connect to the closest Bluetooth speaker that is
near it. If after 2 minutes no Bluetooth speaker can be found to pair

12
with, the Bluetooth transmitter will become inactive and the LED will
turn off.
4. To disconnect pairing, power off the turntable or turn off Bluetooth
pairing on your Bluetooth speaker.
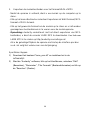
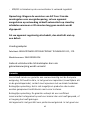
Recording the LP into PC through USB jack:
For installing and recording step please reference to the BRIEF
INTRODUCTION OF AUDACITY. http://audacity.sourceforge.net/
Recording the vinyl to your computer:
1). Follow the detail step as above Turntable Operation to play the vinyl.
2). Double click the Audacity and follow the record steps showing on the
BRIEF INTRODUCTION OF AUDACITY.
Audacity and USB Connection
It supports Windows95/Window XP/Window 7/Vista or more advanced
version, with the EMS memory more than 128MB and Audacity take space
of 5MB.
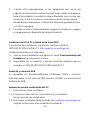
Instruction for PC Encoding
1. Software instruction
1.1) Connect the USB cable with your turntable and your computer.
No extra driver is required.
1.2) Download the Audacity software from http://audacity.sourceforge.net/
Follow the instructions to complete installation.
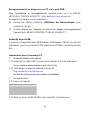
2. Recording
2.1) Open the software

13
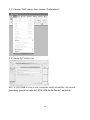
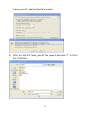
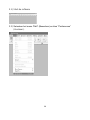
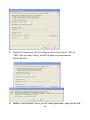
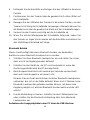
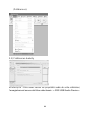
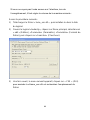
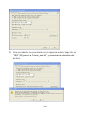
2.2) Choose “Edit” menu, then choose “Preferences”;
2.3) Audacity Preferences
NOTE: you need to check your computer audio properties, the sound
recording should be selected: SSS USB Audio Device” as below:

14
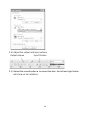
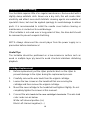
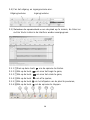
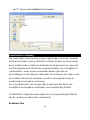
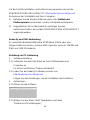
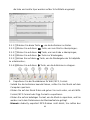
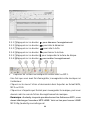
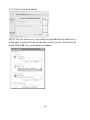
2.4) Adjust the output and input volume
Output volume
Input Volume
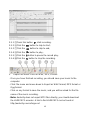
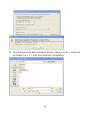
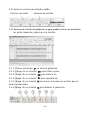
2.5) Select the record button ● to record the disc, the left and right tracks
will show on the interface:

15
2.5.1 ⑤ Press this button , start recording.
2.5.2 ⑥ Click the button to skip to start;
2.5.3 ⑦ Click the button to skip to end;
2.5.4 ⑧ Click the button to play;
2.5.5 ⑨ Click the button to pause the record play;
2.5.6 ⑩ Click the button to stop the recording.
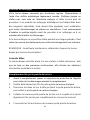
3. Export the Music Files for WAV, MP3, Format.
· Once you have finished recording, you should save your music to the
computer.
· Click File menu and move down to Export as WAV format, MP3 format or
Ogg format.
· Click on any format to save the music, and you will be asked for the file
name of the music recording.
· Note: Audacity does not export MP3 files directly; you should download
the LAME MP3 encoder. A link to find LAME MP3 can be found at
http://audacity.sourceforge.net

16
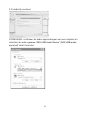
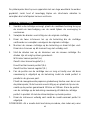
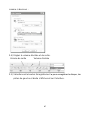
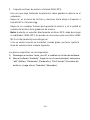
If do not see the sound wave on the interface, when recording, please
adjust the line in volume as follows:
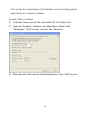
Specific Steps as follows:
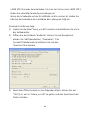
1) Download “lame_enc.dll” file, and install it to the software list.
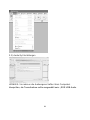
2) Open the “Audacity” software, click Main Menu, Select “edit”,
“Parameter”, “File Formats”, and click the “Searcher”.
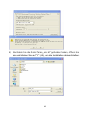
3) After opened, it will come to the following menu, click “YES” to go to

17
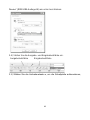
“Llame_enc.dll”, and find the file’s location.
4) After you find the “lame_enc.dl” file, open it and click “Y” to finish
the installation.

18
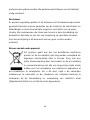
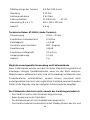
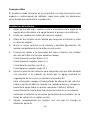
Maintenance and Cleaning
Your turntable requires little of no regular maintenance. Remove dust with a
slightly damp antistatic cloth. Never use a dry cloth, this will create static
electricity and attract more dust! Antistatic cleaning agents are available at
specialist stores, but must be applied sparingly to avoid damage to rubber
parts. It is recommended to install the needle cover before cleaning or
maintenance is carried out to avoid damage.
If the turntable is not used over a long period of time, the drive belt should
be removed to prevent unequal stretching.
NOTE: Always disconnect the record player from the power supply as a
precaution before maintenance!
Useful Tips
The turntable should be positioned on a low-resonance surface such as
wood or multiple layer ply board to avoid structural vibrations disturbing
playback.
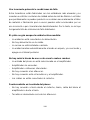
Cartridge Replacement
1. Before replacement, put the stylus protector back on the stylus to
prevent damage to the stylus during the replacement process.
2. Carefully remove the wire leads from the original cartridge.
3. Loosen the two screws on the headshell that are securing the
cartridge and then remove the original cartridge.
4. Mount the new cartridge to the headshell and tighten it lightly. Do not
completely tighten the screws at this moment.
5. Connect the wire leads to the new cartridge’s terminals. The wire lead
color codes are as below:
White Left channel positive (L+)
Black Left channel negative (L–)

19
Red Right channel positive (R+)
Black Right channel negative (R-)
6. Adjust the cartridge’s position to make sure it is precisely aligned on
the headshell so that the stylus will be tracking the grooves in parallel
perfectly.
To achieve this, place the included paper cartridge alignment
protractor over the turntable spindle, carefully lift the tone arm and
place the tip of the stylus on the points marked 130mm and 250mm
respectively. Fine tune the cartridge’s position on the headshell until
the cartridge is perfectly in parallel with the reference lines at both
points.
7. Tighten the screws completely once the perfect alignment is achieved.
NOTE: If you are unfamiliar or uncomfortable with completing this procedure,
we recommend consulting with a professional to perform the installation.
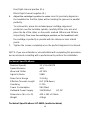
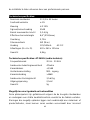
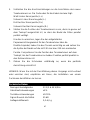
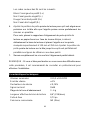
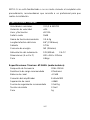
Technical Specifications:
Nominal Speeds
33 1/3 & 45RPM
Speed Variance
±1%
Wow and Flutter
≤0.15%
Signal to Noise
55dB
Down force Range
3.0-6.0g
Effective Tonearm Length
8.6” (218.5mm)
Overhang
0.73in
Power Consumption
5W (Max)
Outboard Power Supply
12V/500mA
AC-DC
Dimensions (W x H x D)
420 x 360 x 125mm
Weight
4.8kgs
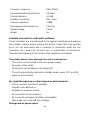
Technical Specifications: AT-3600L (audio-technica)
Seite laden ...
Seite laden ...
Seite laden ...
Seite laden ...
Seite laden ...
Seite laden ...
Seite laden ...
Seite laden ...
Seite laden ...
Seite laden ...
Seite laden ...
Seite laden ...
Seite laden ...
Seite laden ...
Seite laden ...
Seite laden ...
Seite laden ...
Seite laden ...
Seite laden ...
Seite laden ...
Seite laden ...
Seite laden ...
Seite laden ...
Seite laden ...
Seite laden ...
Seite laden ...
Seite laden ...
Seite laden ...
Seite laden ...
Seite laden ...
Seite laden ...
Seite laden ...
Seite laden ...
Seite laden ...
Seite laden ...
Seite laden ...
Seite laden ...
Seite laden ...
Seite laden ...
Seite laden ...
Seite laden ...
Seite laden ...
Seite laden ...
Seite laden ...
Seite laden ...
Seite laden ...
Seite laden ...
Seite laden ...
Seite laden ...
Seite laden ...
Seite laden ...
Seite laden ...
Seite laden ...
Seite laden ...
Seite laden ...
Seite laden ...
Seite laden ...
Seite laden ...
Seite laden ...
Seite laden ...
Seite laden ...
Seite laden ...
Seite laden ...
Seite laden ...
Seite laden ...
Seite laden ...
Seite laden ...
Seite laden ...
Seite laden ...
Seite laden ...
Seite laden ...
Seite laden ...
Seite laden ...
Seite laden ...
Seite laden ...
Seite laden ...
Seite laden ...
Seite laden ...
Seite laden ...
Seite laden ...
Seite laden ...
Seite laden ...
Seite laden ...
Seite laden ...
Seite laden ...
Seite laden ...
Seite laden ...
Seite laden ...
Seite laden ...
Seite laden ...
Seite laden ...
Seite laden ...
Seite laden ...
Seite laden ...
Seite laden ...
Seite laden ...
Seite laden ...
Seite laden ...
Seite laden ...
Seite laden ...
Seite laden ...
Seite laden ...
-
 1
1
-
 2
2
-
 3
3
-
 4
4
-
 5
5
-
 6
6
-
 7
7
-
 8
8
-
 9
9
-
 10
10
-
 11
11
-
 12
12
-
 13
13
-
 14
14
-
 15
15
-
 16
16
-
 17
17
-
 18
18
-
 19
19
-
 20
20
-
 21
21
-
 22
22
-
 23
23
-
 24
24
-
 25
25
-
 26
26
-
 27
27
-
 28
28
-
 29
29
-
 30
30
-
 31
31
-
 32
32
-
 33
33
-
 34
34
-
 35
35
-
 36
36
-
 37
37
-
 38
38
-
 39
39
-
 40
40
-
 41
41
-
 42
42
-
 43
43
-
 44
44
-
 45
45
-
 46
46
-
 47
47
-
 48
48
-
 49
49
-
 50
50
-
 51
51
-
 52
52
-
 53
53
-
 54
54
-
 55
55
-
 56
56
-
 57
57
-
 58
58
-
 59
59
-
 60
60
-
 61
61
-
 62
62
-
 63
63
-
 64
64
-
 65
65
-
 66
66
-
 67
67
-
 68
68
-
 69
69
-
 70
70
-
 71
71
-
 72
72
-
 73
73
-
 74
74
-
 75
75
-
 76
76
-
 77
77
-
 78
78
-
 79
79
-
 80
80
-
 81
81
-
 82
82
-
 83
83
-
 84
84
-
 85
85
-
 86
86
-
 87
87
-
 88
88
-
 89
89
-
 90
90
-
 91
91
-
 92
92
-
 93
93
-
 94
94
-
 95
95
-
 96
96
-
 97
97
-
 98
98
-
 99
99
-
 100
100
-
 101
101
-
 102
102
-
 103
103
-
 104
104
-
 105
105
-
 106
106
-
 107
107
-
 108
108
-
 109
109
-
 110
110
-
 111
111
-
 112
112
-
 113
113
-
 114
114
-
 115
115
-
 116
116
-
 117
117
-
 118
118
-
 119
119
-
 120
120
-
 121
121
-
 122
122


Lenco LBT-188 Bedienungsanleitung
- Kategorie
- Audio-Plattenspieler
- Typ
- Bedienungsanleitung
in anderen Sprachen
- English: Lenco LBT-188 Owner's manual
- français: Lenco LBT-188 Le manuel du propriétaire
- español: Lenco LBT-188 El manual del propietario
- Nederlands: Lenco LBT-188 de handleiding
Verwandte Papiere
-
Lenco Turntable Benutzerhandbuch
-
Lenco LBT-288 Benutzerhandbuch
-
Lenco LS-500 Benutzerhandbuch
-
-
Lenco LS-500 V2 Benutzerhandbuch
-
Lenco LS-10WD Bedienungsanleitung
-
-
Lenco LS-480 Benutzerhandbuch
-
Lenco LS-500 Turntable Benutzerhandbuch
-
Lenco LS 500 Record Player Benutzerhandbuch
Sonstige Unterlagen
-
DJ-Tech vinyl usb 5S Benutzerhandbuch
-
audizio RP310 Bedienungsanleitung
-
audizio PR310 Series Benutzerhandbuch
-
-
 Ibiza FREE-VINYL Benutzerhandbuch
-
audizio 102.170 Benutzerhandbuch
-
-
Omnitronic DD-2520 Benutzerhandbuch
-
Audio-Technica AT-LP60SPBT-BK Benutzerhandbuch
-
American Audio TTD-2400 USB Benutzerhandbuch
