
Reference Guide
HP ENVY Inspire
7200e series
Guida di riferimento
Guide de référence
Naslaggids
Referenzhandbuch
Guía de referencia
Guia de Referência
Referenshandbok
Viiteopas
Referanseveiledning
Referencevejledning
Kasutusjuhend
Nuorodos
Atsauces rokasgrāmata
Οδηγός αναφοράς
2

2
English
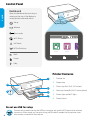
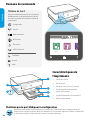
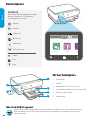
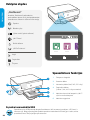
Control Panel
Dashboard
Open the Dashboard by touching or
swiping at the top of the display to
access printer tasks and status.
Back
Home
Help
Setup
Wireless
Quiet mode
Wi-Fi Direct
Ink Status
HP EcoSolutions
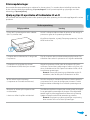
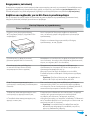
Printer Features
1Scanner lid
2Output tray
3Photo tray (4x6, 5x5, 5x7 inches)
4Main tray (Letter/A4, 4x12 inches photo)
5Power light and Wi-Fi light
6Power button
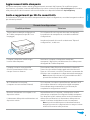
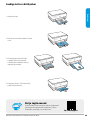
Do not use USB for setup
Printers with a label covering the USB port must be set up with HP Smart and an Internet
connection. After setup, you can print using a USB cable if needed, but the printer must
also remain connected to the Internet.
3
4
1
6
5
2

3
English
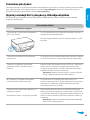
During Setup
Potential Issue Solution
Printer Wi-Fi setup mode timed out
(Wi-Fi light not blinking)
If the HP Software is unable to nd your printer, the
printer might have exited setup mode.
Check the control panel and select “Resume Setup”, if
prompted.
Computer or mobile device too
far from printer
Move your computer or mobile device closer to the
printer. Your device might be out of range of the
printer’s Wi-Fi signal.
Computer connected to a Virtual Private
Network (VPN) or remote work network
Disconnect from a VPN before installing HP Smart
software. You can’t install apps from the Microsoft
Store when connected to a VPN.
Connect to the VPN again aftwer nishing printer setup.
Note: Consider your location and the security of the
Wi-Fi network before disconnecting from a VPN.
Wi-Fi turned o on computer
(computer connected by Ethernet)
If your computer is connected by Ethernet, turn on
the computer’s Wi-Fi while setting up the printer.
Disconnect the Ethernet cable temporarily to complete
setup over Wi-Fi.
Bluetooth is turned o on your computer
or mobile device
Location is turned o on your mobile
device
Turn on Bluetooth for the computer or mobile device being
used to complete printer setup. For mobile devices, turn
on Location services also. Bluetooth and Location help the
software nd your network and printer.
Note: Your location is not being determined and no
location information is being sent to HP as part of
the setup process.
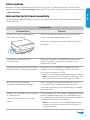
Help and tips for Wi-Fi and connectivity
If the software is unable to nd your printer during setup or post setup, check the following conditions to
resolve the issue.
Printer updates
Automatic rmware updates are turned on for this printer. To change this setting, see the online
product user guide at hp.com/support. View the HP Privacy Policy and information on data collection
at hp.com/privacy

English
4
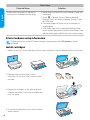
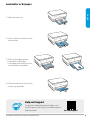
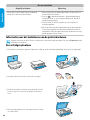
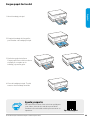
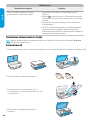
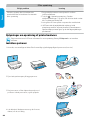
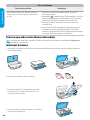
Printer hardware setup information
Follow instructions in the HP Smart software for easy setup. Visit 123.hp.com to install
software.
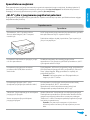
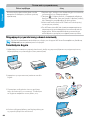
Install cartridges
1. Make sure the scan lid is closed. Open the front door and then lift the cartridge access door (as shown).
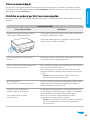
Post Setup
Potential Issue Solution
Printer won't reconnect or maintain a
connection to a netwwork after setup
1. Swipe down on the printer control panel to open the
Dashboard.
2. Touch > Network Setup > Restore Network
Settings. Touch Yes when prompted. The Wi-Fi light
will blink blue.
3. Close and reopen HP Smart on your computer or
mobile device.
4. In HP Smart, right-click or press and hold the printer
card to remove the printer from the Home screen. Then,
add the printer again and follow the on-screen prompts.
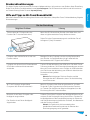
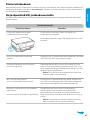
3. Rotate the cartridges so the taller end faces
towards the printer. Insert the cartridges and
click into place.
2. Remove the protective tape on both
cartridges. Do not touch the contacts under
the tape.
4. Close the carriage access door and front door
when nished.

English
5
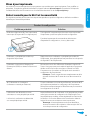
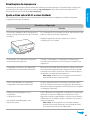
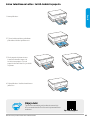
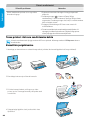
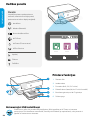
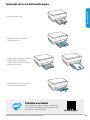
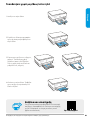
Load Letter or A4 paper
2. Push in the photo tray to access
the main tray.
4. Close the main tray. Pull out the
output tray extender.
3. Slide out the paper guides.
Load Letter or A4 paper.
Push paper all the way into the
tray and adjust the guides.
1. Open the main tray.
The information contained herein is subject to change without notice.
Help and Support
For printer troubleshooting and videos, visit
the HP support site. Enter your model name to
nd the printer. hp.com/support

6
Italiano
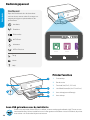
Pannello di controllo
Tableau de bord
Ouvrez le tableau de bord par un mouvement
d’eeurement ou de glissement en haut de
l’écran pour accéder aux tâches et à l’état de
l'imprimante.
Indietro
Pagina iniziale
Guida
Congurazione
Wireless
Modalità silenziosa
Wi-Fi Direct
Stato inchiostro
HP EcoSolutions
Caratteristiche della
stampante
1Coperchio dello scanner
2Vassoio di uscita
3Vassoio per le foto (4x6, 5x5, 5x7 pollici)
4Vassoio principale (formato Lettera/A4,
foto 4x12 pollici)
5Spia di alimentazione e spia del Wi-Fi
6Pulsante di accensione
Non utilizzare un cavo USB per la congurazione
Le stampanti con un'etichetta che copre la porta USB devono essere congurate con HP Smart e
una connessione Internet. Dopo la congurazione, è possibile stampare utilizzando un cavo USB, se
necessario, ma la stampante deve comunque rimanere connessa a Internet.
3
4
1
6
5
2

7
Italiano
Durante la congurazione
Possibile problema Soluzione
Timeout della modalità di congurazione
Wi-Fi della stampante (la spia Wi-Fi non
lampeggia)
Se il software HP non è in grado di trovare la stampante,
è possibile che la stampante sia uscita dalla modalità di
congurazione.
Accedere al pannello di controllo e selezionare "Riprendi
congurazione", se del caso.
Computer o dispositivo mobile troppo
lontano dalla stampante
Avvicinare il computer o il dispositivo mobile alla
stampante. Il dispositivo potrebbe essere fuori dalla portata
del segnale Wi-Fi della stampante.
Computer connesso a una rete VPN
(Virtual Private Network VPN) o a una
rete per il lavoro a distanza
Disconnettersi dalla VPN prima di installare il software HP
Smart. Non è possibile installare applicazioni da Microsoft
Store se si è connessi a una VPN. Connettersi nuovamente alla
VPN dopo aver completato la congurazione della stampante.
Nota: valutare la posizione e la sicurezza della rete Wi-Fi
prima di disconnettersi da una VPN.
Wi-Fi disattivato sul computer
(computer connesso tramite Ethernet)
Se il computer è connesso tramite Ethernet, attivare il Wi-Fi
del computer durante la congurazione della stampante.
Disconnettere temporaneamente il cavo Ethernet per
completare la congurazione sul Wi-Fi.
Bluetooth è disattivato sul computer o sul
dispositivo mobile.
Il rilevamento della posizione è disattivato sul
dispositivo mobile.
Attivare Bluetooth sul computer o sul dispositivo mobile
utilizzato per completare la congurazione della stampante.
Per i dispositivi mobili, attivare anche i servizi di rilevamento
della posizione. Bluetooth e il rilevamento della posizione
aiutano il software a individuare la rete e la stampante.
Nota: la posizione dell'utente non viene determinata e
durante il processo di congurazione non vengono inviate
ad HP le informazioni sulla posizione.
Guida e suggerimenti per Wi-Fi e connettività
Se il software non è in grado di trovare la stampante durante o dopo la congurazione, controllare le seguenti condizioni
per risolvere il problema.
Aggiornamenti della stampante
Per questa stampante risultano attivati gli aggiornamenti automatici del rmware. Per modicare questa
impostazione, consultare il manuale dell'utente per il prodotto online all'indirizzo hp.com/support L'Informativa
sulla privacy di HP e le informazioni sulla raccolta dei dati sono disponibili all'indirizzo hp.com/privacy

Italiano
8
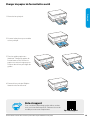
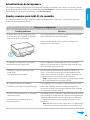
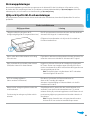
3. Ruotare le cartucce in modo che l'estremità più alta
sia rivolta verso la stampante. Inserire le cartucce
no a farle scattare in posizione.
2. Rimuovere il nastro protettivo da entrambe le
cartucce.
4. Chiudere lo sportello di accesso alle cartucce
e lo sportello anteriore una volta terminate le
operazioni.
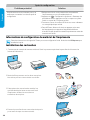
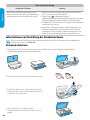
Informazioni sulla congurazione dell'hardware della stampante
Per una facile congurazione, seguire le istruzioni riportate nel software HP Smart. Visitare il sito
123.hp.com per installare il software.
Installazione delle cartucce
1. Assicurarsi che il coperchio dello scanner sia chiuso. Aprire lo sportello anteriore, quindi sollevare lo sportello di
accesso alle cartucce (come mostrato).
Dopo la congurazione
Problème potentiel Solution
La stampante non si riconnette o non
mantiene attiva la connessione alla rete
dopo la congurazione
1. Scorrere verso il basso sul pannello di controllo della
stampante per aprire la dashboard.
2. Toccare Congurazione rete > Ripristina impostazioni di
rete. Toccare Sì quando richiesto. La spia Wi-Fi lampeggia in blu.
3. Chiudere e riaprire HP Smart sul computer o sul dispositivo
mobile.
4. In HP Smart, fare clic con il pulsante destro del mouse
oppure tenere premuto in corrispondenza della scheda della
stampante per rimuovere la stampante dalla schermata
iniziale. A seguire, aggiungere nuovamente la stampante e
seguire le istruzioni visualizzate.

Italiano
9
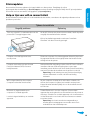
4. Chiudere il vassoio principale.
Estrarre l'estensione del vassoio di
uscita.
1. Aprire il vassoio principale.
Guida e supporto tecnico
Per le procedure di risoluzione dei problemi e i video,
visitare il sito del supporto tecnico HP. Inserire il
nome del modello per individuare la stampante. hp.com/support
Le informazioni contenute in questo documento sono soggette a modica senza preavviso.
Caricare carta in formato Lettera o A4
2. Spingere il vassoio per le foto per
accedere al vassoio principale.
3. Estrarre le guide della carta.
Caricare carta in formato Lettera o
A4. Spingere la carta no in fondo
al vassoio e regolare le guide.

10
Français
Panneau de commande
Tableau de bord
Ouvrez le tableau de bord par un mouvement
d’eeurement ou de glissement en haut de
l’écran pour accéder aux tâches et à l’état de
l'imprimante.
Précédent
Accueil
Aide
Conguration
Sans l
Mode silencieux
Wi-Fi Direct
État encre
HP EcoSolutions
Caractéristiques de
l'imprimante
1Capot du scanner
2Bac de sortie
3Bac photo (4x6, 5x5, 5x7 pouces)
4Bac principal (format lettre/A4,
photo 4x12 pouces)
5Voyant Alimentation et Voyant Wi-Fi
6Bouton Marche/Arrêt
N’utilisez pas le port USB pour la conguration
Les imprimantes dotées d’une étiquette recouvrant le port USB doivent être congurées avec HP
Smart et une connexion Internet. Après la conguration, vous pouvez imprimer à l’aide d’un câble USB
si nécessaire, toutefois l’imprimante doit rester connectée à Internet.
3
4
1
6
5
2

11
Français
Pendant la conguration
Problème potentiel Solution
Mode de conguration Wi-Fi de l’imprimante
interrompu (le voyant Wi-Fi ne clignote pas)
Si le logiciel HP ne parvient pas à trouver votre imprimante,
l’imprimante a peut-être quitté le mode conguration.
Consultez le panneau de commande et sélectionnez
«Reprendre la conguration», si vous y êtes invité.
Ordinateur ou périphérique mobile trop
éloigné de l’imprimante
Rapprochez votre ordinateur ou périphérique mobile de
l’imprimante. Votre périphérique est peut-être hors de portée
du signal Wi-Fi de l'imprimante.
Ordinateur connecté à un Réseau privé
Réseau privé (VPN) ou réseau Professionnel
distant
Déconnectez-vous d’un VPN avant d’installer le logiciel HP
Smart. Vous ne pouvez pas installer d'applications provenant
de Microsoft Store lorsque vous êtes connecté à un VPN.
Connectez-vous à nouveau au VPN après avoir terminé la
conguration de l’imprimante.
Remarque: Tenez compte de votre emplacement et de la
sécurité du réseau Wi-Fi avant de vous déconnecter d’un
VPN.
Wi-Fi désactivé sur l’ordinateur
(ordinateur connecté par Ethernet)
Si votre ordinateur est connecté par Ethernet, activez le Wi-Fi
de l’imprimante pendant la conguration de l'imprimante.
Débranchez temporairement le câble Ethernet pour terminer
la conguration sur le Wi-Fi.
Le Bluetooth est désactivé sur votre
ordinateur ou votre périphérique mobile.
La fonction Localisation est désactivée
sur votre périphérique mobile.
Activez le Bluetooth de l’ordinateur ou du périphérique mobile
utilisé pour terminer la conguration de l'imprimante. Pour
les périphériques mobiles, activez également les Services de
localisation. La fonction Bluetooth et Localisation aident le
logiciel à trouver votre réseau et votre imprimante.
Remarque: Votre emplacement n’est pas identié et
aucune information de localisation n’est envoyée à HP au
cours du processus de conguration.
Aide et conseils pour le Wi-Fi et la connectivité
Si le logiciel ne parvient pas à trouver votre imprimante pendant ou après la conguration, vériez les conditions
suivantes pour résoudre le problème.
Mises à jour Imprimante
Les mises à jour automatiques du microprogramme sont activées pour cette imprimante. Pour modier ce
paramètre, consultez le guide de l'utilisateur en ligne à l’adresse hp.com/support. Consulter la Politique de
condentialité HP et les informations sur la collecte des données sur le site hp.com/privacy

Français
12
3. Faites pivoter les cartouches de manière à ce
que l’extrémité plus haute se retrouve face à
l'imprimante. Insérez les cartouches et
enclenchez-les en place.
2. Retirez le lm protecteur sur les deux cartouches.
Ne touchez pas les contacts situés sous le lm.
4. Fermez la porte d'accès aux cartouches ainsi que la
porte avant lorsque vous avez terminé.
Informations de conguration du matériel de l’imprimante
Suivez les instructions du logiciel HP Smart pour une conguration facile. Visitez le site 123.hp.com pour
installer le logiciel.
Installation des cartouches
1. S’assurer que le couvercle du scanner est fermé. Ouvrir la porte avant puis lever la porte d'accès à la cartouche
(suivant les indications).
Après la conguration
Problème potentiel Solution
L’imprimante ne se reconnectera pas ou ne
restera pas connectée à un réseau après la
conguration
1. Balayez vers le bas sur le panneau de commande de
l'imprimante pour ouvrir le tableau de bord.
2. Appuyez sur > Conguration du réseau > Restaurer les
paramètres réseau. Appuyez sur Oui, lorsque vous y êtes
invité. Le voyant Wi-Fi clignote en bleu.
3. Fermez et ouvrez à nouveau HP Smart sur votre ordinateur
ou votre périphérique mobile.
4. Dans HP Smart, faites un clic droit ou appuyez sur la carte
de l’imprimante pour supprimer l'imprimante de l'écran
d’accueil. Ensuite, ajoutez à nouveau l'imprimante et suivez les
instructions à l’écran.

Français
13
4. Fermez le bac principal. Dépliez
l'extension du bac de sortie.
1. Ouvrez le bac principal.
Aide et support
Pour consulter le dépannage et des vidéos, rendez-
vous sur le site d'assistance HP. Saisissez le nom de
modèle pour retrouver l'imprimante. hp.com/support
Les informations contenues dans ce document peuvent faire l’objet de modications sans préavis.
Charger du papier de format lettre ou A4
2. Pousser le bac photo pour accéder
au bac principal.
3. Tirez les guides papier vers
l'extérieur. Charger du papier de
format lettre ou A4. Pousser le
papier sur toute sa longueur pour
l’insérer dans le bac puis régler les
guides.

14
Nederlands
Bedieningspaneel
Dashboard
Open het Dashboard door de bovenkant
van het scherm aan te raken of te vegen om
toegang te krijgen tot printertaken en de
printerstatus.
Terug
Home
Help
Installatie
Draadloos
Stille modus
Wi-Fi Direct
Inktstatus
HP EcoSolutions
Printerfuncties
1Scannerklep
2Bac de sortie
3Fotolade (4x6, 5x5, 5x7 inch)
4Hoofdlade (Letter/A4, 4x12 inch foto)
5Aan-uitlampje en wilampje
6Aan-uitknop
Geen USB gebruiken voor de installatie
Printers met een label dat de USB-poort afdekt, moeten worden geïnstalleerd via HP Smart en een
internetverbinding. Na het installeren kunt u indien gewenst afdrukken via een USB-kabel; de printer
moet echter ook verbonden blijven met internet.
3
4
1
6
5
2

15
Nederlands
Tijdens de installatie
Mogelijk probleem Oplossing
Time-out in de Wi-Fi-installatiemodus van de
printer (Wi-Fi-lampje knippert niet)
Als de HP Software uw printer niet kan vinden, heeft de printer
mogelijk de installatiemodus verlaten.
Kijk op het bedieningspaneel en selecteer "Installatie
hervatten" als daarom wordt gevraagd.
Computer of mobiel apparaat te ver
van de printer
Plaats uw computer of mobiele apparaat dichter bij de printer.
Uw apparaat bevindt zich mogelijk buiten het bereik van het
wisignaal van de printer.
Computer verbonden met een Virtueel
Particulier Netwerk (VPN) of extern
bedrijfsnetwerk
Verbreek de VPN-verbinding voordat u de HP Smart-software
installeert. Met een VPN-verbinding kunt u geen apps
installeren vanuit de Microsoft Store. Maak opnieuw verbinding
met het VPN nadat de installatie van de printer is voltooid.
Opmerking: Houd rekening met uw locatie en beveiliging
van het winetwerk voordat u de VPN-verbinding
verbreekt.
Wi is uitgeschakeld op de computer
(computer verbonden via ethernet)
Als uw computer via ethernet is verbonden, schakelt u de
wi van de computer in tijdens het instellen van de printer.
Koppel de ethernetkabel tijdelijk los om de installatie via wi
te voltooien.
Bluetooth is uitgeschakeld op uw
computer of mobiele apparaat.
Locatie is uitgeschakeld op uw mobiele
apparaat.
Schakel Bluetooth in voor de computer of het mobiele
apparaat dat wordt gebruikt om de installatie van de printer te
voltooien. Schakel voor mobiele apparaten ook Locatieservices
in. Met Bluetooth en uw locatie kan de software uw netwerk
en printer vinden.
Opmerking: Uw locatie wordt niet vastgesteld en er
worden geen locatiegegevens verzonden naar HP als
onderdeel van het installatieproces.
Hulp en tips voor wi en connectiviteit
Als de software uw printer tijdens of na de installatie niet kan vinden, controleert u de volgende problemen om het
probleem op te lossen.
Printerupdates
Automatische rmware-updates zijn ingeschakeld voor deze printer. Raadpleeg de online
productgebruikershandleiding op hp.com/support om deze instelling te wijzigen. Bekijk het HP privacybeleid en
informatie over het verzamelen van gegevens op hp.com/privacy

Nederlands
16
3. Draai de cartridges zodat het lange uiteinde naar de
printer is gericht. Plaats de cartridges en klik deze
vast.
2. Verwijder de beschermtape van beide cartridges.
4. Sluit de toegangsklep voor de wagen en de voorklep
als u klaar bent.
Informatie over het installeren van de printerhardware
Volg de instructies in de HP Smart-software voor een eenvoudige installatie. Ga naar 123.hp.com om de
software te installeren.
De cartridges plaatsen
1. Zorg dat de scannerklep is gesloten. Open de voorklep en til de cartridgetoegangsklep omhoog (zoals afgebeeld).
Na de installatie
Mogelijk probleem Oplossing
Printer kan na de installatie geen verbinding
maken of houden met een netwerk
1. Veeg omlaag op het bedieningspaneel van de printer om
het dashboard te openen.
2. Druk op > Netwerkinstallatie > Netwerkinstellingen
herstellen. Druk op Ja als dat gevraagd wordt. Het Wi-Fi-
lampje knippert blauw.
3. Sluit en open HP Smart opnieuw op uw computer of
mobiele apparaat.
4. Klik in HP Smart met de rechtermuisknop op de printerkaart
of hou deze ingedrukt om de printer uit het startscherm te
verwijderen. Voeg vervolgens de printer opnieuw toe en volg
de aanwijzingen op het scherm.

Nederlands
17
4. Sluit de hoofdlade. Trek het
verlengstuk van de uitvoerlade naar
buiten.
1. Open de hoofdlade.
Help en ondersteuning
Ga voor het oplossen van printerproblemen en
video's naar de website van HP ondersteuning. Voer
de modelnaam in om uw printer te vinden. hp.com/support
De informatie in dit document kan worden gewijzigd zonder voorafgaande kennisgeving.
Plaats Letter- of A4-papier
2. Duw de fotolade naar binnen om
toegang te krijgen tot de hoofdlade.
3. Schuif de papiergeleiders naar
buiten. Plaats Letter- of A4-papier.
Duw het papier helemaal in de lade
en pas de geleiders aan.

18
Deutsch
Bedienfeld
Dashboard
Önen Sie das Dashboard, indem Sie durch
Tippen oder Wischen über die Symbole im
oberen Displaybereich auf die Druckeraufgaben
und den Druckerstatus zugreifen.
Zurück
Startseite
Hilfe
Einrichtung
Wireless
Leiser Modus
Wi-Fi Direct
Tintenfüllstand
HP EcoSolutions
Druckerfunktionen
1Scannerabdeckung
2Ausgabefach
3Fotofach (4x6, 5x5, 5x7 Zoll)
4Hauptfach (Brief/A4, 4x12 Zoll-Foto)
5Stromanzeige und Wi-Fi-Anzeige
6Ein/Aus-Taste
USB nicht für die Einrichtung verwenden
Drucker mit einem Etikett über dem USB-Anschluss müssen mit HP Smart und einer
Internetverbindung eingerichtet werden. Nach der Einrichtung können Sie bei Bedarf auch über ein
USB-Kabel drucken, aber der Drucker muss weiterhin mit dem Internet verbunden bleiben.
3
4
1
6
5
2

19
Deutsch
Bei der Einrichtung
Mögliches Problem Lösung
Timeout beim Wi-Fi Setupmodus des
Druckers (Wi-Fi-Leuchte blinkt nicht)
Wenn die HP Software Ihren Drucker nicht nden kann, hat
dieser möglicherweise den Setup-Modus verlassen.
Sehen Sie in der Systemsteuerung nach und klicken Sie auf
Anfrage auf „Setup fortsetzen“.
Computer oder mobiles Gerät zu weit vom
Drucker entfernt
Bewegen Sie den Computer bzw. das mobile Geräte näher
zum Drucker. Ihr Gerät bendet sich ggf. außerhalb der
Reichweite des Wi-Fi-Signals des Druckers.
Computer mit einem Virtual Private Network
(VPN) oder entfernten Arbeitsnetzwerk
verbunden
Trennen Sie die Verbindung zum VPN, bevor Sie die HP Smart
Software installieren. Sie können keine Anwendungen aus dem
Microsoft Store installieren, wenn Sie über ein VPN verbunden
sind. Sie können die Verbindung zum VPN nach Abschluss der
Druckereinrichtung wieder
herstellen.
Hinweis: Berücksichtigen Sie Ihren Standort und die
Sicherheit des Wi-Fi-Netzwerks, bevor Sie die Verbindung
zum VPN trennen.
Wi-Fi am Computer ausgeschaltet
(Computer über Ethernet verbunden)
Wenn Ihr Computer über Ethernet verbunden ist, schalten
Sie das Wi-Fi des Computers beim Einrichten des Druckers
an. Trennen Sie das Ethernet-Kabel vorübergehend, um die
Einrichtung über Wi-Fi abzuschließen.
Bluetooth ist auf Ihrem Computer oder
Mobilgerät ausgeschaltet.
Der Standort ist auf Ihrem Mobilgerät
abgeschaltet.
Schalten Sie auf dem Computer oder Mobilgerät Bluetooth ab,
mit dem Sie die Druckereinrichtung durchführen. Schalten Sie
bei Mobilgeräten auf die Standortbestimmung ein. Bluetooth
und Standortbestimmung helfen der Software, Ihre Netzwerke
und den Drucker zu nden.
Hinweis: Ihr Standort wird nicht ermittelt und es
werden keine Standortinformationen im Rahmen des
Einrichtungsvorgangs an HP gesendet.
Hilfe und Tipps zu Wi-Fi und Konnektivität
Wenn die Software bei der Einrichtung Ihren Drucker nicht nden kann, überprüfen Sie zur Problembehebung folgende
Voraussetzungen.
Druckeraktualisierungen
Für diesen Drucker sind automatische Firmware-Updates aktiviert. Informationen zum Ändern dieser Einstellung
nden Sie im Online-Produkthandbuch unter hp.com/support. Die HP Datenschutzrichtlinie und Informationen
zur Datenerfassung nden Sie unter hp.com/privacy

Deutsch
20
3. Drehen Sie die Patronen, sodass die größere Seite
Richtung Drucker zeigt. Setzen Sie die Patronen ein
und lassen Sie sie einrasten.
2. Entfernen Sie die Schutzfolie von beiden Patronen.
4. Wenn Sie fertig sind, schließen Sie die
Zugangsklappe zu den Patronen und die vordere
Klappe.
Informationen zur Einrichtung der Druckerhardware
Für eine einfache Einrichtung folgen Sie der Anleitung in der HP Smart Software. Zum Installieren der
Software besuchen Sie 123.hp.com.
Patronen einsetzen
1. Vergewissern Sie sich, dass der Deckel geschlossen ist. Önen Sie die vordere Klappe und heben Sie die
Zugangsklappe der Kartuschen an (wie dargestellt).
Nach der Einrichtung
Mögliches Problem Lösung
Der Drucker stellt keine Neuverbindung her
oder kann nach einem Setup eine bestehende
Verbindung mit einem Netzwerk nicht halten.
1. Wischen Sie auf der Systemsteuerung des Druckers nach
unten, um das Dashboard zu önen.
2. Tippen Sie auf > Netzwerkeinrichtung >
Netzwerkeinstellungen wiederherstellen. Tippen Sie auf Ja, wenn
Sie dazu aufgefordert werden. Die Wi-Fi-Leuchte blinkt blau.
3. Schießen Sie HP Smart auf Ihrem Computer oder Mobilgerät
und önen Sie es erneut.
4. Klicken Sie in HP Smart mit rechts auf die Druckerkarte oder
halten Sie sie gedrückt, um den Drucker von der Startseite
zu entfernen. Fügen Sie den Drucker dann erneut hinzu und
halten Sie sich an die Auorderungen auf dem Bildschirm.
Seite wird geladen ...
Seite wird geladen ...
Seite wird geladen ...
Seite wird geladen ...
Seite wird geladen ...
Seite wird geladen ...
Seite wird geladen ...
Seite wird geladen ...
Seite wird geladen ...
Seite wird geladen ...
Seite wird geladen ...
Seite wird geladen ...
Seite wird geladen ...
Seite wird geladen ...
Seite wird geladen ...
Seite wird geladen ...
Seite wird geladen ...
Seite wird geladen ...
Seite wird geladen ...
Seite wird geladen ...
Seite wird geladen ...
Seite wird geladen ...
Seite wird geladen ...
Seite wird geladen ...
Seite wird geladen ...
Seite wird geladen ...
Seite wird geladen ...
Seite wird geladen ...
Seite wird geladen ...
Seite wird geladen ...
Seite wird geladen ...
Seite wird geladen ...
Seite wird geladen ...
Seite wird geladen ...
Seite wird geladen ...
Seite wird geladen ...
Seite wird geladen ...
Seite wird geladen ...
Seite wird geladen ...
Seite wird geladen ...
Seite wird geladen ...
Seite wird geladen ...
Seite wird geladen ...
Seite wird geladen ...
-
 1
1
-
 2
2
-
 3
3
-
 4
4
-
 5
5
-
 6
6
-
 7
7
-
 8
8
-
 9
9
-
 10
10
-
 11
11
-
 12
12
-
 13
13
-
 14
14
-
 15
15
-
 16
16
-
 17
17
-
 18
18
-
 19
19
-
 20
20
-
 21
21
-
 22
22
-
 23
23
-
 24
24
-
 25
25
-
 26
26
-
 27
27
-
 28
28
-
 29
29
-
 30
30
-
 31
31
-
 32
32
-
 33
33
-
 34
34
-
 35
35
-
 36
36
-
 37
37
-
 38
38
-
 39
39
-
 40
40
-
 41
41
-
 42
42
-
 43
43
-
 44
44
-
 45
45
-
 46
46
-
 47
47
-
 48
48
-
 49
49
-
 50
50
-
 51
51
-
 52
52
-
 53
53
-
 54
54
-
 55
55
-
 56
56
-
 57
57
-
 58
58
-
 59
59
-
 60
60
-
 61
61
-
 62
62
-
 63
63
-
 64
64


in anderen Sprachen
- français: HP 7200e series Mode d'emploi
- italiano: HP 7200e series Guida utente
- Nederlands: HP 7200e series Gebruikershandleiding
- português: HP 7200e series Guia de usuario
- dansk: HP 7200e series Brugervejledning
- eesti: HP 7200e series Kasutusjuhend
- svenska: HP 7200e series Användarguide
Verwandte Artikel
-
HP OfficeJet 8010e Series Benutzerhandbuch
-
HP Smart Tank 7000 Series Benutzerhandbuch
-
-
-
HP ENVY 6032e All-in-One Printer Schnellstartanleitung
-
HP ENVY 6458e All-in-One Printer Schnellstartanleitung
-
-
-
-
HP ENVY 7640 e series Bedienungsanleitung