Princess 1.182068.01.001 Double Basket Airfryer Benutzerhandbuch
- Typ
- Benutzerhandbuch

!"#$%%&
!
'()!*%%+!,-!.
"#
/"0(#01($2&"!
$ 3(0!(.%&(!.
% /%%�(#%!"
&' /%%�(#!&!-%0"
(' /%%&(#((
%) 3*%4!!.
*% 564"0#%#2"7!8
&! * ,%#")9.!
%+ 564"0#%#2"7!!(
:;<;=>:?=<:;<::;
#, Руководство по эксплуатации
$-,.!/.0%+'

1
1
3
86
2
7
9
3
4
5
10
5
4
2
3
ĘŚČ !
"Č!ОПИСАНИЕЗАПЧАСТИ

Instruction manual
3
SAFETY
• By ignoring the safety instructions the
manufacturer cannot be held responsible for
the damage.
• If the supply cord is damaged, it must be
replaced by the manufacturer, its service
agent, or similarly qualified persons in order
to avoid a hazard.
• Never move the appliance by pulling the
cord and make sure the cord cannot
become entangled.
• The appliance must be placed on a stable,
level surface.
• The user must not leave the device
unattended while it is connected to the
supply.
• This appliance is not intended for use by
persons (including children) with reduced
physical, sensory or mental capabilities, or
lack of experience and knowledge unless
they have been given supervision or
instruction concerning use of the appliance
by a person responsible for their safety.
• Close supervision is necessary when any
appliance is used by or near children.
• WARNING: Spilled food can cause serious
burns. Keep appliances and cords away
from children. Never drape the cord over the
edge of a counter, never use an outlet below
the counter, and never use with an
extension cord.
• The use of accessory attachments not
recommended by the appliance
manufacturer may cause injuries.
• Do not use this appliance outdoors.
• Do not place on or near a hot gas or electric
burner, or in a heated oven.
• Do not clean with metal scouring pads.
Pieces can break off the pad and touch
electrical parts, creating a risk of electric
shock.
• Use extreme caution when removing the
frying baskets.
• Extreme caution must be used when moving
an appliance containing hot oil or other hot
liquids.
• CAUTION: To protect against damage or
electric shock, do not cook in the base unit.
Cook only in the frying baskets provided.
• To disconnect, press the power button, then
remove the plug from the wall outlet.
EN

Instruction manual
4
• Do not use the frying baskets if dented or worn.
• WARNING: Never deep-fry in the Aerofryer,
regardless of whether the lid is on or off. THIS
IS DANGEROUS, AND CAN CAUSE A FIRE
AND SERIOUS DAMAGE.
• Before placing baking pan or aero plate into the
base, ensure both are dry by wiping with a soft
cloth.
• Always ensure the appliance is properly
assembled before use.
• Care should be taken when lifting the baking
pan from the base.
• To avoid possible damage from steam, place
the unit away from walls and cabinets during
use.
• Never lift the unit by the lid side tabs.
• Never touch any exposed heating elements
• To protect yourself against an electric shock, do
not immerse the cord, plug, or appliance in the
water or any other liquid.
• This appliance is intended to be used in
household and similar applications such as:
• Staff kitchen areas in shops, offices, and other
working environments.
• By clients in hotels, motels, and other
residential-type environments.
• Bed and breakfast type environments.
• Farmhouses.
• Children shall not play with the appliance.
• This appliance shall not be used by children.
Keep the appliance and its cord out of reach of
children.
• To protect yourself against an electric shock, do
not immerse the cord, plug or appliance in the
water or any other liquid.
• Do not heat the food for too long.
• The heating element surface is subject to
residual heat after use.
• The connector must be removed before the
appliance will be cleaned, please make sure the
inlet is completely dry before the unit will be
used again.
• Surface is liable to get hot during use.
• WARNING: If the surface is cracked, switch off
the appliance to avoid the possibility of an
electric shock.
• The temperature of accessible surfaces may be
high when the appliance is operating.

Instruction manual
5
• The appliance is not intended to be operated
by means of an external timer or a separate
remote-control system.
• The appliance is to be connected to a
socket-outlet having an earthed contact (for
class I appliances).
• In order to prevent disruptions of the airflow
do not put anything on top of the appliance
and make sure there is always 10
centimeter of free space around the
appliance.
• This appliance is only to be used for
household purposes and only for the
purpose it is made for. In the worst case, the
food can catch fire.
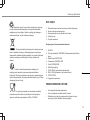
Separate collection / Check your local municipal guidelines.
Symbols and explanation
This product complies with conformity requirements of
the applicable European regulations or directives.
The Green Dot is the registered trademark of Der Grüne
Punkt – Duales System Deutschland GmbH and is protected as a
trademark worldwide. The logo may only be used by customers of
DSD GmbH holding a valid trademark usage contract or by engaged
waste management companies within the Federal Republic of
Germany. This also applies to reproduction of the logo by third
parties in a dictionary, an encyclopaedia or an electronic database
containing a reference manual.
The universal recycling symbol, logo, or icon is an
internationally recognized symbol used to designate recyclable
materials. The recycling symbol is in the public domain and is not a
trademark.
Waste electrical products should not be disposed of with
household waste. Please recycle where facilities exist. Check with
your local Authority or local store for recycling advice.
The product and packaging materials are recyclable,
subject to extended manufacturer responsibility. Dispose it
separately, following the illustrated packaging symbols, for better
waste treatment. The Triman logo is valid in France only.
EN

Instruction manual
6
This symbol is used for marking materials intended to come
into contact with food in the European Union as defined in regulation (EC)
No 1935/2004.
The Eurasian Conformity mark (ЕАС) is a certification mark to
indicate products that conform to all technical regulations of the Eurasian
Customs Union.
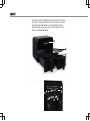
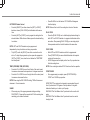
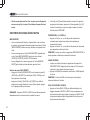
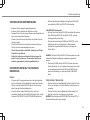
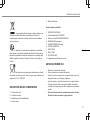
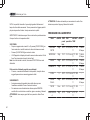
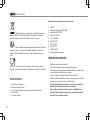
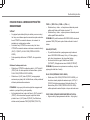
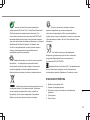
PARTS DESCRIPTION
1. Dual Touchscreen Control
2. Aero Fryer Baskets
3. Non-Stick Crisping Trays
4. Basket Handles
5. Release Button.
Dual Touchscreen Control Panel
1. ON/OFF
2. Dual Digital TIME/TEMP Display
3. LEFT/RIGHT Basket Selector
4. Temperature UP/DOWN
5. Time UP/DOWN
6. SHAKE FOOD
7. SYNC FINISH
8. DUAL COOK
9. START/ PAUSE
10. 8 Cooking pre-sets
BEFORE THE FIRST USE
• Remove all packaging material.
• Remove any stickers or labels from the appliance.
• Thoroughly clean the parts with hot water, some washing-up liquid,
and a non-abrasive sponge.
• Wipe the inside and outside of the appliance with a moist cloth.
• Place the appliance on a stable, horizontal, and level surface, do not
place the appliance on non-heat-resistant surfaces.
•This is an aero fryer that works on hot air. Do not fill the pan with
oil or frying fat.
•In order to prevent disruptions of the airflow do not put anything
on top of the appliance and make sure there is always 10
centimeters of free space around the appliance.
FUNCTIONS OF THE DUAL TOUCHSCREEN PANEL
ON/OFF
• When the Aero fryer is plugged in, a tone will sound, the icons on the
control panel will illuminate for a second and the [ON/OFF] icon will
light up red indicating that the unit is on standby.
• When the ON/OFF icon is pressed, a tone will sound, the [ON/OFF]
icon will turn green and the LEFT, RIGHT, and DUAL COOK icons will
light up.
• When in operation press the [ON/OFF] icon to turn both LEFT and
RIGHT baskets OFF.

Instruction manual
7
LEFT/RIGHT Basket Control
• Press the [ON/OFF] icon then choose the [LEFT] or RIGHT]
basket or choose [DUAL COOK] for both baskets at the same
time.
• Press the [LEFT] or [RIGHT] icon to program the settings for the
selected basket. While the icon flashes, press the desired setting
to continue.
NOTE: LEFT and RIGHT baskets may be programmed
independently at any time before or during an operation.
• The [LEFT] and/or the [RIGHT] icon will be on when the unit is
active. To adjust the program at any time press the appropriate
[LEFT] or [RIGHT] icon, when the icon flashes the TIME/TEMP
can be adjusted.
TEMP (UP/DOWN)/ TIME (UP/DOWN)
• Press the UP or DOWN icon on the left side of the control panel
to increase or decrease the temperature in 5-degree increments.
• Press the UP or DOWN icon on the right side of the control panel
to increase or decrease the time.
NOTE: When using the DEHYDRATE setting, TIME will increase or
decrease in 1-hour increments.
SHAKE
• When using any of the pre-programmed settings excluding
DEHYDRATE, 2 tones will be sounded at 2/3 of the cooking time
reminding you to shake the basket.
• Press SHAKE to turn this feature OFF. SHAKE will disappear
from the display.
NOTE: Shake will not work if the cooking time is below 3 minutes.
DUAL COOK
• Press the [DUAL COOK] icon to effortlessly duplicate settings for
both LEFT and RIGHT baskets or to program both baskets at the
same time. After pressing [DUAL COOK] you can simply adjust
the temperature and time for both baskets at the same time.
SYNC FINISH
• Both LEFT and RIGHT baskets must first be programmed.
• Press [SYNC/FINISH] to ensure that both baskets will complete
cooking at the same time.
• HOLD will appear on the display as the Aero Fryer synchronizes
the final cooking times.
NOTE: Once cooking has started SYNC function will not be operable.
START/PAUSE
• Once programming is complete, press [START/PAUSE] to
START or to PAUSE any operation.
IMPORTANT! The maximum food capacity recommended for each
Aero Fryer basket is 1000 grams of food per basket. Using both
baskets will enable you to feed up to 9 people.
WARNING! This Dual Basket Aero Fryer should not be used to boil
water.
WARNING! This Dual Basket Aero Fryer should never be used to
deep fry foods.
EN

Instruction manual
8
OPERATION
1. If needed, place the crisping tray(s) in the basket(s).
2. Place the food in either or both of the baskets. Do not overfill. To
ensure proper cooking and air circulation, NEVER fill any fryer basket
more than 2/3 full. When air frying fresh vegetables we recommend
not adding more than 2 to 3 cups of food to the fryer basket
NOTE: Up to 6 cups of ingredients may be dehydrated as food will shrink
to a fraction of its original volume. Place a single layer of ingredients into
the empty air fryer basket. Create a second layer by placing the crisping
tray into the basket over the ingredients. Add food on top of the crisping
tray.
1. Insert the assembled fryer basket(s) into the front of the Dual Basket
Aero Fryer. Always make sure fryer basket(s) are in their proper LEFT/
RIGHT position and are fully closed.
2. Plug the cord in the wall outlet.
3. Press [POWER ON/OFF].
4. Select [LEFT], [RIGHT] or [DUAL COOK].
5. If [DUAL COOK] is chosen first press the [LEFT] or the [RIGHT]
basket to program them individually.
6. Select a pre-set cooking program by pressing the icon of the desired
cooking pre-set.
7. From here, you can make any desired adjustments to the pre-set time
and/or temperature by pressing TIME [UP] or [DOWN] and
TEMPERATURE [UP] or [DOWN].
8. For DUAL COOK repeat steps 5 to 7 for the second basket or press
[DUAL COOK] again to duplicate the settings from the first basket to
the second basket.
9. Press the [START/PAUSE] icon to start the cooking process.
10. Press [START/PAUSE] to pause and resume cooking.
When the remaining TIME reaches 00:00, the display will show “Cool
Cool”, then change to “End End” and beep 3 times when it is safe to
remove the food.
NOTE: The quantity, density, weight of food will alter the total cooking time
necessary. Remember, frying smaller batches will result in shorter cooking
times and higher food quality.
IMPORTANT: Always check food halfway through cooking to determine
the final cooking time and temperature
SYNC FINISH
• After programming the LEFT and RIGHT baskets press [SYNC/
FINISH] to ensure that each basket will finish cooking together.
• Press [START/PAUSE] to begin the operation.
• HOLD will appear on the display on the basket side that will be held as
the Dual Aero Fryer synchronizes the final cooking times.
Note: Once cooking has started the SYNC/FINISH function will not be
operable.
Aero Frying Pre Packaged Frozen Foods
• As a rule, depending on the food and the amount to be cooked, the
suggested cooking times may have to be slightly reduced.

Instruction manual
9
TIPS
• Always pat dry foods before cooking to avoid excess smoke and
encourage browning.
• To ensure even cooking/ browning, ALWAYS open the active
basket halfway through the cooking time and check, turn or
shake the foods in the fryer baskets.
CAUTION: Always use oven mittens when handling the Aero Fryer.
CAUTION: Hot oil can collect at the base of the basket. Use caution
when removing foods from the baskets.
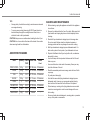
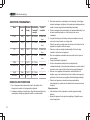
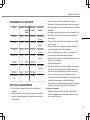
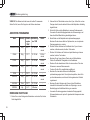
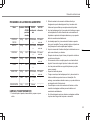
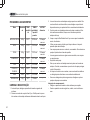
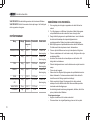
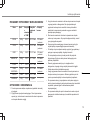
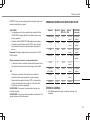
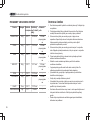
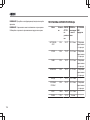
AEROFRYER PROGRAMS
Menu Quantity Default
TEMP
Default TIME SHAKE
Food
FRENCH FRIES 500g 200°C 20 / 28 mins. 2/3 time/once
STEAK 200g 175°C 15 / 21 mins. 2/3 time/once
FISH 200g 160°C 15 / 21 mins. 2/3 time/once
SHRIMP 250g 180°C 8 / 11 mins. 2/3 time/once
PIZZA ½ 150°C 12 / 17 mins. -
DRUMSTICKS 200g 200°C 25 / 35 mins. 2/3 time/once
CAKE 10cm 165°C 12 / 17 mins. -
DEHYDRATE 50g 35°C 8 hours -
CLEANING AND MAINTENANCE
1. Before cleaning, unplug the appliance and wait for the appliance
to cool down.
2. Remove fryer baskets from the Aero Fryer body. Make sure both
fryer baskets and crisping trays have cooled completely before
cleaning.
3. Wash both fryer baskets and crisping trays in hot soapy water.
Do not use metal kitchen utensils or abrasive cleansers or
cleaning products as this may damage the non-stick coating.
4. Both fryer baskets and crisping trays are dishwasher-safe. For
best results, place in the top rack of your dishwasher to clean.
5. Wipe the Dual Basket Aero Fryer body with a soft, non-abrasive
damp cloth to clean.
• Use a soft damp cloth to wipe clean the base and lid of the unit
after every use.
• Use a small brush or cotton swab if necessary. Never pour any
liquid into the base of the unit.
• Wash the removable parts in warm soapy water with a soft cloth
or sponge.
• Dry each piece thoroughly.
• Note that the removable frying baskets and crisping trays are
dishwasher safe. However, we recommend washing them by
hand as this will be beneficial for the lifetime of the product.
• When cleaning or cooking in the frying baskets never use metal
utensils or scouring pads in order to avoid damage to the non-
stick coating.
• Never use harsh chemical detergents, scouring pads, or powders
on any of the parts or accessories.
EN

Instruction manual
10
Storing Instructions
• Unplug allow the unit to cool completely.
• Store the unit in its original box or covered in a cool, dry place.
ENVIRONMENT
This appliance should not be put into the domestic garbage at the
end of its durability, but must be offered at a central point for the recycling
of electric and electronic domestic appliances. This symbol on the
appliance, instruction manual and packaging puts your attention to this
important issue. The materials used in this appliance can be recycled. By
recycling of used domestic appliances you contribute an important push to
the protection of our environment. Ask your local authorities for information
regarding the point of recollection.
Support
You can find all available information and spare parts at
www.princesshome.eu!

Gebruiksaanwijzing
11
VEILIGHEID
• Als u de veiligheidsinstructies negeert, kan
de fabrikant niet verantwoordelijk worden
gehouden voor de mogelijke schade.
• Als het netsnoer is beschadigd, moet het om
gevaarlijke situaties te voorkomen worden
vervangen door de fabrikant, diens
servicevertegenwoordiger of een persoon
met vergelijkbare kwalificaties.
• Verplaats het apparaat nooit door aan het
snoer te trekken en zorg dat het snoer niet
in de war kan raken.
• Het apparaat moet op een stabiele, vlakke
ondergrond worden geplaatst.
• De gebruiker mag het apparaat niet
onbeheerd achterlaten wanneer de stekker
zich in het stopcontact bevindt.
• Dit apparaat is niet bedoeld voor gebruik
door personen (inclusief kinderen) met
verminderde lichamelijke, zintuiglijke of
verstandelijke vermogens of personen met
een gebrek aan ervaring en kennis, tenzij
iemand die verantwoordelijk is voor hun
veiligheid toezicht op hen houdt of hen heeft
uitgelegd hoe het apparaat dient te worden
gebruikt.
• Houd voldoende toezicht wanneer een
apparaat wordt gebruikt door of in de buurt
van kinderen.
• WAARSCHUWING: Gemorst voedsel kan
ernstige brandwonden veroorzaken. Houd
apparaten en snoeren uit de buurt van
kinderen. Laat het snoer nooit over de rand
van een werkblad hangen, gebruik nooit een
stopcontact onder het werkblad en gebruik
het apparaat nooit in combinatie met een
verlengsnoer.
• Wanneer u accessoires gebruikt die niet
worden aanbevolen door de fabrikant van
het apparaat, kan dit letsel veroorzaken.
• Gebruik het apparaat niet buitenshuis.
• Plaats het apparaat niet op of in de buurt
van een ingeschakeld gasfornuis of
elektrisch fornuis, of in een verwarmde
oven.
• Reinig het apparaat niet met metalen
schuursponsjes. Er kunnen stukjes afbreken
van het sponsje en in contact komen met
elektrische onderdelen, waardoor het risico
op een elektrische schok ontstaat.
• Ga uiterst voorzichtig te werk wanneer u de
mandjes verwijdert.
NL

Gebruiksaanwijzing
12
• Ga uiterst voorzichtig te werk wanneer u een
apparaat verplaatst dat hete olie of een andere
hete vloeistof bevat.
• LET OP: Om schade of een elektrische schok te
voorkomen, mag u geen voedsel bereiden in de
basiseenheid. Bereid alleen voedsel in de
meegeleverde mandjes.
• Als u het apparaat wilt loskoppelen, drukt u op
de aan/uit-toets en haalt u daarna pas de
stekker uit het stopcontact.
• Gebruik de mandjes niet als ze ingedeukt of
versleten zijn.
• WAARSCHUWING: Frituur nooit voedsel in de
Aerofryer, met of zonder deksel. DIT IS
GEVAARLIJK EN KAN BRAND OF ERNSTIGE
SCHADE VEROORZAKEN.
• Voordat u de bakpan of aero-plaat in de basis
plaatst, moet u zorgen dat beide droog zijn door
ze af te vegen met een zachte doek.
• Zorg altijd dat het apparaat correct in elkaar is
gezet voordat u het gebruikt.
• Wees voorzichtig wanneer u de bakpan uit de
basis tilt.
• Plaats het apparaat tijdens gebruik niet in de
buurt van muren en kasten om mogelijke
schade door stoom te voorkomen.
• Til het apparaat nooit op aan de uitstekende
delen van het deksel.
• Raak de blootliggende verwarmingselementen
nooit aan.
• Dompel het snoer, de stekker of het apparaat
niet onder in water of andere vloeistoffen om
het risico op een elektrische schok te
voorkomen.
• Dit apparaat is bestemd voor huishoudelijk
gebruik en vergelijkbare toepassingen, zoals:
• In personeelskeukens van winkels, kantoren en
andere werkomgevingen.
• Door gasten in hotels, motels en andere
residentiële omgevingen.
• In bed & breakfast-achtige omgevingen.
• In boerenbedrijven.
• Kinderen mogen niet met het apparaat spelen.
• Dit apparaat mag niet worden gebruikt door
kinderen. Houd het apparaat en het netsnoer
buiten bereik van kinderen.
• Dompel het snoer, de stekker of het apparaat
niet onder in water of andere vloeistoffen om
elektrische schokken te voorkomen.
• Verhit het voedsel niet te lang.
• Het oppervlak van het verwarmingselement is
na gebruik onderhevig aan restwarmte.

Gebruiksaanwijzing
13
• De connector dient te worden verwijderd
alvorens het apparaat te reinigen. Wees er
zeker van dat de inlaat volledig droog is
alvorens het apparaat weer in gebruik te
nemen.
• Het oppervlak wordt heet tijdens
gebruik.
• WAARSCHUWING: Indien het oppervlak is
gebarsten, schakel dan het apparaat uit om
elektrische schokken te voorkomen.
• De temperatuur van de toegankelijke
oppervlakken kan hoog zijn wanneer het
apparaat in gebruik is.
• Het apparaat is niet bedoeld om bediend te
worden met behulp van een externe timer of
een afzonderlijk afstandbedieningssysteem.
• Het apparaat moet worden aangesloten op
een geaard stopcontact (voor klasse I-
apparaten).
• Plaats niets boven op het apparaat en zorg
ervoor dat er altijd 10cm vrije ruimte rondom
het apparaat is om verstoring van de
luchtstroom te voorkomen.
• Dit apparaat is uitsluitend bestemd voor
huishoudelijk gebruik en voor het doel
waarvoor het is gemaakt. In het slechtste
geval kan het voedsel vlam vatten.
Symbolen en uitleg
Dit product voldoet aan de conformiteitseisen van de
toepasselijke Europese verordeningen of richtlijnen.
The Green Dot is het geregistreerde handelsmerk van Der
Grüne Punkt - Duales System Deutschland GmbH en is een
wereldwijd beschermd handelsmerk. Het logo mag uitsluitend worden
gebruikt door klanten van DSD GmbH die in het bezit zijn van een
geldig handelsmerkgebruikscontract of door aangewezen
afvalverwerkingsbedrijven binnen de Bondsrepubliek Duitsland. Dit
geldt ook voor de reproductie van het logo door derden in een
woordenboek, een encyclopedie of een elektronische databank met
een naslagwerk.
Het universele recyclingsymbool, -logo of -pictogram is een
internationaal erkend symbool dat wordt gebruikt om recyclebare
materialen aan te duiden. Het recyclingsymbool behoort tot het
publieke domein en is geen handelsmerk.
NL

Gebruiksaanwijzing
14
Afgedankte elektrische producten mogen niet samen met
huishoudelijk vuil worden weggegooid. Gelieve te laten recyclen bij de
daartoe aangewezen faciliteiten. Neem contact op met uw gemeente of
plaatselijke winkel voor advies over recycling.
Het product en de verpakkingsmaterialen zijn recyclebaar,
binnen de grenzen van de uitgebreide verantwoordelijkheid van de
fabrikant. Verwijder het gescheiden, volgens de geïllustreerde
verpakkingssymbolen, voor een betere afvalverwerking. Het Triman-logo
is alleen in Frankrijk geldig.
Dit symbool wordt gebruikt voor het markeren van materialen
die bestemd zijn om in aanraking te komen met voedsel in de Europese
Unie, zoals gedefinieerd in verordening (EC) nr. 1935/2004.
ONDERDELENBESCHRIJVING
1. Dubbele touchscreenbediening
2. Aerofryer-mandjes
3. Roosterplaten met antiaanbaklaag
4. Handgrepen van mandjes
5. Vrijgaveknop
Paneel voor dubbele touchscreenbediening
1. AAN/UIT
2. Dubbele digitale weergave voor tijd en temperatuur
3. Selectie linker-/rechtermandje
4. Temperatuur omhoog/omlaag
5. Tijd omhoog/omlaag
6. SHAKE (SCHUDDEN)
7. SYNC FINISH (TEGELIJK KLAAR)
8. DUAL COOK (DUBBEL GEBRUIK)
9. Start/pauze
10. 8 bereidingsprogramma's
VOOR HET EERSTE GEBRUIK
• Verwijder alle verpakkingsmateriaal.
• Verwijder eventuele stickers of etiketten van het apparaat.
• Reinig de onderdelen grondig met heet water, wat afwasmiddel en een
niet-schurende spons.
• Reinig de binnenkant en de buitenkant van het apparaat met een
vochtige doek.
• Plaats het apparaat op een stabiel, horizontaal en gelijkmatig
oppervlak. Plaats het niet op een ondergrond die niet hittebestendig is.
•Deze Aerofryer werkt op basis van hete lucht. Vul de pan niet met
olie of frituurvet.

Gebruiksaanwijzing
15
•Voor een vrije luchtstroom zorgt u dat er niets bovenop het
apparaat staat en dat er een ruimte van 10centimeter vrij
blijft rondom het apparaat.
FUNCTIES VAN HET DUBBELE TOUCHSCREEN
AAN/UIT
• Wanneer u de Aerofryer aansluit, klinkt er een geluid, branden de
pictogrammen op het bedieningspaneel één seconde lang en
kleurt het pictogram [AAN/UIT] rood om aan te geven dat het
apparaat in de stand-bystand staat.
• Wanneer u op het pictogram AAN/UIT drukt, klinkt er een geluid,
kleurt het groen en gaan ook de pictogrammen L, R en DUAL
COOK (DUBBEL GEBRUIK) branden.
• Druk terwijl het apparaat aan staat op het pictogram [AAN/UIT]
om zowel het linker- als het rechtermandje UIT te schakelen.
Bediening linker-/rechtermandje
• Druk op het pictogram [AAN/UIT] en kies dan het linker- of
rechtermandje met [L] of [R]. Of kies [DUAL COOK] (DUBBEL
GEBRUIK) als u beide mandjes tegelijk wilt gebruiken.
• Druk op het pictogram [L] of [R] om het gekozen mandje te
programmeren. Druk terwijl het pictogram knippert op de
gewenste instelling om door te gaan.
OPMERKING: U kunt het linker- en rechtermandje op elk gewenst
moment voor of tijdens het gebruik onafhankelijk van elkaar
programmeren.
• Het pictogram [L] en/of [R] brandt terwijl het apparaat in bedrijf is.
Als u een programma op een bepaald moment wilt aanpassen,
drukt u op het betreffende pictogram [L] of [R]. Zodra het
pictogram knippert kunt u de tijd/temperatuur aanpassen.
TEMP (+/–) / TIME (+/–)
• Druk op het pictogram + of – links op het bedieningspaneel om
de temperatuur in stappen van 5 graden te verhogen of verlagen.
• Druk op het pictogram + of – rechts op het bedieningspaneel om
de tijd te verhogen of verlagen.
OPMERKING: Wanneer u het programma DROGEN gebruikt, wordt
de tijd verhoogd of verlaagd in stappen van 1 uur.
SHAKE (SCHUDDEN)
• Wanneer u een van de beschikbare programma's gebruikt
(behalve DROGEN), klinken er 2 geluiden wanneer 2/3 van de
bereidingstijd is verstreken. Dit is een herinnering dat u het
mandje even moet schudden.
• Druk op SHAKE om deze functie UIT te schakelen. SHAKE
verdwijnt van het display.
OPMERKING: De schudfunctie werkt niet als de bereidingstijd
minder dan 3 minuten bedraagt.
DUAL COOK (DUBBEL GEBRUIK)
• Druk op het pictogram [DUAL COOK] (DUBBEL GEBRUIK) om
heel makkelijk de instellingen voor het linker- en rechtermandje te
dupliceren of om beide mandjes tegelijk te programmeren. Nadat
u op [DUAL COOK] hebt gedrukt, kunt u de temperatuur en tijd
eenvoudigweg voor beide mandjes tegelijk aanpassen.
NL

Gebruiksaanwijzing
16
SYNC FINISH (TEGELIJK KLAAR)
• U moet voor zowel het linker- als het rechtermandje eerst de bereiding
instellen.
• Druk daarna op [SYNC FINISH] als u wilt dat beide mandjes tegelijk
klaar zijn.
• Op het display verschijnt HOLD (WACHTEN) terwijl de Aerofryer de
eindtijden synchroniseert.
OPMERKING: Wanneer de bereiding eenmaal is gestart, kunt u deze
functie verder niet gebruiken.
START/PAUZE
• Nadat een programma is voltooid, drukt u op [START/PAUZE] om een
willekeurig proces te starten of onderbreken.
BELANGRIJK! De aanbevolen maximale hoeveelheid voedsel voor elk
Aerofryer-mandje is 1000 gram per mandje. Als u beide mandjes gebruikt,
hebt u voldoende eten voor tot 9 personen.
WAARSCHUWING! Deze Aerofryer met twee mandjes mag niet worden
gebruikt om water te koken.
WAARSCHUWING! Deze Aerofryer met twee mandjes mag nooit worden
gebruikt om eten te frituren.
GEBRUIK
1. Plaats zo nodig een of beide roosterplaten in een of beide mandjes.
2. Plaats het voedsel in een of beide mandjes. Doe de mandjes niet te
vol. Vul de mandjes nooit verder dan 2/3, om een goede bereiding en
luchtcirculatie te waarborgen. Wanneer u verse groenten bereidt,
raden we aan niet meer dan 2 tot 3 kopjes voedsel in elk mandje te
doen.
OPMERKING: U kunt tot 6 kopjes met ingrediënten drogen, omdat
voedsel hierbij krimpt tot slechts een fractie van het oorspronkelijke
volume. Maak één laag met ingrediënten in het lege bereidingsmandje.
Maak een tweede laag door de roosterplaat op de ingrediënten in het
mandje te plaatsen. Leg voedsel op de roosterplaat.
1. Schuif een of beide mandjes in de voorkant van de Aerofryer. Zorg
altijd dat de mandjes correct links/rechts zijn geplaatst en volledig zijn
gesloten.
2. Steek de stekker in het stopcontact.
3. Druk op [AAN/UIT].
4. Kies [L], [R] of [DUAL COOK].
5. Als u [DUAL COOK] kiest, drukt u vervolgens eerst op [L] of [R] om
beide mandjes apart in te stellen.
6. Kies een bereidingsprogramma door op het bijbehorende pictogram te
drukken.
7. Nu kunt u de voorgeprogrammeerde tijd en/of temperatuur eventueel
aanpassen met TIME [+] of [–] en TEMP [+] of [–].
8. Als u DUAL COOK hebt gekozen, herhaalt u stap 5 t/m 7 voor het
tweede mandje of drukt u nogmaals op [DUAL COOK] om de
instellingen van het eerste mandje te dupliceren voor het tweede
mandje.
9. Druk op het pictogram [START/PAUZE] om de bereiding te starten.
10. Druk op [START/PAUZE] om de bereiding te onderbreken en
hervatten.

Gebruiksaanwijzing
17
Wanneer de resterende tijd 00:00 bereikt, verschijnt de tekst 'Cool
Cool' op het display, gevolgd door 'End End'. Wanneer het veilig is
om het voedsel uit de mandjes te halen, klinken er 3 piepjes.
OPMERKING: De hoeveelheid, de dichtheid en het gewicht van het
voedsel zijn van invloed op de benodigde totale bereidingstijd.
Onthoud dat voor kleinere porties een kortere bereidingstijd nodig is
en het resultaat beter zal zijn.
BELANGRIJK: Controleer voedsel altijd halverwege de bereidingstijd
om de definitieve bereidingstijd en -temperatuur te bepalen.
SYNC FINISH (TEGELIJK KLAAR)
• Nadat u het linker- en rechtermandje hebt ingesteld, drukt u op
[SYNC FINISH] om te zorgen dat de mandjes tegelijk klaar zijn.
• Druk op [START/PAUZE] om de bereiding te starten.
• Op het display van het mandje waarvan de bereiding nog moet
wachten, verschijnt 'HOLD' terwijl de eindtijden worden
gesynchroniseerd.
Opmerking: Wanneer de bereiding eenmaal is gestart, kunt u de
SYNC FINISH-functie verder niet gebruiken.
Voorverpakt diepvriesvoedsel bereiden in de Aerofryer
• Afhankelijk van het voedsel en de hoeveelheid zult u gewoonlijk
de aanbevolen bereidingstijden iets moeten inkorten.
TIPS
• Dep voedsel altijd droog voordat u het bereidt, om te voorkomen
dat er te veel rook ontstaat en te zorgen dat het voedsel mooi
bruin wordt.
• Voor een gelijkmatige bereiding/bruine kleur moet u een
ingeschakeld mandje ALTIJD halverwege de bereidingstijd
openen en het voedsel in het mandje controleren, draaien of
schudden.
LET OP: Draag altijd ovenhandschoenen wanneer u de Aerofryer
gebruikt.
LET OP: Onderin de mandjes kan zich hete olie verzamelen. Wees
voorzichtig wanneer u voedsel uit de mandjes haalt.
NL

Gebruiksaanwijzing
18
AEROFRYER-PROGRAMMA'S
Menu Hoeveelh
eid
Standaar
dtemp.
Standaardtijd
/ 1 mandje/ 2
mandjes
Voedsel
schudden
FRIET 500g 200°C 20 / 28 min. 2/3 keer/ een
keer
BIEFSTUK 200g 175°C 15 / 21 min. 2/3 keer/ een
keer
VIS 200g 160°C 15 / 21 min. 2/3 keer/ een
keer
GARNALEN 250g 180°C 8 / 11 min. 2/3 keer/ een
keer
PIZZA ½ 150°C 12 / 17 min. -
DRUMSTICKS 200g 200°C 25 / 35 min. 2/3 keer/ een
keer
CAKE 10cm 165°C 12 / 17 min. -
DROGEN 50g 35°C 8 uur -
REINIGING EN ONDERHOUD
1. Als u het apparaat wilt schoonmaken, haalt u de stekker uit het
stopcontact en wacht u tot het apparaat is afgekoeld.
2. Verwijder de mandjes uit de behuizing. Zorg dat beide mandjes en de
roosterplaten volledig zijn afgekoeld voordat u ze schoonmaakt.
3. Was beide mandjes en roosterplaten in heet zeepsop. Gebruik geen
metalen keukengerei en bijtende of schurende schoonmaakproducten,
omdat u hiermee mogelijk de antiaanbaklaag beschadigt.
4. Zowel de mandjes als de roosterplaten zijn vaatwasserbestendig. Voor
de beste resultaten plaatst u ze in het bovenste rek van uw
vaatwasser.
5. Veeg de behuizing van de Aerofryer met twee mandjes schoon met
een zachte, niet-schurende en vochtige doek.
• Gebruik een zachte, vochtige doek om de basis en het deksel van het
apparaat na elk gebruik schoon te vegen.
• Gebruik zo nodig een kwastje of wattenstaafje. Giet nooit enige
vloeistof in de basis van het apparaat.
• Was de verwijderbare onderdelen met een zachte doek of spons in
warm zeepsop.
• Droog elk onderdeel zorgvuldig af.
• Zowel de uitneembare mandjes als de roosterplaten zijn
vaatwasserbestendig. Het wordt echter aanbevolen ze met de hand af
te wassen om te zorgen dat het product zo lang mogelijk meegaat.
• Wanneer u het apparaat schoonmaakt of voedsel bereidt in de
mandjes, mag u nooit metalen bestek of een metalen schuursponsje
gebruiken, omdat u hiermee mogelijk de antiaanbaklaag beschadigt.
• Gebruik nooit agressieve chemische schoonmaakmiddelen,
schuursponsjes of -poeders om de onderdelen of accessoires schoon
te maken.
Opberginstructies
• Haal de stekker uit het stopcontact en laat het apparaat volledig
afkoelen.
• Bewaar het apparaat in de originele verpakking of afgedekt op een
koele, droge plaats.

Gebruiksaanwijzing
19
MILIEU
Dit apparaat mag aan het einde van de levensduur niet bij het
normale huisafval worden gedeponeerd, maar moet bij een speciaal
inzamelpunt voor hergebruik van elektrische en elektronische
apparaten worden aangeboden. Het symbool op het apparaat, in de
gebruiksaanwijzing en op de verpakking attendeert u hierop. De in
het apparaat gebruikte materialen kunnen worden gerecycled. Met
het recyclen van gebruikte huishoudelijke apparaten levert u een
belangrijke bijdrage aan de bescherming van ons milieu. Informeer bij
uw lokale overheid naar het inzamelpunt.
Support
U kunt alle beschikbare informatie en reserveonderdelen vinden op
www.princesshome.eu!
NL

Manuel d'instructions
20
SÉCURITÉ
• Si vous ignorez les consignes de sécurité, le
fabricant ne peut être tenu pour responsable
des dommages.
• Si le cordon d'alimentation est endommagé, il
doit être remplacé par le fabricant, son agent de
service ou des personnes qualifiées afin d'éviter
tout risque.
• Ne déplacez jamais l'appareil en tirant sur le
cordon et veillez à ce que celui-ci ne s'enroule
pas.
• L'appareil doit être posé sur une surface stable
et nivelée.
• Ne laissez jamais le dispositif sans surveillance
s'il est connecté à l'alimentation.
• Cet appareil n'est pas destiné à être utilisé par
des personnes (enfants inclus) ayant des
capacités physiques, sensorielles ou mentales
réduites ou un manque d'expérience et de
connaissances, à moins qu'elles ne bénéficient
d'une supervision ou d'instructions concernant
l'utilisation de l'appareil émanant d'une
personne responsable de leur sécurité.
• Une surveillance étroite est nécessaire
lorsqu'un appareil est utilisé par des enfants ou
à proximité d'enfants.
• AVERTISSEMENT: les aliments renversés
peuvent causer de graves brûlures. Gardez
l'appareil et le cordon d'alimentation hors de
portée des enfants. Ne faites jamais passer le
cordon par-dessus le bord du plan de travail,
n'utilisez jamais de prise de courant sous le
plan de travail et n'utilisez jamais de rallonge.
• L'utilisation d'accessoires non recommandés
par le fabricant peut provoquer un accident.
• N'utilisez pas l'appareil à l'extérieur.
• Ne placez pas l'appareil sur ou près d'un
brûleur à gaz ou électrique chaud, ou dans un
four chauffé.
• N'utilisez pas de tampons à récurer métalliques
pour le nettoyer. Des morceaux peuvent se
détacher du tampon et toucher des parties
électriques, créant un risque d'électrocution.
• Soyez très prudent lorsque vous retirez les
paniers de cuisson.
• La plus grande prudence s'impose lorsque l'on
déplace un appareil contenant de l'huile chaude
ou d'autres liquides chauds.
• ATTENTION: pour vous protéger contre les
risques de dommages ou d'électrocution, ne
cuisinez pas dans l'unité de base. Cuisinez
uniquement dans les paniers à cuisson fournis.
Seite wird geladen ...
Seite wird geladen ...
Seite wird geladen ...
Seite wird geladen ...
Seite wird geladen ...
Seite wird geladen ...
Seite wird geladen ...
Seite wird geladen ...
Seite wird geladen ...
Seite wird geladen ...
Seite wird geladen ...
Seite wird geladen ...
Seite wird geladen ...
Seite wird geladen ...
Seite wird geladen ...
Seite wird geladen ...
Seite wird geladen ...
Seite wird geladen ...
Seite wird geladen ...
Seite wird geladen ...
Seite wird geladen ...
Seite wird geladen ...
Seite wird geladen ...
Seite wird geladen ...
Seite wird geladen ...
Seite wird geladen ...
Seite wird geladen ...
Seite wird geladen ...
Seite wird geladen ...
Seite wird geladen ...
Seite wird geladen ...
Seite wird geladen ...
Seite wird geladen ...
Seite wird geladen ...
Seite wird geladen ...
Seite wird geladen ...
Seite wird geladen ...
Seite wird geladen ...
Seite wird geladen ...
Seite wird geladen ...
Seite wird geladen ...
Seite wird geladen ...
Seite wird geladen ...
Seite wird geladen ...
Seite wird geladen ...
Seite wird geladen ...
Seite wird geladen ...
Seite wird geladen ...
Seite wird geladen ...
Seite wird geladen ...
Seite wird geladen ...
Seite wird geladen ...
Seite wird geladen ...
Seite wird geladen ...
Seite wird geladen ...
Seite wird geladen ...
Seite wird geladen ...
Seite wird geladen ...
Seite wird geladen ...
Seite wird geladen ...
Seite wird geladen ...
Seite wird geladen ...
Seite wird geladen ...
Seite wird geladen ...
Seite wird geladen ...
Seite wird geladen ...
Seite wird geladen ...
Seite wird geladen ...
Seite wird geladen ...
Seite wird geladen ...
Seite wird geladen ...
Seite wird geladen ...
Seite wird geladen ...
Seite wird geladen ...
Seite wird geladen ...
Seite wird geladen ...
Seite wird geladen ...
Seite wird geladen ...
Seite wird geladen ...
Seite wird geladen ...
Seite wird geladen ...
Seite wird geladen ...
Seite wird geladen ...
Seite wird geladen ...
Seite wird geladen ...
Seite wird geladen ...
Seite wird geladen ...
Seite wird geladen ...
Seite wird geladen ...
Seite wird geladen ...
-
 1
1
-
 2
2
-
 3
3
-
 4
4
-
 5
5
-
 6
6
-
 7
7
-
 8
8
-
 9
9
-
 10
10
-
 11
11
-
 12
12
-
 13
13
-
 14
14
-
 15
15
-
 16
16
-
 17
17
-
 18
18
-
 19
19
-
 20
20
-
 21
21
-
 22
22
-
 23
23
-
 24
24
-
 25
25
-
 26
26
-
 27
27
-
 28
28
-
 29
29
-
 30
30
-
 31
31
-
 32
32
-
 33
33
-
 34
34
-
 35
35
-
 36
36
-
 37
37
-
 38
38
-
 39
39
-
 40
40
-
 41
41
-
 42
42
-
 43
43
-
 44
44
-
 45
45
-
 46
46
-
 47
47
-
 48
48
-
 49
49
-
 50
50
-
 51
51
-
 52
52
-
 53
53
-
 54
54
-
 55
55
-
 56
56
-
 57
57
-
 58
58
-
 59
59
-
 60
60
-
 61
61
-
 62
62
-
 63
63
-
 64
64
-
 65
65
-
 66
66
-
 67
67
-
 68
68
-
 69
69
-
 70
70
-
 71
71
-
 72
72
-
 73
73
-
 74
74
-
 75
75
-
 76
76
-
 77
77
-
 78
78
-
 79
79
-
 80
80
-
 81
81
-
 82
82
-
 83
83
-
 84
84
-
 85
85
-
 86
86
-
 87
87
-
 88
88
-
 89
89
-
 90
90
-
 91
91
-
 92
92
-
 93
93
-
 94
94
-
 95
95
-
 96
96
-
 97
97
-
 98
98
-
 99
99
-
 100
100
-
 101
101
-
 102
102
-
 103
103
-
 104
104
-
 105
105
-
 106
106
-
 107
107
-
 108
108
-
 109
109
-
 110
110


Princess 1.182068.01.001 Double Basket Airfryer Benutzerhandbuch
- Typ
- Benutzerhandbuch
in anderen Sprachen
- English: Princess 1.182068.01.001 Double Basket Airfryer User manual
- français: Princess 1.182068.01.001 Double Basket Airfryer Manuel utilisateur
- español: Princess 1.182068.01.001 Double Basket Airfryer Manual de usuario
- italiano: Princess 1.182068.01.001 Double Basket Airfryer Manuale utente
- русский: Princess 1.182068.01.001 Double Basket Airfryer Руководство пользователя
- Nederlands: Princess 1.182068.01.001 Double Basket Airfryer Handleiding
- slovenčina: Princess 1.182068.01.001 Double Basket Airfryer Používateľská príručka
- português: Princess 1.182068.01.001 Double Basket Airfryer Manual do usuário
- polski: Princess 1.182068.01.001 Double Basket Airfryer Instrukcja obsługi
- čeština: Princess 1.182068.01.001 Double Basket Airfryer Uživatelský manuál
- svenska: Princess 1.182068.01.001 Double Basket Airfryer Användarmanual
Verwandte Artikel
-
Princess 182068 Benutzerhandbuch
-
Princess 01.162725.01.001 Benutzerhandbuch
-
-
-
-
-
-
-
-
Andere Dokumente
-
Tristar FR-6970 Double Hot Air Fryer Benutzerhandbuch
-
-
-
Tristar FR-6999 Benutzerhandbuch
-
-
Cosori CP258-AF-DEU AIRFRYER/DEHYDRATOR Bedienungsanleitung
-
Tristar BP-2965 Benutzerhandbuch
-
Eden ED-7012 Benutzerhandbuch
-
-
Cosori CP158-AF-RXB Benutzerhandbuch