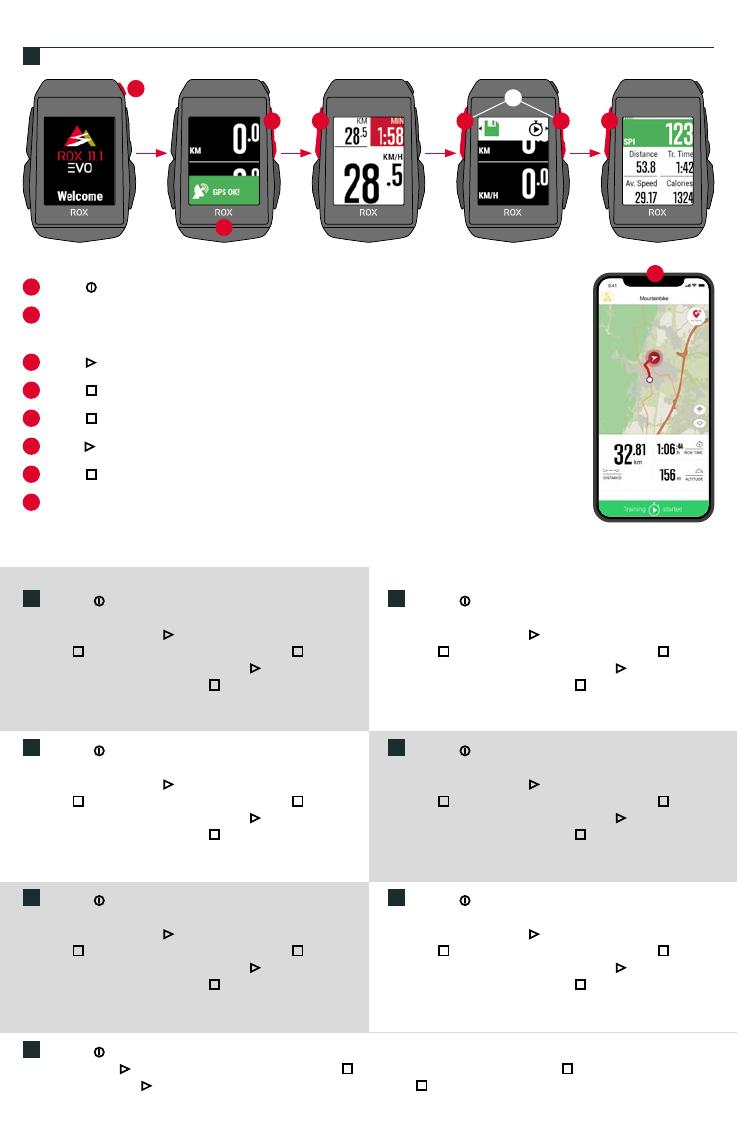
Sigma Rox 11.1 EVO Cycling Computer Benutzerhandbuch

Typ
Benutzerhandbuch
VIDEOS &
COMPLETE
MANUAL AT
SIGMA-ELEKTRO GmbH
Dr.-Julius-Leber- Straße 15
D-67433 Neustadt/Weinstraße
Tel. + 49 (0) 63 21-9120-0
Fax. + 49 (0) 63 21-9120-34
000000/1
www.sigmasport.com
SHORT MANUAL
EN
Bei dieser Anleitung handelt es sich um eine Kurzanleitung.
Die ausführliche Anleitung erreichen Sie, indem Sie diesem Link Folgen:
DE
Bei dieser Anleitung handelt es sich um eine Kurzanleitung.
Die ausführliche Anleitung erreichen Sie, indem Sie diesem Link Folgen:
FR
Bei dieser Anleitung handelt es sich um eine Kurzanleitung.
Die ausführliche Anleitung erreichen Sie, indem Sie diesem Link Folgen:
IT
Bei dieser Anleitung handelt es sich um eine Kurzanleitung.
Die ausführliche Anleitung erreichen Sie, indem Sie diesem Link Folgen:
ES
Bei dieser Anleitung handelt es sich um eine Kurzanleitung.
Die ausführliche Anleitung erreichen Sie, indem Sie diesem Link Folgen:
NL
Bei dieser Anleitung handelt es sich um eine Kurzanleitung.
Die ausführliche Anleitung erreichen Sie, indem Sie diesem Link Folgen:
PL
Bei dieser Anleitung handelt es sich um eine Kurzanleitung.
Die ausführliche Anleitung erreichen Sie, indem Sie diesem Link Folgen:
CZ
Bei dieser Anleitung handelt es sich um eine Kurzanleitung.
Die ausführliche Anleitung erreichen Sie, indem Sie diesem Link Folgen:
sigmasport.com/rox11evo
REMARKS
CONTENTS
ROX 11.1 EVO HR SET SENSOR SET
Art.-Nr. xxxxx
Art.-Nr. xxxxx
Art.-Nr. xxxxx
Art.-Nr. xxxxx
Art.-Nr. xxxxx
Art.-Nr. xxxxx
Art.-Nr. xxxxx
Art.-Nr. xxxxx
Art.-Nr. xxxxx
Art.-Nr. xxxxx
Art.-Nr. xxxxx
Art.-Nr. xxxxx
Art.-Nr. xxxxx
Art.-Nr. xxxxx
Art.-Nr. xxxxx
Art.-Nr. xxxxx
Art.-Nr. xxxxx
Art.-Nr. xxxxx
Art.-Nr. xxxxx
Art.-Nr. xxxxx
CLICK!
HEART RATE SENSOR
HEART RATE SENSOR BATTERY CHANGE
Available in set or sold separately!
or
or
INSTALLATION
o
p
e
n
-
c
l
o
s
e
o
p
e
n
-
c
l
o
s
e
o
p
e
n
-
c
l
o
s
e
1 2 3 4
10
C
ENT
Ø 25,4 mm
0,6 Nm
Ø 31,8 mm
!
TIP
: Watch the video tutorial for
more information, follow this link:
SPEED SENSOR
SPEED / CADENCE SENSOR FIRST START
CADENCE SENSOR
INSTALLATION
1
3 4 5
2
DE
Der SPEED-Sensor kann an der Fahrradnabe beider
Laufräder montiert werden.
EN
Der SPEED-Sensor kann an der
Fahrradnabe beider Laufräder montiert werden.
DE
2. Remove sticker. 5. Blue light flashes. TIP: Watch the
video tutorial for more information.
IT
Der SPEED-Sensor kann an der Fahrradnabe beider
Laufräder montiert werden.
IT
2. Remove sticker. 5. Blue light flashes. TIP: Watch the
video tutorial for more information.
NL
Der SPEED-Sensor kann an der Fahrradnabe beider
Laufräder montiert werden.
NL
2. Remove sticker. 5. Blue light flashes. TIP: Watch the
video tutorial for more information.
CZ
Der SPEED-Sensor kann an der Fahrradnabe beider Laufräder montiert werden.
CZ
2. Remove sticker. 5. Blue light flashes. TIP: Watch the video tutorial for more information.
FR
Der SPEED-Sensor kann an der Fahrradnabe beider
Laufräder montiert werden.
FR
2. Remove sticker. 5. Blue light flashes. TIP: Watch the
video tutorial for more information.
ES
Der SPEED-Sensor kann an der Fahrradnabe beider
Laufräder montiert werden.
ES
2. Remove sticker. 5. Blue light flashes. TIP: Watch the
video tutorial for more information.
PL
Der SPEED-Sensor kann an der Fahrradnabe beider
Laufräder montiert werden.
PL
2. Remove sticker. 5. Blue light flashes. TIP: Watch the
video tutorial for more information.
Remove sticker.
EN
!
QR Code zum Video
!
Blue light flashes.
CAD
Gerät einschalten/ausschalten
(3s drücken)
Menü öffnen oder schließen
– Eine Seite Zurück
– In Listen rauf
– Wert verringern
Training starten/fortsetzen
Eingabe bestätigen
Eine Menüebene runter
Manuelle Runde nehmen im Training
– Training stoppen
– Training nach beenden speichern
– Eine Menüebene rauf
– Eine Seite Weiter
– In Listen runter
– Wert erhöhen
MENU
Button
START/ENTER
Button
STOP/BACK
Button
Button
Button
MENÜ-Taste START/ENTER-Taste STOP/BACK-Taste Taste Taste
– Gerät einschalten/
ausschalten
(3s drücken)
– Menü öffnen oder
schließen
– Training starten /
fortsetzen
– Eingabe bestätigen
– Eine Menüebene
runter
– Manuelle Runde
nehmen im Training
– Training stoppen
– Training nach
beenden speichern
– Eine Menüebene
rauf
– Eine Seite Weiter
– In Listen runter
– Wert erhöhen
– Eine Seite Zurück
– In Listen rauf
– Wert verringern
MENU-Taste START/ENTER-Taste STOP/BACK-Taste Taste Taste
– Gerät einschalten/
ausschalten
(3s drücken)
– Menü öffnen oder
schließen
– Training starten /
fortsetzen
– Eingabe bestätigen
– Eine Menüebene
runter
– Manuelle Runde
nehmen im Training
– Training stoppen
– Training nach
beenden speichern
– Eine Menüebene
rauf
– Eine Seite Weiter
– In Listen runter
– Wert erhöhen
– Eine Seite Zurück
– In Listen rauf
– Wert verringern
BUTTON FUNCTIONS
EN
DE
FR
IT
MENU-Taste START/ENTER-Taste STOP/BACK-Taste Taste Taste
– Gerät einschalten/
ausschalten
(3s drücken)
– Menü öffnen oder
schließen
– Training starten /
fortsetzen
– Eingabe bestätigen
– Eine Menüebene
runter
– Manuelle Runde
nehmen im Training
– Training stoppen
– Training nach
beenden speichern
– Eine Menüebene
rauf
– Eine Seite Weiter
– In Listen runter
– Wert erhöhen
– Eine Seite Zurück
– In Listen rauf
– Wert verringern
PL
NL
ES
CZ
1
Press MENU Button for 5s to Wake-Up.
2
Press START to pair your Smartphone.
3
Download SIGMA RIDE App and follow App
instructions to configure your device.
4
Or press button to set device manually.
5
Pair sensors and finish initial settings.
DE
1. Press for 5s to Wake-Up. 2. Press to pair your
Smartphone. 3. Download SIGMA RIDE App and follow App
instructions to configure your device. 4. Or press to set
device manually. 5. Pair sensors and finish initial settings.
Tipp: Die APP bietet dir viele Funktionen zum einstellen und
individualisieren des ROX 11.1. Für weitere informationen
zu den Funktionen der App siehe Seite „SIGMA RIDE App“.
IT
1. Press for 5s to Wake-Up. 2. Press to pair your
Smartphone. 3. Download SIGMA RIDE App and follow App
instructions to configure your device. 4. Or press to set
device manually. 5. Pair sensors and finish initial settings.
Tip: Die APP bietet dir viele Funktionen zum einstellen und
individualisieren des ROX 11.1. Für weitere informationen
zu den Funktionen der App siehe Seite „SIGMA RIDE App“.
NL
1. Press for 5s to Wake-Up. 2. Press to pair your
Smartphone. 3. Download SIGMA RIDE App and follow App
instructions to configure your device. 4. Or press to set
device manually. 5. Pair sensors and finish initial settings.
Tip: Die APP bietet dir viele Funktionen zum einstellen und
individualisieren des ROX 11.1. Für weitere informationen
zu den Funktionen der App siehe Seite „SIGMA RIDE App“.
CZ
1. Press for 5s to Wake-Up. 2. Press to pair your Smartphone. 3. Download SIGMA RIDE App and follow App inst-
ructions to configure your device. 4. Or press to set device manually. 5. Pair sensors and finish initial settings. Tip: Die APP
bietet dir viele Funktionen zum einstellen und individualisieren des ROX 11.1. Für weitere informationen zu den Funktionen der
App siehe Seite „SIGMA RIDE App“.
FR
1. Press for 5s to Wake-Up. 2. Press to pair your
Smartphone. 3. Download SIGMA RIDE App and follow App
instructions to configure your device. 4. Or press to set
device manually. 5. Pair sensors and finish initial settings.
Tip: Die APP bietet dir viele Funktionen zum einstellen und
individualisieren des ROX 11.1. Für weitere informationen
zu den Funktionen der App siehe Seite „SIGMA RIDE App“.
ES
1. Press for 5s to Wake-Up. 2. Press to pair your
Smartphone. 3. Download SIGMA RIDE App and follow App
instructions to configure your device. 4. Or press to set
device manually. 5. Pair sensors and finish initial settings.
Tip: Die APP bietet dir viele Funktionen zum einstellen und
individualisieren des ROX 11.1. Für weitere informationen
zu den Funktionen der App siehe Seite „SIGMA RIDE App“.
PL
1. Press for 5s to Wake-Up. 2. Press to pair your
Smartphone. 3. Download SIGMA RIDE App and follow App
instructions to configure your device. 4. Or press to set
device manually. 5. Pair sensors and finish initial settings.
Tip: Die APP bietet dir viele Funktionen zum einstellen und
individualisieren des ROX 11.1. Für weitere informationen
zu den Funktionen der App siehe Seite „SIGMA RIDE App“.
1
2
3
4
or
5
SIGMA RIDE App
Die APP bietet Ihnen viele Funktionen zum
einstellen und individualisieren des ROX 11.1.
Für weitere informationen zu den Funktionen
der App siehe Seite „SIGMA RIDE App“.
TIP
FIRST START
EN
1
2
3 4 7
8
1
Press MENU Button for 3s to switch on the device.
2
Wait for “GPS OK” message, search for clear sky and
do not move for fast GPS fix.
3
Press START to start the training session.
4
Press STOP to stop the training session.
5
Press STOP again to save the training session OR
6
Press START again to continue the training session.
7
Press STOP to leave the summary.
8
Use your Smartphone and the SIGMA RIDE App to sync the training
for full data analysis and sharing.
DE
1. Press for 3s to switch on the device. 2. Wait for
“GPS OK” message, search for clear sky and do not move
for fast GPS fix.. 3. Press to start the training session.
4. Press to stop the training session. 5. Press again
to save the training session OR 6. Press again to conti-
nue the training session. 7. Press to leave the summery.
8. Use the SIGMA RIDE App to sync the training for full
data analysis and sharing.
IT
1. Press for 3s to switch on the device. 2. Wait for
“GPS OK” message, search for clear sky and do not move
for fast GPS fix.. 3. Press to start the training session.
4. Press to stop the training session. 5. Press again
to save the training session OR 6. Press again to conti-
nue the training session. 7. Press to leave the summery.
8. Use the SIGMA RIDE App to sync the training for full
data analysis and sharing.
NL
1. Press for 3s to switch on the device. 2. Wait for
“GPS OK” message, search for clear sky and do not move
for fast GPS fix.. 3. Press to start the training session.
4. Press to stop the training session. 5. Press again
to save the training session OR 6. Press again to conti-
nue the training session. 7. Press to leave the summery.
8. Use the SIGMA RIDE App to sync the training for full
data analysis and sharing.
CZ
1. Press for 3s to switch on the device. 2. Wait for “GPS OK” message, search for clear sky and do not move for fast
GPS fix.. 3. Press to start the training session. 4. Press to stop the training session. 5. Press again to save the training
session OR 6. Press again to continue the training session. 7. Press to leave the summery. 8. Use the SIGMA RIDE App
to sync the training for full data analysis and sharing.
FR
1. Press for 3s to switch on the device. 2. Wait for
“GPS OK” message, search for clear sky and do not move
for fast GPS fix.. 3. Press to start the training session.
4. Press to stop the training session. 5. Press again
to save the training session OR 6. Press again to conti-
nue the training session. 7. Press to leave the summery.
8. Use the SIGMA RIDE App to sync the training for full
data analysis and sharing.
ES
1. Press for 3s to switch on the device. 2. Wait for
“GPS OK” message, search for clear sky and do not move
for fast GPS fix.. 3. Press to start the training session.
4. Press to stop the training session. 5. Press again
to save the training session OR 6. Press again to conti-
nue the training session. 7. Press to leave the summery.
8. Use the SIGMA RIDE App to sync the training for full
data analysis and sharing.
PL
1. Press for 3s to switch on the device. 2. Wait for
“GPS OK” message, search for clear sky and do not move
for fast GPS fix.. 3. Press to start the training session.
4. Press to stop the training session. 5. Press again
to save the training session OR 6. Press again to conti-
nue the training session. 7. Press to leave the summery.
8. Use the SIGMA RIDE App to sync the training for full
data analysis and sharing.
SIGMA RIDE App
6
or
5
TRAINING
EN
1
2
1
2
SHORT CUT MENU
1
Press MENU button, when training
is active or in auto pause.
2
Hier können sie schnell auf die
wichtigsten Einstellungen während
der Fahrt zugreifen.
MAIN MENU
1
Press MENU button, when training
is NOT started.
2
Sie haben Zugriff auf das Hauptmenü
mit alle Funktionen des ROX 11.1.
DE
MAIN MENU 1. Press , when training is not
started. 2. Sie haben Zugriff auf das Hauptmenü mit alle
Funktionen des ROX 11.1.
SHORT CUT MENU 1. Press , when training is active or
in auto pause. 2. Hier können sie schnell auf die wichtigs-
ten Einstellungen während der Fahrt zugreifen.
IT
MAIN MENU 1. Press , when training is not
started. 2. Sie haben Zugriff auf das Hauptmenü mit alle
Funktionen des ROX 11.1.
SHORT CUT MENU 1. Press , when training is active or
in auto pause. 2. Hier können sie schnell auf die wichtigs-
ten Einstellungen während der Fahrt zugreifen.
NL
MAIN MENU 1. Press , when training is not
started. 2. Sie haben Zugriff auf das Hauptmenü mit alle
Funktionen des ROX 11.1.
SHORT CUT MENU 1. Press , when training is active or
in auto pause. 2. Hier können sie schnell auf die wichtigs-
ten Einstellungen während der Fahrt zugreifen.
CZ
MAIN MENU 1. Press , when training is not started. 2. Sie haben Zugriff auf das Hauptmenü mit alle Funktionen des
ROX 11.1.
SHORT CUT MENU 1. Press , when training is active or in auto pause. 2. Hier können sie schnell auf die wichtigsten
Einstellungen während der Fahrt zugreifen.
FR
MAIN MENU 1. Press , when training is not
started. 2. Sie haben Zugriff auf das Hauptmenü mit alle
Funktionen des ROX 11.1.
SHORT CUT MENU 1. Press , when training is active or
in auto pause. 2. Hier können sie schnell auf die wichtigs-
ten Einstellungen während der Fahrt zugreifen.
ES
MAIN MENU 1. Press , when training is not
started. 2. Sie haben Zugriff auf das Hauptmenü mit alle
Funktionen des ROX 11.1.
SHORT CUT MENU 1. Press , when training is active or
in auto pause. 2. Hier können sie schnell auf die wichtigs-
ten Einstellungen während der Fahrt zugreifen.
PL
MAIN MENU 1. Press , when training is not
started. 2. Sie haben Zugriff auf das Hauptmenü mit alle
Funktionen des ROX 11.1.
SHORT CUT MENU 1. Press , when training is active or
in auto pause. 2. Hier können sie schnell auf die wichtigs-
ten Einstellungen während der Fahrt zugreifen.
MENU OVERVIEW
EN
123
4
5
1
In MAIN MENU > SETTINGS choose CONNECT to edit connections.
2
Choose SENSORS to pair new sensors or manage paired sensors.
3
Choose SEARCH NEW to add new sensors.
4
Make sure that sensors are switched on!
5
Press START to pair sensor.
DE
1. In MAIN MENU > SETTINGS choose CONNECT
to edit connections. 2. Choose SENSORS to pair new
sensors or manage paired sensors. 3. Choose „SEARCH
NEW“ to add new sensors. 4. Make sure that sensors are
switched on! 5. Press to pair sensor. TIP: Some sensors
are available in Bluetooth and ANT+ at the same time. We
recommend to choose the ANT+ connection.
IT
1. In MAIN MENU > SETTINGS choose CONNECT
to edit connections. 2. Choose SENSORS to pair new
sensors or manage paired sensors. 3. Choose „SEARCH
NEW“ to add new sensors. 4. Make sure that sensors are
switched on! 5. Press to pair sensor. TIP: Some sensors
are available in Bluetooth and ANT+ at the same time. We
recommend to choose the ANT+ connection.
NL
1. In MAIN MENU > SETTINGS choose CONNECT
to edit connections. 2. Choose SENSORS to pair new
sensors or manage paired sensors. 3. Choose „SEARCH
NEW“ to add new sensors. 4. Make sure that sensors are
switched on! 5. Press to pair sensor. TIP: Some sensors
are available in Bluetooth and ANT+ at the same time. We
recommend to choose the ANT+ connection.
CZ
1. In MAIN MENU > SETTINGS choose CONNECT to edit connections. 2. Choose SENSORS to pair new sensors or
manage paired sensors. 3. Choose „SEARCH NEW“ to add new sensors. 4. Make sure that sensors are switched on! 5. Press
to pair sensor. TIP: Some sensors are available in Bluetooth and ANT+ at the same time. We recommend to choose the
ANT+ connection.
FR
1. In MAIN MENU > SETTINGS choose CONNECT
to edit connections. 2. Choose SENSORS to pair new
sensors or manage paired sensors. 3. Choose „SEARCH
NEW“ to add new sensors. 4. Make sure that sensors are
switched on! 5. Press to pair sensor. TIP: Some sensors
are available in Bluetooth and ANT+ at the same time. We
recommend to choose the ANT+ connection.
ES
1. In MAIN MENU > SETTINGS choose CONNECT
to edit connections. 2. Choose SENSORS to pair new
sensors or manage paired sensors. 3. Choose „SEARCH
NEW“ to add new sensors. 4. Make sure that sensors are
switched on! 5. Press to pair sensor. TIP: Some sensors
are available in Bluetooth and ANT+ at the same time. We
recommend to choose the ANT+ connection.
PL
1. In MAIN MENU > SETTINGS choose CONNECT
to edit connections. 2. Choose SENSORS to pair new
sensors or manage paired sensors. 3. Choose „SEARCH
NEW“ to add new sensors. 4. Make sure that sensors are
switched on! 5. Press to pair sensor. TIP: Some sensors
are available in Bluetooth and ANT+ at the same time. We
recommend to choose the ANT+ connection.
!
TIP
: Some sensors are available in Bluetooth and ANT+ at the same time.
We recommend to choose the ANT+ connection.
SENSOR CONNECTION
EN
1 2 3
1
In Main Menu > Settings > Connect choose E-Bike to pair a new E-Bike or manage paired Bike.
2
Make sure that E-Bike is switched on!
3
Select the E-BIKE with or and press START button to pair E-Bike.
DE
1. In Main Menu > Settings > Connect choose E-BIKE
to pair a new E-Bike or manage paired Bike. 2. Make sure
that E-BIKE is switched on! 3. Select the E-BIKE with and
and press to pair E-Bike.
Tip: Choose the eBIKE Sport Profile to see all relevant
eBIKE Values.
IT
1. In Main Menu > Settings > Connect choose E-BIKE
to pair a new E-Bike or manage paired Bike. 2. Make sure
that E-BIKE is switched on! 3. Select the E-BIKE with and
and press to pair E-Bike.
Tip: Choose the eBIKE Sport Profile to see all relevant
eBIKE Values.
NL
1. In Main Menu > Settings > Connect choose E-BIKE
to pair a new E-Bike or manage paired Bike. 2. Make sure
that E-BIKE is switched on! 3. Select the E-BIKE with and
and press to pair E-Bike.
Tip: Choose the eBIKE Sport Profile to see all relevant
eBIKE Values.
CZ
1. In Main Menu > Settings > Connect choose E-BIKE to pair a new E-Bike or manage paired Bike. 2. Make sure that
E-BIKE is switched on! 3. Select the E-BIKE with and and press to pair E-Bike.
Tip: Choose the eBIKE Sport Profile to see all relevant eBIKE Values.
FR
1. In Main Menu > Settings > Connect choose E-BIKE
to pair a new E-Bike or manage paired Bike. 2. Make sure
that E-BIKE is switched on! 3. Select the E-BIKE with and
and press to pair E-Bike.
Tip: Choose the eBIKE Sport Profile to see all relevant
eBIKE Values.
ES
1. In Main Menu > Settings > Connect choose E-BIKE
to pair a new E-Bike or manage paired Bike. 2. Make sure
that E-BIKE is switched on! 3. Select the E-BIKE with and
and press to pair E-Bike.
Tip: Choose the eBIKE Sport Profile to see all relevant
eBIKE Values.
PL
1. In Main Menu > Settings > Connect choose E-BIKE
to pair a new E-Bike or manage paired Bike. 2. Make sure
that E-BIKE is switched on! 3. Select the E-BIKE with and
and press to pair E-Bike.
Tip: Choose the eBIKE Sport Profile to see all relevant
eBIKE Values.
!
TIP
: Choose the eBIKE Sport Profile to see all relevant eBIKE Values.
E-BIKE CONNECTION
EN
Check QR Code for
compatible eBIKEs
http//website.com
1
Set Device and Training Views
2
Firmware Update
3
Analyze your training
4
Share your data
5
Navigation/Tracks
and many more...
DE
1. Set Device and Training Views 2. Firmware Update
3. Analyze your training 4. Share your data 5. Navigation
and many more...
TIP: Check for Firmware Updates regularly. To acces the
changelog, follow this link: QR Code zum Changelog
IT
1. Set Device and Training Views 2. Firmware Update
3. Analyze your training 4. Share your data 5. Navigation
and many more...
TIP: Check for Firmware Updates regularly. To acces the
changelog, follow this link: QR Code zum Changelog
NL
1. Set Device and Training Views 2. Firmware Update
3. Analyze your training 4. Share your data 5. Navigation
and many more...
TIP: Check for Firmware Updates regularly. To acces the
changelog, follow this link: QR Code zum Changelog
CZ
1. Set Device and Training Views 2. Firmware Update 3. Analyze your training 4. Share your data 5. Navigation and many
more... TIP: Check for Firmware Updates regularly. To acces the changelog, follow this link: QR Code zum Changelog
FR
1. Set Device and Training Views 2. Firmware Update
3. Analyze your training 4. Share your data 5. Navigation
and many more...
TIP: Check for Firmware Updates regularly. To acces the
changelog, follow this link: QR Code zum Changelog
ES
1. Set Device and Training Views 2. Firmware Update
3. Analyze your training 4. Share your data 5. Navigation
and many more...
TIP: Check for Firmware Updates regularly. To acces the
changelog, follow this link: QR Code zum Changelog
PL
1. Set Device and Training Views 2. Firmware Update
3. Analyze your training 4. Share your data 5. Navigation
and many more...
TIP: Check for Firmware Updates regularly. To acces the
changelog, follow this link: QR Code zum Changelog
1 2 4 5
SIGMA RIDE APP
EN
!
TIP
: Check for Firmware Updates regularly.
To access the changelog, follow this link:
QR Code zum Changelog
3
4
PC USE
OR
AC/DC
1
2
3
1
Open USB Cover.
2
Insert USB-C cable.
Check that the cable and port are dry!
3
Charge with 5V max. 1000mA.
4
Connect to PC for data transfer.
DE
1. Open USB Cover. 2. Insert USB-C cable. Check
that the cable and port are dry! 3. Charge with 5V max.
1000mA. 4. Connect to PC for data transfer.
WICHTIG: Bitte stelle sicher dass das USB Cover immer
geschlossen ist bevor du ein Training startest.
IT
1. Open USB Cover. 2. Insert USB-C cable. Check
that the cable and port are dry! 3. Charge with 5V max.
1000mA. 4. Connect to PC for data transfer.
WICHTIG: Bitte stelle sicher dass das USB Cover immer
geschlossen ist bevor du ein Training startest.
NL
1. Open USB Cover. 2. Insert USB-C cable. Check
that the cable and port are dry! 3. Charge with 5V max.
1000mA. 4. Connect to PC for data transfer.
WICHTIG: Bitte stelle sicher dass das USB Cover immer
geschlossen ist bevor du ein Training startest.
CZ
1. Open USB Cover. 2. Insert USB-C cable. Check that the cable and port are dry! 3. Charge with 5V max. 1000mA.
4. Connect to PC for data transfer.
WICHTIG: Bitte stelle sicher dass das USB Cover immer geschlossen ist bevor du ein Training startest.
FR
1. Open USB Cover. 2. Insert USB-C cable. Check
that the cable and port are dry! 3. Charge with 5V max.
1000mA. 4. Connect to PC for data transfer.
WICHTIG: Bitte stelle sicher dass das USB Cover immer
geschlossen ist bevor du ein Training startest.
ES
1. Open USB Cover. 2. Insert USB-C cable. Check
that the cable and port are dry! 3. Charge with 5V max.
1000mA. 4. Connect to PC for data transfer.
WICHTIG: Bitte stelle sicher dass das USB Cover immer
geschlossen ist bevor du ein Training startest.
PL
1. Open USB Cover. 2. Insert USB-C cable. Check
that the cable and port are dry! 3. Charge with 5V max.
1000mA. 4. Connect to PC for data transfer.
WICHTIG: Bitte stelle sicher dass das USB Cover immer
geschlossen ist bevor du ein Training startest.
!
IMPORTANT
: Bitte stelle sicher dass das USB Cover immer geschlossen ist
bevor du ein Training startest.
CHARGING AND DATA TRANSFER
EN
5V max.
1000mA
USB-C
!
E-LABELING: To access the FCC and IC regulatory information, choose: Main Menu ► Info
You can find the CE declaration at: ce.sigmasport.com/rox 111
DE
You can find the CE declaration at:
ce.sigmasport.com/rox 111
IT
You can find the CE declaration at:
ce.sigmasport.com/rox 111
NL
You can find the CE declaration at:
ce.sigmasport.com/rox 111
CZ
You can find the CE declaration at: ce.sigmasport.com/rox 111
FR
You can find the CE declaration at:
ce.sigmasport.com/rox 111
ES
You can find the CE declaration at:
ce.sigmasport.com/rox 111
PL
You can find the CE declaration at:
ce.sigmasport.com/rox 111
TECHNICAL INFORMATION
ROX 11.1 EVO
Battery type Rechargeable 1000 mAh /3.7 Wh Battery
Maximum operating altitude 5000 m
Operation temperature 0 °C to 40 °C
Operation frequency
ANT+ 2.4 GHz @ 1 dBm nominal
Bluetooth 2.4 GHz @ 1 dBm nominal
GPS 1575.42 MHz (receiver only)
GLONASS 1602 MHz (receiver only)
Galileo 1575.42 MHz (receiver only)
Transmission power Value xx (ref to testing report)
Water and Dust rating IP67
EN
  • Page 1 1
  • Page 2 2
  • Page 3 3
  • Page 4 4
  • Page 5 5
  • Page 6 6
  • Page 7 7
  • Page 8 8
  • Page 9 9
  • Page 10 10
  • Page 11 11
  • Page 12 12
  • Page 13 13
  • Page 14 14

Sigma Rox 11.1 EVO Cycling Computer Benutzerhandbuch

Typ
Benutzerhandbuch