
www.lg.com
LED TV
*
Please read this manual carefully before operating your set and retain
it for future reference.
* LG LED TVs are LCD TVs with
LED backlighting.
LB63** LB68** LB72** LB87**
LB65** LB69** LB73**
LB67** LB70** LB86**
OWNER’S MANUAL
Click! User Guide
P/NO : MFL68027012(1407-REV03)
Printed in Korea
*MFL68027012*

A-2
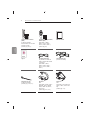
TABLE OF CONTENTS
TABLE OF CONTENTS
A-3 SETTING UP THE TV
A-3 Attaching the stand
A-9 Attaching the Sound Bar Supporter
A-10 Tidying cables
COMMON
A-12 MAKING CONNECTIONS
A-12 Antenna connection
A-14 Satellite dish connection
A-15 HDMI connection
A-18 - ARC (Audio Return Channel)
A-19 DVI to HDMI connection
A-22 Component connection
A-24 Composite connection
A-26 MHL connection
A-29 Audio connection
A-29 - Digital optical audio connection
A-31 USB connection
A-33 CI module connection
A-35 Headphone connection
A-38 Euro Scart connection
LANGUAGE
LANGUAGE LIST
English
Deutsch
Français
Italiano
Español
Português
Nederlands
ǼȜȜȘȞȚțȐ
6ORYHQãþLQD
COMMON
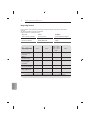
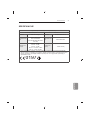
B-1 SPECIFICATIONS

A-3
SETTING UP THE TV
SETTING UP THE TV
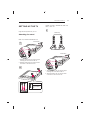
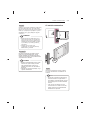
Image shown may differ from your TV.
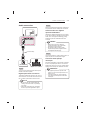
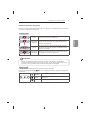
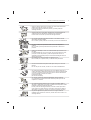
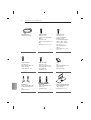
Attaching the stand
LB63**-ZA, 32/39/42/47/50/55LB65**-ZA
B stand base
A stand base
1
2
1
1 Attach the stand to the TV using the upper
mounting hole on the back of the TV.
2 Attach the stand to the TV using the lower
connection on the back of the TV.
2
4EA
M4 x L14
M4 x L20
(Only 32LB65**-
ZA)
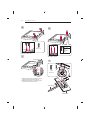
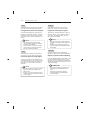
70LB65**-ZA, LB67**-ZA/ZB/ZC/ZF, LB68**-ZD,
LB69**, LB73**-ZA
B stand Assy
A stand Assy
1
2
1
Stand Body
Stand Base
1 Attach the stand to the TV using the upper
mounting hole on the back of the TV.
2 Attach the stand to the TV using the lower
connection on the back of the TV.

A-4
SETTING UP THE TV
2
4EA
M4 x L14
LB63**-ZL, LB65**-ZK
A stand base
B stand base
2
1
1
1 Attach the stand to the TV using the upper
mounting hole on the back of the TV.
2 Attach the stand to the TV using the lower
connection on the back of the TV.
2
4EA
M4 x L14
M4 x L20
(Only
32LB65**-
ZK)
32/39LB65**-ZE/ZN
1
Stand Body
Stand Base
4EA
M4 x L20
1

A-5
SETTING UP THE TV
2
3
2EA
M4 x L20
LB63**-ZU, 42/47/50/55/60LB65**-ZE/ZN
1
Stand Body
Stand Base
4EA
M4 x L20
1
2

A-6
SETTING UP THE TV
2
4EA
M4 x L10
1
2
3
1 Attach the stand to the TV using the upper
mounting hole on the back of the TV.
2 Attach the stand to the TV using the lower
connection on the back of the TV.
3
4EA
M4 x L14
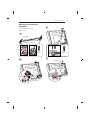
LB67**-ZH, LB68**-ZF, LB70**, LB72**, LB73**-
ZD/ZE
1
A Stand
Supporter
B Stand
Supporter
Stand Front

A-7
SETTING UP THE TV
4
4EA
M4 x L14
LB86**, LB87**
1
Sound Bar
4EA
M4 x L14
Stand Assy Right
Stand Assy Left
2
3
4EA
M4 x L14

A-8
SETTING UP THE TV
4
Screw Cover
CAUTION
y
When attaching the stand to the TV
set, place the screen facing down on a
cushioned table or flat surface to protect
the screen from scratches.
y
Make sure that the screws are inserted
correctly and fastened securely. (If they
are not fastened securely enough, the TV
may tilt forward after being installed.)
Do not use too much force and over
tighten the screws; otherwise screw may
be damaged and not tighten correctly.
NOTE
y
Remove the stand before installing the
TV on a wall mount by performing the
stand attachment in reverse.
y
The Screw Cover will protect the opening
from accumulating dust and dirty.
y
The Rubber will protect the opening from
accumulating dust and dirt. When
installing the wall mounting bracket, use
the Rubber. (Only LB63**-ZU, LB65**-ZE/
ZN)
Rubber

A-9
SETTING UP THE TV
Attaching the Sound Bar
Supporter
(In case of mounting on a wall)
LB86**, LB87**
1
Sound Bar
4EA
M4 x L14
Sound Bar Supporter Right
Sound Bar Supporter Left
2
3
4EA
M4 x L14
4
Screw Cover

A-10
SETTING UP THE TV
CAUTION
y
When attaching the sound bar supporter
to the TV set, place the screen facing
down on a cushioned table or flat surface
to protect the screen from scratches.
y
Make sure that the screws are inserted
correctly and fastened securely. (If they
are not fastened securely enough, the TV
may tilt forward after being installed.)
Do not use too much force and over
tighten the screws; otherwise screw may
be damaged and not tighten correctly.
y
The sound bar supporter only uses for
wall mounting.
y
After assembling the Sound Bar Wall
Mount Brackets, do not adjust the angle
of the TV while holding the Sound Bar or
hanging onto the Sound Bar.
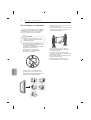
y
When lifting the product, or moving it,
make sure that two or more people safely
lift it and set it upright on a flat surface.
When there are two people, one person
should stand on the right side of the
product and the other person should
stand on the left side to lift it. When
moving the product, hold the top and
bottom corners.
y
When lifting the product, or moving it,
do not hold the Sound Bar. If you hold
the Sound Bar when lifting the product,
or moving it, the Sound Bar may be
damaged.
<When lifting the product>
<When moving the product>
NOTE
y
Remove the sound bar supporter before
installing the stand by performing the
sound bar supporter attachment in
reverse.
y
The Screw Cover will protect the opening
from accumulating dust and dirty.
Tidying cables
Image shown may differ from your TV.
1 Gather and bind the cables with the Cable
Holder. (Depending on model)
2 Fix the Cable Management¿UPO\WRWKH79
(Only 32LB65**-ZA)
Cable Management
(Only LB63**-ZA, 39/42/47/50/55/60LB65**-
ZA, LB67**-ZA/ZB/ZC/ZF, LB68**-ZD, LB69**,
LB73**-ZA
)
Cable Holder
Cable Management

A-11
SETTING UP THE TV
(Only 32LB65**-ZK)
Cable Management
(Only LB63**-ZL, 39/42/47/50/55/60/70LB65**-
ZK/ZL
)
Cable Holder
Cable Management
(Only LB63**-ZU, LB65**-ZE/ZN)
Cable Holder
(Only 70LB65**)
Cable Holder
Cable Management
(Only LB67**-ZH, LB68**-ZF, LB70**, LB72**,
LB73**-ZD/ZE
)
Cable Holder
Cable Management
(Only LB86**, LB87**)
Cable Holder
Cable Management
CAUTION
y
Do not move the TV by holding the cable
holders, as the cable holders may break,
and injuries and damage to the TV may
occur.

A-12
MAKING CONNECTIONS
MAKING CONNECTIONS
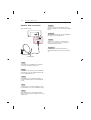
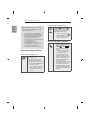
This section on MAKING CONNECTIONS mainly
uses diagrams for the LB67** models.
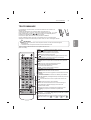
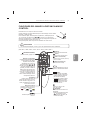
Antenna connection
ANTENNA /
CABLE IN
(*Not Provided)
English
Connect the TV to a wall antenna socket with an
5)FDEOH
NOTE
y
Use a signal splitter to use more than 2
TVs.
y
If the image quality is poor, install a signal
amplifier properly to improve the image
quality.
y
If the image quality is poor with an
antenna connected, try to realign the
antenna in the correct direction.
y
An antenna cable and converter are not
supplied.
y
Supported DTV Audio: MPEG, Dolby
Digital, Dolby Digital Plus, HE-AAC
Deutsch
Schließen Sie das TV-Gerät mit einem HF-Kabel
DQHLQH:DQGDQWHQQHQEXFKVHDQ
HINWEIS
y
Bei Verwendung von mehr als 2
TV-Geräten verwenden Sie einen
Signalsplitter.
y
Ist das Bild schlecht, installieren Sie einen
Signalverstärker, um die Bildqualität zu
verbessern.
y
:HQQGLH%LOGTXDOLWlWEHL
angeschlossener Antenne schlecht ist,
richten Sie die Antenne richtig aus.
y
$QWHQQHQNDEHOXQG:DQGOHUVLQGQLFKWLP
Lieferumfang enthalten.
y
Unterstützter DTV-Ton: MPEG, Dolby
Digital, Dolby Digital Plus, HE-AAC
Français
Connectez la TV à une prise d’antenne murale
DYHFXQFkEOH5)
REMARQUE
y
Utilisez un séparateur de signaux pour
utiliser plus de deux téléviseurs.
y
Si la qualité d’image est mauvaise,
installez correctement un amplificateur de
signaux pour l’améliorer.
y
Si vous utilisez une antenne et que la
qualité d’image est mauvaise, essayez
de réaligner l’antenne dans la bonne
direction.
y
Le câble et le convertisseur d’antenne ne
sont pas fournis.
y
Technologies audio TNT prises en
charge : MPEG, Dolby Digital, Dolby
Digital Plus, HE-AAC

A-13
MAKING CONNECTIONS
Italiano
Collegare il televisore all’antenna centralizzata
FRQXQFDYR5)
NOTA
y
Utilizzare uno sdoppiatore del segnale
per usare più di 2 televisori.
y
Se la qualità dell’immagine è scarsa,
installare correttamente un amplificatore
del segnale per migliorarla.
y
Se la qualità dell’immagine è scarsa con
un’antenna collegata, provare a riallineare
l’antenna nella direzione corretta.
y
Il cavo e il convertitore dell’antenna non
sono in dotazione.
y
Audio DTV supportato: MPEG, Dolby
Digital, Dolby Digital Plus, HE-AAC
Español
Conecte la TV a una toma de pared de antena
FRQXQFDEOH5)
NOTA
y
Emplee un divisor de señal cuando
desee utilizar más de dos TV.
y
Si la imagen es de poca calidad, instale
un amplificador de señal correctamente
para mejorar la calidad de imagen.
y
Si la imagen es de poca calidad con una
antena conectada, intente volver a orientar
la antena en la dirección adecuada.
y
No se suministran el cable de antena ni
el conversor.
y
Audio DTV admitido: MPEG, Dolby
Digital, Dolby Digital Plus, HE-AAC
Português
Ligue a TV a uma tomada de antena de parede
FRPXPFDER5)
NOTA
y
Utilize um separador de sinal se quiser
utilizar mais de 2 TVs.
y
Se a qualidade de imagem for fraca,
instale um amplificador de sinal para
melhorar a qualidade de imagem.
y
Se a qualidade de imagem for fraca
mesmo que tenha uma antena ligada,
tente orientar a antena para a direcção
correcta.
y
O cabo da antena e o conversor não são
fornecidos.
y
Áudio DTV suportado: MPEG, Dolby
Digital, Dolby Digital Plus, HE-AAC
Nederlands
6OXLWGH79PHWEHKXOSYDQHHQ5)NDEHO
aan op een antenneaansluiting op de muur.
OPMERKING
y
Gebruik een signaalsplitter om meer dan
twee TV’s te gebruiken.
y
Als de beeldkwaliteit slecht is, installeert
u een signaalversterker om de
beeldkwaliteit te verbeteren.
y
Als de beeldkwaliteit slecht is terwijl een
antenne is aangesloten, probeert u de
antenne in de juiste richting te draaien.
y
Antennekabel en converter worden niet
meegeleverd.
y
Ondersteunde DTV-audio: MPEG, Dolby
Digital, Dolby Digital Plus, HE-AAC
ǼȜȜȘȞȚțȐ
ȈȣȞįȑıIJİIJȘȞIJȘȜİȩȡĮıȘıİȝȚĮȣʌȠįȠȤȒțİȡĮȓĮȢ
ıIJȠȞIJȠȓȤȠȝİȑȞĮțĮȜȫįȚȠ5)
ȈǾȂǼǿȍȈǾ
y
ȋȡȘıȚȝȠʌȠȚȒıIJİȑȞĮįȚĮȤȦȡȚıIJȒıȒȝĮIJȠȢ
ȖȚĮIJȘȤȡȒıȘʌİȡȚııȩIJİȡȦȞĮʌȩ
IJȘȜİȠȡȐıİȦȞ
y
ǹȞȘʌȠȚȩIJȘIJĮIJȘȢİȚțȩȞĮȢįİȞİȓȞĮȚțĮȜȒ
İȖțĮIJĮıIJȒıIJİȑȞĮȞİȞȚıȤȣIJȒıȒȝĮIJȠȢȖȚĮ
IJȘȕİȜIJȓȦıȘIJȘȢʌȠȚȩIJȘIJĮȢİȚțȩȞĮȢ
y
ǹȞȘʌȠȚȩIJȘIJĮIJȘȢİȚțȩȞĮȢįİȞİȓȞĮȚțĮȜȒ
ȝİIJȐIJȘıȪȞįİıȘIJȘȢțİȡĮȓĮȢįȠțȚȝȐıIJİ
ȞĮĮȜȜȐȟİIJİIJȠȞʌȡȠıĮȞĮIJȠȜȚıȝȩIJȘȢ
țİȡĮȓĮȢıIJȘıȦıIJȒțĮIJİȪșȣȞıȘ
y
ǻİȞʌĮȡȑȤİIJĮȚțĮȜȫįȚȠțİȡĮȓĮȢțĮȚ
ȝİIJĮIJȡȠʌȑĮȢ
y
ȊʌȠıIJȘȡȚȗȩȝİȞȠȢȒȤȠȢ'7903(*
Dolby Digital, Dolby Digital Plus, HE-AAC
6ORYHQãþLQD
7HOHYL]RUSULNOMXþLWHYVWHQVNRDQWHQVNRYWLþQLFRV
NDEORP5)
OPOMBA
y
ýHåHOLWHXSRUDEOMDWLYHþNRWWHOHYL]RUMD
uporabite razcepnik za signal.
y
ýHMHNDNRYRVWVOLNHVODEDMRL]EROMãDMWH
WDNRGDXVWUH]QRQDPHVWLWHRMDþHYDOQLN
signala.
y
ýHMHNDNRYRVWVOLNHVODEDLQXSRUDEOMDWH
anteno, usmerite anteno v ustrezno smer.
y
.DEHODQWHQHLQSUHWYRUQLNQLVWDSULORåHQD
y
Podprte oblike zvoka za DTV: MPEG,
Dolby Digital, Dolby Digital Plus, HE-AAC

A-14
MAKING CONNECTIONS
Satellite dish connection
(Only satellite models)
LNB
Satellite IN
13/18V
700mA Max
(*Not Provided)
English
Connect the TV to a satellite dish to a satellite
VRFNHWZLWKDVDWHOOLWH5)FDEOH
Deutsch
Schließen Sie das TV-Gerät mit einem Satelliten-
+).DEHODQHLQH6DWHOOLWHQVFKVVHORGHU
an eine Satellitenbuchse an.
Français
Connectez la TV à une parabole satellite ou à
une prise satellite à l’aide d’un câble satellite RF
Italiano
Collegare la TV a un’antenna satellitare e a una
SUHVDVDWHOOLWDUHFRQXQFDYR5)VDWHOOLWDUH
Español
Para conectar la TV a una antena parabólica,
enchufe un cable de RF de satélite a una toma de
VDWpOLWH
Português
Ligue a TV a uma antena parabólica ou uma
tomada de satélite com um cabo RF para satélite
Nederlands
Sluit de TV met behulp van een RF-satellietkabel
DDQRSHHQVDWHOOLHWVFKRWHO
ǼȜȜȘȞȚțȐ
ȈȣȞįȑıIJİIJȘȞIJȘȜİȩȡĮıȘıİȝȚĮįȠȡȣijȠȡȚțȒ
țİȡĮȓĮȝȑıȦȝȚĮȢįȠȡȣijȠȡȚțȒȢȣʌȠįȠȤȒȢȝİ
įȠȡȣijȠȡȚțȩțĮȜȫįȚȠ
6ORYHQãþLQD
6NDEORP5)]DVDWHOLWSRYHåLWHWHOHYL]RUV
VDWHOLWVNLPNURåQLNRPSUHNYWLþQLFH]DVDWHOLW

A-15
MAKING CONNECTIONS
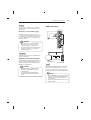
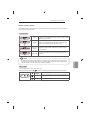
HDMI connection
(Only LB86**, LB87**)
HDMI
DVD/ Blu-Ray / HD Cable Box
/ HD STB / PC
(*Not Provided)
(Only LB63**, LB65**, LB67**, LB68**, LB69**,
LB70**, LB72**, LB73**)
HDMI
(*Not Provided)
DVD/ Blu-Ray / HD Cable Box
/ HD STB / PC
English
Transmits the digital video and audio signals
from an external device to the TV. Connect the
external device and the TV with the HDMI cable
as shown.
Choose any HDMI input port to connect. It does
not matter which port you use.
NOTE
y
It is recommended to use the TV with
the HDMI connection for the best image
quality.
y
Use the latest High Speed HDMI™ Cable
with CEC (Customer Electronics Control)
function.
y
High Speed HDMI™ Cables are tested
to carry an HD signal up to 1080p and
higher.
y
Supported HDMI Audio format :
Dolby Digital (32Khz, 44.1Khz, 48Khz),
DTS (44.1Khz, 48Khz),
PCM (32Khz, 44.1Khz, 48Khz, 96Khz,
192Khz)

A-16
MAKING CONNECTIONS
Italiano
Il segnale digitale audio e video viene trasmesso
da un dispositivo esterno al televisore. Collegare
il dispositivo esterno e il televisore mediante il
cavo HDMI come mostrato nell’illustrazione di
seguito.
Scegliere una porta di ingresso HDMI per il
collegamento. La scelta della porta è libera.
NOTA
y
Si consiglia di utilizzare il televisore con
il collegamento HDMI per ottenere la
migliore qualità delle immagini.
y
Utilizzare un cavo HDMI™ ad alta
velocità dotato dei requisiti più recenti
con funzione CEC (Customer Electronics
Control).
y
I cavi HDMI™ ad alta velocità sono testati
per trasmettere un segnale HD fino a
1080p e superiore.
y
Formato audio HDMI supportato:
Dolby Digital (32Khz, 44.1Khz, 48Khz),
DTS (44.1Khz, 48Khz),
PCM (32Khz, 44.1Khz, 48Khz, 96Khz,
192Khz)
Español
Transmite las señales de audio y vídeo digital de
un dispositivo externo a la TV. Use el cable HDMI
para conectar el dispositivo externo a la TV, tal y
como se muestra en la siguiente ilustración.
Seleccione un puerto de entrada HDMI. El puerto
utilizado es irrelevante.
NOTA
y
Se recomienda usar la conexión HDMI
de la TV para obtener la mejor calidad de
imagen.
y
Utilice el cable HDMI™ de alta velocidad
más reciente con la función CEC (control
de electrónica de consumo).
y
Los cables HDMI™ de alta velocidad
están preparados para transportar una
señal HD de 1080p o superior.
y
Formato de audio HDMI admitido:
Dolby Digital (32Khz, 44.1Khz, 48Khz),
DTS (44.1Khz, 48Khz),
PCM (32Khz, 44.1Khz, 48Khz, 96Khz,
192Khz)
Deutsch
Überträgt digitale Video- und Audiosignale
von einem externen Gerät an das TV-Gerät.
Verbinden Sie das externe Gerät, wie in der
folgenden Abbildung gezeigt, mithilfe des HDMI-
Kabels mit dem TV-Gerät.
:lKOHQ6LH]XP$QVFKOLHHQHLQHQEHOLHELJHQ
HDMI-Eingang. Es ist egal, welchen Eingang Sie
wählen.
HINWEIS
y
Für optimale Bildqualität wird empfohlen,
den HDMI-Anschluss des TV-Gerätes zu
verwenden.
y
Verwenden Sie das neueste
Hochgeschwindigkeits-HDMI™-Kabel
mit CEC-Funktion (Customer Electronics
Control).
y
High-Speed-HDMI™-Kabel sind für die
Übertragung von HD-Signalen bis zu 1080p
und höher getestet.
y
Unterstütztes HDMI-Audioformat:
Dolby Digital (32Khz, 44.1Khz, 48Khz),
DTS (44.1Khz, 48Khz),
PCM (32Khz, 44.1Khz, 48Khz, 96Khz,
192Khz)
Français
Permet de transmettre les signaux vidéo et audio
numériques d’un périphérique externe vers la TV.
Connectez le périphérique externe et la TV avec
le câble HDMI comme indiqué sur l’illustration
suivante.
Choisissez un port d’entrée HDMI pour établir la
connexion. Peu importe le port que vous utilisez.
REMARQUE
y
Pour obtenir une meilleure qualité
d’image, il est recommandé d’utiliser la
TV avec une connexion HDMI.
y
Utilisez le tout nouveau câble haut débit
HDMI™ avec la fonction CEC (contrôles
électroniques client).
y
Les câbles HDMI™ haut débit sont testés
pour transporter un signal HD de 1080p
ou supérieur.
y
Formats audio HDMI pris en charge :
Dolby Digital (32Khz, 44.1Khz, 48Khz),
DTS (44.1Khz, 48Khz),
PCM (32Khz, 44.1Khz, 48Khz, 96Khz,
192Khz)

A-17
MAKING CONNECTIONS
Português
Transmite os sinais digitais de vídeo e áudio
de um dispositivo externo para a TV. Ligue o
dispositivo externo à TV com o cabo HDMI,
conforme demonstrado na ilustração.
Escolha qualquer porta de entrada HDMI para
ligar. Pode utilizar qualquer porta.
NOTA
y
Recomenda-se a utilização da TV com a
ligação HDMI para uma melhor qualidade
de imagem.
y
Utilize o mais recente cabo HDMI™
de alta velocidade com função CEC
(Customer Electronics Control).
y
Os cabos HDMI™ de alta velocidade
foram testados para executar um sinal
HD até 1080p e superior.
y
Formato de áudio HDMI suportado:
Dolby Digital (32Khz, 44.1Khz, 48Khz),
DTS (44.1Khz, 48Khz),
PCM (32Khz, 44.1Khz, 48Khz, 96Khz,
192Khz)
Nederlands
U kunt de digitale video- en audiosignalen vanaf
een extern apparaat naar de TV zenden. Sluit
het externe apparaat en de TV op elkaar aan met
behulp van de HDMI-kabel, zoals aangegeven in
de volgende afbeelding.
Kies op welke HDMI-ingangspoort u wilt
aansluiten. Het maakt niet uit welke poort u
gebruikt.
OPMERKING
y
:LMUDGHQXDDQGH79DDQWHVOXLWHQGRRU
middel van een HDMI-verbinding voor de
hoogste beeldkwaliteit.
y
Gebruik de nieuwste High Speed
HDMI™-kabel met CEC-functie
(Customer Electronics Control).
y
HDMI™-kabels van het type High Speed
zijn getest op het verzenden van HD-
signalen tot 1080p en hoger.
y
Ondersteunde HDMI-audio-indeling:
Dolby Digital (32Khz, 44.1Khz, 48Khz),
DTS (44.1Khz, 48Khz),
PCM (32Khz, 44.1Khz, 48Khz, 96Khz,
192Khz)
ǼȜȜȘȞȚțȐ
ȂİIJĮįȓįİȚIJĮȥȘijȚĮțȐıȒȝĮIJĮİȚțȩȞĮȢțĮȚȒȤȠȣ
ĮʌȩȝȚĮİȟȦIJİȡȚțȒıȣıțİȣȒıIJȘȞIJȘȜİȩȡĮıȘ
ȈȣȞįȑıIJİIJȘȞİȟȦIJİȡȚțȒıȣıțİȣȒțĮȚIJȘȞ
IJȘȜİȩȡĮıȘȝİIJȠțĮȜȫįȚȠ+'0,ȩʌȦȢijĮȓȞİIJĮȚ
ıIJȘȞʌĮȡĮțȐIJȦİȚțȩȞĮ
ǼʌȚȜȑȟIJİȠʌȠȚĮįȒʌȠIJİșȪȡĮİȚıȩįȠȣ+'0,ȖȚĮ
IJȘıȪȞįİıȘǻİȞȑȤİȚıȘȝĮıȓĮʌȠȚĮșȪȡĮșĮ
ȤȡȘıȚȝȠʌȠȚȒıİIJİ
ȈǾȂǼǿȍȈǾ
y
īȚĮIJȘȕȑȜIJȚıIJȘʌȠȚȩIJȘIJĮİȚțȩȞĮȢ
ȤȡȘıȚȝȠʌȠȚȒıIJİIJȘȞIJȘȜİȩȡĮıȘȝİ
ıȪȞįİıȘ+'0,
y
ȋȡȘıȚȝȠʌȠȚȒıIJİIJȠțĮȜȫįȚȠ+'0,
ȣȥȘȜȒȢIJĮȤȪIJȘIJĮȢȝİȜİȚIJȠȣȡȖȓĮ&(&
(Customer Electronics Control).
y
ȉĮțĮȜȫįȚĮ+'0,ȣȥȘȜȒȢIJĮȤȪIJȘIJĮȢ
ȑȤȠȣȞİȜİȖȤșİȓȖȚĮIJȘȝİIJȐįȠıȘıȒȝĮIJȠȢ
+'ĮȞȐȜȣıȘȢȑȦȢSȒȣȥȘȜȩIJİȡȘȢ
y
ȊʌȠıIJȘȡȚȗȩȝİȞȘȝȠȡijȒȒȤȠȣ+'0,
Dolby Digital (32Khz, 44.1Khz, 48Khz),
DTS (44.1Khz, 48Khz),
PCM (32Khz, 44.1Khz, 48Khz, 96Khz,
192Khz)
6ORYHQãþLQD
3UHQDãDGLJLWDOQHYLGHRLQ]YRþQHVLJQDOHL]
]XQDQMHQDSUDYHQDWHOHYL]RU3RYHåLWH]XQDQMR
napravo in televizor s HDMI-kablom, kot je
prikazano na naslednji sliki.
Izberite vhodna vrata HDMI za povezavo. Ni
pomembno, katera vrata uporabite.
OPOMBA
y
=DQDMEROMãRNDNRYRVWVOLNHSULSRURþDPR
uporabo televizorja s HDMI-povezavo.
y
8SRUDELWHQDMQRYHMãLNDEHO+'0,]D
hitri prenos s funkcijo CEC (Customer
Electronics Control).
y
Kabli HDMI™ za hitri prenos so
SUHL]NXãHQLWDNRGDODKNRSUHQDãDMR
VLJQDOYLVRNHORþOMLYRVWLGRSLQYHþ
y
Podprte oblike zvoka za HDMI:
Dolby Digital (32Khz, 44.1Khz, 48Khz),
DTS (44.1Khz, 48Khz),
PCM (32Khz, 44.1Khz, 48Khz, 96Khz,
192Khz)

A-18
MAKING CONNECTIONS
ARC (Audio Return Channel)
English
y
An external audio device that supports
SIMPLINK and ARC must be connected
using
HDMI IN 1 (ARC) or HDMI/DVI IN 1
(ARC) port.
y
:KHQFRQQHFWHGZLWKDKLJKVSHHG
HDMI cable, the external audio device
that supports ARC outputs optical SPDIF
without additional optical audio cable and
supports the SIMPLINK function.
Deutsch
y
Ein externes Audiogerät, das SIMPLINK
und ARC unterstützt, muss über den
HDMI
IN 1 (ARC) oder HDMI/DVI IN 1 (ARC)-
Anschluss verbunden werden.
y
:HQQGHU$QVFKOXVVPLWHLQHP+LJK
Speed-HDMI-Kabel erfolgt, gibt das
externe Audiogerät, das ARC unterstützt,
SPDIF ohne zusätzliches optisches Audio-
kabel aus und unterstützt die SIMPLINK-
Funktion.
Français
y
Un périphérique audio externe prenant
en charge SIMPLINK et ARC doit être
connecté à l’aide du port
HDMI IN 1 (ARC)
ou
HDMI/DVI IN 1 (ARC).
y
Si vous reliez un câble HDMI haut débit,
le périphérique audio externe qui prend en
charge les sorties ARC, prend également
en charge la sortie optique SPDIF sans
câble audio optique supplémentaire, ainsi
que la fonction SIMPLINK.
Italiano
y
Un dispositivo audio esterno che supporta
SIMPLINK e ARC deve essere collegato
tramite la porta
HDMI IN 1 (ARC) o HDMI/
DVI IN 1 (ARC).
y
Se si effettua il collegamento con un
cavo HDMI ad alta velocità, il dispositivo
audio esterno che supporta ARC
trasmette il segnale SPDIF senza il cavo
ottico aggiuntivo e supporta la funzione
SIMPLINK.
Español
y
Hay que conectar un dispositivo de audio
externo que admita SIMPLINK y ARC
utilizando el puerto
HDMI IN 1 (ARC) o
HDMI/DVI IN 1 (ARC).
y
Cuando esté conectado mediante un cable
HDMI de alta velocidad, el dispositivo de
audio externo que admite ARC emite el
SPDIF óptico sin necesidad de un cable
óptico de audio adicional y admite la
función SIMPLINK.
Português
y
É necessário ligar um dispositivo de áudio
externo que suporte SIMPLINK e ARC
utilizando as portas
HDMI IN 1 (ARC) ou
HDMI/DVI IN 1 (ARC).
y
Quando ligado a um cabo HDMI de alta
velocidade, o aparelho de áudio externo
que suporta ARC transmite SPDIF óptica
sem um cabo de áudio óptico adicional e
suporta a função SIMPLINK.
Nederlands
y
Een extern audioapparaat dat
ondersteuning biedt voor SIMPLINK
en ARC, moet op de
HDMI IN 1 (ARC)
of HDMI/DVI IN 1 (ARC) worden
aangesloten.
y
Bij aansluiting met een High Speed HDMI-
kabel zorgt het externe audioapparaat met
ARC-ondersteuning ervoor dat optische
SPDIF wordt uitgevoerd zonder extra
optische audiokabel, en ondersteunt dit
apparaat de SIMPLINK-functie.
ǼȜȜȘȞȚțȐ
y
ȂȚĮİȟȦIJİȡȚțȒıȣıțİȣȒȒȤȠȣȘȠʌȠȓĮ
ȣʌȠıIJȘȡȓȗİȚ6,03/,1.țĮȚ$5&ʌȡȑʌİȚ
ȞĮıȣȞįİșİȓȝȑıȦIJȘȢșȪȡĮȢ
HDMI IN 1
(ARC)ȒHDMI/DVI IN 1 (ARC).
y
ȀĮIJȐIJȘıȪȞįİıȘȝİțĮȜȫįȚȠ+'0,ȣȥȘ-
ȜȒȢIJĮȤȪIJȘIJĮȢȘİȟȦIJİȡȚțȒıȣıțİȣȒȒȤȠȣ
ʌȠȣȣʌȠıIJȘȡȓȗİȚIJȠ$5&ʌĮȡȑȤİȚȠʌIJȚțȩ
ıȒȝĮ63',)ȤȦȡȓȢʌȡȩıșİIJȠȠʌIJȚțȩțĮ-
ȜȫįȚȠȒȤȠȣțĮȚȣʌȠıIJȘȡȓȗİȚIJȘȜİȚIJȠȣȡȖȓĮ
SIMPLINK.

A-19
MAKING CONNECTIONS
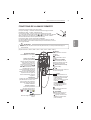
DVI to HDMI connection
(Only LB86**, LB87**)
DVD/ Blu-Ray / HD Cable Box / HD STB / PC
(*Not Provided)
6ORYHQãþLQD
y
=XQDQMR]YRþQRQDSUDYRNLSRGSLUD6,0-
3/,1.LQ$5&SULNOMXþLWHQDYUDWD
HDMI
IN 1 (ARC) ali HDMI/DVI IN 1 (ARC).
y
ýHMRSRYHåHWHVNDEORP+'0,]DKLWUL
SUHQRV]XQDQMD]YRþQDQDSUDYDNLSRGSL-
UDIXQNFLMR$5&RGGDMDRSWLþQL]DSLV63-
',)EUH]GRGDWQHJDRSWLþQHJD]YRþQHJD
kabla in podpira funkcijo SIMPLINK.

A-20
MAKING CONNECTIONS
(Only LB63**, LB65**, LB67**, LB68**, LB69**,
LB70**, LB72**, LB73**)
DVI OUT
AUDIO OUT
DVD / Blu-Ray / HD Cable Box / HD STB / PC
RED
:+,7(
(*Not Provided)
English
Transmits the digital video signal from an external
device to the TV. Connect the external device and
the TV with the DVI-HDMI cable as shown. To
transmit an audio signal, connect an audio cable.
Choose any HDMI input port to connect. It does
not matter which port you use.
NOTE
y
Depending on the graphics card, DOS
mode may not work if a HDMI to DVI
Cable is in use.
y
:KHQXVLQJWKH+'0,'9,FDEOHRQO\
Single link is supported.
Deutsch
Überträgt digitale Videosignale von einem
externen Gerät an das TV-Gerät. Verbinden
Sie das externe Gerät, wie in der folgenden
Abbildung gezeigt, mithilfe des DVI-HDMI-Kabels
mit dem TV-Gerät. Schließen Sie ein Audiokabel
an, um ein Audiosignal zu übertragen.
:lKOHQ6LH]XP$QVFKOLHHQHLQHQEHOLHELJHQ
HDMI-Eingang. Es ist egal, welchen Eingang Sie
wählen.
HINWEIS
y
Abhängig von der Grafikkarte funktioniert
der DOS-Modus bei Einsatz eines HDMI-
zu-DVI-Kabels möglicherweise nicht.
y
Bei Verwendung des HDMI/DVI-Kabels
wird nur eine einfache Verbindung
unterstützt.
Français
Permet de transmettre les signaux vidéo d’un
périphérique externe vers la TV. Connectez le
périphérique externe et la TV avec le câble DVI-
HDMI comme indiqué sur l’illustration suivante.
Pour émettre un signal audio, raccordez un câble
audio.
Choisissez un port d’entrée HDMI pour établir la
connexion. Peu importe le port que vous utilisez.
REMARQUE
y
Selon la carte graphique, le mode DOS
peut ne pas fonctionner si vous utilisez
un câble pour établir la connexion HDMI-
DVI.
y
Lors de l’utilisation du câble HDMI/DVI,
seule une liaison unique peut être prise
en charge.
Seite wird geladen ...
Seite wird geladen ...
Seite wird geladen ...
Seite wird geladen ...
Seite wird geladen ...
Seite wird geladen ...
Seite wird geladen ...
Seite wird geladen ...
Seite wird geladen ...
Seite wird geladen ...
Seite wird geladen ...
Seite wird geladen ...
Seite wird geladen ...
Seite wird geladen ...
Seite wird geladen ...
Seite wird geladen ...
Seite wird geladen ...
Seite wird geladen ...
Seite wird geladen ...
Seite wird geladen ...
Seite wird geladen ...
Seite wird geladen ...
Seite wird geladen ...
Seite wird geladen ...
Seite wird geladen ...
Seite wird geladen ...
Seite wird geladen ...
Seite wird geladen ...
Seite wird geladen ...
Seite wird geladen ...
Seite wird geladen ...
Seite wird geladen ...
Seite wird geladen ...
Seite wird geladen ...
Seite wird geladen ...
Seite wird geladen ...
Seite wird geladen ...
Seite wird geladen ...
Seite wird geladen ...
Seite wird geladen ...
Seite wird geladen ...
Seite wird geladen ...
Seite wird geladen ...
Seite wird geladen ...
Seite wird geladen ...
Seite wird geladen ...
Seite wird geladen ...
Seite wird geladen ...
Seite wird geladen ...
Seite wird geladen ...
Seite wird geladen ...
Seite wird geladen ...
Seite wird geladen ...
Seite wird geladen ...
Seite wird geladen ...
Seite wird geladen ...
Seite wird geladen ...
Seite wird geladen ...
Seite wird geladen ...
Seite wird geladen ...
Seite wird geladen ...
Seite wird geladen ...
Seite wird geladen ...
Seite wird geladen ...
Seite wird geladen ...
Seite wird geladen ...
Seite wird geladen ...
Seite wird geladen ...
Seite wird geladen ...
Seite wird geladen ...
Seite wird geladen ...
Seite wird geladen ...
Seite wird geladen ...
Seite wird geladen ...
Seite wird geladen ...
Seite wird geladen ...
Seite wird geladen ...
Seite wird geladen ...
Seite wird geladen ...
Seite wird geladen ...
Seite wird geladen ...
Seite wird geladen ...
Seite wird geladen ...
Seite wird geladen ...
Seite wird geladen ...
Seite wird geladen ...
Seite wird geladen ...
Seite wird geladen ...
Seite wird geladen ...
Seite wird geladen ...
Seite wird geladen ...
Seite wird geladen ...
Seite wird geladen ...
Seite wird geladen ...
Seite wird geladen ...
Seite wird geladen ...
Seite wird geladen ...
Seite wird geladen ...
Seite wird geladen ...
Seite wird geladen ...
Seite wird geladen ...
Seite wird geladen ...
Seite wird geladen ...
Seite wird geladen ...
Seite wird geladen ...
Seite wird geladen ...
Seite wird geladen ...
Seite wird geladen ...
Seite wird geladen ...
Seite wird geladen ...
Seite wird geladen ...
Seite wird geladen ...
Seite wird geladen ...
Seite wird geladen ...
Seite wird geladen ...
Seite wird geladen ...
Seite wird geladen ...
Seite wird geladen ...
Seite wird geladen ...
Seite wird geladen ...
Seite wird geladen ...
Seite wird geladen ...
Seite wird geladen ...
Seite wird geladen ...
Seite wird geladen ...
Seite wird geladen ...
Seite wird geladen ...
Seite wird geladen ...
Seite wird geladen ...
Seite wird geladen ...
Seite wird geladen ...
Seite wird geladen ...
Seite wird geladen ...
Seite wird geladen ...
Seite wird geladen ...
Seite wird geladen ...
Seite wird geladen ...
Seite wird geladen ...
Seite wird geladen ...
Seite wird geladen ...
Seite wird geladen ...
Seite wird geladen ...
Seite wird geladen ...
Seite wird geladen ...
Seite wird geladen ...
Seite wird geladen ...
Seite wird geladen ...
Seite wird geladen ...
Seite wird geladen ...
Seite wird geladen ...
Seite wird geladen ...
Seite wird geladen ...
Seite wird geladen ...
Seite wird geladen ...
Seite wird geladen ...
Seite wird geladen ...
Seite wird geladen ...
Seite wird geladen ...
Seite wird geladen ...
Seite wird geladen ...
Seite wird geladen ...
Seite wird geladen ...
Seite wird geladen ...
Seite wird geladen ...
Seite wird geladen ...
Seite wird geladen ...
Seite wird geladen ...
Seite wird geladen ...
Seite wird geladen ...
Seite wird geladen ...
Seite wird geladen ...
Seite wird geladen ...
Seite wird geladen ...
Seite wird geladen ...
Seite wird geladen ...
Seite wird geladen ...
Seite wird geladen ...
Seite wird geladen ...
Seite wird geladen ...
Seite wird geladen ...
Seite wird geladen ...
Seite wird geladen ...
Seite wird geladen ...
Seite wird geladen ...
Seite wird geladen ...
Seite wird geladen ...
Seite wird geladen ...
Seite wird geladen ...
Seite wird geladen ...
Seite wird geladen ...
Seite wird geladen ...
Seite wird geladen ...
Seite wird geladen ...
Seite wird geladen ...
Seite wird geladen ...
Seite wird geladen ...
Seite wird geladen ...
Seite wird geladen ...
Seite wird geladen ...
Seite wird geladen ...
Seite wird geladen ...
Seite wird geladen ...
Seite wird geladen ...
Seite wird geladen ...
Seite wird geladen ...
Seite wird geladen ...
Seite wird geladen ...
Seite wird geladen ...
Seite wird geladen ...
Seite wird geladen ...
Seite wird geladen ...
Seite wird geladen ...
Seite wird geladen ...
Seite wird geladen ...
Seite wird geladen ...
Seite wird geladen ...
Seite wird geladen ...
Seite wird geladen ...
Seite wird geladen ...
Seite wird geladen ...
Seite wird geladen ...
Seite wird geladen ...
Seite wird geladen ...
Seite wird geladen ...
Seite wird geladen ...
Seite wird geladen ...
Seite wird geladen ...
Seite wird geladen ...
Seite wird geladen ...
Seite wird geladen ...
Seite wird geladen ...
Seite wird geladen ...
Seite wird geladen ...
Seite wird geladen ...
Seite wird geladen ...
Seite wird geladen ...
Seite wird geladen ...
Seite wird geladen ...
Seite wird geladen ...
Seite wird geladen ...
Seite wird geladen ...
Seite wird geladen ...
Seite wird geladen ...
Seite wird geladen ...
Seite wird geladen ...
Seite wird geladen ...
Seite wird geladen ...
Seite wird geladen ...
Seite wird geladen ...
Seite wird geladen ...
Seite wird geladen ...
Seite wird geladen ...
Seite wird geladen ...
Seite wird geladen ...
Seite wird geladen ...
Seite wird geladen ...
Seite wird geladen ...
Seite wird geladen ...
Seite wird geladen ...
Seite wird geladen ...
Seite wird geladen ...
Seite wird geladen ...
Seite wird geladen ...
Seite wird geladen ...
Seite wird geladen ...
Seite wird geladen ...
Seite wird geladen ...
Seite wird geladen ...
Seite wird geladen ...
Seite wird geladen ...
Seite wird geladen ...
Seite wird geladen ...
Seite wird geladen ...
Seite wird geladen ...
Seite wird geladen ...
Seite wird geladen ...
Seite wird geladen ...
Seite wird geladen ...
Seite wird geladen ...
Seite wird geladen ...
Seite wird geladen ...
Seite wird geladen ...
Seite wird geladen ...
Seite wird geladen ...
Seite wird geladen ...
Seite wird geladen ...
Seite wird geladen ...
Seite wird geladen ...
Seite wird geladen ...
Seite wird geladen ...
Seite wird geladen ...
Seite wird geladen ...
Seite wird geladen ...
Seite wird geladen ...
Seite wird geladen ...
Seite wird geladen ...
Seite wird geladen ...
Seite wird geladen ...
Seite wird geladen ...
Seite wird geladen ...
Seite wird geladen ...
Seite wird geladen ...
Seite wird geladen ...
Seite wird geladen ...
Seite wird geladen ...
Seite wird geladen ...
Seite wird geladen ...
Seite wird geladen ...
Seite wird geladen ...
Seite wird geladen ...
Seite wird geladen ...
Seite wird geladen ...
Seite wird geladen ...
Seite wird geladen ...
Seite wird geladen ...
Seite wird geladen ...
Seite wird geladen ...
Seite wird geladen ...
Seite wird geladen ...
Seite wird geladen ...
Seite wird geladen ...
Seite wird geladen ...
Seite wird geladen ...
Seite wird geladen ...
Seite wird geladen ...
Seite wird geladen ...
Seite wird geladen ...
Seite wird geladen ...
Seite wird geladen ...
Seite wird geladen ...
Seite wird geladen ...
Seite wird geladen ...
Seite wird geladen ...
Seite wird geladen ...
Seite wird geladen ...
Seite wird geladen ...
Seite wird geladen ...
Seite wird geladen ...
Seite wird geladen ...
Seite wird geladen ...
Seite wird geladen ...
Seite wird geladen ...
Seite wird geladen ...
Seite wird geladen ...
-
 1
1
-
 2
2
-
 3
3
-
 4
4
-
 5
5
-
 6
6
-
 7
7
-
 8
8
-
 9
9
-
 10
10
-
 11
11
-
 12
12
-
 13
13
-
 14
14
-
 15
15
-
 16
16
-
 17
17
-
 18
18
-
 19
19
-
 20
20
-
 21
21
-
 22
22
-
 23
23
-
 24
24
-
 25
25
-
 26
26
-
 27
27
-
 28
28
-
 29
29
-
 30
30
-
 31
31
-
 32
32
-
 33
33
-
 34
34
-
 35
35
-
 36
36
-
 37
37
-
 38
38
-
 39
39
-
 40
40
-
 41
41
-
 42
42
-
 43
43
-
 44
44
-
 45
45
-
 46
46
-
 47
47
-
 48
48
-
 49
49
-
 50
50
-
 51
51
-
 52
52
-
 53
53
-
 54
54
-
 55
55
-
 56
56
-
 57
57
-
 58
58
-
 59
59
-
 60
60
-
 61
61
-
 62
62
-
 63
63
-
 64
64
-
 65
65
-
 66
66
-
 67
67
-
 68
68
-
 69
69
-
 70
70
-
 71
71
-
 72
72
-
 73
73
-
 74
74
-
 75
75
-
 76
76
-
 77
77
-
 78
78
-
 79
79
-
 80
80
-
 81
81
-
 82
82
-
 83
83
-
 84
84
-
 85
85
-
 86
86
-
 87
87
-
 88
88
-
 89
89
-
 90
90
-
 91
91
-
 92
92
-
 93
93
-
 94
94
-
 95
95
-
 96
96
-
 97
97
-
 98
98
-
 99
99
-
 100
100
-
 101
101
-
 102
102
-
 103
103
-
 104
104
-
 105
105
-
 106
106
-
 107
107
-
 108
108
-
 109
109
-
 110
110
-
 111
111
-
 112
112
-
 113
113
-
 114
114
-
 115
115
-
 116
116
-
 117
117
-
 118
118
-
 119
119
-
 120
120
-
 121
121
-
 122
122
-
 123
123
-
 124
124
-
 125
125
-
 126
126
-
 127
127
-
 128
128
-
 129
129
-
 130
130
-
 131
131
-
 132
132
-
 133
133
-
 134
134
-
 135
135
-
 136
136
-
 137
137
-
 138
138
-
 139
139
-
 140
140
-
 141
141
-
 142
142
-
 143
143
-
 144
144
-
 145
145
-
 146
146
-
 147
147
-
 148
148
-
 149
149
-
 150
150
-
 151
151
-
 152
152
-
 153
153
-
 154
154
-
 155
155
-
 156
156
-
 157
157
-
 158
158
-
 159
159
-
 160
160
-
 161
161
-
 162
162
-
 163
163
-
 164
164
-
 165
165
-
 166
166
-
 167
167
-
 168
168
-
 169
169
-
 170
170
-
 171
171
-
 172
172
-
 173
173
-
 174
174
-
 175
175
-
 176
176
-
 177
177
-
 178
178
-
 179
179
-
 180
180
-
 181
181
-
 182
182
-
 183
183
-
 184
184
-
 185
185
-
 186
186
-
 187
187
-
 188
188
-
 189
189
-
 190
190
-
 191
191
-
 192
192
-
 193
193
-
 194
194
-
 195
195
-
 196
196
-
 197
197
-
 198
198
-
 199
199
-
 200
200
-
 201
201
-
 202
202
-
 203
203
-
 204
204
-
 205
205
-
 206
206
-
 207
207
-
 208
208
-
 209
209
-
 210
210
-
 211
211
-
 212
212
-
 213
213
-
 214
214
-
 215
215
-
 216
216
-
 217
217
-
 218
218
-
 219
219
-
 220
220
-
 221
221
-
 222
222
-
 223
223
-
 224
224
-
 225
225
-
 226
226
-
 227
227
-
 228
228
-
 229
229
-
 230
230
-
 231
231
-
 232
232
-
 233
233
-
 234
234
-
 235
235
-
 236
236
-
 237
237
-
 238
238
-
 239
239
-
 240
240
-
 241
241
-
 242
242
-
 243
243
-
 244
244
-
 245
245
-
 246
246
-
 247
247
-
 248
248
-
 249
249
-
 250
250
-
 251
251
-
 252
252
-
 253
253
-
 254
254
-
 255
255
-
 256
256
-
 257
257
-
 258
258
-
 259
259
-
 260
260
-
 261
261
-
 262
262
-
 263
263
-
 264
264
-
 265
265
-
 266
266
-
 267
267
-
 268
268
-
 269
269
-
 270
270
-
 271
271
-
 272
272
-
 273
273
-
 274
274
-
 275
275
-
 276
276
-
 277
277
-
 278
278
-
 279
279
-
 280
280
-
 281
281
-
 282
282
-
 283
283
-
 284
284
-
 285
285
-
 286
286
-
 287
287
-
 288
288
-
 289
289
-
 290
290
-
 291
291
-
 292
292
-
 293
293
-
 294
294
-
 295
295
-
 296
296
-
 297
297
-
 298
298
-
 299
299
-
 300
300
-
 301
301
-
 302
302
-
 303
303
-
 304
304
-
 305
305
-
 306
306
-
 307
307
-
 308
308
-
 309
309
-
 310
310
-
 311
311
-
 312
312
-
 313
313
-
 314
314
-
 315
315
-
 316
316
-
 317
317
-
 318
318
-
 319
319
-
 320
320
-
 321
321
-
 322
322
-
 323
323
-
 324
324
-
 325
325
-
 326
326
-
 327
327
-
 328
328
-
 329
329
-
 330
330
-
 331
331
-
 332
332
-
 333
333
-
 334
334
-
 335
335
-
 336
336
-
 337
337
-
 338
338
-
 339
339
-
 340
340
-
 341
341
-
 342
342
-
 343
343
-
 344
344
-
 345
345
-
 346
346
-
 347
347
-
 348
348
-
 349
349
-
 350
350
-
 351
351
-
 352
352
-
 353
353
-
 354
354
-
 355
355
-
 356
356
-
 357
357
-
 358
358
-
 359
359
-
 360
360
-
 361
361
-
 362
362
-
 363
363
-
 364
364


in anderen Sprachen
- français: LG 42LB630V Manuel utilisateur
- español: LG 42LB630V Manual de usuario
- italiano: LG 42LB630V Manuale utente
- português: LG 42LB630V Manual do usuário
- Türkçe: LG 42LB630V Kullanım kılavuzu