English Français
NOTE:
•
Descriptions and illustrations are given in this guide with the LV unit installed.
Preparation:
•
Mount the optional lens.
• Connect the power cable and use the power cable stopper to fix it.
Ask your distributor for mounting the lens and connecting the power cable.
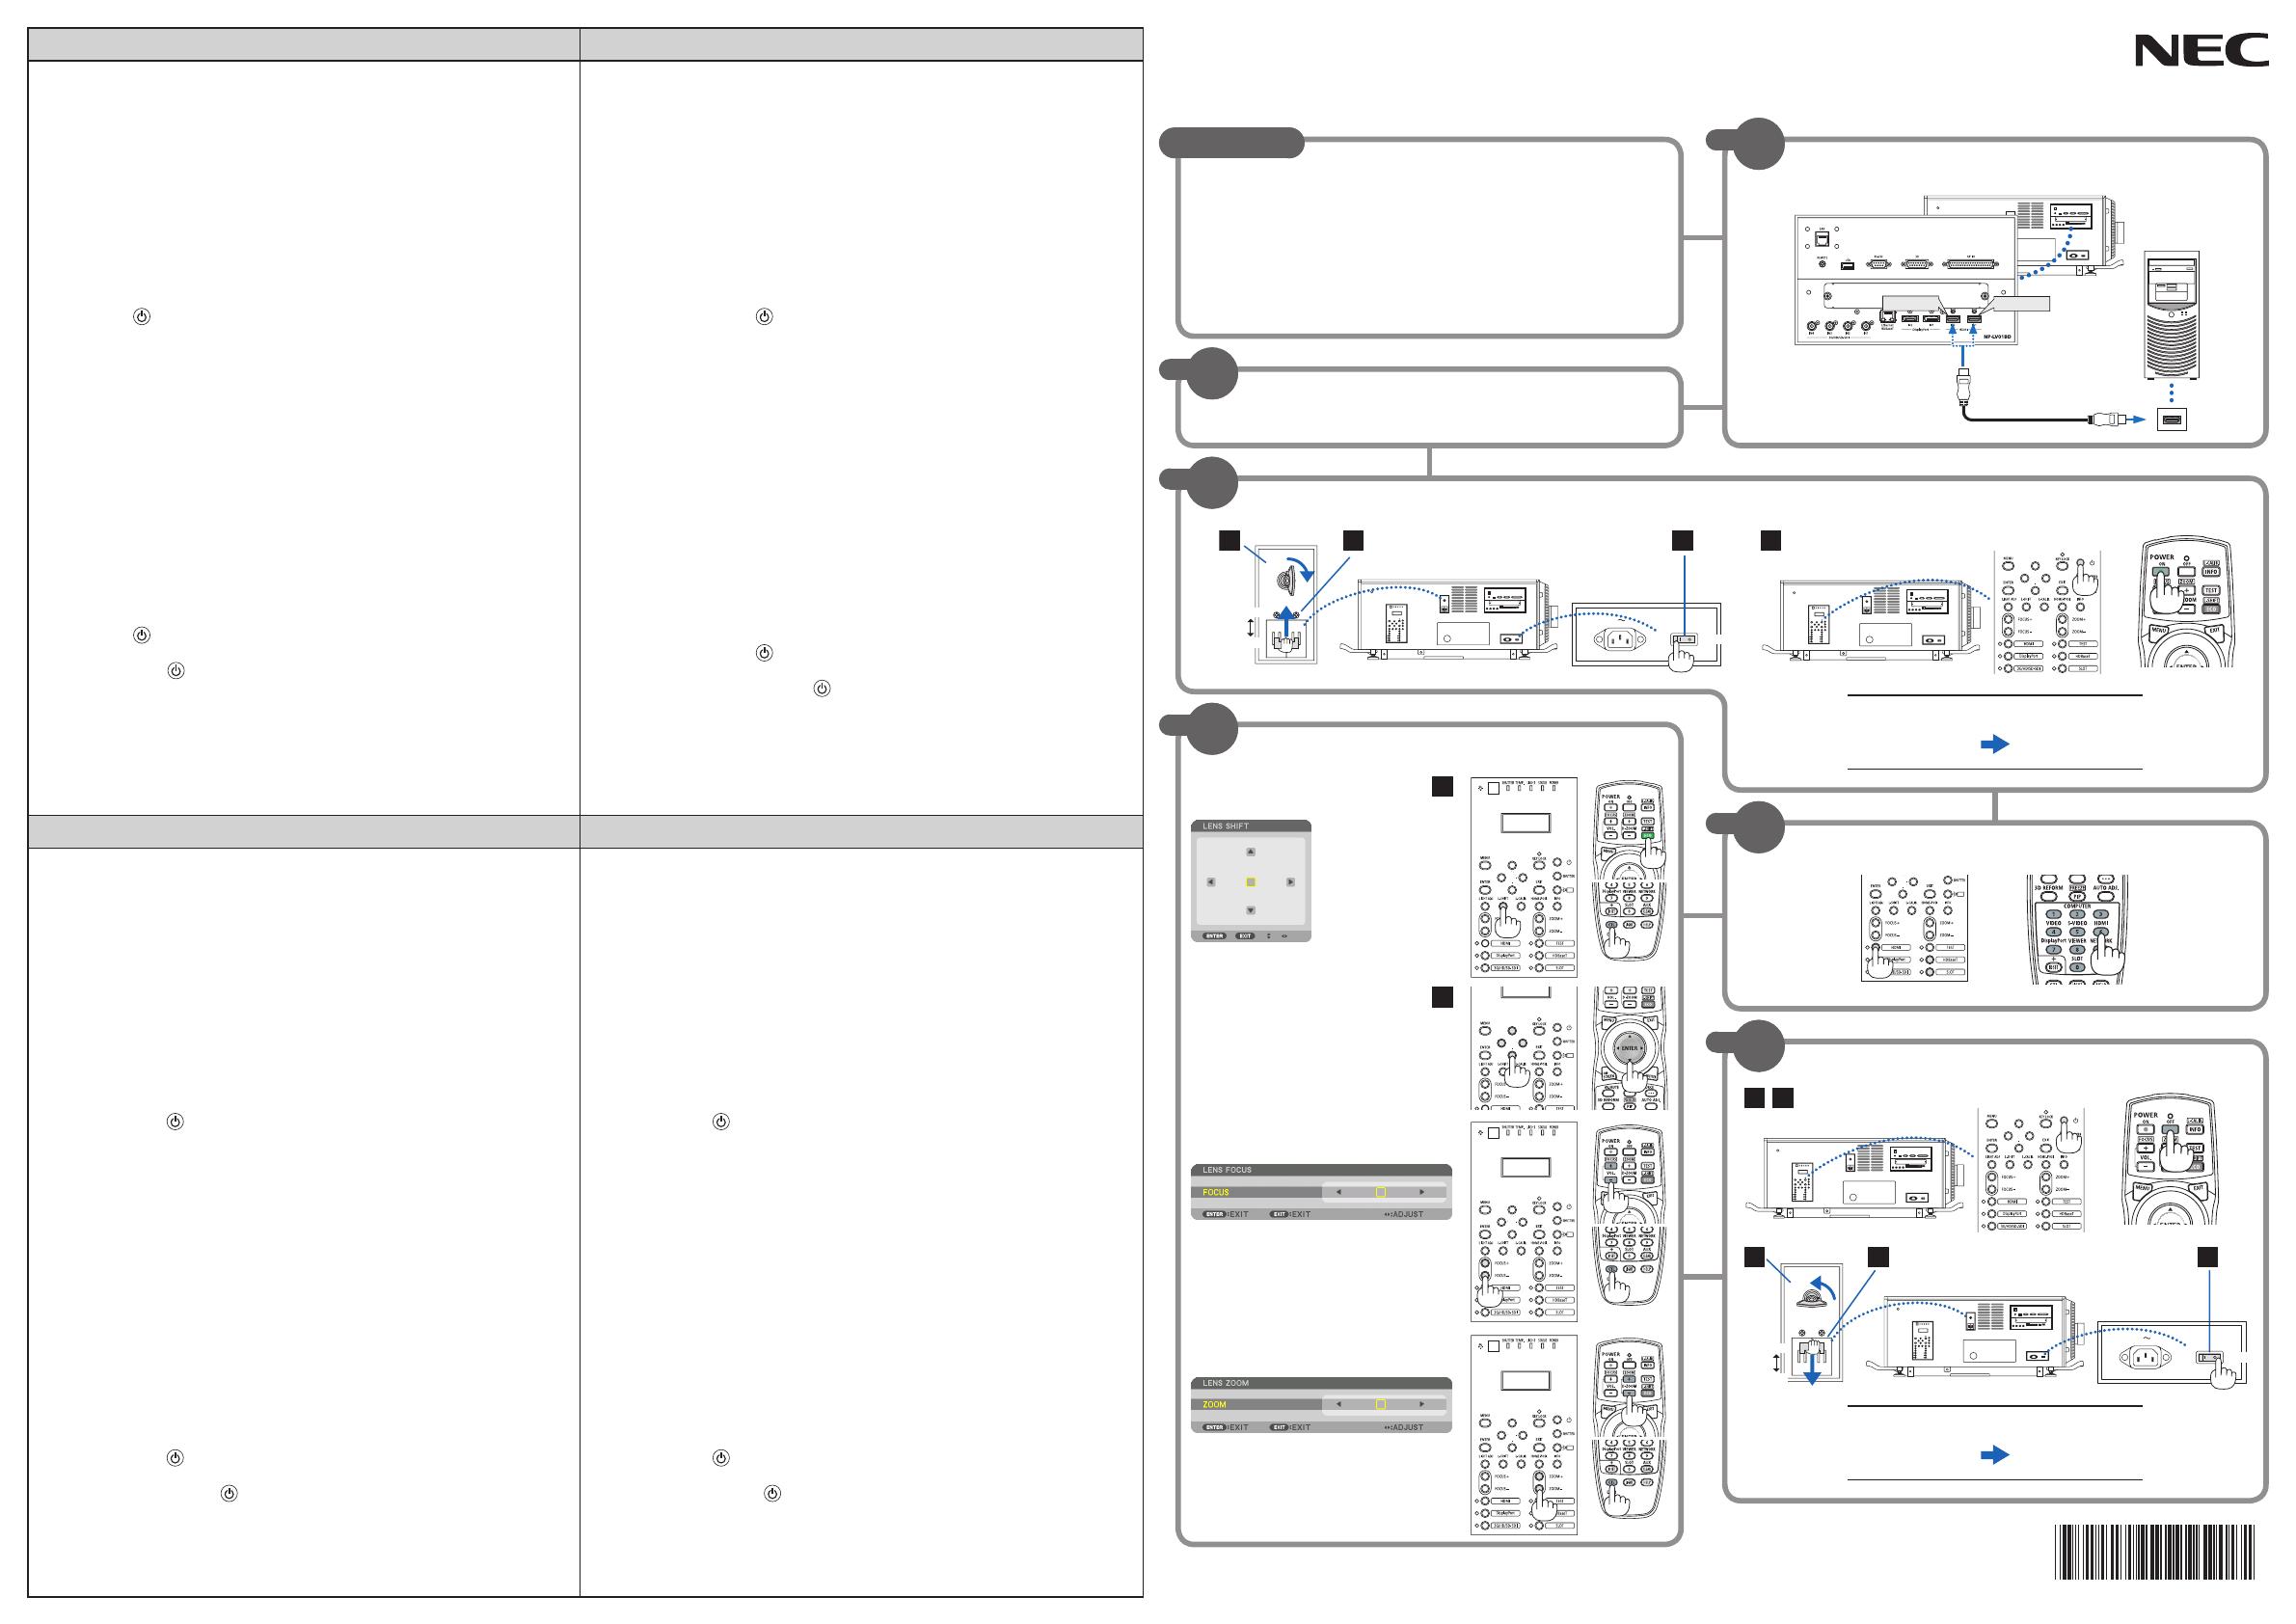
❶
Connect your computer to the projector.
❷ Remove the lens cap.
❸ Turn on the projector.
1. Insert the administrator key vertically, and turn it to the right.
2.
Turn the light power switch to the ON position.
3.
Turn the projector power switch to the ON position (I).
4.
Press the (POWER) button on the projector cabinet or the POWER ON button on the
remote control.
❹
Select a source.
❺ Adjust an image size and position.
[LENS SHIFT]
1. Press the L-SHIFT button.
•
On the remote control, while pressing on the CTL button, press the ECO/L-SHIFT button.
2. Press the ▼▲◀ or ▶ button.
[FOCUS]
1. Press the FOCUS +/− button.
• On the remote control, while pressing on the CTL button, press the VOL/FOCUS (+) or (−)
button.
[ZOOM]
1. Press the ZOOM +/− button.
•
On the remote control, while pressing on the CTL button, press the D-ZOOM/ZOOM (+) or
(−) button.
❻
Turn off the projector.
1. Press the (POWER) button on the projector cabinet or the POWER OFF button on the
remote control.
2.
Press either the (POWER) or the POWER OFF button again.
3.
When the projector goes into standby condition, turn the projector power switch to the OFF
position (○).
4.
Turn the light power switch to the OFF position.
5.
Turn the administrator key to the vertical direction and pull it out.
REMARQUE :
•
Les descriptions et les illustrations de ce guide sont données avec l'unité LV installée.
Préparation:
•
Montez l’objectif en option.
•
Connectez le câble d’alimentation et utilisez la butée du câble d’alimentation pour le fixer.
Demandez à votre fournisseur de monter l’objectif et de connecter le câble d’alimentation.
❶
Connectez votre ordinateur au projecteur.
❷ Retirez le capuchon de l’objectif.
❸ Mettez le projecteur sous tension.
1. Insérez la clé de l'administrateur verticalement et tournez-la vers la droite.
2.
Tournez le commutateur d'alimentation de l'éclairage sur la position ON.
3.
Mettez l’interrupteur d’alimentation du projecteur sur la position ON (I).
4.
Appuyez sur le bouton (POWER) sur le boîtier du projecteur ou sur le bouton POWER ON de
la télécommande.
❹
Sélectionnez une source.
❺ Ajuster la taille et la position d’une image.
[DÉCALAGE D’OBJECTIF]
1. Appuyez sur le bouton L-SHIFT.
•
Sur la télécommande, lorsque vous pressez sur le bouton CTL, appuyez sur le bouton ECO/L-
SHIFT.
2.
Appuyez sur le bouton ▼ ▲ ◀ ou ▶.
[MISE AU POINT]
1. Appuyez sur le bouton FOCUS +/−.
•
Sur la télécommande, lorsque vous pressez sur le bouton CTL, appuyez sur le bouton VOL/
FOCUS (+) ou (−).
[ZOOM]
1. Appuyez sur le bouton ZOOM +/−.
•
Sur la télécommande, lorsque vous pressez sur le bouton CTL, appuyez sur le bouton
D-ZOOM/ZOOM (+) ou (−).
❻
Mettez le projecteur hors tension.
1. Appuyez sur le bouton (POWER) sur le boîtier du projecteur ou sur le bouton POWER OFF
de la télécommande.
2.
Appuyez à nouveau sur le bouton (POWER) ou sur le bouton POWER OFF.
3.
Lorsque le projecteur entre en état de veille, tournez l’interrupteur d’alimentation du
projecteur sur la position OFF (○).
4.
Tournez le commutateur d'alimentation de l’éclairage sur la position OFF.
5.
Tournez la clé de l’administrateur dans le sens vertical et retirez-la.
Deutsch Español
HINWEIS:
•
In den Beschreibungen und Abbildungen in dieser Leitfaden ist die LV-Einheit installiert.
Vorbereitung:
•
Montieren Sie das optionale Objektiv.
•
Schließen Sie das Netzkabel an und verwenden Sie den Netzkabelstopper, um es zu
befestigen.
Wenden Sie sich zur Montage des Objektivs und zum Anschluss des Netzkabels an Ihren Händler.
❶
Schließen Sie Ihren Computer an den Projektor an.
❷ Nehmen Sie die Linsenkappe ab.
❸ Schalten Sie den Projektor ein.
1. Fügen Sie den Administrator-Schlüssel vertikal ein und drehen Sie ihn nach rechts.
2.
Schalten Sie den Lichtquellen-Ein/Aus-Schalter auf ON.
3.
Schalten Sie den Projektor-Ein/Aus-Schalter auf ON (I).
4.
Drücken Sie die (POWER) -Taste am Projektorgehäuse oder die POWER ON -Taste auf der
Fernbedienung.
❹
Wählen Sie eine Quelle aus.
❺ Stellen Sie eine Bildgröße und eine Position ein.
[OBJEKTIVVERSATZ]
1. Drücken Sie die Taste L-SHIFT.
•
Drücken Sie auf der Fernbedienung, während Sie die CTL-Taste gedrückt halten, die Taste
ECO/L-SHIFT.
2.
Drücken Sie die Taste ▼▲◀ oder ▶.
[FOKUS]
1. Drücken Sie die Taste FOCUS +/−.
• Drücken Sie auf der Fernbedienung, während Sie die CTL-Taste gedrückt halten, die Taste
VOL/FOCUS (+) oder (−).
[ZOOM]
1. Drücken Sie die Taste ZOOM +/−.
•
Drücken Sie auf der Fernbedienung, während Sie die CTL-Taste gedrückt halten, die Taste
D-ZOOM/ZOOM (+) oder (−).
❻
Schalten Sie den Projektor aus.
1. Drücken Sie die (POWER) -Taste am Projektorgehäuse oder die POWER OFF -Taste auf der
Fernbedienung.
2.
Drücken Sie entweder die (POWER)-Taste oder die POWER OFF -Taste erneut.
3.
Wenn sich der Projektor auf Standby schaltet, drehen Sie den Projektor-Ein/Aus-Schalter auf
OFF (○).
4.
Schalten Sie den Lichtquellen-Ein/Aus-Schalter auf OFF.
5.
Drehen Sie den Administratorschlüssel in die Vertikale und ziehen Sie ihn heraus.
NOTA:
•
Las descripciones e ilustraciones se dan en esta guía muestran la unidad LV instalada.
Preparación:
•
Monte la lente opcional.
• Conecte el cable de alimentación y use el tope del cable de alimentación para fijarlo.
Póngase en contacto con su distribuidor para el montaje de la lente y la conexión del cable de
alimentación.
❶
Conectar su ordenador al proyector.
❷ Retire la tapa de la lente.
❸ Encienda el proyector.
1. Inserte la llave de administrador en sentido vertical y gírela hacia la derecha.
2.
Ajuste el interruptor de alimentación luminoso a la posición de ON.
3.
Ajuste el interruptor de alimentación del proyector en la posición de ON (I).
4.
Pulse el botón (POWER) en la carcasa del proyector o el botón POWER ON en el mando a
distancia.
❹
Seleccione una fuente.
❺ Ajuste un tamaño y posición de imagen.
[DESPLAZAMIENTO DE LA LENTE]
1. Pulse el botón L-SHIFT.
• En el mando a distancia, pulse el botón ECO/L-SHIFT mientras mantiene pulsado el botón
CTL.
2.
Pulse el botón ▼▲◀ o ▶.
[ENFOQUE]
1. Pulse el botón FOCUS +/−.
• En el mando a distancia, pulse el botón VOL/FOCUS (+) o (−) mientras mantiene pulsado el
botón CTL.
[ZOOM]
1. Pulse el botón ZOOM +/−.
• En el mando a distancia, pulse el botón D-ZOOM/ZOOM (+) o (−) mientras mantiene
pulsado el botón CTL.
❻
Apague el proyector.
1. Pulse el botón (POWER) en la carcasa del proyector o el botón POWER OFF en el mando a
distancia.
2.
Pulse de nuevo el botón (POWER) o el botón POWER OFF.
3.
Cuando el proyector entre en el modo de espera, ajuste el interruptor de alimentación del
proyector a la posición de OFF (○).
4.
Ajuste el interruptor de alimentación luminoso a la posición de OFF.
5.
Gire la llave de administrador en sentido vertical y sáquela.
Quick Setup Guide
© NEC Display Solutions, Ltd. 2018 Ver.2 6/18 Printed in China
Turn off the projector.
Adjust an image size and the position.
[LENS SHIFT]
[FOCUS]
[ZOOM]
Remove the lens cap.
Turn on the projector.
Select a source.
PH3501QL/PH2601QL
powered by NP-LV01BD
4
5 34
ON
ON
OFF
OFF
1
2
*7N8N8802*
NOTE: The color of the POWER indicator
ORANGE
GREEN
[Standby] [Power On]
NOTE: The color of the POWER indicator
GREEN
ORANGE
[Power On] [Standby]
Preparation
Step
2
Step
3
ON
ON
OFF
OFF
1 32
Step
4
Step
6
Step
5
1 2
Connect your computer.
HDMI IN2
HDMI IN1
Step
1
• Mounttheoptionallens.
• Connectthepowercable.
Ask your distributor for the preparation
work.
