Lenco L-3808 Black Bedienungsanleitung
- Kategorie
- Audio-Plattenspieler
- Typ
- Bedienungsanleitung
Dieses Handbuch eignet sich auch für

User Manual Direct Drive Turntable with USB Recording
Gebruiksaanwijzing Platenspeler met Directe Aandruving en USB Codering
Benutzerhandbuch Plattenspieler mit Direktanrieb und USB-aufnahme
Mode d’emploi Platine a Entrainement Direct avec Encodage USB
Manual del Usuario Giradiscos con Tracción Directa y Grabador USB

English ............................................................................................................................................03
Nederlands......................................................................................................................................14
Deutsch...........................................................................................................................................25
Français ..........................................................................................................................................36
Español ...........................................................................................................................................47
INDEX

CAUTION:
Usage of controls or adjustments or performance of
procedures other than those specified herein may result
in hazardous radiation exposure.
This unit should not be adjusted or repaired by anyone
except qualified service personnel.
PRECAUTIONS BEFORE USE
KEEP THESE INSTRUCTIONS IN MIND:
1. Do not use this device near water.
2. Clean only with a slightly damp cloth.
3. Do not cover or block any ventilation openings.
When placing the device on a shelf, leave 5 cm (2”)
free space around the whole device.
4. Install in accordance with the supplied user manual.
5. * Don’t step on or pinch the power adaptor. Be very
careful, particularly near the plugs and the cable’s
exit point. Do not place heavy items on the power
adaptor, which may damage it. Keep the entire
device out of children’s reach! When playing with
the power cable, they can seriously injure themselves.
6. * Unplug this device during lightning storms or
when unused for a long period.
7. Keep the device away from heat sources such as
radiators, heaters, stoves, candles and other
heat-generating products or naked flame.
8. Avoid using the device near strong magnetic fields.
9. Electrostatic discharge can disturb normal usage
of this device. If so, simply reset and restart the
device following the instruction manual. During file
transmission, please handle with care and operate
in a static-free environment.
10. Warning! Never insert an object into the product
through the vents or openings. High voltage flows
through the product and inserting an object can
cause electric shock and/or short circuit internal
parts. For the same reason, do not spill water or
liquid on the product.
11. Do not use in wet or moist areas such as bathrooms,
steamy kitchens or near swimming pools.
12. Do not use this device when condensation may
occur.
13. Although this device is manufactured with the utmost
care and checked several times before leaving the
factory, it is still possible that problems may occur, as
with all electrical appliances. If you notice smoke, an
excessive build-up of heat or any other unexpected
phenomena, you should disconnect the plug from
the main power socket immediately.
14. This device must operate on a power source as
specified on the specification label. If you are not
sure of the type of power supply used in your home,
consult your dealer or local power company.
15. * The socket outlet must be installed near the
equipment and must be easily accessible.
16. * Do not overload ac outlets or extension cords.
Overloading can cause fire or electric shock.
17. * Devices with class 1 construction should be
connected to a main socket outlet with a protective
earthed connection.
18. * Devices with class 2 construction do not require a
earthed connection.
19. Keep away from rodents. Rodents enjoy biting on
power cords.
20. * Always hold the plug when pulling it out of the
main supply socket. Do not pull the power cord.
This can cause a short circuit.
21. Avoid placing the device on any surfaces that may
be subject to vibrations or shocks.
22.
To clean the device, use a soft dry cloth. Do not
use solvents or petrol based fluids. To remove
severe
stains, you may use a damp cloth with dilute
detergent.
23. The supplier is not responsible for damage or lost
data caused by malfunction, misuse, modification
of the device or battery replacement.
24. Do not interrupt the connection when the device is
formatting or transferring files. Otherwise, data
may be corrupted or lost.
25. If the unit has USB playback function, the usb
memory stick should be plugged into the unit
directly. Don’t use an usb extension cable because
it can cause interference resulting in failing of data.
26. The apparatus shall not be exposed to dripping or
splashing and make sure that no objects filled with
liquids, such as vases, are placed on or near the
apparatus.
27. * To completely disconnect the power input, the
mains plug of the apparatus shall be disconnected
from the mains, as the disconnect device is the
mains plug of apparatus.
28. If the unit works with battery, Battery shall not be
exposed to excessive heat such as sunshine, fire
or the like.
29. Attention should be drawn to the environmental
aspects of battery disposal.
30. The apparatus can only be used in moderate
extremely cold or climates warm environments
should be avoided.
31. The rating label has been marked on the bottom or
back panel of the apparatus.
32. This device is not intended for use by people
(including children) with physical, sensory or mental
disabilities, or a lack of experience and knowledge,
unless they’re under supervision or have received
instructions about the correct use of the device by
the person who is responsible for their safety.
33. This product is intended for non professional use
only and not for commercial or industrial use.
34. Make sure the unit is adjusted to a stable position.
Damage caused by using this product in an
unstable position or by failure to follow any other
warning or precaution contained within this user
manual will not be covered by warranty.
35. Never remove the casing of this apparatus.
36. Never place this apparatus on other electrical
equipment.
37. Do not use or store this product in a place where it
is subject to direct sunlight, heat, excessive dust or
vibration.
IMPORTANT SAFETY PRECAUTIONS
3

38. Do not allow children access to plastic bags.
39. Only use attachments/accessories specified by the
manufacturer.
40. Refer all servicing to qualified service personnel.
Servicing is required when the apparatus has been
damaged in any way, such as the power supply
cord or the plug, when liquid has been spilled or
objects have fallen into the apparatus, when the
apparatus has been exposed to rain or moisture,
does not operate normally, or has been dropped.
41. *Do not use a damaged power cord or plug or a
loose outlet. Doing so may result in fire or electric
shock.
42. Prolonged exposure to loud sounds from personal
music players may lead to temporary or permanent
hearing loss.
INSTALLATION
• Unpack all parts and remove protective material.
• *Do not connect the unit to the mains before checking
the mains voltage and before all other connections
have been made.
* Those instructions are related only to products
using power cable or AC power adaptor.
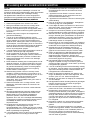
CAUTION: To reduce the risk of electric shock, do not remove any cover. No
user-serviceable parts inside. Refer servicing to qualified service personnel
only.
The lightning flash with arrowhead symbol within the equilateral triangle is intended to alert the use to the
presence of un-insulated “dangerous voltage” within the product’s enclosure that may be of sufficient
magnitude to constitute a risk of electric shock.
The exclamation point within the equilateral triangle is intended to alert the user to the presence of important
operation and maintenance (servicing) instructions in the literature accompanying this appliance.
CAUTION
To prevent electric shock, do not use this polarized plug with an extension cord, receptacle or other outlet unless the
blades can be fully inserted to prevent blade exposure.
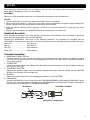
Turntable Quick-Start:
1. Changing Platter Speed
Use the RPM selectors to change the platter speeds. The 33-rpm and 45-rpm speed selectors change the
platter rotation respectively.
2. Starting and Stopping the Platter
Use the START/STOP BUTTON to switch back and forth between platter rotation and pause modes.
3. Pitch Control
(1) The pitch adjustment is a fine adjustment to the platter's RPMs.
(2) The pitch adjustment is variable and may be adjusted between -10% and +10% of the platter-selected
speed.
(3) The pitch is changed by sliding the Pitch Slider in an up and down motion.
(4) The STROBE INDICATORS on the rim of the PLATTER can be used to visual approximate the platter
pitch. These indicators are lit by the STROBE INDICATOR PILOT LAMP as they pass by the POWER
SWITCH. At different pitch levels each row of STROBE INDICATORS may appear stand still.
Note: The use of heavy fluorescent lighting directly above the turntable will defeat the STROBE
LAMP PILOT LAMP affect indicator accuracy.
Product Service:
1. Clean the stylus periodically with a soft brush to prevent the accumulation of dust.
2. When sound becomes distorted or noisy, check the stylus. If the stylus is worn out, replace it with a new
one.
3. From time to time, the dust cover and turntable cabinet should be wiped down with a soft, dry cloth.
4. Volatile materials should not be used, such as: alcohol, thinner, benzine etc. They may remove the paint or
damage the luster.
QUICK-START
IMPORTANT SAFETY PRECAUTIONS
DO NOT OPEN
RISK OF ELECTRIC SHOCK
4

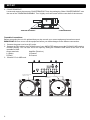
Some assembly required before you can begin to use your new unit. Please follow the assembly instruction
below before attempting to use you new turntable.
ASSEMBLY:
Before you begin assembly please be sure all parts and accessories have arrived intact.
NOTES:
y Do not connect the AC power plug before assembly has been completed.
y Before turning the power on, make sure once again all the connections and power voltage settings are
correct. Always turn off the power when connecting or disconnecting.
y Read this manual carefully before using the unit. Be sure to store the manual in a safe place for future
reference.
y Attach a stylus cartridge to the HEADSHELL before assembling the turntable unit.
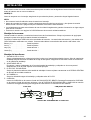
Headshell Assembly:
When installing a cartridge, refer to the operating instructions of that cartridge. During installation, attach the
stylus protector to guard the stylus tip from damage.
Connect the HEADSHELL lead wires to the cartridge terminals. The terminals of cartridges and the
HEADSHELL lead wires are color coded. Connect each lead wire to the cartridge terminals of the same color.
White (L+) ..............................Left channel +
Blue (L-) .................................Left channel –
Red (R+) ................................Right channel +
Green (R-) .............................Right channel –
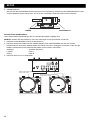
Turntable Assembly:
1. REMOVING FROM CARTON:
Carefully remove the main unit with the packing material intact from the box. Remove the packing material
once the unit has been removed from the shipping carton. Be sure to locate all the accessories located in
the packing material.
2. 45 ADAPTER:
Locate and remove the 45-rpm adapter from the packing material and place it in the 45 adapter cutout on
the top of the main unit.
3. TURNTABLE PLATTER:
Remove the turntable platter from the packing material and gently insert the platter into the CENTER
SPINDLE on the base of the turntable unit.
4. SLIPMAT:
Remove the black slipmat from the packaging and place it on the PLATTER.
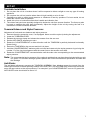
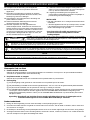
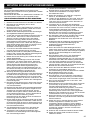
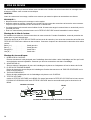
5. HEADSHELL:
Insert the HEADSHELL into the front end of the TONEARM ASSEMBLY. While holding HEADSHELL firmly
into the front end of the tonearm assembly, turn the HEADSHELL LOCKING NUT counter- clockwise to
firmly secure the HEADSHELL to TONEARM ASSEMBLY.
SE
T
-UP
HEADSHELL
TONEARM ASSEMBLY
HEADSHELL LOCKING NUT
5

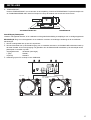
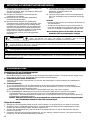
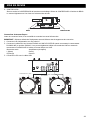
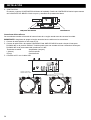
6. COUNTERWEIGHT:
Locate and remove the tonearm COUNTERWEIGHT from the packaging. Slide COUNTERWEIGHT onto
the rear of the TONEARM ASSEMBLY. Turn it lightly and it will screw onto the rear shaft of the tonearm.
Turntable Connections:
Before connecting the unit it is advised that you also consult your current equipment instruction manual.
IMPORTANT: Be sure to turn off the equipment before you make changes to the different connections.
1. Connect the power cord to an AC outlet.
2. Connect the RCA cable to the PHONO input of your AMPLIFIER when you set the PHONO/ LINE switch to
PHONO position. You can also use a line input by setting the PHONO/ LINE switch at the rear of the
turntable to LINE.
Output terminals Amplifier (Receiver)
L (White) L Channel
R (Red) R Channel
3. Connect PC via USB cord.
SET-UP
TONEARM ASSEMBLY COUNTERWEIGHT
Set the PHONO/LINE
switch to “LINE” .
Set the PHONO/LINE switch
to “PHONO” .
6

Turntable Installation:
1. Do not place the unit in a location where it will be exposed to direct sunlight or near any type of heating
appliance.
2. Do not place the unit in a location where there is high humidity or a lot of dust.
3. Cartridge may pick up slight sound pressure or vibrations of near by speakers. For best results, do not
install this unit too close to speakers.
4. Install this unit on a horizontal surface that is stable and vibration free.
5. The rubber feet have been specially designed to isolate the unit from excess vibration. The feet may also
be used to stabilize the main body horizontally. Adjust the height of the unit by turning the feet in a
clockwise or counter-clockwise direction.
Tonearm Balance and Stylus Pressure:
Adjustment of horizontal zero balance and stylus pressure:
1. Remove the stylus protective cover, if so equipped. Never touch the stylus tip during the adjustment.
2. Lower the TONEARM LEVER.
3. Release the tonearm clamp and release the tonearm from the arm rest.
4. Set the ANTI-SKATE adjustment to zero.
5. Rotate the COUNTERWEIGHT in either direction until the TONEARM is perfectly balanced horizontally
(floats freely).
6. Return the TONEARM to the arm rest and lock it in place.
7. Hold the COUNTERWEIGHT stationary with one hand and rotate only the stylus-pressure ring to bring the
number “0” of the ring into alignment with the center line on the tonearm rear shaft.
8. Rotate the COUNTERWEIGHT counterclockwise until the scale value corresponding to the recommended
stylus pressure.
Note: The recommended stylus pressure of the optional cartridge that may have been included with your unit
is 2 grams. For all other cartridge systems please refer to the manufactures specification included with
the cartridge.
Anti-Skate:
The anti-skate adjustment prevents the TONEARM ASSEMBLY from skipping across the record from the
centrifugal force that is caused spinning rotation of the PLATTER. The ANTI-SKATING control knob should be
set to the same value as the stylus pressure. For example if your COUNTERWEIGHT is set to 2.5 grams the
ANTI-SKATE value should also be set to 2.5.
SE
T
-UP
7

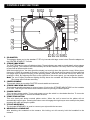
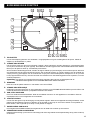
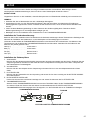
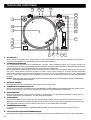
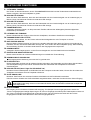
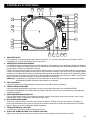
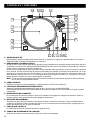
CONTROLS AND FUNCTIONS
1. EP ADAPTER
This adapter allows you to play standard 7” EP vinyl records with large center holes. Place the adapter on
the CENTER SPINDLE 7" records.
2. STROBE INDICATORS
The PLATTER has four rows of indicators (dots). These indicators are used to visually detail various stages
of pitch (speed). The indicators are illuminated by the Strobe Indicator Pilot Lamp. Each row may appear
to stand still at different pitch levels.
With the strobe light on, the dots should be steady (not moving) when the speed is correct. When power
frequency is 50Hz (for example in Europe), it refers to the 1st row (small dots for speed of 33rpm) and 2nd
row (large dots for speed of 45rpm) of the spinning platter, while the 3rd and 4th row are for 60Hz (for
example in USA). By adjusting the Pitch on the right side of the control panel, you can adjust the speed.
Note: The use of heavy fluorescent lighting directly above the turntable will defeat the Strobe Indicator
Pilot Lamp affect indicator accuracy.
3. CENTER SPINDLE
This spindle holds the turntable PLATTER records stable and centered.
4. STROBE INDICATOR PILOT LAMP
This is lamp specially designed to pulse a beam of light at the STROBE INDICATORS on the turntable
PLATTER. This will give the illusion that indicators are not spinning at certain speeds.
5. POWER SWITCH
This is a rotary power switch. To turn main power on turn the switch in a clockwise direction. To turn main
power off turn the switch in counter-clockwise direction.
6. START/STOP BUTTON
This over sized push button controls platter motion. When the unit is turned on the platter will not
automatically begin to spin. Pressing the button once will engage the high torque motor and spin the platter,
pressing this again will stop the platter.
7. STYLUS HEADSHELL
The included HEADSHELL is used to connect your stylus with the tone arm.
8. HEADSHELL LOCKING NUT
After attaching the headshell to the tonearm, this locking nut will securely hold the headshell to the
tonearm.
1
2
3
5
4
6
12
13
14
15
16
17
8
7
10
11
9
19
22
20
21
18
8

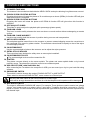
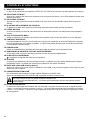
9. S-SHAPED TONE ARM
The tonearm is the mechanism that holds the HEAD- SHELL and stylus allowing it to glide across a record.
10. 33-RPM SPEED SELECTOR BUTTON
Engaging this button will rotate the platter at 33 revolutions per a minute (RPMs). A function LED will glow
when this function is activated.
11. 45-RPM SPEED SELECTOR BUTTONS
Engaging this button will rotate the platter at 45 RPMs A function LED will glow when this function is
activated.
12. PITCH ADJUST SLIDER
This slider is used to adjust the playback pitch percentage (platter speed).
13. TONEARM LEVER
This lever is used to safely elevates the tone arm above a record surface without endangering a records
surface.
14. TONEARM CLAMP AND REST
Use this rest to safely hold the tonearm in position during non use and transportation.
15. ANTI-SKATE CONTROL
The anti-skate applies inward force to the tonearm to prevent outward skipping across the record due to
the centrifugal force cause by platter rotation. The anti-skate value should be equally to that of the stylus
counterweight pressure.
16. COUNTERWEIGHT
Use the counterweight to balance the tone arm and to adjust the stylus pressure.
17. EXTRA STYLUS HOLDER
This cutout has been designed to safely store an extra stylus headshell.
18. COUNTERWEIGHT SCALE
* The counterweight scale must face toward the DJ.
19. PLATTER
This platter connects directly to the center spindle. The platter and center spindle holds a vinyl record
perfectly center. The platter also spins the record at a consistent speed.
20. USB SOCKET (USB cable limit within 3m)
After connecting the Turntable to the computer via USB, you can record your vinyl to your hard disk using
software.
21. PHONO/LINE SWITCH
This switch is used to change the mode of PHONO OUTPUT or LINE OUTPUT.
When switch is selected as LINE OUTPUT, never connect to a Phono input.
With the PRE-AMP switch at ON never connect to a Phono input.
Audio will be strongly distorted then and there is a risk that Amplifier and/or speakers will be damaged.
22. RCA OUTPUT JACKS
The output is switchable PHONO/LINE output. For example: These jacks are used to send a low voltage
“phono” level output signal to a mixers “phono” input jacks. Turntables should be connected to “Phono”
inputs on a mixer. The red colored RCA jack represents the right channel input and the white represents the
left channel input.
CONTROLS AND FUNCTIONS
9

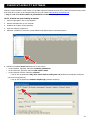
Audacity is free software, licensed under the GNU General Public License (GPL). More information as
well as open source code can be found on the CD included or on the web at
http://audacity.sourceforge.net/
* Please ensure you have installed the software before starting.
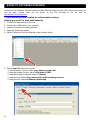
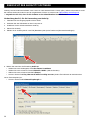
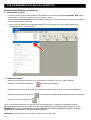
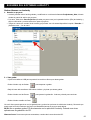
Setting up your PC to work with Audacity
1. Connect an input source to the unit.
2. Connect the USB lead to your computer.
3. Install the Audacity recording software.
4. Open the Audacity program.
5. Select Preference from the Edit tab in the Audacity Menu.
6. Select Audio I/O tab at the top left.
y Under Playback, Device, select your internal sound card.
y Under Recording, Device, select USB Audio CODEC.
y Under Recording, Channels, select 2 (Stereo).
y Check the box marked Play other tracks while recording new one.
y Check the box marked Software Playthrough.
AUDACITY SOFTWARE OVERVIEW
10

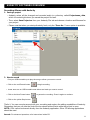
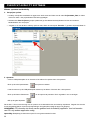
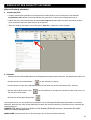
Recording Albums with Audacity
1. Saving a project
y Audacity writes all the changed and recorded audio to a directory called Projectname_data,
which is located right where you saved the project file itself.
y Thus, select Save Project as from your Audacity File tab and choose a location and filename for
your project.
y Please note that when you startup Audacity fresh, only the “Save As...” menu option is available.
2. How to record
y Set your USB turntable up to play the song or album you want to record.
y Click on the red Record button
to begin recording.
y Lower tone arm on USB turntable onto album and track you want to record.
y Click on the blue Pause button
to pause the recording. Press it again to continue.
y Click on the yellow Stop button.
That's it. You can now play around with your recording and explore the editing capabilities of Audacity.
Remember that you can use the Undo function almost without limits while the project is open.
NOTE: CD's cannot be burned directly from the Audacity application. Other CD burning applications
should be used.
Remark: For advanced operation, refer instructions inside CD.
AUDACITY SOFTWARE OVERVIEW
11

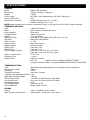
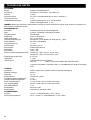
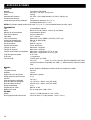
SPECIFICATIONS
GENERAL
Model: Digital USB Turntable
Dimensions: 450(W) x 350(D) x 139(H)mm
Weight: 5.36Kg
Power supply: AC 230V~ 50Hz (Netherlands); AC 240V~ 50Hz(U.K.)
Power consumption: 11W
Standard test condition: Ambient Temperature: 20 +/- 2 deg.C
Relative Humidity: 65% +/- 5%
NOTE: Measurements can be carried out between 5 deg.C to 35 deg.C and 45% to 85% relative humidity.
TURNTABLE SECTION:
Type 2-speed full manual
Motor 8pole, 2phase,brushless DC motor
Driving Method Direct drive
Turntable Platter 332mm (Aluminum)
Speeds 33
1
/
3
and 45rpm
Wow and Flutter Less than 0.15% WRMS (JIS WTD) with 33
1
/
3
rpm
S/N Ratio More than 55dB (DIN-B)
Pitch Controls +/- 10%
Starting Torque More than 1 kgf.cm
Braking System Electronic brake
Starting Time Less than 1 sec.
Braking Time Less than 1 sec.
Less than 1 sec. from 33
1
/
3
to 45 rpm. Time for Speed Change
Less than 1 sec. from 45 to 33
1
/
3
rpm.
High of cue(first track) 8~10.5 mm
Descend of cue 1~3 sec.
USB Function USB rec. Function
A/D, D/A 16BIT 44.1KHz or 48KHz USB SELECTABLE
Computer interface: USB 1.1 compliant WINDOWS XP, Vista7/8 or MAC OSX
TONEARM SECTION:
Type Static balanced straight shaped tone arm with cardan’s suspension
Effective Arm Length 220mm
Overhang 10mm
Tracking Error Angle Less than 3 degree
Tracking Force Adjustment Range 3-4g
Applicable Cartridge Weight
3.5-8.5g
Phono Output Level 1.5~3.6mV at 1KHz 5cm/sec (HP-4005)
Line Output Level 90~216mV at 1KHz 5cm/sec (HP-4005)
Anti-skating Range 0~4g
Channel Separation More than 15 dB
Channel Balance Within 2.5dB at 1KHz
EQ AMP
Output 150mV +/-4dB (IN: 2.5mV 1KHz)
RIAA (Frequency Response) 20Hz~20KHz +1/-3dB (IN: 1.5mV 1KHz )
12

1. Guarantee
Lenco offers service and warranty in accordance to European law, which means that in case of repairs (both
during and after the warranty period) you should contact your local dealer.
Important note: It is not possible to send products that need repairs to Lenco directly.
Important note: If this unit is opened or accessed by a non-official service center in any way, the warranty
expires.
This device is not suitable for professional use. In case of professional use, all warranty obligations of the
manufacturer will be voided.
2. Disclaimer
Updates to Firmware and/or hardware components are made regularly. Therefore some of the instruction,
specifications and pictures in this documentation may differ slightly from your particular situation. All items
described in this guide for illustration purposes only and may not apply to particular situation. No legal right or
entitlements may be obtained from the description made in this manual.
3. Disposal of the Old Device
This symbol indicates that the relevant electrical product or battery should not be disposed of as
general household waste in Europe. To ensure the correct waste treatment of the product and
battery, please dispose them in accordance to any applicable local laws of requirement for
disposal of electrical equipment or batteries. In so doing, you will help to conserve natural
resources and improve standards of environmental protection in treatment and disposal of
electrical waste (Waste Electrical and Electronic Equipment Directive).
4. CE Marking
Hereby, Lenco Benelux B.V., Thermiekstraat 1a, 6361 HB Nuth, The Netherlands, declares that
this product is in compliance with the essential EU directive requirements.
The declaration of conformity may be consulted via techdoc@commaxxgroup.com
5. Service
For more information and helpdesk support, please visit www.lenco.com
Lenco Benelux BV, Thermiekstraat 1a, 6361 HB, The Netherlands.
SERVICE AND SUPPORT
13

LET OP:
Gebruik van bedieningen of afstellingen of uitvoer van
procedures anders dan gespecificeerd in deze documentatie
kan leiden tot blootstelling aan schadelijke straling.
Dit apparaat dient uitsluitend te worden aangepast of
gerepareerd door gekwalificeerd onderhoudspersoneel.
VOORZORGSMAATREGELEN VOOR GEBRUIK
ONTHOUD DE VOLGENDE INSTRUCTIES:
1. Gebruik dit apparaat niet in de buurt van water.
2. Reinig het uitsluitend met een licht vochtige doek.
3. Bedek of blokkeer de ventilatie-openingen niet.
Wanneer u het apparaat op een schap plaatst, dient u
5 cm (2”) vrije ruimte rondom het gehele apparaat te
behouden.
4. Installeer het product volgens de meegeleverde
gebruikershandleiding.
5. * Nooit op de stroomadapter stappen of deze
indrukken. Wees voornamelijk voorzichtig in de buurt
van de stekkers en het punt waar de kabel uit het
apparaat komt. Plaats geen zware voorwerpen op de
stroomadapter, om beschadiging ervan te voorkomen.
Houd het gehele apparaat buiten bereik van kinderen!
Wanneer kinderen met de voedingskabel spelen,
kunnen zij ernstig letsel oplopen.
6. * Haal de stekker uit het stopcontact tijdens onweer of
wanneer u deze langere tijd niet gebruikt.
7. Houd het apparaat uit de buurt van hittebronnen,
zoals radiatoren, verwarmingen, kachels, kaarsen en
andere hittegenererende producten of naakte vlam.
8. Gebruik dit apparaat niet in de buurt van krachtige
magnetische velden.
9. Elektrostatische ontlading kan normaal gebruik van dit
apparaat verstoren. U hoeft het apparaat in dit geval
slechts te resetten en opnieuw op te starten volgens
de gebruikershandleiding. Wees voorzichtig tijdens
bestandsoverdracht en doe dat in een omgeving
zonder statische verstoringen.
10. Waarschuwing! Steek nooit een voorwerp via de
ventilatie- of andere openingen in het product. Er is
hoogspanning in het product aanwezig en als u er een
object insteekt, kan dat een elektrische schok
veroorzaken en/of kortsluiting in de interne
onderdelen. Mors om dezelfde reden geen water of
vloeistof op het product.
11. Gebruik het toestel niet in vochtige ruimtes, zoals
badkamers, stomende keukens of in de buurt van
zwembaden.
12. Gebruik dit apparaat niet wanneer condensatie kan
optreden.
13. Alhoewel dit apparaat met grote zorg gefabriceerd en
verschillende keren geïnspecteerd is voordat het de
fabriek verlaat, is het nog steeds mogelijk dat er
problemen optreden, zoals met alle elektrische
apparaten. Als u rook, een overmatige hitteontwikkeling
of enig ander onverwacht verschijnsel opmerkt, moet u
onmiddellijk de stekker van het netsnoer uit het
stopcontact halen.
14. Dit apparaat moet aangedreven worden door een
voedingsbron, zoals aangegeven op het
specificatieplaatje. Als u twijfelt over het type voeding
dat gebruikt wordt in uw huis, raadpleeg dan a.u.b. uw
dealer of plaatselijk energiebedrijf.
15. * Het stopcontact moet in de buurt van de apparatuur
zijn geïnstalleerd en eenvoudig te bereiken zijn.
16. * Overbelast stopcontacten of verlengsnoeren niet.
Overbelasting kan brand of een elektrische schok
veroorzaken.
17. * Apparaten met een Klasse 1 structuur dienen te
worden aangesloten op een stopcontact met een
beschermende aardverbinding.
18. * Apparaten met een Klasse 2 structuur vereisen geen
aardverbinding.
19. Houd ze uit de buurt van knaagdieren. Knaagdieren
knauwen graag aan voedingskabels.
20. * Houd altijd de stekker vast wanneer u deze uit het
stopcontact trekt. Trek nooit aan de voedingskabel.
Dit kan tot een kortsluiting leiden.
21. Vermijd om het toestel te plaatsen op een ondergrond
die blootgesteld kan worden aan trillingen of schokken.
22. Gebruik een zacht, droog doekje om het apparaat te
reinigen. Gebruik geen oplosmiddelen of op benzine
gebaseerde vloeistoffen. U kunt een vochtig doekje
met verdund schoonmaakmiddel gebruiken om
hardnekkige vlekken te verwijderen.
23. De leverancier is niet verantwoordelijk voor schade of
verloren gegevens veroorzaakt door storing, misbruik,
modificatie van het apparaat of batterijvervanging.
24. Onderbreek nooit de verbinding wanneer het
apparaat formatteert of bestanden overdraagt. De
gegevens kunnen anders corrupt of verloren raken.
25. Indien het apparaat een USB-afspeelfunctie heeft,
moet de USB-geheugenstick rechtstreeks op het
apparaat worden aangesloten. Gebruik geen
USB-verlengkabel, omdat die kan leiden tot storingen
met foutieve gegevens als gevolg.
26. Het apparaat mag niet worden blootgesteld aan
druppels of spatten en zorg ervoor dat er geen met
vloeistof gevulde voorwerpen, zoals vazen, op of nabij
het apparaat zijn geplaatst.
27. * Om de verbinding met de stroomaansluiting volledig
te verbreken, moet de stekker van het apparaat uit het
stopcontact worden gehaald, omdat de stekker van
het apparaat de hoofdschakelaar is.
28. Indien het apparaat op batterijen kan werken, dan
mogen de batterijen niet aan overmatige hitte, zoals
zonlicht, open vuur e.d. worden blootgesteld.
29. Aandacht voor het milieu is nodig bij het verwijderen
van de batterijen.
30. Het apparaat kan alleen worden gebruikt in gematigde
klimaten. Extreem koude of warme omgevingen
moeten worden vermeden.
31. Het nominale specificatielabel is te vinden op het
paneel aan de onder- of achterkant van het apparaat.
32. Dit apparaat is niet bestemd voor gebruik door
mensen (inclusief kinderen) met fysieke, zintuiglijke of
geestelijke gebreken of gebrek aan kennis en ervaring,
tenzij zij onder toezicht staan of instructies hebben
over het juiste gebruik van het apparaat hebben
gekregen van de persoon die verantwoordelijk is voor
hun veiligheid.
33. Dit product is alleen voor niet-professioneel gebruik
bedoeld en niet voor commercieel of industrieel
gebruik.
34. Verzeker u ervan dat het apparaat in een stabiele
positie staat opgesteld. Schade, veroorzaakt door het
gebruik van dit product in een onstabiele positie, of
door het niet naleven van waarschuwingen of
voorzorgsmaatregelen genoemd in deze handleiding,
valt niet onder de garantie.
BELANGRIJKE VEILIGHEIDSVOORSCHRIFTEN
14

35. Verwijder nooit de behuizing van dit apparaat.
36. Plaats dit apparaat nooit op andere elektrische
apparatuur.
37. Dit product niet gebruiken of opslaan op plaatsen
waar het wordt blootgesteld aan direct zonlicht, hitte,
buitensporig veel stof of trillingen.
38. Geef kinderen geen gelegenheid in aanraking met
plastic zakken te komen.
39. Gebruik uitsluitend uitbreidingen/accessoires
gespecificeerd door de fabrikant.
40. Laat alle reparaties over aan gekwalificeerd
onderhoudspersoneel. Onderhoud is vereist als het
toestel hoe dan ook is beschadigd, zoals bijvoorbeeld
het netsnoer of de stekker, wanneer er vloeistof of een
voorwerp in het apparaat is terechtgekomen, wanneer
het apparaat is blootgesteld aan regen of vocht, als
het niet normaal werkt of is gevallen.
41. * Gebruik nooit een beschadigde voedingskabel of
stekker of een los stopcontact. Dit vormt namelijk een
risico op brand of elektrische schokken.
42. Langdurige blootstelling aan luid geluid van
persoonlijke muziekspelers kan leiden tot tijdelijke of
permanente gehoorbeschadiging.
INSTALLATIE
• Pak alle onderdelen uit en verwijder de beschermende
materialen.
• * Sluit het apparaat niet aan op het stopcontact, voordat
u de netspanning hebt gecontroleerd en voordat alle
andere aansluitingen zijn gemaakt.
* deze instructies zijn enkel van toepassing voor
producten met een voedingskabel of een AC
voedingsadapter.
LET OP! Verwijder de afdekking niet om het risico op elektrische schokken te verminderen.
Geen interne onderdelen die de gebruiker zelf kan repareren. Laat reparaties over aan
uitsluitend gekwalificeerd onderhoudspersoneel.
Het symbool met de bliksemschicht met pijlpunt in een gelijkzijdige driehoek, is bedoeld om de gebruiker te
attenderen op de aanwezigheid van niet-geïsoleerde, gevaarlijke spanning binnen de behuizing van het
apparaat, die voldoende groot kan zijn voor het risico op een elektrische schok.
Het uitroepteken binnenin een gelijkzijdige driehoek is bedoeld de gebruiker te wijzen op de aanwezigheid van
belangrijke onderhoud- (reparaties) en gebruiksinstructies in de documentatie meegeleverd met dit apparaat.
LET OP
Om elektrische schokken te voorkomen, gebruik deze gepolariseerde stekker niet met een verlengsnoer, contactdoos of
ander stopcontact, tenzij de uitsteeksels volledig kunnen worden ingestoken en niet blootliggen.
Platenspeler Snel van Start:
1. Plateausnelheid veranderen
Gebruik de TPM-schakelaars om de plateausnelheden te veranderen. De 33-tpm en 45-tpm snelheidschakelaars
veranderen de plateaurotatie dienovereenkomstig.
2. Het plateau starten en stoppen
Gebruik de knop START/STOP om te wisselen tussen plateaurotatie en pauzemodus.
3. Pitchregeling
(1) De pitchregeling wordt gebruikt om het toerental van het plateau fijner af te stellen.
(2) De pitchafstelling is variabel en kan worden ingesteld tussen -10% en +10% van de geselecteerde plateausnelheid.
(3) De pitch wordt veranderd door de pitchschuif omhoog en omlaag te schuiven.
(4) De STROBE-INDICATOREN op de rand van het PLATEAU kunnen worden gebruikt als een visuele benadering
van de pitch. Deze indicatoren worden opgelicht door het STROBE-INDICATIELAMPJE naargelang ze de
AAN/UITSCHAKELAAR passeren. Elke rij van de STROBE-INDICATOREN kan op verschillende pitchniveaus
stil lijken te staan.
Opmerking: Het gebruik van krachtige fluorescerende verlichting direct boven de platenspeler zal de
indicatienauwkeurigheid van het STROBE-INDICATIELAMPJE aantasten.
Product onderhoud:
1. Reinig de naald regelmatig met een zacht borsteltje om stofophoping tegen te gaan.
2. Controleer de naald wanneer het geluid vervormd raakt of ruis vertoont. Als de naald is versleten, dient u deze door
een nieuwe te vervangen.
3. De stofkap en de behuizing van de platenspeler dienen af en toe te worden afgeveegd met een zacht, droog doekje.
4. Vluchtige materialen dienen niet te worden gebruikt, waaronder: alcohol, verdunner, benzine, enz. omdat hierdoor de
verf kan verdwijnen of de glans beschadigd kan raken.
SNEL VAN START
BELANGRIJKE VEILIGHEIDSVOORSCHRIFTEN
DO NOT OPEN
RISK OF ELECTRIC SHOCK
LET OP
RISICO OP ELEKTRISCHE
SCHOKKEN; NIET OPENEN
15

Voordat u uw nieuwe apparaat kunt gebruiken, is er wat assemblage vereist. Volg a.u.b. de montage-instructies
hieronder voordat u probeert uw nieuwe platenspeler te gebruiken.
MONTAGE:
Voordat u met de assemblage begint, controleer a.u.b. of alle onderdelen en accessoires intact zijn geleverd.
OPMERKING:
Sluit de netstekker niet aan voordat de assemblage is voltooid.
Voordat u het apparaat inschakelt, dient u nogmaals te controleren dat alle aansluitingen en stroominstellingen
correct zijn. Schakel het apparaat altijd uit wanneer u iets aansluit of loskoppelt.
Lees deze handleiding zorgvuldig door voordat u het apparaat in gebruik neemt. Bewaar deze handleiding op een
veilige plek als eventueel naslagwerk.
Sluit een naaldpatroon aan op de KOPBEHUIZING voordat u de platenspeler assembleert.
Assemblage kopbehuizing:
Wanneer u een patroon installeert, dient u de gebruiksaanwijzingen van die patroon te raadplegen. Tijdens installatie,
bevestig een naaldbeveiliging om de tip van de naald te beschermen tegen beschadiging.
Sluit de kabels van de KOPBEHUIZING aan op de patroonklemmen. De aansluitklemmen van patronen en de kabels
van de KOPBEHUIZING zijn op kleur gecodeerd. Sluit elke kabel aan op de patroonklemmen van dezelfde kleur.
Wit (L+) .....................
Linker kanaal +
Blauw (L-)
...................
Linker kanaal –
Rood (R+) ..................
Rechter kanaal +
Groen (R-) ..................
Rechter kanaal –
Assemblage platenspeler:
1.
UIT DE VERPAKKING HALEN:
Haal het hoofdapparaat voorzichtig uit de doos met het verpakkingsmateriaal intact. Verwijder het
verpakkingsmateriaal nadat het apparaat eenmaal uit de doos is gehaald. Zorg ervoor alle accessoires uit het
verpakkingsmateriaal te halen.
2. 45 ADAPTER:
Haal de 45-tpm adapter uit het verpakkingsmateriaal en plaats deze in de 45-tpm adapterinkeping boven op het
hoofdapparaat.
3. PLATENSPELERPLATEAU:
Haal het plateau uit het verpakkingsmateriaal en plaats deze voorzichtig op de MIDDENAS op de basis van de
platenspeler.
4. SLIPMAT:
Haal de zwarte slipmat uit de verpakking en plaats deze op het PLATEAU.
5. KOPBEHUIZING:
Steek de KOPBEHUIZING in het vooreinde van de TOONARMASSEMBLAGE. Terwijl u de KOPBEHUIZING stevig
in het vooreinde van de toonarmassemblage houdt, draai de VERGRENDELMOER van de KOPBEHUIZING
linksom om de KOPBEHUIZING stevig vast te zetten op de TOONARMASSEMBLAGE.
INSTELLING
KOPBEHUIZING
TOONARMASSEMBLAGE
VERGRENDELMOER KOPBEHUIZING
16

6.
T
EGENGEWICHT:
Haal het TEGENGEWICHT voor de toonarm uit de verpakking. Schuif het TEGENGEWICHT op de achterzijde van
de TOONARMASSEMBLAGE. Draai het lichtjes om het op de achteras van de toonarm te schroeven.
Aansluitingen platenspeler:
Voordat u het apparaat aansluit, is her raadzaam ook de gebruikshandleiding te raadplegen van uw huidige apparatuur.
BELANGRIJK: Zorg ervoor de apparatuur uit te schakelen voordat u veranderingen aanbrengt in de verschillende
aansluitingen.
1.
Sluit de voedingskabel aan op een AC stopcontact.
2. Sluit de RCA-kabel aan op de PHONO-ingang van uw versterker wanneer u de PHONO/LINE-schakelaar instelt op
de stand PHONO. U kunt een lijningang ook gebruiken door de PHONO/LINE-schakelaar op de achterzijde van de
platenspeler in te stellen op LINE.
Uitgangsklemmen Versterker (Ontvanger)
L (Wit) Kanaal L
R (Rood) Kanaal R
3.
A
ansluiting op een PC verloopt via een USB-kabel.
INSTELLING
TOONARMASSEMBLAGE TEGENGEWICHT
Stel de PHONO/LINE-schakelaar
in op “LINE”.
Stel de PHONO/LINE-schakelaar
in op “PHONO”.
17

De platenspeler installeren:
1.
Plaats het apparaat niet op een plek blootgesteld aan direct zonlicht of in de buurt van enigerlei type
verwarmingsapparatuur.
2. Plaats het apparaat niet op een plek met een hoge luchtvochtigheid of teveel stof.
3. De patroon kan lichte geluidsdruk of trillingen oppikken van luidsprekers in de buurt van het apparaat. Installeer dit
apparaat voor de beste resultaten dus niet te dicht in de buurt van luidsprekers.
4. Installeer dit apparaat op een horizontaal en stabiel oppervlak, zonder trillingen.
5. De rubberen voetstukjes zijn speciaal ontworpen om het apparaat te beschermen tegen teveel trillingen. De
voetstukjes kunnen ook worden gebruikt om de hoofdbehuizing horizontaal te stabiliseren. Pas de hoogte van het
apparaat aan door de voetstukjes rechtsom of linksom te draaien.
Balans van de toonarm en naalddruk:
De horizontale nulbalans en naalddruk afstellen:
1. Verwijder de beschermkap van de naald, indien geïnstalleerd. Raak de tip van de naald tijdens deze afstelling nooit
aan.
2. Laat het TOONARMHENDEL zakken.
3. Ontgrendel de klem van de toonarm en haal de toonarm van de houder af.
4. Stel de afstelling DWARSKRACHTCOMPENSATIE in op nul.
5. Draai het TEGENGEWICHT in een willekeurige richting totdat de TOONARM perfect horizontaal gebalanceerd is
(moet vrij zweven).
6. Leg de TOONARM terug op de houder en sluit de vergrendeling.
7. Houd het TEGENGEWICHT met de ene hand stil en draai met de andere hand alleen de drukring van de naald om
het cijfer “0” van de ring af te stemmen op de middenlijn van de achteras van de toonarm.
8. Draai het TEGENGEWICHT linksom totdat de schaalwaarde overeenkomt met de aanbevolen naalddruk.
Opmerking:
De aanbevolen naalddruk van de optionele patroon mogelijk meegeleverd met uw apparaat is 2 gram. Voor
alle andere
patroonsystemen dient u de specificaties van de fabrikant te raadplegen die zijn meegeleverd
met de patroon.
Dwarskrachtcompensatie:
De DWARSKRACHTCOMPENSATIE-afstelling voorkomt dat de TOOMARMASSEMBLAGE over de plaat springt
wegens de middelpuntvliedende kracht veroorzaakt door het draaien van het PLATEAU. De
DWARSKRACHTCOMPENSATIE-bedieningsknop dient te worden ingesteld op dezelfde waarde als de naalddruk. Als
uw TEGENGEWICHT bijvoorbeeld is ingesteld op 2,5 gram, dient ook de waarde van de
DWARSKRACHTCOMPENSATIE te worden ingesteld op 2,5 gram.
INSTELLING
18

BEDIENINGEN EN FUNCTIES
1. EP-ADAPTER
U kunt deze adapter gebruiken om standaard 7” langspeelplaten met grote middengaten af te spelen. Plaats de
adapter op de MIDDENAS 7” platen.
2. STROBE-INDICATOREN
Het PLATEAU heeft vier rijen met indicatoren (stippen). Deze indicatoren worden gebruikt om verschillende fasen
van de pitch visueel weer te geven (speed). De indicatoren worden opgelicht door het STROBE-INDICATIELAMPJE.
Elke rij kan stil lijken te staan op verschillende pitchniveaus.
Als het strobe-indicatielampje brandt, moeten de stippen stabiel zijn (niet bewegen) als de snelheid juist is. Wanneer
de netfrequentie 50 Hz is (bijvoorbeeld in Europa), dan verwijst dit naar de 1e rij (kleine stippen voor de snelheid van
33 tpm) en 2e rij (grote stippen voor de snelheid van 45 tpm) van het draaiende plateau, terwijl de 3e en 4e rij voor 60
Hz zijn (bijvoorbeeld in de VS). Door de Pitch aan de rechterkant van het bedieningspaneel aan te passen, kunt u de
snelheid aanpassen.
Opmerking: Het gebruik van krachtige fluorescerende verlichting direct boven de platenspeler zal de
indicatienauwkeurigheid van het STROBE-INDICATIELAMPJE aantasten.
3. MIDDENAS
Deze as houdt de platen stabiel en in het midden van het PLATEAU.
4. STROBE-INDICATIELAMPJE
Dit lampje is speciaal ontworpen om een lichtbundel te schijnen op de STROBE-INDICATOREN op het PLATEAU. Dit
creëert de illusie dat indicatoren op bepaalde snelheden niet draaien.
5. AAN-/UITSCHAKELAAR
Dit is een draaibare aan/uitschakelaar. Draai de schakelaar rechtsom om het apparaat in te schakelen. Draai de
schakelaar linksom om het apparaat uit te schakelen.
6. START/STOPKNOP
U kunt met deze grote knop de beweging van het plateau regelen. Wanneer het apparaat wordt ingeschakeld, zal het
plateau niet automatisch beginnen te draaien. Druk eenmaal op de knop om de motor te starten en het plateau te
laten draaien, druk nogmaals op de knop om het plateau te stoppen.
7. KOPBEHUIZING VAN NAALD
De meegeleverde KOPBEHUIZING wordt gebruikt om de naald aan te sluiten op de toonarm.
8. VERGRENDELMOER KOPBEHUIZING
Nadat de kopbehuizing op de toonarm is bevestigd, zal deze vergrendelmoet de kopbehuizing stevig vast houden op
de toonarm.
1
2
3
5
4
6
12
13
14
15
16
17
8
7
10
11
9
19
22
20
21
18
19

9. S-VORMIGE TOONARM
De toonarm is een houdermechanisme voor de KOPBEHUIZING en naald, waardoor de naald over de plaat kan
glijden.
10. 33-TPM SNELHEIDSSCHAKELAAR
Druk op deze knop om het plateau op 33 toeren per minuut (TPM) te laten draaien. Er zal een functie-LED branden
wanneer deze functie is geactiveerd.
11. 45-TPM SNELHEIDSSCHAKELAAR
Druk op deze knop om het plateau op 45 toeren per minuut (TPM) te laten draaien. Er zal een functie-LED branden
wanneer deze functie is geactiveerd.
12. PITCH VERSTELSCHUIF
Deze schuif wordt gebruikt om het afspeelpercentage van de pitch aan te passen (plateausnelheid).
13. TOONARMHENDEL
Dit hendel wordt gebruikt om de toonarm veilig van de plaatoppervlakte op te heffen zonder de plaat te beschadigen.
14. KLEM EN HOUDER VAN TOONARM
Gebruik deze houder om de toonarm veilig vast te zetten wanneer niet in gebruik of wanneer u het apparaat
verplaatst.
15. DWARSKRACHTCOMPENSATIE
De dwarskrachtcompensatie past druk toe op de toonarm richting het midden van de plaat, zodat de naald niet naar
buiten over de plaat kan springen wegens de middelpuntvliedende kracht veroorzaakt door het draaien van het
plateau. De waarde van de dwarskrachtcompensatie dient gelijk te zijn aan de drukwaarde van het tegengewicht
voor de naald.
16. TEGENGEWICHT
Gebruik het tegengewicht om de toonarm te balanceren en de naalddruk aan te passen.
17. EXTRA NAALDHOUDER
Deze inkeping is ontworpen om een extra kopbehuizing veilig op te bergen.
18. SCHAAL VAN TEGENGEWICHT
*
De schaal van het tegengewicht moet naar de DJ zijn gericht.
19. PLATEAU
Dit plateau is direct aangesloten op de middenas. Het plateau en de middenas houden een langspeelplaat perfect in
het midden. Het plateau laat ook de plaat op een constante snelheid draaien.
20. USB-POORT (maximale lengte van USB-kabels is 3 meter)
Nadat u de platenspeler via USB op de computer hebt aangesloten, kunt u d.m.v. de software de plaat opnemen op
uw harddisk.
21. PHONO/LIJNSCHAKELAAR
Deze schakelaar wordt gebruikt om tussen de modi PHONO-UITGANG en LIJNUITGANG te wisselen.
Wanneer de schakelaar is ingesteld op de uitgang LINE, dient u nooit aan te sluiten op een Phono-ingang.
Wanneer de schakelaar PRE-AMP is ingesteld op ON, dient u nooit aan te sluiten op een Phono-ingang.
Audio zal in dit geval erg worden verstoord en er bestaat een kans dat de versterker en/of luidsprekers
beschadigd raken.
22. RCA-UITGANGEN
De uitgang kan worden gewisseld tussen PHONO/LIJN-uitgang. Bijvoorbeeld: Deze uitgangen worden gebruikt om
een laagspanningsniveau “phono”-uitgangssignaal te sturen naar de “phono”-ingangen van een mixer.
Platenspelers dienen te worden aangesloten op de “Phono”-ingangen van een mixer. De rode RCA-aansluiting
vertegenwoordigt de rechter kanaalingang en de witte aansluiting vertegenwoordigt de linker kanaalingang.
BEDIENINGEN EN FUNCTIES
20
Seite wird geladen ...
Seite wird geladen ...
Seite wird geladen ...
Seite wird geladen ...
Seite wird geladen ...
Seite wird geladen ...
Seite wird geladen ...
Seite wird geladen ...
Seite wird geladen ...
Seite wird geladen ...
Seite wird geladen ...
Seite wird geladen ...
Seite wird geladen ...
Seite wird geladen ...
Seite wird geladen ...
Seite wird geladen ...
Seite wird geladen ...
Seite wird geladen ...
Seite wird geladen ...
Seite wird geladen ...
Seite wird geladen ...
Seite wird geladen ...
Seite wird geladen ...
Seite wird geladen ...
Seite wird geladen ...
Seite wird geladen ...
Seite wird geladen ...
Seite wird geladen ...
Seite wird geladen ...
Seite wird geladen ...
Seite wird geladen ...
Seite wird geladen ...
Seite wird geladen ...
Seite wird geladen ...
Seite wird geladen ...
Seite wird geladen ...
Seite wird geladen ...
Seite wird geladen ...
Seite wird geladen ...
Seite wird geladen ...
-
 1
1
-
 2
2
-
 3
3
-
 4
4
-
 5
5
-
 6
6
-
 7
7
-
 8
8
-
 9
9
-
 10
10
-
 11
11
-
 12
12
-
 13
13
-
 14
14
-
 15
15
-
 16
16
-
 17
17
-
 18
18
-
 19
19
-
 20
20
-
 21
21
-
 22
22
-
 23
23
-
 24
24
-
 25
25
-
 26
26
-
 27
27
-
 28
28
-
 29
29
-
 30
30
-
 31
31
-
 32
32
-
 33
33
-
 34
34
-
 35
35
-
 36
36
-
 37
37
-
 38
38
-
 39
39
-
 40
40
-
 41
41
-
 42
42
-
 43
43
-
 44
44
-
 45
45
-
 46
46
-
 47
47
-
 48
48
-
 49
49
-
 50
50
-
 51
51
-
 52
52
-
 53
53
-
 54
54
-
 55
55
-
 56
56
-
 57
57
-
 58
58
-
 59
59
-
 60
60


Lenco L-3808 Black Bedienungsanleitung
- Kategorie
- Audio-Plattenspieler
- Typ
- Bedienungsanleitung
- Dieses Handbuch eignet sich auch für
in anderen Sprachen
- English: Lenco L-3808 Black Owner's manual
- français: Lenco L-3808 Black Le manuel du propriétaire
- español: Lenco L-3808 Black El manual del propietario
- Nederlands: Lenco L-3808 Black de handleiding
Verwandte Artikel
-
Lenco L-3808 Benutzerhandbuch
-
Lenco L-3828 Direct Drive Turntable Benutzerhandbuch
-
-
Lenco L-401 Benutzerhandbuch
-
-
Lenco L-30WD Turntable Bedienungsanleitung
-
-
-
Lenco LS-500 Benutzerhandbuch
-
Andere Dokumente
-
American Audio TTD-2400 USB Benutzerhandbuch
-
DJ-Tech vinyl usb 5S Benutzerhandbuch
-
-
 Ibiza FREE-VINYL Benutzerhandbuch
-
Omnitronic DD-2520 Benutzerhandbuch
-
iON USB Turntable Quick Start Owner's Manual
-
Numark TTXUSB turntable Bedienungsanleitung
-
-
-
audizio RP310 Bedienungsanleitung
