
R3S Compact Music System
R3S Compact Music System
User guide
DA Brugervejledning - DE Bedienungsanleitung - ES Guía del usuario - FR Manuel de l’utilisateur
IT Guida utente - - NL Gebruikershandleiding
NO Brukerveiledning - PL Poradnik użytkownika - 用户指南

EN
DA
DE
ES
FR
IT
JA
KO
NL
NO
PL
ZH
ZH
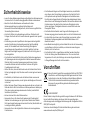
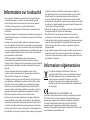
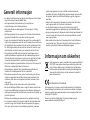
Important information
about the AC power adapter
Model DYS836-140285W-K
Input 100-240V~50/60Hz 1.00A MAX
Output 14.0V 2.85A
Class II, Eciency Level VI
•This AC adapter is for audio & video equipment use
only and complies with IEC 62368 safety standard.
•The supplied 3-pin plug adapter complies with
BS 1363-1 and the supplied 2-pin plug adapter
complies with EN 50075.
•Before using the AC adapter, ensure the mains
voltage is within the rated supply voltage range.
•The output power taken from this AC adapter must
not exceed its rated output power.
•DO NOT disassemble or modify the AC adapter.
•DO NOT drop or throw the AC adapter.
•The external exible cable cannot be replaced and
if the cord is damaged, the AC adapter must be
replaced.
•DO NOT expose the AC adapter to dripping or
splashing water, and do not place objects lled with
liquids, such as vases, on or near the device.
•DO NOT leave the AC adapter in a hot location, such
as near re or under strong sunlight.
•DO NOT cover ventilation openings on the device.
•Unplug the AC adapter during lightning storms or
when unused for long periods of time to prevent
damage.
•Ensure that the AC adapter is readily accessible when
plugged into the mains. If an abnormal condition
occurs while using it, immediately turn off the
connected device and disconnect the mains adapter
from the mains.
•DO NOT dispose this AC adapter as general
household waste or unsorted municipal waste,
dispose of it according to local regulations.

EN
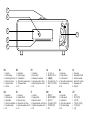
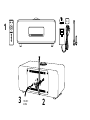
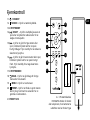
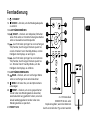
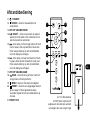
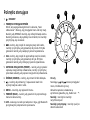
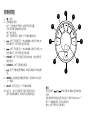
1. Controls
2. OLED display
3. Ambient light sensor
4. 75mm NS+ driver
5. CD eject button
6. CD slot
DA
1. Kontroller
2. OLED-skærm
3. Lysdetektor
4. 75mm NS+ højttaler
5. CD udløserknap
6. CD
1
2
6
3
5
4
DE
1. Kontrollen
2. OLED-Anzeige
3. Lichtdetektor
4. 75mm NS+ Lautsprecher
5. CD-Auswurftaste
6. CD
ES
1. Controles
2. Pantalla OLED
3. Detector de luz
4. Altavoz NS+ de 75mm
5. Botón de expulsión de CD
6. CD
FR
1. Contrôles
2. Écran OLED
3. Détecteur de lumière
4. Haut-parleur NS+ 75mm
5. Bouton d'éjection du CD
6. CD
IT
1. Controlli
2. Display OLED
3. Rilevatore di luce
4. Altoparlante NS+ da 75mm
5. Pulsante di espulsione CD
6. CD
JA
1. コ ント ロ ー ル
2. OLEDディスプレイ
3. 光検出器
4. 75mmNS+スピーカー
5. CDイジェクトボタン
6. CD
KO
NL
1. Besturing
2. OLED-scherm
3. Licht detector
4. 75mm NS+ luidspreker
5. CD-uitwerpknop
6. CD
NO
1. Kontroller
2. OLED-skjerm
3. Lysdetektor
4. 75mm NS+ høyttaler
5. CD-utløserknapp
6. CD
PL
1. Sterownik
2. Wyświetlacz OLED
3. Detektor światła
4. Głośnik 75 mm NS+
5. Wysuwanie CD
6. Płyta CD
ZH

EN
DA
DE
ES
FR
IT
JA
KO
NL
NO
PL
ZH
ZH
EN
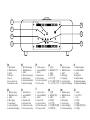
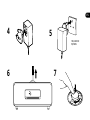
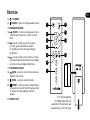
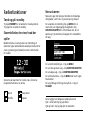
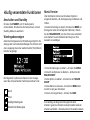
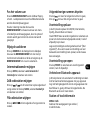
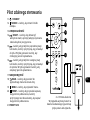
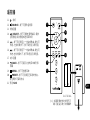
7. Opticalinput
8. DAB-FMantenna
9. USBC
10.DCinput
11.Linein
12.Lineout/subout
13.Headphonesocket
DA
7. Optiskindgang
8. DAB-FM-antenne
9. USBC
10. DC-indgang
11. Linjeindgang
12. Linje/Subudgang
13. Hovedtelefonudgang
9
7
11
10
8
13
12
DE
7. OptischerEingang
8. DAB-FM-Antenne
9. USBC
10. Gleichstromeingang
11. Audio-Eingang
12. Audio-Ausgang/Sub
13. Kopfhörerausgang
ES
7. Entradaóptica
8. AntenaDAB-FM
9. USBC
10. EntradadeCC
11. Entradadelínea
12. Salidadelínea/sub
13. Tomadeauriculares
FR
7. Entréeoptique
8. AntenneDAB-FM
9. USBC
10. Alimentation
11. Prisedeligne
12. Sortiedeligne/Sub
13. Sortiecasque
IT
7. Ingressoottico
8. AntennaDAB-FM
9. USBC
10. IngressoCC
11. Ingressodilinea
12. Uscitadilinea/sub
13. Presapercue
JA
7. 光入力
8. DAB-FMアンテナ
9. USBC
10. DC入力
11. ライン入力
12. ライン出力/サブ出力
13. ヘ ッド フォ ンソ ケ ット
KO
NL
7. Optischeingang
8. DAB-FM-antenne
9. USBC
10. DC-ingang
11. Lijningang
12. Lijn/subuitgang
13. Koptelefoonuitgang
NO
7. Optiskinngang
8. DAB-FM-antenne
9. USBC
10. DC-inngang
11. Linjeinngang
12. Linje/subutgang
13. Hodetelefonutgang
PL
7. Wejście optyczne
8. Antena DAB-FM
9. USB C
10. Wejście DC
11. Wejście liniowe
12. Wyjście liniowe/sub
13. Wyjście słuchawkowe
ZH

1
2
314V DC
2.85A

EN
DA
DE
ES
FR
IT
JA
KO
NL
NO
PL
ZH
ZH
45
6
100-240VAC
50/60Hz
7

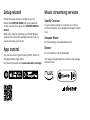
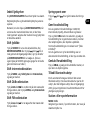
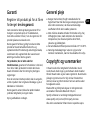
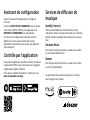
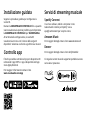
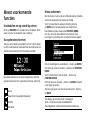
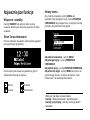
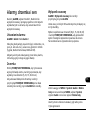
Setup wizard
Follow the setup wizard to congure your R3.
Rotate the CONTROL KNOB until your preferred
choice is shown, then press the CONTROL KNOB to
SELECT.
When your setup is complete, your R3 will display
a menu with a list of the available sources. Select a
source and enjoy your music!
App control
You can also control your R3 using OKTIV. Find it on
the Apple/Android app store.
For more information visit www.ruarkaudio.com/app
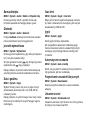
Music streaming services
Spotify Connect
Use your phone, tablet or computer as a remote
control for Spotify. Go to spotify.com/connect to learn
how.
Amazon Music
For more details, visit www.amazon.com
Deezer
For more details, visit dzr.fm/airable
The range of supported music services may change
without notice.

EN
DA
DE
ES
FR
IT
JA
KO
NL
NO
PL
ZH
ZH
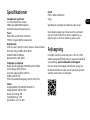
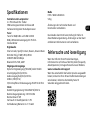
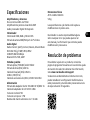
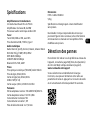
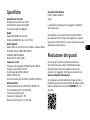
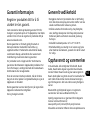
Specications
2 × 75mm Ruark NS+ drivers
30W class AB power amplier
Enhanced digital 3D audio processor
DAB, DAB+ and FM Tuner with RDS
75 Ohm F-type DAB/FM connector
Digital audio
Internet radio, Spotify Connect, Deezer, Amazon Music
Wi-Fi 802.11b/g/n WEP, WPA, WPA2
USB MP3 48kHz 320kbps
Bluetooth V5.2 SBC, A2DP
Digital optical input (TOSLINK) 24-bit 192kHz
Line input (RCA) 2.0Vrms
Line out / Sub out (RCA) 2.0Vrms
USB 2.0, 5W (5V 1A)
3.5mm headphone jack, 25mW into 16-32 Ohm
AC mains adapter input: 100-240V AC 50/60Hz 1.0A
AC mains adapter output: 14V DC 2.85A
Nominal 5W
Standby 1.7W
Remote batteries: 2 x 1.5V AAA
H167 x W420 x D220mm (H6.6 x W16.5 x D8.7in)
5.3kg (11.7lbs)
Specication and design subject to modication
without notice.
Ruark Audio assumes no responsibility for any errors
that may appear in this manual and the information
contained in it may change without notice.
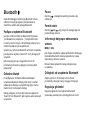
Troubleshooting
For help with your product, please refer to the FAQ
(Frequently Asked Questions) page in the support area
of our website.
For more information visit
If you accidentally select the incorrect language you can
factory reset your radio by pressing and holding the
standby key for 10 seconds.

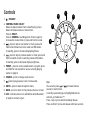
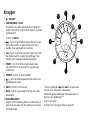
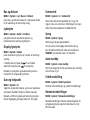
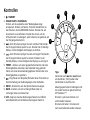
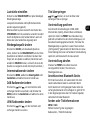
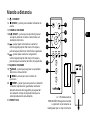
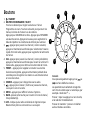
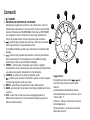
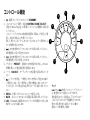
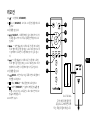
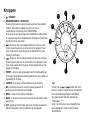
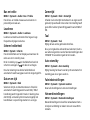
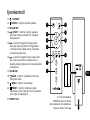
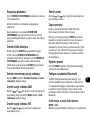
Controls
1. – STANDBY
2. CONTROL KNOB / SELECT
Rotate to adjust volume from a Now Playing screen.
Rotate to browse menus or station lists.
Press to SELECT.
Press to SNOOZE a sounding alarm. Press it again to
increase the snooze time or press and hold to cancel.
3. – press to skip to next station or track, press and
hold to fast forward a track or seek next FM station.
In standby, press to increase display brightness.
4. – press to skip to previous station or track, press and
hold to rewind a track or seek the previous FM station.
In standby, press to decrease display brightness.
5. PRESET – press to recall a saved station or playlist, press
and hold for two seconds to save a currently playing
station or playlist.
6. SOURCE – press to change audio source.
7. press to play/pause a track or mute audio.
8. MENU – press to view the options menu.
9. BACK – press to return to the previous menu or screen.
10. LED – indicates radio is on and ashes when Bluetooth
is ready to connect or pair.
Tips
You can also press or to browse menus,
sources or station lists.
Currently saved settings are highlighted with an
asterisk, eg “Radio text *”.
Press = tap or press and immediately release.
Press and hold = press and release after two seconds.
8
1
10 2
3
6
7
5
4
9

EN
DA
DE
ES
FR
IT
JA
KO
NL
NO
PL
ZH
ZH
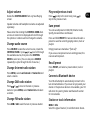
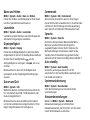
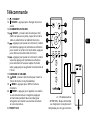
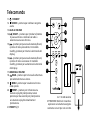
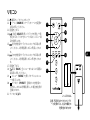
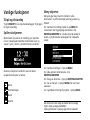
Remote
11. – STANDBY
12. SOURCE – press to change audio source.
13. INCREASE VOLUME
14. / SELECT – press to play/pause a track,
mute/unmute radio or to select a menu
item.
15. – press to skip to previous station
or track, press and hold to rewind.
In standby, press to decrease display
brightness.
16. – press to skip to next station or track,
press and hold to fast forward. In standby,
press to increase display brightness.
17. DECREASE VOLUME
18. BACK – press to return to the previous
menu or list screen.
19. MENU – press to view the menu.
20. PRESET – press to recall a saved station
or playlist, press and hold for two seconds
to save a currently playing station or
playlist.
21.
13
17
11
18
21
15
12
14
16
2 x 1.5V AAA Alkaline
CAUTION: Risk of re or
explosion if the batteries are
replaced by an incorrect type
+
-
+
-
19
20

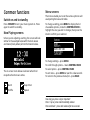
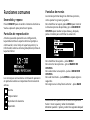
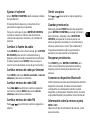
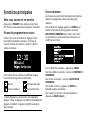
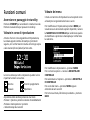
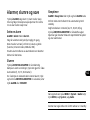
Common functions
Switch on and to standby
Press STANDBY to turn your music system on. Press
again to switch to standby.
Now Playing screens
Unless you’re adjusting a setting, the screen will look
similar to the example below with the clock above
and station/track/album/artist information below.
The on-screen icons below are shown when their
respective functions are active.
Alarm Sleep timer
Shue Repeat
Menu screens
The menus enable you to set the various options such
as adjusting the bass and treble.
To change a setting, press MENU to display the list
of available options, rotate the CONTROL KNOB to
highlight the one you wish to change, then press the
knob to conrm your selection.
System
Audio
Network
Date and time
Brightness
Language
To change settings – press MENU
To scroll through options – rotate CONTROL KNOB
To select option – press CONTROL KNOB
To exit menu – press MENU or wait for a few seconds
To return to the previous menu/list – press BACK
How long you press a key is important
Press = tap or press and immediately release
Press and hold = press and release after two seconds

EN
DA
DE
ES
FR
IT
JA
KO
NL
NO
PL
ZH
ZH
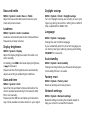
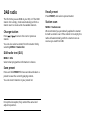
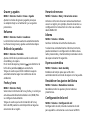
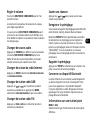
Adjust volume
Rotate the CONTROL KNOB from any Now Playing
screen.
Speaker volume and headphone volume are adjusted
separately.
Please note that rotating the CONTROL KNOB when
a menu or station list is displayed will scroll through
the options or stations and not change the volume.
Change audio source
Press SOURCE to view the current source, rotate the
CONTROL KNOB or press or to scroll through
the available sources, then press the CONTROL
KNOB to select one. (You can also press SOURCE
repeatedly to cycle through the list of sources.)
Change Internet radio station
Press MENU, select or and
select a station.
Change DAB radio station
Press or to tune to the next or previous
station or press MENU, select and select
a station.
Change FM radio station
Press or to seek the next or previous station.
Play next/previous track
Press to skip to the next track, press to
skip to the previous track.
Save preset
You can save 8 presets in DAB, FM, Internet radio,
Spotify, Amazon Music and Deezer.
Press and hold PRESET for two seconds and select a
preset to save the currently playing station, track or
playlist.
Empty presets are marked as “[Not set]”.
If you save a new preset over an existing preset, the
new one will replace it.
Recall preset
Press PRESET, and select a preset station, track or
playlist.
Connect a Bluetooth device
Your R3 will attempt to automatically connect to the
last connected device. If you have not yet paired your
device or the previous device is not available, your R3
will enter into pairing mode. See Bluetooth section
for more details.
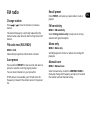
Station or track information
Select the type of station / track information shown.

Bass and treble
or
Adjust the bass and treble levels to best suit your
room and personal taste.
Loudness
Loudness automatically boosts the treble and bass
frequencies at lower volumes.
Display brightness
Adjust the display brightness when the radio is on
and in standby.
In standby, press to decrease display brightness,
or to increase it.
Please note that the brightness also automatically
adjusts according to ambient light conditions.
Date and time
Select the time and date formats and whether the
clock is updated automatically from network, DAB,
FM, or set manually.
Please note that FM time and date synchronisation
may not be available on some stations in your region.
Daylight savings
Turn on if daylight savings are currently in use in your
region, eg during the summer. Setting has no effect if
time is updated from DAB or FM.
Language
Change the user interface language.
If you accidentally select the incorrect language you
can factory reset your radio by pressing and holding
STANDBY for 10 seconds.
Auto standby
Change how long before your R3 automatically goes
into standby if there is no audio.
Factory reset
Resets all settings and clears presets.
Network settings
Network settings including the network wizard to
help you connect to a new Wi-Fi network.

EN
DA
DE
ES
FR
IT
JA
KO
NL
NO
PL
ZH
ZH
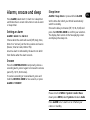
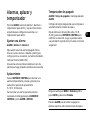
Please note that
means press MENU, select and select Audio
Press ALARM to turn alarms on or off when your
radio is in standby
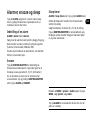
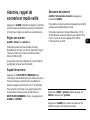
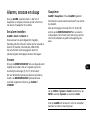
Alarms, snooze and sleep
Press ALARM, select Alarm 1, Alarm 2 or sleep timer
and follow the on-screen instructions to set an alarm
or sleep timer.
Setting an alarm
ALARM > Alarm 1 or Alarm 2.
Choose when the alarm will sound (Off, Daily, Once,
Mon-Fri or Sat-Sun), set the time, volume and source
(Buzzer, Internet radio, DAB or FM).
An active alarm is indicated by the alarm icon which
then ashes when the alarm sounds.
Snooze
Press the CONTROL KNOB to temporarily silence a
sounding alarm, press it again to increase the snooze
period (5, 10, 15, 30 minutes).
To cancel a sounding or snoozed alarm, press and
hold the CONTROL KNOB for two seconds, or press
ALARM or STANDBY.
Sleep timer
or press and hold ALARM
Set the time after which your R3 will automatically
switch to standby.
Choose the delay in minutes (Off, 15, 30, 45, 60) and
press the CONTROL KNOB to conrm your selection.
The display then returns to the Now-playing screen
and displays the sleep icon.

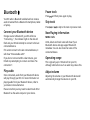
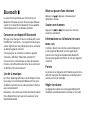
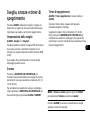
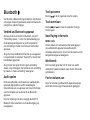
Bluetooth
Your R3 radio is Bluetooth enabled and can receive
audio streamed from a Bluetooth smartphone, tablet
or laptop.
Connect your Bluetooth device
Change source to Bluetooth, your R3 will show
“Connecting...”, the indicator light on the dial will
ash and your R3 will attempt to connect to the last
connected device.
If it cannot connect to the last connected device, it
will show “Discoverable as R3”.
If you do not connect within a few minutes, your
R3 will stop attempting to connect and show “No
connection”.
Play audio
Once connected, audio from your Bluetooth device
will play through your R3. For more information on
playing audio from your Bluetooth device, refer to
your device’s documentation.
Please note that you may need to select Ruark R3 or
Bluetooth as the audio output on your device.
Pause track
Press and then press again to play.
Skip track
Press or to skip to the next or previous track.
Now Playing information
Artist, album and track name will show if your
Bluetooth device and app support Bluetooth
metadata. You can also show the name of the
connected device.
Operating range
This is typically up to 10 metres from your R3,
although obstructions such as walls may reduce this.
Adjust volume
Adjusting the volume on your Bluetooth device will
automatically change the volume on your R3.

EN
DA
DE
ES
FR
IT
JA
KO
NL
NO
PL
ZH
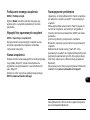
ZH
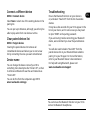
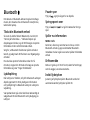
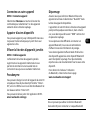
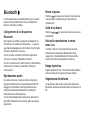
Connect a dierent device
Select or select one of the existing devices in the
pairing list.
You can pair up to 8 devices, although you will only be
able to play audio from one device at a time.
Clear paired devices list
Clearing the paired devices list removes all
remembered devices and allows you to start a new
list by connecting the ones you want remembered.
Device name
You can change the device name of your R3 to
something more descriptive like “Ozzie’s R3”, so then
it will show on Bluetooth searches and networks as
“Ozzie’s R3”.
You can do this from the companion app OKTIV.
www.ruarkaudio.com/app
Troubleshooting
Ensure the Bluetooth function on your device is
on, and select “Ruark R3” from the list of available
devices.
It may take a few seconds for your R3 to appear in the
list on your device, and in some cases you may need
to input “0000” as the pairing password.
If you are having trouble connecting your Bluetooth
device, we recommend you clear the paired devices
list.
You will also need to delete “Ruark R3” from the
paired devices list on your Bluetooth device before
pairing it to your R3 again. For more information,
refer to your Bluetooth device’s documentation.
For help with using Bluetooth, please visit
You cannot use the Bluetooth function on your R3 to
connect to Bluetooth headphones

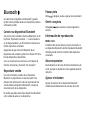
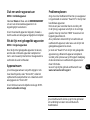
DAB radio
The rst time you use DAB on your R3, or if the DAB
station list is empty, it will automatically perform a
station scan to create a list of available stations.
Change station
Press or to tune to the next or previous
station.
You can also select a station from the station list by
selecting .
DAB radio text (DLS)
Select what programme information is shown.
Save preset
Press and hold PRESET for two seconds and select a
preset to save the currently playing station.
You can store 8 stations in your preset list.
Recall preset
Press PRESET, and select a preset station.
Station scan
We recommend you periodically update the station
list with a station scan. If the station list is empty the
radio will automatically perform a station scan as
soon as you switch to DAB.
For optimal reception, fully extend the aerial and
adjust its position.

EN
DA
DE
ES
FR
IT
JA
KO
NL
NO
PL
ZH
ZH
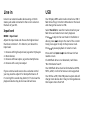
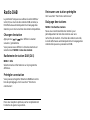
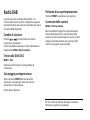
FM radio
Change station
Press or to tune to the next or previous
station.
The station frequency is normally replaced by the
station name a few seconds after tuning into an FM
station.
FM radio text (RDS/RBDS)
Select what programme information is shown.
Save preset
Press and hold PRESET for two seconds and select a
preset to save the currently playing station.
You can store 8 stations in your preset list.
If RDS data is not available, your R3 will store the
frequency instead of the station name in the preset
list.
Recall preset
Press PRESET, and select a preset station, track or
playlist.
FM sensitivity
Select to only tune to strong
stations with good reception.
Mono only
Set FM playback to mono to reduce hiss during FM
playback.
Manual tune
Select manual tune, rotate the CONTROL KNOB to
manually change the frequency and press it to select
that station and exit manual tuning.

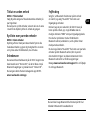
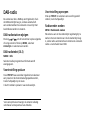
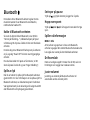
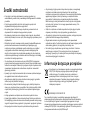
Line in
Listen to an external audio device using a 3.5mm
stereo jack cable connected to the Line in socket on
the back of your R3.
Adjust the input level and choose the highest level
that does not distort - if it distorts, turn down the
input level.
1 - Devices with high output level, eg some CD players
2 - Most devices
3 - Devices with low output, eg some smartphones
4 - Devices with a very low output
If your external audio source has a volume control
you may need to adjust it for best performance. If
it’s too high the sound may distort; if it’s too low the
playback volume may be too low and lack bass.
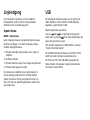
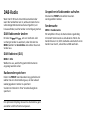
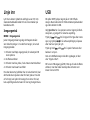
USB
Your R3 plays MP3 audio tracks stored on a USB C
ash drive. Plug it into the USB socket on the back
and change the source to USB.
Select to view the tracks stored on your
ash drive and select one to start playback.
Press to skip to the next track in the folder or
album, press to skip to the start of the current
track, press again to skip to the previous track.
Press to pause playback or restart a track.
Press and hold or to fast forward or fast
rewind a track.
If a USB ash drive is not detected, it will show
“No USB device found”.
Your USB ash drive must be formatted as FAT32.
NTFS, exFAT, or other formats are not supported.
Your R3 has a 5W, 1.0A USB power output and will
charge most devices but it may not charge devices
that require more than 5W.

EN
DA
DE
ES
FR
IT
JA
KO
NL
NO
PL
ZH
ZH
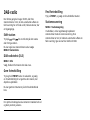
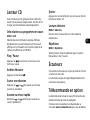
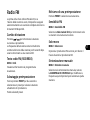
CD player
To insert a CD, gently push it into the CD slot. Once
loaded it will play automatically.
Now playing information
Select what track information is shown.
Generally, track number and time is shown on audio
CDs and track and album name is shown on MP3 CDs.
Play / Pause
Press to play or pause a track.
Stop play
Press and hold .
Skip track
Press or to skip to the next or previous track.
Fast-forward or rewind
Press and hold or to fast-forward or rewind.
Eject
Press the eject button next to the CD slot.
Shue
Turn on to play tracks in a random order.
Repeat
Select repeat mode for tracks (Off / One / All).
Headphones
Connect your headphones to the 3.5mm stereo jack
socket on the back of your R3.
Headphone volume is adjusted independently from
the speaker volume.
Optional remote control
Compact remote control with 4 direct-select
preset keys.
Contact your local Ruark dealer or see
www.ruarkaudio.com for more details.
Any folder structure on MP3 disks will be ignored and the
tracks will show in a single list
Seite wird geladen ...
Seite wird geladen ...
Seite wird geladen ...
Seite wird geladen ...
Seite wird geladen ...
Seite wird geladen ...
Seite wird geladen ...
Seite wird geladen ...
Seite wird geladen ...
Seite wird geladen ...
Seite wird geladen ...
Seite wird geladen ...
Seite wird geladen ...
Seite wird geladen ...
Seite wird geladen ...
Seite wird geladen ...
Seite wird geladen ...
Seite wird geladen ...
Seite wird geladen ...
Seite wird geladen ...
Seite wird geladen ...
Seite wird geladen ...
Seite wird geladen ...
Seite wird geladen ...
Seite wird geladen ...
Seite wird geladen ...
Seite wird geladen ...
Seite wird geladen ...
Seite wird geladen ...
Seite wird geladen ...
Seite wird geladen ...
Seite wird geladen ...
Seite wird geladen ...
Seite wird geladen ...
Seite wird geladen ...
Seite wird geladen ...
Seite wird geladen ...
Seite wird geladen ...
Seite wird geladen ...
Seite wird geladen ...
Seite wird geladen ...
Seite wird geladen ...
Seite wird geladen ...
Seite wird geladen ...
Seite wird geladen ...
Seite wird geladen ...
Seite wird geladen ...
Seite wird geladen ...
Seite wird geladen ...
Seite wird geladen ...
Seite wird geladen ...
Seite wird geladen ...
Seite wird geladen ...
Seite wird geladen ...
Seite wird geladen ...
Seite wird geladen ...
Seite wird geladen ...
Seite wird geladen ...
Seite wird geladen ...
Seite wird geladen ...
Seite wird geladen ...
Seite wird geladen ...
Seite wird geladen ...
Seite wird geladen ...
Seite wird geladen ...
Seite wird geladen ...
Seite wird geladen ...
Seite wird geladen ...
Seite wird geladen ...
Seite wird geladen ...
Seite wird geladen ...
Seite wird geladen ...
Seite wird geladen ...
Seite wird geladen ...
Seite wird geladen ...
Seite wird geladen ...
Seite wird geladen ...
Seite wird geladen ...
Seite wird geladen ...
Seite wird geladen ...
Seite wird geladen ...
Seite wird geladen ...
Seite wird geladen ...
Seite wird geladen ...
Seite wird geladen ...
Seite wird geladen ...
Seite wird geladen ...
Seite wird geladen ...
Seite wird geladen ...
Seite wird geladen ...
Seite wird geladen ...
Seite wird geladen ...
Seite wird geladen ...
Seite wird geladen ...
Seite wird geladen ...
Seite wird geladen ...
Seite wird geladen ...
Seite wird geladen ...
Seite wird geladen ...
Seite wird geladen ...
Seite wird geladen ...
Seite wird geladen ...
Seite wird geladen ...
Seite wird geladen ...
Seite wird geladen ...
Seite wird geladen ...
Seite wird geladen ...
Seite wird geladen ...
Seite wird geladen ...
Seite wird geladen ...
Seite wird geladen ...
Seite wird geladen ...
Seite wird geladen ...
Seite wird geladen ...
Seite wird geladen ...
Seite wird geladen ...
Seite wird geladen ...
Seite wird geladen ...
Seite wird geladen ...
Seite wird geladen ...
Seite wird geladen ...
Seite wird geladen ...
Seite wird geladen ...
Seite wird geladen ...
Seite wird geladen ...
Seite wird geladen ...
Seite wird geladen ...
Seite wird geladen ...
Seite wird geladen ...
Seite wird geladen ...
Seite wird geladen ...
Seite wird geladen ...
Seite wird geladen ...
Seite wird geladen ...
Seite wird geladen ...
Seite wird geladen ...
Seite wird geladen ...
Seite wird geladen ...
Seite wird geladen ...
Seite wird geladen ...
Seite wird geladen ...
Seite wird geladen ...
Seite wird geladen ...
Seite wird geladen ...
Seite wird geladen ...
Seite wird geladen ...
Seite wird geladen ...
Seite wird geladen ...
Seite wird geladen ...
-
 1
1
-
 2
2
-
 3
3
-
 4
4
-
 5
5
-
 6
6
-
 7
7
-
 8
8
-
 9
9
-
 10
10
-
 11
11
-
 12
12
-
 13
13
-
 14
14
-
 15
15
-
 16
16
-
 17
17
-
 18
18
-
 19
19
-
 20
20
-
 21
21
-
 22
22
-
 23
23
-
 24
24
-
 25
25
-
 26
26
-
 27
27
-
 28
28
-
 29
29
-
 30
30
-
 31
31
-
 32
32
-
 33
33
-
 34
34
-
 35
35
-
 36
36
-
 37
37
-
 38
38
-
 39
39
-
 40
40
-
 41
41
-
 42
42
-
 43
43
-
 44
44
-
 45
45
-
 46
46
-
 47
47
-
 48
48
-
 49
49
-
 50
50
-
 51
51
-
 52
52
-
 53
53
-
 54
54
-
 55
55
-
 56
56
-
 57
57
-
 58
58
-
 59
59
-
 60
60
-
 61
61
-
 62
62
-
 63
63
-
 64
64
-
 65
65
-
 66
66
-
 67
67
-
 68
68
-
 69
69
-
 70
70
-
 71
71
-
 72
72
-
 73
73
-
 74
74
-
 75
75
-
 76
76
-
 77
77
-
 78
78
-
 79
79
-
 80
80
-
 81
81
-
 82
82
-
 83
83
-
 84
84
-
 85
85
-
 86
86
-
 87
87
-
 88
88
-
 89
89
-
 90
90
-
 91
91
-
 92
92
-
 93
93
-
 94
94
-
 95
95
-
 96
96
-
 97
97
-
 98
98
-
 99
99
-
 100
100
-
 101
101
-
 102
102
-
 103
103
-
 104
104
-
 105
105
-
 106
106
-
 107
107
-
 108
108
-
 109
109
-
 110
110
-
 111
111
-
 112
112
-
 113
113
-
 114
114
-
 115
115
-
 116
116
-
 117
117
-
 118
118
-
 119
119
-
 120
120
-
 121
121
-
 122
122
-
 123
123
-
 124
124
-
 125
125
-
 126
126
-
 127
127
-
 128
128
-
 129
129
-
 130
130
-
 131
131
-
 132
132
-
 133
133
-
 134
134
-
 135
135
-
 136
136
-
 137
137
-
 138
138
-
 139
139
-
 140
140
-
 141
141
-
 142
142
-
 143
143
-
 144
144
-
 145
145
-
 146
146
-
 147
147
-
 148
148
-
 149
149
-
 150
150
-
 151
151
-
 152
152
-
 153
153
-
 154
154
-
 155
155
-
 156
156
-
 157
157
-
 158
158
-
 159
159
-
 160
160
-
 161
161
-
 162
162
-
 163
163
-
 164
164
-
 165
165
-
 166
166
-
 167
167
-
 168
168
-
 169
169


in anderen Sprachen
- français: RuarkAudio R3S Manuel utilisateur
- español: RuarkAudio R3S Manual de usuario
- italiano: RuarkAudio R3S Manuale utente
- Nederlands: RuarkAudio R3S Handleiding
- dansk: RuarkAudio R3S Brugermanual
- polski: RuarkAudio R3S Instrukcja obsługi
- eesti: RuarkAudio R3S Kasutusjuhend
Verwandte Artikel

Andere Dokumente
-
Ruark Audio R3 Compact Music System Benutzerhandbuch
-
 Ruark Audio R2 Mk4 Smart Tabletop Radio Benutzerhandbuch
-
Kärcher DAB 9000CDi Benutzerhandbuch
-
Revo SuperSystem Bedienungsanleitung
-
Revo SUPERCD Bedienungsanleitung
-
Revo Domino Bedienungsanleitung
-
-
Revo Superconnect Bedienungsanleitung
