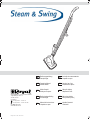
Royal Appliance Steam & Swing Bedienungsanleitung
- Typ
- Bedienungsanleitung

Royal Appliance International GmbH
Jagenbergstraße 19
41468 Neuss
Germany
+49 (0) 2131 - 60 90 0
+49 (0) 2131 - 60 90 60 95
info@dirtdevil.de
www.dirtdevil.de
Roya-15181 • A5 • 20.01.2011
Bedienungsanleitung
Dampfreiniger
Instrução de manuseamento
Limpador a vapor
Operating Manual
Steam cleaner
Istruzioni per l'uso
Idropulitore a vapore
Mode d'emploi
Nettoyeur à vapeur
Návod k obsluze
Napaovací isti
Bedieningshandleiding
Stoomreiniger
Návod na obsluhu
Parný istiaci prístroj
Manual de instrucciones
Limpiador a vapor
Kezelési útmutató
Gztisztító
DE PT
GB IT
FR CZ
NL SK
ES HU
Steam_and_Swing.book Seite 1 Donnerstag, 20. Januar 2011 10:29 10

2
DEPT GBFRNLESITCZSKHU
Bedienungsanleitung ................................................................................ 4 - 9
Operating Manual ....................................................................................... 10 - 15
Mode d‘emploi............................................................................................. 16 - 21
Bedieningshandleiding .............................................................................. 22 - 27
Manual de instrucciones ........................................................................... 28 - 33
Instrução de manuseamento .................................................................... 34 - 39
Istruzioni per l'uso ...................................................................................... 40 - 45
Návod k obsluze ......................................................................................... 46 - 51
Návod na obsluhu ...................................................................................... 52 - 57
Kezelési útmutató ...................................................................................... 58 - 63
Steam_and_Swing.book Seite 2 Donnerstag, 20. Januar 2011 10:29 10

3
D
1
2
3
4
5
7
8
9
6
6
1
1
2
3
4
5
2
3
1
4
30 s
6
5
3
2
1
7
Steam_and_Swing.book Seite 3 Donnerstag, 20. Januar 2011 10:29 10

4
1 Sicherheitshinweise
Vielen Dank!
Es freut uns, dass Sie sich für den Dampf-
reiniger „Steam & Swing“ entschieden haben!
Wir wünschen Ihnen viel Freude mit dem Ge-
rät und danken Ihnen für den Kauf!
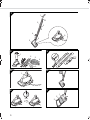
Überblick (Abb. 1):
1 Handgriff
2Stiel
3 Stromkabel mit Stecker
4 Wassertank mit Einfüllkappe
5 Dampffuß
6 Kabelaufwickelvorrichtung
7 Dampfschalter
8 Strom-Kontrollleuchte (rot)
9 Dampfbetrieb-Bereitschaftsleuchte (grün)
Lieferumfang (Abb. 2):
1 Dampffuß mit Stromkabel & Wassertank
2 Stielsegmente und Handgriff
3 Mikrofaser-Reinigungstücher (2 Stück)
4 Teppichgleitsohle
5 Nachfüllbehälter
Technische Daten
Technische und gestalterische Änderungen im Zuge
stetiger Produktverbesserungen vorbehalten.
© Royal Appliance International GmbH
1 Sicherheitshinweise
1.1 zur Bedienungsanleitung
Lesen Sie diese Bedienungsanleitung voll-
ständig durch, bevor Sie mit dem Gerät arbei-
ten. Bewahren Sie die Anleitung gut auf. Falls
Sie das Gerät an Dritte weitergeben, geben
Sie auch die Bedienungsanleitung mit.
Die Nichtbeachtung dieser Anleitung kann
zu schweren Verletzungen oder Schäden
am Gerät führen.
Für Schäden, die aufgrund der Nichtbeach-
tung dieser Bedienungsanleitung entstehen,
übernehmen wir keine Haftung.
1.2 zu verwendeten Hinweisen
Wichtige Hinweise für Ihre Sicherheit sind be-
sonders gekennzeichnet. Beachten Sie diese
Hinweise unbedingt, um Unfälle und Schäden
am Gerät zu vermeiden:
1.3 zum Heißdampf
Das Gerät erzeugt zum Reinigen
Heißdampf mit einer Temperatur
von ca. 110 °C. Hiervon gehen un-
terschiedliche Gefahren aus. Daher:
Richten Sie den Dampfstrahl niemals auf
Personen oder Tiere. Verbrühungsgefahr!
Richten Sie den Dampfstrahl nicht auf
elektrische Geräte, Steckdosen etc. Gefahr
eines elektrischen Schlags!
Lassen Sie das Reinigungstuch und wei-
tere heiße Geräteteile erst abkühlen, ehe Sie
diese berühren. Verbrennungsgefahr!
Geräteart : Dampfreiniger
Modell : Steam & Swing
Modellnummer : M350 (-0/.../-9)
Spannung : 220 V - 240 V~
50 Hz
Leistung : 1550 W nom.
Dampfbetrieb-
Bereitschaft
: 20 min
(nach ca. 30 s)
Dampftemperatur : ca. 110 °C
Wassertankvolumen : 400 ml
Stromkabellänge : 5 m
Gewicht (mit leerem
Wassertank)
: ca. 2,4 kg
Material Mikrofaser-
Reinigungstücher
: 100% Polyester
IPX4
WARNUNG:
Warnt vor Gefahren für Ihre Gesundheit und
zeigt mögliche Verletzungsrisiken auf.
ACHTUNG:
Weist auf mögliche Gefährdungen für das
Gerät oder andere Gegenstände hin.
HINWEIS:
Hebt Tipps und Informationen hervor.
Steam_and_Swing.book Seite 4 Donnerstag, 20. Januar 2011 10:29 10

DE
5
1 Sicherheitshinweise
1.4 zur Stromversorgung
Das Gerät wird mit elektrischem Strom be-
trieben, dabei besteht grundsätzlich die Ge-
fahr eines elektrischen Schlags. Achten Sie
daher besonders auf Folgendes:
- Fassen Sie den Netzstecker niemals mit
nassen Händen an.
- Wenn Sie den Netzstecker aus der Steck-
dose herausziehen wollen, ziehen Sie im-
mer direkt am Stecker. Niemals am
Stromkabel, es könnte reißen.
- Tauchen Sie das Gerät niemals in Was-
ser oder andere Flüssigkeiten und halten
Sie es von Regen und Nässe fern.
- Achten Sie darauf, dass das Stromkabel
nicht geknickt, eingeklemmt, überfahren
wird oder mit Hitzequellen in Berührung
kommt. Es darf außerdem nicht zur Stol-
perfalle werden.
- Stellen Sie vor dem Anschließen an die
Stromversorgung sicher, dass die auf
dem Typenschild angegebene elektrische
Spannung mit der Spannung Ihrer Steck-
dose übereinstimmt. Benutzen Sie nur
Steckdosen mit Schutzkontakt.
- Benutzen Sie nur GS-geprüfte, einfache
Verlängerungskabel (keine Mehr-
fachsteckdosen), die für die Leistungsauf-
nahme des Geräts ausgelegt sind.
- Befüllen Sie den Wassertank ausschließ-
lich nach Beendigung des Reinigungsvor-
gangs und bei gezogenem Netzstecker.
1.5 zu Kindern
Dieses Gerät ist nicht dafür bestimmt,
durch Personen (einschließlich Kinder) mit
eingeschränkten physischen, sensorischen
oder geistigen Fähigkeiten oder mangels Er-
fahrung und/oder mangels Wissen benutzt zu
werden, es sei denn, sie werden durch eine
für ihre Sicherheit zuständige Person beauf-
sichtigt oder erhielten von ihr Anweisungen,
wie das Gerät zu benutzen ist.
Kinder sollten beaufsichtigt werden, um si-
cherzustellen, dass sie nicht mit dem Gerät
oder dem Kabel spielen. Bewahren Sie das Ge-
rät für diesen Personenkreis unzugänglich auf.
Verpackungsmaterialien dürfen nicht zum
Spielen verwendet werden. Erstickungsge-
fahr!
1.6 bestimmungsgemäßer Einsatz
Setzen Sie den Dampfreiniger ausschließlich
im Haushalt für das Reinigen von normalver-
schmutzten Hartböden, z. B. Fliesen, Stein-
böden, Parkett, Laminat und andere glatte
Flächen (mit Teppichgleitsohle auch Tep-
pichen) ein, die der hohen Temperatur, dem
Druck und der Feuchtigkeit des Heißdampfes
standhalten. Jede weitere Verwendung gilt
als nicht bestimmungsgemäß und ist unter-
sagt. Verboten ist insbesondere:
Das Dampfreinigen von:
- Personen, Tieren oder Pflanzen sowie
Kleidungstücken, die sich noch am Kör-
per befinden. Verbrühungsgefahr!
- Oberflächen, die durch gesundheitsge-
fährdende Stoffe verschmutzt sind, oder
verleimten Flächen. Der heiße Dampf
kann diese Stoffe lösen.
- unversiegelten, lackierten, geölten oder
gewachsten Holz- oder Parkettfußböden
oder solchen aus weichem Kunststoff. Di-
ese können beschädigt werden.
- glänzendem Kunststoff. Dieser kann
durch den Dampf matt werden.
- Textilien, Möbeln, Fensterscheiben. Für
derartige Anwendungen hat DirtDevil die
„Dampfente“ im Sortiment.
Das Befüllen des Wassertanks mit ande-
ren Flüssigkeiten als Wasser bzw. mit Was-
serzusätzen (z. B. Reinigungsmittel etc.). Zu-
sätze können gesundheitsschädlich sein oder
das Gerät zerstören.
Die Verwendung in der Nähe von explo-
siven, leicht entzündlichen Stoffen oder an
Druckbehältern. Es besteht Brand-, Berst-
oder Explosionsgefahr.
Die Verwendung im Freien. Regen und
Schmutz zerstören das Gerät.
Der Betrieb mit leerem Wassertank.
Der eigenmächtige Umbau des Geräts.
1.7 falls das Gerät defekt ist
Betreiben Sie niemals ein defektes Gerät
oder ein Gerät mit einem defekten Kabel. Es
besteht erhebliches Verletzungsrisiko.
Geben Sie ein defektes Gerät zur Repara-
tur an einen Fachhändler oder den Royal Ap-
pliance Kundendienst.
Steam_and_Swing.book Seite 5 Donnerstag, 20. Januar 2011 10:29 10

6
2 Vor dem Reinigen
2 Vor dem Reinigen
2.1 Auspacken
Packen Sie das Gerät und alle Zubehörteile
aus und überprüfen Sie den Inhalt auf Voll-
ständigkeit (Abb. 2).
2.2 Montieren
1. Montieren Sie den Stiel, indem Sie die
Steckrohre und den Handgriff zusammen-
stecken (Abb. 3). Das untere Steckrohr ist
an der Entriegelungstaste erkennbar.
2. Stecken Sie den Stiel in die Aufnahme.
Die Entriegelungstaste (Abb. 4/1) rastet
hör- und spürbar ein.
3. Legen Sie ein Mikrofaser-Reinigungstuch
lagerichtig auf den Boden und stellen Sie
den Dampffuß darauf ab. Das Reini-
gungstuch wird per Klettverschluss gehal-
ten.
Nur bei Teppichen:
4. Setzen Sie die Teppichgleitsohle (Abb. 7/
3) auf Dampffuß (Abb. 7/1) und Reini-
gungstuch (Abb. 7/2).
2.3 Wassertank füllen
1. Stellen Sie sicher, dass das Gerät ausge-
schaltet ist und das Stromkabel aus der
Steckdose gezogen ist.
2. Drehen Sie die Einfüllkappe gegen den
Uhrzeigersinn vom Wassertank.
3. Füllen Sie den Wassertank mithilfe des im
Lieferumfang enthaltenen Nachfüllbehäl-
ters (Abb. 5) mit kaltem, klarem Leitungs-
wasser. Benutzen Sie keine anderen Ge-
fäße zum Nachfüllen. Beachten Sie im
Tank befindliche Restmengen an Wasser.
Es besteht die Gefahr des Verschüttens
von Wasser oder der Überfüllung des
Wassertanks.
4. Schließen Sie die Einfüllkappe und prüfen
Sie diese auf festen Sitz.
ACHTUNG:
Transportieren/versenden Sie das Gerät
grundsätzlich immer in der Originalverpa-
ckung, damit es keinen Schaden nimmt.
Heben Sie dazu die Verpackung auf.
Entsorgen Sie nicht mehr benötigtes Verpa-
ckungsmaterial entsprechend den in Ihrem
Land geltenden Vorschriften.
HINWEIS:
Sollten Sie einen Transportschaden bemer-
ken, wenden Sie sich umgehend an Ihren
Händler.
HINWEIS:
Falls Sie den Stiel wieder herausnehmen
möchten, drücken Sie die Entriegelungs-
taste (Abb. 4/1) und ziehen Sie den Stiel
nach oben heraus.
WARNUNG:
Befüllen Sie niemals ein am Stromnetz
befindliches Gerät mit Wasser. Es besteht
die Gefahr eines elektrischen Schlags.
ACHTUNG:
Verwenden Sie keine Zusätze im Wasser.
Diese können das Gerät zerstören.
HINWEIS:
Durch die Verwendung von destilliertem
Wasser anstelle von Leitungswasser kann
die Lebensdauer des Gerätes verlängert
werden. Dies ist besonders in Haushalten
mit hartem Wasser zu empfehlen.
Steam_and_Swing.book Seite 6 Donnerstag, 20. Januar 2011 10:29 10

DE
7
3 Bedienung
3 Bedienung
3.1 Dampfreinigen
Heißdampf erleichtert das Reinigen von
glatten Flächen. Der Dampfreiniger funktio-
niert dabei ganz ohne chemische Lösungs-
mittel.
Ihr Dampfreiniger dient nicht zur Tiefenrei-
nigung von Teppichen oder zur Beseitigung
hartnäckiger Verschmutzungen.
1. Bevor Sie das Gerät in Betrieb nehmen,
prüfen Sie, ob der Wassertank gefüllt ist.
2. Stecken Sie den Stecker in die Steckdose.
Die rote Strom-Kontrollleuchte (Abb. 1/8)
leuchtet.
3. Warten Sie ca. 30 s, bis die blaue Dampf-
betrieb-Bereitschaftsleuchte (Abb. 1/9)
leuchtet (Abb. 6).
4. Ihr Steam & Swing ist jetzt einsatzbereit.
Schalten Sie nun den Dampfschalter
(Abb. 1/7) ein.
Bei glatten Böden:
Schalten Sie den Dampfschalter spätes-
tens dann aus, wenn ein Feuchtigkeitsfilm auf
dem Boden entsteht.
Das Dampfreinigen mit ausgeschaltetem
Dampfschalter sorgt für schnelleres Abtrock-
nen und verringert die Ausrutschgefahr.
Bei Teppichen:
Lassen Sie den Dampfschalter während des
gesamten Reinigungsvorgangs eingeschaltet.
3.2 Aufbewahren
1. Schalten Sie den Dampfschalter (Abb. 1/
7) aus und ziehen Sie das Stromkabel aus
der Steckdose.
2. Wickeln Sie das Stromkabel auf. So ver-
meiden Sie Unfälle.
3. Warten Sie, bis sich das Mikrofaser-Reini-
gungstuch und die umgebenden Geräte-
teile abgekühlt haben.
4. Entnehmen Sie das Mikrofaser-Reini-
gungstuch. Reinigen Sie es ZKapitel 4.2,
„Gehäuse und Tücher reinigen“.
Wenn Sie das Gerät längere Zeit lagern
möchten, leeren Sie den Wassertank und las-
sen Sie ihn vollständig austrocken. Verstauen
Sie das Gerät erst, wenn es völlig trocken ist.
Bewahren Sie das Gerät in einem kühlen,
trockenen Raum für Kinder unzugänglich auf.
WARNUNG:
Prüfen Sie Gerät und Stromkabel vor jeder
Benutzung. Ein beschädigtes Gerät darf
nicht verwendet werden.
ACHTUNG:
Prüfen Sie vor Beginn der Reinigung, ob der
jeweilige Bodenbelag für die Dampfreini-
gung geeignet ist. Falls Sie sich nicht sicher
sind, reinigen Sie erst eine unauffällige
Stelle. Beachten Sie immer die Reingungs-
hinweise zu den einzelnen Belägen. Diese
könnten beschädigt werden. Glasflächen
können durch Wärmeschock zerspringen.
Wärmen Sie Glasflächen mit weit gestreu-
tem Dampf aus einem Abstand von ca.
25 cm auf.
Wir übernehmen keine Haftung für Schäden
aus unsachgemäßem Heißdampfgebrauch.
HINWEIS:
Der Dampfreiniger besitzt einen Überhit-
zungsschutz. Er schaltet sich bei Überhit-
zung (z. B. durch leeren Wassertank) auto-
matisch ab. Ist dies der Fall, schalten Sie
den Dampfschalter aus und ziehen Sie den
Stecker. Beseitigen Sie die Ursache der
Überhitzung. Warten Sie ca. 45 Minuten.
Den dann abgekühlten Dampfreiniger kön-
nen Sie wieder einschalten.
HINWEIS:
Zur Beseitigung hartnäckiger Verschmut-
zungen empfehlen wir das vorherige Anlö-
sen der Verunreinigung mithilfe eines che-
mischen Reinigungsmittels, sofern der
jeweilige Bodenbelag dies erlaubt.
ACHTUNG:
Stellen Sie vor dem Anschließen des Ste-
ckers an die Stromversorgung sicher, dass
die auf dem Typenschild angegebene elek-
trische Spannung mit der Spannung Ihrer
Steckdose übereinstimmt. Benutzen Sie nur
Steckdosen mit Schutzkontakt.
Steam_and_Swing.book Seite 7 Donnerstag, 20. Januar 2011 10:29 10

8
4 Pflege
4 Pflege
4.1 Entkalken
Um die Lebensdauer des Gerätes zu verlän-
gern, entkalken Sie es ca. alle 6 Monate.
1. Füllen Sie den Wassertank mit Wasser
und geben Sie ca. 1 Tab Bio-Entkalker (im
Handel erhältlich) hinein. Beachten Sie
die Hinweise des Entkalker-Herstellers.
2. Richten Sie den Dampffuß in ein Gefäß,
das den Dampf auffangen kann.
3. Schalten Sie den Dampfschalter ein.
4. Lassen Sie die Entkalkungslösung ca.
5 Minuten durchlaufen.
5. Warten Sie anschließend weitere 5 Minu-
ten bei eingeschaltetem Gerät.
6. Wiederholen Sie diesen Vorgang 3-mal
und entsorgen Sie die restliche Lösung.
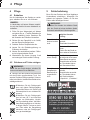
4.2 Gehäuse und Tücher reinigen
Reinigen Sie das Gehäuse ausschließlich
mit einem leicht angefeuchteten Tuch. Ver-
wenden Sie keine Reinigungsmittel, Scheuer-
mittel oder Alkohol, da diese das Gehäuse be-
schädigen können.
Waschen Sie die Reinigungstü-
cher nach jedem Reinigungsgang.
Andernfalls bilden sich Keime und
Schimmelpilze bis zur nächsten Be-
nutzung.
Waschen Sie die Reinigungstü-
cher bei max. 60 °C und ohne den
Einsatz von Weichspüler. Verzich-
ten Sie unbedingt darauf, die Mikro-
faser-Reinigungstücher zu bleichen,
zu bügeln oder im Trockner zu trock-
nen. Dies würde die Saugwirkung
reduzieren oder die Reinigungstü-
cher gar beschädigen.
5 Fehlerbehebung
Bevor Sie das Gerät an den Royal Appliance
Kundendienst einschicken, überprüfen Sie
anhand der folgenden Tabelle, ob Sie den
Fehler selbst beseitigen können.
HINWEIS:
In Haushalten mit hartem Wasser empfeh-
len wir, das Gerät in kürzeren Abständen zu
entkalken.
WARNUNG:
Bevor Sie das Gerät reinigen, schalten Sie
es aus und lassen Sie es abkühlen.
WARNUNG:
Betreiben Sie niemals ein defektes Gerät,
oder ein Gerät mit einem defekten Kabel.
Es besteht erhebliches Verletzungsrisiko.
Fehler mögliche Ursache
Lösung
Strom-Kontroll-
leuchte leuchtet
nicht
Stromkabel ist nicht ein-
gesteckt.
Stromkabel einstecken.
Steckdose führt keinen
Strom.
Testen Sie das Gerät an
einer anderen Steckdose.
Gerät erzeugt
keinen Dampf
Der Überhitzungsschutz
hat aufgrund eines leeren
Wassertanks ausgelöst.
Dampfschalter ausschal-
ten, Stromkabel ziehen
und Wassertank füllen.
Dauer bis zur
Dampfbetrieb-
Bereitschaft ist
ungewöhnlich
hoch
Wasser-/Dampfwege sind
verkalkt.
Dampfschalter ausschal-
ten, Stromkabel ziehen
und Gerät entkalken
ZKapitel 4.1, „Entkalken“.
0180 501 50 50
*
In Deutschland stehen wir Ihnen
für Fragen, Anregungen oder bei
Problemen gerne zur Verfügung.
Mo.-Fr. 8-20 Uhr
*0,14€ /Min. aus dem deutschen Festnetz
(deutscher Mobilfunkhöchstpreis 0,42€ /Min.)
SERVICE-HOTLINE
Steam_and_Swing.book Seite 8 Donnerstag, 20. Januar 2011 10:29 10

DE
9
6 Ersatzteile
6 Ersatzteile
Zubehör und Ersatzteile können nachbestellt
werden.
Diese erhalten Sie bei den Firmen:
Service-Versand Ina Riedmüller
Frankenstraße 34
89233 Neu-Ulm
Deutschland
Tel.: + 49 (0) 7307 - 51 75
Fax: + 49 (0) 7307 - 41 56
Riedmueller.service@t-online.de
Staubsauger-Center Feuerbach KG
Corneliusstraße 75
40215 Düsseldorf
Deutschland
Tel.: + 49 (0) 211 - 38 10 07
Fax: + 49 (0) 211 - 37 04 97
www.dirtdevil-service.de
7 Entsorgung
Wenn das Gebrauchsende erreicht ist,
insbesondere, wenn Funktionsstörun-
gen auftreten, machen Sie das ausge-
diente Gerät unbrauchbar, indem Sie
den Netzstecker aus der Steckdose zie-
hen und das Stromkabel durchtrennen.
Entsorgen Sie das Gerät entsprechend der in
Ihrem Land geltenden Umweltvorschriften.
Elektrische Abfälle dürfen nicht zusammen
mit Haushaltsabfällen entsorgt werden. Wen-
den Sie sich für Ratschläge bezüglich des Re-
cyclings an Ihre Kommunalbehörde oder Ih-
ren Händler.
8 Garantie
Wir übernehmen für das von uns vertrie-
bene Gerät eine Garantie von 24 Monaten
ab Kaufdatum.
Innerhalb dieser Garantiezeit beseitigen wir
nach unserer Wahl durch Reparatur oder
Austausch des Gerätes oder des Zubehörs
(Schäden an Zubehörteilen führen nicht auto-
matisch zum Umtausch des kompletten Ge-
rätes) unentgeltlich alle Mängel, die auf Mate-
rial- oder Herstellungsfehlern beruhen. Von
der Garantie sind Schäden ausgenommen,
die auf unsachgemäßen Gebrauch (Betrieb
mit falscher Stromart/-spannung, Anschluss
an ungeeignete Stromquellen, Bruch etc.) zu-
rückzuführen sind, normaler Verschleiß und
Mängel, die den Wert oder die Gebrauch-
stauglichkeit des Gerätes nur unerheblich be-
einflussen. Bei Eingriffen durch eine nicht von
uns autorisierte Stelle oder bei Verwendung
anderer als original Royal Appliance Ersatz-
teile erlischt die Garantie. Verschleißteile fal-
len nicht unter die Garantie und sind deshalb
kostenpflichtig! Die Garantie tritt nur in Kraft,
wenn das Kaufdatum durch Stempel und Un-
terschrift des Händlers auf der Garantiekarte
bestätigt ist oder eine Rechnungskopie dem
eingeschickten Gerät beiliegt. Garantieleis-
tungen bewirken weder eine Verlängerung
der Garantiezeit, noch beginnt dadurch ein
Anspruch auf eine neue Garantie!
Versenden Sie das Gerät mit entleertem
Wassertank und einer kurzer Fehlerbeschrei-
bung in Blockschrift. Versehen Sie das An-
schreiben mit dem Vermerk „Zur Garantie“.
Senden Sie es zusammen mit der Garantie-
karte oder einer Rechnungskopie an folgende
Adresse:
Royal Appliance International GmbH
Abt. Kundenservice
Jagenbergstraße 19
41468 Neuss
Germany
Tel.: + 49 (0) 21 31 / 60 90 0
Fax: + 49 (0) 21 31 / 60 90 60 95
www.dirtdevil.de
ACHTUNG:
Verwenden Sie nur Originalersatzteile aus
dem Lieferumfang oder solche, die Sie
durch Nachbestellung erworben haben.
Artikel-Nr. Beschreibung
0350001 4-teiliges Mikrofaser-
Reinigungstuch-Set
Steam_and_Swing.book Seite 9 Donnerstag, 20. Januar 2011 10:29 10

10
1 Safety instructions
Many thanks!
We are pleased that you decided on the
"Steam & Swing" steam cleaner! We hope
you enjoy using your appliance and we would
like to thank you for your purchase!
Overview (Fig. 1):
1 Handle
2 Main stick
3 Power cable with plug
4 Water tank with filler cap
5 Steam foot
6 Cable retraction device
7 Steam switch
8 Power indicator light (red)
9 Steam ready light (green)
Scope of delivery (Fig. 2):
1 Steam foot with power cable & water tank
2 Stick segments and handle
3 Micro-fibre cleaning cloths (x 2)
4 Carpet sole plate
5 Refill container
Technical data
Technical and design specifications may be
changed in the course of continuous product im-
provement. © Royal Appliance International GmbH
1 Safety instructions
1.1 Regarding the manual
Read this operating manual through com-
pletely before working with the appliance.
Keep the operating manual safe. If you pass
the appliance on to a third party, give them the
operating manual as well.
Non-compliance with these instructions
can lead to serious injuries or damage to
the appliance.
We assume no liability for damage that occurs
as a result of non-compliance with this operat-
ing manual.
1.2 Notes used in the manual
Important notes for your safety are especially
marked. You must observe these instructions
to avoid accidents and damage to the appli-
ance:
1.3 Regarding the hot steam
The appliance produces hot steam
for cleaning with a temperature of
approx. 100 °C. Various hazards are
associated with the hot steam.
Therefore:
Never direct the steam jet at persons or
animals. Risk of scalding!
Never direct the steam jet at electrical ap-
pliances, plug sockets, etc. There is a risk of
electric shock!
Allow the cleaning cloth and other hot ap-
pliance parts to cool down before touching
them. Risk of burns!
Type of appliance : Steam cleaner
Model : Steam & Swing
Model number : M350 (-0/.../-9)
Voltage : 220 V - 240 V~
50 Hz
Output : 1550 W nom.
Steam ready : 20 min
(after approx. 30 s)
Steam temperature : approx. 110 °C
Water tank capacity : 400 ml
Power cable length : 5 m
Weight (with empty
water tank)
: approx. 2.4 kg
Material micro-fibre
cleaning cloths
: 100% Polyester
IPX4
WARNING:
Warns against hazards for your health and
indicates possible risks of injury.
ATTENTION:
Indicates possible hazards for the appliance
or other objects.
NOTE:
Highlights tips and information.
Steam_and_Swing.book Seite 10 Donnerstag, 20. Januar 2011 10:29 10

11
1 Safety instructions
GB
1.4 Regarding the power supply
The appliance is operated with electrical
power which means there is in principle a risk
of electric shock. Pay particular attention to
the following:
- Never touch the mains plug with wet
hands.
- If you want to pull the mains plug out of
the socket then always pull directly on the
plug. Never pull on the power cable as it
could break.
- Never immerse the appliance in water or
other fluids and keep it away from rain
and moisture.
- Make sure that the power cable is not
bent, caught or run over, and that it does
not come into contact with heat sources.
Arrange in such a way that it cannot be
tripped over it.
- Before connecting to the power supply,
make sure that the electrical voltage stat-
ed on the type plate matches the voltage
of your plug socket. Only use plug sockets
with a grounding contact.
- Use only safety-checked, single-plug ex-
tension cables (not multi-plug sockets)
which are designed for the power con-
sumption of the appliance.
- Only fill up the water tank after completing
cleaning and when the mains plug is
pulled out.
1.5 Regarding children
This appliance is not intended to be used
by persons (including children) with impaired
physical, sensory or mental abilities or insuffi-
cient experience or knowledge, unless they
are supervised by a person responsible for
their safety or have been instructed in the
proper use of the appliance by this person.
Children should be supervised to make
sure that they do not play with the appliance
or cable. Store it so it is inaccessible.
Packing material must not be used to play
with. Risk of suffocation!
1.6 Intended use
Only use the steam cleaner in households for
cleaning normally dirty hard floors, e. g. tiles,
stone floors, parquet, laminate flooring and
other smooth surfaces, (and carpets with car-
pet sole plate), that can withstand the high
temperature, the pressure and the moisture of
the hot steam. Any other use is considered
non-intended use and is prohibited.
The following is prohibited in particular:
Do not steam clean:
- Persons, animals or plants, including
clothing that is still being worn. Risk of
scalding!
- Surfaces that are dirtied by substances
hazardous to health or glued surfaces.
The hot steam could loosen these sub-
stances.
- Unsealed, lacquered, oiled or waxed
wood or parquet flooring, or flooring make
of soft synthetic material. They could be-
come damaged.
- Glossy plastics. The plastic can become
matt from the steam.
- Textiles, furniture, window panes. The
DirtDevil Steam Duck is part of the range
offered for these kind of applications.
Do not fill up the water tank with liquids
other than water or with water additives (e. g.
cleaning agents, etc.). Additives could be
harmful to health or could destroy the appli-
ance.
Do not use near explosive or easily flam-
mable substances or on pressurized contain-
ers. There is a risk of fire or explosion or of the
containers bursting.
Do not use in the open-air. Rain and dirt
destroy the appliance.
Do not operate with an empty tank.
Do not reconstruct or alter the appliance.
1.7 If the appliance is defective
Never operate a defective appliance or an
appliance with a defective cable. There is a
considerable risk of injury.
Bring or send defective appliances to a
specialist dealer or to Royal Appliance Cus-
tomer Services for repair.
Steam_and_Swing.book Seite 11 Donnerstag, 20. Januar 2011 10:29 10

12
2 Before cleaning
2 Before cleaning
2.1 Unpacking
Unpack the appliance and all accessory parts
and check that the contents are complete
(Fig. 2).
2.2 Assembly
1. Assemble the stick by pushing together
the insert tubes and handle correspond-
ingly (Fig. 3). The lower insert tube is rec-
ognizable by the release button.
2. Insert the stick into the receiving end.
The release button (Fig. 4/1) clicks into
place audibly and noticeably.
3. Position a micro-fibre cleaning cloth on the
base and place the steam foot on top. The
cleaning cloth is held by velcro fastening.
Only on carpets:
4. Place the carpet sole plate (Fig. 7/3) on to
the steam foot (Fig. 7/1) and cleaning
cloth (Fig. 7/2).
2.3 Filling the water tank
1. Make sure that the appliance is turned off
and that the power cable has been pulled
out of the plug socket.
2. Twist the filler cap anti-clockwise off the
water tank.
3. Fill the water tank with cold, clear tap wa-
ter using the refill container (Fig. 5) includ-
ed in the scope of delivery. Do not refill
using any other containers. Be aware of
any residual water in the tank. There is a
risk of spilling water or overfilling the water
tank.
4. Close the filler cap and check it is securely
in place.
ATTENTION:
Always transport/send the appliance in its
original packaging so that it does not
become damaged. Keep the packing mate-
rial for this purpose.
Dispose of any packing material that is no
longer required in accordance with the pro-
visions applicable in your country.
NOTE:
If you should notice damage due to trans-
port, then contact your dealer immediately.
NOTE:
If you want to remove the stick again, press
the release button (Fig. 4/1) and pull the
stick up and out.
WARNING:
Never fill an appliance up with water when
the appliance is still connected to the mains
plug. There is a risk of electric shock.
ATTENTION:
Do not add anything to the water. This could
destroy the appliance.
NOTE:
The service life of the appliance can be
extended by using distilled water instead of
tap water. This is recommended particularly
in those households with hard water.
Steam_and_Swing.book Seite 12 Donnerstag, 20. Januar 2011 10:29 10

13
3 Operating
GB
3 Operating
.
Hot steam makes it easier to clean smooth
surfaces. The steam cleaner works entirely
without chemical solvents.
Your steam cleaner is not suitable for
deep cleaning carpets or for removing stub-
born stains.
3.1 Steam cleaning
1. Before starting up the appliance, check
that the water tank is full.
2. Insert the plug into the plug socket. The red
power indicator light (Fig. 1/8) lights up.
3. Wait approx. 30 s until the blue steam
ready light (Fig. 1/9) is illuminated (Fig. 6).
4. Your Steam & Swing is now ready to use.
Switch the steam cleaner (Fig. 1/7) on.
On smooth floors:
Turn off the steam switch at the latest when
a film of moisture has appeared on the floor.
Steam cleaning with the steam switch off
ensures that drying is quicker and reduces the
risk of slipping.
On carpets:
Leave the steam switch on during the en-
tire cleaning process.
3.2 Storage
1. Switch off the steam cleaner (Fig. 1/7) and
pull the power cable out of the plug socket.
2. Wind up the power cable. This will help
avoid accidents.
3. Wait until the micro-fibre cleaning cloth
and the surrounding appliance parts have
cooled down.
4. Remove the micro-fibre cleaning cloth.
Clean it ZChapter 4.2, "Cleaning housing
and cloths".
If you want to store the appliance for a
longer period of time, empty the water tank
and clean it completely. Only stow away the
appliance if it is completely dry.
Store the appliance in a cool, dry room, in-
accessible to children.
WARNING:
Check the appliance and power cable
before each use. A damaged appliance
must never be used.
ATTENTION:
Before starting to clean, check whether the
corresponding floor surface is suitable for
steam cleaning. If you are not sure, first
clean an inconspicuous part of the floor.
Always observe the cleaning instructions for
the individual flooring. They could become
damaged. Glass surfaces can shatter as a
result of heat shock. Warm up glass sur-
faces first by spraying steam from a dis-
tance of approx. 25 cm.
We assume no liability for damage resulting
from improper use of hot steam.
NOTE:
The steam cleaner has an overheating pro-
tection device. It will switch off automatically
if overheated (e. g. due to an empty water
tank). If this happens, then turn off the
steam cleaner and remove the plug.
Remove the cause of overheating. Wait
approx. 45 minutes. Once the steam
cleaner has cooled down you can switch it
on again.
NOTE:
To remove stubborn stains, we recommend
working on the stain beforehand with a
chemical cleaner, as long as the particular
flooring permits this.
ATTENTION:
Before connecting the plug to the power
supply, make sure that the electrical voltage
stated on the type plate matches the voltage
of your plug socket.. Only use plug sockets
with a grounding contact.
ATTENTION:
Never position the appliance directly against
heat sources (e.g. heating, oven). Avoid direct
sunlight. Heat can damage the appliance.
Steam_and_Swing.book Seite 13 Donnerstag, 20. Januar 2011 10:29 10

14
4Care
4Care
4.1 Decalcification
Decalcify the appliance approx. every
6 months to extend its service life.
1. Fill the water tank with water and add ap-
prox. 1 tablet of biological decalcifier
(available in the shops). Observe the in-
structions of the decalcifier manufacturer.
2. Direct the steam foot into a container
which can collect the steam.
3. Switch the steam cleaner on.
4. Allow the decalcifying solution to run
through for approx. 5 minutes.
5. Then wait another 5 minutes with the ap-
pliance still on.
6. Repeat this procedure 3 times and dis-
pose of the remaining solution.
4.2 Cleaning housing and cloths
Only clean the housing with a slightly
damp cloth. Do not use any cleaning agent,
scouring agent or alcohol as these can dam-
age the housing.
Wash the cleaning cloths after
each cleaning episode. Otherwise
germs and mould can form by the
next time you use it.
Wash the cleaning cloths at max.
60 °C and do not use softener. You
must never bleach the micro-fibre
cleaning cloths, or iron them or dry
them in a dryer. This would reduce
the soak-up effect or even damage
the cleaning cloths.
5 Correcting malfunctions
Before sending the appliance to Royal Appli-
ance Customer Services, use the following ta-
ble to check whether you can correct the
malfunctions yourself.
NOTE:
In households with hard water, we recom-
mend you decalcify the appliance at shorter
intervals.
WARNING:
Before you clean the appliance, switch it off
and allow it to cool down.
WARNING:
Never operate a defective appliance or an
appliance with a defective cable. There is a
considerable risk of injury.
Malfunction Possible cause
Solution
Power indicator
light does not
light up
Power cable has not been
plugged in.
Plug in power cable.
Socket does not carry any
current.
Test the appliance at an-
other plug socket.
Appliance does
not produce
steam
The overheating protec-
tion device has triggered
due to an empty water
tank.
Switch off steam switch,
pull out power cable and
fill up water tank.
Time until appli-
ance is steam
ready is unusual-
ly long
Water/steam conduits are
calcified.
Switch off steam switch,
pull out power cable and
decalcify appliance
ZChapter 4.1, "Decalcifi-
cation".
Steam_and_Swing.book Seite 14 Donnerstag, 20. Januar 2011 10:29 10

15
6Spare parts
GB
6 Spare parts
Accessory parts and spare parts can be reor-
dered.
You can get these from the following compa-
nies: Zpage 65, „Royal Appliance Int. GmbH
International Service“
7 Waste disposal
When the service life of the appli-
ance has expired, in particular if mal-
functions occur, make the finished
appliance unusable by removing the
mains plug from the socket and dis-
connecting the power cable.
Dispose of the appliance according to the en-
vironmental provisions applicable in your
country. Electrical waste must not be dis-
posed of with domestic waste. Contact your
municipal authority or your dealer for any ad-
vice regarding recycling.
8 Warranty
We offer a warranty of 24 months from the
date of purchase for the appliances we
sell.
Within this warranty period, we will remove all
defects free of charge that are due to material
or manufacturing faults, either by repair work
or replacing the appliance or accessories, at
our discretion (damage to accessory parts
does not automatically lead to the entire appli-
ance being replaced). The warranty does not
cover damage due to improper use (operating
with the wrong power type/voltage, connect-
ing to unsuitable power sources, breakage,
etc.), normal wear and defects that only insig-
nificantly affect the value or the ability of the
appliance to be used.
The warranty is made null and void if any work
is carried out by a site not authorized by us or
if spare parts other than Royal Appliance
spare parts are used. Wear parts are not in-
cluded in the warranty and are therefore at the
customer's expense!
The warranty only comes into force if the pur-
chase date is confirmed by a stamp and sig-
nature of the dealer on the warranty card or if
a copy of the invoice is included with the ap-
pliance when it is sent in. Warranty work does
not extend the warranty time nor does it con-
stitute a claim for a new warranty!
Send the appliance with an emptied water
tank and a short description of the fault in
block capitals. Write the comment "Regarding
warranty" on the address label. Send it to-
gether with the warranty card or a copy of the
invoice to the following address:
Zpage 65, „Royal Appliance Int. GmbH
International Service“
ATTENTION:
Only use original spare parts from the scope
of delivery or those that you have acquired
through reordering.
Item No. Description
0350001 4-part micro-fibre clean-
ing cloth set
Steam_and_Swing.book Seite 15 Donnerstag, 20. Januar 2011 10:29 10

16
1 Consignes de sécurité
Merci beaucoup !
Nous sommes heureux de vous compter par-
mi les utilisateurs du nettoyeur à vapeur
"Steam & Swing" ! Nous vous souhaitons
beaucoup de plaisir avec votre appareil et
nous vous remercions de votre achat !
Aperçu (ill. 1):
1 Poignée
2 Manche
3 Cordon d'alimentation avec fiche
4 Réservoir d'eau avec bouchon de remplissage
5 Pied à vapeur
6 Dispositif d'enroulement du câble
7 Bouton de vapeur
8 lampe témoin du courant (rouge)
9 Mode de vapeur-voyant de service (vert)
Contenu de livraison (ill. 2):
1 Pied de vapeur avec cordon et réservoir d'eau
2 Segments du manche et poignée
3 Chiffons de nettoyage en microfibres
(2 pièces)
4 Semelle glissante pour tapis
5 Récipient de remplissage
Caractéristiques techniques
Toutes les modifications d'ordre technique ou
conceptuel liées à l'évolution du produit sont réser-
vées. © Royal Appliance International GmbH
1 Consignes de sécurité
1.1 relatives à ce mode d'emploi
Veuillez lire attentivement et intégralement ce
mode d'emploi, avant de vous servir de l'ap-
pareil. Conservez précieusement ce mode
d'emploi. Donnez toujours le mode d'emploi à
toute personne se servant de l'appareil.
Le non respect de ce mode d'emploi peut
entraîner des blessures graves ou des
dommages irrévocables sur l'appareil.
Nous déclinons toute responsabilité pour des
dommages résultant du non respect de ce
mode d'emploi.
1.2 À propos des indications utili-
sées
Les consignes importantes pour votre sécuri-
té sont mises en relief. Respectez impérative-
ment ces consignes afin d'éviter tout accident
ou dommage de l'appareil :
1.3 Remarques relatives à la
vapeur chaude
Pour le nettoyage, l'appareil génère
de la vapeur chaude à une tempéra-
ture d'environ 110 °C. La vapeur
chaude comporte plusieurs risques.
Pour cette raison :
Ne dirigez jamais le jet de vapeur vers des
personnes ou des animaux. Danger de brûlure !
Ne dirigez pas le jet de vapeur vers des
appareils électriques, des prises de courant,
etc. Il y a un risque d'électrocution.
Laissez refroidir les chiffons et autres par-
ties de l'appareil avant de les toucher. Danger
de brûlure !
Type d'appareil : Nettoyeur à vapeur
Modèle : Steam & Swing
Numéro de modèle : M350 (-0/.../-9)
Tension : 220 - 240 V~, 50 Hz
Puissance : 1550 W nom.
Mode de service à va-
peur
: 20 min
(après env. 30 s)
Température de vapeur : env. 110 °C
Contenance du réser-
voir d'eau
: 400 ml
Longueur du cordon : 5 m
Poids (avec réservoir
vide)
: env. 2,4 kg
Matière chiffons en mi-
crofibres
: 100% Polyester
IPX4
AVERTISSEMENT:
Attire votre attention sur des dangers immi-
nents pour votre santé et vous informe sur
les risques de blessures possibles.
ATTENTION:
Indique les risques pour l'appareil ou tout
autre objet.
REMARQUE:
Met en évidence les astuces et informations.
Steam_and_Swing.book Seite 16 Donnerstag, 20. Januar 2011 10:29 10

17
1 Consignes de sécurité
FR
1.4 Alimentation électrique
L'appareil est alimenté par du courant
électrique, entraînant ainsi des risques d'élec-
trocution. Respectez par conséquent les
points ci-dessous :
- Ne touchez jamais la prise avec des
mains mouillées.
- Si vous voulez retirer la fiche de la prise,
tirez toujours directement sur la fiche. Ne
tirez jamais sur le cordon car il pourrait se
rompre.
- Ne plongez jamais l'appareil dans de l'eau
ou tout autre liquide, et conservez-le à
l'abri de la pluie.
- Assurez-vous que le cordon d'alimenta-
tion n'est pas plié, coincé, écrasé ou en-
core en contact direct avec une source de
chaleur. Il ne doit pas non plus être une
cause de trébuchement.
- Assurez-vous avant le branchement au
courant que la tension électrique indiquée
sur la panneau signalétique correspond à
celle de la prise. N'utilisez que des prises
avec contact de protection.
- Utilisez seulement des rallonges certi-
fiées GS simples (pas de prises multiples)
qui sont conçues pour la puissance ab-
sorbée de l'appareil.
- Remplissez le réservoir d'eau unique-
ment après la fin du nettoyage et après
avoir retiré la prise.
1.5 Remarques relatives aux
enfants
Cet appareil ne convient pas aux person-
nes (y compris les enfants) qui ne sont pas en
mesure de se servir de manière sûre de l'appa-
reil, en raison de leurs capacités physiques ou
sensorielles, de leurs capacités mentales, de
leur inexpérience ou d'un manque de connais-
sances. Elles ne doivent pas utiliser cet appa-
reil sans surveillance ou sans bénéficier des
indications d'une personne responsable.
Les enfants doivent être surveillés afin de
s'assurer qu'ils ne jouent pas avec l'appareil
ou avec le câble. Conservez-le hors de leur
portée.
Ne jouez pas avec le matériel
d'emballage : Danger d'étouffement !
1.6 Utilisation conforme à la finalité
Utilisez le nettoyeur à vapeur uniquement à la
maison pour le nettoyage des sols durs nor-
malement sales, par ex. carrelage, pierres,
parquets, stratifiés et autres surfaces lisses,
(avec la semelle glissante aussi sur les tapis)
qui supportent les hautes températures, la
pression et l'humidité de la vapeur chaude.
Toute autre utilisation est considérée comme
non conforme.
Cette interdiction concerne en particulier :
Le nettoyage à vapeur de :
- Personnes, animaux ou plantes ainsi que
les vêtements qui sont encore portés sur
le corps. Danger de brûlure !
- Surfaces salies par des substances dan-
gereuses pour la santé ou les surfaces
collées. La vapeur chaude peut dissoudre
ces substances.
- Sols en bois ou parquets non vitrifiés, ver-
nis, huilés ou cirés, ou ceux en matières
synthétiques souples. Ces dernières
pourraient s'abîmer.
- Matière synthétique brillante. Celle-ci
pourrait devenir mat à cause de la vapeur.
- Textiles, meubles et fenêtres. Pour ces
applications, DirtDevil offre dans sa gam-
me le "Canard à vapeur".
Le remplissage du réservoir d'eau avec
d'autres liquides ou des additifs (par ex. des
produits de nettoyage, etc) Les additifs pour-
raient être dangereux pour la santé ou abîmer
l'appareil.
L'utilisation à proximité d'explosifs, de ma-
tières très inflammables ou de réservoirs sous
pression. Risque d'incendie, d'éclatement et
d'explosion.
Utilisation à l'extérieur. La pluie et la saleté
détériorent l'appareil.
Le fonctionnement avec un réservoir vide.
La transformation sans autorisation de
l'appareil.
1.7 Si l'appareil est défectueux
N'utilisez jamais un appareil défectueux
ou ayant un cordon d'alimentation abîmé. Ris-
ques de blessures imminents.
Amenez l'appareil à réparer chez un ma-
gasin spécialisé ou chez votre SAV Royal.
Steam_and_Swing.book Seite 17 Donnerstag, 20. Januar 2011 10:29 10

18
2 Avant le nettoyage
2 Avant le nettoyage
2.1 Déballage
Déballez l'appareil et tous ses accessoires,
puis vérifiez si le contenu est bien complet
(ill. 2).
2.2 Montage
1. Montez le manche en emboîtant les tubes
et la poignée comme dans (ill. 3). Vous re-
connaîtrez le tube emboîtable du bas par
sa réglette de verrouillage.
2. Emboîtez le manche dans l'ouverture.
Vous entendez et sentez la réglette de
verrouillage (ill. 4/1) s'encliquer.
3. Placez le chiffon en microfibres correcte-
ment sur le sol et posez le pied à vapeur
dessus. Le chiffon de nettoyage est tenu
par une bande velcro.
Seulement pour les tapis :
4. Mettez la semelle glissante pour tapis
(ill. 7/3) sur le pied à vapeur (ill. 7/1) et le
chiffon (ill. 7/2).
2.3 Remplissage du réservoir
1. Assurez-vous que l'appareil est débran-
ché et que le cordon est retiré de la prise.
2. Tournez le bouchon de remplissage
contre le sens horaire.
3. Remplissez le réservoir à l'aide du réci-
pient livré avec les fournitures (ill. 5) avec
de l'eau du robinet froide et claire. N'utili-
sez pas d'autres récipients pour le rem-
plissage. Tenez compte de l'eau encore
restante dans le réservoir. Il y a danger de
renversement ou de débordement du ré-
servoir.
4. Fermez le bouchon de remplissage et
contrôlez sa bonne tenue.
ATTENTION:
Transportez et expédiez l'appareil unique-
ment dans son emballage d'origine afin
d'éviter tout dommage. Pour ce faire,
conservez précieusement l'emballage.
Jetez l'emballage dont vous n'avez plus
besoin en tenant compte des réglementa-
tions nationales et locales en vigueur.
REMARQUE:
Si vous constatez des défauts ou des dom-
mages dus au transport, contactez immé-
diatement votre revendeur.
REMARQUE:
Si vous voulez retirez le manche, appuyez
sur la réglette de verrouillage (ill. 4/1) puis
tirez le manche vers le haut.
AVERTISSEMENT:
Ne remplissez jamais un appareil qui est
encore branché au secteur. Ceci peut
entraîner une électrocution.
ATTENTION:
N'utilisez aucun additif dans l'eau. Ceci
pourrait endommager l'appareil.
REMARQUE:
Vous pouvez prolonger la durée de vie de
l'appareil en utilisant de l'eau distillée au
lieu de l'eau du robinet. Ceci est surtout
recommandé dans les régions où l'eau est
trop calcaire.
Steam_and_Swing.book Seite 18 Donnerstag, 20. Januar 2011 10:29 10

19
3Emploi
FR
3Emploi
.
La vapeur chaude facilite le nettoyage des
surfaces lisses. Le nettoyeur à vapeur fonc-
tionne entièrement sans détergents chimi-
ques.
Votre nettoyeur à vapeur ne sert pas au
nettoyage en profondeur des tapis ou pour
l'élimination de saletés incrustées.
3.1 Nettoyeur à vapeur
1. Avant de mettre l'appareil en service, véri-
fiez que le réservoir d'eau est bien rempli.
2. Branchez la fiche dans la prise de courant.
La lampe témoin rouge (ill. 1/8) s'allume.
3. Attendez env. 30 s. jusqu'à ce que le
voyant de service à vapeur bleu (ill. 1/9)
s'allume (ill. 6).
4. Votre Steam & Swing est maintenant prêt
à l'emploi. Enclenchez le bouton de va-
peur (ill. 1/7).
Sur les sols lisses :
Éteignez le nettoyeur à vapeur au plus
tard quand le film d'humidité apparaît sur le
sol.
Le nettoyage à vapeur avec le bouton à
vapeur éteint assure un séchage rapide et di-
minue le danger de glissement.
Sur les tapis :
Laissez le bouton à vapeur enclenché
pendant tout le nettoyage.
3.2 Rangement
1. Éteignez le nettoyeur à vapeur (ill. 1/7) et
retirez le cordon de la prise.
2. Enroulez le cordon d'alimentation. Vous
éviterez ainsi les accidents.
3. Attendez jusqu'à ce que le chiffon en mi-
crofibres et les pièces de l'appareil soient
refroidis.
4. Enlevez le chiffon en microfibres. Net-
toyez-le ZChapitre 4.2, „Nettoyage du
boîtier et des chiffons“.
AVERTISSEMENT:
Vérifiez l'appareil et le cordon d'alimentation
avant chaque utilisation. N'utilisez jamais un
appareil qui est endommagé.
ATTENTION:
Vérifiez avant le début du nettoyage si le
revêtement du sol est approprié pour le net-
toyage à vapeur. Si vous n'êtes pas sûr, net-
toyez d'abord une place peu visible. Res-
pectez toujours les consignes de nettoyage
relatives aux différentes matières. Ces der-
nières pourraient s'abîmer. Les surfaces en
verre peuvent se fendre sous l'action de la
chaleur brusque. Chauffez celles-ci en
maintenant la vapeur à une distance d'envi-
ron 25 cm.
Nous ne prenons pas la responsabilité pour
les dégâts dus à une utilisation inadaptée
de la vapeur chaude.
REMARQUE:
Le nettoyeur à vapeur est équipé d'une pro-
tection anti-surchauffe. En cas de sur-
chauffe, l'aspirateur s'éteint automatique-
ment (par exemple si le réservoir d'eau est
vide). Dans ce cas, éteignez le nettoyeur à
vapeur et débranchez-le. Recherchez la
cause de la surchauffe. Attendez environ 45
minutes. Une fois le nettoyeur à vapeur
refroidi, vous pouvez le remettre en marche.
REMARQUE:
Pour l'élimination de saletés incrustées,
nous conseillons de dissoudre les salissu-
res avec un produit chimique pour autant
que le revêtement du sol le permette.
ATTENTION:
Assurez-vous avant le branchement au cou-
rant que la tension électrique indiquée sur la
panneau signalétique correspond à celle de
la prise. N'utilisez que des prises avec
contact de protection.
Steam_and_Swing.book Seite 19 Donnerstag, 20. Januar 2011 10:29 10

20
4Entretien
Si vous rangez l'appareil pour une période
prolongée, videz le réservoir d'eau et séchez-
le complètement. Rangez l'appareil seule-
ment quand il est entièrement sec.
Rangez l'appareil dans un endroit frais et
sec, hors de portée des enfants.
4Entretien
4.1 Détartrer
Vous devez détartrer l'appareil tous les 6 mois
environ afin de prolonger sa durée de fonc-
tionnement.
1. Remplissez le réservoir d'eau et ajoutez
environ 1 tablette de produit décalcifiant
biodégradable (disponible dans le com-
merce). Respectez les consignes du fabri-
cant de produits décalcifiants.
2. Placez le pied à vapeur dans un récipient
qui peut récupérer la vapeur.
3. Enclenchez le bouton à vapeur.
4. Laissez passer la solution décalcifiante
env. 5 minutes.
5. Ensuite, patientez encore 5 minutes près
de l'appareil branché.
6. Répétez cette procédure 3 fois et éliminez
le reste de la solution.
4.2 Nettoyage du boîtier et des
chiffons
Nettoyer le corps de l'aspirateur unique-
ment avec un chiffon légèrement humide.
N'utilisez en aucun cas des nettoyants, déter-
gents ou de l'alcool car cela endommagerait
le corps de l'aspirateur.
Lavez les chiffons après chaque
utilisation. Sinon, des germes et des
moisissures peuvent se former jus-
qu'à la prochaine utilisation.
Lavez les chiffons à 60 º C max
sans ajout d'adoucissant. Renoncez
impérativement au lavage des chif-
fons avec de l'eau de Javel, au re-
passage et au séchoir. Cela réduirait
la capacité d'absorption ou même
endommagerait les chiffons.
5 Remèdes en cas d'anomalies
Avant de ramenez votre aspirateur chez le
SAV de Royal Appliance, veuillez vérifier, en
vous aidant du tableau ci-dessous, si vous ne
pouvez pas remédier à l'anomalie vous-même.
ATTENTION:
Ne rangez ou ne posez jamais l'appareil à
proximité directe d'une source de chaleur
(par ex. chauffage, four). Évitez de l'exposer
aux rayons du soleil. La chaleur peut
endommager l'appareil.
REMARQUE:
Nous conseillons de détartrer l'appareil plus
souvent dans les ménages avec de l'eau
très calcaire.
AVERTISSEMENT:
Avant de nettoyer l'appareil, éteignez-le et
laissez-le refroidir.
AVERTISSEMENT:
N'utilisez jamais un appareil défectueux ou
ayant un cordon d'alimentation abîmé. Ris-
ques de blessures imminents.
Anomalie Cause possible
Remède
La lampe témoin
ne s'allume pas
Le cordon d'alimentation
n'est pas branché
Brancher le cordon.
Il n'y pas de courant à la
prise.
Essayez l'appareil sur une
autre prise.
L'appareil ne
produit pas de
vapeur
La protection de surchauf-
fe s'est déclenchée car le
réservoir d'eau est vide.
Déclencher le bouton à va-
peur, retirez le cordon et
remplir le réservoir.
Durée jusqu'à
service à vapeur
est inhabituelle-
ment longue.
Les voies d'eau/vapeur
sont entartrés.
Déclenchez le bouton à
vapeur, retirez le cordon et
détartrez l'appareil
ZChapitre 4.1, „Détartrer“.
Steam_and_Swing.book Seite 20 Donnerstag, 20. Januar 2011 10:29 10
Seite wird geladen ...
Seite wird geladen ...
Seite wird geladen ...
-
 1
1
-
 2
2
-
 3
3
-
 4
4
-
 5
5
-
 6
6
-
 7
7
-
 8
8
-
 9
9
-
 10
10
-
 11
11
-
 12
12
-
 13
13
-
 14
14
-
 15
15
-
 16
16
-
 17
17
-
 18
18
-
 19
19
-
 20
20
-
 21
21
-
 22
22
-
 23
23


Royal Appliance Steam & Swing Bedienungsanleitung
- Typ
- Bedienungsanleitung
in anderen Sprachen

Andere Dokumente
-
Dirt Devil M 319 AQUA CLEAN Bedienungsanleitung
-
Dirt Devil Factory M3330 Bedienungsanleitung
-
-
Shark Pocket Pad steam cleaner Bedienungsanleitung
-
SEVERIN ST 7181 Bedienungsanleitung
-
-
Fakir DR 36 Bedienungsanleitung
-
ARIETE BALAI 4163 Bedienungsanleitung
-
Silvercrest SDM 1500 A1 Benutzerhandbuch