Sonus Faber IL CREMONESE Bedienungsanleitung
- Kategorie
- Soundbar-Lautsprecher
- Typ
- Bedienungsanleitung


Gentile Cliente,
desideriamo ringraziarLa e complimentarci con Lei per aver scelto Sonus faber Il Cremonese.
I diffusori Sonus faber sono pensati per procurarLe immediatamente la massima soddisfazione ma poiché è nostro
preciso interesse che Lei ottenga il miglior risultato possibile nell’ascolto e che ciò avvenga nella piena sicurezza, La
invitiamo a leggere attentamente, prima dell’installazione, questo manuale d’istruzioni.
Qualora dovessero sorgerLe dubbi o curiosità, Le consigliamo di rivolgersi al personale tecnico del suo punto
vendita di fiducia, al distributore ufficiale Sonus faber della nazione in cui vive o prendere contatto direttamente con il
dipartimento di customer service di Sonus faber, scrivendo a [email protected].
Infine Le suggeriamo vivamente di registrare il suo diffusore on-line sul sito www.sonusfaber.com.
Buona Musica!
Dear Customer,
Thank you and congratulations for having purchased Il Cremonese by Sonus faber.
Sonus faber designs its speakers to immediately meet our customers’ highest expectations. As our aim is to ensure
you get the best possible listening result in full safety, please read this instruction manual carefully before installation.
Should you have any doubts or enquiries, please contact the technical staff of your sales point, the official Sonus
faber distributor in your country, or contact Sonus faber’s customer service directly by writing to customerservice@
sonusfaber.com.
Finally, we warmly suggest registering your speaker online, at www.sonusfaber.com.
Enjoy your music!
Verehrter Kunde,
Wir bedanken uns bei Ihnen und gratulieren zum Kauf von Sonus faber Il Cremonese.
Die Lautsprechersysteme Sonus faber sind darauf ausgelegt, Ihnen sofort den größtmöglichen Hörgenuss zu
verschaffen. Da es aber auch in unserem Interesse liegen muss, dass Sie die Klangleistungen nach Möglichkeit voll
und sicher ausschöpfen, bitten wir Sie, vor der Installation diese Bedienungsanleitung sorgfältig zu lesen.
Sollten Zweifel oder weitergehende Fragen bestehen, empfehlen wir Ihnen, sich an das technische Personal Ihres
Händlers, an den offiziellen Vertrieb von Sonus faber in Ihrem Land oder auch direkt an den Kundenservice von Sonus
faber zu wenden. Hierzu schreiben Sie bitte eine E-Mail an [email protected].
Des Weiteren empfehlen wir Ihnen das Lautsprechersystem online unter www.sonusfaber.com zu registrieren.
Wir wünschen Ihnen einen unbeschwerten Musikgenuss!
Cher Client,
Nous souhaitons vous remercier et vous féliciter d’avoir choisi Sonus faber II Cremonese.
Les haut-parleurs Sonus faber sont conçus pour vous donner immédiatement le maximum de satisfaction. Toutefois,
comme nous avons précisément intérêt à ce que vous obteniez les meilleurs résultats possibles dans l’écoute et que
cela soit possible en toute sécurité, nous vous invitons à lire attentivement ce manuel d’instructions avant d’installer
l’équipement.
En cas de doute ou de questions à poser, n’hésitez pas à contacter le service technique de votre point de vente, le
distributeur officiel Sonus faber de votre pays ou prenez directement contact avec le service après-vente de Sonus
faber, en écrivant à l’adresse suivante : [email protected].
Enfin, nous vous conseillons d’enregistrer votre haut-parleur en ligne sur le site Internet www.sonusfaber.com.
Bonne Musique !

ITALIANO
APERTURA DELL’IMBALLO
INDICAZIONI SPECIFICHE
Il Cremonese è imballato in modo tale da preservarlo efficacemente e al tempo stesso rendere semplice la sua estrazione.
Suggeriamo comunque di seguire le seguenti indicazioni generali:
• Conservare gli imballi per eventuali futuri trasporti;
• Durante l’apertura dell’imballo non indossare orologi, braccialetti, anelli, etc. per evitare di graffiare i diffusori e le
loro preziose finiture. Uguale attenzione si dovrà porre nella protezione di eventuali elementi metallici presenti
nell’abbigliamento indossato quali cerniere, bottoni, fibbie, rivetti, ecc.
• Aprire l’imballo rispettando le indicazioni poste sullo stesso.
IMPORTANTE: Si raccomanda fortemente di eseguire le seguenti operazioni con l’aiuto di almeno un’altra persona.
Si raccomanda inoltre di procedere con l’apertura dell’imballo dei diffusori in una posizione più vicino possibile alla
posizione definitiva nella sala d’ascolto.
MONTAGGIO MASCHERINE TENDIFILO
Al diffusore possono venire applicate le mascherine tendifilo, contenute nella scatola accessori, seguendo scrupolosamente le
seguenti istruzioni dedicate per le mascherine frontali e laterali.
MASCHERINE FRONTALI
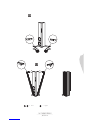
1. Inserire i perni delle asticelle della mascherina tendifilo
nelle apposite guide, iniziando dalla parte inferiore del
diffusore (fig. 8);
2. tendere gli elastici della mascherina sino ad inserire i
perni delle asticelle della mascherina nelle apposite
guide nella parte superiore del diffusore (fig. 9).
CONTENUTO DELL’IMBALLO
Oltre al diffusore, all’interno dell’imballo troverete una scatola accessori contenente:
• owner’s Manual Il Cremonese;
• chiavetta USB;
• 8 punte e 8 sottopunte;
• 4 blocca punte;
• 2 mascherine tendifilo frontali;
1. Rimuovere lo Stratocell superiore di protezione;
2. rimuovere il sacco di protezione in plastica;
3. rimuovere le viti di fissaggio al pallet poste sulla
base del diffusore utilizzando la chiave a brugola in
dotazione (fig. 1);
4. ruotare attentamente il diffusore (fig.2);
ATTENZIONE! NON afferrare il diffusore dalla lastra in
alluminio e vetro del top. NON TOCCARE gli altoparlanti
mentre si effettua questa operazione. (fig. 3);
5. avvitare le 3 punte poste sulla parte frontale e ai lati
della base del diffusore (fig. 4);
6. inclinare frontalmente il diffusore fino al punto in cui la
punta frontale tocca il pavimento.
ATTENZIONE! Posizionare sotto un panno in microfibra
o un tappeto al fine di proteggere la base in allumino
(fig. 5);
7. avvitare la punta posteriore (fig. 6);
8. spostare il diffusore dal pallet facendo perno sulla
punta anteriore (fig. 7);
9. posizionare il diffusore nella sua posizione finale nella
sala d’ascolto.
• 4 mascherine tendifilo laterali;
• 1 chiave a brugola;
• panno in microfibra;
• flacone detergente;
• 2 coperture antipolvere in tessuto

ITALIANO
ISTRUZIONI PER IL COLLEGAMENTO
L’operazione è da effettuarsi tassativamente con gli apparecchi spenti!
Sul pannello posteriore di Il Cremonese sono presenti due coppie di morsetti di connessione, una coppia per le polarità positive,
l’altra per le polarità negative (fig. 12).
Esse accettano collegamenti con forcelle, banane e con cavo sguainato.
All’interno della confezione Il Cremonese presenta già installati in morsettiera i ponticelli di collegamento.
Segue una descrizione relativa alle diverse tipologie di collegamento in un ordine tale da determinare un aumento progressivo
della qualità di riproduzione sonora in termini di definizione, controllo e dettaglio.
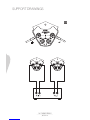
MONO-WIRING
O COLLEGAMENTO STANDARD
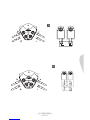
BI-WIRING
BI-AMPLIFICAZIONE
Il collegamento standard si esegue utilizzando un singolo
amplificatore stereofonico o una coppia di amplificatori
monofonici, unitamente ad un singolo set di cavi di potenza.
Si dovrà procedere al collegamento lasciando i terminali
collegati tra loro tramite i ponticelli, così come la si trova
appena estratta dall’imballo, come illustrato in (fig. 12).
Questo tipo di connessione ha lo scopo di aumentare
la qualità generale della riproduzione, in particolare la
risoluzione dei dettagli delle basse frequenze. Essa si esegue
utilizzando un singolo amplificatore stereofonico o una
coppia di amplificatori monofonici, unitamente a due set di
cavi di potenza, come illustrato in (fig. 13).
La bi-amplificazione apporta un generale miglioramento
del suono riprodotto ed in particolare una miglior dinamica
e controllo delle basse frequenze. La sua realizzazione con
due amplificatori stereofonici o un quartetto di amplificatori
monofonici, prevede l’utilizzo di due coppie di cavi di
potenza e la rimozione dei ponticelli. Un amplificatore di
potenza stereofonico (o con una coppia di monofonici) verrà
impiegato per l’amplificazione della sezione medio-acuta e il
secondo amplificatore andrà ad alimentare la sezione grave.
Si veda (fig. 14).
Da ultimo ricordiamo che l’accurato serraggio dei contatti
e la verifica periodica degli stessi contribuiscono al
miglioramento delle prestazioni.
MASCHERINE LATERALI
1. Individuare la mascherina laterale destra e sinistra
con l’ausilio degli indicatori grafici posti sull’asticella in
alluminio della mascherina (fig. 10);
2. inserire i perni delle asticelle della mascherina tendifilo
nelle apposite guide, iniziando dalla parte inferiore del
diffusore e tendere gli elastici della mascherina sino
ad inserire i perni delle asticelle della mascherina nelle
apposite guide nella parte superiore del diffusore (fig. 11).
Qualora si volesse precedere con la rimozione delle mascherine tendifilo, sfilare i perni delle asticelle iniziando dalla parte
superiore e procedendo verso il basso.
IMPORTANTE: Durante le operazioni di applicazione e rimozione della mascherina tendifilo sopra descritte fare
molta attenzione a non danneggiare il frontale del diffusore, i fianchi in pelle ed i subwoofer laterali.

CONSIGLI DI INSTALLAZIONE:
AMPLIFICAZIONE E DISPOSIZIONE
DE IL CREMONESE IN AMBIENTE
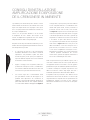
Si potrebbero porre moltissimi quesiti in merito al corretto
interfacciamento de Il Cremonese, ma sentiamo la necessità
di precisare semplicemente che un progetto come questo
non è concepito per funzionare ottimamente solamente con
un solo tipo d’amplificazione.
L’unica cosa che possiamo affermare è che un sistema
di altoparlanti allo stato dell’arte avrà bisogno di un
sistema di amplificazione ugualmente allo stato dell’arte,
indipendentemente dalla tecnologia impiegata.
Dal punto di vista del posizionamento in ambiente, possono
risultare utili alcuni suggerimenti generali al fine di ottenere la
massima prestazione possibile:
1. la scelta della sala d’ascolto e del posizionamento
dei diffusori influenzano la resa di tutto il sistema di
riproduzione. Sarà preferibile scegliere una stanza
di forma irregolare poiché questo può migliorare la
risposta in ambiente in quanto viene ad essere limitata
la formazione di onde stazionarie;
2. tappeti e tendaggi, senza esagerazioni, influiscono
positivamente sulla risposta acustica, contribuendo a
loro volta all’assorbimento delle riflessioni e delle onde
stazionarie che si generano nella stanza d’ascolto;
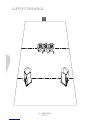
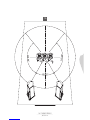
3. non esistono regole fisse e universalmente valide
per ogni ambiente. Tuttavia un buon approccio al
problema della disposizione de Il Cremonese in
ambiente è quello di partire dividendo idealmente la
pianta della stanza d’ascolto in tre superfici equivalenti,
così come mostrato dalle linee tratteggiate nella figura 15.
Sarà opportuno, a questo punto, posizionare i diffusori
acustici sulla prima delle linee così individuate e ben
distanti dalle pareti laterali, nonché posizionare la
postazione d’ascolto sulla seconda, come mostrato
dalla figura 15. In questo modo si assicura la presenza
di una buona quantità d’aria tutto intorno ai soggetti
coinvolti nella riproduzione stereofonica, ponendo gli
altoparlanti in condizione di lavorare in totale libertà
e l’ascoltatore al riparo dalle riflessioni acustiche
che si generano in prossimità dei muri e degli angoli
della stanza. La figura 16 mostra come gli assi dei
diffusori dovrebbero essere fatti convergere verso il
punto d’ascolto, incrociandosi su di esso e creando
così la classica configurazione “a triangolo isoscele”.
Quest’ultimo accorgimento, che consiste nell’orientare
i diffusori puntando letteralmente alle orecchie
dell’ascoltatore, permette di migliorare nettamente la
messa a fuoco dell’immagine stereofonica.
Nella consapevolezza che il procedimento esposto, volto a
creare delle condizioni d’ascolto vicine a quelle ideali, non
sarà applicabile da tutti i nostri clienti a causa di oggettive
problematiche legate alla vivibilità degli ambienti domestici,
ci sentiamo comunque di consigliare di posizionare i due
diffusori Il Cremonese lontano dagli angoli della sala e
lontani dalle pareti laterali e di fondo di almeno 100 cm.
Consigliamo inoltre di posizionare i due diffusori ad una
distanza tra loro di non meno di 180 cm così come tra ogni
singola Il Cremonese ed il punto d’ascolto. I primissimi ascolti
probabilmente potranno necessitare di una variazione
della distanza tra i diffusori e tra ciascuno di essi ed il punto
d’ascolto.
ITALIANO

MANUTENZIONE E PULIZIA
DE IL CREMONESE
Il Cremonese è stato progettato e fabbricato secondo i più alti standard qualitativi.
Tuttavia, nella remota ipotesi in cui si manifestasse un guasto o malfunzionamento, i diffusori sono comunque coperti da garanzia
secondo i termini previsti dalla normativa del Paese dove sono stati acquistati. Pertanto, in tal caso, invitiamo il possessore a
rivolgersi al rivenditore Sonus faber presso cui ha effettuato l’acquisto e a far riferimento alla suddetta normativa.
Inoltre, nel suo interesse, ci permettiamo di fare presente:
Il Cremonese non necessita di manutenzioni particolari se non quella di una periodica pulizia generale. Per preservarne l’aspetto
intatto si consiglia caldamente di ricoprire il diffusore con la protezione in tessuto fornita in dotazione, soprattutto nell’eventualità
che il sistema di altoparlanti venga lasciato “a riposo” per un periodo di tempo prolungato.
Per la pulizia della parte lignea del cabinet si sconsiglia l’utilizzo di prodotti quali cere o detergenti che potrebbero macchiare
o danneggiare il legno o gli altoparlanti. Si consiglia semplicemente l’uso di un panno morbido (microfibra ad esempio, come
quello fornito in dotazione) ed eventualmente appena inumidito (con il liquido in dotazione). Il legno è un materiale naturale
e sempre vivo, quindi sensibile agli agenti esterni. Consigliamo di evitare il posizionamento del diffusore in prossimità di fonti
di calore o in vicinanza di finestre e vetrate, in particolar modo durante i mesi estivi. Si consiglia inoltre di non porre il diffusore
all’esposizione diretta dei raggi solari.
Per la cura delle superfici metalliche e del vetro de Il Cremonese, si consiglia l’utilizzo del panno e del liquido in dotazione.
Per l’eventuale polvere depositatasi sul mobile, sui pannelli frontali e sugli altoparlanti usare un pennello morbido facendo molta
attenzione a non danneggiare le delicate membrane degli stessi.
Tutte queste semplici attenzioni conserveranno il diffusore perfetto per molti anni. Il tempo contribuirà a migliorare il suono per
effetto del rodaggio delle parti in movimento (membrane e sospensioni) e la camera acustica risponderà sempre meglio quanto
più sarà usata: sono le stesse regole che valgono per gli strumenti musicali a corda!
GARANZIA
• di conservare assolutamente il documento comprovante l’acquisto in modo da poterlo esibire al rivenditore in caso di
necessità;
• di consegnare i diffusori da riparare con il loro imballo originale affinché possano essere trasportati in sicurezza, e
accompagnati da una descrizione del malfunzionamento o difetto eventualmente riscontrato;
• che la garanzia copre i diffusori da eventuali difetti di costruzione purché gli stessi non siano stati smontati, modificati,
manomessi o impiegati per usi o con modalità non previste dal presente manuale.
ITALIANO

OPENING THE PACKAGING
ENGLISH
Il Cremonese is packed in a manner that effectively preserves it, while making its removal simple.
We suggest, however, that you follow these general recommendations:
• keep all packaging for any future transport;
• do not wear watches, bracelets, rings etc. in order to avoid scratching the speakers and their precious finishes when
unpacking. The same care will be taken to protect the speakers from any metal finishes on the clothes you are wearing,
such as zips, buttons, belt clasps, rivets, etc.
• open the package following the instructions printed on it.
IMPORTANT: We strongly suggest that the following operations are carried out by no less than two persons.
Moreover, the speaker package should be opened in a place that is as close as possible to the final location of the
speaker in the listening room.
SPECIFIC INDICATIONS
INSTALLING THE FRONT AND SIDE GRILLES
The speaker can be fitted with front and grilles, to be found in the accessories box, by carefully following these instructions for the
front and lateral masks:
FRONT GRILLES
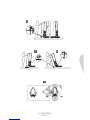
1. Insert the pins of the bars of the grille in the relevant
guides, starting from the bottom of the speaker (fig. 8);
2. Stretch the elastic bands of the grill until you are able to
insert the pins of the grille bars into the relevant guides
in the upper part of the speaker (fig. 9).
CONTENT OF THE PACKAGE
In addition to the speaker, you will find a box of accessories in the packaging that contains:
• il Cremonese Owner’s Manual;
• USB stick;
• 8 spikes and 8 floor disks;
• 4 spike lock nuts;
• 2 front grilles;
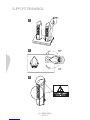
1. remove the protective upper Stratocell layer;
2. remove the protective plastic bag;
3. remove the screws fastening the speaker to the pallet
using the supplied Allen wrench (fig. 1);
4. carefully rotate the speaker (fig. 2);
WARNING! DO NOT grab the speaker from the
aluminium plate and the glass pane on its top.
DO NOT TOUCH the drivers while performing this
operation. (fig. 3);
5. screw in the 3 spikes on the front and on the sides of the
speaker base (fig. 4);
6. tilt the speaker frontwards until the front spike touches
the floor.
WARNING! Place a microfibre cloth or a carpet under
the aluminium base to protect it (fig. 5);
7. screw in the rear spike (fig. 6);
8. remove the speaker from the pallet by pivoting on the
front spike (fig. 7);
9. then put the speaker in its final position in the listening
room.
• 4 side grilles;
• 1 Allen wrench;
• 1 microfibre cloth;
• 1 bottle of detergent;
• 2 dust-proof fabric covers

ENGLISH
CONNECTION INSTRUCTIONS
This operation must be carried out with all equipment switched off!
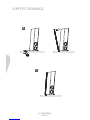
The rear panel of Il Cremonese features two pairs of terminal boards, one pair for the positive polarity, and the other for the
negative polarity (fig. 12). These accept connection with spade connectors, bananas, and with bare cables.
Inside the package, all the connection jumpers are already installed on the terminal board of Il Cremonese.
Please find below a description of the different connections; the sequence of these connections is marked by a progressive
escalation in the quality of the sound reproduction in terms of definition, control and details.
SIDE GRILLES
1. Identify the right and left side grilles using the marks on
the aluminium bar of each grille (fig. 10);
2. fit the pins of the bars of the side grille in the relevant
guides, starting from the bottom part of the speaker
and pull the elastic bands of the grille until the pins of
the grilles bars are fitted in the relevant guides in the
top of the speaker (fig. 11).
If you wish to disassemble the front and side grilles, first pull the bar pins out starting from the top of the speaker, then move to
the base.
IMPORTANT: While mounting or removing the front and lateral grilles as described above, be careful not to damage
the front part of the speaker, the leather sides and the lateral subwoofers.
MONO-WIRING
OR STANDARD CONNECTION
BI-WIRING
BI-AMPLIFICATION
The standard connection requires a single stereophonic
amplifier or a pair of monophonic amplifiers, together with a
single kit of power cables.
The connection shall be made by leaving the terminals
connected one to the other by means of the jumpers, as they
are already set when the speaker is unpacked, and as shown
in figure 12.
This type of connection improves the general reproduction
quality, and in particular the detail resolution at low
frequencies. It is performed by using a single stereophonic
amplifier or a pair of monophonic amplifiers, together with
two sets of power cables, as shown in figure 13.
Bi-amplification improves the reproduced sound in
general, and ensures greater dynamics and control of bass
frequencies in particular. To produce this configuration with
either two stereo amplifiers or four mono amplifiers, you need
to use two pairs of power cables and remove the jumpers.
A stereo amplifier (or a pair of mono amplifiers) is used to
amplify the medium-acute range and the second amplifier
will power the low range. See figure 14.
Finally, the accurate tightening of the contacts and a periodic
check of these contributes to improved performance.

INSTALLATION TIPS:
AMPLIFICATION AND POSITIONING
OF IL CREMONESE IN THE ROOM
There are countless questions about the proper interfacing
of Il Cremonese, but what we would like to emphasise is that
a project like this is not designed to be at its first with just a
specific type of amplification.
All we can say is that a state-of-the-art loudspeaker system
requires an amplification system that is just as state-of-the-art,
no matter what technology is used.
Regarding the position of the loudspeakers in a room, some
general advice can prove useful to obtain the maximum
performance possible:
1. the choice of the listening room and the speaker
position influence the performance of the whole
system. A room with an irregular shape is preferable;
this type of room improves the response in the
environment because it limits the formation of standing
waves;
2. rugs and curtains (without exaggerating) positively
influence the acoustic response, because they
contribute to the absorption of reflections and standing
waves that are created in the listening room;
3. there are no hard and fast rules for every environment.
A good approach to the issue of positioning Il
Cremonese in a room, however, is to virtually divide the
listening room into three equal parts, as shown by the
broken lines in figure 15.
At this point, position the speakers on the first of these
broken lines and well away from the side walls.
The listening position should be placed on the second
broken line, as shown in figure 15.
In this manner a good amount of air is guaranteed all
around the subjects involved in the stereo reproduction,
because the speakers can work freely while the listener
is not struck by the acoustic reflections that generate
near the walls and the corners of the room.
Figure 16 shows how the speakers should be angled
to converge towards the listening point, thus creating
the classic ‘isosceles triangle’ configuration.
This final adjustment, consisting of angling the
speakers literally towards the ears of the listener,
greatly improves the focus of the stereophonic image.
We are aware that many of our customers will not be able
to create these quasi-ideal listening conditions because
of objective problems connected with the organization
of space and furniture in a house; therefore we advise
positioning the Il Cremonese speakers away from the room
corners and keeping them at a distance of at least 100 cm
min. from the side and back walls. We also recommend
placing the two speakers at a distance of no less than 180 cm
from one another and between each Il Cremonese speaker
and the listening point.
During the very first listening occasions you might need to
change the distance between the speakers and between
each speaker and the listening position.
ENGLISH

MAINTENANCE AND CLEANING
OF IL CREMONESE
Il Cremonese speakers are designed and built in compliance with the highest quality standards.
Should however a fault or a malfunctioning occur, the speakers are covered by guarantee in compliance with the regulations
in force in the country were the loudspeakers were purchased. In such cases, please contact the Sonus faber dealer where you
purchased the loudspeaker, and refer to the relevant regulation.
In addition and for your convenience please remember:
Il Cremonese speakers do not require any special maintenance other than regular general cleaning. To preserve its look, we
warmly recommend protecting the speaker with the fabric cover provided in the package, especially when you expect not to use
the speaker for a long period of time.
Do not use products such as wax or detergents to clean the wooden part of the cabinet, because these could stain or damage
the wood or the drivers. We recommend simply using a clean soft cloth (microfibre for example, like the one supplied in the
package), possibly slightly damp (with the supplied liquid). Wood is a natural, living material that can be affected by environmental
conditions. We advise keeping the speakers away from heat sources or windows, in particular during the summer months. We
advise keeping the speakers away from direct sunlight.
To clean the metal surfaces and the glass of Il Cremonese, we recommend using the supplied cloth and liquid.
Any dust on the unit, on the front panels or the drivers must be removed using a soft paintbrush, being very careful not to damage
their delicate membranes.
These simple guidelines will help keep your speaker perfect for many years. Time will help improve the sound by breaking in the
moving parts of the speaker (membranes and suspensions), and the acoustic chamber will become accustomed to music being
played the more it is used – much like what happens with acoustic string instruments!
GUARANTEE
• to absolutely keep the receipt that proves you have purchased the loudspeaker, which receipt you will exhibit to the
dealer in case of need;
• that the speakers in need of repair should be returned in their original packaging in order to be shipped safely, together
with a description of the malfunction or defect noticed by the customer;
• the guarantee covers the speakers for any construction faults as long as they have not been dismantled, modified,
tampered with or used for purposes or in ways that have not been outlined in this manual.
ENGLISH

DEUTSCH
ÖFFNEN DER VERPACKUNG
SPEZIELLE ANGABEN
Il Cremonese ist so verpackt, dass es wirksam geschützt und sich gleichzeitig leicht entnehmen lässt.
Trotzdem empfehlen wir, die folgenden allgemeinen Hinweise zu befolgen:
• heben Sie das Verpackungsmaterial für einen möglichen zukünftigen Transport auf.
• tragen Sie beim Öffnen der Verpackung keine Uhren, Armbänder, Ringe oder Ähnliches, damit die Lautsprecherboxen
und ihre edlen Oberflächen nicht verkratzen können. Die gleiche Sorgfalt ist auf den Schutz vor möglichen Metallteilen
an der getragenen Kleidung zu verwenden wie etwa Reißverschlüssen, Knöpfen, Gürtelschnallen oder Nieten.
• öffnen Sie die Verpackung gemäß den Angaben auf der Verpackung.
WICHTIG: Es wird dringend empfohlen, sich bei den folgenden Schritten von mindestens einer weiteren Person
Hilfestellung leisten zu lassen. Außerdem wird empfohlen, die Verpackung der Lautsprechersysteme so nahe wie
möglich am endgültigen Aufstellungsort im Hörraum zu öffnen.
MONTAGE DER DRAHTSPANNMASKEN
Am Lautsprechersystem können Drahtspannmasken, die sich in der Zubehörschachtel befinden, angebracht werden. Hierfür die
folgenden Anweisungen, die sich auf die Masken vorne und an der Seite beziehen, genau befolgen.
MASKEN VORNE
1. Im unteren Teil des Lautsprechersystems beginnend,
die Stifte für die Stäbchen der Drahtspannmaske in die
entsprechenden Führungen einfügen (Abb. 8).
2. Die Gummis der Maske spannen, bis die Stifte für die
Stäbchen der Maske in die zugehörigen Führungen im
oberen Teil des Lautsprechersystems eingeführt sind
(Abb. 9).
INHALT DER VERPACKUNG
Neben dem Lautsprechersystem finden Sie in der Packung eine Zubehörschachtel mit folgendem Inhalt:
• 1 bedienungsanleitung Il Cremonese;
• 1 USB-Stick;
• 8 spikes und 8 Spikeuntersetzer;
• 4 einschraubmuttern;
• 2 drahtspannmasken vorn;
1. Das obere Schutzmaterial aus Stratocell entfernen.
2. Den Schutzbeutel aus Plastik entfernen.
3. Die Befestigungsschrauben von der Palette an der
Basis des Lautsprechersystems entfernen. Hierzu
den im Lieferumfang enthaltenen Inbusschlüssel
verwenden (Abb. 1).
4. Das Lautsprechersystem vorsichtig drehen (Abb. 2).
ACHTUNG! Das Lautsprechersystem NICHT an der
Aluminiumplatte und der oben liegenden Glasscheibe
ergreifen. Während dieses Vorgangs die Lautsprecher
NICHT BERÜHREN. (Abb. 3);
5. Die 3 Spikes anschrauben, die sich vorne und seitlich an
der Basis des Lautsprechersystems befinden (Abb. 4).
6. Das Lautsprechersystem bis zu der Stelle nach vorne
neigen, an der der vordere Spike den Boden berührt.
ACHTUNG! Ein Mikrofasertuch oder einen Teppich
unterlegen, um die Aluminiumbasis zu schützen (Abb. 5).
7. Den hinteren Spike anschrauben (Abb. 6).
8. Das Lautsprechersystem von der Palette nehmen. Hierzu
den vorderen Spike als Basis verwenden (Abb. 7).
9. Das Lautsprechersystem an der vorgesehenen Stelle im
Hörraum aufstellen.
• 4 seitliche Drahtspannmasken;
• 1 inbusschlüssel;
• 1 mikrofasertuch;
• 1 fläschchen mit Reinigungsmittel;
• 2 gewebeabdeckungen gegen Staub

DEUTSCH
ANLEITUNG FÜR DEN ANSCHLUSS
Vorher sind alle Geräte auszuschalten!
Auf dem rückwärtigen Paneel des Modells Il Cremonese befinden sich zwei Paar Anschlussklemmen: ein Paar umfasst die
Pluspole, das andere die Minuspole (Abb. 12). Verbindung mittels Gabelverbinder, Bananenstecker und abgemantelten Kabel
möglich.
Bereits im verpackten Zustand sind bei Il Cremonese die Anschlussbrücken auf dem Klemmenblock installiert.
Nachstehend sind die verschiedenen Anschlussarten in der Reihenfolge zunehmender Tonwiedergabequalität (in Form von
Schärfe, Kontrolle und Detail) beschrieben.
MONO-WIRING
ODER STANDARDVERBINDUNG
BI-WIRING
BI-AMPING
Der Standardanschluss wird mit einem einzelnen
Stereoverstärker oder einem Paar Monoverstärker sowie
einem einzelnen Satz Leistungskabel vorgenommen.
Beim Anschluss müssen die Endstücke über eine Brücke
miteinander verbunden bleiben. Dieser Zustand ist nach
dem Auspacken des Systems gegeben, wie Abbildung 12
zeigt.
Durch diese Art von Anschluss soll die allgemeine
Wiedergabequalität erhöht und insbesondere die Auflösung
der Details bei den niedrigen Frequenzen verbessert werden.
Verwendet werden dazu ein einzelner Stereoverstärker oder
ein Paar Monoverstärker sowie zwei Leistungskabelsätze,
wie Abbildung 13 zeigt.
Das Bi-Amping verbessert allgemein die Tonwiedergabe,
insbesondere die Dynamik und die Kontrolle niedriger
Frequenzen. Verwendet werden zwei Stereoverstärker
oder vier Monoverstärker. Zwei Leistungskabelpaaren und
die Entfernung der Brücken sind vorgesehen. Ein Stereo-
Leistungsverstärker (oder ein Paar Monoverstärker) wird für
den mittelhohen Abschnitt, der zweite Verstärker für den
tiefen Abschnitt verwendet, siehe Abbildung 14.
Zuletzt sei daran erinnert, dass sich das sorgfältige
Festziehen der Kontakte und ihre regelmäßige Überprüfung
leistungsverbessernd auswirken.
SEITLICHE MASKEN
1. Die rechte und die linke seitliche Maske unter
Zuhilfenahme der grafischen Hinweise auf dem
Aluminiumstäbchen der Maske bestimmen (Abb. 10).
2. Die Stifte der Stäbchen der Drahtspannmaske in die
zugehörigen Führungen einführen. Dabei im unteren
Bereich des Lautsprechersystems beginnen und
die Gummis der Maske spannen, bis die Stifte für die
Stäbchen der Maske in die zugehörigen Führungen im
oberen Teil des Lautsprechersystems eingeführt sind
(Abb. 11).
Sollen die Drahtspannmasken entfernt werden, sind - von oben nach unten - die Stifte der Stäbchen herauszuziehen.
WICHTIG: Während der oben beschriebenen Vorgänge zur Anbringung und Entfernung der Drahtspannmaske ist
höchste Vorsicht geboten, damit das Frontteil des Lautsprechersystems, die Seitenelemente aus Leder und die
seitlichen Subwoofer nicht beschädigt werden.

TIPPS FÜR DIE INSTALLATION:
VERSTÄRKUNG UND ANORDNUNG
VON IL CREMONESE IM RAUM
Zur korrekten Vernetzung von Il Cremonese ließe sich
trefflich diskutieren. Wir möchten jedoch hervorheben, dass
ein Projekt wie dieses nicht optimal für den Betrieb mit nur
einer Art von Verstärkung konzipiert wurde.
Das Einzige, was wir mit Sicherheit sagen können, ist, dass
ein Lautsprechersystem auf dem neuesten Stand der
Technik ein Verstärkersystem benötigt, das unabhängig von
der verwendeten Technik ebenfalls dem neuesten Stand der
Technik entspricht.
Im Hinblick auf die Positionierung im Raum mögen einige
allgemeine Tipps nützlich sein, um die größtmögliche
Leistung zu erzielen:
1. Die Wahl des Raumes und die Platzierung der
Lautsprecher wirken sich auf die Leistung des
gesamten Wiedergabesystems aus. Vorzugsweise
sollte ein unregelmäßig geformter Raum gewählt
werden, da dieser die Bildung stehender Wellen
begrenzen und so die Leistung im jeweiligen Ambiente
verbessern kann.
2. Ohne es zu übertreiben, beeinflussen Teppiche und
Vorhänge die akustische Leistung positiv und tragen
dazu bei, dass im Raum entstehende Reflexionen und
stehende Wellen, absorbiert werden.
3. Es gibt keine festen Regeln, die für alle Umgebungen
allgemeingültig sind. Trotzdem sollte man sich dem
Problem der Anordnung von Il Cremonese im Raum
annähern, indem man den Grundriss des Hörraums
idealerweise in drei gleiche Flächen teilt, wie es
die gestrichelten Linien in Abbildung 15 zeigen.
Nun sollten die Lautsprecher auf der ersten der
solchermaßen eingezeichneten Linien, und zwar
recht weit von den Seitenwänden entfernt, positioniert
werden. Die Stelle, an der gehört werden soll, ist auf
der zweiten Linie zu platzieren, wie Abbildung 15
zeigt. Auf diese Weise ist sichergestellt, dass die für
die Stereo-Wiedergabe genutzten Elemente von
ausreichend Luft umgeben sind. Auf der einen Seite
können die Lautsprecher so völlig ungehindert
funktionieren, auf der anderen Seite ist der Hörer vor
akustischen Reflexionen geschützt, die in Wand- und
Ecknähe entstehen. Die Abbildung 16 gibt an, wie
die Achsen der Lautsprecher an der Stelle des Hörers
zusammenlaufen und sich dort kreuzen sollten. Auf
diese Weise wird die klassische Anordnung eines
„gleichschenkligen Dreiecks“ geschaffen. So werden
letztendlich die Lautsprecher buchstäblich auf die
Ohren des Hörers zeigend ausgerichtet und eine
klarere Fokussierung des Stereobildes wird ermöglicht.
Wir sind uns bewusst, dass die erläuterte Vorgehensweise
für die Schaffung nahezu idealer Hörbedingungen nicht
für alle unserer Kunden machbar ist. Bedingt ist dies durch
objektive Schwierigkeiten, denn die häusliche Umgebung
muss vor allem praktischen Wohnanforderungen genügen.
Trotzdem empfehlen wir, die beiden Lautsprecher Il
Cremonese fern von den Raumecken zu platzieren sowie
von den Seitenwänden und von der Rückwand einen
Abstand von mindestens 100 cm einzuhalten. Des Weiteren
wird empfohlen, die beiden Lautsprecher Il Cremonese
mindestens 180 cm voneinander und von der Stelle des
Hörers entfernt aufzustellen.
Beim ersten Hören ist wahrscheinlich eine Änderung des
Abstandes zwischen den Lautsprechersystemen sowie
zwischen den einzelnen Lautsprechersystemen und dem
Ort des Hörens erforderlich.
DEUTSCH

PFLEGE UND REINIGUNG
VON IL CREMONESE
Il Cremonese wurde nach den höchsten Qualitätsstandards entworfen und gebaut.
Es ist zwar unwahrscheinlich, aber möglich, dass ein Schaden oder eine Fehlfunktion auftritt. In diesem Fall wird für die von Ihnen
erworbenen Lautsprechersysteme natürlich Gewähr geleistet. Es gelten die Bestimmungen in dem Land, in dem das Produkt
erworben wurde. In einem solchen Fall wird der Besitzer gebeten, sich an den Händler Sonus faber zu wenden, bei dem der Kauf
erfolgte und sich auf die obigen Bestimmungen zu berufen.
Des Weiteren möchten wir Sie in Ihrem Interesse auf Folgendes hinweisen:
Außer einer regelmäßigen allgemeinen Reinigung erfordert Il Cremonese keine besondere Pflege. Damit das Lautsprechersystem
sein tadelloses Aussehen behält, ist es sehr empfehlenswert, es mit dem Schutzgewebe abzudecken, welches zum Lieferumfang
gehört. Dies gilt insbesondere dann, wenn das Lautsprechersystem längere Zeit nicht benutzt wird.
Das Holz des Gehäuses sollte nicht mit Produkten wie Wachs oder Reinigungsmitteln gesäubert werden, welche das Holz
oder die Lautsprecher fleckig werden lassen oder beschädigen könnten. Es wird empfohlen, einfach ein weiches Tuch (z. B.
aus Mikrofaser, wie das im Lieferumfang enthaltene Tuch) zu benutzen und es bei Bedarf leicht zu befeuchten (mit der zur
Grundausstattung gehörenden Flüssigkeit). Holz ist ein natürlicher, lebendiger Werkstoff, der empfindlich auf äußere Einflüsse
reagiert. Wir raten, das Lautsprechersystem besonders in den Sommermonaten nicht in der Nähe von Wärmequellen, Fenstern
oder Glasflächen aufzustellen. Außerdem empfiehlt es sich, das Lautsprechersystem keiner direkten Sonneneinstrahlung
auszusetzen.
Für die Pflege der Metalloberflächen und der Glasscheibe des Systems Il Cremonese wird die Verwendung des Tuches und der
Flüssigkeit empfohlen, die im Lieferumfang enthalten sind.
Für den Staub, der sich auf dem Möbelstück, den Frontpaneelen und den Lautsprechern abgesetzt hat, verwenden Sie bitte
einen weichen Pinsel. Gehen Sie äußerst vorsichtig vor, um die empfindlichen Lautsprechermembranen nicht zu beschädigen.
Bei Einhaltung dieser einfachen Vorsichtsmaßnahmen bleibt das Lautsprechersystem über Jahre hinweg in einem
ausgezeichneten Zustand. Mit der Zeit wird sich der Klang weiter verbessern, weil sich die die Bewegungsteile (Membranen und
Aufhängungen) erst einspielen müssen. Der Schallraum reagiert immer besser, je häufiger er gebraucht wird: Es gelten also die
gleichen Gesetzmäßigkeiten, wie für Saiteninstrumente!
GEWÄHRLEISTUNG
DEUTSCH
• Bitte bewahren Sie den Kaufbeleg unbedingt auf, um ihn bei Bedarf dem Händler vorlegen zu können.
• Die reparaturbedürftigen Lautsprechersysteme sind in ihrer Originalverpackung auszuhändigen, um für einen sicheren
Transport zu sorgen. Dem Produkt muss eine Beschreibung der festgestellten Fehlfunktion oder des Fehlers beiliegen.
• Die Gewährleistung auf die Lautsprechersysteme deckt Herstellungsfehler ab. Voraussetzung ist, dass sie nicht
auseinandergebaut, geändert oder manipuliert worden sind. Außerdem dürfen sie nicht für einen Gebrauch eingesetzt
oder auf eine Weise verwendet worden sein, die in diesem Handbuch nicht vorgesehen ist.

FRANÇAIS
OUVERTURE DE L’EMBALLAGE
INSTRUCTIONS SPÉCIFIQUES
Le haut-parleur Il Cremonese est emballé de façon à le préserver efficacement tout en simplifiant son extraction.
Nous recommandons en tout cas de suivre les instructions générales suivantes:
• conserver les matériaux d’emballage pour tout transport futur éventuel ;
• ne pas porter de montre, bracelets, bagues, etc. pendant l’ouverture de l’emballage, afin d’éviter de rayer les haut-
parleurs et leurs précieuses finitions. De même, faire attention de protéger les haut-parleurs contre d’éventuelles parties
métalliques des vêtements, telles que des fermetures éclair, des boutons, des boucles, des rivets, etc.
• ouvrir l’emballage en respectant les instructions imprimées.
IMPORTANT: Nous recommandons vivement d’exécuter les opérations suivantes avec l’aide d’au moins une
personne. Nous recommandons par ailleurs de procéder à l’ouverture de l’emballage des haut-parleurs le plus près
possible de leur position définitive dans la salle d’écoute.
MONTAGE DES FILETS RÉTICULÉS
Il est possible d’appliquer au haut-parleur les filets réticulés livrés dans la boîte des accessoires en suivant attentivement les
instructions suivantes dédiées aux filets frontaux et latéraux.
FILETS RÉTICULÉS FRONTAUX
1. Installer les pivots des baguettes du filet dans les
glissières prévues à cet effet, en commençant par la
partie inférieure du haut-parleur (fig. 8);
2. tendre les élastiques du filet jusqu’à installer les pivots
des baguettes dans les guides situés dans la partie
supérieure du haut-parleur (fig. 9).
CONTENU DE L’EMBALLAGE
En plus du haut-parleur, à l’intérieur de l’emballage il y a une boîte contenant les accessoires suivants:
• 1 manuel d’utilisation Il Cremonese;
• 1 clé USB;
• 8 pointes et 8 sous-pointes;
• 4 bloque pointes;
• 2 filets réticulés frontaux;
1. enlever le Stratocell supérieur de protection;
2. enlever le sac de protection en plastique;
3. enlever les vis de fixation à la palette placées sur
la base du haut-parleur en utilisant la clé à six pans
fournies (fig. 1);
4. tourner doucement le haut-parleur (fig. 2);
ATTENTION ! NE PAS saisir le haut-parleur par la plaque
en aluminium et en verre située au-dessus. NE PAS
TOUCHER les haut-parleurs tandis que vous effectuez
cette opération. (fig. 3);
5. visser les 3 pointes placées sur la partie avant et sur les
côtés de la base du haut-parleur (fig. 4);
6. incliner le haut-parleur vers l’avant jusqu’à ce que la
pointe frontale touche le sol.
ATTENTION! Placer un chiffon en microfibre ou un tapis
sous la base en aluminium pour la protéger (fig. 5);
7. visser la pointe postérieure (fig. 6);
8. déplacer le haut-parleur de la palette en le faisant
pivoter sur la pointe antérieure (fig. 7);
9. placer le haut-parleur dans sa position finale dans la
salle d’écoute.
• 4 filets réticulés latéraux;
• 1 clé à six pans;
• 1 chiffon en microfibre;
• 1 flacon de produit détergent;
• 2 housses anti-poussière en tissu

FRANÇAIS
INSTRUCTIONS POUR LE BRANCHEMENT
Cette opération doit absolument être effectuée avec les appareils éteints!
Sur le panneau postérieur de Il Cremonese, on trouve deux paires de bornes de connexion, une paire pour les polarités positives,
l’autre pour les polarités négatives (fig. 12).
Celles-ci acceptent des branchements avec fiches fourches, bananes et avec câble dénudé.
À l’intérieur de la confection Il Cremonese, vous trouverez tous les shunts de branchements déjà installés en boîtier de connexion.
Voici une description des différentes typologies de branchement dans un ordre déterminant une augmentation progressive de la
qualité de reproduction sonore en termes de définition, contrôle et détail.
MONO-CÂBLAGE
OU BRANCHEMENT STANDARD
BI-CÂBLAGE
BI-AMPLIFICATION
Le branchement standard s’effectue en utilisant un seul
amplificateur stéréophonique ou une paire d’amplificateurs
monophoniques, avec un seul set de câbles de puissance.
Il faudra procéder au branchement en laissant les
terminaisons branchées entre elles à travers des shunts,
comme on la trouve quand on l’extrait de l’emballage, et
selon l’illustration de la figure 12.
Ce type de connexion sert à augmenter en général la qualité
de reproduction et, en particulier, à améliorer la résolution
des détails en basses fréquences. Elle s’effectue en
utilisant un seul amplificateur stéréophonique ou une paire
d’amplificateurs monophoniques, avec deux sets de câbles
de puissance comme l’illustre la figure 13.
La bi-amplification améliore en général la reproduction
du son, en apportant davantage de dynamique et un
plus grand contrôle des basses fréquences. Sa réalisation
avec deux amplificateurs stéréophoniques ou un quartet
d’amplificateurs monophoniques, prévoit l’utilisation de deux
paires de câbles de puissance et l’élimination des shunts. On
utilisera un amplificateur de puissance stéréophonique (ou
avec une paires de monophoniques) pour l’amplification
de la section moyenne-aiguë et le second amplificateur
alimentera la section grave. Voir figure 14.
En dernier lieu, nous souhaitons rappeler que le bon serrage
des contacts et leur contrôle périodique contribuent à
améliorer les performances.
FILETS RÉTICULÉS LATÉRAUX
1. Identifier le filet latéral droit et gauche à l’aide des
indicateurs graphiques placés sur la baguette en
aluminium du filet (fig. 10);
2. insérer les pivots des baguettes du filet dans les
glissières prévues à cet effet, en commençant par la
partie inférieure du haut-parleur et tendre les élastiques
du filet jusqu’à l’insertion des pivots des baguettes du
filet dans les glissières prévues à cet effet sur la partie
supérieure du haut-parleur (fig. 11).
Pour enlever les filets réticulés, il faut extraire les pivots des baguettes en commençant par le haut et en procédant vers le bas.
IMPORTANT: Pendant les susdites opérations d’installation et de retrait du filet, il faut faire très attention de ne pas
endommager la partie avant du haut-parleur, les côtés en cuir et les subwoofers latéraux.

CONSEILS POUR L’INSTALLATION:
AMPLIFICATION ET DISPOSITION
DE IL CREMONESE DANS LA PIÈCE
On pourrait poser de nombreuses conditions pour un
interfaçage correct de Il Cremonese, mais nous désirons
simplement préciser qu’un projet comme celui-ci n’est pas
conçu pour fonctionner de façon optimale avec seulement
un seul type d’amplification.
Tout ce que nous pouvons affirmer est qu’un système
de haut-parleurs de pointe aura besoin d’un système
d’amplification tout aussi ultramoderne, quelle que soit la
technologie utilisée.
En ce qui concerne son positionnement dans une pièce,
voici quelques conseils généraux utiles pour obtenir le
maximum de performance possible:
1. le choix de la salle d’écoute et l’emplacement des
haut-parleurs influencent la performance de tout le
système de reproduction sonore. Il est préférable de
choisir une pièce de forme irrégulière, parce que cela
peut améliorer les performances dans le milieu choisi
puisque la formation d’ondes stationnaires est ainsi
limitée;
2. tapis et tentures en quantité non excessive influencent
positivement la réponse acoustique et contribuent
à leur tour à l’absorption des réflexions et des ondes
stationnaires générées dans la salle d’écoute;
3. il n’existe pas de règles fixes et universelles valables
pour n’importe quelle pièce. Toutefois une bonne
approche au problème de la disposition de Il
Cremonese dans une pièce est de partir en divisant
idéalement le plan de la pièce d’écoute en trois
surfaces équivalentes, comme le montre les lignes en
pointillées sur la figure 15. Ensuite il faudra placer les
haut-parleurs sur la première des lignes tracées, bien
loin des murs latéraux, et placer le poste d’écoute sur
la seconde, comme indiqué à la figure 15. De cette
façon on garantit la présence d’une bonne quantité
d’air tout autour des éléments impliqués dans la
reproduction stéréophonique, en plaçant d’un côté
les haut-parleurs qui sont à même de travailler en
toute liberté, et de l’autre la personne qui écoute, à
l’abri des retours acoustiques générés à proximité des
murs et des coins de la pièce. La figure 16 montre la
manière dont il faudrait faire converger les axes des
haut-parleurs vers le point d’écoute, en se croisant sur
celui-ci et en créant de cette façon la configuration
typique «en triangle isocèle». Cet ultérieur détail,
qui consiste à orienter les haut-parleurs en visant
littéralement les oreilles de celui qui écoute, permet
d’améliorer considérablement la mise au point de
l’image stéréophonique.
Tout en étant conscients du fait que les conseils donnés
visant à créer des conditions quasi idéales d’écoute ne
pourront pas être appliqués par tous nos clients à cause de
difficultés objectives liées à l’aménagement des espaces
domestiques, nous vous conseillons tout de même de placer
les deux haut-parleurs Il Cremonese loin des coins de la
pièce et à une distance d’au moins 100 cm des murs latéraux
et du mur du fond. Nous conseillons en outre de placer les
deux haut-parleurs à une distance minimale l’un de l’autre
de 180 cm ainsi qu’entre chaque Il Cremonese et le point
d’écoute.
Les toutes premières écoutes auront probablement besoin
d’une variation de la distance entre les haut-parleurs et entre
chacun d’eux et le point d’écoute.
FRANÇAIS
Seite wird geladen ...
Seite wird geladen ...
Seite wird geladen ...
Seite wird geladen ...
Seite wird geladen ...
Seite wird geladen ...
Seite wird geladen ...
Seite wird geladen ...
Seite wird geladen ...
Seite wird geladen ...
Seite wird geladen ...
Seite wird geladen ...
Seite wird geladen ...
Seite wird geladen ...
Seite wird geladen ...
Seite wird geladen ...
Seite wird geladen ...
Seite wird geladen ...
Seite wird geladen ...
Seite wird geladen ...
Seite wird geladen ...
Seite wird geladen ...
Seite wird geladen ...
Seite wird geladen ...
-
 1
1
-
 2
2
-
 3
3
-
 4
4
-
 5
5
-
 6
6
-
 7
7
-
 8
8
-
 9
9
-
 10
10
-
 11
11
-
 12
12
-
 13
13
-
 14
14
-
 15
15
-
 16
16
-
 17
17
-
 18
18
-
 19
19
-
 20
20
-
 21
21
-
 22
22
-
 23
23
-
 24
24
-
 25
25
-
 26
26
-
 27
27
-
 28
28
-
 29
29
-
 30
30
-
 31
31
-
 32
32
-
 33
33
-
 34
34
-
 35
35
-
 36
36
-
 37
37
-
 38
38
-
 39
39
-
 40
40
-
 41
41
-
 42
42
-
 43
43
-
 44
44


Sonus Faber IL CREMONESE Bedienungsanleitung
- Kategorie
- Soundbar-Lautsprecher
- Typ
- Bedienungsanleitung
in anderen Sprachen
Verwandte Artikel


Andere Dokumente
-
Gold Note A6 EVO II Benutzerhandbuch
-
Polk Audio LCi-RTS105 Benutzerhandbuch
-
-
Bowers & Wilkins 800 Diamond Benutzerhandbuch
-
-
-
B&W DM305 Bedienungsanleitung
-
Q-ACOUSTICS 1000I Bedienungsanleitung
-
Naim OVATOR S-600 Bedienungsanleitung