Hoover TVE43 Bedienungsanleitung
- Kategorie
- Wäschetrockner
- Typ
- Bedienungsanleitung
Dieses Handbuch eignet sich auch für

TVX33 Reverse Action
TVE43 Reverse Action
English 2-13
Français 14-26
Deutsch 27-39
Italiano 40-52
Nederlands 53-65
Português 66-78
Dansk 79-91
Norsk 92-104
Svenska 105-117
®
®
05651114.qxd 24-05-02 13:52 Page 1

ENGLISH
2
Safety reminders
User’s manual. This machine should only
be used for its intended purpose as
described in this manual. Ensure that it is
fully understood before operating.
Installation. Never install the dryer
against curtains and be sure to prevent
items from falling or collecting behind the
dryer.
Ventilation. Check regularly that the air
flowing through the dryer is not restricted:
Check the fluff filter after use, and clean,
if necessary.
The venting hose or duct should be
checked periodically and any
accumulation of fluff removed.
The inlet and outlets should be kept free
from obstructions.
If the dryer is used frequently the period
between checks should be reduced
accordingly.
Dryness. Clothes should be spin dried or
thoroughly wrung before they are put into
the tumble dryer. Clothes that are
dripping wet should NOT be put into the
dryer.
Lighters and matches must not be left in
pockets and NEVER use flammable
liquids near the machine.
Foam plastic, foam rubber and rubber-
like material are not suitable for tumble
drying. Articles made from these
materials MUST NOT be placed in the
dryer.
Glass fibre curtains should never be put
in this machine. Skin irritation may occur
if other garments are contaminated with
the glass fibres.
Garments treated with flammable
cleaning sprays or liquids such as petrol,
must not be put in this machine.
Lint or fluff must not be allowed to
collect on the floor around the outside of
the machine.
Cool down period. The drum inside may
be very hot. Always allow the dryer to
complete the cool down period before
removing the laundry.
Faults. Do not continue to use this
machine if it appears to be faulty.
After use. Remove the plug from the
electricity supply. Always remove the
plug before cleaning the appliance.
Supply cord. If the supply cord on this
appliance is damaged, it must be replaced
by a special cord which is only available
from Hoover Service or an authorised
Hoover Dealer.
Hoover service. To ensure the continued
safe and efficient operation of this
appliance we recommend that any
servicing or repairs are only carried out
by an authorised Hoover service engineer.
05651114.qxd 24-05-02 13:52 Page 2

Electrical requirements
This appliance is fitted with a moulded-on
non-rewireable plug.
The plug should be accessible for
disconnection after the appliance has been
installed.
IMPORTANT: The wires in the mains
lead are coloured in accordance with the
following code:
Blue - NEUTRAL
Brown - LIVE
Green-and-yellow - EARTH
If the supply cord on this appliance is
damaged, it must be replaced by a
special cord which is only available from
Hoover Service or an authorised Hoover
Dealer.
ENGLISH
3
Before using the tumble dryer for the
first time:
● please read this instruction book
thoroughly.
● remove all items packed inside drum.
● wipe the inside of the drum and door
with a damp cloth to remove any dust
which may have settled in transit.
IMPORTANT: This dryer must only be
used for drying household textiles and
garments where a water solution has
been used for the cleaning process.
DO NOT tumble dry fabrics treated
with dry cleaning fluids.
WARNING!
ELECTRICITY CAN BE
EXTREMELY DANGEROUS.
THIS APPLIANCE MUST BE
EARTHED.
PLEASE READ THESE INSTRUCTIONS THOROUGHLY
This appliance must be operated in accordance with the instructions given in this
manual. It is for domestic use only in drying household textiles and garments where a
water solution has been used in the cleaning process. It MUST NOT be used with dry
cleaning fluids. For your safety, this dryer must be correctly installed.
If there is any doubt about installation, call Hoover Service for advice.
Safety reminders 2
Electrical requirements 3
Ventilation requirements 4
Preparing the load 5
Clothes preparation 5
Maximum drying weight 5
Sorting the load 5
Do not tumble dry 5
Energy saving 5
Opening the door 6
Filter 6
Drying guide 7
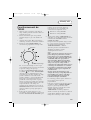
Controls & indicators TVX33 8
Operation TVX33 9
Controls & indicators TVE43 10
Operation TVE43 11-12
Cleaning the dryer 12
Technical specification 12
Trouble shooting 13
05651114.qxd 24-05-02 13:52 Page 3

ENGLISH
4
Installation and
Ventilation requirements
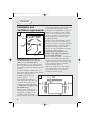
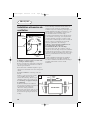
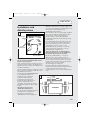
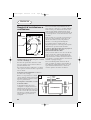
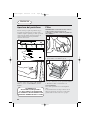
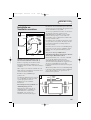
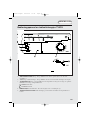
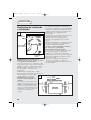
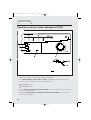
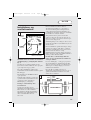
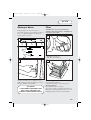
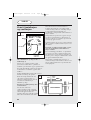
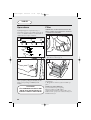
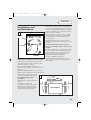
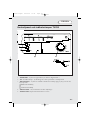
IMPORTANT: This dryer must be
installed such that the air inlets and
outlets are not restricted (fig. 1).
There should be a gap of at least 12 mm
(0.5 inches) between the sides and rear of
the machine and the surrounding walls and
cabinets.
To ensure adequate ventilation the space
between the bottom of the machine and the
floor must not be obstructed.
NEVER install the dryer up
against curtains.
Prevent items from falling or
collecting between the sides and
rear of the dryer as these may
obstruct the air inlet and outlets.
A venting hose is supplied with
this tumble dryer.
The use of the venting hose to
exhaust hot air to the external
atmosphere is strongly recom-
mended to ensure maximum
drying efficiency. Protect the external outlet
from prevailing winds to ensure back-draughts
do not reduce the drying performance.
If the dryer is installed under a worktop or
built-in, it is essential to use the venting
hose to carry the hot moist air away from
the dryer otherwise re-circulation of the
moist air will prevent the dryer from
working efficiently.
The hose may be fitted through a wall or
through an open door or window (fig. 2).
The hose is 95 mm (3.75 inches) in diameter
and will extend up to 1.8 metres (6 feet).
Venting hoses longer than 1.8 metres
(6 feet) are not recommended as the dryer
performance will be reduced.
Ensure that the venting hose is not
kinked as this will prevent the dryer
from working efficiently.
There are three air outlets – one at the rear
and one on each side of the dryer. The
venting hose must only be attached to one
of these outlets. The covers must be fitted
to the two unused outlets to maintain
maximum drying efficiency.
Where it is not practical to fit a venting
hose, condensation can be reduced by
operating the dryer close to an open
window or an extractor fan.
2
1
SUPPLY CORD
AIR INLET
VENTS
HOT AIR
OUTLET
05651114.qxd 24-05-02 13:52 Page 4

ENGLISH
Preparing the load
Before using the dryer for the first time
wipe the inside of the drum and door with a
damp cloth.
Make sure that the laundry you are going to
dry is suitable for drying in a tumble dryer,
as shown by the care symbols on each item.
Clothes preparation
Check that all fastenings are closed and that
pockets are empty. Turn the articles inside
out. Place clothes loosely in the drum to
make sure that they don’t get tangled.
Do not overload the drum, particularly when
drying large items, otherwise, the laundry
may stick to the drum and not dry evenly.
Maximum drying weight
● Cottons Max. 6 kg
● Synthetics Max. 3 kg
Sort the load as follows:
A) By care symbols
On the collar or inside seam:
Suitable for tumble drying.
Tumble drying at high temperature.
Tumble drying at low temperature only.
DO NOT tumble dry.
B) By amount and thickness
Whenever the load is bigger than the
dryer capacity, separate clothes
according to thickness (e.g. towels from
thin underwear).
C) By type of fabric
Cottons/linen: Towels, cotton jersey, bed
and table linen.
Synthetics: Blouses, shirts, overalls, etc.
made of polyester or polyamid, as well
as for cotton/synthetic mixes.
5
D) By drying level
● Sort into: Iron dry, cupboard dry, etc.
● For delicate articles press the ‘HEAT
SETTING’ button to select low drying
temperature.
Do not tumble dry:
Woollens, silk, delicate fabrics, nylon
stockings, delicate embroidery, fabrics
with metallic decorations, garments
with PVC or leather trimmings,
training shoes, bulky items such as
sleeping bags, etc.
IMPORTANT: Do not dry articles
which have been treated with a dry
cleaning fluid or rubber clothes
(danger of fire or explosion).
Energy saving
Only put into the tumble dryer laundry
which has been thoroughly wrung or
spin-dried. The drier the laundry the
shorter the drying time thus saving
electricity.
ALWAYS try to dry the maximum
weight of laundry, this will save time
and electricity.
NEVER exceed the maximum weight,
this will waste time and electricity.
ALWAYS check that the filter is clean
before every drying cycle.
NEVER put dripping wet items into
the tumble dryer, this may damage the
appliance.
ALWAYS ensure that the covers are
fitted to the two unused vent outlets,
this will maintain maximum drying
performance.
05651114.qxd 24-05-02 13:52 Page 5

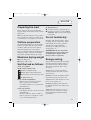
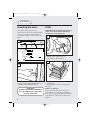
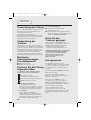
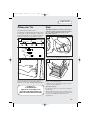
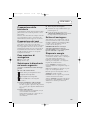
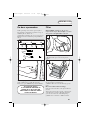
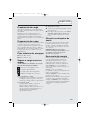
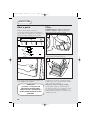
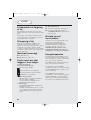
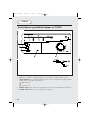
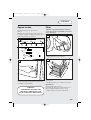
Press button to open door (fig. 3).
The door may also be opened by pushing
on it (fig. 4). This is a safety feature to
prevent the entrapment of minors in the
drum.
To restart the dryer, close the door and
press the ‘ON’ button (Model TVX33) or
‘START’ button (Model TVE43).
ENGLISH
6
Opening the door
WARNING!
WHEN THE TUMBLE DRYER IS
IN USE THE DRUM AND DOOR
MAY BE VERY HOT.
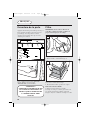
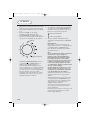
Filter
IMPORTANT: To maintain the efficiency
of the dryer check that the fluff filter is
clean before each drying cycle.
1. Pull the filter upwards (fig. 5).
2. Open filter as shown (fig. 6).
3. Gently remove lint using a soft brush or
your fingertips.
4. Snap the filter together and push back
into place.
Filter Care Indicator
Lights when the filter needs cleaning.
If the laundry is not drying check that the
filter is not clogged. The indicator will also
light when the venting hose is blocked or
kinked.
6
5
3
4
05651114.qxd 24-05-02 13:52 Page 6

ENGLISH
7
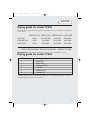
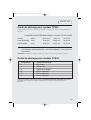
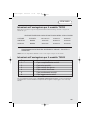
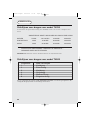
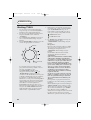
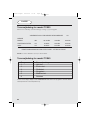
Drying guide for model TVX33
The table shows approximate drying times, depending on the type of fabric and dampness
of the clothes.
REMEMBER: During the last 10 minutes the load is always tumbled in cool air.
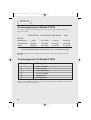
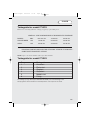
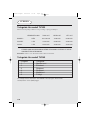
Drying guide for model TVE43
HEAT SETTING HEAVY LOAD MEDIUM LOAD LIGHT LOAD
COTTON HIGH 120-135 Min 70-80 Min 50-65 Min
SYNTHETICS LOW 70-85 Min 50-65 Min 40-55 Min
ACRYLICS LOW 50-65 Min 40-50 Min 30-40 Min
PRE-IRON PROGRAM: RELAXES CREASES – EASIER TO IRON
Programme Drying Guide
1 Bone Dry
2 Extra Dry
3 Cupboard Dry
4 Iron Dry
5 Medium Dry
6 Damp Dry
For delicate fabrics select the ‘LOW HEAT SETTING’ button for all Drying Programmes. This reduces
the drying temperature to protect your garments.
05651114.qxd 24-05-02 13:52 Page 7

ENGLISH
8
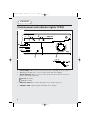
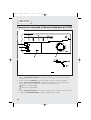
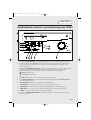
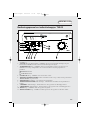
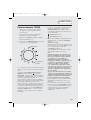
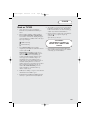
1. ‘DOOR OPEN’ button – press to open the door. (See ‘Opening the door’ section.)
2. ‘ON’ button and indicator – press to switch on, the indicator will light.
3. ‘HEAT SETTING’ button – press to reduce the heat level for delicate items, press
again to select high temperature.
4. ‘DRYING TIME’ dial – selects drying time or pre-ironing option (a).
5. ‘FILTER CARE’ indicator lights when filter needs cleaning.
Control panel and indicator lights TVX33
HIGH Heat setting
LOW Heat setting
05651114.qxd 24-05-02 13:52 Page 8

ENGLISH
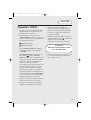
6. The load is dried by tumbling in
thermostatically controlled warm air.
Cool air is used for the last 10 minutes
to reduce creasing and cool the load
ready for handling.
7. When the program is fully completed
the drum will stop rotating and the dial
will point to the symbol ●.
Open the door and remove the load.
8. Clean the filter after every drying cycle
to ensure maximum dryer efficiency.
(See ‘Filter’ section.)
9
WARNING!
THE DRUM, DOOR AND LOAD
MAY BE VERY HOT.
Operation TVX33
1. Open the door and load the drum with
laundry. Ensure that garments do not
hinder closure of the door.
2. If drying delicate items press the
‘HEAT SETTING’ button to reduce the
heat level. Press again on completion, to
select high temperature.
3. Turn ‘DRYING TIME’ dial until the
required drying time aligns with the
symbol ●.
The PRE-IRONING setting shown by
the symbol on the ‘DRYING
TIME’ dial provides a conditioning and
anti-crease function. The dryer will heat
the load for 8 minutes followed by a 2
minute cool down period and is
especially good for garments which may
have been left for some time prior to
ironing, in a linen basket for example.
Garments may also become stiffened
when dried outside on a washing line or
inside on radiators. The PRE-IRONING
process relaxes the creases in the fabric
making ironing quicker and easier.
4. Gently close the door pushing it slowly
until you hear the door ‘click’ shut.
5. Press the ‘ON’ button. The indicator
will light and the drying cycle begins.
HIGH Heat setting
LOW Heat setting
05651114.qxd 24-05-02 13:52 Page 9

ENGLISH
10
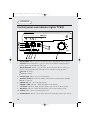
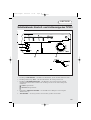
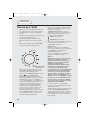
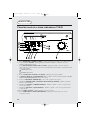
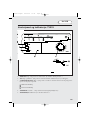
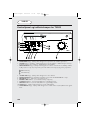
1. ‘DOOR OPEN’ button – press to open the door. (See ‘Opening the door’ section.)
2. ‘ON/OFF’ button and indicator – press to switch on, the indicator will light. Press
again to switch off, the indicator will go out.
3. ‘HEAT SETTING’ button – press to reduce the heat level for delicate items, press
again to select high temperature. This function is available on all programmes.
4. ‘ALARM OFF’ button – press to stop the buzzer.
5. ‘DIGITAL DISPLAY’ shows the number of hours delay remaining when ‘START
DELAY’ is selected.
6. ‘PROGRAM’ dial – selects drying program.
7. ‘FILTER CARE’ indicator – lights when filter needs cleaning.
8. ‘COOLING’ indicator – lights when the drying cycle is in the cooldown period.
9. ‘HEATING’ indicator – lights when the drying cycle is in the heating period.
10. ‘START’ button – press to start the drying cycle.
11. ‘START DELAY’ button – press to delay the start of the drying cycle by up to 9 hours.
Control panel and indicator lights TVE43
HIGH Heat setting
LOW Heat setting
05651114.qxd 24-05-02 13:52 Page 10

ENGLISH
5. If drying delicate items on the ‘timed’
programs press the ‘HEAT SETTING’
button to reduce the heat level. Press
again on completion, to select high
temperature.
6. Press the ‘START’ button. The dryer
will start automatically and the
‘HEATING’ indicator will light.
Drying sensor
A sensor will detect when the load is
dry. The drying cycle will then go into
the cooldown period and the
‘COOLING’ indicator will light.
After 10 minutes of cooldown the drum
will stop rotating automatically.
Note:
(i) The sensor may not detect a small
load of small articles. For small loads
and separate items or pre-dried
fabrics with low moisture content,
utilise the timed programs. Set the
program between 30 and 75 minutes
depending upon load size and dryness
required and select high or low heat
depending upon the fabric type. If
this is not carried out the dryer will
only operate for 10 minutes before
going into cooldown.
(ii) If the sensor does not operate, for
example when a load is too large or
too wet to tumble dry, the dryer will
automatically go into cooldown after
180 minutes.
The dryer can be set to start up to 9
hours after the program has been set.
To set the time delay option press and
release the ‘START DELAY’ button until
the required delay (shown in hours)
appears on the display and then press the
‘START’ button. The display will flash.
11
Operation TVE43
1. Open the door and load the drum with
laundry. Ensure that garments do not
hinder closure of the door.
2. Gently close the door pushing it slowly
until you hear the door ‘click’ shut.
3. Press the ‘ON/OFF’ button to switch on
the dryer. The indicator will light.
4. Turn the ‘PROGRAM’ dial to select the
required drying program:
e.g. if you are drying cotton laundry and
would like it suitable for ironing please
select the iron dry option.
The PRE-IRONING setting shown by
the symbol on the ‘PROGRAM’
dial provides a conditioning and anti-
crease function. The dryer will heat the
load for 9 minutes followed by a 3
minute cool down period and is
especially good for garments which may
have been left for some time prior to
ironing, in a linen basket for example.
Garments may also become stiffened
when dried outside on a washing line or
inside on radiators. The PRE-IRONING
process relaxes the creases in the fabric
making ironing quicker and easier.
HIGH Heat setting
LOW Heat setting
Pre-iron
Airing
05651114.qxd 24-05-02 13:53 Page 11

ENGLISH
12
As each hour passes the figure shown
on the display will count down. When it
gets to 0 the dryer will start.
The delay can be changed at any time
simply by pressing the button until the
new figure appears on the display.
If there is an interruption to the
electricity supply the time delay will be
lost and so will have to be re-set when
the power is restored.
7. To switch off the buzzer, which sounds
at the end of each cycle, press the
‘ALARM OFF’ button.
8. The load is dried by tumbling in
thermostatically controlled warm air.
Cool air is used for the last 10 minutes
to reduce creasing and cool the load
ready for handling. During this time the
‘COOLING’ indicator is lit.
9. When the program is fully completed
the drum will stop rotating. The dial
remains at the position of the selected
program. The ‘COOLING’ indicator
will flash and the buzzer will sound.
10. Open the door and remove the load.
If the load is not removed from the
dryer at the end of the drying cycle, a
‘creaseguard’ function is activated. Every
15 minutes the dryer will tumble the load
for 5 seconds and the buzzer will sound.
This process will be repeated until the
‘creaseguard’ function is cancelled by
opening the door.
The ‘COOLING’ indicator will continue
to flash while ‘creaseguard’ is activated.
11. Clean the filter after every drying cycle
to ensure maximum dryer efficiency.
(See ‘Filter’ section.)
Cleaning the dryer
IMPORTANT: Always switch off and
remove the plug from the electricity
supply before cleaning this appliance.
Clean the filter after every drying cycle.
After each period of use, wipe the inside of
the drum and leave the door open for a
while to allow circulation of air to dry it.
Wipe the outside of the machine and the
door with a soft cloth.
DO NOT use abrasive pads or cleaning
agents.
To prevent the door sticking, periodically
clean the door gasket with a ‘non-scratch
cream cleaner.’
Technical
specifications
Drum capacity 115 litres
Maximum load 6 kg
Height 85 cm
Width 60 cm
Depth 60 cm
Energy Label Band C
Note: For electrical data refer to the rating
label on the front of the dryer cabinet (with
the door open).
WARNING!
THE DRUM, DOOR AND LOAD
MAY BE VERY HOT.
05651114.qxd 24-05-02 13:53 Page 12

ENGLISH
13
Trouble shooting
Should your dryer operate incorrectly,
check the following points before calling
for a service engineer.
Drying time is too long/clothes are not
dry enough:
● Have you selected the correct drying
time/program? Go to page 7.
● Were the clothes too wet? Were the
clothes thoroughly wrung or spin-dried?
● Does the filter need cleaning? Go to
page 6.
● Is the dryer overloaded? Go to page 5.
● Is the venting hose kinked or blocked?
Go to page 4.
● Is the load too small? Go to page 11.
● Has the ‘HEAT SETTING’ option been
selected from a previous cycle? Go to
page 8/10.
The dryer does not operate:
● Is there a working electricity supply to
the dryer? Check using another
appliance such as a table lamp.
● Is the plug properly connected to the
mains supply?
● Is there a power failure?
● Has the fuse blown?
● Is the door fully closed? Go to page 9/11.
● Is the dryer switched on, both at the
mains supply and at the machine? Go to
page 8/10.
● Has the drying time or the program been
selected? Go to page 8/10.
● On TVE43: Have you pressed the
‘START’ button to begin the program?
Go to page 11.
● On TVE43: Has the ‘START DELAY’
option been set and is there still time
remaining? Go to page 11.
● On TVX33: Has the
‘ON’ button been
pressed after opening the door? Go to
page 6.
● On TVE43: Has the ‘START’ button
been pressed after opening the door?
Go to page 6.
Filter Care Indicator on
● Does the filter need cleaning? Go to
page 6.
● Is the venting hose kinked or blocked?
Go to page 4.
Drum light does not operate
● The drum light can be replaced by
unscrewing the glass cover and
unscrewing the bulb. The bulb should be
replaced by type E14 (10W, 240V).
If the supply cord on this appliance is
damaged, it must be replaced by a special
cord which is only available from Hoover
Service or an authorised Hoover Dealer.
Should there still be a problem with your
dryer after completing all the recommended
checks, please call Hoover Service for
advice. They may be able to assist you over
the telephone or arrange for a suitable
appointment for an engineer to call under
the terms of your guarantee. However, a
charge may be made if any of the following
applies to your machine:
● Is found to be in working order.
● Has not been installed in accordance
with the installation instructions.
● Has been used incorrectly.
05651114.qxd 24-05-02 13:53 Page 13

FRANÇAIS
14
Rappels de sécurité
Manuel de l’utilisateur. Cette machine ne
doit être utilisée que pour l’emploi auquel elle
est destinée et qui est décrit dans ce manuel.
Veillez à bien comprendre ce manuel avant
d’utiliser la machine.
Installation. Veillez à ne pas installer le
sèche-linge contre des rideaux et assurez-vous
que rien ne pourra tomber ou s’accumuler
derrière le sèche-linge.
Ventilation. Vérifiez régulièrement que l’air
peut circuler librement autour du sèche-linge :
Vérifiez le filtre à peluches après usage, et
nettoyez-le le cas échéant.
Il est nécessaire d’inspecter régulièrement le
tuyau ou la conduite de ventilation et
d’éliminer les accumulations éventuelles de
peluches.
Les entrées et sorties doivent être libres
d’obstructions.
Si le sèche-linge est utilisé fréquemment, les
intervalles entre les inspections doivent être
réduits en conséquence.
Degré de séchage. Les vêtements doivent être
essorés en machine ou à la main avant d’être
placés dans le sèche-linge. Les vêtements qui
dégoulinent NE DOIVENT PAS être mis dans
le sèche-linge.
Enlevez les briquets et les allumettes des
poches et veillez à ne JAMAIS utiliser de
liquides inflammables à proximité de la
machine.
Les plastiques alvéolaires, les mousses
alvéolaires et autres types de mousses ne
peuvent pas être séchés en machine. Les
articles fabriqués à partir de ces matériaux NE
DOIVENT PAS être placés dans le sèche-
linge.
Les rideaux en fibres de verre ne doivent
jamais être placés dans cette machine. La
contamination d’autres vêtements par les
fibres de verre peut entraîner des irritations de
la peau.
Les vêtements traités avec un nettoyant
inflammable vaporisé ou des liquides tels
que le pétrole ne doivent pas être placés dans
cette machine.
Veillez à ce que les peluches ne puissent pas
s’accumuler sur le sol, à l’extérieur de la
machine.
Période de refroidissement. Il se peut que
l’intérieur du tambour soit très chaud. Veillez
à ce que le sèche-linge termine son cycle de
refroidissement avant d’en retirer le linge.
Pannes. Cessez d’utiliser la machine si elle
semble défectueuse.
Après usage. Débranchez du courant de
secteur. Retirez toujours la prise avant de
nettoyer la machine.
Cordon d’alimentation. Si le cordon
d’alimentation de cet appareil est endommagé,
il doit être remplacé par un cordon spécial
exclusivement disponible auprès de Hoover
Service ou d’un distributeur Hoover agréé.
Service Hoover. Pour veiller au
fonctionnement efficace et sans risque de cet
appareil, nous vous recommandons de faire
exclusivement appel à un technicien Hoover
agréé pour son entretien ou sa réparation
éventuelle.
05651114.qxd 24-05-02 13:53 Page 14

Besoins électriques
Cet appareil est équipé d’une fiche moulée qu’il est
impossible de recâbler.
La fiche doit être accessible pour débrancher
l’appareil une fois qu’il a été installé.
IMPORTANT : Les fils du câble de secteur sont
codés par couleur, comme suit :
Bleu - NEUTRE
Marron - SOUS TENSION
Vert et jaune - TERRE
Si le cordon d’alimentation de cet appareil est
endommagé, il doit être remplacé par un cordon
spécial exclusivement disponible auprès de Hoover
Service ou d’un distributeur Hoover agréé.
FRANÇAIS
15
Avant d’utiliser le sèche-linge pour la première
fois :
● veuillez lire ce manuel d’instruction en détail.
● retirez tous les articles qui se trouvent à
l’intérieur du tambour.
● essuyez l’intérieur du tambour et de la porte
avec un chiffon humide pour éliminer la
poussière éventuelle qui aurait pu s’y infiltrer
en transit.
IMPORTANT : Ce sèche-linge doit être utilisé
exclusivement pour sécher le linge de maison et
les vêtements qui ont été nettoyés avec une
solution aqueuse.
NE séchez PAS les tissus qui ont été traités avec
des liquides de nettoyage à sec.
ATTENTION !
L’ELECTRICITE PEUT ETRE
EXTREMEMENT DANGEREUSE.
CET APPAREIL DOIT ETRE MIS
A LA TERRE.
VEUILLEZ LIRE CES INSTRUCTIONS EN DETAIL
L’utilisation de cet appareil doit respecter les instructions qui figurent dans ce manuel. Il est prévu
pour usage domestique uniquement, afin de sécher le linge de maison et les vêtements qui ont été
nettoyés avec une solution aqueuse. Il NE DOIT PAS être utilisé avec des liquides de nettoyage à
sec. Par mesure de sécurité, veillez à installer ce sèche-linge correctement.
En cas de doute concernant son installation, veuillez demander conseil à Hoover Service.
Rappels de sécurité 14
Besoins électriques 15
Besoins de ventilation 16
Préparation de la charge 17
Préparation des vêtements 17
Poids de séchage maximum 17
Tri de la charge 17
Ne séchez pas en machine 17
Economies d’énergie 17
Ouverture de la porte 18
Filtre 18
Guide de séchage 19
Commandes et indicateurs du TVX33 20
Fonctionnement du TVX33 21
Commandes et indicateurs du TVE43 22
Fonctionnement du TVE43 23-24
Nettoyage du sèche-linge 24
Spécification technique 24
Dépistage de pannes 25
Modalités de la garantie 26
05651114.qxd 24-05-02 13:53 Page 15

FRANÇAIS
16
Installation et besoins de
ventilation
IMPORTANT : Ce sèche-linge doit être installé
de manière à ce que les entrées et sorties d’air
ne soient pas obstruées (fig. 1).
Il doit y avoir un espace d’au moins 12 mm entre
les côtés et l’arrière de la machine et les murs et
armoires qui l’entourent.
Pour veiller à une ventilation adéquate, l’espace
entre le bas de la machine et le sol ne doit pas être
obstrué.
N’installez JAMAIS le sèche-linge contre des
rideaux.
Veillez à ce que rien ne puisse tomber
ou s’accumuler entre les côtés et
l’arrière du sèche-linge, afin de ne pas
obstruer les entrées et les sorties d’air.
Ce sèche-linge est équipé d’un tuyau
de ventilation.
L’utilisation du tuyau de ventilation
pour évacuer l’air chaud à l’extérieur est
recommandée pour assurer une
efficacité de séchage maximale.
Protégez la sortie externe contre le vent
pour vous assurer que les rebroussages
d’air n’affectent pas la performance de
séchage.
Si le sèche-linge est installé sous une surface de
travail ou s’il est encastré, il est indispensable
d’utiliser le tuyau de ventilation pour éloigner l’air
humide chaud du sèche-linge, de manière à ce que
la recirculation de l’air humide n’affecte pas le
fonctionnement efficace du sèche-linge.
Le tuyau peut être installé à travers un mur ou une
porte ou fenêtre ouverte (fig. 2). Le tuyau mesure
95 mm de diamètre et jusqu’à 1,8 mètre de long.
Les tuyaux de ventilation qui excèdent 1,8 mètre de
long ne sont pas recommandés car ils peuvent
affecter la performance du sèche-linge.
Veillez à ce que le tuyau de ventilation ne soit
pas coudé pour ne pas affecter le
fonctionnement efficace du sèche-linge.
Il y a trois sorties d’air, une à l’arrière et une de
chaque côté du sèche-linge. Le tuyau de ventilation
ne doit être fixé qu’à l’une de ces trois sorties. Les
couvercles doivent être installés sur les deux sorties
inusitées pour maintenir une efficacité de séchage
maximale.
Lorsque l’installation d’un tuyau de ventilation
n’est pas pratique, il est possible de réduire le
niveau de condensation en utilisant le sèche-linge à
proximité d’une fenêtre ouverte ou d’un
ventilateur.
2
1
CORDON
D’ALIMENTATION
ENTREES D’AIR
SECHE-LINGE
SORTIE D’AIR
CHAUD
MUR
MUR
MUR
05651114.qxd 24-05-02 13:53 Page 16

FRANÇAIS
Préparation de la charge
Avant d’utiliser le sèche-linge pour la première
fois, essuyez l’intérieur du tambour et de la porte à
l’aide d’un chiffon humide.
Vérifiez sur les étiquettes comportant les symboles
d’entretien que le linge que vous souhaitez sécher
convient au séchage en machine.
Préparation des
vêtements
Vérifiez que toutes les fermetures sont fermées et
que les poches sont vides. Mettez les articles à
l’envers. Placez les vêtements en vrac dans le
tambour en veillant à ce qu’ils ne s’emmêlent pas
les uns avec les autres.
Ne surchargez pas le
tambour, particulièrement lorsque vous séchez de
grands articles, sinon le linge risque d’adhérer au
tambour et de ne pas sécher de manière uniforme.
Poids de séchage
maximum
● Coton, 6 kg maxi
● Synthétiques, 3 kg maxi
Triez la charge comme
suit :
A) Par symbole de soin d’entretien
Sur le col ou la couture intérieure :
Convient pour séchage en machine.
Séchage à haute température.
Séchage à basse température uniquement.
NE PAS sécher en machine.
B) Par quantité et épaisseur
Lorsque la charge est plus importante que la
capacité du sèche-linge, séparez les vêtements
selon leur épaisseur (ex : les serviettes des
sous-vêtements fins).
C) Par type de tissu
Coton/toile de lin : Serviettes, jersey en coton,
linge de lit ou de table.
Synthétiques : Chemisiers, chemises, blouses
etc. fabriqués en polyester ou polyamide, ainsi
qu’en mélange coton/synthétique.
17
D) Par degré de séchage
● Triez selon : Sec pour repassage, sec pour
rangement, etc.
● Pour les articles délicats, appuyez sur le bouton
‘PUISSANCE DE SECHAGE’ pour
sélectionner une température de séchage basse.
Ne séchez pas en
machine :
Les lainages, la soie, les tissus délicats, les bas
de nylon, les broderies délicates, les tissus
ayant des décorations métalliques, les
vêtements avec des bordures en PVC ou en
cuir, les chaussures de sport, les articles
volumineux comme les sacs de couchage, etc.
IMPORTANT : Ne séchez pas les articles
qui ont été traités avec un liquide de
nettoyage à sec ou les vêtements en
caoutchouc (risque d’incendie ou
d’explosion).
Economies d’énergie
Ne mettez que du linge essoré en machine ou
à la main dans le sèche-linge. Plus le linge est
sec, plus le temps de séchage sera court, ce
qui économisera de l’énergie.
Essayez TOUJOURS de sécher le poids de
linge maximum, pour économiser du temps et
de l’électricité.
Ne dépassez JAMAIS le poids maximum pour
ne pas gaspiller du temps ou de l’électricité.
Vérifiez TOUJOURS que le filtre est propre
avant chaque cycle de séchage.
Ne mettez JAMAIS d’articles dégoulinant
d’eau dans le sèche-linge, pour ne pas
endommager l’appareil.
Vérifiez TOUJOURS que les couvercles sont
bien installés sur les deux sorties de
ventilation inusitées pour assurer une
performance de séchage maximale.
05651114.qxd 24-05-02 13:53 Page 17

FRANÇAIS
18
Ouverture de la porte
Appuyez sur le bouton pour ouvrir la porte (fig. 3).
Il est également possible d’ouvrir la porte en la
poussant (fig. 4). Ce dispositif de sécurité
empêche que les enfants en bas âge ne soient
entraînés par le tambour.
Pour remettre le sèche-linge en marche, fermez la
porte et appuyez sur le bouton ‘MARCHE’.
(modèle TVX33) ou sur le bouton
‘DEMARRAGE’ (modèle TVE43).
ATTENTION !
LORSQUE LE SECHE-LINGE EST
EN COURS D’UTILISATION, IL
SE PEUT QUE LE TAMBOUR ET
LA PORTE SOIENT TRES
CHAUDS.
Filtre
IMPORTANT : Pour assurer l’efficacité du
sèche-linge, vérifiez que le filtre à peluches est
propre avant chaque cycle de séchage.
1. Tirez le filtre vers le haut (fig. 5).
2. Ouvrez le filtre, comme illustré (fig. 6).
3. Retirez doucement les peluches à l’aide d’une
brosse douce ou du bout des doigts.
4. Réenclenchez le filtre et poussez-le en place.
Indicateur d’entretien du filtre
S’allume lorsqu’il faut nettoyer le filtre.
Si le linge ne sèche pas, vérifiez que le filtre n’est
pas colmaté. L’indicateur s’allume également
lorsque le tuyau de ventilation est bloqué ou coudé.
6
5
3
4
05651114.qxd 24-05-02 13:53 Page 18

FRANÇAIS
19
Guide de séchage pour modèle TVX33
Ce tableau indique les temps de séchage approximatifs, selon le type de tissu et le degré d’humidité des
vêtements.
ATTENTION : Pendant les 10 dernières minutes, la charge est toujours séchée dans de l’air froid.
PUISSANCE DE SECHAGEPLEINE CHARGE 1/2 CHARGE PETITE CHARGE
COTON HAUT 120-135 min 70-80 min 50-65 min
SYNTHETIQUES BAS 70-85 min 50-65 min 40-55 min
ACRYLIQUES BAS 50-65 min 40-50 min 30-40 min
PROGRAMME PRE-REPASSAGE : ANTI-FROISSEMENT – PLUS FACILE A
REPASSER
Guide de séchage pour modèle TVE43
Pour les tissus délicats sélectionnez le bouton ‘TEMPERATURE BASSE’ (LOW HEAT) pour tous les
programmes de séchage. Ceci réduit la température de séchage et permet de protéger vos
vêtements.
Programme Guide de séchage
1 Extra sec
2 Super sec
3 Sec/Pret a ranger
4 Pret a repasser
5 Pret a repasser
6 Pret a repasser
05651114.qxd 24-05-02 13:53 Page 19

FRANÇAIS
20
1. Bouton ‘OUVERTURE DE PORTE’ – appuyez pour ouvrir la porte. (Voir la section ‘Ouverture
de la porte’.)
2. Bouton et indicateur ‘MARCHE’ – appuyez pour mettre en marche ; l’indicateur s’allumera.
3. Bouton ‘PUISSANCE DE SECHAGE’ – appuyez pour diminuer le niveau de chaleur pour les
articles délicats ; appuyez à nouveau pour sélectionner une température élevée.
4. Cadran ‘TEMPS DE SECHAGE’ – sélectionne le temps de séchage ou l’option de pré-repassage (a).
5. L’indicateur ‘ENTRETIEN FILTRE’ s’allume lorsqu’il faut nettoyer le filtre.
Panneau de commande et témoins indicateurs du TVX33
Puissance de séchage HAUTE
Puissance de séchage BASSE
05651114.qxd 24-05-02 13:53 Page 20
Seite wird geladen ...
Seite wird geladen ...
Seite wird geladen ...
Seite wird geladen ...
Seite wird geladen ...
Seite wird geladen ...
Seite wird geladen ...
Seite wird geladen ...
Seite wird geladen ...
Seite wird geladen ...
Seite wird geladen ...
Seite wird geladen ...
Seite wird geladen ...
Seite wird geladen ...
Seite wird geladen ...
Seite wird geladen ...
Seite wird geladen ...
Seite wird geladen ...
Seite wird geladen ...
Seite wird geladen ...
Seite wird geladen ...
Seite wird geladen ...
Seite wird geladen ...
Seite wird geladen ...
Seite wird geladen ...
Seite wird geladen ...
Seite wird geladen ...
Seite wird geladen ...
Seite wird geladen ...
Seite wird geladen ...
Seite wird geladen ...
Seite wird geladen ...
Seite wird geladen ...
Seite wird geladen ...
Seite wird geladen ...
Seite wird geladen ...
Seite wird geladen ...
Seite wird geladen ...
Seite wird geladen ...
Seite wird geladen ...
Seite wird geladen ...
Seite wird geladen ...
Seite wird geladen ...
Seite wird geladen ...
Seite wird geladen ...
Seite wird geladen ...
Seite wird geladen ...
Seite wird geladen ...
Seite wird geladen ...
Seite wird geladen ...
Seite wird geladen ...
Seite wird geladen ...
Seite wird geladen ...
Seite wird geladen ...
Seite wird geladen ...
Seite wird geladen ...
Seite wird geladen ...
Seite wird geladen ...
Seite wird geladen ...
Seite wird geladen ...
Seite wird geladen ...
Seite wird geladen ...
Seite wird geladen ...
Seite wird geladen ...
Seite wird geladen ...
Seite wird geladen ...
Seite wird geladen ...
Seite wird geladen ...
Seite wird geladen ...
Seite wird geladen ...
Seite wird geladen ...
Seite wird geladen ...
Seite wird geladen ...
Seite wird geladen ...
Seite wird geladen ...
Seite wird geladen ...
Seite wird geladen ...
Seite wird geladen ...
Seite wird geladen ...
Seite wird geladen ...
Seite wird geladen ...
Seite wird geladen ...
Seite wird geladen ...
Seite wird geladen ...
Seite wird geladen ...
Seite wird geladen ...
Seite wird geladen ...
Seite wird geladen ...
Seite wird geladen ...
Seite wird geladen ...
Seite wird geladen ...
Seite wird geladen ...
Seite wird geladen ...
Seite wird geladen ...
Seite wird geladen ...
Seite wird geladen ...
Seite wird geladen ...
Seite wird geladen ...
Seite wird geladen ...
Seite wird geladen ...
-
 1
1
-
 2
2
-
 3
3
-
 4
4
-
 5
5
-
 6
6
-
 7
7
-
 8
8
-
 9
9
-
 10
10
-
 11
11
-
 12
12
-
 13
13
-
 14
14
-
 15
15
-
 16
16
-
 17
17
-
 18
18
-
 19
19
-
 20
20
-
 21
21
-
 22
22
-
 23
23
-
 24
24
-
 25
25
-
 26
26
-
 27
27
-
 28
28
-
 29
29
-
 30
30
-
 31
31
-
 32
32
-
 33
33
-
 34
34
-
 35
35
-
 36
36
-
 37
37
-
 38
38
-
 39
39
-
 40
40
-
 41
41
-
 42
42
-
 43
43
-
 44
44
-
 45
45
-
 46
46
-
 47
47
-
 48
48
-
 49
49
-
 50
50
-
 51
51
-
 52
52
-
 53
53
-
 54
54
-
 55
55
-
 56
56
-
 57
57
-
 58
58
-
 59
59
-
 60
60
-
 61
61
-
 62
62
-
 63
63
-
 64
64
-
 65
65
-
 66
66
-
 67
67
-
 68
68
-
 69
69
-
 70
70
-
 71
71
-
 72
72
-
 73
73
-
 74
74
-
 75
75
-
 76
76
-
 77
77
-
 78
78
-
 79
79
-
 80
80
-
 81
81
-
 82
82
-
 83
83
-
 84
84
-
 85
85
-
 86
86
-
 87
87
-
 88
88
-
 89
89
-
 90
90
-
 91
91
-
 92
92
-
 93
93
-
 94
94
-
 95
95
-
 96
96
-
 97
97
-
 98
98
-
 99
99
-
 100
100
-
 101
101
-
 102
102
-
 103
103
-
 104
104
-
 105
105
-
 106
106
-
 107
107
-
 108
108
-
 109
109
-
 110
110
-
 111
111
-
 112
112
-
 113
113
-
 114
114
-
 115
115
-
 116
116
-
 117
117
-
 118
118
-
 119
119
-
 120
120


Hoover TVE43 Bedienungsanleitung
- Kategorie
- Wäschetrockner
- Typ
- Bedienungsanleitung
- Dieses Handbuch eignet sich auch für
in anderen Sprachen
- français: Hoover TVE43 Le manuel du propriétaire
- italiano: Hoover TVE43 Manuale del proprietario
- Nederlands: Hoover TVE43 de handleiding
- português: Hoover TVE43 Manual do proprietário
- dansk: Hoover TVE43 Brugervejledning
Verwandte Artikel
Andere Dokumente
-
Candy CDC 266X CH User Instructions
-
Otsein-Hoover AB OHDV 6 Benutzerhandbuch
-
Candy GCV 580NC-S Benutzerhandbuch
-
-
Miele PDR 510 ROP Bedienungsanleitung
-
Electrolux EDD2400 RH Benutzerhandbuch
-
Electrolux EDD2400 RH Benutzerhandbuch
-
Asko HB1152W Installation instructions (FR)
-