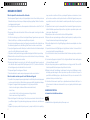
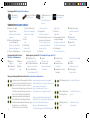
DeLonghi LATISSIMA PLUS EN521.R Bedienungsanleitung
- Kategorie
- Kaffeemaschinen
- Typ
- Bedienungsanleitung

TSM SUCCESS MANUAL
®
designed and copyright by
*
* Ma machine
Seite wird geladen ...
Seite wird geladen ...

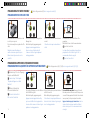
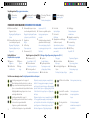
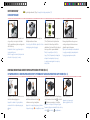
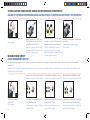
Energy saving settings, refer to page 12
When the machine is switched on, buttons light for 2sec:
Lungo= power off after 9 min
Espresso= power off after 30 min
Both Lungo+Espresso = power off after 8 h
Water hardness settings, refer to page 14
When the machine is switched on, buttons light for 2sec:
Latte Macchiato= Soft water hardness
Cappuccino= Medium water hardness
Latte Macchiato+Cappuccino= Hard water hardness
Coffee mode is ready
Coffee and milk recipe
modes are ready
Descaling alert, refer to
page 13
Mode économie d’énergie, se référer à la page 12
Lorsque la machine est allumée , les boutons restent allumés
pendant 2 secondes :
Bouton Lungo allumé = arrêt de la machine après 9 minutes
Bouton Espresso allumé = arrêt de la machine après 30 minutes
Boutons Lungo et Espresso allumés = arrêt après 8 heures
Mode Dureté de l’eau, se référer à la page 14
Lorsque la machine est allumée, les boutons restent allumés pen-
dant 2 secondes : Bouton Latte Macchiato allumé = faible dureté
de l’eau ; Bouton Cappuccino allumé = moyenne dureté de l’eau ;
Boutons Latte Macchiato + Cappuccino = forte dureté de l’eau
Le mode Café (Espresso et
Lungo) est prêt à être utilisé.
Les modes Café et Recettes à
base de lait sont prêts à être
utilisé.
Alerte de détartrage, se référer
à la page 13
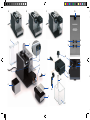
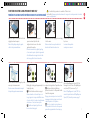
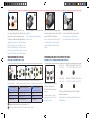
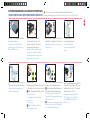
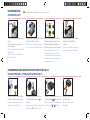
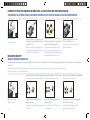
Backlight Buttons indication/Signification des boutons rétroéclairés
A Machine without the Rapid
Cappuccino System
Machine sans le
“Rapid Cappuccino System”
B Machine with the Rapid Cappuc-
cino System (for Cappuccino)
Machine avec le “Rapid Cappuc-
cino System” (pour Cappuccino)
C Machine with the Rapid Cappuc-
cino System (for Latte Macchiato)
Machine avec le “Rapid Cap-
puccino System” (pour Latte
Macchiato)
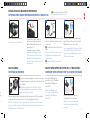
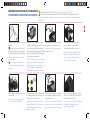
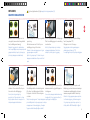
1 Lever
Levier
2 Coffee outlet
Sortie café
3 Water tank (0.9 l)
Réservoir d’eau (0,9L)
4 Used capsule container
Bac à capsules usagées
5 Drip tray (push inside for Latte
Macchiato glass)
Bac de récupération (faire
coulisser à l’intérieur pour un
verre Macchiato)
6 Left Grid
Grille gauche
7 Right Grid
Grille droite
8 Descaling pipe storage door (pull
to open)
Trappe d’accès à la buse de
détartrage (tirer pour ouvrir)
9 Descaling pipe
Buse de détartrage
10 Steam connector door
Trappe d’accès au connecteur
vapeur
11 Steam connector
Connecteur vapeur
12 ON/OFF button
Bouton ON/OFF
13 Cappuccino
Cappuccino
14 Latte Macchiato
Latte Macchiato
15 Espresso
Espresso
16 Lungo
Lungo
Backlight Buttons/Boutons rétroéclairés Rapid Cappuccino System (R.C.S.)/Rapid Cappuccino System (R.C.S.)
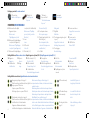
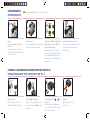
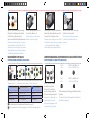
Packaging content/Ce carton contient :
Coffee machine
Machine à café Nespresso
16 Capsule Set
Set de 16 capsules
Nespresso
“Welcome to
Nespresso folder”
“Pochette de bienvenue
Nespresso“
User manual
Mode d’emploi
Warranty card
la garantie de la machine
17 Milk container (0.35 l)
Bac à lait (0,35L)
18 Milk container Lid
Couvercle du pot à lait
19 Lid detach button
Bouton de déclipage du couvercle
20 Rinsing button
Bouton de rinçage
21 Milk Froth regulator knob
Bouton de réglage de la mousse
de lait
22 Min. froth
Mousse minimale
23 Max. froth
Mousse maximale
24 Rapid Cappuccino System
connector
Connecteur du RCS
25 Milk spout
Buse de lait
26 Milk aspiration tube
Tuyau d’aspiration du lait
VUE D’ENSEMBLEOVERVIEW/
4

EN
FR
SAFETY PRECAUTIONS
Avoid risks of fatal electric shock and fire
1. Only plug the appliance into suitable, earthed mains connections. Make sure that the voltage of the
power source is the same as that specified on the rating plate. The use of an incorrect connection
voids warranty.
2. If an extension lead is required, use only an earthed cable with a conductor cross-section of at least
1.5 mm
2
.
3. Do not pull the cable over sharp edges. Clamp it or allow it to hang down. Keep the cable away from
heat and damp.
4. If the cable is damaged, do not operate the appliance. Return appliance to the manufacturer‘s service,
the Nespresso Club or similarly qualified persons for repair.
5. To avoid hazardous damage, never place the appliance on or beside hot surfaces such as radiators,
cooking rings, gas burners, open flames, or similar.
6. Always place it on a stable and even surface. The surface must be resistant to heat and fluids, like
water, coffee, descaler, or similar.
7. Disconnect the appliance from the mains when not in use for a long period.
8. Disconnect by pulling out the plug and not pulling the cable itself or the cable may be damaged.
Never touch the cable with wet hands.
9. Never immerse the appliance or part of it in water. Never put the appliance or part of it into a dish-
washer, except the Rapid Cappuccino System (R.C.S.). Electricity and water together is dangerous and
can lead to deadly electrical shocks.
10. Do not open the appliance. Hazardous voltage inside!
11. Do not put anything into openings. Doing so may cause fire or electrical shock!
Avoid possible harm when operating the appliance
12. This product has been designed for domestic use only. Any commercial use, inappropriate use or
failure to comply with the instructions, the manufacturer accepts no responsibility and the warranty
will not apply.
13. This is a household appliance only. It is not intended to be used in:
– staff kitchen areas in shops, offices and other working environments;
– farm houses;
– by clients in hotels, motels and other residential type environments;
– bed and breakfast type environments;
– planes, boats, trains and automobiles.
14. Do not use the appliance if it is damaged or not operating perfectly. Immediately remove the plug
from the power socket. Call the Nespresso Club for a diagnosis. A damaged appliance can cause
electrical shocks, burns and fire.
15. The appliance is not intended for use by persons (including children) with reduced physical, sensory
or mental capabilities, or lack of experience and knowledge, unless they have been given supervi-
sion or instruction concerning use of the appliance by a person responsible for their safety. Children
should be supervised to ensure that they do not play with the appliance.
16. Always close the lever and never lift it during or immediately after operation. Risk of scalding! Do not
put fingers into the capsule compartment or the capsule shaft. Danger of injury!
17. Do not put fingers under the coffee outlet or milk spout. Risk of scalding!
18. Never use a damaged or deformed capsule. Water could flow around the capsule when not perfo-
rated by the blades and damage appliance.
19. Do not use the appliance without drip tray and drip grid to avoid spilling any liquid on surrounding
surfaces.
20. Always use the milk container (Rapid Cappuccino System) supplied with the machine. Risk of scald-
ing if milk container is not inserted properly.
21. The milk spout gets hot. Risk of burns! Use with care.
22. If coffee volumes higher than 150 ml are programmed: Let the machine cool down for 5 minutes
before making the next coffee. Risk of overheating!
23. Do not use any strong cleaning agent or solvent cleaner. Use a damp cloth and mild cleaning agent
to clean the surface of the machine.
24. Descale the machine when you see the descaling alert. Read the safety precautions on the descaling
pack age care fully. The desc aling solut ion can be ha rmful. Avoid cont act w ith eyes, sk in and sur face s. We
recommend the Nespresso descaling kit available from the Nespresso Club as it is specifically adapted
to your machine. Do not use other products (such as vinegar) that would affect the taste of the coffee.
For any additional questions you may have regarding descaling, please contact the Nespresso Club
25. This machine works with Nespresso capsules available exclusively through the Nespresso Club.Your
Nespresso machine’s proper functioning and lifetime are only guaranteed with the usage of Nes-
presso capsules.
SAVE THESE INSTRUCTIONS
Pass them on to any subsequent user
This instruction manual is also available as a PDF at nespresso.com.
5
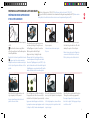
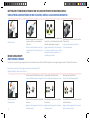
Seite wird geladen ...

1
2
3 4
5 6 7
8
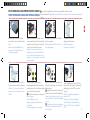
Rinse the Rapid Cappuccino System (R.C.S.) by
following the section “Care of the Rapid Cappuc-
cino System (R.C.S) twice a week”, p. 11
Rincer le “Rapid Cappuccino System” (R.C.S) en
suivant le chapitre Entretien du “Rapid Capuccino
System (R.C.S) deux fois par semaine, page 11
EN
FR
Allumer la machine. Les boutons Espresso et
Lungo clignotent. Le temps de chauffe de la ma-
chine est estimé à 40 secondes. Quand la lumière
des boutons est fixe, la machine est prête.
Se référer au chapitre Signification des
boutons rétroéclairés page 4
Switch the machine on.
Blinking light: heating up for approximately 40 sec.
Steady light: ready
Refer to the button indications on page 4.
First read the safety precautions to avoid risks of fatal electrical
shock and fire/ Commencer par lire attentivement les consignes de sécurité pour éviter tout accident
corporel ou dégât matériel.
Le réservoir d’eau peut être
soulevé par son couvercle.
Retirer le réservoir d’eau, la grille d’égouttage
et le réservoir à capsules. Ajuster la longueur du
câble d’alimentation et ranger l’excès de câble
dans le range-câble situé sous la machine.
Retirer le film plastique des grilles gauche
et droit et des panneaux latéraux.
Redresser la machine en position droite et la
brancher sur l’alimentation du secteur.
PREMIÈRE UTILISATION OU APRÈS UNE PÉRIODE DE NONUTILISATION PROLONGÉE
Rincer le réservoir d’eau avant de le remplir
d’eau potable jusqu’au niveau maximum.
Rinçage : placer un récipient sous la sortie Café
et appuyer sur le bouton Lungo sans utiliser de
capsule. Répéter trois fois l’opération.
Des tests sont réalisés sur les machines en
fin de production. Des traces de café en poudre
peuvent donc apparaitre dans l’eau de rinçage.
The water tank can be carried
by its cover.
Remove the water tank, drip tray, and
capsule container. Adjust the cable
length and store the excess in the cable
guide under the machine.
Remove the plastic film from both the left and
right grid, and machine panels.
Put the machine in the upright position and plug
it into the mains.
FIRST USE OR AFTER A LONG PERIOD OF NONUSE/
Rinse the water tank before filling with potable
water up to the maximum level.
Rinsing: Place a container under the coffee outlet
and press the Lungo button. Repeat three times.
Machines are fully tested after being
produced. Some traces of coffee powder could be
found in the rinsing water.
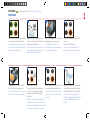
7

2
1
3 4
1 2
3 4
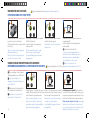
Refer to safety precautions (16)/Lire les consignes de sécurité (16)
Appuyer sur le bouton Espresso (40ml) ou le
bouton Lungo (110ml). La préparation du café
s’arrêtera automatiquement. Pour arrêter la
préparation du café ou la redémarrer, appuyer
une nouvelle fois.
Prenez votre tasse. Soulever puis baisser le levier
pour éjecter la capsule usagée dans le bac à
capsules usagées.
PRÉPARATION DU CAFÉ
Pour un verre Latte Macchiato, pousser le bac de
récupération à l’intérieur de la machine.
Soulever le levier et insérer la capsule
Nespresso. Baisser le levier et positionner une
tasse sous la sortie Café.
Retirer la buse de lait en la tirant
vers l’extérieur.
Retirer le bouton de réglage de la mousse de
lait en le tournant jusqu’au (
) et en le tirant
vers le haut.
Retirer le couvercle du bac à lait et
débrancher le tuyau d’aspiration du lait.
Retirer le connecteur du “Rapid Cappuccino
System” verrouillé en le tournant vers la gauche
et en le tirant vers l’extérieur.
MONTAGE/DÉMONTAGE DU “RAPID CAPPUCCINO SYSTEM” R.C.S
Press the Espresso (40 ml / 1.35 oz) or the
Lungo (110 ml / 3.7 oz) button. Preparation will
stop automatically. To stop the coffee flow or
top up your coffee, press again.
Take the cup. Lift and close the lever to eject the
capsule into the used capsule container.
COFFEE PREPARATION/
For a Latte Macchiato glass, push the drip tray
inside the machine.
Lift the lever completely and insert a Nespresso
capsule.
Close the lever and place a cup under the
coffee outlet.
Remove the milk spout by
pulling it off.
Remove the milk froth regulator knob by
turning it to (
) and pulling it up.
Remove the milk container lid and unplug the
milk aspiration tube.
Unlock and remove the Rapid Cappuccino System
connector by turning it from (
) to ( ) and
pulling it off.
ASSEMBLING / DISASSEMBLING OF THE RAPID CAPPUCCINO SYSTEM R.C.S/
8

1 2 3 4
5 6 7 8
EN
FR
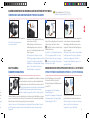
Refer to safety precautions (16) (20) (21)/Se référer aux conditions de sécurité (16) (20) (21)
For perfect milk froth, use skimmed or semi-skimmed milk at refrigerator temperature (about 4° C)/Pour une mousse
de lait parfaite, utiliser du lait écrémé et demi-écrémé conservé à température réfrigérée (env 4°C).
PRÉPARATION D’UN CAPPUCCINO OU
D’UN LATTE MACCHIATO
Remplir le bac à lait avec la quantité de lait voulue.
Lorsque le pot à lait est vide et avant de le
remplir de nouveau, rincer minutieusement le pot
à lait et le tuyau d’aspiration du lait avec de l’eau
potable.
Soulever le levier et insérer une capsule
Nespresso.
Refermer le pot à lait. Ouvrir la trappe d’accès au
connecteur vapeur en la faisant glisser sur la droite.
Connecter le “Rapid Cappuccino System” (R.C.S) à l’ap-
pareil. Les boutons des recettes à base de lait clignotent:
le Rapid Cappuccino se met en mode chauffe. Quand la
lumière des boutons est fixe, la machine est prête.
Baisser le levier, placer une tasse Cappuccino
ou un verre à Latte Macchiato sous la sortie
Café et ajuster la position de la buse de lait.
Ajuster le tuyau d’aspiration du lait selon la
quantité de mousse désirée.
Rincer après chaque utilisation comme cela est
décrit dans le chapitre “Nettoyage après chaque
recette à base de lait”.
A la fin de la préparation, soulever et baisser
le levier pour éjecter la capsule dans le bac à
capsules usagées.
Appuyer sur le bouton Cappuccino ou Macchiato.
La préparation commence après quelques secondes
(le lait puis le café) et s’arrêtera automatiquement.
PREPARING A CAPPUCCINO AND LATTE MACCHIATO/
Fill the milk container with your desired quantity
of milk.
When the milk container is empty, before
refilling, thoroughly rinse it and the milk aspiration
tube with potable water.
Lift the lever completely and insert a
Nespresso capsule.
Close the milk container. Open the steam con-
nector door by sliding it to the right. Connect
the Rapid Cappuccino System to the machine.
Milk recipe buttons blink: the Rapid
Cappuccino heats up. Steady light: ready
Close the lever, place a Cappuccino cup or a
Latte Macchiato glass under the coffee outlet
and adjust the position of the milk spout.
Adjust the milk froth regulator knob accord-
ing to the quantity of froth you want.
Rinse after each use as described in the section
“Rinsing after each milk recipe preparation”.
At the end of the preparation, lift and close the
lever to eject the capsule into the used capsule
container.
Press the Cappucino or Latte Macchiato button.
The preparation starts after a few seconds (first
milk and then coffee) and will stop automatically.
9

2 3
1 2 3 4
1
Refer to safety precautions (20) (21) (22)/Lire les consignes de sécurité (20) (21) (22).
Refer to safety precautions (22)/Lire les consignes de sécurité (22).
Appuyer et maintenir appuyé le même bouton. L’extraction
commence. Lâcher le bouton lorsque la quantité de café désiré est
atteinte. Le bouton clignote 3 fois : le nouveau volume de la recette
est enregistré.
PROGRAMMATION DU VOLUME D’EAU
Appuyer et maintenir appuyé le bouton
Espresso ou Lungo. L’extraction du café
commence. Le bouton clignote rapidement :
mode programmation.
Lâcher le bouton lorsque le volume désiré est
atteint.
PROGRAMMATION DE LA QUANTITÉ DE CAPPUCCINO/LATTE MACCHIATO
Le volume d’eau est enregistré pour les prochaines
préparations de café. Le bouton clignote 3 fois : le
nouveau volume d’eau est enregistré.
min. 20 ml / max. 300 ml
Suivre les étapes 1 à 5 du chapitre
“Préparation du Cappuccino et du Lait
Macchiato”
Appuyer et maintenir appuyé le bouton Cap-
puccino ou Latte Macchiato. La préparation de
la mousse de lait commence. Le bouton clignote
rapidement : mode programmation.
Lâcher le bouton lorsque la quantité de mousse
désirée est atteinte. Le bouton clignote rapide-
ment : mode programmation.
Remplir le réservoir d’eau, allumer la
machine et insérer une capsule Nespresso.
Baisser le levier et placer une tasse sous la
sortie Café.
Lait : min 20 ml / max 300 ml
Café : min 20 ml / max 300 ml
Press and hold the same button. Brewing starts. Release the
button when your desired coffee volume is reached. The recipe volume
is now stored for future preparations. Button blinks 3 times: confirm the
new recipe volume. Eject the capsule and press the clean button.
PROGRAMMING THE WATER VOLUME/
Press and hold the Espresso or Lungo button.
Brewing starts.
Button blinks quickly: programming mode.
Release the button when the desired volume is
reached.
PROGRAMMING CAPPUCCINO/LATTE MACCHIATO VOLUME/
The water volume is now stored for future coffee
preparations.
Button blinks 3 times: confirm the new water volume
min 20 ml / max 300 ml.
Milk: min 20 ml/max 300 ml.
Coffee: min 20 ml/max 300 ml
Follow the steps 1-5 of section “Preparing a
Cappuccino and Latte Macchiato”
Press and hold the Cappuccino or Latte Macchiato
button. Milk frothing starts.
Button blinks quickly: programming mode.
Release the button when your desired volume of
milk froth is reached.
Button blinks quickly: programming mode.
Fill the water tank, switch the machine on and
insert a Nespresso capsule.
Close the lever and place a cup under the coffee
outlet.
10

1
1 1
2 3 4
EN
FR
Refer to safety precautions (20) (21) (22)/Lire les consignes de sécurité (20) (21) (22).
Refer to safety precautions (17) (20) (21)/
Lire les consignes de sécurité (17) (20) (21).
Appuyer et maintenir appuyé le même bouton. L’extraction
commence. Lâcher le bouton lorsque la quantité de café désiré est
atteinte. Le bouton clignote 3 fois : le nouveau volume de la recette
est enregistré.
NETTOYAGE APRÈS CHAQUE PRÉPARATION DE RECETTE À BASE DE LAIT
NETTOYAGE AU QUOTIDIEN
ENTRETIEN DU “RAPID CAPPUCINO SYSTEM” R.C.S DEUX FOIS PAR SEMAINE
Placer un récipient sous la buse de lait.
Retirer le bac de récupération, le bac à capsules usagées et le réservoir d’eau. Vider et rincer. Les
grilles gauche et droite doivent être retirés de la machine pour être facilement lavés. Laver la sortie
Café régulièrement avec un chiffon humide.
Mettre tous les composants dans la partie
haute du lave vaisselle au moins deux fois
par semaine.
Déconnecter la R.C.S de la machine et le placer
au réfrigérateur. Fermer la trappe d’accès au
connecteur vapeur.
Le lait ne doit pas être conservé plus de 2
jours.
Appuyer et maintenir appuyé le bouton
“Clean” jusqu’à ce que la machine s’arrête
automatiquement de pomper (environ 10
secondes). La lumière est fixe : processus de
rinçage terminé.
Tous les composants du bac à lait peuvent être lavés
au lave-vaisselle. Deux fois par semaine, suivre le
chapitre Entretien du “Rapid Cappucino System”
(R.C.S) deux fois par semaine
Ne pas utiliser de détartrant ou de solvant. Utiliser un chiffon
humide et un produit d’entretien doux pour nettoyer la surface de la
machine. Ne pas mettre au lave-vaisselle.
Démonter le “Rapid Cappucino Sys-
tem”. Se référer au chapitre Montage/
Démontage du “Rapid Cappucino
System” (R.C.S)
Press and hold the same button. Brewing starts. Release the
button when your desired coffee volume is reached. The recipe volume
is now stored for future preparations. Button blinks 3 times: confirm the
new recipe volume. Eject the capsule and press the clean button.
RINSING AFTER EACH MILK RECIPE PREPARATION/
DAILY CLEANING/ CARE OF RAPID CAPPUCCINO SYSTEM R.C.S. TWICE A WEEK/
Place a container under the milk spout.
Remove the drip tray, capsule container and water tank. Empty and rinse. Both left and right grid
can be removed for easy cleaning. Clean the coffee outlet regularly with a damp cloth.
Clean all components in the upper level
of a dishwasher at least twice a week.
Disconnect the R.C.S. from the machine and place
it in the refrigerator. Close the machine steam
connector door.
This milk should not be kept for more than
2 days.
Press and hold the ”CLEAN” button until
machine stops pumping automatically.
Milk recipe buttons blink: rinsing process
approximately 10 sec.
Steady light: rinsing process finished.
All the milk container components are dishwash-
erproof. Twice a week, follow the section “Care of
Rapid Cappuccino System twice a week”.
Disassemble the Rapid Cappuccino
System. Refer to section ”Assembling/
Disassembling of Rapid Cappuccino
System (R.C.S)”.
Do not use any strong cleaning agent or solvent cleaner. Use a damp
cloth and mild cleaning agent to clean the surface of the machine. Do not
put in a dishwasher.
11

1 2 3 4
1 A B C
VIDER L’APPAREIL AVANT UN PÉRIODE DE NONUTILISATION, CONTRE LE GEL OU AVANT UNE RÉPARATION
MODE ÉCONOMIE D’ÉNERGIE
Allumer la machine.
Activer le mode arrêt automatique après 9 mn (réglage d’usine)
Activer le mode arrêt automatique après 30 mn
Activer le mode arrêt automatique après 8h
Appuyer et maintenir appuyé sur le bouton Lungo
et allumer la machine.
Appuyer et maintenir appuyé le bouton Espresso
et allumer la machine.
Appuyer et maintenir appuyé les boutons Lungo et
Espresso et allumer la machine.
Appuyer simultanément sur les boutons Cappuc-
cino et Espresso pendant 5 secondes. Les boutons
de préparation clignotent alternativement : le
mode vidange est en marche.
Retirer le réservoir d’eau. Baisser le levier (sans
capsule à l’intérieur). Placer un récipient sous la
sortie Café.
Lorsque l’opération est terminée, la machine
s’éteint automatiquement.
Eteindre la machine
Cette machine consomme moins d’énergie grâce notamment à un arrêt automatique (0W).
L’appareil s’éteind après 9 minutes de non-utilisation.
EMPTYING THE SYSTEM BEFORE A PERIOD OF NONUSE, FOR FROST PROTECTION OR BEFORE A REPAIR/
ENERGY SAVING CONCEPT/
Switch on the machine.
Activation power off after 9min (factory setting)
Activation power off mode after 30min
Activation power off mode after 8h
Press and hold the Lungo button and switch the
machine on.
Press and hold the Espresso button and switch
the machine on.
Press and hold both the Lungo and Espresso button
and switch machine on.
Press the Cappuccino and Espresso buttons simul-
taneously for 5 seconds. Preparation buttons blink
alternately: emptying mode is in progress.
Remove the water tank. Close the lever (without
a capsule inside). Place a container under the
coffee outlet.
When the process is finished, the machine switches
off automatically.
This machine has an excellent energy consumption profile as well as an automatic power off function (0W) which enables you to save energy. The appliance switches off 9 minutes after the last use.
Switch the machine off.
12
Seite wird geladen ...

9 10 11 12
1 A B C
1
A
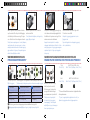
Soft water hardness
Faible dureté de l’eau
B
Medium water hardness
Moyenne dureté de l’eau
C
Hard water hardness
Forte dureté de l’eau
< 10° dH 10° dH – 20° dH >20° dH
< 18° fH 18° fH – 36° fH >36° fH
< 180 mg/l CaCO
3
180–360 mg/l CaCO
3
360 mg/l CaCO
3
40 ml (1.35 oz)
40 ml (1.35 oz)
110 ml (3.7oz)
110 ml (3.7oz)
Milk*: 50ml (1.7 oz)/Coffee: 40ml (1.35 oz)
Lait* : 50ml (1.7 oz)/Café : 40ml (1.35 oz)
Milk*: 150ml (5 oz)/Coffee: 40 ml (1.35 oz)
Lait* : 150ml (5 oz)/Café : 40 ml (1.35 oz)
RÉGLER LA DURETÉ DE L’EAU
Appuyer et maintenir appuyé les boutons indiqués et allumer la machine.
Appuyer une nouvelle fois sur le bouton Cappuccino.
L’opération de rinçage se poursuit depuis la sortie
Café, la buse de détartrage et le bac de récupération
jusqu’à ce que le réservoir d’eau soit vide. Les boutons
Cappuccino et Macchiato clignotent alternativement.
Laver la machine avec un chiffon humide.
Vous avez terminé de détartrer votre machine.
Une fois l’opération de rincage terminée, la
machine s’éteint.
Eteindre la machine
Retirer et ranger la buse de détartrage. Vider
le bac de récupération et le bac à capsules
usagées. Remplir le réservoir d’eau d’eau
potable.
REVENIR À LA PROGRAMMATION INITIALE
Lorsque la machine est allumée,
appuyer sur les 4 boutons à la fois
pendant 5 secondes.
Les boutons programmés clignotent 3 fois : la dureté de l’eau est réglée
*La quantité de mousse de lait dépend du type de lait utilisé et
de sa température.
WATER HARDNESS SETTING/
Press and hold the indicated buttons and switch the machine on.
Press the Cappuccino button again. The rinsing
cycle continues through the coffee outlet, descaling
pipe and drip tray until the water tank is empty.
The Cappucino and Macchiato button blink alternatively.
Clean the machine using a damp cloth.
You have now finished descaling the machine.
Once the rinsing process is finished, the machine
switches off.
Switch the machine off.
Remove and store the descaling pipe. Empty
the drip tray and used capsule container. Fill the
water tank with fresh potable water.
RESTORING VOLUMES TO FACTORY SETTINGS/
Press all 4 buttons for 5 sec (when
machine is switched on). All
buttons blink 3 times: all volumes
are reset.
Programmed buttons blink 3 times: water hardness is set.
* The volume of milk froth depends on the kind of milk that is
used and its temperature.
14

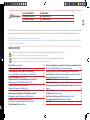
Aucune lumière
➔ Vérifier l’alimentation du secteur, la fiche, la tension et le fusible. En cas de problème, appeler le Club Nespresso.
Pas de café, pas d’eau.
➔ Le réservoir d’eau est vide. Remplir le réservoir d’eau. ➔ Détartrer si nécessaire ; voir le chapitre Détartrage.
Le café coule très lentement.
➔ La vitesse du débit dépend de la variété de café. ➔ Détartrer si nécessaire ; voir le chapitre Détartrage
Le café n’est pas assez chaud.
➔ Préchauffer la tasse ➔ Détartrer si nécessaire ; voir le chapitre Détartrage.
La zone de la capsule fuit (eau dans le réservoir à
capsules).
➔ Positionner la capsule correctement. En cas de fuite, appeler le Club Nespresso.
Clignotement irrégulier.
➔ Envoyer la machine en réparation ou appeler le Club Nespresso.
Pas de café, uniquement de l’eau qui sort (malgré la
présence d’une capsule insérée)
➔ En cas de problèmes, appeler le Club Nespresso.
Le levier ne peut être complètement baissé.
➔ Vider le bac à capsules usagées. S’assurer qu’aucune capsule n’est bloquée à l’intérieur du bac.
La qualité de la mousse de lait ne correspond pas au
standard.
➔ Utiliser du lait écrémé ou demi-écrémé à température réfrigérée (environ 4°C). Rincer après chaque préparation à base
de lait (voir page 11). Détartrer la machine (voir page 13).
La lumière du bouton Cappuccino est orange
➔ Détartrer la machine.
La lumière du bouton Cappuccino clignote orange
➔ La machine est en mode Détartrage.
Tous les boutons clignotent successivement.
➔ La machine est en train de se vider.
No indicator light.
➔ Check the mains, plug, voltage, and fuse. In case of problems, call the Nespresso Club.
No coffee, no water.
➔ Water tank is empty. Fill water tank. ➔ Descale if necessary; see Descaling section.
Coffee comes out very slowly.
➔ Flow speed depends on the coffee variety. ➔ Descale if necessary; see Descaling section.
Coffee is not hot enough.
➔ Preheat cup. ➔ Descale if necessary; see Descaling section.
Capsule area is leaking (water in capsule container).
➔ Position capsule correctly. If leakages occur, call the Nespresso Club.
Irregular blinking.
➔ Send appliance for repair or call the Nespresso Club.
No coffee, just water runs out (despite inserted
capsule).
➔ Call the Nespresso Club.
Lever cannot be closed completely.
➔ Empty capsule container. Make sure that no capsule is blocked inside the capsule container.
Quality of milk froth is not up to standard.
➔ Use skimmed or semi-skimmed milk at refrigerator temperature (about 4° C) / Rinse after each milk
preparation (see p.11). Descale the machine (see. p. 13)
Cappuccino button shine orange.
➔ Descale the machine.
Cappuccino button blinks orange.
➔ Machine is in descaling mode.
All buttons blink.
➔ Machine is in emptying mode.
EN
FR
220–240 V, 50/60 Hz, 1300 W
max
19 bar
~ 4.5 kg
0.9 l
0.35 l
16.7 cm 25.3 cm 31.9 cm
Milk*: 50ml (1.7 oz)/Coffee: 40ml (1.35 oz)
Lait* : 50ml (1.7 oz)/Café : 40ml (1.35 oz)
Milk*: 150ml (5 oz)/Coffee: 40 ml (1.35 oz)
Lait* : 150ml (5 oz)/Café : 40 ml (1.35 oz)
Elimination et protection de l’environnement • Votre appareil contient des matériaux valorisables qui peuvent être récupérés ou recyclés. La séparation des matériaux issu des déchets en diérentes
catégories facilité le recyclage de ces matières premières valorisables. Déposer l’appareil dans un point de collecte. Vous pouvez obtenir les informations sur l’élimination des déchets auprès de votre municipalité.
ELIMINATION ET PROTECTION DE L’ENVIRONNEMENT
PANNES
SPÉCIFICITÉS TECHNIQUES
CONTACTEZ LE CLUB N ESPRESSO
Pour toute information complémentaire, en cas de
problème ou pour tout renseignement technique
sur votre machine, appelez le Club Nespresso. Les
coordonnées du Club Nespresso sont disponible dans
le welcome set Nespresso situé dans le carton de la
machine ou sur nespresso.com
Disposal and Environmental Protection • Your appliance contains valuable materials that can be recovered or recycled. Separation of the remaining waste materials into dierent types facilitates the
recycling of valuable raw materials. Leave the appliance at a collection point. You can obtain information on disposal from your local authorities.
DISPOSAL AND ENVIRONMENTAL CONCERNS/
TROUBLESHOOTING/
SPECIFICATIONS/
CONTACT THE NESPRESSO CLUB/
For any additional information, in case of problems or
simply to seek advise, call the Nespresso Club. Contact
details of the Nespresso Club can be found in the
‘Welcome to Nespresso’ folder in your machine box or
at nespresso.com.
15

Nous nous sommes engagés à acheter du café de qualité supérieure, produit dans le respect de l’environnement et des cultivateurs. Depuis 6 ans, nous collaborons avec l’organisation Rainforest Alliance
pour mettre en œuvre notre Programme Nespresso AAA Substainable Quality™, et notre objectif est que 80% de notre café soit issu du Programme et bénéficie de la certification Rainforest Alliance
d’ici à 2013.
Nous avons choisi l’aluminium comme matériau d’emballage de nos capsules car il protège les arômes des Grands Crus Nespresso et peut aussi être recyclé à l’infini sans perdre sa qualité. Nous mettons
en place notre propre système de collecte et de recyclage des capsules usagées avec pour objectif de tripler notre capacité de recyclage à 75% des capsules utilisées d’ici à 2013.
Nespresso s’engage à développer des machines à la fois innovantes, performantes et esthétiques. Désormais, nous intégrons des caractéristiques environnementales dans la conception de nos gammes
de machines.
GARANTIE
ECOLABORATION : ECOLABORATION.COM
Delonghi garantit ce produit contre tous les défauts matériels et de fabrication pour une période de deux ans à compter de la date d’achat. Pendant cette période, Delonghi réparera ou remplacera, à sa discrétion,
tout produit défectueux sans frais supplémentaires pour son propriétaire. Les produits de remplacement ou les pièces réparées seront exclusivement garantis pour la part non expirée de la garantie initiale ou
pendant six mois, la durée retenue étant la plus longue. Cette garantie limitée ne s’applique pas à un quelconque défaut résultant d’un accident, d’un usage inapproprié de la machine, d’un mauvais entretien ou
d’une usure normale. Tout défaut résultant d’une utilisation de capsules autres que Nespresso ne sera pas couvert par la garantie. Sauf si cela est prévu par la législation en vigueur, les conditions de cette garantie
limité n’excluent, ni ne restreignent, ni ne modifient les droits légaux obligatoires relatifs à votre achat, voire y sont complémentaires. Si vous estimez que votre produit est défectueux, contactez Nespresso pour
obtenir des précisions sur l’adresse à laquelle il convient de l’envoyer ou de l’apporter pour réparation. Veuillez consulter notre site web www.nespresso.com pour en savoir plus sur Nespresso.
WARRANTY/
ECOLABORATION : ECOLABORATION.COM/
Delonghi warrants this product against defects in materials and workmanship for a period of two years from the date of purchase. During this period, Nespresso will either repair or replace, at its discretion, any
defective product at no charge to the owner. Replacement products or repaired parts will be guaranteed for only the unexpired portion of the original warranty or six months, whichever is greater. This limited
warranty does not apply to any defect resulting from accident, misuse, improper maintenance, or normal wear and tear. Any defect resulting from the usage of non genuine Nespresso capsules will not be covered
by this warranty. Except to the extent allowed by applicable law, the terms of this limited warranty do not exclude, restrict or modify, and are in addition to, the mandatory statutory rights applicable to the sale of
the product to you. If you believe your product is defective, contact Nespresso for instructions on where to send or bring it for repair. Any defect resulting from the use of capsules which are not genuine Nespresso
capsules will not be covered by this warranty. Please visit our website at nespresso.com to discover more about Nespresso.
We have committed to buy coffee of the very highest quality grown in a way that is respectful of the environment and farming communities. Since 2003 we have been working together with the Rainfor-
est Alliance developing our Nespresso AAA Sustainable Quality
TM
Coffee Program, and now we are committed to sourcing 80% of our coffee from the Program, Rainforest Alliance Certified
TM
, by 2013.
We chose aluminium as the material for our capsules because it protects the coffee and aromas of the Nespresso Grands Crus. Aluminium is also infinitely recyclable, without losing any of its qualities.
We are setting up a capsule collection system in major European markets to triple our capacity to recycle used capsules to 75% by 2013.
Nespresso is committed to designing and making machines that are innovative, high-performing and user friendly. Now we are engineering environmental benefits into the design of our new and future
machine ranges.
16

Cutting mark
Übersicht/Indicazioni generali 18
Sicherheitsvorkehrungen/Precauzioni di sicurezza 19–20
Erstinbetriebnahme oder nach längerer Nichtbenutzung/
In caso di primo utilizzo o dopo un lungo periodo di non utilizzo 21
Kaffeezubereitung/Preparazione caffè 22
Zusammenbauen/Zerlegen des Rapid Cappuccino Systems (R.C.S.)/
Montare/smontare il Sistema Rapid Cappuccino (R.C.S) 22
Cappuccino und Latte Macchiato zubereiten/
Preparazione Cappuccino e Latte Macchiato 23
Zubereitungsmenge für Espresso und Lungo einstellen
/Programmare la quantità di acqua 24
Zubereitungsmenge für Cappuccino/Latte Macchiato einstellen/
Programmare la quantità di Cappuccino/Latte Macchiato 24
Reinigung nach jeder Zubereitung von Milchrezepten/
Risciacquo dopo ogni preparazione di ricetta a base di latte 25
Tägliche Reinigung/Pulizie quotidiane 25
Pflege des Rapid Cappuccino Systems (R.C.S.) mindestens zweimal wöchentlich/
Pulizia del Sistema Rapid Cappuccino due volte a settimana 25
Leeren des Systems vor längerer Nichtbenutzung, als Frostschutz oder vor
einer Reparatur/Svuotamento del sistema prima di un periodo di non-utilizzo 26
Energiespar-Konzept/Modalità risparmio energetico 26
Entkalkung/Decalcificazione 27–28
Wasserhärte einstellen/Impostazione durezza dell’acqua 28
Zubereitungsmenge auf Werkseinstellung zurücksetzen/Ripristinare le quantità
originali 28
Fehlerbehebung/Ricerca guasti 29
Spezifikationen/Specifiche tecniche 29
Kontaktieren Sie den Nespresso Club/Contattare Nespresso Club 29
Entsorgung und Umweltschutz/Smaltimento e ambiente 29
Garantie/Garanzia 30
DE
IT
NESPRESSO, un sistema esclusivo per preparare un espresso perfetto, tazzina dopo tazzina.
Tutte le macchine Nespresso sono dotate di un sistema brevettato di estrazione ad alta pressione (fino a 19 bar), in grado di rivelare tutte le fragranze e gli aromi delicati di ciascun Grand Cru e di esaltarli con
uno strato superiore di crema densa e corposa.
CONTENUTO
Attenzione – in presenza di questa spia, leggere le precauzioni di sicurezza per evitare eventuali danni.
Informazioni – in presenza di questa spia, leggere le indicazioni per un uso sicuro e adeguato dell’apparecchio.
Vorsicht - wenn Sie dieses Zeichen sehen, beachten Sie den Punkt “Sicherheitsvorkehrungen” um mögliche Verletzungen und Schäden zu vermeiden.
Information - wenn Sie dieses Zeichen sehen, nehmen Sie bitte die Ratschläge für eine korrekte und sichere Handhabung des Gerätes zur Kenntnis.
NESPRESSO, ein exklusives System, das zu jeder Zeit den perfekten Espresso zubereitet. Alle Nespresso Maschinen sind mit einem patentierten Extraktionssystem ausgestattet, das einen Druck von bis zu 19 bar
garantiert. Jeder einzelne Parameter wurde strengen Kontrollen unterzogen, um die Aromenvielfalt, den Körper sowie die unvergleichbare Crema jedes einzelnen Grands Crus zum Ausdruck zu bringen.
INHALT/
EN
INSTRUCTION MANUAL
FR
MODE D’EMPLOI 4
DE
BEDIENUNGSANLEITUNG
IT
ISTRUZIONI PER L’USO 18
NL
GEBRUIKSAANWIJZING
GR
ΕΓΧΕΙΡΙ∆ΙΟ Ο∆ΗΓΙΩΝ 32
* Ma machine
17

Um Ihnen anzuzeigen in welchen Energiesparmodus sich die Maschine
befindet (siehe Seite 26), leuchten folgende Tasten beim Einschalten
der Maschine für 2 Sekunden auf: Lungo = Maschine schaltet sich 9
Minuten nach der letzten Benutzung ab. Espresso = Maschine schaltet
sich 30 Minuten nach der letzten Benutzung ab. Lungo + Espresso =
Maschine schaltet sich 8 Stunden nach der letzten Benutzung ab
Um Ihnen anzuzeigen in welcher Wasserhärte-Einstellung sich die
Maschine befindet (siehe Seite 28), leuchten folgende Tasten beim
Einschalten der Maschine für 2 Sekunden auf: Latte Macchiato = geringe
Wasserhärte. Cappuccino = mittlere Wasserhärte.
Latte Macchiato + Cappuccino = hohe Wasserhärte
Kaffee-Zubereitung ist bereit
Kaffee- und Milchrezept-
Zubereitung ist bereit
Entkalkungsalarm, siehe
Seite 27
Impostazioni risparmio energetico, vedere pagina 26
Quando la macchina è accesa, i pulsanti si illuminano per 2s:
Lungo= spegnimento dopo 9 minuti
Espresso= spegnimento dopo 30 minuti
Lungo+Espresso insieme= spegnimento dopo 8 ore
Impostazioni durezza dell’acqua, vedere pagina 28
Quando la macchina è accesa i pulsanti si illuminano per 2s:
Latte macchiato= Durezza dell’acqua dolce
Cappuccino= Durezza dell’acqua media
Latte Macchiato+Cappuccino= Durezza dell’acqua dura
La modalità caffè è pronta
Le modalità caffè e latte sono
pronte
Allarme decalcificazione,
vedere pagina 27
Anzeige der hintergrundbeleuchtete Tasten/Indice pulsanti a retroilluminazione
A Maschine ohne Rapid
Cappuccino System
Macchina senza Sistema Rapid
Cappuccino
B Maschine mit Rapid Cappuccino
System (für Cappuccino)
Macchina con Sistema Rapid
Cappuccino (per Cappuccino)
C Maschine mit Rapid Cappuccino
System (für Latte Macchiato)
Macchina con Sistema Rapid
Cappuccino (per Latte Mac-
chiato)
1 Hebel
Leva
2 Kaffeeauslauf
Erogatore caffè
3 Wassertank (0,9 l)
Serbatoio acqua (0.9 l)
4 Kapselbehälter
Contenitore capsule usate
5
Abtropfschale (nach hinten schieben zur
Nutzung eines Latte Macchiato Glases)
Vassoio raccogligocce (far scor-
rere all’interno per l’utilizzo del
bicchiere da ricetta)
6 Gitter links
Griglia sinistra
7 Gitter rechts
Griglia destra
8 Aufbewahrungsfach der Enkal-
kungdüse (aufklappbar)
Porta del vano del beccuccio di
decalcificazione (tirare e aprire)
9 Entkalkungsdüse
Beccuccio di decalcificazione
10 Dampfanschluss-Klappe
Sportello del connettore di
vapore
11 Dampfanschluss
Connettore di vapore
12 Hauptschalter
Pulsante ON/OFF
13 Cappuccino
Cappuccino
14 Latte Macchiato
Latte Macchiato
15 Espresso
Espresso
16 Lungo
Lungo
Hintergrundbeleuchtete Tasten/
Pulsanti a retroilluminazione
Rapid Cappuccino System (R.C.S.)/Sistema Rapid Cappuccino (R.C.S.)
Verpackungsinhalt/Contenuto della confezione
Kaffeemaschine
Macchina da caffè
Kapselset mit 16 Kapseln
Set da 16 capsule
“Willkommen bei Nespresso”-
Ordner
Cofanetto “Benvenuto in
Nespresso”
Bedienungsanleitung
Istruzioni per l’uso
Warranty card
Warranty card
17 Milchbehälter (0,35 l)
Contenitore latte (0,35 l)
18 Deckel für den Milchbehälter
Coperchio contenitore latte
19 Taste zur Deckelabnahme
Pulsante di apertura del R. C. S.
20 Spültaste
Pulsante risciacquo
21 Schaumregulierer
Manopola regolatrice della
schiuma di latte
22 Minimaler Schaum
Schiuma Min.
23 Maximaler Schaum
Schiuma Max.
24 Rapid Cappuccino System
Verbindung
Connettore del Sistema Rapid
Cappuccino
25 Milchdüse
Tubo di erogazione latte
26 Milchansaugrohr
Condotto del latte
INDICAZIONI GENERALIÜBERSICHT/
18

DE
IT
SICHERHEITSVORKEHRUNGEN
Vermeiden von tödlichem Stromschlag und Brand
1. Verbinden Sie das Gerät nur mit einem geeigneten, geerdeten Netzanschluss. Die auf dem Typen-
schild angegebene Spannung muss mit der Netzspannung übereinstimmen. Die Verwendung eines
falschen Anschlusses hat die Aufhebung der Gewährleistung zur Folge.
2. Wenn ein Verlängerungskabel notwendig ist, darf nur ein Kabel mit Schutzleiter mit einem Leiter-
querschnitt von mindestens 1,5 mm
2
verwendet werden.
3. Ziehen Sie das Kabel nicht über scharfe Kanten. Befestigen Sie es oder lassen Sie es herunterhängen.
Halten Sie das Kabel von Hitze und Feuchtigkeit fern.
4. Nehmen Sie das Gerät nicht in Betrieb, wenn das Kabel beschädigt ist. Bitte wenden Sie sich in
diesem Fall an den Nespresso Club oder an eine qualifizierte Fachwerkstatt.
5. Um gefährliche Beschädigungen zu vermeiden, stellen Sie das Gerät niemals auf oder neben heiße
Oberflächen wie Heizkörper, Kochplatten, Gasbrenner, offene Flammen o.ä.
6. Stellen Sie das Gerät immer auf eine stabile und ebene Oberfläche. Die Oberfläche muss gegen Hitze
und Flüssigkeiten wie Wasser, Kaffee, Entkalkerlösung o.ä. resistent sein.
7. Ziehen Sie den Netzstecker des Geräts, wenn Sie es für längere Zeit nicht verwenden.
8. Ziehen Sie den Stecker aus der Steckdose, indem Sie den Stecker anfassen. Niemals am Kabel ziehen,
da es dadurch beschädigt werden könnte. Das Kabel niemals mit nassen Händen berühren.
9. Tauchen Sie das Gerät oder Teile davon niemals in Wasser. Stellen Sie das Gerät oder Teile davon, mit
Ausnahme des Rapid Cappuccino System (R.C.S.), niemals in die Spülmaschine. Die Verbindung von
Elektrizität und Wasser ist gefährlich und kann zu tödlichen Stromschlägen führen.
10. Öffnen Sie das Gerät nicht. Die im Inneren vorhandene Spannung ist gefährlich!
11.
Stecken Sie nichts in die Öffnungen. Dies könnte Feuer verursachen oder zu einem Stromschlag führen!
Vermeiden Sie mögliche Verletzungen beim Gebrauch des Geräts
12. Dieses Produkt wurde ausschließlich für den Hausgebrauch entwickelt. Bei kommerziellem Ge-
brauch, bei unsachgemäßem Gebrauch oder bei Nichtbeachtung der Anweisungen übernimmt der
Hersteller keine Haftung und die Gewährleistung erlischt.
13. Dies ist ein Privat-Haushaltsgerät. Es ist nicht bestimmt für:
– Personalküchen in Geschäften, Büros und sonstigen Arbeitsumgebungen;
– landwirtschaftliche Betriebe;
– die Nutzung durch Gäste in Hotels, Motels und anderen Unterkünften;
– Übernachtungsbetriebe mit Frühstück.
14.
Benutzen Sie das Gerät nicht, wenn es beschädigt oder nicht einwandfrei funktionstüchtig ist. Ziehen Sie
sofort den Stecker aus der Steckdose. Geben Sie das Gerät an den Nespresso Club zu weiteren Abklärungen,
Reparaturen oder Anpassungen ab. Ein beschädigtes Gerät kann elektrische Schläge, Brände und Feuer
verursachen.
15. Dieses Gerät ist nicht dafür bestimmt, durch Personen (einschließlich Kinder) mit eingeschränkten
physischen, sensorischen oder geistigen Fähigkeiten oder mangels Erfahrung und/oder mangels
Wissen benutzt zu werden. Es sei denn, sie werden durch eine für ihre Sicherheit zuständige Person
beaufsichtigt oder erhielten von ihr Anweisungen, wie das Gerät zu benutzen ist. Kinder sollten
beaufsichtigt werden, um sicherzustellen, dass sie nicht mit dem Gerät spielen.
16.
Schließen Sie immer den Hebel und öffnen Sie diesen niemals, wenn das Gerät in Betrieb ist. Dies könnte zu
Verbrühungen führen. Stecken Sie keine Finger in das Kapselfach oder den Kapselhalter. Verletzungsgefahr!
17. Halten Sie die Finger nicht unter den Kaffee-Auslauf oder die Milchdüse. Verbrennungsgefahr!
18. Verwenden Sie niemals eine beschädigte oder deformierte Kapsel. Wenn die Kapsel nicht von den
Klingen perforiert wird, könnte Wasser um die Kapsel herum laufen und das Gerät beschädigen.
19.
Verwenden Sie das Gerät nicht ohne Abtropfschale und Tropfgitter um umliegende Oberflächen vor Flüssigkeit zu schützen.
20.
Verwenden Sie immer den Milchbehälter (Rapid Cappuccino System), der im Lieferumfang der Maschine
enthalten ist. Wird der Milchbehälter nicht korrekt eingesetzt, besteht
Verbrennungsgefahr
.
21. Die Milchdüse wird heiß. Verbrennungsgefahr! Achtsam verwenden.
22.
Wenn eine Kaffeemenge größer als 150 ml programmiert wurde: Lassen Sie die Maschine 5 Minuten
lang abkühlen, bevor Sie den nächsten Kaffee zubereiten. Überhitzungsgefahr!
23. Verwenden Sie zur Reinigung des Maschinengehäuses sowie für alle Teile der Maschine ein
geeignetes feuchtes Tuch und mildes Reinigungsmittel.
24.
Entkalken Sie die Maschine, wenn der Entkalkungsalarm angezeigt wird. Bitte lesen Sie sorgfältig die
Sicherheitshinweise auf der Verpackung des Entkalkers. Die Entkalkerlösung kann gesundheitsschäd-
lich sein. Kontakt mit Augen, Haut und Oberflächen vermeiden. Wir empfehlen die Verwendung des
Nespresso Entkalkersets, das speziell für Ihre Maschine entwickelt wurde. Keine anderen Produkte (z.B.
Essig) verwenden, da diese den Kaffeegeschmack und die Lebensdauer Ihrer Maschine beeinträchtigen
können. Für alle weiteren Fragen zur Entkalkung kontaktieren Sie bitte den Nespresso Club.
25.
Diese Maschine funktioniert mit Nespresso Kapseln, die ausschließlich beim Nespresso Club erhältlich sind. Die einwandfreie
Funktion und Lebensdauer Ihrer Nespresso Maschine kann nur bei Verwendung der Nespresso Kapseln garantiert werden.
BEWAHREN SIE DIESE GEBRAUCHSANWEISUNG AUF.
Händigen Sie diese jedem nachfolgenden Benutzer aus.
Diese Bedienungsanleitung ist ebenfalls als PDF-Datei auf www.nespresso.com verfügbar.
19
Seite wird geladen ...

1
2
3 4
5 6 7
8
Spülen Sie das Rapid Cappuccino System (R.C.S.)
mit Hilfe der Anleitung im Kapitel “Pflege des
Rapid Cappuccino Systems (R.C.S.) mindestens
zweimal wöchentlich”, Seite 25
Risciacquare il Sistema Rapid Cappuccino
(R.C.S.) seguendo la sezione “Pulizia del
Sistema Rapid Cappuccino due volte a
settimana”, p. 25
DE
IT
Accendere la macchina.
Luce lampeggiante: fase di riscaldamento
per circa 40 sec.
Luce fissa: pronta
Vedere pag. 18 per le indicazioni sui
pulsanti a retroilluminazione.
Maschine einschalten.
Kaffee-Bezugstasten blinken: Das System heizt für
ca. 40 Sekunden auf. Konstantes Leuchten: bereit
Siehe hintergrundbeleuchtete Tasten, Seite 18
Lesen Sie zunächst die Sicherheitshinweise zur Vermeidung der Gefahr eines tödlichen
Stromschlags oder Feuer./Leggere le precauzioni di sicurezza per evitare rischi di scariche elettriche e incendi.
Il serbatoio dell’acqua può
essere rimosso prendendolo dal
coperchio.
Rimuovere il serbatoio dell’acqua, il vassoio
raccogligocce e il contenitore capsule. Re-
golare la lunghezza del cavo usando il vano
apposito situato sotto la macchina.
Rimuovere la pellicola di plastica dalla
griglia raccogligocce di sinistra, di destra e
dai pannelli della macchina.
Posizionare la macchina in verticale e inserire la
spina nella presa.
IN CASO DI PRIMO UTILIZZO O DOPO UN LUNGO PERIODO DI NON UTILIZZO
Sciacquare il serbatoio d’acqua prima di
riempirlo con acqua potabile.
Risciacquo: posizionare un contenitore sotto
l’erogatore di caffè e premere il pulsante Lungo.
Ripetere per tre volte.
Le macchine sono interamente testate dopo
la produzione. Alcune tracce di caffè potrebbero
essere trovate nell’acqua di risciacquo.
Der Wassertank kann mit Hilfe
seines Deckels getragen werden.
Entfernen Sie den Wassertank, die Abtropf-
schale und den Kapselbehälter. Passen Sie die
Kabellänge an und bewahren Sie die Überlänge
in der integrierten Kabelaufwicklung auf.
Kunststofffolie vom Abtropfgitter und Gitter
der Seitenteile entfernen.
Stellen Sie die Maschine in die richtige Position
und schließen Sie das Gerät an das Stromnetz an.
ERSTINBETRIEBNAHME ODER NACH LÄNGERER NICHTBENUTZUNG
/
Spülen Sie den Wassertank aus bevor Sie ihn mit
Trinkwasser bis zum maximalen Füllstand füllen.
Spülen: Platzieren Sie einen Behälter unter dem Kaffeeauslauf
und drücken Sie die Lungo Taste. Dreimal wiederholen.
Die Maschinen werden nach der Produktion getestet.
Kaffeemehlrückstände können beim Spülen austreten.
21

2
1
3 4
1 2
3 4
Siehe Sicherheitshinweise (16)/Vedere le precauzioni di sicurezza (16)
Premere il pulsante caffè Espresso (40 ml)
o il pulsante caffè Lungo (110ml). Il flusso si
arresterà automaticamente. Per interrompere
manualmente o per riempire completamente la
tazzina, premere di nuovo.
Togliere la tazzina. Sollevare e chiudere la leva
per espellere la capsula usata nel contenitore.
PREPARAZIONE CAFFÈ
Per il bicchiere per Latte Macchiato, spingere il
vassoio raccogligocce all’interno della macchina.
Sollevare completamente la leva e inserire una
capsula Nespresso.
Chiudere la leva e posizionare una tazzina
sotto l’erogatore di caffè.
Rimuovere il tubo di erogazione
latte tirandolo.
Rimuovere il pulsante regolatore di schiuma di latte
ruotandolo fino a
e tirandolo verso l’alto.
Rimuovere il coperchio del contenitore del
latte e staccare il condotto del latte.
Rimuovere il condotto del sistema Rapid Cappuc-
cino sbloccandolo da
ad e tirandolo.
MONTARE/SMONTARE IL SISTEMA RAPID CAPPUCCINO R.C.S
Espresso (40 ml) oder Lungo (110 ml) wählen.
Die Zubereitung stoppt automatisch. Um die
Zubereitung abzubrechen oder die akutelle
Kaffeemenge zu erhöhen, Taste erneut drücken.
Tasse entnehmen. Hebel öffnen und schließen
um die Kapsel in den Kapselbehälter
auszuwerfen.
KAFFEEZUBEREITUNG/
Schieben Sie die Abtropfschale zur Nutzung eines
Latte Macchiato Glases nach hinten.
Hebel vollständig öffnen und Nespresso Kapsel
einlegen.
Hebel schließen und Tasse unter dem Kaf-
feeauslauf platzieren.
Milchdüse entfernen, indem
Sie sie herausdrehen.
Schaumregulierer entfernen, indem Sie ihn
in die entsprechende Position drehen
und
abnehmen.
Entfernen Sie den Deckel des Milchbehälters
und ziehen Sie das Milchansaugrohr heraus.
Rapid Cappuccino System Verbindung entfernen, indem Sie
sie gemäß der Abbildung (
) drehen und abnehmen.
ZUSAMMENBAUEN/ZERLEGEN DES RAPID CAPPUCCINO SYSTEMS R.C.S./
22

1 2 3 4
5 6 7 8
DE
IT
Für einen perfekten Milchschaum entrahmte oder teilentrahmte Milch verwenden, die Kühlschranktemperatur (ca. 4°C) besitzt.
Wichtig: Milchschaumvolumen ist abhängig von der Milchart und ihrer Temperatur./Per una schiuma di latte perfetta,
usare latte scremato o parzialmente scremato ad una temperatura di circa 4° C.
Siehe Sicherheitshinweise (16) (20) (21)/Vedere le precauzioni di sicurezza (16) (20) (21)
PREPARAZIONE CAPPUCCINO E LATTE MACCHIATO
Riempire il contenitore con la quantità di latte
desiderata.
Quando il contenitore del latte è vuoto, prima
di riempirlo, sciacquarlo accuratamente insieme al
condotto del latte, con acqua potabile.
Alzare completamente la leva e inserire una
capsula Nespresso.
Chiudere il contenitore del latte. Aprire lo
sportello del connettore del vapore facendolo
scorrere verso destra. Collegare il Sistema
Rapid Cappuccino all’apparecchio. I pulsanti
da ricetta lampeggiano: il Sistema Rapid
Cappuccino si riscalda. Luce fissa: pronta.
Abbassare la leva, posizionare la tazza da Cap-
puccino o il bicchiere per il Latte Macchiato
sotto l’erogatore di caffè e regolare il tubo di
erogazione latte.
Adeguare la manopola regolatrice della
schiuma di latte alla quantità di schiuma
desiderata.
Risciacquare al termine di ogni utilizzo come
descritto nella sezione “Risciacquo dopo ogni
preparazione di ricetta a base di latte”
Al termine della preparazione, alzare e abbassare
la leva per espellere la capsula nel contenitore di
capsule usate.
Premere il pulsante Cappuccino o Latte Macchiato.
La preparazione inizia dopo pochi secondi (prima il
latte e poi il caffè) e si arresta automaticamente.
CAPPUCCINO UND LATTE MACCHIATO ZUBEREITEN/
Milchbehälter mit gewünschter Menge Milch
füllen.
Wenn der Milchbehälter leer ist, spülen Sie ihn
und das Milchansaugrohr vor Befüllung gründlich
mit Trinkwasser aus.
Hebel vollständig öffnen und Nespresso
Kapsel einlegen.
Milchbehälter schließen. Dampfanschluss-Klappe
öffnen, indem Sie sie nach rechts schieben. Rapid
Cappuccino System mit dem Gerät verbinden.
Milchrezept-Bezugstasten blinken: Rapid Cappuc-
cino System heizt auf. Konstantes Leuchten: bereit
Hebel schließen, Cappuccino Tasse oder Latte
Macchiato Glas unter Kaffeeauslauf stellen
und Milchdüse positionieren.
Schaumregulierer gemäß der gewünschten
Schaumkonsistenz einstellen.
Nach jeder Anwendung gemäß Anleitung im
Kapitel “Reinigung nach der Zubereitung von
Milchrezepten” spülen.
Am Ende der Zubereitung Hebel öffnen und
schließen um die Kapsel in den Kapselbehälter
auszuwerfen.
Cappuccino oder Latte Macchiato wählen. Die Zu-
bereitung startet nach wenigen Sekunden (erst Milch
und anschließend Kaffee) und stoppt automatisch.
23

2 3
1 2 3 4
1
Siehe Sicherheitshinweise (20) (21) (22)/Vedere le precauzioni di sicurezza (20) (21) (22)
Siehe Sicherheitshinweise (22)/Vedere le precauzioni di sicurezza (22)
Tenere premuto lo stesso pulsante. L’erogazione ha inizio. Rila-
sciare il pulsante quando viene raggiunta la quantità di caffè desiderata.
La quantità da ricetta è ora impostata per le successive preparazioni. Il
pulsante lampeggia 3 volte: conferma del nuovo volume da ricetta.
PROGRAMMARE LA QUANTITÀ DI ACQUA
Premere e tenere premuto il pulsante caffè
Espresso o caffè Lungo. La preparazione ha inizio.
Il pulsante lampeggia velocemente: modalità di
preparazione.
Rilasciare il pulsante quando viene raggiunta la
quantità desiderata.
PROGRAMMARE LA QUANTITA’ DI CAPPUCCINO/LATTE MACCHIATO
Il volume dell’acqua è ora impostato per le succes-
sive preparazioni di caffè. Il pulsante lampeggia 3
volte: conferma il nuovo volume di acqua.
Min 20 ml / Max 300 ml
Seguire i passaggi 1-5 della sezione
“Preparazione Cappuccino e Latte Macchiato”.
Premere e tenere premuto il pulsante Cappuccino
o Latte Macchiato. La preparazione della schiuma
di latte inizia. Il pulsante lampeggia velocemente:
modalità di preparazione.
Rilasciare il pulsante quando viene raggiunta
la quantità di schiuma di latte desiderata. Il
pulsante lampeggia velocemente: modalità di
preparazione.
Riempire il contenitore di acqua, accendere
la macchina e inserire una capsula Nespresso.
Abbassare la leva e posizionare una tazza
sotto l’erogatore di caffè.
Latte: min 20 ml / max 300 ml
Caffè: min 20 ml / max 300 ml
Die selbe Taste drücken und gedrückt halten.
Die Zubereitung startet. Taste loslassen, wenn die gewünschte Kaffeemenge
erreicht ist. Die Mengen des Milchrezepts sind nun für folgende Zubereitungen
gespeichert. Taste blinkt dreimal: Bestätigung der neuen Rezeptmenge.
ZUBEREITUNGSMENGE FÜR ESPRESSO UND LUNGO EINSTELLEN/
Espresso oder Lungo Taste drücken und
gedrückt halten.
Die Zubereitung startet. Taste blinkt schnell:
Programmiermodus
Taste loslassen, wenn die gewüschte Menge
erreicht ist.
ZUBEREITUNGSMENGE FÜR CAPPUCCINO/LATTE MACCHIATO EINSTELLEN/
Die Wassermenge ist nun für folgende Zubereitungen
gespeichert.
Taste blinkt dreimal: Bestätigung der neuen Wassermenge
Mindestens 20 ml/Maximal 300 ml
Milchschaum: min 20 ml/max 300 ml.
Kaffee: min 20 ml/max 300 ml
Den Schritten 1-5 des Kapitels “Cappuccino
und Latte Macchiato zubereiten” befolgen.
Cappuccino oder Latte Macchiato Taste drücken
und gedrückt halten.
Die Milchschaumzubereitung startet. Taste blinkt
schnell: Programmiermodus
Taste loslassen, wenn die gewüschte Milch-
schaummenge erreicht ist.
Taste blinkt schnell: Programmiermodus
Wassertank füllen, Maschine einschalten und
Nespresso Kapsel einlegen.
Hebel schließen und Tasse unter Kaffeeauslauf
platzieren.
24

1
1 1
2 3 4
DE
IT
Siehe Sicherheitshinweise (22)/Vedere le precauzioni di sicurezza (22)
Siehe Sicherheitshinweise (17) (20) (21)/
Vedere le precauzioni di sicurezza (17) (20) (21)
Tenere premuto lo stesso pulsante. L’erogazione ha inizio. Rila-
sciare il pulsante quando viene raggiunta la quantità di caffè desiderata.
La quantità da ricetta è ora impostata per le successive preparazioni. Il
pulsante lampeggia 3 volte: conferma del nuovo volume da ricetta.
RISCIACQUO DOPO OGNI PREPARAZIONE DI RICETTA A BASE DI LATTE
PULIZIE QUOTIDIANE
PULIZIA DEL SISTEMA RAPID CAPPUCCINO DUE VOLTE A SETTIMANA
Posizionare un contenitore sotto il tubo di
erogazione latte.
Rimuovere il vassoio raccogligocce, il contenitore delle capsule e il serbatoio dell’acqua. Svuotare e
risciacquare. Entrambe le griglie di destra e di sinistra devono essere rimosse per una facile pulizia.
Pulire l’erogatore di caffè regolarmente con un panno umido.
Riporre tutte le componenti nella parte
alta della lavastoviglie almeno due volte a
settimana.
Scollegare il R.C.S. dalla macchina e riporlo in
frigorifero. Chiudere lo sportello del connettore
del vapore della macchina.
Lo stesso latte non deve essere conservato
per più di 2 giorni.
Premere e tenere premuto il pulsante “CLEAN”
fino a quando la macchina non smetterà di
pompare automaticamente.
I pulsanti Cappuccino e Latte Macchiato lampeg-
giano: processo di risciacquo di circa 10 sec.
Luce fissa: processo di risciacquo terminato.
Tutte le componenti del contenitore del latte sono
lavabili in lavastoviglie. Due volte a settimana,
vedere la sezione “Pulizia del Sistema Rapid
Cappuccino”
Non utilizzare detersivi abrasivi o solventi. Pulire regolarmente la
superficie della macchina con un panno umido e un detergente delicato.
Non lavare in lavastoviglie.
Smontare il Sistema Rapid Cappuccino.
Vedere la sezione “Montare/smontare
il sistema Rapid Cappuccino (R.C.S)”
Die selbe Taste drücken und gedrückt halten.
Die Zubereitung startet. Taste loslassen, wenn die gewünschte Kaffeemenge
erreicht ist. Die Mengen des Milchrezepts sind nun für folgende Zubereitungen
gespeichert. Taste blinkt dreimal: Bestätigung der neuen Rezeptmenge.
Die Wassermenge ist nun für folgende Zubereitungen
gespeichert.
Taste blinkt dreimal: Bestätigung der neuen Wassermenge
Mindestens 20 ml/Maximal 300 ml
REINIGUNG NACH JEDER ZUBEREITUNG VON MILCHREZEPTEN/
TÄGLICHE REINIGUNG/
PFLEGE DES RAPID CAPPUCCINO SYSTEMS R.C.S. MINDESTENS ZWEIMAL WÖCHENTLICH/
Ein Gefäß unter die Milchdüse stellen.
Abtropfschale, Kapselbehälter und Wassertank entfernen, leeren und spülen. Linkes und rechtes Gitter
können zur einfachen Reinigung entfernt werden. Kaffeeauslauf regelmäßig mit feuchtem Tuch reinigen.
Alle Teile mindestens zweimal wöchentlich im
oberen Bereich der Spülmaschine reinigen.
R.C.S. von der Maschine entfernen und im
Kühlschrank aufbewahren. Schließen Sie die
Dampfanschluss-Klappe.
Die Milch sollte nicht länger als 2 Tage
aufbewahrt werden.
Spültaste drücken und gedrückt halten bis die
Maschine den Vorgang automatisch stoppt.
Die Tasten für die Milchrezepte blinken ca. 10
Sekunden lang.
Konstantes Leuchten: Spülvorgang ist beendet.
Alle Bestandteile des Milchbehälters sind spül-
maschinenfest. Mindestens zweimal wöchentlich
der Anleitung im Kapitel “Pflege des Rapid
Cappuccino Systems (R.C.S.) mindestens zweimal
wöchentlich” folgen.
Zerlegen Sie das Rapid Cappuccino
System. Siehe Kapitel “Zusammen-
bauen/Zerlegen des Rapid Cappuccino
Systems (R.C.S)”
Verwenden Sie zur Reinigung des Maschinengehäuses sowie für alle
Teile der Maschine ein geeigentes feuchtes Tuch und mildes Reinigungs-
mittel.
25
Seite wird geladen ...
Seite wird geladen ...
Seite wird geladen ...
Seite wird geladen ...
Seite wird geladen ...
Seite wird geladen ...
Seite wird geladen ...
Seite wird geladen ...
Seite wird geladen ...
Seite wird geladen ...
Seite wird geladen ...
Seite wird geladen ...
Seite wird geladen ...
Seite wird geladen ...
Seite wird geladen ...
Seite wird geladen ...
Seite wird geladen ...
Seite wird geladen ...
Seite wird geladen ...
Seite wird geladen ...
-
 1
1
-
 2
2
-
 3
3
-
 4
4
-
 5
5
-
 6
6
-
 7
7
-
 8
8
-
 9
9
-
 10
10
-
 11
11
-
 12
12
-
 13
13
-
 14
14
-
 15
15
-
 16
16
-
 17
17
-
 18
18
-
 19
19
-
 20
20
-
 21
21
-
 22
22
-
 23
23
-
 24
24
-
 25
25
-
 26
26
-
 27
27
-
 28
28
-
 29
29
-
 30
30
-
 31
31
-
 32
32
-
 33
33
-
 34
34
-
 35
35
-
 36
36
-
 37
37
-
 38
38
-
 39
39
-
 40
40
-
 41
41
-
 42
42
-
 43
43
-
 44
44
-
 45
45


DeLonghi LATISSIMA PLUS EN521.R Bedienungsanleitung
- Kategorie
- Kaffeemaschinen
- Typ
- Bedienungsanleitung
in anderen Sprachen
Verwandte Artikel
-
 DeLonghighi Lattissima+ EN 520.B Benutzerhandbuch
-
DeLonghi EN550.BM Benutzerhandbuch
-
-
-
DeLonghi EMKP42.B PRESSION Bedienungsanleitung
-
-
-

Andere Dokumente
-
Nespresso by De'Longhi Lattissima Touch Benutzerhandbuch
-
Nespresso Krups ESSENZA XN 214 Benutzerhandbuch
-
 Nestle Nespresso EN550S Benutzerhandbuch
-
De'Longhi EN750MB Benutzerhandbuch
-
-
Siemens SN30 Bedienungsanleitung
-
-
-
Sage VERTUO CREATISTA KAPSELMASKIN, HVIT Bedienungsanleitung
-
De’Longhi Lattissima Pro EN 750.MB Benutzerhandbuch
