
QUICK START GUIDE
STIR IT UP WIRELESS
ATTENTION, PLEASE READ QUICK START GUIDE BEFORE USE
ATTENTION, PRIÈRE DE LIRE LE GUIDE DE
DÉMARRAGE RAPIDE AVANT UTILISATION
ATENCIÓN, LEA LA GUÍA DE INICIO RÁPIDO ANTES DE USARLO
VOR DEM GEBRAUCH BITTE DIE SCHNELLSTARTANLEITUNG LESEN
ATTENZIONE, LEGGERE LA GUIDA DI AVVIAMENTO RAPIDO PRIMA DEL USO

Stir It Up Wireless / Bluetooth® Turntable
1
English
Français 14
Español
Deutsche
Italiano
Nederlands
INDEX

Quick Start Guide
2
ENGLISH

Quick Start Guide
3
45
33
OFF
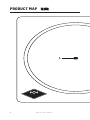
1.
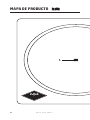
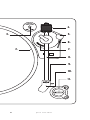
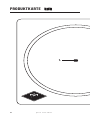
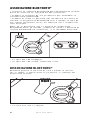
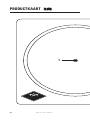
PRODUCT MAP

Quick Start Guide
4
45
33
OFF
4.
5.3.
6.
7.2.
8.
9.
10.
11.

Quick Start Guide
5
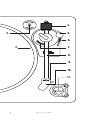
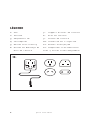
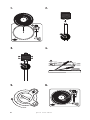
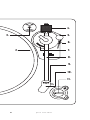
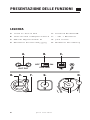
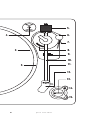
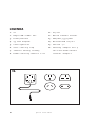
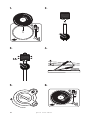
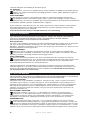
1. Spindle
2. Turntable
3. Adaptor
4. Balance Weight
5. Anti-Skating Knob
6. Tone Arm Lift Level
7. Tone Arm Rest Holder
8. Tone Arm
9. Stylus
10. Needle Cover
11. Off// Knob
12. Power Adaptor With
Interchangeable Plugs
LEGEND
12.

Quick Start Guide
6
45
33
OFF
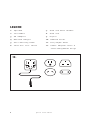
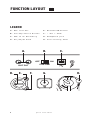
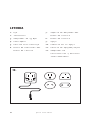
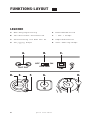
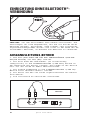
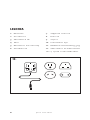
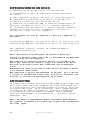
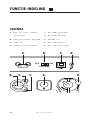
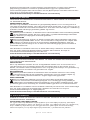
A. RCA Line Out
B. Pre-Amp Switch Button
C. USB to PC Recording
D. Off// Knob
LEGEND
E. Bluetooth® Button
F. - VOL + Knob
G. Headphone Jack
H. Anti-skating Knob
A.
D. E. F.
B.
G.
C.
H.
FUNCTION LAYOUT
45
33
OFF
OUT PUT PRE-AMP
OFF ON
OUT PUT PRE-AMP
OFF ON

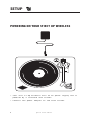
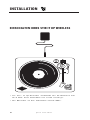
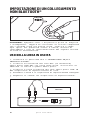
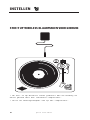
POWERING ON YOUR STIR IT UP WIRELESS
• Your Stir It Up Wireless uses an AC power supply and is
powered by a standard wall outlet.
• Connect the power adaptor to the wall outlet.
SETUP
Quick Start Guide
7

Quick Start Guide
8
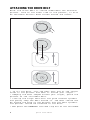
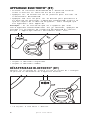
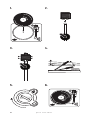
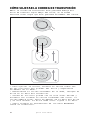
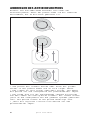
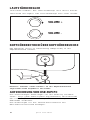
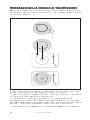
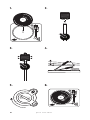
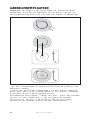
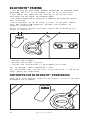
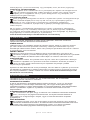
ATTACHING THE DRIVE BELT
Note: The drive belt is stored underneath the aluminum
platter. Look on the under side of the platter, it will
be the black elastic band stored around the center.
• To fit the belt, lift the belt over one of the larger
holes in the platter and hook it around your finger.
• Keeping the belt looped around your finger, place the
platter on the turntable base.
• Line up the large hole with the gold colored spindle
and gently loop the belt around it. The belt should now
be around the base of the platter and the gold spindle.
The platter should be attached to the base.
• Now place the REGRIND™ silicone slip mat on the turntable.

Quick Start Guide
9
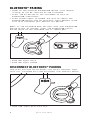
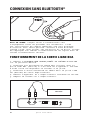
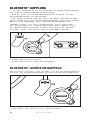
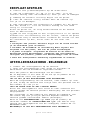
BLUETOOTH® PAIRING
• Power on the external Bluetooth® device first before
turning on the BT function on the Turntable.
• Press the BT button on the turntable to turn on
Bluetooth® transmitter.
• Press button again to enable the unit to search the
Bluetooth® device till BT indicator light becomes solid.
This will indicated your devices are paired.
NOTE: If the Turntable does not pair with your Bluetooth®
device within 30 seconds, press the Bluetooth® search
button again on the turntable and it should pair.
45
33
OFF
• Blue LED light flash
• Blue LED light stable
DISCONNECT BLUETOOTH® PAIRING
Long press and hold the BT button till the BT indicator light
turns off. Turntable will then disconnect from external device.
45
33
OFF
• Blue LED light will turn off.

Quick Start Guide
10
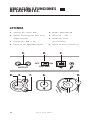
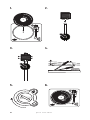
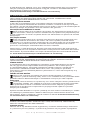
PLAYING A RECORD
. Put a vinyl record on the turntable.
. Assemble the balance weight and set it to a proper
position.
. To adjust the balance weight rotate the balance
weight at counter-clock wise.
. Lift and move the tone arm to turntable. Place the
tone arm on the edge of the record.
. Turn the RPM Dial knob to select the speed according
to the record you are playing.
. The turntable platter will auto stop when the music
has ended. Lift the tone arm and place it to tone arm
rest manually.
To listen to side B, flip record and repeat the above steps.
*33 RPM speed to play corresponding size 33 vinyl disc
*45 RPM speed to play corresponding size 45 vinyl disc
To power the unit off Rotate the RPM Dial knob to the off
position.
Note:
Remove the needle cover before you balance the tone arm.
Hold tone arm whenever you make any adjustment or action
so as to protect the tone arm.
Do not try to adjust the balance weight while playing a
record as this could break the needle and scratch the record.
Re-secured the tone arm before transportation to protect
the needle.
Remove the balance weight before transportation to
prevent damage or breakage to the unit.
Do not stop or turn the platter manually. Moving or
jarring the turntable without securing the Tone arm
clamp could result in damage to the Tone arm.
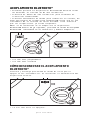
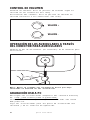
ANTI-SKATING
Normally the anti-skating should be set to its minimum
setting. Anti-skate compensates for inward tracking forces
that occur with certain pick-up when the stylus nears the
center of the record. If the turntable is experiencing
excessive skipping while nearing the center spindle, try
increase the anti-skating in the increments indicated
on the dial. Start by adding an increment of 1, test its
performance, then increase it more, and so on.
Note: During adjusting the anti-skating knob, leave the
tone arm and balance weight alone to prevent damaging the
stylus (needle).

Quick Start Guide
11
45
33
OFF
1.
3.
5.
2.
4.
6.

Quick Start Guide
12
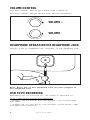
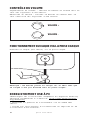
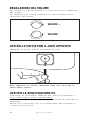
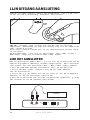
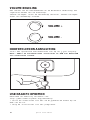
VOLUME CONTROL
Increase Volume: Rotate the Volume Knob clockwise.
Decrease Volume: Rotate Volume Knob counter clockwise.
HEADPHONE OPERATION VIA HEADPHONE JACK
Connect a set of headphone (not included) in the headphone jack.
Note: Never put on the headphone till you have plugged in
the headphone plug
USB TO PC RECORDING
Download Full instruction for the Audacity Software at:
http://www.audacityteam.org/download/
• Connect the Turntable and the computer via the provided
USB cable.
• Follow the instruction of the software installation steps
and operation interface.
OUT PUT PRE-AMP
OFF ON
OUT PUT PRE-AMP
OFF ON
VOLUME +
VOLUME -

Quick Start Guide
13
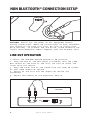
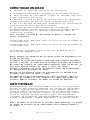
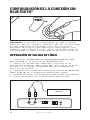
NON BLUETOOTH® CONNECTION SETUP
45
33
OFF
CAUTION: Switch off the power to all equipment before
making connections. Read the instructions of each component
you intend to use with this unit. Be sure to insert each
plug securely. To prevent hum and noise, avoid bundling the
signal interconnection cables together with the AC power cord.
LINE OUT OPERATION
1.Switch the PRE-AMP OFF/ON SWITCH to ON position.
2. Plug one end of the RCA cable (included) into the LINE
OUT socket at the back of the unit. Be sure to match the
color with the socket.
3. Plug the other end of the cable into the LINE IN socket
of your home amplifier device.
4. Switch on the unit and the amplifier device you
connected.
5. Adjust the volume on the amplifier device.
OUT PUT PRE-AMP
OFF ON
AMPLIFIER

Quick Start Guide
14
FRANÇAIS

Quick Start Guide
15
45
33
OFF
1.
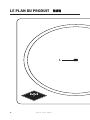
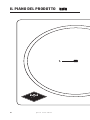
LE PLAN DU PRODUIT

Quick Start Guide
16
45
33
OFF
4.
5.3.
6.
7.2.
8.
9.
10.
11.

Quick Start Guide
17
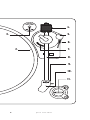
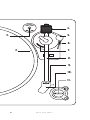
1. Axe
2. Platine
3. Adaptateur
4. Contrepoids
5. Bouton Anti-skating
6. Niveau De Relevage Du
Bras De Lecture
7. Support Du Bras De Lecture
8. Bras De Lecture
9. Pointe De Lecture
10. Couvercle De L’aiguille
11. Bouton Arrêt//
12. Adaptateur D'alimentation
Avec 4 Fiches Interchangeables
LÉGENDE
12.

Quick Start Guide
18
45
33
OFF
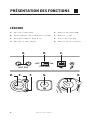
A. Sortie Ligne RCA
B. Interrupteur De Préamplificateur
C. Enregistrement USB À PC
D. Bouton Arrêt//
LÉGENDE
E. Bouton Bluetooth®
F. Bouton - VOL +
G. Prise De Casque
H. Bouton Anti-skating
A.
D. E. F.
B.
G.
C.
H.
PRÉSENTATION DES FONCTIONS
45
33
OFF
OUT PUT PRE-AMP
OFF ON
OUT PUT PRE-AMP
OFF ON

Quick Start Guide
19
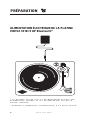
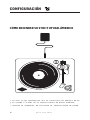
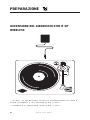
ALIMENTATION ÉLECTRIQUE DE LA PLATINE
VINYLE STIR IT UP Bluetooth®
• La platine vinyle Stir It Up Bluetooth® utilise une
alimentation secteur et est alimentée par une prise
murale standard.
• Branchez l’adaptateur d'alimentation à la prise murale.
PRÉPARATION
Seite wird geladen ...
Seite wird geladen ...
Seite wird geladen ...
Seite wird geladen ...
Seite wird geladen ...
Seite wird geladen ...
Seite wird geladen ...
Seite wird geladen ...
Seite wird geladen ...
Seite wird geladen ...
Seite wird geladen ...
Seite wird geladen ...
Seite wird geladen ...
Seite wird geladen ...
Seite wird geladen ...
Seite wird geladen ...
Seite wird geladen ...
Seite wird geladen ...
Seite wird geladen ...
Seite wird geladen ...
Seite wird geladen ...
Seite wird geladen ...
Seite wird geladen ...
Seite wird geladen ...
Seite wird geladen ...
Seite wird geladen ...
Seite wird geladen ...
Seite wird geladen ...
Seite wird geladen ...
Seite wird geladen ...
Seite wird geladen ...
Seite wird geladen ...
Seite wird geladen ...
Seite wird geladen ...
Seite wird geladen ...
Seite wird geladen ...
Seite wird geladen ...
Seite wird geladen ...
Seite wird geladen ...
Seite wird geladen ...
Seite wird geladen ...
Seite wird geladen ...
Seite wird geladen ...
Seite wird geladen ...
Seite wird geladen ...
Seite wird geladen ...
Seite wird geladen ...
Seite wird geladen ...
Seite wird geladen ...
Seite wird geladen ...
Seite wird geladen ...
Seite wird geladen ...
Seite wird geladen ...
Seite wird geladen ...
Seite wird geladen ...
Seite wird geladen ...
Seite wird geladen ...
Seite wird geladen ...
Seite wird geladen ...
Seite wird geladen ...
Seite wird geladen ...
Seite wird geladen ...
Seite wird geladen ...
Seite wird geladen ...
Seite wird geladen ...
Seite wird geladen ...
Seite wird geladen ...
Seite wird geladen ...
Seite wird geladen ...
Seite wird geladen ...
Seite wird geladen ...
-
 1
1
-
 2
2
-
 3
3
-
 4
4
-
 5
5
-
 6
6
-
 7
7
-
 8
8
-
 9
9
-
 10
10
-
 11
11
-
 12
12
-
 13
13
-
 14
14
-
 15
15
-
 16
16
-
 17
17
-
 18
18
-
 19
19
-
 20
20
-
 21
21
-
 22
22
-
 23
23
-
 24
24
-
 25
25
-
 26
26
-
 27
27
-
 28
28
-
 29
29
-
 30
30
-
 31
31
-
 32
32
-
 33
33
-
 34
34
-
 35
35
-
 36
36
-
 37
37
-
 38
38
-
 39
39
-
 40
40
-
 41
41
-
 42
42
-
 43
43
-
 44
44
-
 45
45
-
 46
46
-
 47
47
-
 48
48
-
 49
49
-
 50
50
-
 51
51
-
 52
52
-
 53
53
-
 54
54
-
 55
55
-
 56
56
-
 57
57
-
 58
58
-
 59
59
-
 60
60
-
 61
61
-
 62
62
-
 63
63
-
 64
64
-
 65
65
-
 66
66
-
 67
67
-
 68
68
-
 69
69
-
 70
70
-
 71
71
-
 72
72
-
 73
73
-
 74
74
-
 75
75
-
 76
76
-
 77
77
-
 78
78
-
 79
79
-
 80
80
-
 81
81
-
 82
82
-
 83
83
-
 84
84
-
 85
85
-
 86
86
-
 87
87
-
 88
88
-
 89
89
-
 90
90
-
 91
91


in anderen Sprachen
- English: Marley EM-JT002-SB User guide
- français: Marley EM-JT002-SB Mode d'emploi
- español: Marley EM-JT002-SB Guía del usuario
- italiano: Marley EM-JT002-SB Guida utente
- Nederlands: Marley EM-JT002-SB Gebruikershandleiding
- română: Marley EM-JT002-SB Manualul utilizatorului
Verwandte Artikel
Andere Dokumente
-
Crosley C62 Benutzerhandbuch
-
Lenco LS-500 Turntable Benutzerhandbuch
-
Lenco Turntable Benutzerhandbuch
-
Lenco LBT-188 Bedienungsanleitung
-
Lenco L-3808 Benutzerhandbuch
-
Lenco L-3807 Bedienungsanleitung
-
Lenco L-3808 Matt Grey Bedienungsanleitung
-
Gemini SA-2400 Benutzerhandbuch
-
Reloop TURN 5 Benutzerhandbuch