PUIG Pro 2.0 Frame Sliders Mounting instructions
- Typ
- Mounting instructions

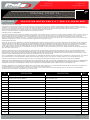
ID. DESCRIPCIÓN DESCRIPTION QTY.
1 Juego de tapas Caps set 2
2 Tornillo M10/150x 80 DIN912 M10/150 x80 screw 1
3 Tornillo M10/150 x 90 DIN912 M10/150 x90 screw 1
4Arandela M10 DIN125/A Washer M10 DIN125/A 6
5Protector Nylon Nylon protector 2
6Casquillo l/derecho Metal arrowhead right hand side 1
7Casquillo l/izquierdo Metal arrowhead left hand side 1
8Desplazador l/derecho Right offset 1
9Desplazador l/izquierdo Left offset 1
10 Casquillo l/derecho Ø24x10 Metal arrowhead right hand side Ø24x10 1
11 Casquillo l/derecho Ø24x25 Metal arrowhead right hand side Ø24x25 1
12 Casquillo l/izquierdo Ø24x18 Metal arrowhead left hand side Ø24x18 1
13 Casquillo l/izquierdo Ø24x22 Metal arrowhead left hand side Ø24x22 1
14 Tornillo M10/125 x 70 DIN912 M10/125 x70 screw 1
15 Tornillo M10/125 x 80 DIN912 M10/125 x80 screw 3
16 Tuerca M10 DIN6923 Nut M10 DIN6923 2
17 Tapón plástico tornillo M10 DIN912 M10 Plastic cap screw 4
YAMAHA MT09 ’13-
www.puig.tv
www.puigusa.com
Pg. 1/2
Created by:
www.rrdisseny.cat
REF 21543N PROTECTOR MOTOR PRO 2.0 / PRO 2.0 CRASH PAD
INSTRUCCIONES DE MONTAJE
Desmontar los tornillos de sujeción del chasis del motor. Montar los protectores en el lado correspondiente según el croquis adjunto. Una vez
apretado colocar las tapas. Todos los tornillos reemplazados deben ser apretados según el par de apriete especificado en el manual de la moto-
cicleta si no se dispone de dicho dato puede usar un par de apriete de 23Nm para los tornillos M8 y 54Nm para los tornillos M10.
Se recomienda el empleo de un fijador medio (ej. Loctite) para asegurar la tornilleria.
Revisar el apriete de toda la tornilleria después de los primeros 50 km.
INSTRUCTIONS TO ASSEMBLE
Remove the fasteners that subject the chassis to the engine. Mount the protectors on each own side as the figure below shows. Tight the set, and
place the caps. All the screws replaced, should be tightened to the torque specified in the oem maintenance manual for your motorcycle. if no
torque specifications are provided in the oem maintenance manual, may be used 23Nm for all M8 screws and 54Nm for all M10 screws.
Medium strength liquid thread-locker (i.e. “Loctite”) should be used to secure all screws, bolts and nuts. All screws, bolts and nuts should be chec-
ked after driving the first 50 km to ensure that all are tightened to the proper torque.
MONTAGEANLEITUNG
Entfernen Sie die auf der Abbildung markierten Verbindungsschrauben zwischen Rahmen und Motor. Bauen Sie die Sturzpads an der jeweiligen
Seite gemäß der unteren Skizze an. Bringen Sie die Endkappen nach der endgültigen Montage der Sturzprotektoren. Alle ersetzten Schrauben
müssen gem. dem in der Bedienungsanleitung des Motorrads angegebenen Drehmoment angezogen werden. Falls die Daten zum Anzugsmo-
ment nicht vorliegen, können die M8 Schrauben mit 23 Nm angezogen werden und M10 Schrauben mit 54 Nm angezogen werden.
Wir empfehlen die Verwendung von Schraubensicherung (z.B. Loctite) um die Verschraubung zu sichern. Überprüfen Sie die Schraubenverbindun-
gen nach den ersten 50 km.
PARA EL MONTAJE DE LOS PROTECTORES, SI USTED NO ES UN MECÁNICO, POR FAVOR CONTACTE CON UN TALLER ESPECIALIZADO.
MOTOPLASTIC DECLINA TODA RESPONSABILIDAD POR LOS DAÑOS CAUSADOS POR UN INCORRECTO MONTAJE DEL PRODUCTO. EL
MONTAJE DE LOS PROTECTORES DE MOTOR NO GARANTIZAN UNA PROTECCIÓN INTEGRAL EN CASO DE CAÍDAS. MOTOPLASTIC-PUIG
DECLINA TODA RESPONSABILIDAD EN CASO DE DETERIODO DE LA MOTOCICLETA.
FOR TO ASSEMBLE THE CRASH PADS, IF YOU ARE NOT A TRAINED MECHANIC, PLEASE CONTACT A SPECIALIST. MOTOPLASTIC, S.A. TAKES
NO RESPONSIBILITY FOR DAMAGES CAUSED BY IMPROPER INSTALLATION. THE USE OF CRASH PADS DO NOT GUARANTEE A FULL
PROTECTION IN CASE OF ACCIDENT. MOTOPLASTIC-PUIG DECLINE ANY RESPONSIBILITY IN CASE OF MOTORCYCLE DAMAGE.
WENN SIE KEIN AUSGEBILDETER MECHANIKER SIND, WENDEN SIE SICH BITTE AN IHRE FACHWERKSTATT. MOTOPLASTIC,S.A. ÜBERNIMMT
KEINE HAFTUNG FÜR SCHÄDEN, DIE DURCH EINE UNSACHGEMÄSSE MONTAGE DES STURZBÜGELS VERURSACHT WERDEN. HINWEIS:
DIE BENUTZUNG VON STURZBÜGELS GARANTIERT KEINEN VOLLSTÄNDIGEN SCHUTZ BEI EVENTUELLEN UNFÄLLEN.
Accesorio verificado en la configuración básica de la motocicleta. Para modelos con configuraciones extras de fàbrica. No podemos asegurar su
compatibilidad, salvo consulta prèvia. Declinamos cualquier eventual reclamación.
Accessory verified in the basic configuration of the motorcycle. For models with extra factory settings. We cannot assure its compatibility,
except for prior consultation. We decline any eventual claim.

1
2
ASSEMBLY
MONTAJE
ASSEMBLY
MONTAJE
YAMAHA MT09 ’13-
www.puig.tv
www.puigusa.com
Pg. 2/2
Created by:
www.rrdisseny.cat
INSTRUCCIONES DE MONTAJE - MOUNTING INSTRUCTIONS - MONTAGEANLEITUNG
REF
21543N
LADO DERECHO - RIGHT SIDE
LADO IZQUIERDO - LEFT SIDE
-
 1
1
-
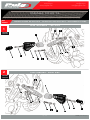 2
2


PUIG Pro 2.0 Frame Sliders Mounting instructions
- Typ
- Mounting instructions
in anderen Sprachen
- English: PUIG Pro 2.0 Frame Sliders
- español: PUIG Pro 2.0 Frame Sliders
Verwandte Artikel
-
PUIG Pro 2.0 Frame Sliders Mounting instructions
-
PUIG R19 Frame Sliders Mounting instructions
-
-
-
-
-
-
-
-
Andere Dokumente
-
Yamaha 2000 WR450F Owner's Service Manual
-
Ducati 96380031A Instructions Manual
-
-
-
Malaguti MADISON 400 Bedienungsanleitung
-
Husqvarna SMR 450-R 2009 Bedienungsanleitung
-
-
-