
Issued / Herausgegeben / Pubblicato 10/1998 V9376
328-336
Introduction
This product combines a 7-day time switch with a daylight sensor
controller, in one unit. The time switch will accept up to eight
programme pictures for time control. Each picture is a complete LCD
display of a switching cycle, i.e. a command for the output relays to be
switched on at a set time, on one or more days, and off at a different
set time, on one or more days. The on days need not be the same as
the off days.
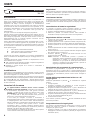
Figure 2 shows an example of a programme picture.This example
demonstrates overnight programmes, typical for this type of product.
Besides switching in accordance with the eight programme pictures,
the unit can be manually overridden, either temporarily until the next
opposite command, or continuously switched on or off.
A summer/wintertime changeover (±1hr) button is also available.
Additionally, a Holiday Programme facility is incorporated permitting the
unit to be switched continuously on or off for up to ninety nine days. A
3-position, manual override switch is also incorporated to provide:
Ι output relay continuously off
output relay follows set programme
ΙΙ output relay continuously on
The daylight sensor is housed in an all-insulated, weather resistant
enclosure (IP55) for external mounting, if required.
The main advantages of this time switch/daylight sensor combination
are:
● All controls easily accessed, including the setting of the daylight
switching levels.
● Single pair, low voltage wiring between the sensor and
the time switch/controller.
Installation
The time switch/controller may be snap-fitted on symmetrical DIN
mounting rail to BS 5584: 1978 (EN 50 002, DIN 46227-3) or housed in
a suitable enclosure.
Modular enclosures, permitting access to the front of the time
switch/controller, are available (see RS catalogue main index under
'DIN 43 880 equipment - housing/enclosures"). The unit must be
connected in accordance with the diagrams displayed near the
terminals.
Safety instructions
Electrical equipment must only be fitted by qualified
personnel. Ensure that the available supply voltage is within the
unit's nominal range. The output relay contacts must not be
directly used to switch low voltages (24V and 12-24V )
according to DIN 57 100 pt 410/VDE 0100 pt 410 section 4.1, i.e.
Safety Extra Low Voltage.
!
RS Stock No.
±1h
C
S
OK
R
I
II
Lux
1 2 3 4 5 6 7
N
L
1
2
7 8
4
5
≤50M
A
B
C
Figures / Abbildung / Figura
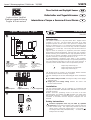
Time Switch and Daylight Sensor
Interruttore a Tempo e Sensore di Luce Diurna
Instruction Leaflet
Bedienungsanleitung
Foglio d’instruzioni
Zeitschalter und Tageslichtsensor
1
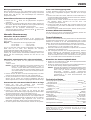
Wiring diagram
A.Time switch/controller
B.Daylight sensor
C.Lighting load
Verdrahtungsplan
A.Zeitschalter/
Steuergerät
B.Tageslichtsensor
C.Lampenlast
Schema elettrico
A.Interruttore a tempo/
regolatore
B.Sensore di luce
diurna
C.Carico illuminazione
Programme picture Programmdarstellung Immagine di programma
2
3

Cable used to wire between the sensor and the time
switch/controller, must be double insulated. The time
switch/controller must be isolated from the supply when making
connections to the sensor terminals. All screw terminals must be
protected against accidental contact or damage. Conductors
wired to them must be properly prepared in order to maintain the
finger and back of hand protection (VDE 0106).
The load applied to the output relay contacts must not exceed the
ratings shown in the technical specification.
Settings
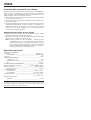
To access all the control buttons, lift the front cover. The six buttons, 3-
position switch and daylight level control potentiometer are shown in
figure 3.
Initial switch on
The time switch must be installed and wired in accordance with the
instructions detailed above. On applying power to the unit, the LCD
display wil take about thirty seconds to become visible.
Erase all settings
This procedure is best followed when the time switch/daylight sensor is
first installed.
1. Press the S and OK buttons simultaneously.
2. Release the buttons. The memories have now been erased and the
time switch is ready to accept new settings.
Setting the actual time
1. Press the button once. The clock indicator will be displayed
above the numeric time display.
2. Press the S* button until the correct hour (0-23) is showing.
3. Press the OK button once. The minute display will flash.
4. Press the S* button until the correct minutes (00-59) are showing.
5. Press the OK button once. The day indicator will flash above day 1.
6. Press the S* button until the day indicator appears steady above the
actual day (1-7).
7. Press the button when the set time coincides with the actual time.
This starts the clock.
*Note: Pressing and holding in the button will cause the setting to
be advanced rapidly. This can be done until the required
setting is near. Thereafter, short duration pulses will advance
the setting more slowly until the required setting is reached.
Setting switching programmes
To assist in programming, the programme has two block settings, days
1 to 7 and days 1 to 5. Using block programmes saves time in entering
them. It does not save programme memory. The switching commands
may also be assigned to the individual applicable days.
Choosing block or individual day programming
Repeated pressing of the button displays the following items:
1. Clock set.
2. Completed programmes (not applicable if clearing memory
procedure has been followed).
3. Programme by 7-day block picture, identified by day indicators
above and below all days 1 to 7.
4. Programme by 5-day block picture, identified by day indicators
above and below all days 1 to 5.
5. Programme by individual day picture, identified by no day indicators
showing.
6. Normal running.
Continuing to press the button displays the items again.
Individual day programming
To commence individual day programming, scroll through the items,
listed above, until the programme by individual day picture is displayed:
1. Press the S button once. The on time hour display will flash.
Continue to press the S button to set the required on time hour (0-
23).
2. Press the OK button once. The on time minute display will flash.
Press the S button to set the required on time minutes (00-59).
3. Press the OK button once. The on day indicator will flash above day
1. Now is decision time:
4. Is the on time applicable to this day?
Yes: If yes, press the OK button once and the S button once (except
when day 7 is reached). Another on day indicator will flash
above the next day. Proceed again from point 4.
No: If no, press the S button once (except when day 7 is reached).
An on day indicator will flash above the next day.
Proceed again from point 4 until day 7.
If the above procedure is continued beyond day 7, all entries will
cancel and will require re-entering.
5. Press the button. The off time hour display will flash.
6. Use the S button to set the required off time hour (0-23).
7. Press the OK button. The off time minutes display will flash.
8. Use the S button to set the required off time minutes (00-59).
9. Press the OK button. The off day indicator will flash below day 1.
Now is decision time again:
10.Is the off time applicable to this day?
Yes: If yes, press the OK button once and the S button once (except
when day 7 is reached). Another off day indicator will flash below
the next day. Proceed again from point 10).
No: If no, press the S button once (except when day 7 is reached).
An off day indicator will flash below the next day.
Proceed again from point 10 until day 7.
If the above procedure is continued beyond day 7, all entries will
cancel and will require re-entering.
11.Press the button. The programmed picture will be entered into
the memory and the display will return to the normal running mode.
12.If further programmes are required, proceed from the beginning of
individual day programming. Unused programming pictures will be
presented in the three programming choices:
7-day block, 5-day block, individual day.
When all eight programming pictures have been used, the display will
read full after scrolling through all the entered programmes.
Block programming
The procedure for programming by 7-day and 5-day blocks is similar to
individual day programming. The only difference is that on/off day entry
is automatically entered.
Programme review/cancel
1. Press the button to review programme pictures.
2. When a picture required to be changed or deleted is displayed,
press the C button. The programme picture will clear, permitting re-
programming.
3. After cancelling all the unwanted switching point commands, press
the button to return to the normal running mode.
Override facilites
Manual on/off override
This facility permits the changing of the output relay state, contrary to
the programmed position, until the next opposite command.
Example: The time switch is programmed as follows:
on at 08:00...............off at 12:00
on at 13:00...............off at 17:00
At 10:00 the manual off override is used. The time switch will remain
off until 13:00, the next opposite (on) command.
The programme will continue as normal thereafter. To effect manual
override, press the + button. Repeated pressing of this button will
cause the output relay to alternate between on and off.
V9376
2

3
Continuous on/off manual reset
1. Press the + button until the appropriate contact on/off indicator is
displayed:
= on, o = off.
Note: This manual change is required even if the appropriate
contact on/off indicator is already displayed, e.g. a manual
change to on, with the contacts already in the on position,
would require two pushes of the + button.
2. Press the OK button. The on/off indicator will start and continue to
flash as long as this continuous on or off condition remains.
3. To cancel the continuous on or off condition, press the + button.
The normal programme will resume on the next opposite command.
Continuous on/off for up to 99 days
1. Follow the instructions as detailed in 1. under the heading
Continuous on/off manual reset.
2. Press the S button once. A 'd' symbol, followed by the day number,
will be displayed.
3. Continue to press the S button to enter the number of days, not
including the current day, the continuous on or off condition is
required.
4. Press the OK button once. The on/off indicator will start and
continue to flash as long as this continuous on or off condition
remains. The day number will reduce by 1 each midnight and the
programme will resume thereafter automatically.
5. To cancel this programme, press the + button.
Sunday and holiday programme
In this mode, the time switch follows the Sunday (7th day) programme
each day for up to 99 days.
1. With the time switch in the normal running mode, press the S button
once. An F symbol, followed by a flashing number 1, will be
displayed.
2. Continue to press the S button to enter the number of days, not
including the current day, the Sunday programme is required.
3. Press the OK button once. The programme starts at 0:00 the
following day and will end at midnight on the last selected day.
4. To cancel this programme, press the + button.
Summer/winter changeover
To alter the real time to coincide with summer/winter changes, press
the ±1hr button as often as required.
Daylight sensor control
The sensor controls the lighting during the time switch on periods. The
sensor housing must be mounted within 50 metres of the time
switch/controller. Care should be taken when siting the sensor.
1. It must not be mounted in an area where the lens might
be soiled by mud or excrement from e.g. birds.
2. It should face away from the controlled light source or
any reflection of same.
3. Although the controller has an inbuilt time delay, to
prevent unwanted switching, circumstances which may give rise to this
should be avoided, e.g. the sensor should not face a busy road where
car headlights might cause problems.
Setting the daylight level
1. Put the time switch in the on condition, the output relay contacts are
now controlled by the sensor.
2. During dusk, adjust the setting of the daylight level control
potentiometer until the above LED lights.
Note:Because of the inbuilt time delay, the output contacts will
operate approximately one minute later. This delay also
applies when switching to off, with lighting levels above the
set level. The delay is to prevent unwanted switching due to
e.g. passing clouds, car headlights etc.
Technical specification
Supply voltage (nominal) ________________________220-240V
min./max. limits ____________________________188-264V
Power consumption __________________________________2.5VA
Contact ratings/type:
resistive (cos j = 1) ________________________________10A
inductive (cos j = 0.6)________________________________6A
type ________________________________________S.P.S.T.
Minimum switching interval __________________________1 minute
Time switch accuracy ____________________±0.5 sec./day (typical)
Reserve power ____________________________100 hours (typical)
recharge time ________________________________60 hours.
Temperature limits:
operating ________________________________0°C to +50°C
storage ________________________________-10°C to +60°C
Terminal capacity____________________________2 x 2.5mm2 max.
or 1 x 4mm2 max.
Sensor housing:
protection____________________________________________IP55
RS Components shall not be liable for any liability or loss of any nature (howsoever
caused and whether or not due to RS Components’ negligence) which may result
from the use of any information provided in RS technical literature.
328-336
Einführung
In diesem Gerät sind ein 7-Tage-Zeitschalter und eine
Tageslichtsensor-Steuereinheit kombiniert. Der Zeitschalter akzeptiert
bis zu acht Programmeinstellungen von der Steuereinheit. Hierbei
handelt es sich jeweils um eine LCD-Anzeige eines kompletten
Schaltzyklus, d. h. um die Befehle zum Einschalten der Ausgangsrelais
zu einer bestimmten Zeit an einem oder mehreren Tagen und zum
Ausschalten der Relais zu einer anderen Zeit an einem oder mehreren
Tagen. Die Ein-Tage müssen nicht mit den Aus-Tagen identisch sein.
Bild 2 zeigt eine solche Programmdarstellung.
Das Beispiel illustriert Übernachtprogramme, eine typische Anwendung
des Gerätes. Neben dem automatischem Betrieb mit den acht
vorprogrammierten Schaltzyklen kann das Gerät auch manuell
geschaltet werden, entweder vorübergehend oder bis zum nächsten
entgegengesetzten Befehl. Permanentes Ein- oder Ausschalten ist
ebenfalls möglich.
Zusätzlich ist eine mit ±1h gekennzeichnete Taste zum Umstellen von
Sommer- auf Winterzeit und umgekehrt vorhanden. Und mit dem
Urlaubsprogramm kann das Gerät bis zu neunundneunzig Tage
ständig ein- oder ganz ausgeschaltet werden. Ein manueller
Dreiwegschalter erlaubt folgende Grundeinstellungen:
Ι Ausgangsrelais permanent aus
Ausgangsrelais programmgesteuert
ΙΙ Ausgangsrelais permanent ein
Der Tageslichtsensor ist in einem isolierten, witterungsbeständigen
Gehäuse (Schutzklasse IP55) untergebracht und damit auch für
Außenmontage geeignet. Die Hauptvorteile dieser Zeitschalter/Tages-
lichtsensor-Kombination sind:
● Gute Zugänglichkeit aller Bedienelemente, auch derer zum
Einstellen der Sensorempfindlichkeit.
● Einzelpaar-Niedrigspannungsverdrahtung zwischen Sensor und
Zeitschalter/Steuergerät.
Montage
Das Gerät kann an einer symmetrischen Montageschiene (DIN 46227-
3, EN 50 002) oder in einem geeigneten Gehäuse untergebracht
werden. Gehäuse, die Zugang zur Vorderseite des Gerätes erlauben,
sind verfügbar (siehe "DIN 43 880-Gehäuse" im Produktverzeichnis
des RS-Katalogs). Das Gerät muß gemäß den Verdrahtungs- schemen
bei den Klemmen angeschlossen werden.
RS Best-Nr.
V9376

4
Sicherheitshinweise
Elektrische Geräte immer von einem qualifizierten Elektriker
installieren lassen. Darauf achten, daß die
Versorgungsspannung dem Nennspannungsbereich des Gerätes
entspricht. Die Ausgangsrelaiskontakte dürfen nach DIN 57 100
Teil 410/VDE 0100 Teil 410 Abschnitt 4.1 nicht direkt zum
Schalten von Niedrigspannungen (24 V oder 12-24 V )
benutzt werden.
Zwischen dem Sensor und dem Zeitschalter/ Steuergerät ist ein
doppelt isoliertes Kabel zu verwenden.Versorgungsspannung
vom Zeitschalter/ Steuergerät trennen, bevor die Verbindungen
zu den Sensorklemmen hergestellt werden. Die an die Klemmen
angeschlossenen Leiter müssen ordnungsgemäß vorbereitet
sein, damit der Berührungsschutz erhalten bleibt (VDE 0106).
Die Last an den Ausgangsrelaiskontakten darf die in den
technischen Daten angegebenen Werte nicht überschreiten.
Einstellungen
Um Zugang zu den Bedienelementen zu erhalten, die Frontabdeckung
abnehmen. Bild 3 zeigt die sechs Bedientasten, den Dreiwegschalter
und das Potentiometer zum Einstellen der Sensorempfindlichkeit.
Erstmaliges Einschalten
Sicherstellen, daß das Gerät gemäß der obigen Anleitung montiert und
verdrahtet wurde. Sobald der Strom eingeschaltet wird, dauert es etwa
30 Sekunden, bis die LCD-Anzeige sichtbar wird.
Alle Einstellungen löschen
Nach der Installation des Gerätes ist es sinnvoll, alle vorhandenen
Einstellungen zu löschen.
1. Drücken Sie gleichzeitig die Tasten S und OK.
2. Geben Sie die Tasten wieder frei.
Damit ist der Inhalt der Programmspeicher gelöscht, so daß neue
Einstellungen eingegeben werden können.
Einstellen der Uhrzeit
1. Einmal die Taste drücken. Über der numerischen Zeitanzeige
erscheint hierauf das Uhrzeichen.
2. Drücken Sie die S-Taste*, bis die richtige Stunde (0-23) angezeigt
wird.
3. Drücken Sie einmal die OK-Taste. Die Minutenanzeige blinkt.
4. Drücken Sie die S-Taste*, bis die richtige Minutenzahl (00-59)
angezeigt wird.
5. Drücken Sie einmal die OK-Taste. Über Wochentag 1 blinkt jetzt ein
Markierungsbalken.
6. Drücken Sie die S-Taste*, bis der Markierungsbalken über dem
richtigen Wochentag (1-7) steht.
7. Nachdem Sie die Uhrzeit richtig eingestellt haben, drücken Sie die
-Taste, um die Uhr zu starten.
*Hinweis: Halten Sie die Taste gedrückt, um im Schnellvorlauf bis
kurz vor die gewünschte Einstellung zu gehen, und
drücken Sie die Taste dann wiederholt, um den Wert
langsam weiter zu erhöhen, bis die genaue Einstellung
erreicht ist.
Programmieren der Schaltzeiten
Um das Programmieren zu vereinfachen, hat das Gerät zwei
Blockoptionen, Tag 1 bis 7 und Tag 1 bis 5. Hiermit sparen Sie
Programmierzeit (jedoch keine Speicherkapazität). Natürlich können
die Schaltbefehle auch separat für einzelne Tage programmiert
werden.
Auswahl von Block- oder Einzeltagprogrammierung
Wiederholtes Drücken der -Taste bewirkt folgende Anzeigen:
1. Uhrzeiteinstellung.
2. Vorhandene Programme (nicht verfügbar, wenn alle Einstellungen
gelöscht wurden).
3. 7-Tage-Block, zu erkennen an den Markierungsbalken über und
unter allen Wochentagen (1-7).
4. 5-Tage-Block, zu erkennen an den Markierungsbalken über und
unter den Wochentagen 1-5.
5. Einzeltagprogramm, daran zu erkennen, daß keine Tage markiert
sind.
6. Normaler Betrieb.
Wenn Sie die -Taste weiter drücken, werden die obigen Posten
erneut durchlaufen.
Einzeltagprogrammierung
Um Einzeltagprogrammierung zu wählen, gehen Sie die obigen Posten
durch, bis die entsprechende Programmdarstellung angezeigt wird.
1. Drücken Sie einmal die S-Taste. Die Anzeige für Einschalt-Stunde
blinkt. Drücken Sie die S-Taste, bis die gewünschte Einschaltstunde
(0-23) angezeigt wird.
2. Drücken Sie einmal die OK-Taste. Die Anzeige für Einschalt-Minute
blinkt. Drücken Sie die S-Taste, bis die gewünschte Einschaltminute
(00-59) angezeigt wird.
3. Drücken Sie einmal die OK-Taste. Der Markierungsbalken für den
Einschalt-Tag blinkt über Tag 1. Und jetzt müssen Sie sich
entscheiden:
4. Wollen Sie die Einschaltzeit wirklich für diesen Tag
programmieren?
Ja Dann drücken Sie einmal die OK-Taste und einmal die S-
Taste (es sei denn, die Anzeige steht auf Tag 7). Hierauf blinkt
der Markierungsbalken über dem nächsten Tag. Wiederholen Sie
den Vorgang ab Punkt 4.
Nein Dann drücken Sie einmal die S-Taste (es sei denn, die Anzeige
steht auf Tag 7). Der Markierungsbalken blinkt nun über dem
nächsten Tag.
Wiederholen Sie den Vorgang ab Punkt 4 bis Tag 7.
Wenn Sie über Tag 7 hinausgehen, werden alle Eingaben gelöscht
und die Werte müssen neu eingegeben werden.
5. Drücken Sie die -Taste. Die Anzeige für Ausschalt-Stunde blinkt.
6. Drücken Sie die S-Taste, bis die gewünschte Ausschaltstunde (0-
23) angezeigt wird.
7. Drücken Sie einmal die OK-Taste. Die Anzeige für Ausschalt-Minute
blinkt.
8. Drücken Sie die S-Taste, bis die gewünschte Ausschaltminute (00-
59) angezeigt wird.
9. Drücken Sie einmal die OK-Taste. Der Markierungsbalken für den
Ausschalt-Tag blinkt unter Tag 1. Und jetzt müssen Sie sich wieder
entscheiden:
10.Wollen Sie die Ausschaltzeit wirklich für diesen Tag
programmieren?
Ja Dann drücken Sie einmal die OK-Taste und einmal die S-Taste
(es sei denn, die Anzeige steht auf Tag 7). Der
Markierungsbalken für den Ausschalt-Tag blinkt nun unter dem
nächsten Tag. Wiederholen Sie den Vorgang ab Punkt 10.
Nein Dann drücken Sie einmal die S-Taste (es sei denn, die Anzeige
steht auf Tag 7). Hierauf blinkt der Markierungsbalken unter dem
nächsten Tag.
Wiederholen Sie den Vorgang ab Punkt 10 bis Tag 7.
Wenn Sie über Tag 7 hinausgehen, werden alle Eingaben gelöscht
und die Werte müssen neu eingegeben werden.
11.Drücken Sie die -Taste. Das Programm wird gespeichert und die
Anzeige kehrt in den normalen Betriebsmodus zurück.
12.Wenn weitere Programme eingegeben werden sollen, wiederholen
Sie den gesamten Vorgang für die Einzeltagprogrammierung. Noch
nicht belegte Programmpositionen werden in den drei Programmier-
optionen angezeigt:
7-Tage-Block, 5-Tage-Block, Einzeltag.
Wenn alle acht Programmpositionen vergeben sind, erscheint nach
dem Durchlaufen der Programmdarstellungen die Anzeige full (voll).
!
V9376

5
Blockprogrammierung
Beim Programmieren von 5- oder 7-Tage-Blöcken gehen Sie ähnlich
vor wie bei der Einzeltagprogrammierung. Der einzige Unterschied
besteht darin, daß die Ein- und Ausschalttage hier automatisch
programmiert werden.
Kontrollieren/Löschen von Programmen
1. Drücken Sie die -Taste, um die gespeicherten Programme
anzuzeigen.
2. Wenn Sie ein Programm ändern oder löschen wollen, drücken Sie
die C-Taste. Hierauf werden die Werte in der Programmdarstellung
gelöscht, so daß Sie neue Eingaben machen können.
3. Nachdem Sie die einzelnen Einstellungen nach Bedarf
geändert oder gelöscht haben, schalten Sie mit der -Taste in den
normalen Betriebsmodus zurück.
Manuelle Übersteuerung
Manuelles Ein-/Ausschalten
Hiermit können Sie den Relaisausgang in das Gegenteil des
programmierten Zustands ändern, bis der nächste entgegengesetzte
Befehl erfolgt.
Beispiel: Der Zeitschalter ist wie folgt programmiert:
ein um 08:00.................... aus um 12:00
ein um 13:00.................... aUS um 17:00
Um 10 Uhr wird das Gerät manuell ausgeschaltet. Der Zeitschalter
bleibt dann bis um 13:00, dem Zeitpunkt des nächsten
entgegengesetzten Befehls (EIN) ausgeschaltet.
Danach läuft das Programm normal weiter. Um das Gerät manuell zu
schalten, die p-Taste drücken. Wiederholtes Betätigen dieser Taste
bewirkt, daß der Relaisausgang zwischen ein und aus hin- und
herschaltet.
Manuelles permanentes Ein- oder Ausschalten
1. Drücken Sie die p-Taste, bis die gewünschte Statusanzeige
erscheint:
= EIN, o = AUS
Hinweis: Die manuelle Änderung ist auch dann erforderlich, wenn
bereits die gewünschte Statusanzeige (• bzw. o)
erscheint. Um den Zeitschalter manuell permanent auf
ein zu stellen, während sich die Kontakte bereits in der
ein-Position befinden, müssen Sie zum Beispiel zweimal
die p-Taste drücken.
2. Drücken Sie die OK-Taste. Die Ein/Aus-Anzeige blinkt, und zwar
solange wie das Gerät permanent ein- oder ausgeschaltet ist.
3. Um den permanenten Ein- oder Aus-Zustand wieder aufzuheben,
drücken Sie die p-Taste. Der normale Schaltbetrieb wird dann
wieder aufgenommen, sobald ein entgegengesetzter Befehl erfolgt.
Permanentes Ein- oder Ausschalten für bis zu 99 Tage
1. Gehen Sie nach der Anleitung unter "Manuelles
permanentes Ein- oder Ausschalten", Punkt 1, vor.
2. Drücken Sie einmal die S-Taste. Ein 'd'-Zeichen (engl. day = Tag)
erscheint, gefolgt von der Tageszahl.
3. Drücken Sie weiter die S-Taste, bis die Anzahl der Tage
(ausschließlich des aktuellen Tages) angezeigt wird, während derer
das Gerät permanent ein- oder ausgeschaltet sein soll.
4. Drücken Sie einmal die OK-Taste. Die Ein/Aus-Anzeige blinkt, und
zwar solange wie das Gerät permanent ein- oder ausgeschaltet ist.
Die Anzahl der Tage wird jeweils um Mitternacht um eins reduziert.
Sobald die eingestellten Tage abgelaufen sind, nimmt der
Zeitschalter automatisch wieder seinen normalen Betrieb auf.
5. Um das Programm wieder auszuschalten, drücken Sie die p-Taste.
Sonn- und Feiertagsprogramm
In dieser Einstellung richtet sich der Schalter täglich nach dem für
Sonntag (Tag 7) eingestellten Programm, und zwar bis zu 99 Tage
lang.
1. Drücken Sie einmal die S-Taste, während sich der Zeitschalter im
normalen Betriebsmodus befindet. Hierauf erscheint ein F-Zeichen,
gefolgt von einer blinkenden Ziffer 1.
2. Drücken Sie die S-Taste, bis die Anzahl der Tage (ausschließlich
des aktuellen Tages) erscheint, für die das Sonn- und
Feiertagsprogramm gelten soll.
3. Drücken Sie einmal die OK-Taste. Das Programm startet um 0:00
am folgenden Tag und endet um Mitternacht am letzten Tag der
eingestellten Frist.
4. Um das Programm wieder auszuschalten, drücken Sie die p-Taste.
Sommer-/Winterzeit-Umstellung
Um die Uhrzeit von Sommer- auf Winterzeit umzustellen, drücken Sie
so oft wie notwendig die mit ±1h markierte Taste.
Tageslichtsensor
Der Sensor steuert die Beleuchtung während der mit dem Zeitschalter
programmierten Einschaltzeiten. Das Sensorgehäuse muß in einem
Abstand von maximal 50 m vom Zeitschalter/Steuergerät montiert
werden. Bei der Wahl des Montageortes ist folgendes zu beachten:
1. Den Sensor nicht in Bereichen installieren, in denen die Linse einer
Verschmutzung, z. B. durch Vogelkot, ausge- setzt ist.
2. Der Sensor sollte von der gesteuerten Lichtquelle und von eventuell
reflektiertem Licht abgewandt sein.
3. Das Steuergerät hat zwar eine Verzögerungsschaltung, dennoch
sollten Umstände, die unerwünschte Schaltvorgänge auslösen
könnten, nach Möglichkeit vermieden werden, d. h. der Sensor
sollte zum Beispiel nicht auf eine verkehrsreiche Straße gerichtet
sein, um Probleme durch Autoscheinwerfer zu vermeiden.
Einstellen der Sensorempfindlichkeit
1. Stellen Sie den Zeitschalter auf EIN. Die Ausgangsrelaiskontakte
werden nun vom Sensor gesteuert.
2. Stellen Sie während der Dämmerung das Regelpotentiometer so
ein, daß die LED-Anzeige darüber gerade aufleuchtet.
Hinweis: Aufgrund der eingebauten Verzögerungsschaltung treten
die Ausgangskontakte mit ca. 1minütiger Verzögerung in
Aktion. Dies gilt sowohl beim Ein- als auch beim
Ausschalten. Hierdurch werden unerwünschte
Schaltvorgänge aufgrund kurzfristiger Änderungen der
Lichtintensität, z. B. durch Autoscheinwerfer oder
Wolken, vermieden.
Technische Daten
Versorgungsspannung (Nennwert) ________________220-240 V
Min./Max.-Werte ____________________________188-264 V
Leistungsaufnahme __________________________________2,5 VA
Kontaktstrom:
Ohmsch (cos j = 1) __________________________________10 A
Induktiv (cos j = 0,6) __________________________________6 A
Kontakttyp ______________________________einpolige Umschalter
Schaltintervall (min.) ________________________________1 Minute
Zeitschaltgenauigkeit (typ.) ________________________±0,5 s/Tag
Batterie (typ.) __________________________________100 Stunden
Ladezeit (typ.) ________________________________60 Stunden
Betriebstemperatur ____________________________0°C bis +50°C
Lagertemperatur ____________________________-10°C bis +60°C
Leiter/Klemme (max.) ____________________________2 x 2,5 mm2
oder 1 x 4 mm2
Sensorgehäuse-Schutzklasse____________________________IP55
RS Components haftet nicht für Verbindlichkeiten oder Schäden jedweder Art (ob auf
Fahrlässigkeit von RS Components zurückzuführen oder nicht), die sich aus der
Nutzung irgendwelcher der in den technischen Veröffentlichungen von RS
enthaltenen Informationen ergeben.
V9376

6
328-336
Introduzione
Questo prodotto abbina un interruttore a tempo con impostazione a 7
giorni con un regolatore sensore di luce diurna in una singola unità.
L’interruttore a tempo accetta fino a 8 immagini di programma per la
regolazione del tempo. Ciascuna immagine è la visualizzazione
completa a LCD di un ciclo di commutazione, vale a dire un comando
di ‘inserimento’ dei relè di commutazione ad un’ora specificata, in uno
o più giorni e ‘disinserimento’, in uno o più giorni ad un’ora diversa. Non
è necessario che i giorni di ‘inserimento’ siano gli stessi del
‘disinserimento’.
La Figura 2 mostra un esempio di immagine di programma.
Questo esempio mostra programmi dalla sera alla mattina, tipici per
questo tipo di prodotto. Oltre alla commutazione in conformità con le
otto immagini di programma, l’unità può essere esclusa a mano sia
temporaneamente fino al comando opposto successivo sia con
inserimento o disinserimento continuo.
Inoltre è disponibile un pulsante di scambio ora legale/solare (± 1 ora),
è incorporata una funzione aggiuntiva di programma per ferie che
consente di inserire e disinserire in continuazione l’unità fino a 99 giorni
ed è incorporato un interruttore di esclusione manuale a 3 posizioni per
fornire quanto segue:
Ι relè di uscita continuamente disinserito
il relè di uscita segue il programma specificato
ΙΙ relè di uscita continuamente inserito
Il sensore di luce diurna è alloggiato in un involucro completamente
isolato e resistente alle intemperie (IP55) per montaggio esterno, se
richiesto.
I vantaggi principali di questo interruttore a tempo/sensore di luce
diurna abbinati sono i seguenti:
● Tutti i comandi sono facilmente accessibili, compresa la regolazione
dei livelli di luce diurna di commutazione
● Cablaggio a coppia singola tra il sensore e l’interruttore a
tempo/regolatore.
Installazione
L’interruttore a tempo/regolatore può essere montato a scatto su rotaia
DIN simmetrica a norma BS 5584: 1978 (EN 50 002, DIN 46227-3) o
può essere alloggiato in un involucro idoneo.
Sono disponibili involucri modulari che consentono l’accesso alla parte
anteriore dell’interruttore a tempo/regolatore (vedere l’indice alfabetico
del catalogo RS alla voce “Alloggiamenti - apparecchiature DIN 43
880”. I collegamenti dell’unità devono essere conformi agli schemi posti
accanto ai terminali.
Istruzioni di sicurezza
Le apparecchiature elettriche devono essere montate
soltanto da personale qualificato. Controllare che la tensione
di alimentazione disponibile rientri nella gamma nominale
dell’unità. I contatti dei relè di uscita non devono essere usati
direttamente per commutare basse tensioni (24 V e 12-24
V ) a norma DIN 57 100 parte 410/VDE 0100 parte 410
sezione 4.1, cioè Sicurezza tensione extra bassa.
Il cavo usato per collegare il sensore e l’interruttore a
tempo/regolatore deve essere a doppio isolamento. L’interruttore
a tempo/regolatore deve essere isolato dall’alimentazione
quando si effettuano i collegamenti ai terminali del sensore. Tutti
i terminali a vite devono essere protetti contro il contatto
accidentale o danni. I conduttori collegati ai terminali devono
essere approntati opportunamente per mantenere la protezione
delle dita e del dorso della mano (VDE 0106).
Il carico applicato ai contatti dei relè di uscita non deve superare
i valori nominali indicati nelle specifiche tecniche.
Regolazioni
Per accedere ai pulsanti di comando sollevare il coperchio anteriore. I
sei pulsanti, l’interruttore a 3 posizioni ed il potenziometro di controllo
della luce diurna sono riportati in figura 3.
Inserimento iniziale
L’interruttore a tempo deve essere installato e cablato in conformità con
le istruzioni descritte in precedenza. Quando si mette sotto tensione
l’unità, passeranno circa trenta secondi prima che il display LCD diventi
visibile.
Cancellazione di tutte le regolazioni
Si consiglia di eseguire questa procedura quando si installa
l’interruttore a tempo/sensore di luce diurna per la prima volta.
1. Premere contemporaneamente i pulsanti S e OK.
2. Rilasciare i pulsanti. Le memorie saranno state cancellate e
l’interruttore a tempo è pronto per ricevere nuove regolazioni.
Regolazione dell’ora corrente
1. Premere una volta il pulsante . L’orologio sarà visualizzato sopra
il display numerico dell’ora.
2. Premere il pulsante “S” fino a quando è mostrata l’ora giusta (0-23).
3. Premere il pulsante OK una volta. Il display dei minuti lampeggia.
4. Premere il pulsante “S” fino a quando sono mostrati i minuti giusti
(00-59).
5. Premere il pulsante OK una volta. L’indicatore del giorno lampeggia
sopra al giorno 1.
6. Premere il pulsante “S” fino a quando l’indicatore del giorno appare
fisso sopra al giorno corrente (1-7).
7. Premere il pulsante quando l’ora fissata coincide con l’ora
corrente. Questo avvia l’orologio.
*Nota: Premendo e mantenendo premuto il pulsante la
regolazione avanza rapidamente. Questa funzione si può
utilizzare fino a quando ci si avvicina alla regolazione
desiderata. Poi gli impulsi di durata più breve faranno
avanzare la regolazione più lentamente fino a quando si
raggiunge la regolazione desiderata.
Regolazione dei programmi di commutazione
Per aiutare la programmazione, il programma ha due blocchi di
regolazione: giorni da 1 a 7 e giorni da 1 a 5. Questi programmi fanno
risparmiare tempo di impostazione ma non la memoria dei programmi.
I programmi di commutazione possono anche essere assegnati a
singoli giorni.
Scelta della programmazione in blocco o di
singoli giorni
Premendo ripetutamente il pulsante si visualizzano le seguenti
funzioni:
1. Orologio regolato.
2. Programmi completati (non pertinente se è stata eseguita la
procedura di cancellazione della memoria).
3. Programma mediante immagine blocco 7 giorni, identificato da
indicatori dei giorni sopra e sotto ogni giorno da 1 a 7.
4. Programma mediante immagine blocco 5 giorni, identificato da
indicatori dei giorni sopra e sotto ogni giorno da 1 a 5.
5. Programma mediante immagine giorno singolo, identificato dal fatto
che non sono mostrati indicatori dei giorni.
6. Funzionamento normale.
Se si continua a premere il pulsante saranno visualizzate di nuovo
le funzioni precedenti.
Programmazione di singoli giorni
Per iniziare la programmazione di singoli giorni, scorrere sui punti
elencati più sopra fino a quando è visualizzato il programma di
immagine per giorno singolo:
1. Premere il pulsante S una volta. Il display dell’ora di inserimento
lampeggerà. Continuare a premere il pulsante per regolare l’ora di
inserimento (0-23).
!
RS Codici.
V9376

7
2. Premere il pulsante OK una volta. Il display dei minuti lampeggia.
Premere il pulsante S per regolare i minuti desiderati (00-59).
3. Premere il pulsante OK una volta. L’indicatore del giorno di
inserimento lampeggia sopra al giorno 1. Questo è il momento di
decidere:
4. L’ora di inserimento va bene per questo giorno?
Sì Se sì, premere il pulsante OK una volta e il pulsante S una volta
(tranne quando si raggiunge il giorno 7). Un altro indicatore di
inserimento lampeggia sotto il giorno successivo. Procedere di
nuovo dal punto 4.
No Se no, premere il pulsante S una volta (tranne quando si raggiunge
il giorno 7). Un indicatore di inserimento lampeggia sul giorno
successivo.
Procedere di nuovo dal punto 4 fino al giorno 7.
Se la procedura suindicata continua oltre il giorno 7, tutte le
regolazioni saranno cancellate e dovranno essere impostate di
nuovo.
5. Premere il pulsante . Il display dell’ora di disinserimento
lampeggia.
6. Usare il pulsante S per regolare l’ora di disinserimento desiderata
(0-23).
7. Premere il pulsante OK. Il display dei minuti di disinserimento
lampeggia.
8. Usare il pulsante S per regolare i minuti desiderati di disinserimento
(00-59).
9. Premere il pulsante OK. L’indicatore del giorno di disinserimento
lampeggia sotto al giorno 1. Questo è il momento di decidere di
nuovo:
10.Il tempo di disinserimento va bene per questo giorno?
Sì Se sì, premere il pulsante OK una volta e il pulsante S una volta
(tranne quando si raggiunge il giorno 7). Un altro indicatore di
disinserimento lampeggia sul giorno successivo. Procedere di
nuovo dal punto 10.
No Se no, premere il pulsante S una volta (tranne quando si
raggiunge il giorno 7). Un indicatore di disinserimento
lampeggia sotto il giorno successivo.
Procedere di nuovo dal punto 10 fino al giorno 7.
Se la procedura suindicata continua oltre il giorno 7, tutte le
regolazioni saranno cancellate e dovranno essere impostate di
nuovo.
11.Premere il pulsante . L’immagine programmata sarà introdotta
nella memoria e il display torna alla modalità di funzionamento
normale.
12.Se sono richiesti altri programmi, procedere dall’inizio della
programmazione dei singoli giorni. Le immagini di programmazione
non utilizzate saranno presentate nelle tre scelte di programmi:
blocco 7 giorni, blocco 5 giorni, giorno singolo.
Quando si sono utilizzate tutte e otto le immagini di programmazione, il
display indicherà full (pieno) dopo lo scorrimento attraverso tutti i
programmi impostati.
Programmazione in blocco
La procedura di programmazione dei blocchi 7 giorni e 5 giorni è simile
alla programmazione dei singoli giorni con la sola differenza che
l’impostazione del giorno inserito/disinserito è automatica.
Revisione/Cancellazione dei programmi
1. Premere il pulsante per rivedere le immagini dei programmi.
2. Quando è visualizzata un’immagine da modificare o cancellare
premere il pulsante C. L’immagine scompare consentendo una
nuova programmazione.
3. Dopo aver cancellato tutti i comandi non richiesti dei punti di
commutazione, premere il pulsante per tornare alla modalità
funzionamento normale.
Funzioni di esclusione
Esclusione manuale inserimento/disinserimento
Questa funzione permette di cambiare lo stato di uscita del relè,
contrariamente alla posizione programmata, fino al comando opposto
successivo.
Esempio: L’interruttore a tempo è programmato come segue:
inserito alle ore 08:00 .............. disinserito alle 12
inserito alle ore 13:00 ............. disinserito alle 17
Alle ore 10 si usa l’esclusione manuale. L’interruttore a tempo rimane
disinserito fino alle ore 13:00 il comando successivo opposto
(inserimento).
Successivamente il programma si svolgerà normalmente. Per eseguire
l’esclusione manuale, premere il pulsante p. Premendo ripetutamente
questo pulsante farà alternare il relè di uscita tra inserimento e
disinserimento.
Ripristino manuale di inserimento/disinserimento
continuo
1. Premere il pulsante p fino a quando è visualizzato l’indicatore di
contatto inserito/disinserito desiderato:
= inserito, o = disinserito
Nota: Questo cambiamento manuale è necessario anche se è già
visualizzato l’indicatore di contatto inserito/ disinserito, cioè
un cambiamento manuale a inserito con il contatto già nella
posizione inserito richiede due pressioni sul pulsante p.
2. Premere il pulsante OK. L’indicatore inserito/disinserito si avvia e
continua a lampeggiare fintanto che persiste questa condizione di
inserito o disinserito.
3. Per cancellare questa condizione, premere il pulsante p. Il
programma normale riprende al comando opposto successivo.
Inserimento/disinserimento continuo fino a 99 giorni
1. Seguire le istruzioni descritte al numero 1. della voce Ripristino
manuale di inserimento/disinserimento continuo.
2. Premere il pulsante S una volta. Sarà visualizzato il simbolo “d”
seguito dal numero del giorno.
3. Continuare a premere il pulsante S per impostare il numero di giorni,
escluso il giorno corrente, per i quali è richiesta la condizione di
inserimento/disinserimento.
4. Premere il pulsante OK una volta. L’indicatore inserito/disinserito si
avvia e continua a lampeggiare fintanto che persiste questa
condizione di inserito o disinserito. Il numero del giorno diminuisce
di 1 ogni mezzanotte, dopo di che il programma riprende
automaticamente.
5. Per cancellare il programma premere il pulsante p.
Programma per la domenica e le ferie
In questa modalità, l’interruttore a tempo segue il programma
Domenica (7˚ giorno) ogni giorno fino a 99 giorni.
1. Quando l’interruttore a tempo è nella modalità di funzionamento
normale, premere il pulsante S una volta. Sarà visualizzato un
simbolo F seguito dal numero 1 lampeggiante.
2. Continuare a premere il pulsante S per impostare il numero di giorni,
escluso il giorno corrente, per i quali è richiesto il programma
Domenica.
3. Premere il pulsante OK una volta. Il programma comincerà alle ore
0:00 il giorno successivo e terminerà a mezzanotte dell’ultimo
giorno selezionato.
4. Per cancellare il programma premere il pulsante p.
Commutazione ora legale/ora solare
Per modificare l’ora in modo che coincida con l’ora legale/solare,
premere il pulsante ±1 hr quando necessario.
V9376

Controllo del sensore di luce diurna
Il sensore controlla l’illuminazione durante i periodi in cui l’interruttore a
tempo è inserito. L’alloggiamento del sensore deve essere montato
entro un raggio di 50 metri dall’interruttore a tempo/regolatore. Fare
molta attenzione quando si posiziona il sensore.
1. Non montarlo in una posizione dove la lente può essere sporcata da
fango o escrementi di uccelli.
2. Deve essere rivolto lontano dalla sorgente luminosa controllata o da
riflessi della stessa.
3. Benché nel regolatore sia incorporato un ritardo di tempo per evitare
commutazioni indesiderate, si devono evitare le circostanze che
potrebbero provocarle: per esempio, il sensore non deve essere
rivolto verso una strada trafficata dove i fari degli autoveicoli
possono essere causa di problemi.
Regolazione del livello di luce diurna
1. Mettere l’interruttore a tempo nella condizione inserito: ora i contatti
del relè di uscita sono controllati dal sensore.
2. All’imbrunire, regolare il livello del potenziometro di controllo della
luce diurna fino a quando il LED si accende.
Nota: Grazie al ritardo di tempo incorporato, i contatti di uscita
funzioneranno circa un minuto più tardi. Questo ritardo è
presente anche quando si commuta a disinserito con livelli
di luce superiori al livello impostato. Il ritardo ha lo scopo di
evitare commutazioni indesiderate dovute per esempio al
passaggio di nuvole, fari di autoveicoli, ecc.
Specifiche tecniche
Tensione di alimentazione
(nominale) ____________________________________220-240 V
limiti min/max ____________________________188-264 V
Consumo __________________________________________2,5 VA
Potenza/tipo dei contatti:
resistivo (cos j = 1) ________________________________10 A
induttivo (cos j = 0,6)________________________________6 A
tipo __________________________________________S.P.S.T.
Intervallo minimo di commutazione ____________________1 minuto
Precisione interruttore a tempo ____________±0,5 sec/giorno (tipica)
Potenza di riserva ____________________________100 ore (tipica)
tempo di ricarica ________________________________60 ore
Limiti di temperatura:
funzionamento __________________________da 0˚C a +50˚C
conservazione ________________________da -10˚C a +60˚C
Capacità terminali __________________________2 x 2,5 mm
2
max.
o 1 x 4 mm
2
max.
Alloggiamento sensore:
protezione ______________________________________IP55
La RS Components non si assume alcuna responsabilità in merito a perdite di
qualsiasi natura (di qualunque causa e indipendentemente dal fatto che siano dovute
alla negligenza della RS Components), che possono risultare dall’uso delle
informazioni fornite nella documentazione tecnica.
V9376
-
 1
1
-
 2
2
-
 3
3
-
 4
4
-
 5
5
-
 6
6
-
 7
7
-
 8
8


in anderen Sprachen
- English: RS 328-336
- italiano: RS 328-336
Andere Dokumente
-
Hama 00047677 Bedienungsanleitung
-
Chamberlain TX2225 Bedienungsanleitung
-
Conrad TE 857 Bedienungsanleitung
-
Danfoss Instr. TP5000 Installationsanleitung
-
-
-
RADSON PTC BLOWER 950W Benutzerhandbuch
-
Panasonic NV7000 Bedienungsanleitung
-
Vaillant VRC 410 Bedienungsanleitung
-
NightStick XPR-5584GMX Benutzerhandbuch