Zanussi ZGG35214XA Benutzerhandbuch
- Kategorie
- Kochfelder
- Typ
- Benutzerhandbuch

EN
User manual 2
DE
Benutzerinformation 14
Hob
Kochfeld
ZGG35214
IT

Contents
Safety information _ _ _ _ _ _ _ _ _ _ _ _ _ _ 2
Safety instructions _ _ _ _ _ _ _ _ _ _ _ _ _ _ 3
Product description _ _ _ _ _ _ _ _ _ _ _ _ _ 6
Daily use _ _ _ _ _ _ _ _ _ _ _ _ _ _ _ _ _ _ _ 6
Helpful hints and tips _ _ _ _ _ _ _ _ _ _ _ _ 7
Care and cleaning _ _ _ _ _ _ _ _ _ _ _ _ _ _ 7
Troubleshooting _ _ _ _ _ _ _ _ _ _ _ _ _ _ _ 8
Installation _ _ _ _ _ _ _ _ _ _ _ _ _ _ _ _ _ _ 9
Technical information _ _ _ _ _ _ _ _ _ _ _ 12
Environment concerns _ _ _ _ _ _ _ _ _ _ _ 13
Subject to change without notice.
Safety information
Before the installation and use of the appliance, carefully read the
supplied instructions. The manufacturer is not responsible if an in-
correct installation and use causes injuries and damages. Always
keep the instructions with the appliance for future reference.
Children and vulnerable people safety
Warning! Risk of suffocation, injury or permanent disability.
• This appliance can be used by children aged from 8 years and
above and persons with reduced physical, sensory or mental ca-
pabilities or lack of experience and knowledge if they are super-
vised by an adult or a person who is responsible for their safety.
• Do not let children play with the appliance. Children under 3
years must not be left unsupervised in the vicinity of the appli-
ance.
• Keep all packaging away from children.
• Keep children and pets away from the appliance when it oper-
ates or when it cools down. Accessible parts are hot.
• If the appliance has a child safety device, we recommend that
you activate it.
• Cleaning and user maintenance shall not be made by children
without supervision.
General Safety
• The appliance and its accessible parts become hot during use.
Do not touch the heating elements.
2
www.zanussi.com

• Do not operate the appliance by means of an external timer or
separate remote-control system.
• Unattended cooking on a hob with fat or oil can be dangerous
and may result in fire.
• Never try to extinguish a fire with water, but switch off the appli-
ance and then cover flame e.g. with a lid or a fire blanket.
• Do not store items on the cooking surfaces.
• Do not use a steam cleaner to clean the appliance.
• Metallic objects such as knives, forks, spoons and lids should
not be placed on the hob surface since they can get hot.
• If the supply cord is damaged, it must be replaced by the manu-
facturer, an authorized Service or similarly qualified persons in
order to avoid a hazard.
• Where the appliance is directly connected to the power supply,
an all-pole isolating switch with a contact gap is required. Com-
plete disconnection in compliance with the conditions specified
in overvoltage category III must be guaranteed. The earth cable
is excluded from this.
• When you route the mains cable, make sure that the cable
doesn't come into direct contact (for example using insulating
sleeving) with parts that can reach temperatures of more than
50°C above room temperature.
Safety instructions
Installation
Warning! Only a qualified person must
install this appliance.
• Remove all the packaging.
• Do not install or use a damaged appliance.
• Obey the installation instruction supplied
with the appliance.
• Keep the minimum distance from the other
appliances and units.
• Always be careful when you move the appli-
ance because it is heavy. Always wear safe-
ty gloves.
• Seal the cut surfaces with a sealant to pre-
vent moisture to cause swelling.
• Protect the bottom of the appliance from
steam and moisture.
• Do not install the appliance adjacent to a
door or under a window. This prevents hot
cookware to fall from the appliance when
the door or the window is opened.
3
www.zanussi.com

• If the appliance is installed above drawers
make sure that the space, between the bot-
tom of the appliance and the upper drawer,
is sufficient for air circulation.
• The bottom of the appliance can get hot.
We recommend to install a non-combustile
separation panel under the appliance to
prevent access to the bottom.
Electrical connection
Warning! Risk of fire and electrical
shock.
• All electrical connections must be made by
a qualified electrician.
• The appliance must be earthed.
• Before carrying out any operation make sure
that the appliance is disconnected from the
power supply.
• Use the correct electricity mains cable.
• Do not let the electricity mains cable tangle.
• Make sure the mains cable or plug (if appli-
cable) does not touch the hot appliance or
hot cookware, when you connect the appli-
ance to the near sockets
• Make sure the appliance is installed correct-
ly. Loose and incorrect electricity mains ca-
ble or plug (if applicable) can make the ter-
minal become too hot.
• Make sure that a shock protection is instal-
led.
• Use the strain relief clamp on cable.
• Make sure not to cause damage to the
mains plug (if applicable) or to the mains
cable. Contact the Service or an electrician
to change a damaged mains cable.
• The electrical installation must have an iso-
lation device which lets you disconnect the
appliance from the mains at all poles. The
isolation device must have a contact open-
ing width of minimum 3 mm.
• Use only correct isolation devices: line pro-
tecting cut-outs, fuses (screw type fuses re-
moved from the holder), earth leakage trips
and contactors.
Gas connection
• All gas connections should be made by a
qualified person.
• Before installation, make sure that the local
distribution conditions (nature of the gas
and gas pressure) and the adjustment of the
appliance are compatible.
• Make sure that there is air circulation around
the appliance.
• The information about the gas supply is on
the rating plate.
• This appliance is not connected to a device,
which evacuates the products of combus-
tion. Make sure to connect the appliance
according to current installation regulations.
Pay attention to requirements regarding ad-
equate ventilation.
Use
Warning! Risk of injury, burns or electric
shock.
• Remove all the packaging, labelling and pro-
tective film (if applicable) before first use.
• Use this appliance in a household environ-
ment
• Do not change the specification of this ap-
pliance.
• Do not let the appliance stay unattended
during operation.
• Do not operate the appliance with wet
hands or when it has contact with water.
• Do not put cutlery or saucepan lids on the
cooking zones. They can become hot.
• Set the cooking zone to “off” after use.
• Do not use the appliance as a work or as a
storage surface.
• When you place food into hot oil, it may
splash.
Warning! Risk of fire or explosion.
• Fats and oil when heated can release flam-
mable vapours. Keep flames or heated ob-
jects away from fats and oils when you cook
with them.
4
www.zanussi.com

• The vapours that very hot oil releases can
cause spontaneous combustion.
• Used oil, that can contain food remnants,
can cause fire at a lower temperature than
oil used for the first time.
• Do not put flammable products or items that
are wet with flammable products in, near or
on the appliance.
Warning! Risk of damage to the
appliance.
• Do not keep hot cookware on the control
panel.
• Do not let cookware to boil dry.
• Be careful not to let objects or cookware fall
on the appliance. The surface can be dam-
aged.
• Do not activate the cooking zones with
empty cookware or without cookware.
• Do not put aluminium foil on the appliance.
• Do not let acid liquids, for example vinegar,
lemon juice or limescale remover, touch the
hob. This can cause matt patches.
• This appliance is for cooking purposes only.
Do not use the appliance for other purpo-
ses, as for example room heating.
• The use of a gas cooking appliance results
in the production of heat and moisture. Pro-
vide good ventilation in the room where the
appliance is installed.
• Make sure that the ventilation openings are
not blocked.
• Prolonged intensive use of the appliance
may call for additional ventilation, for exam-
ple opening of a window, or more effective
ventilation, for example increasing the level
of mechanical ventilation where present.
• Use only stable cookware with the correct
shape and diameter larger than the dimen-
sions of the burners. There is a risk of over-
heating and rupture of the glass plate (if ap-
plicable).
• Make sure the flame does not go out when
you quickly turn the knob from the maximum
to the minimum position.
• Make sure pots are centrally positioned on
the rings and do not stick out over edges of
the cooking surface.
• Use only the accessories supplied with the
appliance.
• Do not install a flame diffuser on the burner.
Care and Cleaning
Warning! Risk of damage to the
appliance.
• Clean regularly the appliance to prevent the
deterioration of the surface material.
• Do not use water spray and steam to clean
the appliance.
• Do not clean the burners in the dishwasher.
• Clean the appliance with a moist soft cloth.
Only use neutral detergents. Do not use
abrasive products, abrasive cleaning pads,
solvents or metal objects.
Disposal
Warning! Risk of injury or suffocation.
• Contact your municipal authority for infor-
mation on how to discard the appliance cor-
rectly.
• Disconnect the appliance from the mains
supply.
• Cut off the mains cable and discard it.
• Flat the external gas pipes.
Service
• Contact the Service to repair the appliance.
We recommend only the use of original
spare parts.
5
www.zanussi.com

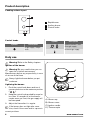
Product description
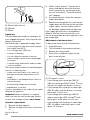
Cooking surface layout
1
2
3
1
Rapid burner
2
Auxiliary burner
3
Control knobs
Control knobs
Symbol Description
no gas supply / off po-
sition
Symbol Description
ignition position / maxi-
mum gas supply
minimum gas supply
Daily use
Warning! Refer to the Safety chapters.
Ignition of the burner
Warning! Be very careful when you use
open fire in kitchen environment.
Manufacturer decline any responsibility in case
of misuse of the flame
Always light the burner before you put
cookware.
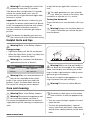
Lightning the burner:
1. Push the control knob down and turn it
counterclockwise to the maximum position
(
).
2. Keep the control knob pushed for equal or
less than 10 seconds to let the thermo-
couple warm up. If not, the gas supply will
be interrupted.
3. Adjust the flame after it is regular.
If the burner does not light after some
tries, check if the crown and its cap are in
correct positions.
A
B
C
D
A) Burner cap
B) Burner crown
C) Ignition candle
D) Thermocouple
6
www.zanussi.com

Warning! Do not keep the control knob
pushed for more than 15 seconds.
If the burner does not light after 15 seconds,
release the control knob, turn it into off
position and try to light the burner again after
minimum 1 minute.
Important! In the absence of electricity you
can ignite the burner without electrical device;
in this case approach the burner with a flame,
push the relevant knob down and turn it
counter-clockwise to maximum gas release
position.
If the burner accidentally goes out, turn
the control knob to the off position and try
to light the burner again after minimum 1 mi-
nute.
The spark generator can start automati-
cally when you switch on the mains, after
installation or a power cut. It is normal.
Turning the burner off
To put the flame out, turn the knob to the sym-
bol
.
Warning! Always turn the flame down or
switch it off before you remove the pans
from the burner.
Helpful hints and tips
Warning! Refer to the Safety chapters.
Energy savings
• If possible, always put the lids on the pans.
• When the liquid starts to boil, turn down the
flame to barely simmer the liquid.
Warning! Use cookware with diameters
applicable to the size of burners.
Burner Diameters of cookware
Rapid 180 - 240 mm
Auxiliary 80 - 160 mm
Warning! Make sure that the bottoms of
pots do not stand above the control
knobs. If the control knobs are under the
bottoms of pots, the flame heats them up.
Do not put the same pan on two burners.
Warning! Make sure that pot handles is
not above the front edge of the cooktop.
Make sure that pots are centrally put on the
rings in order to get maximum stability and to
get lower gas consumption.
Do not put unstable or damaged pots on the
rings to prevent from spill and injury.
Warning! Do not use a flame diffuser.
Care and cleaning
Warning! Refer to the Safety chapters.
Warning! Deactivate the appliance and
let it cool down before you clean it.
Disconnect the appliance from the electrical
supply before you do cleaning or maintenance
work.
Scratches or dark stains on the surface
have no effect on how the appliance op-
erates.
• You can remove the pan supports to easily
clean the hob.
• To clean the enamelled parts, cap and
crown, wash them with warm soapy water
and dry them carefully before you put them
back.
7
www.zanussi.com

• Wash stainless steel parts with water, and
then dry them with a soft cloth.
•The pan supports are not dishwasher
proof. They must be washed by hand.
• The enamel coating occasionally can have
rough edges, so be careful when you wash
the pan supports by hand and dry them. If
necessary, remove stubborn stains with a
paste cleaner.
• Make sure you position the pan supports
correctly after cleaning.
• To make the burners work correctly, make
sure that the arms of the pan supports are in
the centre of the burner.
• Be very careful when you replace the
pan supports to prevent the hob top
from damage.
After cleaning, dry the appliance with a soft
cloth.
Removing the dirt:
1. – Remove immediately: melting plastic,
plastic foil, and food containing sugar.
– Stop the appliance and let it cool
down before you clean: limescale rings,
water rings, fat stains, shiny metallic
discolorations. Use a special cleaner
applicable for surface of hob.
2. Clean the appliance with a damp cloth
and some detergent.
3. At the end rub the appliance dry with
a clean cloth.
The stainless steel can become tarnished if it
is too much heated. Refer to this you must not
cook with potstones, earthenware pans or cast
iron plates.
Cleaning of the spark plug
This feature is obtained through a ceramic ig-
nition candle with a metal electrode. Keep
these components well clean to prevent diffi-
cult lighting and check that the burner crown
holes are not obstructed.
Periodic maintenance
Periodically speak your local Service Force
Centre to check the conditions of the gas sup-
ply pipe and the pressure adjuster, if fitted.
Troubleshooting
Problem Possible cause Remedy
There is no spark when lighting
the gas
• There is no electrical supply • Make sure that the unit is con-
nected and the electrical sup-
ply is switched on.
• Control the fuse. If the fuse is
released more than one time,
refer to a qualified electrician.
• Burner cap and crown are
placed uneven
• Make sure that the burner cap
and crown are in correct posi-
tions.
The flame is blow out immediately
after ignition
• Thermocouple is not heated
sufficient
• After lightning the flame, keep
the knob pushed for equal or
less than 10 seconds.
The gas ring burns unevenly • Burner crown is blocked with
food residues
• Make sure that the injector is
not blocked and the burner
crown is clear of food particles.
If there is a fault, first try to find a solution to
the problem yourself. If you cannot find a solu-
tion to the problem yourself, speak your dealer
or the local Service Force Centre.
If you operated the appliance incorrectly,
or the installation was not carried out by a
registered engineer, the visit from the custom-
er service technician or dealer may not take
8
www.zanussi.com

place free of charge, even during the warranty
period.
These data are necessary to help you
quickly and correctly. These data are
available on the supplied rating plate.
• Model description .................
• Product number (PNC) .................
• Serial Number (S.N.) .................
Use the original spare parts only. They are
available at Service Force Centre and ap-
proved spare parts shops.
Labels supplied with the accessories bag
Stick the adhesive labels as indicated below:
MOD.
PROD.NO.
SER.NO
DATA
MOD.
PROD.NO.
SER.NO
DATA
MODELMODEL
MOD.
PROD.NO.
SER.NO.
03 IT
MADE IN ITALY
TYPE
230V-50Hz
IP20
0049
A B C
A) Stick it on Guarantee Card and send this
part (if applicable)
B) Stick it on Guarantee Card and keep this
part (if applicable)
C) Stick it on instruction booklet
Installation
Warning! Refer to the Safety chapters.
Warning! The following instructions
about installation, connection and
maintenance must be carried out by qualified
personnel in compliance with standards and
local regulations in force.
Gas Connection
Choose fixed connections or use a flexible
pipe in stainless steel in compliance with the
regulation in force. If you use flexible metallic
pipes, be careful they do not come in touch
with mobile parts or they are not squeezed. Al-
so be careful when the hob is put together
with an oven.
Important! Make sure that the gas supply
pressure of the appliance obeys the
recommended values. The adjustable
connection is fixed to the comprehensive ramp
by means of a threaded nut G 1/2". Screw the
parts without force, adjust the connection in
the necessary direction and tighten everything.
9
www.zanussi.com

ABC
A) End of shaft with nut
B) Washer
C) Elbow
Liquid gas
Use the rubber pipe holder for liquid gas. Al-
ways engage the gasket. Then continue with
the gas connection.
The flexible pipe is prepared for apply when:
– it can not get hot more than room tempera-
ture, higher than 30°C;
– it is no longer than 1500 mm;
– it shows no throttles;
– it is not subject to traction or torsion;
– it does not get in touch with cutting edges
or corners;
– it can be easily examined in order to make
sure its condition.
The control of preservation of the flexible pipe
consists in checking that:
– it does not show cracks, cuts, marks of
burnings on the two ends and on its full
length;
– the material is not hardened, but shows its
correct elasticity;
– the fastening clamps are not rusted;
– expired term is not due.
If one or more defects are visible, do not repair
the pipe, but replace it.
Important! When installation is complete,
make sure that the seal of each pipe fitting is
correct. Use a soapy solution, not a flame!
Injectors replacement
1. Remove the pan supports.
2. Remove the caps and crowns of the burn-
er.
3. With a socket spanner 7 remove the in-
jectors and replace them with the ones
which are necessary for the type of gas
you use (see table in "Technical Informa-
tion" chapter).
4. Assemble the parts, follow the same pro-
cedure backwards.
5. Replace the rating plate (it is near the gas
supply pipe) with the one for the new type
of gas supply. You can find this plate in
the package supplied with the appliance.
If the supply gas pressure is changeable or
different from the necessary pressure, you
must fit an applicable pressure adjuster on the
gas supply pipe.
Adjustment of minimum level
To adjust the minimum level of the burners:
1. Light the burner.
2. Turn the knob on the minimum position.
3. Remove the control knob.
4. With a thin screwdriver, adjust the by-
pass screw position.
A
A) The by-pass screw
• If you change from natural gas G20 20
mbar (or natural gas G20 13 mbar
1)
) to liq-
uid gas, fully tighten the by-pass screw in.
• If you change from liquid gas to natural gas
G20 20 mbar, undo the by-pass screw ap-
proximately 1/4 of a turn.
• If you change from natural gas G20 20
mbar to natural gas G20 13 mbar
1)
undo
the by-pass screw about 1/4 of a turn.
• If you change from liquid gas to natural gas
G20 13 mbar
1)
, undo the by-pass screw
about 1/2 of a turn.
1) only for Russia
10
www.zanussi.com

• If you change from natural gas G20 13
mbar
1)
to natural gas G20 20 mbar to tight-
en the by-pass screw about 1/4 of a turn.
Warning! Make sure the flame does not
go out when you quickly turn the knob
from the maximum position to the minimum
position.
Electrical connection
• Make sure that the rated voltage and type of
power on the rating plate agree with the
voltage and the power of the local power
supply.
• This appliance is supplied with a mains ca-
ble. It has to be supplied with a correct plug
which can hold the load that the rating plate
rates. Make sure that you install the plug in a
correct socket.
• Always use a correctly installed shockproof
socket.
• Make sure that there is an access to the
mains plug after the installation.
• Do not pull the mains cable to disconnect
the appliance. Always pull the mains plug.
• There is a risk of fire when the appliance is
in connection with an extension cable, an
adapter or a multiple connection. Make sure
that the ground connection agrees with the
standards and regulations.
• Do not let the power cable to heat up to a
temperature higher than 90° C.
Make sure that you connect the blue neutral
cable to the terminal with a letter "N" on it.
Connect the brown (or black) phase cable to
the terminal which has a letter "L". Keep the
phase cable connected at all times.
Replacement of the connection cable
To replace the connection cable use only
H05V2V2-F T90 or equivalent type. Make sure
that the cable section is applicable to the volt-
age and the working temperature. The yellow/
green earth wire must be approximately 2 cm
longer than the brown (or black) phase wire.
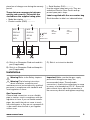
Building In
40-50 mm
55 mm
30 mm
min. 650 mm
490 mm
min. 100 mm
270 mm
If several 30 cm hobs are to be installed side
by side into the same cut out, an assembly kit
including a support side bracket and supple-
mentary seals is available at our Service Cen-
tres. The relevant installation instructions are
supplied within the kit package.
A
B
A) supplied seal
B) supplied bracket
Caution! Install the appliance only on a
worktop with flat surface.
Possibilities for insertion
Kitchen unit with door
The panel installed below the hob must be
easy to remove and let an easy access in case
a technical assistance intervention is necessa-
ry.
min 20 mm
(max 150 mm)
30 mm
60 mm
B
A
a) Removable panel
b) Space for connections
11
www.zanussi.com

Kitchen unit with oven
The electrical connection of the hob and the
oven must be installed separately for safety
reasons and to let easy remove oven from the
unit.
Technical information
Hob dimensions
Width: 290 mm
Length: 510 mm
Hob recess dimensions
Width: 270 mm
Length: 490 mm
Heat input
Rapid burner: 3.0 kW
Auxiliary burner: 1.0 kW
TOTAL POWER: G20 (2H) 20 mbar = 4
kW
G30/G31 (3B/P)
30/30 mbar = 276 g/h
G20 (2H) 13 mbar =
2.8 kW
Electric supply: 230 V ~ 50 Hz
Category: II2H3B/P
Gas supply: G20 (2H) 20 mbar
Appliance class: 3
By-pass diameters
Burner Ø By-pass in 1/100 mm
Auxiliary 28
Rapid 42
Gas burners for NATURAL GAS G20 20 mbar
BURNER NORMAL POWER kW inj. 1/100 mm
Auxiliary 1.0 70
Rapid 3.0 119
Gas burners for LPG G30/G31 30/30 mbar
BURNER NORMAL POWER kW inj. 1/100 mm g/h
Auxiliary 1.0 50 73
Rapid 2.8 86 204
Gas burners for NATURAL GAS G20 13 mbar
BURNER NORMAL POWER kW inj. 1/100 mm
Semi-rapid 0.9 80
Rapid 1.9 120
12
www.zanussi.com

Environment concerns
Recycle the materials with the symbol . Put
the packaging in applicable containers to
recycle it.
Help protect the environment and human
health and to recycle waste of electrical and
electronic appliances. Do not dispose
appliances marked with the symbol
with the
household waste. Return the product to your
local recycling facility or contact your
municipal office.
Packaging material
The packaging materials are friendly to
the environment and can be recycled. The
plastic components are identified by marking:
>PE<,>PS<, etc. Discard the packaging ma-
terials as household waste at the waste dis-
posal facilities in your municipality.
13
www.zanussi.com

Inhalt
Sicherheitsinformationen _ _ _ _ _ _ _ _ _ 14
Sicherheitshinweise _ _ _ _ _ _ _ _ _ _ _ _ 16
Gerätebeschreibung _ _ _ _ _ _ _ _ _ _ _ _ 18
Täglicher Gebrauch _ _ _ _ _ _ _ _ _ _ _ _ 19
Praktische Tipps und Hinweise _ _ _ _ _ _ 20
Reinigung und Pflege _ _ _ _ _ _ _ _ _ _ _ 20
Fehlersuche _ _ _ _ _ _ _ _ _ _ _ _ _ _ _ _ 21
Montage _ _ _ _ _ _ _ _ _ _ _ _ _ _ _ _ _ _ 22
Technische Daten _ _ _ _ _ _ _ _ _ _ _ _ _ 25
Umwelttipps _ _ _ _ _ _ _ _ _ _ _ _ _ _ _ _ 26
Änderungen vorbehalten.
Sicherheitsinformationen
Lesen Sie vor der Montage und Verwendung des Geräts sorgfältig
die mitgelieferte Anleitung. Der Hersteller haftet nicht für Verletzun-
gen oder Schäden, die durch eine fehlerhafte Montage entstehen.
Bewahren Sie die Anleitung zum Nachschlagen auf.
Sicherheit von Kindern und schutzbedürftigen
Personen
Warnung! Es besteht Erstickungsgefahr, das Risiko von
Verletzungen oder permanenten Behinderungen.
• Dieses Gerät kann dann von Kindern ab 8 Jahren, von Personen
mit eingeschränkten körperlichen, sensorischen oder geistigen
Fähigkeiten sowie von Personen ohne bisherige Erfahrung im
Umgang mit solchen Geräten bedient werden, wenn sie dabei
von einer Person, die für ihre Sicherheit verantwortlich ist, beauf-
sichtigt werden.
• Kinder dürfen nicht mit dem Gerät spielen. Kinder unter 3 Jahren
dürfen sich nicht unbeaufsichtigt in der Nähe des Geräts aufhal-
ten.
• Halten Sie das Verpackungsmaterial von Kindern fern.
• Halten Sie Kinder und Haustiere vom Gerät fern, wenn es in Be-
trieb oder in der Abkühlphase ist. Berührbare Teile sind heiss.
• Falls Ihr Gerät mit einer Kindersicherung ausgestattet ist, emp-
fehlen wir, diese einzuschalten.
• Reinigung und Wartung des Geräts darf nicht von Kindern ohne
Aufsicht erfolgen.
14
www.zanussi.com

Allgemeine Sicherheit
• Das Gerät und die zugänglichen Geräteteile werden während
des Betriebs heiß. Berühren Sie nicht die Heizelemente.
• Schalten Sie das Gerät nicht über eine externe Zeitschaltuhr
oder eine separate Fernsteuerung ein.
• Kochen mit Fett oder Öl auf einem unbeaufsichtigten Kochfeld
ist gefährlich und kann zu einem Brand führen.
• Versuchen Sie nicht einen Brand mit Wasser zu löschen, son-
dern schalten Sie das Gerät aus und bedecken Sie die Flamme
mit einem Deckel oder einer Feuerlöschdecke.
• Legen Sie keine Gegenstände auf dem Kochfeld ab.
• Benutzen Sie zum Reinigen des Gerätes keinen Dampfreiniger.
• Legen Sie keine Metallgegenstände wie Messer, Gabeln, Löffel
oder Topfdeckel auf die Oberfläche des Kochfelds, da diese
heiß werden können.
• Wenn das Netzkabel beschädigt ist, muss es vom Hersteller,
seinem Kundenservice oder einer gleichermaßen qualifizierten
Person ausgetauscht werden, um Gefahrenquellen zu vermei-
den.
• Ist das Gerät direkt an die Stromversorgung angeschlossen,
wird ein allpoliger Netztrennschalter mit einem Kontaktabstand
benötigt. Es muss eine vollständige Trennung entsprechend der
Überspannungskategorie III gewährleistet sein. Dies gilt nicht für
das Erdungskabel.
• Wenn Sie das Netzkabel verlegen, achten Sie darauf, dass es
keinen direkten Kontakt mit Teilen hat, die Temperaturen errei-
chen können, die mehr als 50 °C über der Raumtemperatur lie-
gen. Verwenden Sie ansonsten Isolierschläuche.
15
www.zanussi.com

Sicherheitshinweise
Montage
Warnung! Nur eine qualifizierte Fachkraft
darf den elektrischen Anschluss des
Geräts vornehmen.
• Entfernen Sie das gesamte Verpackungs-
material.
• Stellen Sie ein beschädigtes Gerät nicht auf
und benutzen Sie es nicht.
• Halten Sie sich an die mitgelieferte Monta-
geanleitung.
• Die Mindestabstände zu anderen Geräten
und Küchenmöbeln sind einzuhalten.
• Seien Sie beim Umsetzen des Geräts vor-
sichtig, denn es ist schwer. Tragen Sie stets
Sicherheitshandschuhe.
• Dichten Sie die Ausschnittskanten mit ei-
nem Dichtungsmittel ab, um ein Aufquellen
durch Feuchtigkeit zu verhindern.
• Schützen Sie die Geräteunterseite vor
Dampf und Feuchtigkeit.
• Installieren Sie das Gerät nicht direkt neben
einer Tür oder unter einem Fenster. So kann
heißes Kochgeschirr nicht herunterfallen,
wenn die Tür oder das Fenster geöffnet
wird.
• Wird das Gerät über Schubladen einge-
baut, achten Sie darauf, dass zwischen dem
Geräteboden und der oberen Schublade ein
ausreichender Abstand für die Luftzirkulati-
on vorhanden ist.
• Der Boden des Geräts kann heiß werden.
Wir empfehlen eine feuerfeste Trennplatte
unter dem Gerät anzubringen, damit der Bo-
den nicht zugänglich ist.
Elektrischer Anschluss
Warnung! Brand- und
Stromschlaggefahr.
• Die elektrischen Anschlüsse müssen von ei-
nem qualifizierten Elektriker ausgeführt wer-
den.
• Das Gerät muss geerdet sein.
• Vor der Durchführung jeglicher Arbeiten
muss das Gerät von der elektrischen Strom-
versorgung getrennt werden.
• Stellen Sie sicher, dass Sie das richtige Ka-
bel für den elektrischen Netzanschluss ver-
wenden.
• Achten Sie darauf, dass das Netzkabel nicht
lose hängt oder sich verheddert.
• Stellen Sie beim elektrischen Anschluss des
Gerätes sicher, dass das Netzkabel oder
ggf. der Netzstecker nicht mit dem heißen
Gerät oder heißem Kochgeschirr in Berüh-
rung kommt.
• Achten Sie darauf, dass das Gerät ord-
nungsgemäß montiert wird. Wenn freilie-
gende oder ungeeignete Netzkabel oder
Netzstecker verwendet werden, kann der
Anschluss überhitzen.
• Sorgen Sie dafür, dass ein Berührungs-
schutz installiert wird.
• Kabel zugentlasten.
• Achten Sie darauf, Netzstecker und Netzka-
bel nicht zu beschädigen. Wenden Sie sich
zum Austausch des beschädigten Netzka-
bels an den Kundendienst oder einen Elekt-
riker.
• Die elektrische Installation muss eine Trenn-
einrichtung aufweisen, mit der Sie das Ge-
rät allpolig von der Stromversorgung tren-
nen können. Die Trenneinrichtung muss mit
einer Kontaktöffnungsbreite von mindestens
3 mm ausgeführt sein.
• Verwenden Sie nur geeignete Trennvorrich-
tungen: Überlastschalter, Sicherungen
(Schraubsicherungen müssen aus dem Hal-
ter entfernt werden können), Fehlerstrom-
schutzschalter und Schütze.
Gasanschluss
• Die Gasanschlüsse müssen von einer Fach-
kraft ausgeführt werden.
• Überprüfen Sie vor der Montage des Ge-
räts, dass das von Ihrem Gaswerk gelieferte
16
www.zanussi.com

Gas (Gasart und Druck) mit der Einstellung
des Geräts kompatibel ist.
• Stellen Sie sicher, dass die Luft um das Ge-
rät zirkulieren kann.
• Informationen über die Gasversorgung fin-
den Sie auf dem Typenschild.
• Das Gerät darf nicht an einen Abzug für
Verbrennungsprodukte angeschlossen wer-
den. Das Gerät muss gemäß den aktuell
geltenden Montagebestimmungen ange-
schlossen werden. Halten Sie die Bestim-
mungen hinsichtlich der Belüftung ein.
Gebrauch
Warnung! Es besteht Verletzungs-,
Verbrennungs- und Stromschlaggefahr.
• Entfernen Sie vor dem ersten Gebrauch das
gesamte Verpackungsmaterial, die Aufkle-
ber und Schutzfolie (falls vorhanden).
• Das Gerät ist für die Verwendung im Haus-
halt vorgesehen.
• Nehmen Sie keine technischen Änderungen
am Gerät vor.
• Lassen Sie das Gerät bei Betrieb nicht un-
beaufsichtigt.
• Bedienen Sie das Gerät nicht mit feuchten
oder nassen Händen oder wenn es mit
Wasser in Kontakt gekommen ist.
• Legen Sie kein Besteck und keine Topfde-
ckel auf die Kochzonen. Sie werden heiß.
• Schalten Sie die Kochzonen nach jedem
Gebrauch aus.
• Benutzen Sie das Gerät nicht als Arbeits-
oder Abstellfläche.
• Wenn Sie Nahrungsmittel in heißes Öl ge-
ben, kann dieses spritzen.
Warnung! Es besteht Explosions- und
Brandgefahr.
• Erhitzte Öle und Fette können brennbare
Dämpfe freisetzen. Halten Sie Flammen und
erhitzte Gegenstände beim Kochen mit Fet-
ten und Ölen von diesen fern.
• Die von sehr heißem Öl freigesetzten
Dämpfe können eine Selbstzündung verur-
sachen.
• Bereits verwendetes Öl kann Lebensmittel-
reste enthalten und schon bei niedrigeren
Temperaturen eher einen Brand verursa-
chen als frisches Öl.
• Platzieren Sie keine entflammbaren Produk-
te oder Gegenstände, die mit entflammba-
ren Produkten benetzt sind, im Gerät, auf
dem Gerät oder in der Nähe des Geräts.
Warnung! Das Gerät könnte beschädigt
werden.
• Stellen Sie kein heißes Kochgeschirr auf
das Bedienfeld.
• Lassen Sie das Kochgeschirr nicht leerko-
chen.
• Lassen Sie keine Gegenstände oder Koch-
geschirr auf das Gerät fallen. Die Oberflä-
che könnte beschädigt werden.
• Schalten Sie die Kochzonen niemals ein,
wenn sich kein Kochgeschirr darauf befin-
det, oder wenn das Kochgeschirr leer ist.
• Legen Sie keine Alufolie auf das Gerät.
• Lassen Sie keine säurehaltigen Flüssigkei-
ten wie Essig, Zitronensaft oder kalklösende
Reinigungsmittel mit dem Kochfeld in Be-
rührung kommen. Diese könnten matte Fle-
cken verursachen.
• Dieses Gerät ist nur zum Kochen bestimmt.
Verwenden Sie das Gerät nicht für andere
Zwecke, wie zum Beispiel als Raumheizung.
• Beim Gebrauch eines Gaskochfelds ent-
steht Wärme und Feuchtigkeit. Sorgen Sie
für eine ausreichende Belüftung in dem
Raum, in dem das Gerät aufgestellt ist.
• Die Lüftungsöffnungen dürfen nicht abge-
deckt werden.
• Bei längerer Benutzung des Gerätes kann
eine zusätzliche Belüftung erforderlich wer-
den (Öffnen eines Fensters oder Erhöhung
der Absaugleistung der Abzugshaube, falls
vorhanden).
• Verwenden Sie nur standfestes Kochge-
schirr mit der richtigen Form und einem
Durchmesser, der größer als der der Bren-
ner ist. Die Glasplatte (falls vorhanden) kann
überhitzen und zerspringen.
17
www.zanussi.com

• Vergewissern Sie sich, dass die Flamme
nicht erlischt, wenn Sie den Einstellknopf
schnell von der höchsten zur niedrigsten
Stufe drehen.
• Stellen Sie das Kochgeschirr mittig auf die
Heizkreise. Es darf nicht über die Ränder
der Kochfläche herausragen.
• Verwenden Sie ausschließlich das mit dem
Gerät gelieferte Zubehör.
• Setzen Sie keinen Wärmeverteiler auf den
Brenner.
Reinigung und Pflege
Warnung! Das Gerät könnte beschädigt
werden.
• Reinigen Sie das Gerät regelmäßig, um eine
Abnutzung des Oberflächenmaterials zu
verhindern.
• Reinigen Sie das Gerät nicht mit einem
Wasser- oder Dampfstrahl.
• Reinigen Sie die Brenner nicht im Geschirr-
spüler.
• Reinigen Sie das Gerät mit einem weichen,
feuchten Tuch. Verwenden Sie ausschließ-
lich Neutralreiniger. Benutzen Sie keine
Scheuermittel, scheuernde Reinigungs-
schwämmchen, Lösungsmittel oder Metall-
gegenstände.
Entsorgung
Warnung! Verletzungs- und
Erstickungsgefahr.
• Für Informationen zur korrekten Entsorgung
des Gerätes wenden Sie sich an Ihre kom-
munale Behörde.
• Trennen Sie das Gerät von der Stromver-
sorgung.
• Schneiden Sie das Netzkabel ab, und ent-
sorgen Sie es.
• Drücken Sie die äußeren Gasrohre flach.
Kundendienst
• Wenden Sie sich zur Reparatur des Geräts
an den Kundendienst. Wir empfehlen nur
Originalersatzteile zu verwenden.
Gerätebeschreibung
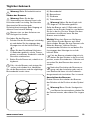
Kochfeldanordnung
1
2
3
1
Starkbrenner
2
Hilfsbrenner
3
Einstellknöpfe
Kochstellen-Schalter
Symbol Beschreibung
keine Gaszufuhr / Ge-
rät ausgeschaltet
Symbol Beschreibung
Zündstellung / maxima-
le Gaszufuhr
minimale Gaszufuhr
18
www.zanussi.com

Täglicher Gebrauch
Warnung! Siehe Sicherheitshinweise.
Zünden des Brenners
Warnung! Seien Sie bei der
Verwendung von offenem Feuer in der
Küche besonders vorsichtig. Der Hersteller
übernimmt bei Missachtung der
Sicherheitsbestimmungen beim Umgang mit
offenem Feuer keinerlei Haftung.
Brenner stets vor dem Aufsetzen von
Kochgeschirr zünden.
So zünden Sie den Brenner:
1. Drücken Sie den Einstellknopf vollständig
ein und drehen Sie ihn entgegen dem
Uhrzeigersinn auf die höchste Stufe (
).
2. Halten Sie den Einstellknopf höchstens
10 Sekunden gedrückt, um das Thermo-
element zu erwärmen. Andernfalls wird die
Gaszufuhr unterbrochen.
3. Stellen Sie die Flamme ein, sobald sie ru-
hig brennt.
Falls sich der Brenner nach einigen Ver-
suchen nicht zünden lässt, überprüfen
Sie, ob die Brennerkrone und der zugehörige
Brennerdeckel korrekt sitzen.
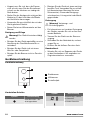
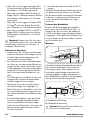
A
B
C
D
A) Brennerdeckel
B) Brennerkrone
C) Zündkerze
D) Thermoelement
Warnung! Halten Sie den Knopf nicht
länger als 15 Sekunden gedrückt.
Sollte der Brenner nach 15 Sekunden nicht
zünden, lassen Sie den Knopf los, und drehen
Sie ihn in die Aus-Position. Warten Sie dann
mindestens eine Minute, bevor Sie den
Brenner erneut zünden.
Wichtig! Wenn kein Strom zur Verfügung
steht, können Sie den Brenner auch ohne
Strom zünden. Bringen Sie eine Flamme in die
Nähe des Brenners, drücken Sie den
entsprechenden Schalter ein und drehen Sie
ihn entgegen dem Uhrzeigersinn auf die
höchste Stufe.
Falls der Brenner unbeabsichtigt erlischt,
drehen Sie den Schalter in die Ausschalt-
position, warten Sie mindestens 1 Minute und
versuchen Sie, den Brenner dann erneut zu
zünden.
Nach dem Einschalten der Stromversor-
gung, nach der Installation oder nach ei-
nem Stromausfall kann sich die Funkenzün-
dung automatisch einschalten. Das ist normal.
Ausschalten des Brenners
Drehen Sie zum Ausschalten des Brenners
den Schalter auf die Position mit dem Symbol
.
Warnung! Bevor Sie das Kochgeschirr
vom Brenner herunternehmen, drehen Sie
die Flamme herunter, oder drehen Sie sie ganz
ab.
19
www.zanussi.com

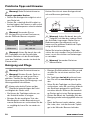
Praktische Tipps und Hinweise
Warnung! Siehe Sicherheitshinweise.
Energie sparendes Kochen
• Decken Sie Kochgeschirr möglichst mit ei-
nem Deckel ab.
• Drehen Sie, sobald die Kochflüssigkeit zu
kochen beginnt, die Flamme so weit zurück,
dass die Siedetemperatur aufrecht erhalten
wird.
Warnung! Verwenden Sie nur
Kochgeschirr mit einem Durchmesser,
der der Größe der Brenner entspricht.
Brenner Durchmesser des Kochge-
schirrs
Starkbrenner 180 - 240 mm
Hilfsbrenner 80 - 160 mm
Warnung! Achten Sie darauf, dass die
Topfböden nicht die Einstellknöpfe
berühren. Befinden sich die Einstellknöpfe
unter den Topfböden, werden sie durch die
Flamme erhitzt.
Kochen Sie nicht mit einem Kochgeschirrteil
auf zwei Brennern gleichzeitig.
Warnung! Achten Sie darauf, dass die
Topfgriffe nicht über den vorderen Rand
des Kochfelds hinausragen. Stellen Sie zur
Reduzierung des Gasverbrauchs und im
Interesse einer größeren Stabilität die Töpfe
mittig auf die Kochzonen.
Stellen Sie keine beschädigten Töpfe oder
solche, die nicht standfest sind, auf die Koch-
zonen, um ein Verschütten und Verletzungen
zu vermeiden.
Warnung! Verwenden Sie keinen
Wärmeverteiler.
Reinigung und Pflege
Warnung! Siehe Sicherheitshinweise.
Warnung! Schalten Sie das Gerät vor
dem Reinigen aus und lassen Sie es
abkühlen. Trennen Sie das Gerät von der
Stromversorgung, bevor Sie Reinigungs- und
Wartungsarbeiten durchführen.
Kratzer oder dunkle Flecken auf der
Oberfläche beeinträchtigen die Funkti-
onsfähigkeit des Geräts nicht.
• Sie können die Topfträger entfernen, um
das Kochfeld leichter zu reinigen.
• Reinigen Sie die emaillierten Teile, den
Brennerdeckel und die Brennerkrone mit
warmen Seifenwasser und trocknen Sie die-
se sorgfältig ab, bevor Sie sie wieder ein-
setzen.
• Reinigen Sie Edelstahlteile mit Wasser und
wischen Sie sie mit einem weichen Tuch
trocken.
•Die Topfträger sind nicht spülmaschinen-
fest. Sie müssen von Hand gereinigt wer-
den.
• Wenn Sie die Topfträger von Hand spülen
und trocknen, seien Sie vorsichtig, da durch
das Emaillieren gelegentlich raue Kanten
entstehen können. Entfernen Sie hartnäcki-
ge Flecken ggf. mit einer Reinigungspaste.
• Achten Sie darauf, die Topfträger nach der
Reinigung wieder ordnungsgemäß aufzuset-
zen.
• Damit die Brenner korrekt arbeiten, stellen
Sie sicher, dass sich die Arme der Topfträ-
ger in der Mitte des Brenners befinden.
20
www.zanussi.com
Seite wird geladen ...
Seite wird geladen ...
Seite wird geladen ...
Seite wird geladen ...
Seite wird geladen ...
Seite wird geladen ...
Seite wird geladen ...
Seite wird geladen ...
-
 1
1
-
 2
2
-
 3
3
-
 4
4
-
 5
5
-
 6
6
-
 7
7
-
 8
8
-
 9
9
-
 10
10
-
 11
11
-
 12
12
-
 13
13
-
 14
14
-
 15
15
-
 16
16
-
 17
17
-
 18
18
-
 19
19
-
 20
20
-
 21
21
-
 22
22
-
 23
23
-
 24
24
-
 25
25
-
 26
26
-
 27
27
-
 28
28


Zanussi ZGG35214XA Benutzerhandbuch
- Kategorie
- Kochfelder
- Typ
- Benutzerhandbuch
in anderen Sprachen
- English: Zanussi ZGG35214XA User manual
Verwandte Artikel
-
Zanussi ZGG65414XA Benutzerhandbuch
-
Zanussi ZCK65200WA Benutzerhandbuch
-
-
-
Zanussi ZGG96624XA Benutzerhandbuch
-
-
-
Zanussi ZGG35214XA Benutzerhandbuch
-
-