

Planar Systems, Inc.
Corporate Headquarters
1195 NW Compton Drive
Beaverton, OR 97006-1992
Planar Customer Support
Telephone: US: 1-866-PLANAR1 (866) 752-6271 Outside US: (503)
748-5799
E-mail: [email protected]
Online Technical Library: http://www.planar.com/support
Hours: M-F, 8am - 8pm ET, 12pm - 12am GMT
美商平達科技股份有限公司(Planar System, Inc.)
美國總公司
1195 NW Compton Drive
Beaverton, OR 97006-1992, USA
平達科技客戶支援部
電話:美國:1-866-PLANAR1 (866) 752-6271 美國境外:+1 (503) 748-5799
電子郵件信箱:PlanarSupport@planar.com
線上技術總覽:http://www.planar.com/support
查詢時間:週一至週五,東部時間 8am~8pm,格林威治標準時間 12pm~
12am
Planar Systems, Inc.
Corporate Headquarters
1195 NW Compton Drive
Beaverton, OR 97006-1992
Assistance clientèle de Planar
Téléphone: US: 1-866-PLANAR1 (866) 752-6271 Hors des USA: +1 (503)
748-5799
E-mail: [email protected]
Bibliotheque technique en ligne: http://www.planar.com/support
Heures : L-V, 8.00-16.00 ET, 12.00-24.00 GMT
Planar Systems, Inc.
Sede dell'azienda
1195 NW Compton Drive
Beaverton, OR 97006-1992
Planar Assitenza Clienti
Telefono: US: 1-866-PLANAR1 (866) 752-6271 Resto del Mondo: +1 (503)
748-5799
E-mail: PlanarSupport@planar.com
Risorse Tecniche Online: http://www.planar.com/support
Orario: M-F, 8am - 8pm ET, 12pm - 12am GMT
Planar Systems, Inc.
Korporatives Hauptquartier
1195 NW Compton Drive
Beaverton, OR 97006-1992
Kundenunterstützung Planars
Telefon: VS: 1-866-PLANAR1 (866) 752-6271 Außerhalb der Vereinigten
Staaten: +1 (503) 748-5799
E-mail: PlanarSupport@planar.com
Online Technische Bibliothek: http://www.planar.com/support
Stunden: M-F, 8am - 8pm ET, 12pm - 12am GMT
Planar Systems, Inc.
Konsernets hovedkontor
1195 NW Compton Drive Beaverton, OR
97006-1992
Planar kundestøtte
Telephone: USA: 1-866-PLANAR1 (866) 752-6271 Utenfor USA: +1 (503)
748-5799
E-post: [email protected]
Online teknisk bibliotek: http://www.planar.com/support
Timer: M-F, 08 - 20 ET, 12 - 24 GMT
Planar Systems, Inc.
Sede corporativo
1195 NW Compton Drive
Beaverton, OR 97006-1992, USA
Planar Apoyo de cliente
Teléfono: EEUU: 1-866-PLANAR1 (866) 752-6271 Outside US: +1 (503)
748-5799
E-mail: PlanarSupport@planar.com
Biblioteca Técnica Online: http://www.planar.com/support
Horas: M-F, 8am - 8pm ET, 12pm - 12am GMT
Planar Systems, Inc.
Huvudkontor
1195 NW Compton Drive
Beaverton, OR 97006-1992
Planar Kundsupport
Telefon: US: 1-866-PLANAR1 (866) 752-6271 Internationellt: +1 (503)
748-5799
E-post: PlanarSupport@planar.com
On-line tekniska bibliotek: http://www.planar.com/support
Öppet: M-F, 8am - 8pm ET, 12pm - 12am GMT
Planar Systems, Inc.
Cooperar Quartel-general
1195 NW Compton Drive
Beaverton, OR 97006-1992
Suporto Para Cliente do Planar
Telefone : EUA: 1-866-PLANAR1 (866) 752-6271 Fora de EUA: +1 (503)
748-5799
E-mail: PlanarSupport@planar.com
Biblioteca técnica online: http://www.planar.com/support
Horas: M-F, 8am - 8pm ET, 12pm - 12am GMT
Planar Systems, Inc.
Hoofdzetel
1195 NW Compton Drive
Beaverton, OR 97006-1992
Planar klantenondersteuning
Telefoon: VS: 1-866-PLANAR1 (866) 752-6271 Buiten de VS: +1 (503)
748-5799
E-mail: [email protected]
Online technische bibliotheek: http://www.planar.com/support
Openingstijden: ma-vr, 8am - 8pm ET, 12pm - 12am GMT
美国平达系统公司(Planar System, Inc.)
美国总公司
1195 NW Compton Drive
Beaverton, OR 97006-1992, USA
平达系统客户支持部
电话:美国:1-866-PLANAR1 (866) 752-6271 美国境外:+1 (503) 748-5799
电子邮件信箱:PlanarSupport@planar.com
在线技术总览:http://www.planar.com/support
查询时间:周一至周五,东部时间 8am8pm ;格林威治标准时间
12pm12am
Planar Systems, Inc.
КорпоративныйШтаб
1195 NW Compton Drive, USA
Beaverton, OR 97006-1992
Planar ПоддержкаКлиента
Телефон: США: 1-866-PLANAR1 (866) 752-6271 ВнутриСША: +1 (503)
748-5799
E-mail: PlanarSupport@planar.com
ОнлайнТехническаяБиблиотека: http://www.planar.com/support
Часы: M-F, 8am - 8pm ET, 12pm - 12am GMT

The information contained in this document is subject to change without notice.
This document contains proprietary information that is protected by copyright. All
rights are reserved. No part of this document may be reproduced, translated to
another language or stored in a retrieval system, or transmitted by any means,
electronic, mechanical, photocopying, recording, or otherwise, without prior written
permission. Windows is a registered trademark of Microsoft, Inc. Other brand or
product names are trademarks of their respective holders.
Important Recycle Instructions:
Lamp(s) inside this product contain mercury. This product may contain other
electronic waste that can be hazardous if not disposed of properly. Recycle or
dispose in accordance with local, state, or federal Laws. For more information,
contact the Electronic Industries Alliance at WWW.EIAE.ORG
. For lamp specific
disposal information check WWW.LAMPRECYCLE.ORG
.
Register Your Planar Products Today
Thank you for choosing Planar. To assure you receive all the benefits of your Planar
product and services, register your Planar product today. Visit our website to register
your product at
http://www.planar.com/support/product_registration.html
Cables, Replacement Lamps and Accessories
To find cables, replacement lamps and accessories for your Planar projector, LCD
monitor, touchscreen or other Planar products visit our online store at
www.PlanarOnline.com or find other stores who carry Planar products at
http://www.planar.com/howtobuy


—
—
U
U
s
s
e
e
r
r
’
’
s
s
G
G
u
u
i
i
d
d
e
e
—
—
21
C
HECK
P
ARTS
L
IST
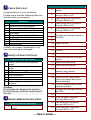
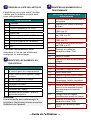
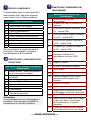
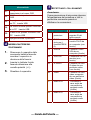
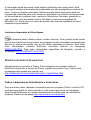
Congratulations on your purchase!
Please check that the following items are
included with your projector.
Parts List
1.
Projector
2.
Remote control with batteries
3.
Computer cable (VGA-VGA)
4.
Power cord
5.
USB cable
6.
Composite cable (RCAx3-RCAx3)
7.
Audio cable (Mini jack-Mini jack)
8.
CD-ROM (user manual)
9.
User’s Guide
10.
Carrying case
Contact your dealer immediately if any
items are missing or damaged.
2
I
DENTIFY
P
ROJECTOR
P
ARTS
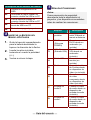
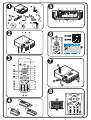
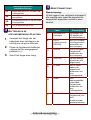
Projector Parts Description
1.
Focus—turn to focus the projected
image
2.
Zoom—turn to enlarge the projected
image
3.
Lamp cover screws
4.
OSD buttons and LEDs
5.
Front IR receiver
6.
Lens
7.
Lens cover
8.
Height adjusters—adjusts level of
projector
Caution:
Overheating can damage the projector.
Do not block any of the air vents around
the unit.
23
I
DENTIFY
R
EMOTE
C
ONTROL
P
ARTS
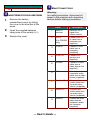
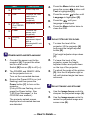
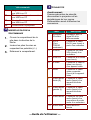
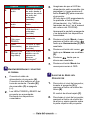
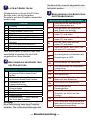
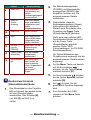
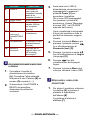
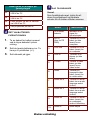
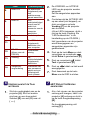
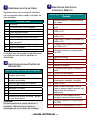
Remote Buttons Description
1.
Lights when the remote control is
used
Remote Buttons Description
2.
Press to operate the on-screen
pointer
3.
Up arrow when connected
through USB to a PC
4.
Right arrow when connected
through USB to a PC
5.
Down arrow when connected
through USB to a PC
6.
Page down when connected
through USB to a PC
7.
8.
9.
Navigate and change settings in
the OSD
10.
Adjust volume
11.
Mutes the built-in speaker
12.
Zoom in
13.
Zoom out
14.
Freeze/unfreeze the on-screen
picture
15.
Make the screen blank
16.
Detect the input device
17.
Auto adjustment for phase,
tracking, size, position
18.
Open the OSD
19.
Open the OSD Status menu
(menu only opens when input
device detected)
20.
Correct image-trapezoid (wider
top/bottom) effect
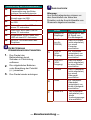
21.
Navigate and change settings in
the OSD
22.
Change settings in the OSD
23.
Page up when connected
through USB to a PC
24.
Left arrow when connected
through USB to a PC
25.
Enter key when connected
through USB to a PC

—
—
U
U
s
s
e
e
r
r
’
’
s
s
G
G
u
u
i
i
d
d
e
e
—
—
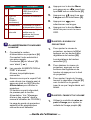
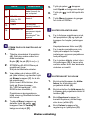
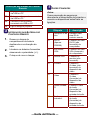
Remote Buttons Description
26.
Turn the projector on or off
4
I
NSERT
R
EMOTE
C
ONTROL
B
ATTERIES
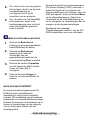
1.
Remove the battery
compartment cover by sliding
the cover in the direction of the
arrow.
2.
Insert the supplied batteries
taking note of the polarity (+/-).
3.
Replace the cover.
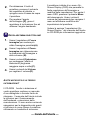
25
M
AKE
C
ONNECTIONS
Warning:
As a safety precaution, disconnect all
power to the projector and connecting
devices before making connections.
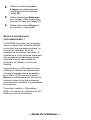
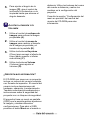
Label Description
1.
Rear IR
receiver
Receiver for IR
signal from
remote control
2.
DVI-D
(For PR5020
only)
Connect the DVI-
D cable from a
computer (not
supplied)
3.
VGA IN
Connect a VGA
cable from a
computer
(supplied)
4.
VGA OUT
Connect to a
monitor (not
supplied)
5.
S-video
Connect S-video
cable from a
video device (not
supplied)
6.
Video
Connect a
composite video
cable from a video
device (supplied)
7.
Audio in-R
Connect the
audio cable from
an audio input
device (supplied)
8.
Audio in-L
Connect the
audio cable from
an audio input
device (supplied)
9.
Audio-in
Connect an audio
cable from the
computer’s audio-
out connector
(supplied)

—
—
U
U
s
s
e
e
r
r
’
’
s
s
G
G
u
u
i
i
d
d
e
e
—
—
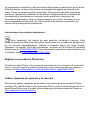
Label Description
10.
Audio-out Audio loop-thru
11.
USB
Connect the USB
cable from a
computer
(supplied)
12.
RS-232
(For PR5020
only)
Installation control
13.
Power
Connect the
power cord
(supplied)
14.
Security
Lock
Secure to
permanent object
with a
Kensington® Lock
system
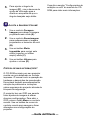
6
P
OWER ON
/
OFF AND
S
ET
L
ANGUAGE
1.
Connect the power cord to the
projector [A] .Connect the other
end to a wall outlet.
Switch [B] from on (O) to off (
Ϋ
)
2.
The POWER and READY LEDs
on the projector turn on.
Turn on the connected devices.
3.
Ensure the Power LED is on (not
flashing) and then press the
Power button [C] to turn on the
projector.
(If any LEDs are flashing, do not
press the Power button. See
“LED Error Messages” in the
CD-ROM user manual.)
The projector splash screen
displays and connected devices
are detected.
4.
Press the Menu button and then
press the cursor
button until
Tool is highlighted [D].
5.
Press the cursor button until
Language is highlighted [D].
6.
Press the until your
language is displayed.
7.
Press the Menu button twice to
close the OSD.
7
A
DJUST
P
ROJECTOR
L
EVEL
1.
To raise the level of the
projector, lift the projector [A]
and press the height-adjuster
button [B].
The height adjuster drops down
[C].
2.
To lower the level of the
projector, press the height-
adjuster button and push down
on the top of the projector.
3.
To adjust the angle of the picture
[D], turn the tilt adjuster right or
left until desired angle has been
achieved.
28
A
DJUST
I
MAGE AND
V
OLUME
1.
Use the Image-focus control to
sharpen the projected image (A).
2.
Use the Image-zoom control to
resize the projected image and
screen size (B).

—
—
U
U
s
s
e
e
r
r
’
’
s
s
G
G
u
u
i
i
d
d
e
e
—
—
3.
Use the Keystone buttons to
correct keystone (wider top or
bottom) effect (C).
4.
Use the Volume buttons to
adjust the volume (D).
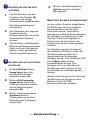
N
EED
M
ORE
I
NFORMATION
?
The CD-ROM that shipped with your
projector features a detailed user manual
in a printer-friendly format. The user
manual includes hardware, operation,
and maintenance descriptions. You will
also find troubleshooting procedures and
instructions on securing the projector by
means of a security lock.
The projector has an On-Screen Display
(OSD) that lets you make image
adjustments and change various settings.
To open the OSD, press the Menu
button on the remote control. Use the
remote control cursor buttons to navigate
and make changes to the projector
settings.
Refer to the “On-Screen Display
Settings” section of the CD-ROM user
manual for more information.

Les informations contenues dans ce document peuvent être modifiées sans
notification préalable. Ce document contient des informations de propriétés qui sont
protégées par droits d’auteur. Tous droits réservés. Aucune partie de ce document
ne peut être reproduite, traduite dans une autre langue ou stockée dans un système
de récupération, ou transmise d’aucune façon, électronique, mécanique, photocopie,
enregistrement, ou autre, sans le consentement préalable par écrit. Windows est
une marque déposée de Microsoft, Inc. Les autres marques ou noms de produits
sont déposés par leurs propriétaires respectifs.
I
MPORTANTES INSTRUCTIONS DE RECYCLAGE
.
La (Les) lampe(s) à l’intérieur de ce produit contien(nen)t du mercure. Ce
produit peut contenir d’autre déchet électronique qui peuvent être dangereux si vous
ne vous en débarrassez pas correctement. Recycler ou jeter en accord avec les lois
locales, d’état, ou fédérales. Pour plus d’information, contacter Electronic Industries
Alliance sur le site WWW.EIAE.ORG
. Pour des informations de recyclage spécifique
de la lampe, consulter WWW.LAMPRECYCLE.ORG
.
Enregistrer votre produit Planar aujourd’hui
Merci de choisir Planar. Pour bénéficier pleinement de votre produit Planar et des
services proposés, enregistrer votre produit Planar aujourd’hui. Visitez notre site
web pour enregistrer votre produit à l’adresse :
HTTP
://
WWW
.
PLANAR
.
COM
/
SUPPORT
/
PRODUCT
_
REGISTRATION
.
HTML
Câbles, Lampes et Accessoires de Remplacement
Pour trouver des câbles, lampes et accessoires de remplacement pour votre
projecteur Planar, écran LCD, touchscreen ou autre produits Planar, visiter notre
magasin en ligne à l’adresse www.PlanarOnline.com ou trouver d’autres magasins
distribuant les produits Planar à l’adresse http://www.planar.com/howtobuy
.


—
—
G
G
u
u
i
i
d
d
e
e
d
d
e
e
l
l
'
'
u
u
t
t
i
i
l
l
i
i
s
s
a
a
t
t
e
e
u
u
r
r
—
—
21
V
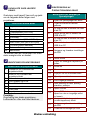
ERIFIER LA LISTE DES ARTICLES
Félicitations pour votre achat! Veuillez
vérifier que les articles suivants sont
avec votre projecteur.
Liste des articles
1.
Projecteur
2.
Télécommande avec piles
3.
Câble d’ordinateur(VGA-VGA)
4.
Cordon d’alimentation
5.
Câble USB
6.
Câble composite (RCAx3-RCAx3)
7.
Câble audio (Mini jack-Mini jack)
8.
CD-ROM (manuel de l’utilisateur)
9.
Guide de l’Utilisateur
10.
Etui
Contactez immédiatement votre
revendeur si l’un de ces articles est
manquant ou endommagé.
2
I
DENTIFIER LES ELEMENTS DU
PROJECTEUR
Description des éléments du projecteur
1.
Mise au point—tourner pour effectuer
la mise au point de l’image projetée.
2.
Zoom—tourner pour agrandir l’image
projetée.
3.
Vis du couvercle de la lampe
4.
Boutons OSD et voyants
5.
Récepteur IR Avant
6.
Objectif
7.
Couvercle de l’objectif
8.
Régulateurs de hauteur—ajuste le
niveau du projecteur
Attention:
Une surchauffe peut endommager le
projecteur. Ne bloquer aucune ouverture
d'aération de l'appareil.
23
I
DENTIFIER LES ELEMENTS DE LA
TELECOMMANDE
Description des boutons de la
télécommande
1.
S’allume quand la télécommande
est utilisée
2.
Appuyer pour utiliser le pointeur
d’écran
3.
Flèche Haut quand connecté par
USB à un PC
4.
Flèche Droite quand connecté
par USB à un PC
5.
Flèche Bas quand connecté par
USB à un PC
6.
Page suivante quand connecté
par USB à un PC
7.
8.
9.
Parcourt et modifie les
paramètres dans l'OSD
10.
Règle le volume
11.
Désactive le son du haut-parleur
intégré
12.
Zoom avant
13.
Zoom arrière
14.
Fige/libère l’image à l’écran
15.
Rend l’écran vide
16.
Détecte le périphérique d’entrée
17.
Réglage auto pour la phase,
l’alignement, la taille, la position
18.
Ouvre l’OSD
19.
Ouvre le menu Etat de l'OSD (le
menu s'ouvre seulement quand
un périphérique d'entrée est
détecté)
20.
Corrige l'effet de trapèze
(haut/bas plus grand) de l'image
21.
Parcourt et modifie les
paramètres dans l'OSD
22.
Modifie les paramètres dans
l’OSD

—
—
G
G
u
u
i
i
d
d
e
e
d
d
e
e
l
l
'
'
u
u
t
t
i
i
l
l
i
i
s
s
a
a
t
t
e
e
u
u
r
r
—
—
Description des boutons de la
télécommande
23.
Page suivante quand connecté
par USB à un PC
24.
Flèche gauche quand connecté
par USB à un PC
25.
Touche Entrée quand connecté
par USB à un PC
26.
Allume/Eteint le projecteur
4
I
NSERER LES PILES DE LA
TELECOMMANDE
1.
Ouvrez le compartiment de la
pile dans la direction de la
flèche.
2.
Insérez les piles fournies en
respectant les polarités (+/-).
3.
Refermez le compartiment.
25
C
ONNECTER
Avertissement:
Comme précaution de sécurité,
déconnectez le projecteur et les
périphériques de leur source
d’alimentation avant d’effectuer les
connexions.
Label Description
1.
Récepteur
IR arrière
Récepteur pour le
signal IR de la
télécommande
2.
DVI-D
(Pour
PR5020
seulement)
Connecter le câble
DVI-D (non fourni) à
partir d’un ordinateur
3.
VGA-IN
Connecter un câble
VGA (fourni) d’un
ordinateur
4.
VGA OUT
Connecter à un écran
(non fourni)
5.
S-video
Connecter le câble S-
video (non fourni)
d’un appareil vidéo
6.
Vidéo
Connecter le câble
vidéo composite
(fourni) d’un appareil
vidéo
7.
Entrée audio
droite (R)
Connecter le câble
audio (fourni) d’un
appareil d’entrée
audio
8.
Entrée audio
gauche (L)
Connecter le câble
audio (fourni) d’un
appareil d’entrée
audio
9.
Entrée audio
Connecter un câble
audio (fourni) d’un
connecteur de sortie
audio d’un ordinateur
10.
Sortie audio
Sortie audio en
boucle

—
—
G
G
u
u
i
i
d
d
e
e
d
d
e
e
l
l
'
'
u
u
t
t
i
i
l
l
i
i
s
s
a
a
t
t
e
e
u
u
r
r
—
—
Label Description
11.
USB
Connecter le câble
USB (fourni) d’un
ordinateur
12.
RS-232
(Pour
PR5020
seulement)
Contrôle d’installation
13.
Alimentation
Connecter le cordon
d’alimentation (fourni)
14.
Verrou de
sécurité
Attacher à un objet
solide avec le
système de Verrou
Kensington®.
6
A
LLUMER
/E
TEINDRE ET CONFIGURER
LA LANGUE
1.
Connectez le cordon
d’alimentation au projecteur [A].
Connectez l’autre extrémité à
une prise murale.
Commutez [B] de ‘allumé’ (O)
vers ‘éteint’ (
Ϋʳ
)
2.
Les voyants ALIMENTATION et
PRÊT s’allument.
Allumez les périphériques
connectés.
3.
Assurez-vous que le voyant Prêt
reste allumé (ne clignote pas) et
appuyez alors sur le [C] bouton
Alimentation pour allumer le
projecteur.
(Si certains voyants clignotent,
ne presses pas le bouton
Alimentation. Voir “Messages
d'erreur des voyants” dans le
manuel d’utilisateur du CD-ROM.)
La page de garde du projecteur
apparaît et les périphériques
connectés sont détectés.
4.
Appuyez sur le bouton Menu
puis appuyez sur jusqu’à ce
que Outil soit en surbrillance [D].
5.
Appuyez sur jusqu’à ce que
Langue soit en surbrillance [D].
6.
Appuyez sur pour
sélectionner une langue.
7.
Appuyez sur le bouton Menu
deux fois pour ouvrir le menu
OSD.
7
A
JUSTER LE NIVEAU DU
PROJECTEUR
1.
Pour ajuster le niveau du
projecteur, soulevez-le [A] et
appuyez sur les boutons des
régulateurs de hauteur [B].
Les régulateurs de hauteur
ressortent [C].
2.
Pour abaisser le niveau du
projecteur, appuyez sur les
boutons des régulateurs de
hauteur et appuyez sur le haut
du projecteur.
3.
Pour ajuster l’angle de l’image,
tourner le régulateur d’angle [D]
vers la droite ou la gauche
jusqu‘à ce que l’angle désiré soit
atteint.
28
A
JUSTER L
’
IMAGE ET LE VOLUME
1.
Utilisez le contrôle de mise au
point d’image pour ajuster la
netteté de l’image projeté (A).

—
—
G
G
u
u
i
i
d
d
e
e
d
d
e
e
l
l
'
'
u
u
t
t
i
i
l
l
i
i
s
s
a
a
t
t
e
e
u
u
r
r
—
—
2.
Utilisez le contrôle de zoom
d’image pour redimensionner
l’image projetée et la taille de
l’écran (B).
3.
Utilisez les boutons Distorsion
pour corriger l’effet de distorsion
(sommet ou base plus large) (C).
4.
Utilisez les boutons Volume +/-
pour ajuster le volume (D).
B
ESOIN D
’
INFORMATIONS
SUPPLEMENTAIRES
?
Le CD-ROM livré avec votre projecteur
inclut un manuel de l’utilisateur détaillé
prévu pour une impression pratique. Le
manuel de l’utilisateur inclut les
descriptions de matériel, opération, et
maintenance. Vous trouverez également
des procédures de dépannage et des
instructions sur la sécurisation du
projecteur en utilisant un verrou de
sécurité.
Le projecteur a un affichage sur écran
(OSD) pour effectuer des ajustements
d’image et changer divers paramètres.
Pour ouvrir l’OSD, pressez le bouton
Menu sur la télécommande. Utilisez les
boutons curseur de la télécommande
pour parcourir et modifier les paramètres
du projecteur.
Consultez la section « Paramètres
OSD » du manuel de l’utilisateur du CD-
ROM pour plus d’informations.

ʳ
La información contenida en este documento está sujeta a cambios sin previo aviso.
Este documento contiene información de propiedad protegida por derechos de
copia. Todos los derechos están reservados. Ninguna parte de este documento
puede ser reproducido, traducido a otro idioma o almacenado en un sistema de
recuperación o transmitido por cualquier medio electrónico, mecánico, de
fotocopiado, grabación u otros, sin previo permiso por escrito. Windows es una
marca registrada de Microsoft, Inc. Otros nombres de marcas o productos son
marcas de sus respectivos propietarios.
Instrucciones de reciclado importantes:
La(s) lámpara(s) del interior de este producto contiene(n) mercurio. Este
producto puede contener otros desechos electrónicos que pueden ser peligrosos si
no se eliminan apropiadamente. Recicle o deseche según las leyes locales,
federales o de estado. Para más información, contacte con la Alianza de Industrias
Electrónicas en WWW.EIAE.ORG
. Para información específica sobre el desecho de
la lámpara, visite WWW.LAMPRECYCLE.ORG
.
Registre sus productos Planar hoy
Gracias por elegir Planar.
Para comprobar que recibe todos los elementos de su producto
planar y servicios, registre su producto planar hoy. Visite nuestro sitio web para registrar su
producto en
http://www.planar.com/support/product_registration.html
Cables, lámparas de repuesto y accesorios
Para buscar cables, lámparas de repuesto y accesorios para su proyector Planar,
monitor LCD, pantalla táctil u otros productos Planar, visite nuestra tienda online en
www.PlanarOnline.com o busque otras tiendas que ofrezcan productos Planar en
http://www.planar.com/howtobuy


ʳ
—
—
G
G
u
u
í
í
a
a
d
d
e
e
l
l
u
u
s
s
u
u
a
a
r
r
i
i
o
o
—
—
21
C
OMPROBACIÓN DE LA
L
ISTA DE
LAS
P
ARTES
ʳ
¡Enhorabuena por su compra! Por favor,
compruebe que los siguientes elementos
están incluidos con su proyector.
Lista de las partes
1.
Proyector
2.
Mando a distancia con baterías
3.
Cable de ordenador (VGA-VGA)
4.
Cable de alimentación
5.
Cable USB
6.
Cable compuesto (RCAx3-RCAx3)
7.
Cable de audio (Mini jack-Mini jack)
8.
CD ROM (manual del usuario)
9.
Guía del usuario
10.
Maletín de transporte
Si falta algún componente o está dañado,
contacte con su distribuidor
inmediatamente.
2
I
DENTIFICAR
P
ARTES DEL
P
ROYECTOR
Descripción de las partes del proyector
1.
Enfoque—girar para enfocar la
imagen proyectada
2.
Zoom—girar para agrandar la imagen
proyectada
3.
Tornillos de la tapa de la lámpara
4.
Botones OSD y LEDs
5.
Receptor IR frontal
6.
Objetivo
7.
Tapa de la lente
8.
Controles de altura—ajusta el nivel
del proyector
Precaución:
El sobrecalentamiento puede dañar el
proyector. No bloquee ninguna de las
ranuras de ventilación en la unidad.
23
I
DENTIFICAR
P
ARTES DEL
M
ANDO
A
D
ISTANCIA
Descripción de los botones del mando
1.
Se enciende cuando se utiliza el
mando a distancia
2.
Presionar para utilizar el puntero
en pantalla
3.
Flecha arriba cuando se conecte a
través de USB a un PC
4.
Flecha derecha cuando se
conecte a través de USB a un PC
5.
Flecha abajo cuando se conecte a
través de USB a un PC
6.
Avance de página cuando se
conecte a través de USB a un PC
7.
8.
9.
Navega y cambia la configuración
en el OSD
10.
Ajusta el volumen
11.
Silencia el altavoz incorporado
12.
Acercar
13.
Alejar
14.
Congela/descongela la imagen en
pantalla
15.
Deja la pantalla vacía
16.
Detecta el dispositivo de entrada
17.
Ajuste automático de la fase,
pista, tamaño y posición
18.
Abre el OSD
19.
Abre el menú de Estado del OSD
(el menú sólo se abre si se
detecta un dispositivo de entrada)
20.
Corrige el efecto de imagen
trapezoidal (parte superior o
inferior más ancha)
21.
Navega y cambia la configuración
en el OSD

ʳ
—
—
G
G
u
u
í
í
a
a
d
d
e
e
l
l
u
u
s
s
u
u
a
a
r
r
i
i
o
o
—
—
Descripción de los botones del mando
22.
Cambia la configuración en el
OSD
23.
Retrocede la página cuando se
conecte a través de USB a un PC
24.
Flecha izquierda cuando se
conecte a través de USB a un PC
25.
Tecla Entrar cuando se conecte a
través de USB a un PC
26.
Enciende o apaga el proyector
4
I
NSERTAR LA
B
ATERÍA DEL
M
ANDO A
D
ISTANCIA
1.
Quite la tapa del compartimiento
para la batería deslizando la
tapa en la dirección de la flecha.
2.
Inserte las pilas incluidas
teniendo en cuenta la polaridad
(+/-).
3.
Vuelva a colocar la tapa.
25
R
EALIZAR
C
ONEXIONES
Aviso:
Como precaución de seguridad,
desconecte toda la alimentación al
proyector y los dispositivos conectados
antes de realizar las conexiones.
Etiqueta Descripción
1.
Receptor IR
posterior
Receptor para la
señal IR desde el
mando a distancia
2.
DVI-D
(Sólo para
PR5020)
Conecte un cable
DVI-D desde un
ordenador (no
incluido)
3.
VGA IN
(Entrada VGA)
Conecte un cable
VGA desde un
ordenador
(incluido)
4.
Salida VGA
Conecte a un
monitor (no
incluido)
5.
S-vídeo
Conecte el cable
de S-vídeo desde
un dispositivo de
vídeo (no incluido)
6.
Vídeo
Conecte un cable
de vídeo
compuesto desde
un dispositivo de
vídeo (incluido)
7.
Entrada de
audio R
Conecte el cable
de audio desde un
dispositivo de
entrada de audio
(incluido).
8.
Entrada de
audio L
Conecte el cable
de audio desde un
dispositivo de
entrada de audio
(incluido).

ʳ
—
—
G
G
u
u
í
í
a
a
d
d
e
e
l
l
u
u
s
s
u
u
a
a
r
r
i
i
o
o
—
—
Etiqueta Descripción
9.
Entrada de
audio
Conecte un cable
de audio desde el
conector de salida
de audio del
ordenador
(incluido).
10.
Salida de
audio
Conexión del
audio
11.
USB
Conecte el cable
USB desde un
ordenador
(incluido)
12.
RS -232
(Sólo para
PR5020)
Control de
instalación
13.
Power
(Alimentación)
Conecte el cable
de alimentación
(incluido)
14.
Security Lock
(Bloqueo de
seguridad)
Fíjelo a un objeto
estático con un
sistema de
bloqueo
Kensington
®
6
E
NCENDER
/A
PAGAR Y
A
JUSTAR
EL
I
DIOMA
1.
Conecte el cable de
alimentación al proyector [A].
Conecte el otro extremo en una
toma de corriente. Cambie [B]
de encendido (O) a apagado
(—)
2.
Los LEDs POWER y READY del
proyector se encenderán.
Encienda los dispositivos
conectados.
3.
Asegúrese de que el LED de
alimentación esté encendido (sin
parpadear) y luego presione el
botón Power [C] para encender
el proyector.
(Si hay algún LED parpadeando,
no presione el botón Power
(Alimentación). Ver “LEDs de
mensajes de error” en el manual
del usuario del CD-ROM).
Aparecerá la pantalla emergente
y se detectarán los dispositivos
conectados.
4.
Presione el botón Menú y luego
presione el botón del cursor
hasta que Herramientas [D] sea
resaltado.
5.
Presione el botón del cursor
hasta que Idioma sea resaltado
[D].
6.
Presione hasta que su
idioma sea resaltado.
7.
Presione el botón Menú dos
veces para cerrar el OSD.
7
A
JUSTAR EL
N
IVEL DEL
P
ROYECTOR
1.
Para subir el nivel del proyector,
levante el proyector [A] y
presione el botón de control de
altura [B].
El control de altura bajará [C].
2.
Para bajar el nivel del proyector,
presione el botón de control de
de altura y ejerza presión sobre
la parte superior del proyector.

ʳ
—
—
G
G
u
u
í
í
a
a
d
d
e
e
l
l
u
u
s
s
u
u
a
a
r
r
i
i
o
o
—
—
3.
Para ajustar el ángulo de la
imagen [D], gire el control de
inclinación a la derecha o a la
izquierda hasta que alcance el
ángulo deseado.
28
A
JUSTAR LA
I
MAGEN Y EL
V
OLUMEN
1.
Utilice el control de enfoque de
imagen para enfocar la imagen
proyectada (A).
2.
Utilice el control de zoom de
imagen para cambiar el tamaño
de la imagen proyectada y el
tamaño de la pantalla (B).
3.
Utilice los botones Keystone
(Clave) para corregir el efecto de
clave (parte superior o inferior
más ancha) (C).
4.
Utilice los botones Volume
(Volumen) para ajustar el
volumen (D).
¿N
ECESITA MÁS INFORMACIÓN
?
El CD-ROM que viene con su proyector
incluye un manual del usuario completo
con formato de impresión. El manual del
usuario incluye descripciones del
hardware, operación y mantenimiento.
También encontrará procedimientos e
instrucciones sobre la seguridad del
proyector con un bloqueo de seguridad.
El proyector tiene un menú en pantalla
(OSD) que le permite realizar ajustes en
la imagen y cambiar diferentes
configuraciones. Para abrir el OSD,
presione el botón Menú en el mando a
distancia. Utilice los botones del cursor
del mando a distancia y realice los
cambios en la configuración del
proyector.
Consulte la sección “Configuración del
menú en pantalla” del manual del
usuario del CD-ROM para más
información.
Seite wird geladen ...
Seite wird geladen ...
Seite wird geladen ...
Seite wird geladen ...
Seite wird geladen ...
Seite wird geladen ...
Seite wird geladen ...
Seite wird geladen ...
Seite wird geladen ...
Seite wird geladen ...
Seite wird geladen ...
Seite wird geladen ...
Seite wird geladen ...
Seite wird geladen ...
Seite wird geladen ...
Seite wird geladen ...
Seite wird geladen ...
Seite wird geladen ...
Seite wird geladen ...
Seite wird geladen ...
Seite wird geladen ...
Seite wird geladen ...
Seite wird geladen ...
Seite wird geladen ...
Seite wird geladen ...
Seite wird geladen ...
Seite wird geladen ...
Seite wird geladen ...
Seite wird geladen ...
Seite wird geladen ...
Seite wird geladen ...
-
 1
1
-
 2
2
-
 3
3
-
 4
4
-
 5
5
-
 6
6
-
 7
7
-
 8
8
-
 9
9
-
 10
10
-
 11
11
-
 12
12
-
 13
13
-
 14
14
-
 15
15
-
 16
16
-
 17
17
-
 18
18
-
 19
19
-
 20
20
-
 21
21
-
 22
22
-
 23
23
-
 24
24
-
 25
25
-
 26
26
-
 27
27
-
 28
28
-
 29
29
-
 30
30
-
 31
31
-
 32
32
-
 33
33
-
 34
34
-
 35
35
-
 36
36
-
 37
37
-
 38
38
-
 39
39
-
 40
40
-
 41
41
-
 42
42
-
 43
43
-
 44
44
-
 45
45
-
 46
46
-
 47
47
-
 48
48
-
 49
49
-
 50
50
-
 51
51


Planar PR5020 Schnellstartanleitung
- Typ
- Schnellstartanleitung
in anderen Sprachen
- français: Planar PR5020 Guide de démarrage rapide
- español: Planar PR5020 Guía de inicio rápido
- italiano: Planar PR5020 Guida Rapida
- Nederlands: Planar PR5020 Snelstartgids
- português: Planar PR5020 Guia rápido