Amazon basics B000S6N026 Benutzerhandbuch
- Kategorie
- Aktenvernichter
- Typ
- Benutzerhandbuch
Dieses Handbuch eignet sich auch für

B000S6N026
B000S6I9BI

2
English (UK) ........................3
Français ........................... 15
Deutsch ........................... 27
Italiano.............................. 39
Español ........................... 51

3
Instruction Manual • English (UK)
AmazonBasics 8-Sheet Micro-Cut Paper/CD/Credit
Card Shredder with pullout basket
Features
• Feed opening for shredding up to 8 sheets of paper at once
• Slot for destroying credit cards
• Slot for shredding CDs and DVDs
Customer Service - 0800 496 1081

4
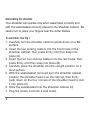
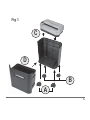
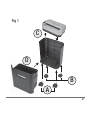
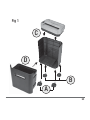
Assembling the shredder
Your shredder will operate only when assembled correctly and
with the wastebasket correctly placed in the shredder cabinet. Be
careful not to place your ngers near the cutter blades.
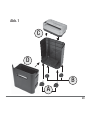
To assemble: See Fig 1
1. Carefully turn the shredder cabinet upside down on a at
surface.
2. Insert the two locking casters into the front holes of the
shredder cabinet, then press rmly until they snap into
place (A).
3. Insert the two non-locking casters into the rear holes, then
press rmly until they snap into place (B) .
4. Carefully place the shredder into the upright position on a
level surface.
5. With the wastebasket removed from the shredder cabinet,
position the shredder head over the cabinet, then rmly
push down on the four corners of the shredder head to lock
it into place (C) .
6. Slide the wastebasket into the shredder cabinet (D).
7. Plug the power cord into a wall outlet.

5
Fig 1
A
B
D
C

6
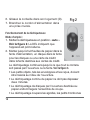
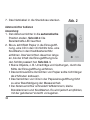
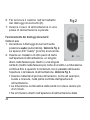
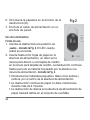
Operating the shredder
To use:
1. Turn the shredder to the auto position. See
Fig 2. The ready LED lights.
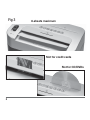
2. Insert up to eight pieces of paper into the
feed opening, one disc into the disc slot, or
one credit card into the credit card slot.
Shredding continues until the contents have
passed through the feed opening or slot.
See Fig 3.
• Insert small materials, such as envelopes
and receipts, through the middle of the
feeding opening.
• Continuous shredding of paper should not exceed 2
minutes.
• Shredding discs in the paper feed opening will damage the
cutter assembly.
• The shredder will cut staples, small paper clips, and credit
cards. Proper discretion is advised.
• In the event of a paper jam, slide the switch to rev. See
“Paper Jams and Motor Overloads” on page 9 for more
information.
Fig 2

7
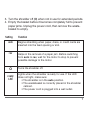
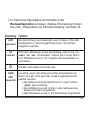
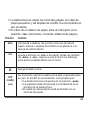
Setting
Function
auto
rev
O
ready
LED
Begins shredding when paper, discs, or credit cards are
inserted into the feed opening or slot.
Helps in the removal of a paper jam. Before switching
from auto to rev, wait for the motor to stop to prevent
possible damage to the motor.
Turns the shredder off.
Lights when the shredder is ready for use. If the LED
does not light, make sure:
• The shredder is in the auto position.
• The wastebasket is correctly placed in the shredder
cabinet.
• The power cord is plugged into a wall outlet.
3. Turn the shredder off (O) when not in use for extended periods.
4. Empty the basket before it becomes completely full to prevent
paper jams. Unplug the power cord, then remove the waste-
basket to empty.

8
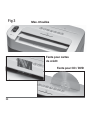
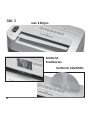
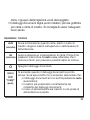
Fig 3
8-sheets maximum
Slot for credit cards
Slot for CD/DVDs

9
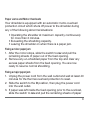
Paper Jams and Motor Overloads
Your shredder is equipped with an automatic motor-overload
protection circuit which shuts off power to the shredder during
any of the following abnormal situations:
• Operating the shredder at maximum capacity continuously
for more than 2 minutes.
• Exceeding the shredding capacity.
• Leaving the shredder on when there is a paper jam.
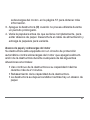
Fixing a minor paper jam
1. After the motor stops, slide the switch to rev and pull the
remaining sheets of paper out of the feed opening.
2. Remove any un-shredded paper from the top and clear any
excess paper shreds from the feed opening. You are now
ready to resume normal shredding.
Fixing a major paper jam
1. Unplug the power cord from the wall outlet and wait at least 40
minutes for the thermal-overload protection to reset.
2. Slide the switch to the O position, then plug the power cord
into the wall outlet.
3. If paper was left inside the feed opening prior to the overload,
slide the switch to rev and pull the remaining sheets of paper

10
out of the feed opening. Remove any un-shredded paper from
the top and clear any excess paper shreds from the feed
opening. You are now ready to resume normal shredding.

11
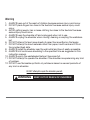
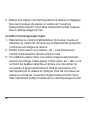
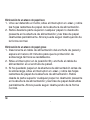
Warning
1. ALWAYS keep out of the reach of children because serious injury could occur.
2. DO NOT place ngers too close to the feed slot because serious injury could
occur.
3. AVOID getting jewelry, hair or loose clothing too close to the feed slot because
serious injury could occur.
4. ALWAYS keep the shredder off and unplugged when not in use.
5. ALWAYS unplug the shredder when moving, cleaning or empting the wastebas-
ket.
6. DO NOT attempt to feed more sheets of paper than specied on the feeder.
7. DO NOT attempt to shred materials other than paper, credit cards and CD’s in
the provided feed slots.
8. ALWAYS install the shredder near the wall-outlet and have it easily accessible.
9. ALWAYS limit continuous shredding to the specied time as suggested in this
instruction manual.
10. ALWAYS empty the wastebasket before it becomes full.
11. DO NOT attempt to operate the shredder if the shredder is experiencing any kind
of problem.
12. DO NOT use ammable synthetic oil, petroleum-based or aerosol products of
any kind on shredder.
DO NOT attempt to repair the shredder yourself.
WARNING
!
KEEP OUT OF REACH OF CHILDREN

12
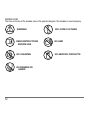
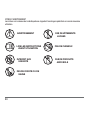
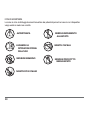
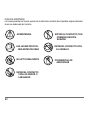
WARNING ICONS
The icons on the top of the shredder warn of the potential dangers if the shredder is used improperly.
WARNING
READ INSTRUCTIONS
BEFORE USE
NO CHILDREN
NO FINGERS OR
HANDS
NO LOOSE CLOTHING
NO HAIR
NO AEROSOL PRODUCTS

13
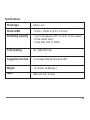
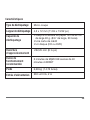
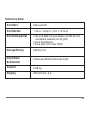
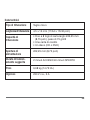
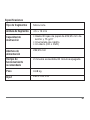
Shred type
Shred width
Shredding Capacity
Feed opening
Suggested run time
Weight
Input
Micro-cut
11/64 x 15/32 in (4.5 x 12 mm)
• Up to 8 sheets of 8
¾
"w 20 lb. bond paper
• One credit card
• One disc (CD or DVD)
8
¾
" (222.25 mm)
2 minutes ON/40 minutes OFF
14.72 lbs. (6.68 kgs.)
230 volt AC, 2 amp
Specications

Made in China
© 2012 Amazon.com, Inc. or its afliates. All Rights reserved. Amazon and the AmazonBasics
logo are trademarks of Amazon.com, Inc. or its afliates.
RoHS
WEEE
Regulatory Information: Disposal of Waste Electrical and Electronic Equipment (WEEE)
The Waste Electrical and Electronic Equipment (WEEE) Directive aims to minimize the impact of electrical and electronic
goods on the environment, by increasing re-use and recycling and by reducing the amount of WEEE going to landll. The
symbol on this product or its packaging signies that this product must be disposed separately from ordinary household
wastes at its end of life. Be aware that this is your responsibility to dispose of electronic equipment at recycling centers in
order to help conserve natural resources.
Each country should have its collection centers for electrical and electronic equipment recycling. For information about
your recycling drop o area, please contact your related electrical and electronic equipment waste management
authority, your local city oce, or your household waste disposal service.
14

15
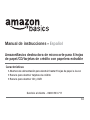
Manuel d’instructions • Français
Déchiqueteuse avec corbeille pour 8 feuilles de papier /
cartes de crédit / CD d’AmazonBasics
Service à la clientèle - 08 00 94 77 15
Fonctions
• Ouverture d’alimentation pour le déchiquetage d’un maximum de 8
feuilles de papier
• Fente pour la destruction des cartes de crédit
• Fente pour la destruction de CD et de DVD

16
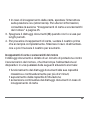
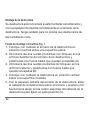
Montage de la déchiqueteuse
Votre déchiqueteuse ne fonctionnera que si elle est assemblée
correctement et si la corbeille est correctement en place dans son
logement. Attention à ne pas mettre les doigts à proximité des
lames coupantes.
Pour le montage: voir la gure 1
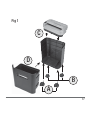
1. En usant de précautions, retournez la déchiqueteuse et
placez-la sur une surface plane et horizontale.
2. Insérez les deux roulettes à blocage dans les trous avant du
corps de la déchiqueteuse, puis appuyez fermement
jusqu'à ce qu'elles s'enclenchent en place (A).
3. Insérez les deux roulettes sans blocage dans les trous
arrière, puis appuyez fermement jusqu'à ce qu'elles
s'enclenchent en place (B).
4. En usant de précautions, posez la déchiqueteuse à l'endroit
sur une surface plane et horizontale.
5. La corbeille étant retirée de son logement, positionnez la
tête de la déchiqueteuse au-dessus du coffret, puis
appuyez fermement sur les quatre coins de la tête pour la
verrouiller en place (C).

17
Fig 1
A
B
D
C

18
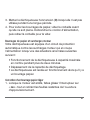
6. Glissez la corbeille dans son logement (D).
7. Branchez le cordon d'alimentation dans
une prise murale.
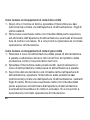
Fonctionnement de la déchiqueteuse
Mode d’emploi:
1. Mettez la déchiqueteuse en position «auto».
Voir la figure 2. La DEL indiquant que
l’appareil est prêt s'allume.
2. Mettez jusqu'à huit feuilles de papier dans la
fente d’alimentation, un disque dans la fente
pour les disques ou une carte de crédit
dans la fente destinée aux cartes de crédit.
Le déchiquetage continuera jusqu'à ce que tout le contenu
soit passé par l'ouverture ou la fente. Voir la gure 3.
• Les petits objets, tels les enveloppes et les reçus, doivent
être insérés au milieu de l'ouverture.
• Le déchiquetage continu de papier ne doit pas dépasser
deux minutes.
• Le déchiquetage de disques par l'ouverture destinée au
papier endommagera l'ensemble de coupe.
• Le déchiquetage coupera les agrafes, les petits trombones
Fig 2

19
Réglages
Fonction
auto
rev
O
ready
LED
(DEL
indiquant
que
l’appareil
est prêt)
Débute le déchiquetage dès que du papier, des disques
ou des cartes de crédit sont insérés dans l'ouverture ou
la fente.
Aide à corriger un bourrage de papier. Avant de basculer
de «auto» à «rev», attendez que le moteur s'arrête
pour éviter tout dommage éventuel à celui-ci.
Met la déchiqueteuse hors tension.
S'allume lorsque la déchiqueteuse est prête à être
utilisée. Si la DEL ne s'allume pas, assurez-vous que:
• La déchiqueteuse est en position auto.
• La corbeille est correctement en place dans son
logement.
• Le cordon d'alimentation est branché dans une
prise murale.
et les cartes de crédit. User de bon sens lors de l’utilisation
de l’appareil.
• En cas de bourrage papier, glissez l'interrupteur en position
«rev ». Voir «Bourrages de papier et surcharges moteur» à
la page 21 pour plus d'informations.

20
Fig 3
Max. 8 feuilles
Fente pour cartes
de crédit
Fente pour CD/ DVD
Seite wird geladen ...
Seite wird geladen ...
Seite wird geladen ...
Seite wird geladen ...
Seite wird geladen ...
Seite wird geladen ...
Seite wird geladen ...
Seite wird geladen ...
Seite wird geladen ...
Seite wird geladen ...
Seite wird geladen ...
Seite wird geladen ...
Seite wird geladen ...
Seite wird geladen ...
Seite wird geladen ...
Seite wird geladen ...
Seite wird geladen ...
Seite wird geladen ...
Seite wird geladen ...
Seite wird geladen ...
Seite wird geladen ...
Seite wird geladen ...
Seite wird geladen ...
Seite wird geladen ...
Seite wird geladen ...
Seite wird geladen ...
Seite wird geladen ...
Seite wird geladen ...
Seite wird geladen ...
Seite wird geladen ...
Seite wird geladen ...
Seite wird geladen ...
Seite wird geladen ...
Seite wird geladen ...
Seite wird geladen ...
Seite wird geladen ...
Seite wird geladen ...
Seite wird geladen ...
Seite wird geladen ...
Seite wird geladen ...
Seite wird geladen ...
Seite wird geladen ...
Seite wird geladen ...
Seite wird geladen ...
-
 1
1
-
 2
2
-
 3
3
-
 4
4
-
 5
5
-
 6
6
-
 7
7
-
 8
8
-
 9
9
-
 10
10
-
 11
11
-
 12
12
-
 13
13
-
 14
14
-
 15
15
-
 16
16
-
 17
17
-
 18
18
-
 19
19
-
 20
20
-
 21
21
-
 22
22
-
 23
23
-
 24
24
-
 25
25
-
 26
26
-
 27
27
-
 28
28
-
 29
29
-
 30
30
-
 31
31
-
 32
32
-
 33
33
-
 34
34
-
 35
35
-
 36
36
-
 37
37
-
 38
38
-
 39
39
-
 40
40
-
 41
41
-
 42
42
-
 43
43
-
 44
44
-
 45
45
-
 46
46
-
 47
47
-
 48
48
-
 49
49
-
 50
50
-
 51
51
-
 52
52
-
 53
53
-
 54
54
-
 55
55
-
 56
56
-
 57
57
-
 58
58
-
 59
59
-
 60
60
-
 61
61
-
 62
62
-
 63
63
-
 64
64


Amazon basics B000S6N026 Benutzerhandbuch
- Kategorie
- Aktenvernichter
- Typ
- Benutzerhandbuch
- Dieses Handbuch eignet sich auch für
in anderen Sprachen
- English: Amazon basics B000S6N026 User manual
- français: Amazon basics B000S6N026 Manuel utilisateur
- español: Amazon basics B000S6N026 Manual de usuario
- italiano: Amazon basics B000S6N026 Manuale utente
Verwandte Artikel
Andere Dokumente
-
Swordfish 1000XC Bedienungsanleitung
-
Swordfish 1500XCD Bedienungsanleitung
-
Swordfish 1600XCD Bedienungsanleitung
-
Swordfish 1000XCD Bedienungsanleitung
-
Swordfish 1100XCD Bedienungsanleitung
-
Swordfish 800XXC Bedienungsanleitung
-
Rebel URZ0986 Benutzerhandbuch
-
Swordfish 800XC Bedienungsanleitung
-
Swordfish 1200XXCD Bedienungsanleitung
-
Geha S7 CD Bedienungsanleitung