
INSECT SCREEN
Introduction
We congratulate you on the purchase of your new product. You have chosen
a high quality product. Familiarise yourself with the product before using it for
the fi rst time. In addition, please carefully refer to the operating instructions and
the safety advice below. Only use the product as instructed and only for the
indicated fi eld of application. Keep these instructions in a safe place. If you
pass the product on to anyone else, please ensure that you also pass on all the
documentation with it.
Intended use
This product is intended to protect against insects. This product is not intended
for commercial use. This product is intended for household use only.
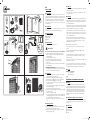
Parts description
[A] Hook tape
[B] Hook-and-loop tape
[C] Polyester fabric
[D] Brush tool
Technical data
Max. installation dimensions: 130x150cm
Safety advice
KEEP ALL SAFETY NOTES AND INSTRUCTIONS FOR FUTURE REFERENCE!
Make sure that all parts are undamaged and correctly assembled.
Improper assembly may result in injury. Damaged parts can impact the
safety and functionality.
Do not hang anything to the product.
Keep the product away from open fl ames and sharp objects.
Remove the product from the window in extreme weather (e.g.
thunderstorms).
For the best possible protection, regularly check the product for damages
(e.g. fabric damage).
mWARNING! DANGER TO LIFE! Do not lean too far out the window
when installing, removing or cleaning the product. Only install on windows
which can be accessed from outside without danger.
Installation
1. Clean the surface (e.g. remove grease) on which you wish to apply the
product with a damp cloth. Then dry the surface.
2. Remove the protective fi lm from the back of the hook tape[A].
Firmly press the hook tape [A] onto the 4sides of the cleaned surface.
3. Apply the hook-and-loop tape[B] onto the hook tape[A].
Keep the hook-and-loop tape 2cm longer at the bottom, so you can use the
excess tape as a handle.
4. Cut out a piece of the polyester fabric[C] with an area larger than that of
the hook-and-loop tape[B].
Apply the polyester fabric onto the hook-and-loop tape.
5. Firmly press the polyester fabric[C] fi rmly onto the hook-and-loop tape[B]
using the brush tool[D].
6. Cut off the excess polyester fabric[C].
7. Use a stapler (not included) to staple the hook-and-loop tape[B] and the
polyester fabric[C] together on all 4corners. In this way, the product looks
more tidy and it is easier to open and close the screen.
Use the excess hook-and-loop tape at the bottom to open and close the
screen.
Cleaning and care
Never use corrosive or abrasive cleaners.
Regularly thoroughly clean the fabric and frame using a lint-free, slightly
damp cloth. Use a mild cleaning agent if necessary.
To keep the polyester fabric[C] in place, regularly press it against the
surface using the brush tool[D].
Disposal
The packaging is made entirely of recyclable materials, which you may dispose
of at local recycling facilities.
Contact your local refuse disposal authority for more details of how to dispose
of your worn-out product.
Warranty
The product has been manufactured to strict quality guidelines and meticulously
examined before delivery. In the event of product defects you have legal rights
against the retailer of this product. Your legal rights are not limited in any way
by our warranty detailed below.
The warranty for this product is 3 years from the date of purchase. The warranty
period begins on the date of purchase. Please keep the original sales receipt in
a safe location. This document is required as your proof of purchase.
Should this product show any fault in materials or manufacture within 3 years
from the date of purchase, we will repair or replace it – at our choice – free of
charge to you. This warranty becomes void if the product has been damaged,
or used or maintained improperly.
The warranty applies to defects in material or manufacture. This warranty
does not cover product parts subject to normal wear, thus possibly considered
consumables (e.g. batteries) or for damage to fragile parts, e.g. switches,
rechargeable batteries or glass parts.
Warranty claim procedure
To ensure quick processing of your case, please observe the following
instructions:
Please have the till receipt and the item number (IAN 400851_2107)
available as proof of purchase.
You will fi nd the item number on the rating plate, an engraving, on the front
page of the instructions for use (bottom left), or as a sticker on the rear or
bottom of the product.
If functional or other defects occur, please contact the service department listed
either by telephone or by e-mail.
You can return a defective product to us free of charge to the service address
that will be provided to you. Ensure that you enclose the proof of purchase (till
receipt) and information about what the defect is and when it occurred.
Service
Service Great Britain
Tel.: 08000569216
MOSKITIERA DO OTWIERANIA I ZAMYKANIA
Wstęp
Gratulujemy Państwu zakupu nowego produktu. Zdecydowali się Państwo
na zakup produktu najwyższej jakości. Przed uruchomieniem urządzenia po
raz pierwszy zapoznaj się z nim. W tym celu przeczytaj uważnie poniższą
instrukcję obsługi oraz wskazówki dotyczące bezpieczeństwa. Produkt
należy użytkować w sposób tu opisany i zgodnie z określonym zakresem
zastosowania. Należy przechowywać tę instrukcję w bezpiecznym miejscu.
Przekazując produkt innej osobie, należy również przekazać wszystkie
dokumenty.
Użytkowanie zgodne z przeznaczeniem
Ten produkt służy do ochrony przed owadami. Produkt nie jest przeznaczony
do użytku komercyjnego. Ten produkt jest przeznaczony wyłącznie do użytku
domowego.
Opis części
[A] Taśma haczykowa
[B] Taśma z rzepem
[C] Tkanina poliestrowa
[D] Pędzel
2cm
3.2.
1.
[D]
[C]
4.
6.
5.
4x
7.
[D]
[C]
[B]
[A]
[A]
400851_2107_PL_01.indd 1400851_2107_PL_01.indd 1 21/06/2022 4:56:03 pm21/06/2022 4:56:03 pm

Dane techniczne
Maks. wymiary montażowe: 130x150cm
Instrukcje bezpieczeństwa
WSZYSTKIE INSTRUKCJE BEZPIECZEŃSTWA I UŻYTKOWANIA
ZACHOWAĆ DO WYKORZYSTANIA W PRZYSZŁOŚCI!
Upewnić się, czy wszystkie części są nieuszkodzone i prawidłowo
zmontowane. Niewłaściwy montaż może prowadzić do obrażeń.
Uszkodzone części mogą mieć wpływ na bezpieczeństwo i funkcjonalność.
Nie wieszać niczego na produkcie.
Produkt trzymać z dala od otwartego ognia i ostrych przedmiotów.
W ekstremalnych warunkach pogodowych (np. burza) produkt należy
wyjąć z okna.
W celu zapewnienia najlepszej możliwej ochrony produkt należy regularnie
sprawdzać pod kątem uszkodzeń (np. uszkodzenia tkaniny).
m OSTRZEŻENIE! ZAGROŻENIE ŻYCIA! Podczas montażu, demontażu
lub czyszczenia produktu nie wychylać się zbyt daleko przez okno. Produkt
należy montować tylko w oknach, do których można bezpiecznie dotrzeć
z zewnątrz.
Montaż
1. Za pomocą wilgotnej szmatki wyczyścić powierzchnię (np. odtłuścić), do
której produkt ma być przymocowany. Następnie powierzchnię osuszyć.
2. Z tylnej części taśmy haczykowej [A] usunąć folię ochronną.
Taśmę haczykową [A] docisnąć mocno do 4stron oczyszczonej
powierzchni.
3. Taśmę z rzepem [B] przymocować do taśmy haczykowej [A].
Na dole taśmę haczykową pozostawić dłuższą o 2cm, aby wystającą
taśmę można było wykorzystać jako uchwyt.
4. Tkaninę poliestrową [C] przyciąć tak, aby jej powierzchnia była większa niż
taśma z rzepem [B].
Tkaninę poliestrową przymocować do taśmy z rzepem.
5. Tkaninę poliestrową [C] mocno docisnąć do taśmy z rzepem [B] za pomocą
pędzla [D].
6. Nadmiar tkaniny poliestrowej [C] odciąć.
7. Użyć zszywacza (brak w zestawie), aby taśmę z rzepem [B] i tkaninę
poliestrową [C] skleić we wszystkich 4rogach. W takim przypadku produkt
będzie wyglądał ładniej i łatwiej będzie się otwierać i zamykać siatkę.
Wystającej na dole taśmy z rzepem używać do otwierania i zamykania
siatki.
Czyszczenie i konserwacja
Nigdy nie używać żrących lub ściernych środków czyszczących.
Tkaninę i ramę czyścić regularnie i dokładnie niestrzępiącą się, lekko
zwilżoną ściereczką. W razie potrzeby używać łagodnego detergentu.
Aby utrzymywać tkaninę poliestrową [C] na miejscu, należy regularnie
dociskać ją do powierzchni za pomocą pędzla [D].
Utylizacja
Opakowanie wykonane jest z materiałów przyjaznych dla środowiska, które
można przekazać do utylizacji w lokalnym punkcie przetwarzania surowców
wtórnych.
Informacji na temat możliwości utylizacji wyeksploatowanego produktu udziela
urząd gminy lub miasta.
Gwarancja
Produkt wyprodukowano według wysokich standardów jakości i poddano
skrupulatnej kontroli przed wysyłką. W przypadku wad produktu nabywcy
przysługują ustawowe prawa. Gwarancja nie ogranicza ustawowych praw
nabywcy produktu.
Produkt objęte jest 3 gwarancją, licząc od daty zakupu. Gwarancja wygasa w
razie zawinionego przez użytkownika uszkodzenia produktu, niewłaściwego
użycia lub konserwacji.
W przypadku wystąpienia w ciągu 3 lat od daty zakupu wad materiałowych
lub fabrycznych, dokonujemy – według własnej oceny – bezpłatnej naprawy
lub wymiany produktu.
Świadczenie gwarancyjne obejmuje wady materiałowe i fabryczne. Gwarancja
nie obejmuje części produktu ulegających normalnemu zużyciu, uznawanych
za części zużywalne (np. baterie) oraz uszkodzeń części łamliwych,
np. przełączników, akumulatorów lub wykonanych ze szkła.
Zgodnie z Kodeksem Cywilnym art. 581 §1 wraz z wymianą urządzenia lub
ważnej części czas gwarancji rozpoczyna się na nowo.
Sposób postępowania w przypadku naprawy
gwarancyjnej
Aby zapewnić szybkie rozpatrzenie Państwa wniosku, prosimy stosować się do
następujących wskazówek:
Przed skontaktowaniem się z działem serwisowym należy przygotować
paragon i numer artykułu (IAN 400851_2107) jako dowód zakupu.
Numery artykułów można znaleźć na tabliczce znamionowe, na grawerunku,
na stronie tytułowej jego instrukcji (na dole po lewej stronie) lub jako naklejkę
na stronie odwrotnej lub spodniej.
W razie wystąpienia błędów w działaniu lub innych wad, należy skontaktować
się najpierw z wymienionym poniżej działem serwisowym telefonicznie lub
pocztą elektroniczną.
Produkt uznany za uszkodzony można następnie z dołączeniem dowodu
zakupu (paragonu) i podaniem, na czym polega wada i kiedy wystąpiła,
przesłać bezpłatnie na podany Państwu adres serwisu.
Serwis
Serwis Polska
Tel.: 008004911946
FLIEGENGITTER ZUM ÖFFNEN UND SCHLIESSEN
Einleitung
Wir beglückwünschen Sie zum Kauf Ihres neuen Produkts. Sie haben sich
damit für ein hochwertiges Produkt entschieden. Machen Sie sich vor der ersten
Inbetriebnahme mit dem Produkt vertraut. Lesen Sie hierzu aufmerksam die
nachfolgende Bedienungsanleitung und die Sicherheitshinweise. Benutzen Sie
das Produkt nur wie beschrieben und für die angegebenen Einsatzbereiche.
Bewahren Sie diese Anleitung an einem sicheren Ort auf. Händigen Sie alle
Unterlagen bei Weitergabe des Produktes an Dritte mit aus.
Bestimmungsgemäße Verwendung
Dieses Produkt dient zum Schutz vor Insekten. Dieses Produkt ist nicht für
den gewerblichen Einsatz bestimmt. Dieses Produkt ist nur für den häuslichen
Gebrauch vorgesehen.
Teilebeschreibung
[A] Hakenband
[B] Klettband
[C] Polyesterstoff
[D] Bürstenwerkzeug
Technische Daten
Max. Montageabmessungen: 130x150cm
Sicherheitshinweise
BEWAHREN SIE ALLE SICHERHEITS- UND GEBRAUCHSHINWEISE ZUM
SPÄTEREN NACHSCHLAGEN AUF!
Stellen Sie sicher, dass alle Teile unbeschädigt und korrekt montiert sind.
Eine unsachgemäße Montage kann zu Verletzungen führen. Beschädigte
Teile können die Sicherheit und Funktionalität beeinträchtigen.
Hängen Sie nichts am Produkt auf.
Halten Sie das Produkt von offenen Flammen und scharfkantigen Objekten
fern.
Entfernen Sie das Produkt bei extremem Wetter (z.B. Gewitter) aus dem
Fenster.
Überprüfen Sie das Produkt für einen bestmöglichen Schutz regelmäßig auf
Schäden (z.B. Stoffschäden).
m WARNUNG! LEBENSGEFAHR! Lehnen Sie sich nicht zu weit aus
dem Fenster, wenn Sie das Produkt montieren, entnehmen oder reinigen.
Montieren Sie das Produkt nur an Fenstern, die von außen ohne Gefahr
erreichbar sind.
Montage
1. Reinigen Sie die Oberfläche (z.B. Fett entfernen), auf der Sie das Produkt
montieren wollen, mit einem feuchten Tuch. Trocknen Sie danach die
Oberfläche ab.
2. Entfernen Sie die Schutzfolie von der Rückseite des Hakenbands[A].
Drücken Sie das Hakenband fest [A] auf die 4Seiten der gereinigten
Oberfläche.
3. Bringen Sie das Klettband[B] auf dem Hakenband[A] an.
Lassen Sie das Hakenband unten 2cm länger, damit Sie das überstehende
Band als Griff verwenden können.
4. Schneiden Sie den Polyesterstoff[C] so zurecht, dass dessen Fläche größer
als die des Klettbands[B] ist.
Bringen Sie den Polyesterstoff am Klettband an.
5. Drücken Sie den Polyesterstoff[C] fest auf das Klettband[B], verwenden Sie
dazu das Bürstenwerkzeug[D].
6. Schneiden Sie den überschüssigen Polyesterstoff[C] ab.
7. Verwenden Sie ein Heftgerät (nicht enthalten), um das Klettband[B] und
den Polyesterstoff[C] an allen 4Ecken aneinanderzuheften. In diesem Fall
sieht das Produkt ordentlicher aus und es ist einfacher, das Gitter zu öffnen
und zu schließen.
Verwenden Sie das überstehende Klettband an der unteren Seite, um das
Gitter zu öffnen und zu schließen.
Reinigung und Pflege
Verwenden Sie niemals ätzende oder scheuernde Reinigungsmittel.
Reinigen Sie den Stoff und den Rahmen regelmäßig und gründlich mit
einem fusselfreien, leicht angefeuchteten Tuch. Verwenden Sie ein mildes
Reinigungsmittel, falls nötig.
Um den Polyesterstoff[C] in Position zu halten, drücken Sie diesen
regelmäßig mit dem Bürstenwerkzeug[D] gegen die Oberfläche.
Entsorgung
Die Verpackung besteht aus umweltfreundlichen Materialien, die Sie über die
örtlichen Recyclingstellen entsorgen können.
Möglichkeiten zur Entsorgung des ausgedienten Produkts erfahren Sie bei Ihrer
Gemeinde- oder Stadtverwaltung.
Garantie
Das Produkt wurde nach strengen Qualitätsrichtlinien sorgfältig produziert und
vor Anlieferung gewissenhaft geprüft. Im Falle von Mängeln dieses Produkts
stehen Ihnen gegen den Verkäufer des Produkts gesetzliche Rechte zu. Diese
gesetzlichen Rechte werden durch unsere im Folgenden dargestellte Garantie
nicht eingeschränkt.
Sie erhalten auf dieses Produkt 3 Jahre Garantie ab Kaufdatum. Die
Garantiefrist beginnt mit dem Kaufdatum. Bitte bewahren Sie den Original-
Kassenbon gut auf. Diese Unterlage wird als Nachweis für den Kauf benötigt.
Tritt innerhalb von 3 Jahren ab dem Kaufdatum dieses Produkts ein Material-
oder Fabrikationsfehler auf, wird das Produkt von uns – nach unserer Wahl – für
Sie kostenlos repariert oder ersetzt. Diese Garantie verfällt, wenn das Produkt
beschädigt, nicht sachgemäß benutzt oder gewartet wurde.
Die Garantieleistung gilt für Material- oder Fabrikationsfehler. Diese Garantie
erstreckt sich nicht auf Produktteile, die normaler Abnutzung ausgesetzt sind
(z. B. Batterien) und daher als Verschleißteile angesehen werden können oder
Beschädigungen an zerbrechlichen Teilen, z. B. Schalter, Akkus oder die aus
Glas gefertigt sind.
Abwicklung im Garantiefall
Um eine schnelle Bearbeitung Ihres Anliegens zu gewährleisten, folgen Sie bitte
den folgenden Hinweisen:
Bitte halten Sie für alle Anfragen den Kassenbon und die Artikelnummer
(IAN 400851_2107) als Nachweis für den Kauf bereit.
Die Artikelnummer entnehmen Sie bitte dem Typenschild, einer Gravur, auf dem
Titelblatt Ihrer Bedienungsanleitung (unten links) oder als Aufkleber auf der Rück-
oder Unterseite des Produkts.
Sollten Funktionsfehler oder sonstige Mängel auftreten, kontaktieren Sie
zunächst die nachfolgend benannte Serviceabteilung telefonisch oder per
E-Mail.
Ein als defekt erfasstes Produkt können Sie dann unter Beifügung des
Kaufbelegs (Kassenbon) und der Angabe, worin der Mangel besteht und wann
er aufgetreten ist, für Sie portofrei an die Ihnen mitgeteilte Service-Anschrift
übersenden.
Service
Service Deutschland
Tel.: 0800 5435 111
Service Österreich
Tel.: 0800 292726
Service Schweiz
Tel.: 0800562153
IAN 400851_2107
OWIM GmbH & Co. KG
Stiftsbergstraße 1
74167 Neckarsulm
GERMANY
Model No.: HG09112A/ HG09112B
Version: 01/2022
400851_2107_PL_01.indd 2400851_2107_PL_01.indd 2 21/06/2022 4:56:04 pm21/06/2022 4:56:04 pm
-
 1
1
-
 2
2


in anderen Sprachen
- English: LIVARNO 400851 Owner's manual
- polski: LIVARNO 400851 Instrukcja obsługi