Samsung NL20J7100W Benutzerhandbuch
- Kategorie
- Wärmeschubladen
- Typ
- Benutzerhandbuch

Warming Drawer
User & installation manual
NL20J7100W*
NL20T8100W*
NL20T9100W*

Warming Drawer - Instruction Manual
EN
- Manuel d'instructions
FR
Wärmeschublade - Bedienungsanleitung
DE
IT

3
EN
Contents
Safety Information .............................................................................................................................. 2
Appliance Description ........................................................................................................................ 5
Main Components ............................................................................................................................ 5
How the warming drawer works ........................................................................................................ 5
Use ....................................................................................................................................................... 6
Before using for the first time ............................................................................................................ 6
Control Panel .................................................................................................................................... 6
Using the warming drawer ................................................................................................................ 6
Selecting temperature ...................................................................................................................... 6
Cleaning and Maintenance ................................................................................................................. 8
Appliance front and control panel ..................................................................................................... 8
Interior of the warming drawer .......................................................................................................... 8
Mat with non-slip surface .................................................................................................................. 8
What should I do if the warming drawer doesn’t work? .................................................................. 9
Technical Characteristics ................................................................................................................ 10
Environmental protection ................................................................................................................ 10
Installation instructions ................................................................................................................... 11
Before installation ........................................................................................................................... 11
Installation ...................................................................................................................................... 11
Electrical Connection ...................................................................................................................... 11
Installation ......................................................................................................................................... 45
Combination possibilities ................................................................................................................ 45
We ask you to read the instructions in this booklet very carefully as this will allow you to get the best
results from using your warming drawer.
KEEP THE DOCUMENTATION OF THIS PRODUCT FOR FUTURE REFERENCE.

2
EN
Safety Information
Carefully read the instructions before installing and using the
equipment. The manufacturer is not liable for improper installation
and use of the equipment that may cause injuries and damage.
Always keep the instructions at hand, so they can be easily referred
to during use.
This appliance complies with current safety standards. Improper use
of the appliance may put the user at risk.
Children and Vulnerable People Safety
Warning! Risk of suffocation, injury or permanent disability.
• This appliance can be used by children aged from 8 years and
above and persons with reduced physical, sensory or mental
capabilities or lack of experience and knowledge if they are
supervised by an adult or a person who is responsible for their
safety.
• Children should be supervised to ensure that they do not play with
the appliance.
• Keep all packaging away from children.
• WARNING: The appliance and its accessible parts become hot
during use. Care should be taken to avoid touching heating
elements. Children less than 8 years of age shall be kept away
unless continuously supervised.
• Cleaning and user maintenance shall not be made by children
without supervision.
General Safety
• This appliance is intended to be used in household applications
and not in hotels, shops, offices and other similar environments.
• Internally the appliance becomes hot when in operation. Do not
touch the heating elements that are in the appliance.
• Always use oven gloves to remove or put in accessories or
ovenware.
• Do not sit or hang on the drawer. The telescopic runners will be
damaged. The maximum load capacity of the drawer is 25 kg.

3
EN
Safety Information
• Do not store synthetic containers or easily inflammable objects
inside the crockery warmer. When you switch on the appliance
such containers and objects may melt or catch fire. Fire danger!
• Do not use the appliance to heat up the air temperature in the
kitchen. The high temperatures reached may cause easily
inflammable objects close to the appliance to catch fire.
Installation
• The electric system must be equipped with a means for
disconnection, with a contact separation in all poles that provides
full disconnection under overvoltage category III.
• If a plug is used for the electric connection, then it must be
accessible after installation.
• The installation must comply with current regulations.
• Protection against electric shock must be provided by the electrical
installation.
• WARNING! The appliance must be earthed.
• WARNING! The appliance is intended to be built in. Please refer to
the last pages of this user manual for detailed information on the
installation dimensions.
Cleaning and Maintenance
• WARNING! Cut the power supply before cleaning and
maintenance.
• Failure to maintain the appliance in a clean condition could lead to
deterioration of the surface that could adversely affect the life of
the appliance and possibly result in a hazardous situation.
• Do not use harsh abrasive cleaners or sharp metal scrapers to
clean the glass door since they can scratch the surface, which may
result in shattering of the glass.
• Do not use a steam cleaner to clean the appliance.
• Please follow the instructions regarding cleaning in the section
"Cleaning and Maintenance".

4
EN
Safety Information
Service and Repair
• WARNING! Cut the power supply before repair.
• If the power cable is damaged it should be substituted by the
manufacturer, authorized agents or technicians qualified for this
task in order to avoid dangerous situations.
• Repair and maintenance work, especially of current carrying parts,
can only be carried out by technicians authorized by the
manufacturer.

5
EN
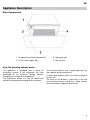
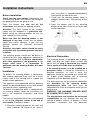
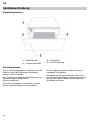
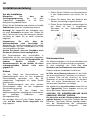
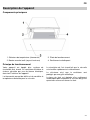
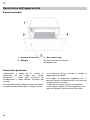
Appliance Description
Main Components
1. Temperature selector (thermostat)
2. On/Off switch (lights up)
3. Operating light
4. Anti-slip mat
How the warming drawer works
This appliance is equipped with a warm air
circulation system. A fan distributes the heat
generated by an electrical heating element
throughout the interior of the appliance.
The thermostat allows the user to define and
control the temperature wanted for the crockery.
The circulating hot air that is generated heats up
the crockery quickly and evenly.
A metal grille protects both the heating element
and the fan.
The base of the drawer is fitted with a non-slip
mat to prevent plates and dishes sliding around
when the drawer is opened and closed.

6
EN
Use
Before using for the first time
Before using the appliance for the first time you
should clean the interior and the exterior,
following the cleaning instructions given in the
section “Cleaning and Maintenance”.
Then heat the warming drawer for at least 2
hours. For this, turn the temperature control to the
maximum position (see section ‘Selecting
temperature”).
Make sure the kitchen is well-ventilated when you
are doing this.
The appliance’s parts are protected by a special
product. For this reason, during the first heating
an odour will be released. Both the odour and any
smoke that may form will disappear after a short
time and neither signifies that there is anything
wrong with the connection or the appliance.
Control Panel
The control panel has a temperature selector and
the on/off switch. The control panel is only visible
when the drawer is open.
When the drawer is closed you can check
whether the warming drawer is switched on by
looking through the viewing port on the front of
the appliance.
Using the warming drawer
To use the warming drawer, proceed as follows:
• Push the center of the front face to open the
warming drawer.
• Put the crockery in the drawer.
• Select the temperature you want by turning the
thermostat control to the desired position.
• Switch on the appliance by pressing the switch,
which will light up.
• Close the drawer.
Be careful not to use too much force when closing
the drawer since it may open up again.
Before taking out the warm crockery you must
switch off the warming drawer by pressing the
switch again.
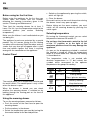
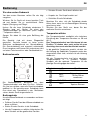
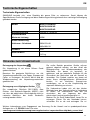
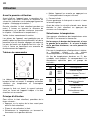
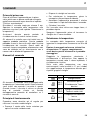
Selecting temperature
By turning the thermostat control you can select
temperatures between 30 and 80 °C.
Do not force the thermostat control to the left
of the “0” position or to the right of the
maximum position since this may damage the
appliance.
As soon as the temperature selected is reached,
the heating is turned off. When the temperature
drops to a value below that selected, the heating
is turned back on.
The temperature scale is not marked with
absolute temperatures in ºC but instead has
symbols which correspond to the optimum
temperatures for groups of crockery:
Symbol
ºC
Function
30ºC
Defrosting
40ºC-50ºC
Proving dough
Cups / glasses warming
60ºC-70ºC
Crockery warming
Keep food warm
80ºC
Low temperature cooking
Food Warming

7
EN
Use
Heating times
Various factors affect heating times:
• Material and thickness of the crockery
• Load quantity
• How the crockery is arranged
• Temperature setting
It is therefore not possible to give any precise
heating times.
However, as a guide, the following times are given
for the thermostat setting and for uniform
heating of the crockery:
Load
Time (min)
Crockery for 6 people
30 – 35
As you use the warming drawer more and more
you will learn the best settings for your crockery.
Load capacity
Load capacity depends on the size of the items of
crockery. The warming drawer can be loaded
with a maximum of 25 kg.
Below we give you some crockery arrangements
as examples:
• Crockery for 6 people:
- 6 dinner plates Ø 28 cm
- 6 soup bowls Ø 10cm
- 1 dish Ø 22 cm
- 1 dish Ø 19 cm
- 1 dish Ø 17 cm
- 2 large plates Ø 36 cm
or one of the following
• 20 dinner plates Ø 28 cm
• 36 soup bowls Ø 22 cm
• 30 soup bowls Ø 10cm
• 10 dinner plates Ø 28cm
• 10 soup bowls Ø 22 cm
• 10 pizza plates Ø 36 cm
• 80 expresso cups
• 40 cappuccino cups
• 30 glasses
• 18 soup bowls Ø 22 cm;
2 soup tureens 21 cm x 18 cm
• etc.

8
EN
Cleaning and Maintenance
Cleaning is the only maintenance action that is
required normally.
Warning! Cleaning must be done with the
warming drawer disconnected from the
electrical power supply. Remove the plug from
the power socket or disconnect the warming
drawer power supply circuit.
Do not use aggressive or abrasive cleaning
products, abrasive sponges or pointed
objects since stains or abrasion marks may
appear.
Do not use high pressure or steam jet
cleaning appliances.
Appliance front and control panel
The warming drawer can be cleaned using just a
damp cloth. If it is very dirty, add a few drops of
washing-up liquid to the washing water.
Wipe the surfaces dry using a dry cloth.
For stainless steel fronted warming drawer,
special products for treatment of stainless steel
surfaces can be used. These products prevent
the surfaces becoming dirty again for some time.
Apply a thin layer of such a product on the
surface using a soft cloth.
On aluminium fronted warming drawer use a
gentle glass cleaning product and a soft cloth that
does not release fluff. Wipe horizontally without
pressing on the surface since aluminium is
sensitive to scratches and cuts.
For glass fronted warming drawer If there are
fingerprints, grease, or stains on the exterior
(such as the front panel surface) clean with a soft
cloth with a glass cleaner or neutral detergent,
and then wipe dry with soft, clean, dry cloth.
Interior of the warming drawer
Clean the inside of the warming drawer regularly
using a damp cloth. If it is very dirty add a few
drops of washing-up liquid to the washing water.
Wipe the surfaces dry using a dry cloth.
Avoid water entering through the air circulation
opening.
Only use the warming drawer again when it is
completely dry.
Mat with non-slip surface
The non-slip surface mat can be removed to
facilitate cleaning of the drawer.
The mat can be cleaned by hand using hot water
with a few drops of washing-up liquid.
Dry thoroughly.
The non-slip mat should only be replaced when it
is completely dry.

9
EN
What should I do if the warming drawer doesn’t work?
WARNING! Any type of repair must only be
done by a specialised technician. Any repair
done by a person not authorised by the
manufacturer is dangerous.
Before contacting Technical Assistance, check on
the following:
• The crockery doesn’t heat up enough.
Check whether:
- The appliance has been switched on.
- The appropriate temperature has been
selected.
- The air circulation orifices are covered by
the crockery.
- The crockery was left to heat up for
sufficient time.
Heating time depends on several factors, such as,
for example:
- Crockery material type and thickness.
- Quantity of crockery.
- How the crockery is arranged.
• The crockery doesn’t heat up at all. Check
whether:
- You can hear the noise of a fan.
If the fan is operating then the heating element
is broken; if the fan is not operating then the
fan is broken.
- The switchboard fuses / circuit breakers
have fused / tripped out.
• The crockery is heating up too much.
- The temperature selector is broken.
• The on/off switch does not light up.
- The switch’s pilot light has blown.
• There is some noise when the drawer is
opened and closed:
- This is normal and comes from the latching
mechanism.
After checking the points and if non of them
matches your problem, please contact our
Technical Assistance.

10
EN
Technical Characteristics
Technical Data
SAMSUNG strives to improve its products at all times. Both the design specifications and these user
instructions are thus subject to change without notice.
Model
NL20J7100WM/UR
NL20T8100WK/UR
NL20T9100WD/UR
Power source
220-240 V / 50-60 Hz
Power consumption
Maximum Power
420W
Dimensions (WxDxH)
Outside
Drawer Cavity
595x522x140
485x490x110
Volume
25 ltr
Weight
Net
14,2 kg
Environmental protection
Disposal of the packaging
The packaging bears the Green Point mark.
Dispose of all the packaging materials such as
cardboard, expanded polystyrene and plastic
wrapping in the appropriate bins. In this way you
can be sure that the packaging materials will be
re-used.
Please keep all packaging materials away from
small children as there is a choking / suffocation
risk.
Disposal of equipment no longer used
According to European Directive 2012/19/EU on
the management of waste electrical and
electronic equipment (WEEE), home electrical
appliances should not be put into the normal
systems for disposal of solid urban waste.
Outdated appliances should be collected
separately to optimise component material
recovery and re-cycling rates and to prevent
potential harm to human health and the
environment. The symbol of a rubbish container
superimposed by a diagonal cross should be put
on all such products to remind people of their
obligation to have such items collected
separately.
Consumers should contact their local authorities
or point of sale and request information on the
appropriate places to leave their old home
electrical appliances.
Before disposing of your appliance, render it non-
usable by pulling out the power cable, cutting this
and disposing of it.
For information on Samsung’s environmental commitments and product specific regulatory obligations
e.g. REACH visit:
samsung.com/uk/aboutsamsung/samsungelectronics/corporatecitizenship/data_corner.html

11
EN
Installation instructions
Before installation
Check that the input voltage indicated on the
characteristics plate is the same as the voltage of
the power outlet you are going to use.
Open the drawer and take out all the
accessories and remove the packing material.
Attention! The front surface of the crockery
heater may be wrapped in a protective film.
Before using the warming drawer for the first
time, remove this film carefully.
Make sure that the warming drawer is not
damaged in any way. Check that the drawer
opens and closes correctly. If you find any
damage, contact the Technical Assistance
Service.
Attention: the power socket should be easily
accessible after the warming drawer has been
installed.
The warming drawer should only be built-in in
combination with those appliances indicated by
the manufacturer. If it is fitted in combination
with other appliances, the guarantee is no
longer valid since it is impossible to
guarantee that the warming drawer will work
correctly.
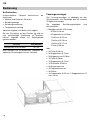
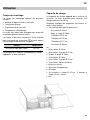
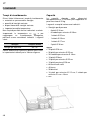
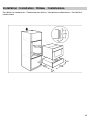
Installation
To build-in the warming drawer in combination
with another appliance there must be a fixed,
interim shelf in the housing unit to support the
weight of both appliances.
The appliance to be combined with the warming
drawer will be placed directly on the latter without
any need to have a separating shelf.
To build-in the appliance which is combined with
the warming drawer, follow the instructions set
out in the respective instructions and fitting
booklet.
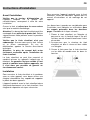
The relevant installation dimensions are indicated
in mm in the diagrams shown at the end of
this booklet. Proceed as follows:
1. Place the warming drawer on the shelf and
slide it towards the interior of the niche in
such a way that it is centred and completely
lined up with the front of the unit.
2. Check that the warming drawer frame is
properly levelled and is sitting evenly on the
shelf.
3. Open the drawer and fix the warming
drawer to the sides of the unit using the two
screws provided.
Electrical Connection
The warming drawer is equipped with a power
cable and plug for single phase current. We
advise that the plug is connected to a socket
that is easily accessible after installation.
If the warming drawer is to be installed on a
permanent basis it should be installed by a
qualified technician. In such a case, the
appliance should be connected to a circuit with
an all-pole circuit breaker with a minimum
separation of 3 mm between contacts.
The data necessary for the electrical connection
are described on the warming drawer
characteristics plate and these must be
compatible with those of the power outlet you are
going to use.
WARNING: THE WARMING DRAWER MUST
BE CONNECTED TO EARTH.
The manufacturer and retailers do not accept
responsibility for any damage that may be
caused to people, animals or property if these
installation instructions are not observed.

12
DE
Inhaltsverzeichnis
Informationen zur Sicherheit ........................................................................................................... 13
Gerätebeschreibung ......................................................................................................................... 16
Hauptkomponenten ........................................................................................................................ 16
Vorinformationen ............................................................................................................................ 16
Bedienung ......................................................................................................................................... 17
Vor dem ersten Gebrauch .............................................................................................................. 17
Bedienelemente .............................................................................................................................. 17
Bedienprinzip .................................................................................................................................. 17
Temperatur wählen ......................................................................................................................... 17
Aufheizzeiten .................................................................................................................................. 18
Fassungsvermögen ........................................................................................................................ 18
Reinigung und Pflege ....................................................................................................................... 19
Stirnseite und Bedienblende ........................................................................................................... 19
Innenraum ...................................................................................................................................... 19
Antirutschauflage ............................................................................................................................ 19
Was ist im Falle einer Funktionsstörung zu tun? .......................................................................... 20
Technische Eigenschaften ............................................................................................................... 21
Hinweise zum Umweltschutz ........................................................................................................... 21
Installationsanleitung ....................................................................................................................... 22
Vor der Installation .......................................................................................................................... 22
Einbau ............................................................................................................................................ 22
Elektroanschluss ............................................................................................................................ 22
Einbau ................................................................................................................................................ 45
Kombinationsmöglichkeiten ............................................................................................................ 45
Wir bitten Sie, die in diesem Buch enthaltenen Anweisungen aufmerksam durchzulesen, die Ihnen
ermöglichen werden, bei der Nutzung Ihrer Wärmeschublade bessere Ergebnisse zu erzielen.
BEWAHREN SIE DIE DOKUMENTATION DIESES GERÄTES AUF, UM KÜNFTIG IN IHR
NACHSCHLAGEN ZU KÖNNEN.

13
DE
Informationen zur Sicherheit
Lesen Sie die Anweisungen sorgfältig vor der Installation und
bevor Sie Ihr Gerät in Betrieb setzen. Der Hersteller haftet nicht für
unsachgemäße Installation und Nutzung der Geräte, die
Verletzungen und Schäden verursachen können. Halten Sie die
Anweisungen griffbereit, so dass sie während des Gebrauchs leicht
konsultierbar sind. Dieses Gerät entspricht den vorgeschriebenen
Sicherheits-bestimmungen. Ein unsach-gemäßer Gebrauch kann
jedoch zu Schäden an Personen und Sachen führen.
Sicherheit von Kindern und Schutzbedürftigen Personen
WARNUNG! Es besteht Erstickungsgefahr, das Risiko von
Verletzungen oder permanenten Behinderungen.
• Dieses Gerät kann dann von Kindern ab 8 Jahren, von Personen
mit eingeschränkten körperlichen, sensorischen oder geistigen
Fähigkeiten sowie von Personen ohne bisherige Erfahrung im
Umgang mit solchen Geräten bedient werden, wenn sie dabei von
einer Person, die für ihre Sicherheit verantwortlich ist, beaufsichtigt
werden.
• Kinder sollten während der Benutzung beaufsichtigt sein, um
sicher zu gehen, dass sie nicht mit dem Gerät spielen.
• Halten Sie das Verpackungsmaterial von Kindern fern.
• WARNUNG: Das Gerät und die zugänglichen Elemente werden
heiß, während das Gerät in Betrieb ist. Bitte achten Sie darauf, die
erhitzten Elemente nicht zu berühren. Kinder unter 8 Jahren sollten
vom Gerät ferngehalten werden, es sei denn sie werden
durchgängig beaufsichtigt.
• Reinigung und Wartung des Geräts darf nicht von Kindern ohne
Aufsicht erfolgen.
Allgemeine Sicherheit
• Dieses Gerät ist für den Haushaltsbedarf und nicht für die Nutzung
in Hotels, Geschäften, Büros oder anderen, ähnlichen
Einrichtungen, bestimmt.

14
DE
Informationen zur Sicherheit
• Der Geräteinnenraum wird während des Betriebs heiß. Berühren
Sie nicht die Heizelemente im Geräteinnern. Verwenden Sie zum
anfassen des zubehörs und der Töpfe wärmeisolierende
Handschuhe.
• Stellen oder setzen Sie sich nicht auf die geöffnete Geschirr-
schublade. Der Teleskopauszug wird beschädigt. Die Belastbarkeit
der Geschirrschublade beträgt max. 25kg.
• Bewahren Sie keine Kunststoff-behälter oder brennbare
Gegenstände im Gerät auf. Beim Einschalten können sie
schmelzen oder sich entzünden. Brandgefahr!
• Benutzen Sie das Gerät nicht zum Beheizen von Räumen. Durch
die Temperaturentwicklung können leicht entzündbare
Gegenstände in der Nähe zu brennen beginnen.
Installation
• Die Elektronik muss mit einer Einrichtung zur Abschaltung
ausgestattet sein, womit das Gerät sich von jedem Pol vom Netz
ausschalten lässt und die vollständige Trennung unter der
Überspannungskategorie III bietet.
• Wenn ein Stecker für die elektrische Verbindung verwendet wird,
dann muss er nach der Installation zugänglich sein.
• Die Installation des Gerätes muss nach aktuellen Vorschriften
erfolgen.
• Schutz gegen elektrischen Schlag muss durch den Einbau
gewährleistet sein (Erdung).
• Achtung: Das Gerät muss unbedingt geerdet werden.
• WARNUNG: Das Gerät ist für den Einbau bestimmt. Bitte
beziehen Sie sich auf die letzten Seiten der Bedienungsanleitung,
für detaillierte Informationen und Maßzeichnungen.
Reinigung und Instandhaltung
• WARNUNG: Trennen Sie vor reinigung und instandhaltung das
Gerät von der Stromversorgung.

15
DE
Informationen zur Sicherheit
• Wird das Gerät nicht regelmäßig gereinigt, können die Oberflächen
beschädigt werden; dies kann sich nachteilig auf die Lebensdauer
des Geräts auswirken und zu gefährlichen Situationen führen.
• Benutzen Sie keine Scheuermittel oder Metallschwämmchen zum
Reinigen der Ofenglastür; sie können die Glasfläche verkratzen
und zum Zersplittern der Scheibe führen.
• Benutzen Sie zum Reinigen des Geräts keinen Dampfreiniger.
• Bitte beachten Sie die Hinweise bezüglich der Sauberkeit unter
dem Punkt “Reinigung und Wartung“.
Service und Reparatur
• WARNUNG: Trennen Sie vor Service und Reparatur das Gerät
von der Stromversorgung.
• Falls das Netzkabel beschädigt wird, ist es vom Hersteller, von
autorisierten Vertretern oder von für diese Aufgabe qualifizierten
Technikern zu ersetzen, um gefährliche Situationen zu vermeiden.
Denn dazu sind Spezialwerkzeuge notwendig.
• Reparaturen und Wartungsarbeiten, besonders an unter Strom
stehenden Teilen, dürfen nur durch vom Hersteller autorisierten
Technikern ausgeführt werden.

16
DE
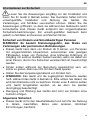
Gerätebeschreibung
Hauptkomponenten
1. – Bedienblende
3. – Gerätefront
2. – Temperaturknebel
4. – Antirutschauflage
Vorinformationen
Dieses Gerät verfügt über ein Heißluftsystem. Ein
Gebläse verteilt die Wärme des Heizkörpers
optimal in der Schublade.
Das Thermostat ermöglicht die Bestimmung und
Überwachung der gewünschten
Geschirrtemperatur.
Durch die entstehende Luftzirkulation wird das
Geschirr gleichmäßig und schnell erwärmt.
Ein Schutzgitter verhindert die Berührung mit
Heizkörper und Gebläse.
Der Boden der Geschirrschublade ist mit einer
Antirutschauflage ausgelegt, die das Verrutschen
des Geschirrs beim Öffnen und Schließen der
Schublade verhindert.

17
DE
Bedienung
Vor dem ersten Gebrauch
Vor dem ersten Benutzen sollten Sie wie folgt
vorgehen:
Wischen Sie Ihr Gerät mit einem feuchten Tuch
ab und trocken Sie es anschließend. Siehe
Kapitel „Reinigung und Pflege“.
Heizen Sie die leere Schublade mindestens 2
Stunden lang auf. Stellen Sie dazu den
Temperaturknebel auf Maximum (siehe Kapitel
"Temperatur wählen").
Sorgen Sie dabei für eine gute Belüftung der
Küche.
Die Bauteile sind mit einem Pflegemittel
geschützt. Deshalb kommt es beim ersten
Aufheizen vorübergehend zur Geruchsbildung.
Die Geruchsbildung und eventuell auftretender
Dunst vergehen nach kurzer Zeit und weisen nicht
auf einen Falschanschluss oder Gerätedefekt hin.
Bedienelemente
Die Bedienelemente bestehen aus dem
Temperaturknebel und dem Ein-/Aus- Schalter.
Sie sind nur sichtbar, wenn die Geschirrschublade
geöffnet ist. Bei geschlossener Schublade kann
man durch das Kontrollfeld in der Gerätefront
sehen, ob das Gerät eingeschaltet ist.
Bedienprinzip
Um die Wärmeschublade zu verwenden verfahren
wie folgt:
• Drücken Sie die Front der Wärmeschublade um
diese zu öffnen.
• Stellen Sie das Geschirr in die Schublade.
• Um die Temperatur zu wählen, bitte drehen Sie
denn Schalter auf die gewünschte Position.
• Schalten Sie das Gerät durch drücken des
• Knopfes ein. Der Knopf leuchtet auf.
• Schließen Sie die Schublade.
Beachten Sie, dass sich die Schublade wieder
öffnen kann, wenn sie mit übermäßigem Schwung
geschlossen wird.
Schalten Sie das Gerät aus, bevor Sie das
erwärmte Geschirr entnehmen.
Temperatur wählen
Der Temperaturknebel ermöglicht die stufenlose
Einstellung der Temperatur zwischen ca. 30 und
80 °C.
Den Temperaturknebel nur linksherum bis zur
Position “0“drehen oder nach rechts bis zum
Anschlag, den sonst wird der Knebel zerstört.
Ist die gewählte Temperatur erreicht, schaltet sich
die Heizung ab. Sobald die Temperatur unter den
eingestellten Wert sinkt, schaltet sich die Heizung
wieder ein.
Auf der Temperaturskala sind keine absoluten
Temperaturwerte in °C markiert, sondern
Symbole, die die optimale Temperatur für die
jeweilige Geschirrgruppe darstellen:
Symbol
ºC
Funktion
30ºC
Antauen
40ºC-
50ºC
Teig gehen lassen
Tassen/Gläser
vorwärmen
60ºC-70ºC
Geschirr vorwärmen
80ºC
Speisen warm halten
Speisen Erhitzen

18
DE
Bedienung
Aufheizzeiten
Unterschiedliche Faktoren beeinflussen die
Aufheizzeit:
• Material und Dicke des Geschirrs
• Beladungsmenge
• Beladungsanordnung
• Temperatureinstellung
Absolute Angaben sind daher nicht möglich.
Bei der Einstellung auf der Position und um
eine gleichmäßige Erwärmung zu erreichen
können folgende Werte als Anhaltspunkte
genannt werden:
Geschirr
Zeit (Minuten)
Menügeschirr für 6 Personen
30 – 35
Bitte ermitteln Sie im praktischen Gebrauch die
optimalen Einstellungen für Ihren Haushalt.
Fassungsvermögen
Das Fassungsvermögen ist abhängig von den
Geschirrmaßen; die Schublade darf mit maximal
25 kg belastet werden.
Die folgenden Bestückungsbeispiele sind
Anhaltspunkte:
• Menügeschirr für 6 Personen:
- 6 Teller Ø 28 cm
- 6 Suppentassen Ø 10cm
- 1 Schüssel Ø 22 cm
- 1 Schüssel Ø 19 cm
- 1 Schüssel Ø 17 cm
- 2 Teller Ø 36 cm
oder
• 20 Teller Ø 28 cm
• 36 Suppenteller Ø 22 cm
• 30 Suppentassen Ø 10cm
• 10 Teller Ø 28cm
• 10 Suppenteller Ø 22 cm
• 10 Pizzateller Ø 36 cm
• 80 Espressotassen
• 40 Cappuccinotassen
• 30 Gläser
• 18 Suppenteller Ø 22 cm; 2 Suppenterrinen 21
cm x 18 cm
• usw.
Seite wird geladen ...
Seite wird geladen ...
Seite wird geladen ...
Seite wird geladen ...
Seite wird geladen ...
Seite wird geladen ...
Seite wird geladen ...
Seite wird geladen ...
Seite wird geladen ...
Seite wird geladen ...
Seite wird geladen ...
Seite wird geladen ...
Seite wird geladen ...
Seite wird geladen ...
Seite wird geladen ...
Seite wird geladen ...
Seite wird geladen ...
Seite wird geladen ...
Seite wird geladen ...
Seite wird geladen ...
Seite wird geladen ...
Seite wird geladen ...
Seite wird geladen ...
Seite wird geladen ...
Seite wird geladen ...
Seite wird geladen ...
Seite wird geladen ...
Seite wird geladen ...
-
 1
1
-
 2
2
-
 3
3
-
 4
4
-
 5
5
-
 6
6
-
 7
7
-
 8
8
-
 9
9
-
 10
10
-
 11
11
-
 12
12
-
 13
13
-
 14
14
-
 15
15
-
 16
16
-
 17
17
-
 18
18
-
 19
19
-
 20
20
-
 21
21
-
 22
22
-
 23
23
-
 24
24
-
 25
25
-
 26
26
-
 27
27
-
 28
28
-
 29
29
-
 30
30
-
 31
31
-
 32
32
-
 33
33
-
 34
34
-
 35
35
-
 36
36
-
 37
37
-
 38
38
-
 39
39
-
 40
40
-
 41
41
-
 42
42
-
 43
43
-
 44
44
-
 45
45
-
 46
46
-
 47
47
-
 48
48


Samsung NL20J7100W Benutzerhandbuch
- Kategorie
- Wärmeschubladen
- Typ
- Benutzerhandbuch
in anderen Sprachen
- English: Samsung NL20J7100W User manual
- français: Samsung NL20J7100W Manuel utilisateur
- italiano: Samsung NL20J7100W Manuale utente