
QUICK START GUIDE
Hitch
®
2
switch interface
WARRANTY
AbleNet manufactured products include a 2-year limited
warranty. This warranty is against defects in materials and
manufacturing for 2-years from the date of purchase. Full
warranty details available at www.ablenetinc.com.
AbleNet, Inc.
2625 Patton Road
Roseville, MN 55113
United States of America
(651) 294-3101
ablecare@ablenetinc.com
www.ablenetinc.com
Made with recycled content
EN June 18, 2021 1:48 PM
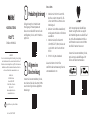
1Product
Registration
Registering your product provides you
access to ableCARE, product updates,
and resources for your product. Scan the
QR code below to register your product.
2Geing
Started
Scan the QR code below to watch a
short getting started video or follow
the instructions listed.
To get started:
1. Connect Hitch 2 to USB port on
computer. One LED light on Hitch 2
will turn on when connected.
2. Activate select mode button to
select desired row of functions.
3. Attach switch(es) with 3.5-mm /
1/8-in TS (mono) plug or joystick with
female D-sub 9 connector to Hitch 2.
4. Your Hitch 2 is now ready to use.
This device can do more! Full Instructions
for Use are available at
www.ablenetinc.com.
Download the ableCARE app to access
live support from the ableCARE Product
Success team, an online knowledge base
filled with videos and getting started
information, and other resources.
Scan the QR code below to download
the free ableCARE app to your phone or
tablet.

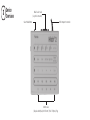
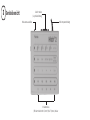
3Device
Overview
USB Computer ConnectionSelect Mode Button
Male D-sub 9 Jack
(Joystick Connection)
Switch Jacks
(Requires Switch(es) with 3.5-mm / 1/8-in TS (mono) Plug

GUIDE DE DÉMARRAGE RAPIDE
Hitch
®
2
interface de commutation
GARANTIE
Les produits fabriqués par AbleNet sont fournis avec une
garantie limitée de deux (2) ans. Cette garantie est applicable
aux défauts de matériels ou de fabrication sur deux (2) ans à
compter de la date d’achat. Tous les détails de la garantie se
trouvent à l’adresse www.ablenetinc.com.
AbleNet, Inc.
2625 Patton Road
Roseville, MN 55113
United States of America
(651) 294-3101
ablecare@ablenetinc.com
www.ablenetinc.com
Fait de matières recyclées
FR June 18, 2021 1:48 PM
1Enregistrement
de produit
L’enregistrement de votre produit vous donne
accès à ableCARE ainsi qu’à des mises à jour
et des ressources pour votre produit. Balayez
le codeQR ci-dessous pour enregistrer votre
produit.
Mise en route:
1. Branchez le Hitch2 dans le port USB de
l’ordinateur. Une DEL du Hitch2 s’allume
lorsqu’il est branché.
2. Activez le bouton de mode de sélection
pour choisir la ligne de fonctions désirée.
3. Connectez les contacteurs avec prise
mono de 3,5mm (1/8po) ou le joystick
avec un connecteur Sub-D9 femelle au
Hitch2.
4. Votre Hitch2 est maintenant prêt à être
utilisé.
Votre appareil peut en faire bien plus! Les
instructions d’utilisation complètes se trouvent
à l’adresse www.ablenetinc.com.
2Mise en route
Balayez le codeQR ci-dessous pour visionner
une courte vidéo de mise en route ou suivez
les instructions listées ici.
Téléchargez l’application ableCARE pour avoir
accès à de l’assistance en direct de la part de
l’équipe de produit ableCARE ainsi qu’à une
banque de connaissances en ligne remplies
de vidéos, d’information de mise en route et
de diverses ressources.
Balayez le codeQR ci-dessous pour
télécharger gratuitement l’application
ableCARE sur votre mobile ou votre tablette.

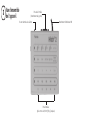
Branchement d’ordinateur USBBouton de mode de sélection
Prise Sub-D9 mâle
(branchement du joystick)
Prises femelles
(prises mono de 3,5mm [1/8po] requises)
3Vue d’ensemble
de l’appareil

KURZANLEITUNG
Hitch
®
2
Schalterschnittstelle
GARANTIE
Für alle von AbleNet hergestellten Produkte gilt eine 2-jährige
beschränkte Garantie. Diese Garantie beschränkt sich auf
Material- und Verarbeitungsfehler und gilt für 2 Jahre ab dem
Kaufdatum. Ausführliche Garantieinformationen finden Sie
auf unserer Website unter www.ablenetinc.com.
AbleNet, Inc.
2625 Patton Road
Roseville, MN 55113
United States of America
(651) 294-3101
ablecare@ablenetinc.com
www.ablenetinc.com
Hergestellt aus recycelten Inhalten
GE June 18, 2021 1:48 PM
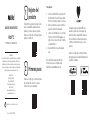
Erste Schrie:
1. Verbinden Sie Hitch 2 mit einem USB-
Anschluss an dem Computer. Ein LED-
Licht an dem Hitch 2 leuchtet bei einer
Verbindung auf.
2. Aktivieren Sie den Modus Auswahlknopf,
um die gewünschte Reihe von Funktionen
auszuwählen.
3. Verbinden Sie den/die Schalter mit
3,5-mm/1/8-Zoll TS (Mono) Stecker oder
Joystick mit D-Sub 9 Buchse mit dem
Hitch 2.
4. Ihr Hitch 2 ist jetzt einsatzbereit.
Dieses Gerät kann noch mehr! Eine
ausführliche Gebrauchsanweisung finden Sie
unter www.ablenetinc.com.
2Allgemeine
Beschreibung
Scannen Sie den untenstehenden QR-Code,
um ein kurzes Video über die ersten Schritte
zu sehen oder folgen Sie den aufgeführten
Anweisungen.
Durch Herunterladen der ableCARE-App
erhalten Sie Zugriff auf den Live-Support
des Produkterfolgsteams von ableCARE, auf
eine Online-Wissensdatenbank mit Videos
und Informationen zu den ersten Schritten
einschließlich weiterer Ressourcen.
Scannen Sie den untenstehenden QR-Code,
um die kostenlose ableCARE-App auf Ihr
Telefon oder Tablet herunterzuladen.
1Produktregistrierung
Die Registrierung Ihres Produkts bietet
Ihnen Zugang zu Produkt-Updates und
Ressourcen von ableCARE. Scannen Sie den
nachfolgenden QR-Code, um Ihr Produkt zu
registrieren.

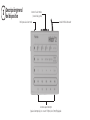
USB-ComputerverbindungModustaste auswählen
D-Sub 9 Stecker
(Joystick-Verbindung)
Schalterbuchse
(Erfordert Schalter mit 3,5-mm / 1/8-in TS (mono) Stecker
3Geräteübersicht

GUÍA DE INICIO RÁPIDO
Hitch
®
2
Interfaz de conmutación
GARANTÍA
Los productos fabricados por AbleNet incluyen una garantía
limitada de dos años. Esta garantía cubre defectos de
materiales y de fabricación durante dos años a partir de
la fecha de compra. Los detalles completos de la garantía
están disponibles en www.ablenetinc.com.
AbleNet, Inc.
2625 Patton Road
Roseville, MN 55113
United States of America
(651) 294-3101
ablecare@ablenetinc.com
www.ablenetinc.com
Fabricado con contenido reciclado.
SP June 18, 2021 1:48 PM
Para empezar:
1. Conecte la unidad Hitch 2 al puerto USB
del ordenador. Una luz LED en la unidad
Hitch 2 se encenderá cuando se conecte.
2. Active el botón para seleccionar modo y
elija la fila de funciones deseada.
3. Conecte los interruptores con el enchufe
TS (mono) de 3,5mm/1/8 pulgadas o el
joystick con el conector D-sub 9 hembra
a la unidad Hitch 2.
4. Su unidad Hitch 2.0 ya está lista para
usar.
¡Este dispositivo puede hacer más! Las
instrucciones de uso completas están
disponibles en www.ablenetinc.com.
1Registro del
producto
El registro de su producto le proporciona
acceso a ableCARE, actualizaciones de
productos y recursos para su producto.
Escanee el código QR a continuación para
registrar su producto.
2Primeros pasos
Escanee el código QR a continuación para
ver un breve video de inicio o siga las
instrucciones que se enumeran.
Descargue la aplicación ableCARE para
acceder al soporte en vivo del equipo de
éxito del producto de ableCARE, una base
de conocimientos en línea llena de videos
e información de primeros pasos, y otros
recursos.
Escanee el código QR a continuación para
descargar la aplicación ableCARE gratuita en
su teléfono o tableta.

Conexión USB del ordenadorBotón para seleccionar modo
Conector D-sub 9 macho
(Conexión de joystick)
Conectores para interruptor
(requiere interruptor(es) con conector TS (mono) de 3,5mm/1/8 pulgadas
3Descripción general
del dispositivo
-
 1
1
-
 2
2
-
 3
3
-
 4
4
-
 5
5
-
 6
6
-
 7
7
-
 8
8


in anderen Sprachen
- English: AbleNet 10000021 User guide
- français: AbleNet 10000021 Mode d'emploi
- español: AbleNet 10000021 Guía del usuario
Verwandte Artikel
-
AbleNet 12000033 Benutzerhandbuch
-
AbleNet Switch Click USB Switch Interface Benutzerhandbuch
-
AbleNet KinderBoard, VisionBoard USB keyboard Benutzerhandbuch
-
AbleNet 10000005 Benutzerhandbuch
-
AbleNet 10000025-BIG Benutzerhandbuch
-
AbleNet BIGtrack 2 Benutzerhandbuch
-
AbleNet 10000032 Benutzerhandbuch
-
AbleNet Wired Accessibility Switches Benutzerhandbuch
-
AbleNet TrackerPro 2 Hands Free Computer Mouse Benutzerhandbuch
-
AbleNet 10000044 Benutzerhandbuch

