
11.855.715.1800
REVISED 01/23/2023
CODES: SH129908, SH129909
GETTING STARTED
BEFORE YOU BEGIN
We recommend consulting a professional if you are
Hardware accepts no liability for any damage to the
faucet, plumbing, sink, counter top, or for personal
injury during installation.
Observe all local plumbing and building codes.
Unpack and inspect the product for shipping damage.
If any damage is found, contact our Customer Rela…
tions team via live chat at www.signaturehardware.com
or by emailing support@signaturehardware.com.
Ensure that you have gathered all the required
materials that are needed for the installation.
ANTES DE COMENZAR
Le recomendamos que consulte a un profesional si no
sabe cómo instalar accesorios de plomería. Signature
Hardware no asume ninguna responsabilidad con
respecto a los daños causados al inodoro, sistema de
plomería, suelo o daños personales durante
la instalación.
Cumpla con todas las normas locales de plomería y
construcción.
Desempaque e inspeccione el producto para determinar
si tiene daños por el envío. Si tiene daños, comuníquese
con nuestro equipo de Relaciones con el Cliente por chat
en directo en www.signaturehardware.com o por correo
electrónico a support@signaturehardware.com.
AVANT DE COMMENCER
Nous vous recommandons de consulter un professionnel
si vous n’avez pas d’expérience dans l’installation
d’appareils de plomberie. Signature Hardware décline
toute responsabilité en cas de dommage au robinet, à la
plomberie, à l’évier, au comptoir ou de blessure corporelle
lors de l’installation.
Respectez tous les codes locaux de plomberie et de
construction.
Déballez et inspectez le produit pour vérifier qu’il n’a pas
été endommagé pendant le transport. Si un dommage
est constaté, communiquez avec notre équipe des
relations avec la clientèle au www.signaturehardware.com
ou par mailsupport@signaturehardware.com.
CÓMO COMENZAR
Asegúrese de haber reunido todos los materiales
necesarios para la instalación.
PREMIERS PAS
Assurez-vous d’avoir réuni tout le matériel nécessaire
à l’installation.
ADDITIONAL QUESTIONS?
Still need help? Check out our Help Center at
www.signaturehardware.com for product and
warranty information, or contact us through live
chat or by emailing support@signaturehard…
ware.com.
¿MÁS PREGUNTAS?
Todavía necesita ayuda. Consulte nuestro Centro de
Ayuda en www.signaturehardware.com para obtener
información de productos y garantías o comuníquese
con nosotros por chat directo o enviando un correo
electrónico a support@signaturehardware.com.
D’AUTRES QUESTIONS?
Si vous avez encore besoin de l’ aide. Veuillez consult+
ez notre centre d'aide à l'adresse www.signaturehard+
ware.com pour obtenir des informations sur les
produits et la garantie ou veuillez nous contacter par
clavardage en direct ou par courriel à l'adresse
support@signaturehardware.com.
LINWALD
DOG WASHING STATION
ESTACIÓN DE BAÑO PARA PERROS
STATION DE LAVAGE POUR
CHIENS
SKU: 484624,484621

21.855.715.1800
TOOLS AND MATERIALS:
HERRAMIENTAS Y MATERIALES:
OUTILS ET MATÉRIEL:
ROUGH-INS
DIMENSIONES APROX.
POINTS DE RACCORDEMENT
18"
(475mm)
36-3/16"
(919mm)
24-3/16"
(614mm)
12"
(305mm)
12"
(305mm)
12"
(305mm)
24-3/16"
(614mm)
24-3/16"
(614mm)
LINWALD
DOG WASHING STATION
ESTACIÓN DE BAÑO PARA PERROS
STATION DE LAVAGE POUR CHIENS
SKU: 953878, 953879
Level
Nivelador
Niveau
Wood Shims
Cuñas de madera
Cales en bois
Silicone Sealant
(100% Neutral Cure)
Sellador de silicona
(100% curado neutro)
Produit d’étanchéité en silicone
(à polymérisation neutre à 100 %)

31.855.715.1800
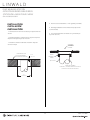
2. Drain to be connected to 3” I.P.S. gasket (provided)
2. El desagüe deberá connectarse al empaque I.P.S.
(suminstrada)
2. Le conduit doit être connecté à un joint statique
3po I.P.S. (fourni)
1. Level basin and shim as necessary. Prepare drain as
shown.
1. Nivele el lavadero y coloque lainas, según se requiera.
Prepare el desagüe según se muestra.
1. Niveler la cuvette et stabiliser au besoin. Préparer
comme indiqué.
INSTALLATION
INSTALACIÓN
INSTALLATION
FINISHED FLOOR
PISO TERMINADO
PLANCHER FINISHED
6"
(152mm)
3/4"
(19mm)
QIC3-3XH
DRAIN
STRAINER
3" PIPE (BY OTHERS)
TUBO DE 3” (SUMINISTRADO POR OTROS)
TUYAU DE 3 PO (PAR LES AUTRES)
STRAINER
COLADERA
CRÉPINE
DRAIN
DRENAJE
DRAIN
LINWALD
DOG WASHING STATION
ESTACIÓN DE BAÑO PARA PERROS
STATION DE LAVAGE POUR CHIENS
SKU: 953878, 953879

41.855.715.1800
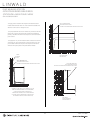
SILICONE
SEALANT
FRONT VIEW
TOP VIEW
SILICONE
SEALANT
SILICONE SEALANT
SELLADOR DE SILICÓN
PRODUIT D’ÉTANCHÉITÉ À BASE DE SILICONE
AGAINST CONCRETE TOP VIEW BLOCK OR
WALL BOARD (FINISHED OR UNFINISHED)
CONTRA BLOQUE DE CONCRETO O
TABLERO DE PARED (CON O SIN ACABADO)
CONTRE LE BLOC EN BÉTON VU DE DESSUS
OU PANNEAU MURAL (FINI OU NON FINI)
WALL
PARED
MUR
FRONT VIEW
VISTA FRONTAL
VUE DE FACE
TOP VIEW
VISTA SUPERIOR
VUE DE DESSUS
SILICONE SEALANT
SELLADOR DE SILICÓN
PRODUIT D’ÉTANCHÉITÉ À BASE DE SILICONE
SILICONE SEALANT
SELLADOR DE SILICÓN
PRODUIT D’ÉTANCHÉITÉ À BASE DE SILICONE
LINWALD
DOG WASHING STATION
ESTACIÓN DE BAÑO PARA PERROS
STATION DE LAVAGE POUR CHIENS
SKU: 953878, 953879
3. Apply silicon sealant at all points where the basin
meets the wr. Do not install lint basket and
strainer until room is ready for use.
3. Aplique sellador de silicón todos los puntos en donde
la tarja se junta con la pared. No instale la canastilla de
pelusa y coladera de domo hasta que el cuarto esté listo
para usarse.
3. Appliquez un produit d’étanchéité à base de silicone
à l’endroit ou la cuvette est en contact avec le mur. Ne
pas installer le filtre à charpie et la crépine en forme de
dôme avant que la pièce soit prête à être utilisée.
-
 1
1
-
 2
2
-
 3
3
-
 4
4


in anderen Sprachen
- English: ProFlo MSB3624 Installation guide
- français: ProFlo MSB3624 Guide d'installation
- español: ProFlo MSB3624 Guía de instalación