Collingwood Lighting FL05 Benutzerhandbuch
- Typ
- Benutzerhandbuch

FL05 with PIR sensor I Avec détecteur de mouvement infrarouge I
Mit pyroelektrischem PIR-sensor
Installation instructions I Consignes d’installation I Montageanleitung
t +44 (0) 1604 495 151 f +44 (0) 1604 495 095 e sales@collingwoodgroup.com w collingwoodlighting.com
Collingwood Lighting, Brooklands House, Sywell Aerodrome, Sywell, Northampton NN6 0BT, United Kingdom
t +33 (0) 4 816 816 10 f +33 (0) 4 816 816 11 e ventes@collingwoodgroup.com w collingwoodlighting.com
Collingwood Lighting Limited, 43-47 Avenue de la Grande Armée, 75 116, Paris, France
EN
FR
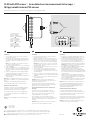
Installation
1. Set A - motion sensitivity, B - Lux level sensitivity, C -
Time to required levels
2. Set required colour temperature for all units. Switch is
located at the back of the floodlight under rubber cover.
Use small screwdriver to lever the cover to access the
switch.
Note: Ensure the rubber cover is fitted correctly after
selecting the colour temperature.
3. Fix the circular wall bracket to the wall. Screws and wall
plugs are supplied.
4. Locate the floodlight over the circular wall bracket and
tighten the screw to secure it in the required position. The
aim of the floodlight can be adjusted by turning/tilting
the unit.
5. Connect the flying lead to the mains supply. A suitable
waterproof junction box or enclosure must be used to
maintain the IP65 rating of the product.
6. Tighten the two side screws to clamp the floodlight in the
required position.
Note: When the floodlight is switched on for the first time,
you may notice a slight presence of condensation behind the
glass.
The product is fitted with a breathable gland and any
condensation will disappear after several hours of use.
Manual override the PIR sensor
To disable the PIR sensor, switch the floodlight on and off
twice within 2 seconds. In this mode, the floodlight will
remain illuminated until the PIR is activated again.
To reactivate the PIR sensor, switch the floodlight off for
10 seconds. When turned back on, the floodlight will be
controlled by the
PIR sensor.
Note: Each time the floodlight is switched on single flicker
is visible.
Installation
1. Sélection A –Niveau de distance requis et B –Niveau
d’éclairement en lux, C –Durée
2. Réglez la température de couleur requise pour tous les
produits. L’interrupteur est situé à l’arrière du projecteur
sous un cache en caoutchouc. Utilisez un petit tournevis
pour soulever le couvercle pour accéder à l’interrupteur.
Remarque: assurez-vous que le couvercle en caoutchouc
soit correctement remis en place après avoir sélectionné
la température de couleur.
3. Installez le support mural circulaire au mur. Les vis et les
chevilles sont fournies.
4. Placez le projecteur sur le support mural circulaire et
serrez la vis pour le fixer dans la position souhaitée.
L’orientation du projecteur peut être ajustée en tournant /
inclinant l’appareil.
5. Connectez le câble au secteur. Une boîte de connexion ou
un boitier étanche doit être utilisé afin de maintenir l’IP65
du produit.
6. Serrez les 2 vis sur les côtés pour maintenir le projecteur
dans la position requise.
Remarque: Lorsque le projecteur est allumé pour la
première fois, vous pouvez remarquer une légère présence
de condensation derrière la vitre.
Le produit est équipé d’un presse étoupe respirant qui
permet d’évacuer l’essentiel de l’éventuelle condensation
après quelques heures de fonctionnement.
Désactivez manuellement le détecteur de mouvement
infrarouge
Pour désactiver le détecteur infrarouge, éteignez le
projecteur et allumez rapidement dans les 2 secondes.
Dans ce mode, le projecteur restera allumé jusqu’à la
réinitialisation du détecteur infrarouge.
Pour réinitialiser le détecteur infrarouge, éteignez le
projecteur pendant 10 secondes. Lorsque le projecteur sera
rallumé, il sera contrôlé par le détecteur de mouvement
infrarouge.
Remarque: Chaque fois que le détecteur est réinitialisé, le
projecteur restera allumé pendant 30 secondes.
Installation
1. Stellen Sie A - Bewegungsempfindlichkeit und B - Lux-
Empfindlichkeit auf die gewünschten Werte ein, C - Zeit
2. Stellen Sie die gewünschte Farbtemperatur für alle
Geräte ein. Der Schalter befindet sich auf der Rückseite
des Scheinwerfers unter der Gummiabdeckung.
Benutzen Sie einen kleinen Schraubenzieher, um die
Abdeckung anzuheben und auf den Schalter zuzugreifen.
Hinweis: Bitte stellen Sie sicher, dass das Gummi nach
der Farbtemperaturauswahl korrekt sitzt.
3. Befestigen Sie die runde Wandhalterung an der Wand.
Schrauben und Dübel werden mitgeliefert.
4. Platzieren Sie den Scheinwerfer über der runden
Wandhalterung und ziehen Sie die Schraube an, um sie
in der gewünschten Position zu fixieren. Die Ausrichtung
des Scheinwerfers kann durch Drehen/Kippen des Geräts
eingestellt werden.
5. Verbinden Sie die freie Zuleitung mit dem Stromnetz.
Um die Schutzart IP65 des Produkts aufrechtzuerhalten
muss eine geeignete wasserdichte Anschlussdose oder
Gehäuse verwendet werden.
6. Ziehen Sie die beiden seitlichen Schrauben fest, um den
Scheinwerfer in der gewünschten Position zu halten.
Hinweis: Beim ersten Einschalten des Strahlers kann es zu
leichter Kondensationsbildung hinter dem Glas kommen.
Das Produkt ist mit einer atmungsaktiven Dichtung
ausgestattet, und etwaige Kondensation bildet sich nach
einigen Stunden Gebrauch zurück.
Manuelles Abschalten des PIR-Sensors
Schalten Sie zum Deaktivieren des PIR-Sensors den
Scheinwerfer innerhalb von 2 Sekunden aus und wieder ein.
In diesem Modus bleibt der Scheinwerfer eingeschaltet bis
der PIR-Sensor erneut aktiviert wird.
Um den PIR-Sensor wieder zu aktivieren, schalten Sie den
Scheinwerfer für 10 Sekunden aus. Beim Wiedereinschalten
wird der Scheinwerfer vom PIR-Sensor gesteuert.
Hinweis: Bei jeder erneuten Aktivierung des PIR-Sensors
leuchtet der Scheinwerfer 30 Sekunden lang.
CWI 8148 V6
EN FR DE
+- +-
A B C
LUXSENS TIME
B
MIN 10 lux
MAX 2000 lux
A
MIN 2mtr
MAX 8mtr
C
MIN 10sec 3sec
MAX 7min 3min
Ø10mm
+
-
+
-
L E N
220-240V AC I 50-60Hz
LIVE - L (F) BROWN
NEUTRAL - N (N) BLUE
EARTH - E YELLOW / GREEN
220-240V AC I 50-60Hz
PHASE - L (F) MARRON
NEUTRE - N (N) BLEU
TERRE - E VERT / JAUNE
220-240V AC I 50-60Hz
PHASE - L (F) BRAUN
NEUTRAL - N (N) BLAU
ERDE - E GELB / GRÜN
3 year warranty
3 ans de garantie
3 Jahres-Garantie

CWI 8148 V6
EN FR DE
Disposal of this product should be separate from household
waste. Please separate these items from other types
of waste and recycle them responsibly to promote the
sustainable reuse of material resource. Household
users should contact their local government office for
details of where and how they can take these items for
environmentally safe recycling.
Dieses Produkt darf nicht im Haushaltsmüll entsorgt
werden. Bitte trennen Sie diese Gegenstände von anderen
Abfallarten und recyceln Sie sie verantwortungsbewusst, um
die nachhaltige Wiederverwendung von Materialressourcen
zu fördern. Privathaushalte kontaktieren bitte ihre
regionalen Ämter für Informationen darüber.
Ce produit ne doit pas être éliminé avec les ordures
ménagères. Merci de le séparer des autres déchets et de
le recycler de manière responsable afin de promouvoir
la réutilisation des ressources matérielles. Les
consommateurs doivent contacter leurs autorités locales
pour plus d’information quant aux lieux et méthodes de
recyclage en accord avec la protection de l’environnement.
t +44 (0) 1604 495 151 f +44 (0) 1604 495 095 e sales@collingwoodgroup.com w collingwoodlighting.com
Collingwood Lighting, Brooklands House, Sywell Aerodrome, Sywell, Northampton NN6 0BT, United Kingdom
EN
FR t +33 (0) 4 816 816 10 f +33 (0) 4 816 816 11 e ventes@collingwoodgroup.com w collingwoodlighting.com
Collingwood Lighting Limited, 43-47 Avenue de la Grande Armée, 75 116, Paris, France
Installation data
• Isolate the mains supply, prior to wiring.
• This unit must be wired by a qualified electrician or
suitable competent person.
• The light source of this luminaire is not replaceable.
When the light source reaches it’s end of life the whole
luminaire shall be replaced.
Données d’installation
• Isolez l’alimentation secteur avant le câblage
• Cet appareil doit être installé par un électricien qualifié
ou une personne compétente appropriée.
• La source lumineuse de ce luminaire n’est pas
remplaçable. Lorsque la source lumineuse atteint sa fin
de vie, le luminaire complet doit être remplacé.
Installationsdaten
• Vor der Verdrahtung Netzversorgung isolieren
• Diese Einheit muss von einem qualifizierten Elektriker
oder einer geeigneten kompetenten Person verdrahtet
werden.
• Die Lichtquelle dieser Leuchte ist nicht austauschbar.
Wenn die Lichtquelle ihr Gebrauchsende erreicht hat,
muss die gesamte Leuchte ersetzt werden.
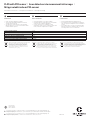
Product / Produit / Produkt FL05
Input voltage / Tension / Nennspannung 220-240V AC 50/60Hz
Input current / Courant d’entrée / Eingangsstrom 0.24A
Input power / Puissance / Eingangsleistung 50W
Power factor / Facteur de puissance / Leistungsfaktor >0.9
Inrush current / Courant d’appel / Einschaltstrom 28A/15μs
3 year warranty
3 ans de garantie
3 Jahres-Garantie
FL05 with PIR sensor I Avec détecteur de mouvement infrarouge I
Mit pyroelektrischem PIR-sensor
Installation instructions I Consignes d’installation I Montageanleitung
-
 1
1
-
 2
2


