
EN
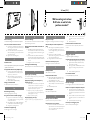
Note for mounting
To secure the mounting on wall, concrete wall is required.
Use screws to mount the device on the wall
1 Use this sheet as a template. Mark the position where you
want to hang the device on the wall (as shown above) and
then drill two 6mm diameter holes.
2 Secure the 2 dowels and 2 screws (both supplied) in the
holes respectively. Leave a gap of 5 mm between the head
of the screw and the wall.
3 Hang the device on the fastening screws.
CS
Poznámka k vrtání
Chcete-li zajistit bezpečné upevnění výrobku na zeď, upevněte
výrobek na betonovou stěnu.
Pro připevnění zařízení na stěnu použijte šrouby
1 Tyto pokyny použijte jako šablonu. Označte místo, kde
chcete pověsit zařízení na zeď (viz obrázek výše) a poté
vyvrtejte otvory s průměrem 6 mm.
2 Vložte dvě hmoždinky a dva šrouby (obojí dodané)
do otvorů v tomto pořadí. Nechte 5mm mezeru mezi
hlavičkou šroubu a stěnou.
3 Zavěste zařízení na upevňovací šrouby.
Pokyny pro montáž na stěnu
Na vyznačených místech vyvrtejte do stěny otvor.*
DA
Bemærkning til montering
En sikker vægmontering kræver en betonvæg.
Brug skruer til at montere enheden på væggen
1 Brug dette ark som skabelon. Marker det sted på væggen,
hvor du vil hænge enheden op (som vist), og bor derefter
to huller på 6 mm i diameter.
2 Placer 2 rawlplugs og 2 skruer (medfølger) i hullerne. Efterlad
et mellemrum på 5 mm mellem skruehovedet og væggen.
3 Hæng enheden op på de fastgjorte skuer.
Instruktioner til vægmontering
Bor huller i væggen, hvor der er markeringer.*
DE
Hinweise zur Montage
Damit das Gerät sicher montiert werden kann, sollte es ausschließlich
an Betonwänden angebracht werden.
Befestigen Sie das Gerät mithilfe von Schrauben an
der Wand.
1 Dieses Blatt dient dazu als Vorlage. Markieren Sie an der
Wand die Position, an der das Gerät montiert werden soll
(wie oben gezeigt), und bohren Sie dann zwei 6 mm große
Löcher.
2 Setzen Sie in beide Löcher jeweils einen Dübel und eine
Schraube ein (beides im Lieferumfang enthalten). Lassen Sie
zwischen dem Schraubenkopf und der Wand einen Abstand
von 5 mm.
3 Hängen Sie das Gerät an den Schrauben auf.
Anweisungen zur Wandmontage
Bohren Sie entsprechend der markierten Stellen Löcher in die Wand.*
EL
Σημείωση για την τοποθέτηση
Για να παραμείνει σταθερή η συσκευή, ο τοίχος όπου θα αναρτηθεί
πρέπει να είναι τσιμεντένιος.
Χρησιμοποιήστε βίδες για να τοποθετήσετε τη
συσκευή στον τοίχο
1 Χρησιμοποιήστε αυτό το φύλλο ως πρότυπο. Σημειώστε
τη θέση όπου θέλετε να αναρτήσετε τη συσκευή στον
τοίχο (όπως φαίνεται παραπάνω) και στη συνέχεια
ανοίξτε δύο οπές διαμέτρου 6 χιλιοστών.
2 Σφίξτε τους 2 πείρους και τις 2 βίδες (παρέχονται)
στις οπές. Αφήστε ένα κενό 5 χιλιοστών ανάμεσα στην
κεφαλή της βίδας και στον τοίχο.
3 Κρεμάστε τη συσκευή στις βίδες.
Οδηγίες ανάρτησης στον τοίχο
Ανοίξτε με το τρυπάνι τις οπές στις σημειωμένες θέσεις στον
τοίχο.*
ES
Nota para el montaje
Para garantizar un montaje seguro, la pared debe ser de hormigón.
Utilice tornillos para montar el dispositivo en la
pared
1 Utilice esta página como plantilla. Marque la posición en
la que desea colgar el dispositivo en la pared (como se
muestra en la imagen anterior) y perfore dos oricios de 6
mm de diámetro.
2 Fije los 2 tacos y 2 tornillos (ambos incluidos)
respectivamente en los agujeros. Deje un hueco de 5 mm
entre la cabeza del tornillo y la pared.
3 Cuelgue el dispositivo en los tornillos de sujeción.
Instrucciones de montaje en pared
Perfore agujeros en la pared en la posición deseada.*
FI
Kiinnityshuomautus
Teline on kiinnitettävä betoniseinään.
Kiinnitä laite seinään ruuveilla.
1 Käytä tätä arkkia mallina. Merkitse seinään paikka, johon
haluat laitteen kiinnittää (ks. edellä oleva kuva), ja poraa
sitten kaksi halkaisijaltaan 6 mm:n reikää.
2 Kiinnitä 2 kiinnitystappia ja 2 ruuvia (toimitetaan laitteen
mukana) reikiin. Jätä 5 mm:n väli ruuvin kannan ja seinän
väliin.
3 Ripusta laite kiinnitysruuveihin.
Seinäkiinnitysohjeet
Poraa seinään reiät merkittyihin kohtiin.*
FR
Remarque concernant la xation
Le système de xation est conçu pour les murs en béton.
Fixez l'appareil au mur à l'aide de vis.
1 Servez-vous de cette feuille comme modèle. Tracez des
repères à l'endroit où vous souhaitez suspendre l'appareil
sur le mur (comme illustré ci-dessus), puis percez deux
trous d'un diamètre de 6 mm.
2 Fixez les 2 chevilles et les 2 vis (fournies) dans chacun des
trous. Laissez un espace de 5 mm entre la tête de vis et
le mur.
3 Attachez l'appareil aux vis.
Instructions relatives à la xation murale
Percez des trous dans le mur en respectant la position des trous
marquée.*
HU
Megjegyzés a rögzítéshez
A megfelelő falrarögzítéshez betonfal szükséges.
Csavarok segítségével rögzítse a falra a készüléket.
1 Ez a lap mintaként szolgál. A falon jelölje meg a helyet, ahova
rögzíteni szeretné a készüléket (a fentebbi ábra szerint),
majd fúrjon két 6 mm-es lyukat.
2 Húzza meg a lyukakban a mellékelt két tiplit és két csavart.
Hagyjon 5 mm távolságot a csavar feje és a fal között.
3 Akassza a készüléket a rögzítőcsavarokra.
Falra szerelési utasítások
A furatok jelölt helyénél fúrjon lyukat a falba.*
IT
Nota per il montaggio
Per un montaggio a parete sicuro, sono necessari muri in cemento.
Utilizzare le viti per ssare il dispositivo alla parete.
1 Usare questo documento come modello. Segnare sulla
parete la posizione in cui si intende montare il dispositivo
(come indicato sopra), quindi praticare due fori di 6 mm di
diametro.
2 Inserire i 2 tasselli e le 2 viti (entrambi forniti) nei rispettivi
fori. Lasciare uno spazio di 5 mm tra la testa della vite e il
muro.
3 Appendere il dispositivo sulle viti di serraggio.
Istruzioni per il montaggio a parete
Effettuare i fori sulla parete all'altezza segnata.*
142 mm (5.59")
Wall mounting instructions
Drill holes on wall at hole
positions marked.*
Seite laden ...
-
 1
1
-
 2
2


Philips BM50/10 Quick Installation Guide
- Typ
- Quick Installation Guide
in anderen Sprachen
- English: Philips BM50/10
- français: Philips BM50/10
- español: Philips BM50/10
- italiano: Philips BM50/10
- русский: Philips BM50/10
- Nederlands: Philips BM50/10
- slovenčina: Philips BM50/10
- português: Philips BM50/10
- dansk: Philips BM50/10
- polski: Philips BM50/10
- čeština: Philips BM50/10
- svenska: Philips BM50/10
- 日本語: Philips BM50/10
- Türkçe: Philips BM50/10
- suomi: Philips BM50/10