
Lighting Audio System / Systeme Audio Lumineux
© 2013 Yamaha Corporation
Printed in Malaysia ZH23480
OWNER’S MANUAL
MODE D’EMPLOI
BEDIENUNGSANLEITUNG
BRUKSANVISNING
Read the supplied booklet “Safety Brochure” before using the unit.
Lisez le livret fourni «Brochure sur la sécurité» avant d’utiliser l’unité.
Lesen Sie die „Sicherheitsbroschüre“, bevor Sie das Gerät verwenden.
Läs den medföljande broschyren ”Säkerhetsanvisningar” innan du använder receivern.
Prima di utilizzare l’unità, leggere il “Volantino sulla sicurezza” fornito.
Lea el “Folleto de seguridad” que se proporciona antes de utilizar la unidad.
Lees het meegeleverde boekje “Veiligheidsbrochure” voordat u dit toestel gebruikt.
Перед использованием аппарата прочтите прилагаемую “брошюру по безопаснос ти”.
MANUALE DI ISTRUZIONI
MANUAL DE INSTRUCCIONES
GEBRUIKSAANWIJZING
ИНС ТРУКЦИЯ ПО ЭКСПЛУАТАЦИИ
G
English Français Deutsch Svenska Italiano Español
Nederlands
Русский

2 En
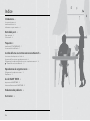
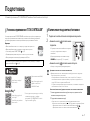
Contents
Introduction......4
Supplied accessories......4
Placing the unit......4
About this manual......4
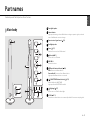
Part names......5
Main body......5
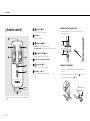
Remote control......6
Preparations......7
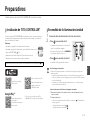
Installing “DTA CONTROLLER”......7
Turning on the lighting/power......7
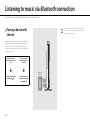
Listening to music via Bluetooth connection......8
Pairing a device with the unit......8
Performing pairing and playing back music......9
Connecting a paired Bluetooth device and playing back music......10
Terminating the Bluetooth connection......10
Listening to external sources......11
Connecting an external device......11
Playing back......11
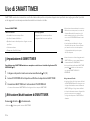
Using the SMART TIMER......12
Setting the SMART TIMER......12
Activating/deactivating the SMART TIMER......12
Troubleshooting......13
Specifications......15

En 3
English
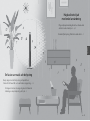
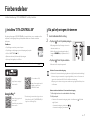
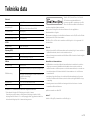
High quality sound
with ease of use
Plug and play convenience of your mobile
devices with enhanced sound.
.......8, 11
Convenient remote operation by your
mobile device.
......7
A fusion of music and lighting
Start your day in the right light and on the right note.
Wake to your favorite song in a comfortable atmosphere.
......12
At the end of the day, immerse yourself in a healing
ambience of soft lighting and sound.
......7

4 En
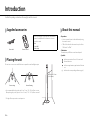
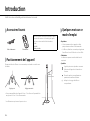
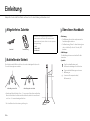
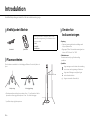
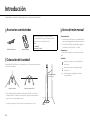
Introduction
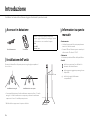
Confirm the package contents and thoroughly read this manual.
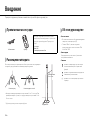
Supplied accessories
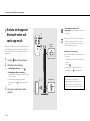
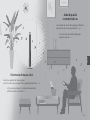
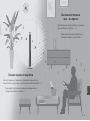
Placing the unit
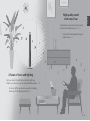
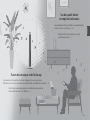
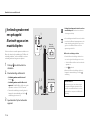
This unit uses corner or rear wall reflections to expand its sound and light output.
• It is recommended to place the unit 30 cm - 70 cm (1 ft - 2 ft 4 in) from a corner.
When placing it by a wall, place it 20 cm - 50 cm (0.7 ft - 1 ft 7 in) from a rear wall.
* The light effects represent the sound expansion.
Power cable
Use the following items to assemble the stand. Read the
separate “Assembly Guide” for information on how to
assemble the stand.
•Base
•Screw (M5)
• Cable clamp
Remote control
Front
About 30 cm - 70 cm
(1 ft - 2 ft 4 in)
Corner setting Near wall setting
About this manual
• Operations
- How to operate this unit is described mainly using
the remote control.
- “iPhone” described in this manual may also refer to
“iPod touch” or “iPad.”
• Illustrations
Illustrations may differ from actual item depicted.
• Symbols
Indicates precautions for use of the unit and
feature limitations.
Indicates supplementary explanations for better
use.
&
Indicates the corresponding reference page(s).

En 5
English
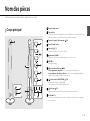
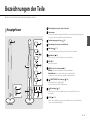
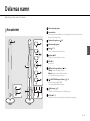
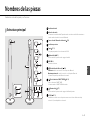
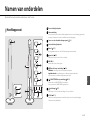
Part names
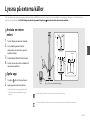
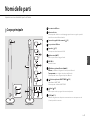
Familiarize yourself with all parts and these functions.
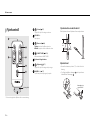
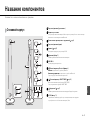
Main body
1 Front light/speaker
2 Status indicator
Lights up when turning on the unit. Blinks when receiving an operation signal, or when the
status of the Bluetooth connection changes.
3 Remote control signal sensor (& P.6)
4 Back light/speaker
5 Cover (& P.11)
Detaches for access to the AUX IN terminal.
6 A (Power) (& P.7)
Press to turn on or off the unit.
7 VOLUME +/–
Controls the volume.
8 (Bluetooth button/indicator) (& P.9)
Press: Connects to a Bluetooth device.
Press and hold: Disconnects from a Bluetooth device.
Lights up while a Bluetooth device is connected.
9 (SMART TIMER button/indicator) (& P.12)
Enables/disables the SMART TIMER.
Lights up while the SMART TIMER is enabled.
0 (Lighting) (& P.7)
Press to turn on or off the front/back light.
A AUX IN (& P.11)
Connects to an external device via a commercially available 3.5 mm stereo mini-plug cable.
Front Rear

Part names
6 En
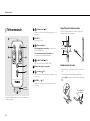
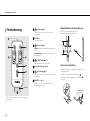
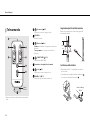
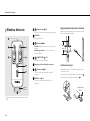
Remote control
* Remove the insulation sheet of the remote control before
using.
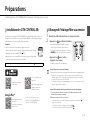
1 (Power) (& P.7)
Press to turn on or off the unit.
2 VOLUME +/–
Controls the volume.
3 (Bluetooth) (& P.9)
Press: Connects to a Bluetooth device.
Press and hold: Disconnects from a Bluetooth device.
4 (SMART TIMER) (& P.12)
Enables/disables the SMART TIMER.
5 Remote control signal transmitter
6 (Lighting) (& P.7)
Press to turn on or off the lighting.
7 DIMMER +/– (& P.7)
Press to adjust the lighting brightness.
Remote control angle/range
Point the remote control at the remote control signal
sensor on the unit.
Replacing the battery
• Check the “+” of the battery and insert it the correct way
around.
• While pushing the release tab in direction , slide out
the battery holder in direction .
Insulation
sheet*
Within
6 m (20 ft)
CR2025 type
lithium battery

En 7
English
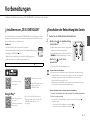
Preparations
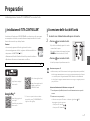
Install Yamaha’s application “DTA CONTROLLER” and turn the unit on.
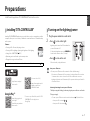
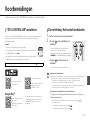
Installing “DTA CONTROLLER”
Installing DTA CONTROLLER application on a mobile device, such as a smartphone or tablet
computer, allows you to use a variety of additional convenient features of Yamaha desktop
audio systems.
Features
• Turning on/off of the unit, adjusting volume
• Turning on/off the lighting, adjusting the brightness of the lighting
• Setting of the SMART TIMER (& P.12)
• Optimizing unit sound based on placement position
• Playing back songs stored in an iPhone
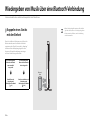
Turning on the lighting/power
1 Plug the power cable into a wall outlet.
2 • Press to turn on the light.
- Lighting can be turned on/off even when the
power of the unit is off.
- To adjust the brightness, press the DIMMER +/–
button on the remote control (10 steps).
• Press to turn on the unit.
- The unit is ready to play back music.
The mobile device needs to be connected with the unit via Bluetooth connection (& P.8).
http://itunes.com/app/
dtacontroller
(For users in the U.S.A.)
https://itunes.apple.com/us/
app/dta-controller-us/
id549333293?mt=8
Google Play™
https://play.google.com/
store/apps/
details?id=com.yamaha.av.
dtacontroller
* If access to any of these fails, search for “DTA
CONTROLLER” on the App Store or
Google Play.
Auto power off function
• The auto power off function will be activated as follows (default setting).
- The unit turns off automatically if no operation has been performed for more than
20 minutes with no device connected to AUX IN or via Bluetooth connection.
- Lighting and the unit turn off automatically if no operation has been performed for
more than 24 hours.
Activating/deactivating the auto power off function
1 While pressing and holding A on the unit, plug the power cable into a wall outlet.
2 Keep pressing A.
• The auto power off function switches and the indicators (& P.5) blink as follows:
- Auto power off is activated:
,
- Auto power off is deactivated:

8 En
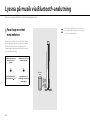
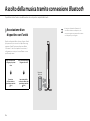
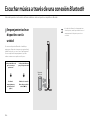
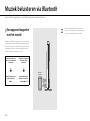
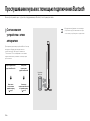
Listening to music via Bluetooth connection
You can listen to sound wirelessly from a Bluetooth compatible device.
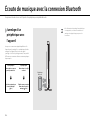
Pairing a device with
the unit
When connecting a Bluetooth device to the unit for the
first time, the device is required to be registered to the
unit. This process is called “pairing.” Once pairing is
completed, subsequent connection can be made with a
couple of easy steps.
A Bluetooth device
connecting for the first
time
A Bluetooth device
already having been
connected
Perform pairing and play
back music (& P.9)
Establish Bluetooth
connection and play back
music (& P.10)
Bluetooth
device
• If pairing information for a device is deleted, you
will need to perform pairing of that device again in
order to connect it again.

Listening to music via Bluetooth connection
En 9
English
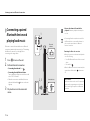
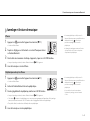
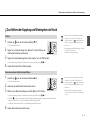
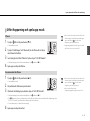
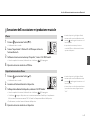
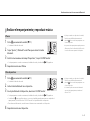
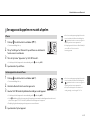
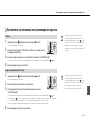
Performing pairing and playing back music
1 Press to turn on the unit (& P.7).
• The status indicator lights up.
2 Tap “Settings” and “Bluetooth” on your iPhone to turn on its
Bluetooth function.
3 On the connecting list in the “Device” field, tap “LSX-700 Yamaha.”
• When the pairing is successful, the status indicator and indicator (& P.5) blink.
4 Play back music on your iPhone.
1 Press to turn on the unit (& P.7).
• The status indicator lights up.
2 Turn on the Bluetooth function on your device.
3 In the Bluetooth setting of the device, select “LSX-700 Yamaha.”
• When the pairing is successful, the status indicator and indicator (& P.5) blink.
• If the indicator turns off and the device does not connect to the unit automatically after the pairing is completed,
select “LSX-700 Yamaha” again in the Bluetooth setting on your device.
• For details, see the owner’s manual of your device.
4 Play back music on your device.
iPhone
Other than iPhone
• If another device is already connected to the unit,
terminate that Bluetooth connection by pressing
and holding , then perform pairing with the
new device.
• The pairing operation may differ depending on
your iPhone or version of device OS.
• If another device is already connected to the unit,
terminate that Bluetooth connection by pressing
and holding , then perform pairing with the
new device.
• If a passkey is required during the pairing
operation, enter the number “0000.”

Listening to music via Bluetooth connection
10 En
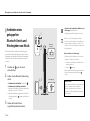
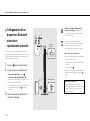
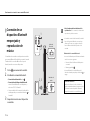
Connecting a paired
Bluetooth device and
playing back music
If the unit is connected to another device via Bluetooth
connection, terminate that connection (see “Terminating
the Bluetooth connection” on the right) before
connecting to the target device.
1 Press to turn on the unit.
2 Perform Bluetooth connection.
• Connecting from the unit: Press .
• Connecting from the Bluetooth device:
Turn on the Bluetooth function on the device and
select “LSX-700 Yamaha.”
• When the connection is established, the status
indicator blinks and the indicator on the unit
lights up.
3 Play back music on the connected
device.
1
Bluetooth
indicator
2
Status indicator
2, 3
• Decrease the volume of the unit before
playback. Otherwise, playback volume may be
too loud.
• If connecting from the unit, the unit searches for
the Bluetooth device connected the last time. In
this case, make sure that device’s Bluetooth
function is turned on.
Terminating the Bluetooth connection
• Bluetooth connection can be terminated by either
one of the following.
- Turn off the Bluetooth function of the connected
device.
- Press and hold .
• When the Bluetooth connection is terminated, the
status indicator blinks and the indicator turns
off.
Music enhancer
This function enhances the sound of compressed
digital sound by regenerating musical elements
that are lost through compression via Bluetooth
connection.

En 11
English
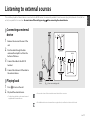
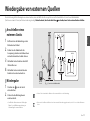
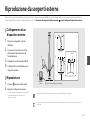
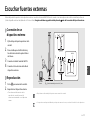
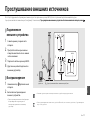
Listening to external sources
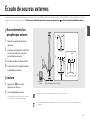
This unit allows playback of external devices connected to the AUX IN terminal. A commercially available 3.5 mm stereo mini-plug cable (diameter: 12 mm (0.47 in)
or less) is required for this connection. Be sure to turn off the unit by pressing before connecting the external device.
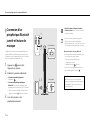
Connecting an external
device
1 Remove the cover on the rear of the
unit.
2 Pass the cable through the hole
underneath and pull it out from the
bottom of the base.
3 Connect the cable to the AUX IN
terminal.
4 Connect the other end of the cable to
the external device.
Playing back
1 Press to turn on the unit.
2 Play back the external device.
• For details on playback, see the owner’s manual
supplied with the external device.
• Decrease the volume of the unit and the external device before connection.
• If both a Bluetooth device and external device are played back, sound from both devices will be heard.
3.5 mm stereo mini-plug cable
AUX IN
1
2
3
4
External
device

12 En
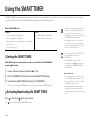
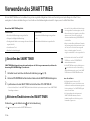
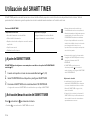
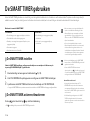
Using the SMART TIMER
The SMART TIMER allows you to turn on the lighting at the brightness you set and play back your favorite music as a wake-up timer every morning. You can also
turn off the lighting and stop music playback automatically while you are in bed listening to music.
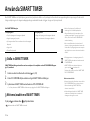
What the SMART TIMER can do
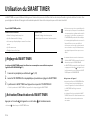
Setting the SMART TIMER
SMART TIMER settings can be performed with a smart phone or tablet that has the DTA CONTROLLER
application (& P.7) installed.
1 Connect a device via Bluetooth connection (& P.9, 10).
2 Start DTA CONTROLLER on the device and make the SMART TIMER settings.
3 Synchronize the SMART TIMER with the unit by DTA CONTROLLER.
• Be sure to synchronize the SMART TIMER with the unit every time you perform the SMART TIMER setting.
Activating/deactivating the SMART TIMER
Press on the unit or on the remote control.
• The indicator lights up when the SMART TIMER is activated.
On-timer Off-timer
• Turn on the lighting at a specified time.
• Specify the brightness of the lighting.
• Play back the music of a connected device at a specified time.
• Specify a song.
• Preset the volume level.
• Turn off the lighting at a specified time.
• Turn off the power at a specified time.
• To play back a song via Bluetooth connection at a
set time, it is required that the Bluetooth function
of your smart phone or tablet is turned on.
Additionally, in the case of an iPhone, do not quit
DTA CONTROLLER while multitasking.
• If another Bluetooth device is connected to the
unit at the time you set, the song you set as the
on-timer will not be played back. Disconnect any
other device before the time you set.
• The on-timer and off-timer of the SMART TIMER
can be activated/deactivated by DTA
CONTROLLER only.
• The SMART TIMER cannot be activated/
deactivated by pressing on the unit or remote
control if you do not set the SMART TIMER from
DTA CONTROLLER.
Inner clock of the unit
• The unit copies the time to the unit’s inner clock
from DTA CONTROLLER when a device connects
to the unit via Bluetooth connection. The SMART
TIMER follows the unit’s inner clock.
• The clock setting will be reset and the SMART
TIMER will be deactivated if the power cable is
kept disconnected from the wall outlet for about a
week.

En 13
English
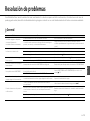
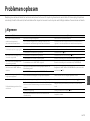
Troubleshooting
Refer to the table below if the unit does not function properly. If your solution is not listed below or if the instruction below does not help, turn off the unit,
disconnect the power cable, and contact your nearest authorized Yamaha dealer or service center.
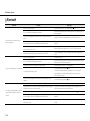
General
Problem Cause Solution
The unit turns off soon after the power is
turned on.
The unit does not operate properly.
The power cable is not properly connected. Connect the power cable firmly.
This unit has been exposed to a strong external electric shock such as
lightning or strong static electricity.
Turn off the unit and unplug the power cable. Plug it back in after about 30
seconds and then turn the power on again.
The speakers make no sound.
The volume is minimum. Turn up the volume.
The power is off. Turn on the unit and play the music again.
The auto power off function is activated. Turn on the unit (& P.7).
The unit and/or lighting turn off suddenly.
The auto power off function is activated. Turn on the unit and/or lighting (& P.7).
The off-timer of the SMART TIMER is set. Check the setting of the off-timer from DTA CONTROLLER.
The unit and lighting turn on suddenly. The on-timer of the SMART TIMER is set. Check the setting of the on-timer from DTA CONTROLLER.
Cannot turn on the SMART TIMER.
The power cable has been disconnected for more than a week and the
clock information is cleared.
Set the SMART TIMER from DTA CONTROLLER and synchronize it to the unit
(& P.12).
SMART TIMER is not set from DTA CONTROLLER.
There is noise interference from digital or
high-frequency equipment.
This unit is too close to the digital or high-frequency equipment. Place this unit farther away from such equipment.
The remote control does not work or does
not function properly.
The remote control may be operated outside its operation range. Operate the remote control within its operation range (& P.6).
The remote control sensor on this unit may be exposed to direct sunlight or
strong lighting such as an inverter type fluorescent lamp.
Change the orientation of the lighting or unit, or location of the unit.
The battery may be worn out. Replace the battery with new one (& P.6).
There are obstacles between the sensor of this unit and the remote control. Remove the obstacles.

Troubleshooting
14 En
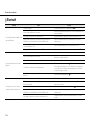
Bluetooth
Problem Cause Solution
Cannot make the unit pair with a
Bluetooth device.
The unit is turned off. Turn the unit on and perform the paring (& P.9).
Another Bluetooth device is connected.
Terminate current Bluetooth connection, and perform pairing with the new
device.
This unit and the device are too far apart. Pair the unit and device within a distance of 10 m (33 ft).
There is a device (microwave oven, wireless LAN, etc.) that outputs signals
in the 2.4 GHz frequency band nearby.
Move this unit away from the device that is emitting radio-frequency
signals.
A Bluetooth adaptor, etc., that you want to pair with this unit has a passkey
other than “0000.”
Use a Bluetooth adaptor, etc., whose passkey is “0000.”
The Bluetooth device does not support A2DP. Perform pairing with a device which supports A2DP.
Cannot make a Bluetooth connection.
The unit is turned off. Turn the unit on.
Another Bluetooth device is connected.
Terminate current Bluetooth connection, then establish a Bluetooth
connection with that device again.
The Bluetooth function of the device is turned off. Turn on the Bluetooth function of the device.
The pairing information has been deleted.
Perform pairing again (& P.9).
This unit can be paired with eight devices. If pairing with a ninth device is
performed, the pairing information with the earliest connection date will be
deleted.
This unit is not registered on the device’s Bluetooth connection list. Perform paring again (& P.9).
No sound is produced, or the sound is
interrupted during playback.
The volume of the connecting device is set too low. Turn up the volume of the connecting device.
The connecting device is not set to send Bluetooth audio signals to the unit.
Switch the output of Bluetoot h audio signals of the connecting device to
the unit.
The Bluetooth connection of the unit with the device has terminated. Perform Bluetooth connection operations again (& P.10).
There is a device (microwave oven, wireless LAN, etc.) that outputs signals
in the 2.4 GHz frequency band nearby.
Move this unit away from the device that is emitting radio-frequency
signals.
This unit and the connecting device are too far apart. Move the connecting device to within 10 m (33 ft) of the unit.

En 15
English
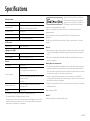
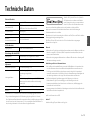
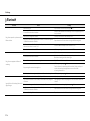
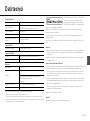
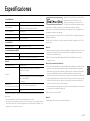
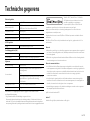
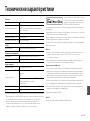
Specifications
As of October 2013. Specifications are subject to change without notice.
* The estimated lifetime of LED lighting is about 40,000 hours.
This figure is based on the shorter of either the duration until the lighting is worn out, or the
duration before luminous flux drops to below 70% of the original. Note, however, that the
estimated 40,000 hour duration is not guaranteed.
“Made for iPod,” “Made for iPhone,” and “Made for
iPad” mean that an electronic accessory has been
designed to connect specifically to iPod, iPhone, or
iPad, respectively, and has been certified by the
developer to meet Apple performance standards.
Apple is not responsible for the operation of this device or its compliance with safety and
regulatory standards.
Please note that the use of this accessory with iPod, iPhone, or iPad may affect wireless
performance.
iPad, iPhone, iPod and iPod touch are trademarks of Apple Inc., registered in the U.S. and other
countries.
Bluetooth
• Bluetooth is a technology for wireless communication between devices within an area of about
10 meters (33 ft) employing the 2.4 GHz frequency band, a band which can be used without a
license.
• Bluetooth is a registered trademark of the Bluetooth SIG and is used by Yamaha in accordance
with a license agreement.
Handling Blu e tooth communications
• The 2.4 GHz band used by Bluetooth compatible devices is a radio band shared by many types of
equipment. While Bluetooth compatible devices use a technology minimizing the influence of
other components using the same radio band, such influence may reduce the speed or distance
of communications and in some cases interrupt communications.
• The speed of signal transfer and the distance at which communication is possible differs
according to the distance between the communicating devices, the presence of obstacles, radio
wave conditions and the type of equipment.
• Yamaha does not guarantee all wireless connections between this unit and devices compatible
with Bluetooth function.
aptX® is a trademark of CSR.
Android™
Android and Google Play are trademarks of Google, Inc.
Bluetooth section
Bluetooth version Ver. 2.1+EDR
Supported profile
A2DP (Advanced Audio Distribution Profile)
AVRCP (Audio/Video Remote Control Profile)
Compatible codecs SBC, AAC, aptX®
Wireless output Bluetooth Class 2
Maximum communication range 10 m ([33 ft] without obstructions)
AUX IN section
Input connector 3.5 mm stereo mini jack
Lighting section (LED*)
Lifetime (Luminous flux under 70%) About 40,000 hours
Power consumption (When only the lighting is on) 9 W
General
Power supply AC 230 V, 50 Hz
Power consumption
Power-on condition
(music is played back and the lighting is on):
20 W
Power-off condition (lighting and SMART TIMER are off and no
Bluetooth connection):
0.5 W or less
Dimensions (W × H × D)
300 × 1,152 × 300 mm (11-3/4 × 45-3/8 × 11-3/4 in)
(including the base)
Weight 5.5 kg (12.1 lbs.)

2 Fr
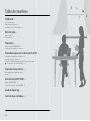
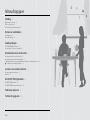
Table des matières
Introduction......4
Accessoires fournis......4
Positionnement de l’appareil......4
Quelques mots sur ce mode d’emploi......4
Nom des pièces......5
Corps principal......5
Télécommande......6
Préparations......7
Installation de « DTA CONTROLLER »......7
Allumage de l’éclairage/Mise sous tension......7
Écoute de musique avec la connexion Bluetooth......8
Jumelage d’un périphérique avec l’appareil......8
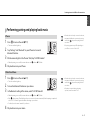
Jumelage et lecture de musique......9
Connexion d’un périphérique Bluetooth jumelé et lecture de musique......10
Désactivation de la connexion Bluetooth......10
Écoute de sources externes......11
Raccordement d’un périphérique externe......11
Lecture......11
Utilisation du SMART TIMER......12
Réglage du SMART TIMER......12
Activation/Désactivation du SMART TIMER......12
Guide de dépannage......13
Caractéristiques techniques......15

Fr 3
Français
Son de qualité élevée
et simplicité d’utilisation
Aspect pratique de Plug and Play sur vos périphériques
mobiles avec un son amélioré.
......8, 11
Utilisation commode à distance de votre
périphérique mobile.
......7
Fusion de la musique et de l’éclairage
Commencez votre journée sous le bon éclairage et sur une bonne note.
Réveillez-vous au son de votre morceau préféré, dans une ambiance conviviale.
......12
À la fin de la journée, plongez dans une ambiance reposante de
lumière tamisée et de sons calfeutrés.
......7

4 Fr
Introduction
Vérifiez le contenu de l’emballage et lisez entièrement ce manuel.
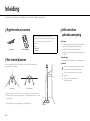
Accessoires fournis
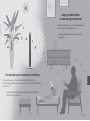
Positionnement de l’appareil
Cet appareil utilise les réflexions coin ou mur arrière pour étendre sa sortie de son et
de lumière.
• Il est recommandé de placer l’appareil à 30 cm - 70 cm d’un coin. À proximité d’un
mur, placez-le à 20 cm - 50 cm d’un mur arrière.
* Les effets lumineux représentent l’expansion du son.
Câble d’alimentation
Utilisez les éléments suivants pour assembler le support.
Pour plus d’informations sur l’assemblage du support,
lisez l’autre volume intitulé « Guide d’installation ».
•Socle
•Vis (M5)
• Bride pour câble
Télécommande
Avant
Environ 30 cm -
70 cm
Avant
Environ
30 cm - 70 cm
Réglages coin Réglages mur arrière
Quelques mots sur ce
mode d’emploi
• Opérations
- Le fonctionnement de cet appareil est décrit
principalement en utilisant la télécommande.
- L’« iPhone », décrit dans ce manuel peut également
faire référence à un « iPod touch» ou à un « iPad ».
• Illustrations
Les illustrations peuvent varier du véritable article
représenté.
• Symboles
Signale les précautions à prendre concernant
l’utilisation de l’appareil et les limites de ses
fonctions.
Donne des explications supplémentaires
permettant une meilleure utilisation.
&
Indique la ou les pages de référence
correspondantes.

Fr 5
Français
Nom des pièces
Familiarisez-vous avec toutes les pièces et les fonctions suivantes.
Corps principal
1 Enceinte/Lampe avant
2 Témoin d’état
S’allume lorsque vous mettez l’appareil sous tension. Clignote lors de la réception d’un signal
de fonctionnement ou lorsque l’état de la connexion Bluetooth change.
3 Capteur de signal de télécommande (& P.6)
4 Enceinte/Lampe arrière
5 Couvercle (& P.11)
Se détache pour offrir l’accès à la borne AUX IN.
6 A (alimentation) (& P.7)
Appuyez sur cette touche pour mettre l’appareil sous ou hors tension.
7 VOLUME +/–
Pour régler le volume.
8 (touche/témoin Bluetooth) (& P.9)
Si vous appuyez sur cette touche : Se connecte à un périphérique Bluetooth.
Si vous maintenez cette touche enfoncée : Se déconnecte d’un périphérique Bluetooth.
S’allume lorsqu’un périphérique Bluetooth est connecté.
9 (touche/témoin SMART TIMER) (& P.12)
Active/Désactive la fonction SMART TIMER.
S’allume lorsque la fonction SMART TIMER est activée.
0 (éclairage) (& P.7)
Appuyez sur cette touche pour allumer ou éteindre la lampe avant/arrière.
A AUX IN (& P.11)
Se connecte à un périphérique externe via un câble mini-jack stéréo de 3,5 mm disponible
dans le commerce.
Avant Arrière

Nom des pièces
6 Fr
Télécommande
* Retirez la feuille de protection de la télécommande avant
d’utiliser l’appareil.
1 (alimentation) (& P.7)
Appuyez sur cette touche pour mettre l’appareil sous ou
hors tension.
2 VOLUME +/–
Pour régler le volume.
3 (Bluetooth) (& P.9)
Si vous appuyez sur cette touche : Se connecte à un
périphérique Bluetooth.
Si vous maintenez cette touche enfoncée : Se
déconnecte d’un périphérique Bluetooth.
4 (SMART TIMER) (& P.12)
Active/Désactive la fonction SMART TIMER.
5 Émetteur de signal de commande
6 (éclairage) (& P.7)
Appuyez sur cette touche pour mettre l’éclairage sous ou
hors tension.
7 DIMMER +/– (& P.7)
Appuyez sur cette touche pour régler la luminosité de
l’éclairage.
Angle/Plage de la télécommande
Pointez la télécommande vers le capteur de signal de
télécommande situé sur l’appareil.
Remplacement de la pile
• Vérifiez la borne « + » de la pile et insérez-la dans le bon
sens.
• Tout en poussant la patte de dégagement dans la
direction , faites glisser le porte-pile dans la direction
.
Feuille de
protection*
6m au
maximum
Pile au lithium de
type CR2025
Seite wird geladen ...
Seite wird geladen ...
Seite wird geladen ...
Seite wird geladen ...
Seite wird geladen ...
Seite wird geladen ...
Seite wird geladen ...
Seite wird geladen ...
Seite wird geladen ...
Seite wird geladen ...
Seite wird geladen ...
Seite wird geladen ...
Seite wird geladen ...
Seite wird geladen ...
Seite wird geladen ...
Seite wird geladen ...
Seite wird geladen ...
Seite wird geladen ...
Seite wird geladen ...
Seite wird geladen ...
Seite wird geladen ...
Seite wird geladen ...
Seite wird geladen ...
Seite wird geladen ...
Seite wird geladen ...
Seite wird geladen ...
Seite wird geladen ...
Seite wird geladen ...
Seite wird geladen ...
Seite wird geladen ...
Seite wird geladen ...
Seite wird geladen ...
Seite wird geladen ...
Seite wird geladen ...
Seite wird geladen ...
Seite wird geladen ...
Seite wird geladen ...
Seite wird geladen ...
Seite wird geladen ...
Seite wird geladen ...
Seite wird geladen ...
Seite wird geladen ...
Seite wird geladen ...
Seite wird geladen ...
Seite wird geladen ...
Seite wird geladen ...
Seite wird geladen ...
Seite wird geladen ...
Seite wird geladen ...
Seite wird geladen ...
Seite wird geladen ...
Seite wird geladen ...
Seite wird geladen ...
Seite wird geladen ...
Seite wird geladen ...
Seite wird geladen ...
Seite wird geladen ...
Seite wird geladen ...
Seite wird geladen ...
Seite wird geladen ...
Seite wird geladen ...
Seite wird geladen ...
Seite wird geladen ...
Seite wird geladen ...
Seite wird geladen ...
Seite wird geladen ...
Seite wird geladen ...
Seite wird geladen ...
Seite wird geladen ...
Seite wird geladen ...
Seite wird geladen ...
Seite wird geladen ...
Seite wird geladen ...
Seite wird geladen ...
Seite wird geladen ...
Seite wird geladen ...
Seite wird geladen ...
Seite wird geladen ...
Seite wird geladen ...
Seite wird geladen ...
Seite wird geladen ...
Seite wird geladen ...
Seite wird geladen ...
Seite wird geladen ...
Seite wird geladen ...
Seite wird geladen ...
Seite wird geladen ...
Seite wird geladen ...
Seite wird geladen ...
Seite wird geladen ...
Seite wird geladen ...
Seite wird geladen ...
Seite wird geladen ...
Seite wird geladen ...
-
 1
1
-
 2
2
-
 3
3
-
 4
4
-
 5
5
-
 6
6
-
 7
7
-
 8
8
-
 9
9
-
 10
10
-
 11
11
-
 12
12
-
 13
13
-
 14
14
-
 15
15
-
 16
16
-
 17
17
-
 18
18
-
 19
19
-
 20
20
-
 21
21
-
 22
22
-
 23
23
-
 24
24
-
 25
25
-
 26
26
-
 27
27
-
 28
28
-
 29
29
-
 30
30
-
 31
31
-
 32
32
-
 33
33
-
 34
34
-
 35
35
-
 36
36
-
 37
37
-
 38
38
-
 39
39
-
 40
40
-
 41
41
-
 42
42
-
 43
43
-
 44
44
-
 45
45
-
 46
46
-
 47
47
-
 48
48
-
 49
49
-
 50
50
-
 51
51
-
 52
52
-
 53
53
-
 54
54
-
 55
55
-
 56
56
-
 57
57
-
 58
58
-
 59
59
-
 60
60
-
 61
61
-
 62
62
-
 63
63
-
 64
64
-
 65
65
-
 66
66
-
 67
67
-
 68
68
-
 69
69
-
 70
70
-
 71
71
-
 72
72
-
 73
73
-
 74
74
-
 75
75
-
 76
76
-
 77
77
-
 78
78
-
 79
79
-
 80
80
-
 81
81
-
 82
82
-
 83
83
-
 84
84
-
 85
85
-
 86
86
-
 87
87
-
 88
88
-
 89
89
-
 90
90
-
 91
91
-
 92
92
-
 93
93
-
 94
94
-
 95
95
-
 96
96
-
 97
97
-
 98
98
-
 99
99
-
 100
100
-
 101
101
-
 102
102
-
 103
103
-
 104
104
-
 105
105
-
 106
106
-
 107
107
-
 108
108
-
 109
109
-
 110
110
-
 111
111
-
 112
112
-
 113
113
-
 114
114


Yamaha LSX-700 Black Benutzerhandbuch
- Typ
- Benutzerhandbuch
- Dieses Handbuch eignet sich auch für
in anderen Sprachen
- français: Yamaha LSX-700 Black Manuel utilisateur
- español: Yamaha LSX-700 Black Manual de usuario
- Nederlands: Yamaha LSX-700 Black Handleiding