
EN
DE
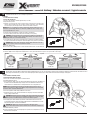
Yaw right Yaw left
Additionally, the “Understanding the Primary Flight Controls” section of the manual included with the X-Vert incorrectly displayed the yaw rotation direction
in multirotor fl ight mode. The diagram below illustrates the correct yaw rotation direction response to the given rudder control inputs.
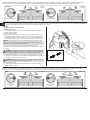
The “Battery Installation and ESC Arming” section of the manual included with the X-Vert
™
aircraft gave incorrect information for the throttle trim settings in step 1 when powering on the
transmitter and aircraft. The correct settings are given below:
Der Abschnitt „Einsatz der Akkus und Ausrüstung mit Geschwindigkeitsregler“ des im Lieferumfang des Flugzeugs X-Vert enthaltenen Handbuchs umfasst inkorrekte Informationen zu den
Einstellungen der Gastrimmung in Schritt 1, wenn der Empfänger und das Flugzeug eingeschaltet werden. Die korrekten Einstellungen sind folgende:
Manual addendum / Zusatztext Anleitung / Addendum au manuel / Aggiunta manuale
EFL1800, EFL1850
Installation
1. Lower the throttle stick fully.
2. Center the throttle trim.
3. Power on the transmitter and wait approximately 5 seconds.
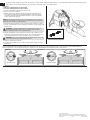
4. Open the battery hatch.
5. Apply the loop side (soft side) of the hook and loop tape to the bottom of your battery and
the hook side to the battery tray. Use enough hook and loop material to ensure the battery
is held securely in place through even the most violent aerobatic maneuvers.
NOTICE: Failure to use adequate hook and loop material may allow the battery to become
dislodged or ejected in fl ight. Movement of the battery in fl ight may cause a change of the
center of gravity and loss of control.
6. Install the fully charged battery centered in the battery compartment.
7. Connect the battery lead to the aircraft power lead, noting correct polarity.
CAUTION: Connecting the battery to the aircraft power lead with reversed polarity will
cause damage to the fl ight controller and the battery. Damage caused by incorrectly
connecting the battery is not covered under warranty.
8. The aircraft must be either vertical on the landing gear or horizontal on its back to initialize.
Keep the aircraft immobile and away from wind or the fl ight control system may not initialize.
CAUTION: Always keep hands away from the propeller. When armed, the motor will
turn the propeller in response to any throttle movement.
9. Close the battery hatch.
10. Refer to the Center of Gravity section to ensure the model balances at the recommended CG.
Montage
1. Den Gashebel vollständig senken.
2. Die Gastrimmung mittig einstellen.
3. Den Sender einschalten und ungefähr 5Sekunden warten.
4. Die Akku-Abdeckung öffnen.
5. Die Schlingenseite (glatte Seite) des optionalen Klettbands an der Unterseite des Akkus und
die Hakenseite an der Akkuhalterung befestigen. Ausreichend Klettband verwenden, um
sicherzustellen, dass der Akku auch bei heftigen Manövern in der Luft gut fi xiert ist.
HINWEIS: Wird zu wenig Klettband verwendet, kann der Akku im Flug verrutschen oder sich
ganz aus seiner Position lösen. Wenn sich der Akku im Flug bewegt, kann dies den Schwerpunkt
verschieben und zu einem Kontrollverlust führen.
6. Den voll aufgeladenen Akku mittig im Akku-Fach montieren.
7. Den Batteriestecker an das Stromanschlusskabel des Flugzeugs anschließend und dabei
auf die richtige Polarität achten.
ACHTUNG: Wird der Akku mit falscher Polarität an das Stromanschlusskabel des Flugzeugs
angeschlossen, können Flug-Steuerung und Akku beschädigt werden. Schäden, die durch
einen falsch angeschlossenen Akku entstehen, sind nicht von der Garantie gedeckt.
8. Das Flugzeug muss für die Initialisierung entweder vertikal auf dem Fahrwerk stehen oder
horizontal auf dem Rücken liegen. Das Flugzeug still und nicht in den Wind halten, da sich das
Flug-Steuerungssystem ansonsten nicht initialisiert.
ACHTUNG: Die Hände immer weg vom Propeller halten. Der Motor wird im
eingeschalteten Zustand den Propeller als Reaktion auf eine Gashebelbewegung drehen.
9. Die Akku-Abdeckung schließen.
10. Weitere Informationen dazu, ob das Flugzeug den empfohlenen Schwerpunkt hat, siehe im
Abschnitt zum Schwerpunkt.
Rudder
Rudder right Rudder left
Top view Top view
Seite wird geladen ...
Seite wird geladen ...
-
 1
1
-
 2
2
-
 3
3


E-flite X-VERT EFL1800 Manual Addendum
- Typ
- Manual Addendum
- Dieses Handbuch eignet sich auch für
in anderen Sprachen
- English: E-flite X-VERT EFL1800
- français: E-flite X-VERT EFL1800
- italiano: E-flite X-VERT EFL1800