
English
Congratulations on your purchase, and welcome
to Philips! To fully benet from the support that
Philips offers, register your product at www.
philips.com/welcome.
1 Important
Read these instructions for use carefully before
using the antenna and save them for future
reference.
Warning
• Risk of injury: Never install the antenna and
its accessories on the airbag cover.
• Risk of swallowing parts: Keep the antenna
and accessories out of the reach of children.
Caution
• Risk of electromagnetic interference: Do
not install the GPS antenna over any sensors
or vents.
• Risk of short circuit, malfunction, or damage
to your car navigation system: Do not alter
the GPS antenna cable or dismantle the
antenna box.
• Risk of poor reception: Use the supplied
metal sheet only, and never cut or distort it;
do not paint the GPS antenna.
• Risk of damage to the GPS antenna cable:
Never pull the antenna cable when you
remove the antenna.
• Risk of scratching your car: The GPS
antenna box has a magnet. When you install
or remove it, do not drag it on any metal
surface.
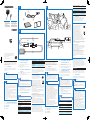
2 What’s included (Fig. 1)
Check and identify the contents of your package:
GPS antenna
a GPS antenna
b Metal sheet
c Clamp x 5
a
b
c
GPS AERIAL
ab
1
2
3
a
c
b
CSM102
All registered and unregistered trademarks
are property of their respective owners.
© 2012 Koninklijke Philips Electronics N.V.
All rights reserved.
CSM102_12_UM_V1.0
User manual
Benutzerhandbuch
Mode d’emploi
Manuale utente
Gebruiksaanwijzing
Instrukcja obsługi
3 Connect the GPS
antenna (Fig. 2)
1 Connect the GPS antenna to your car
navigation system.
2 Use the supplied screw to fasten the
connectors.
4 Install the GPS antenna
(Fig. 3)
You can install the signal receptor of GPS antenna:
• On the dashboard cover
• On the back panel of rear-view mirror
Note
• Make sure that the contact surface that
contacts with the metal sheet is free of
moisture, dust, grime, oil, and any other
dirt.
• If you remove the metal sheet, some
adhesive may be left on the contact surface.
1 Remove the protective cover of the metal
sheet, and then afx it.
2 Afx the antenna box onto the metal sheet.
3 Use clamps to secure the antenna cable.
5 Product information
Note
• Product information is subject to change
without prior notice.
Antenna Build-in ceramic patch
antenna
Supplying voltage 5 ± 0.2 V
Operating
temperature
-20 ~ +70°C
Cold start 28 s (typical), < 50 s
Hot start 1 s (typical), < 3 s
Acquisition
sensitivity
-141 dBm (typical)
Navigation sensitivity -158 dBm (typical)
Tracking sensitivity -158 dBm (typical)
Antenna cable length 3.0 m
Dimensions of
antenna box
(W x H x D)
50 x 40 x 16 mm
6 Notice
Any changes or modications made to this
device that are not expressly approved by Philips
Consumer Lifestyle may void the user’s authority
to operate the equipment.
Care of the environment
Your product is designed and
manufactured with high quality
materials and components, which can
be recycled and reused.
When this crossed-out wheeled bin
symbol is attached to a product it
means that the product is covered
by the European Directive 2002/96/
EC. Please inform yourself about the
local separate collection system for electrical and
electronic products.
Please act according to your local rules and do not
dispose of your old products with your normal
household waste.
Correct disposal of your old product helps to
prevent potential negative consequences for the
environment and human health.
Environmental information
All unnecessary packaging has been omitted. We
have tried to make the packaging easy to separate
into three materials: cardboard (box), polystyrene
foam (buffer) and polyethylene (bags, protective
foam sheet.)
Your system consists of materials which can
be recycled and reused if disassembled by a
specialized company. Please observe the local
regulations regarding the disposal of packaging
materials, exhausted batteries and old equipment.
Copyright
2012 © Koninklijke Philips Electronics N.V.
Specications are subject to change without
notice. Trademarks are the property of
Koninklijke Philips Electronics N.V or their
respective owners. Philips reserves the right
to change products at any time without being
obliged to adjust earlier supplies accordingly.
Deutsch
Herzlichen Glückwunsch zu Ihrem Kauf und
willkommen bei Philips! Um die Unterstützung von
Philips optimal nutzen zu können, sollten Sie Ihr
Produkt unter www.philips.com/welcome registrieren.
1 Wichtig
Lesen Sie diese Bedienungsanleitung vor dem
Gebrauch der Antenne sorgfältig durch, und
bewahren Sie sie für eine spätere Verwendung auf.
Warnung
• Verletzungsrisiko: Installieren Sie die
Antenne und ihre Zubehörteile nie auf der
Airbagabdeckung.
• Gefahr des Verschluckens von Teilen:
Bewahren Sie die Antenne und die
Zubehörteile nicht in der Reichweite von
Kindern auf.
Achtung
• Elektromagnetisches Störungsrisiko:
Installieren Sie die GPS-Antenne nicht über
Sensoren oder Belüftungsschlitzen.
• Gefahr von Kurzschlüssen,
Fehlern und Beschädigungen des
Autonavigationssystems: Verändern Sie das
GPS-Antennenkabel nicht, und nehmen Sie
das Antennengehäuse nicht auseinander.
• Risiko von schlechtem Empfang: Verwenden
Sie nur die mitgelieferte Metallplatte, und
schneiden oder biegen Sie diese nicht.
Lackieren Sie die GPS-Antenne nicht.
• Risiko von Beschädigungen des GPS-
Antennenkabels: Ziehen Sie nie am
Antennenkabel, wenn Sie die Antenne
entfernen.
• Risiko von Kratzern am Auto: Das
GPS-Antennengehäuse verfügt über
einen Magneten. Wenn Sie die Antenne
installieren, oder entfernen, ziehen Sie sie
nicht über Metalloberächen.
2 Lieferumfang (Abb. 1)
Prüfen Sie zunächst den Verpackungsinhalt:
GPS-Antenne
a GPS-Antenne
b Metallplatte
c Klammern x 5
3 Anschließen der GPS-
Antenne (Abb. 2)
1 Verbinden Sie die GPS-Antenne mit Ihrem
Autonavigationssystem.
2 Verwenden Sie die mitgelieferte Schraube,
um die Anschlüsse zu befestigen.
4 Installieren der GPS-
Antenne (Abb. 3)
Sie können den Signalempfänger der GPS
Antenne an folgenden Positionen installieren:
• Auf der Armaturenbrettabdeckung
• An der Rückwand des Rückspiegels
Hinweis
• Vergewissern Sie sich, dass die
Kontaktäche, die mit der Metallplatte
Kontakt hat, frei von Feuchtigkeit, Staub,
Schmutz, Öl und anderem Schmutz ist.
• Wenn Sie die Metallplatte entfernen, kann
Klebstoff auf der Kontaktäche haften bleiben.
1 Entfernen Sie die Schutzabdeckung der
Metallplatte, und kleben Sie sie dann auf.
2 Kleben Sie das Antennengehäuse auf die
Metallplatte.
3 Verwenden Sie die Klammern, um das
Antennenkabel zu befestigen.
5 Produktinformationen
Hinweis
• Die Produktinformationen können ohne
vorherige Ankündigung geändert werden.
Antenne Integrierte
Keramik-
Patchantenne
Netzspannung 5 ± 0,2 V
Betriebstemperatur -20 ~ +70 °C
Kaltstart 28 s (typisch),
< 50 s
Warmstart 1 s (typisch),
< 3 s
Empfangsempndlichkeit -141 dBm
(typisch)
Navigationsempndlichkeit -158 dBm
(typisch)
Tracking-Empndlichkeit -158 dBm
(typisch)
Länge des Antennenkabels 3,0 m
Abmessungen des
Antennengehäuses
(B x H x T)
50 x 40 x 16 mm
6 Hinweis
Änderungen oder Modizierungen des Geräts,
die nicht ausdrücklich von Philips Consumer
Lifestyle genehmigt wurden, können zum
Erlöschen der Betriebserlaubnis führen.
Umweltschutz
Ihr Gerät wurde unter Verwendung
hochwertiger Materialien und
Komponenten entwickelt und
hergestellt, die recycelt und
wiederverwendet werden können.
Bendet sich dieses Symbol
(durchgestrichene Abfalltonne auf
Rädern) auf dem Gerät, bedeutet
dies, dass für dieses Gerät die
Europäische Richtlinie 2002/96/EG gilt.
Informieren Sie sich über die örtlichen
Bestimmungen zur getrennten Sammlung
elektrischer und elektronischer Geräte.
Richten Sie sich nach den örtlichen Bestimmungen
und entsorgen Sie Altgeräte nicht über Ihren
Hausmüll.
Durch die korrekte Entsorgung Ihrer Altgeräte
werden Umwelt und Menschen vor möglichen
negativen Folgen geschützt.
Umweltinformationen
Auf überüssige Verpackung wurde verzichtet.
Die Verpackung kann leicht in drei Materialtypen
getrennt werden: Pappe (Karton), Styropor
(Polsterung) und Polyethylen (Beutel,
Schaumstoff-Schutzfolie).
Ihr Gerät besteht aus Werkstoffen, die
wiederverwendet werden können, wenn das
Gerät von einem spezialisierten Fachbetrieb
demontiert wird. Bitte beachten Sie die
örtlichen Vorschriften zur Entsorgung von
Verpackungsmaterial, verbrauchten Batterien und
Altgeräten.
Copyright
2012 © Koninklijke Philips Electronics N.V.
Technische Daten können ohne vorherige
Ankündigung geändert werden. Die Marken sind
Eigentum von Koninklijke Philips Electronics N.V.
bzw. ihren jeweiligen Inhabern. Philips behält sich das
Recht vor, Produkte jederzeit ohne die Verpichtung
zu ändern, frühere Lieferungen entsprechend
nachzubessern.
Français
Félicitations pour votre achat et bienvenue chez
Philips ! Pour proter pleinement de l’assistance
offerte par Philips, enregistrez votre produit à
l’adresse suivante : www.philips.com/welcome.
1 Important
Lisez attentivement ces consignes avant d’utiliser
l’antenne et conservez-le pour consultation ultérieure.
Avertissement
• Risque de blessures : n'installez jamais
l'antenne et ses accessoires sur le cache de
l'airbag.
• Risque d'ingestion des pièces : gardez
l'antenne et ses accessoires hors de portée
des enfants.
Attention
• Risque d'interférences électromagnétiques :
n'installez pas l'antenne GPS sur un capteur
ou un orice de ventilation.
• Risque de court-circuit, de
dysfonctionnement et d'endommagement
de votre système de navigation : ne
modiez pas le câble de l'antenne GPS et ne
démontez pas le boîtier.
• Risque de mauvaise réception : n'utilisez
que la plaque de métal fournie, ne la
découpez pas et ne la tordez pas ; ne
peignez pas l'antenne GPS.
• Risque d'endommagement du câble de
l'antenne GPS : ne tirez jamais sur le câble
lorsque vous enlevez l'antenne.
• Risque de griffures sur votre voiture : le
boîtier de l'antenne GPS contient un aimant.
Lorsque vous l'installez ou l'enlevez, évitez
de le faire glisser sur une surface métallique.
Seite wird geladen ...
-
 1
1
-
 2
2


in anderen Sprachen
- English: Philips CSM102/12 User manual
- français: Philips CSM102/12 Manuel utilisateur
- italiano: Philips CSM102/12 Manuale utente
- Nederlands: Philips CSM102/12 Handleiding
- polski: Philips CSM102/12 Instrukcja obsługi
Verwandte Artikel
Andere Dokumente
-
TomTom Link 300 Installationsanleitung
-
Alpine INE-W INE-W611D Installationsanleitung
-
Kenwood KNA-G421 Bedienungsanleitung
-
Garmin GA™ 38 GPS/GLONASS Antenna Installationsanleitung
-
-
Mode d'Emploi Kenwood Série DDX 8026 BT Benutzerhandbuch
-
Mode d'Emploi Kenwood Série DNX 7220 Benutzerhandbuch