MULTIPLEX Automatiklader Mp 24 Duo Bedienungsanleitung
- Kategorie
- Autobatterieladegeräte
- Typ
- Bedienungsanleitung

Modellsport GmbH & Co. KG, Neuer Weg 2, D-75 223 NIEFERN
MP24/MP24 DUO Nr. 82 56 99
Automatic-Computer-Lader
MP 24 / MP 24 DUO
Bedienungsanleitung
Der Computer-Lader MP 24 ist ein mikroprozessorgesteuer-
tes Ladegerät für NiCd-Akkus. Der MP 24 DUO hat zusätzlich
noch ein Ladeteil für Empfängerakkus mit 4 oder 5 Zellen.
Ein 16-stelliges LCD informiert Sie über Ladestrom, Ladezeit,
Akkuspannung und Ladeschlußspannung (nur ohne Schutz-
diode zwischen Akku und Ladegerät). Am Ende eines Lade-
vorgangs werden Ladeschlußspannung und Ladezeit ge-
speichert, solange der Lader an der Autobatterie und der
NiCd-Akku am Lader angeschlossen bleibt. Falschpolung
oder eine zu tief entladene Autobatterie werden ebenfalls
angezeigt.
Im MP 24 DUO zeigen zwei LED den Betriebszustand für den
Ladeteil Empfängerakku an.
Start, "Akku voll", Falschpolung und "KFZ-Akku zu weit entla-
den" werden zusätzlich durch verschiedene akustische Si-
gnale gemeldet.
Der Ladestrom ist mit einem Potentiometer stufenlos von 0,4
A bis 3 A einstellbar. Wenn mehr als 21 Zellen geladen
werden, geht der Ladestrom u.U. während des Ladevorgangs
zurück, damit das Gerät nicht thermisch überlastet wird. Die
Anzahl der angeschlossenen Zellen erkennt das Gerät auto-
matisch.
Der Ladestrom für Empfängerakkus im MP 24 DUO beträgt
konstant 400 mA.
Alle Anschlüsse sind gegen Falschpolung geschützt. Eine
Überstrom- und Temperaturüberwachung verhindert das Über-
hitzen des Gerätes (direkte Sonnenbestrahlung, Laden von
Akkus mit mehr als 24 Zellen).
Technische Daten
MP 24 und MP 24 DUO
z Eingangsspannung: Autobatterie 12V
z Ausgang für 4 bis 24 NiCd-Zellen
z Ausgangsstrom: 0,4 bis 3 A stufenlos regelbar
z Ruhestrom: 20 mA
z Abmessungen: ca. 175 x 115 x 32 mm
z Gewicht: ca. 410 Gramm
nur MP 24 DUO
z Ausgang: 4 oder 5 NiCd-Zellen
z Ausgangsstrom: 400 mA
4 bis 24 Zellen laden mit 0,4 bis 3 A
MP 24 und MP 24 DUO
1.Ladegerät an Autobatterie 12V anschließen.
Auf guten Kontakt achten!
z ROT = PLUS (+)
z SCHWARZ = MINUS (-)
Nach dem Anschließen der 12 V-Autobatterie erscheint im
Display "READY" = bereit.
2.Stromeinstellknopf ganz nach links drehen (kleinster Lade-
strom).
3.NiCd-Akku an die Buchsen auf der rechten Seite der Frontplatte
anschließen.
z ROT = PLUS (+)
z SCHWARZ = MINUS (-)
Im Display sollte jetzt die aktuelle Akkuspannung und die
Aufforderung den Ladevorgang zu beginnen ("START") an-
gezeigt werden.
Best.Nr. 9 2514 MP24
Best.Nr. 9 2515 MP24 DUO
, Sicherheitshinweise!
Blanke Kontakte/Anschlüsse nicht berühren.
Dieses Gerät ist nur zum Betrieb an 12 V - Au-
tobatterien geeignet. Nicht an andere Stromquellen
anschließen.
Wenn NiCd-Akkus auslaufen, können am Ausgang
gefährliche Spannungen auftreten.
Nur isolierte Stecker verwenden.
,Wenn das Wort "READY" noch im Display steht, ist der
angeschlossene Akku entweder tiefentladen oder durch
eine Diode gegen Verpolung geschützt (in manchen Sen-
dern eingebaut). Wenn Sie jetzt die Taste "Unterspannung"
drücken und festhalten, können Sie den Ladevorgang trotz-
dem starten (wie unter Punkt 4. beschrieben).
4.Ladevorgang starten
a.Wenn im Display die Akkuspannung angezeigt wird:
Mit einem kurzen Druck auf "START" den Ladevorgang
beginnen. Anschließend den Ladestrom einstellen (4.c).
b.Wenn im Display noch "READY" steht
Taste "Unterspannung" drücken und festhalten und dann
mit einem kurzen Druck auf "START" den Ladevorgang
beginnen.
c.Stellen Sie nun einen Ladestrom ein, der für den ange-
schlossenen Akku geeignet ist. Beachten Sie dabei die
Empfehlungen des Akkuherstellers. Als Richtwert für schnell-
adefähige MULTIPLEX-Akkus empfehlen wir 2 x C, d.h.
Kapazität des Akku in Ah x 2 = Ladestrom in A.
Die Spannung, die nach dem Drücken der Taste "Unter-
spannung" angezeigt wird, ist nicht die tatsächliche Akku-
spannung. Wenn Sie die Tasten "START" und "Unter-
spannung" wieder losgelassen haben, erscheint im Dis-
play die Summe von Akkuspannung und Durchlaßspannung
der Diode.
4- oder 5-zellige Empfängerakkus
laden mit 400 mA
Nur MP 24 DUO !
1.Ladegerät an Autobatterie 12V anschließen.
Auf guten Kontakt achten!
z ROT = PLUS (+)
z SCHWARZ = MINUS (-)
Nach dem Anschließen der Autobatterie erscheint im Dis-
play "READY" = bereit.
2.Empfängerakku an die Buchsen auf der linken Seite der
Frontplatte anschließen. Der Ladevorgang wird beim An-
schließen automatisch gestartet.
z ROT = PLUS (+)
z SCHWARZ = MINUS (-)
Die rote LED "Laden" leuchtet auf, und ein Triller quittiert
den Start des Ladevorgangs auch akustisch.
3.Das Ende des Ladevorgangs wird ebenfalls mit einem
Triller signalisiert, und die grüne LED "Fertig" leuchtet auf.
Trennen Sie nun den Akku vom Ladegerät.

Modellsport GmbH & Co. KG, Neuer Weg 2, D-75 223 NIEFERN
MP24/MP24 DUO Nr. 82 56 99
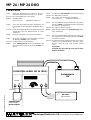
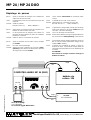
MP 24 / MP 24 DUO
400 mA
-+ -+
rot
schwarz
+
-
schwarz
rot
schwarz rot
Autobatterie
12V
NiCd-Akku
4 bis 24 Zellen
Empfängerakku
4 oder 5 Zellen
Nur MP 24 DUO!
COMPUTER-LADER MP 24 (DUO)
Fehler: Nach dem Anklemmen des Laders an die 12 V-
Autobatterie erfolgt keine Anzeige im LC-Display.
Ursache: Die Anschlußklemmen sind verpolt.
Abhilfe: Polarität prüfen!
ROT = PLUS (+) SCHWARZ = MINUS (-)
Fehler: Auch nach dem polungsrichtigen Anklemmen des
Ladegerätes an die Autobatterie erfolgt keine Anzei-
ge.
Ursache: Durch mehrmaliges Berühren der Batteriepole beim
Anschließen, kann der Mikroprozessor im Lader
"abstürzen".
Abhilfe: Klemmen abnehmen und erneut anschließen.
Fehler: Nach dem Anschließen des NiCd-Akkus erscheint
die Meldung "START" nicht im Display.
Ursache: Der NiCd-Akku ist zu tief entladen.
Abhilfe: Taste "Unterspannung" drücken und festhalten und
dann den Ladevorgang mit der Taste "START" be-
ginnen.
Fehler: Die Warnung "FALSCHPOL!" erscheint im Display.
Ursache: Der NiCd-Akku ist verpolt.
Abhilfe: Anschlüsse des NiCd-Akkus vertauschen.
ROT = PLUS (+) SCHWARZ = MINUS (-)
Fehler: Der Schnelladevorgang wird kurz nach dem Drük-
ken der "START"-Taste wieder beendet, obwohl der
NiCd-Akku noch entladen ist.
Ursache: Der Akku ist sehr tief entladen.
Abhilfe: Start mit gedrückter Taste "Unterspannung" mehr-
fach wiederholen.
Fehler: Der Schnelladevorgang wird beendet, obwohl der
NiCd-Akku noch nicht voll ist und die Warnung "KFZ!"
erscheint im Display.
Ursache: Die Spannung der Autobatterie ist unter 10,5 V abge-
sunken. Der Schnelladevorgang wird dann unter-
brochen, damit das Auto noch gestartet werden
kann.
ACHTUNG!
Klemmen Sie den Lader ab, bevor Sie die Auto-
batterie nachladen.
Fehlersuche

Modellsport GmbH & Co. KG, Neuer Weg 2, D-75 223 NIEFERN
MP24/MP24 DUO Nr. 82 56 99
Automatic computer charger
MP 24 / MP 24 DUO
Operating instructions
The MP 24 computer charger is a micro-processor controlled
unit designed for recharging NC batteries. The MP 24 DUO can
also charge NC receiver battery packs (4 or 5 NC cells).
A 16 character LCD panel keeps you informed of the charge
current, charge period, battery voltage and final charged volta-
ge. At the end of the process the final voltage and charge period
are stored for as long as the unit is left connected to the car
battery. The display also warns you of reversed polarity or
insufficient car battery voltage.
The MP 24 DUO also features two LEDs which indicate the
charge status of the receiver battery.
Different audible signals are provided to indicate start, battery
full, reversed polarity and car battery discharged.
The charge current is infinitely variable within the range 0.4 A
to 3 A by means of a potentiometer. The charger automatically
detects the number of NC cells connected to it.
Diode protected or deeply discharged batteries can also be
charged by means of the “Unterspannung” (low voltage) but-
ton.
The MP 24 DUO provides a constant 400 mA current for
recharging receiver batteries.
All terminals are fitted with reverse polarity protection systems.
The unit is protected against overheating (as a result of direct
sunshine, charging too many cells etc.) by monitor circuits
which guard against excess current and temperature.
Specification
MP 24 and MP 24 DUO
z Input voltage: 12V DC - car battery
z Output : 4 to 24 NiCd cells
z Output current: 0.4A to 3A, infinitely variable
z Input current - no load connected: 20 mA
z Dimensions: approx. 175 x 115 x 32 mm
z Weight: approx. 410g
MP 24 DUO only
z Output: 4 or 5 NiCd cells
z Output current: 400 mA
Charging 4 to 24 cells at 0.4 to 3 A
MP 24 and MP 24 DUO
1.Connect the charger to a 12 V car battery.
Check that both clips are making good contact.
z RED = POSITIVE (+)
z BLACK = NEGATIVE (-)
When the 12 V car battery is connected you will see the
message READY in the display.
2.Rotate the current adjustor knob fully anti-clockwise (minimum
charge current).
3.Connect the NC battery to the output sockets on the right hand
side of the front panel of the charger.
z RED = POSITIVE (+)
z BLACK = NEGATIVE (-)
The voltage of the NC pack should now appear in the display,
together with the word "START", indicating that the MP 24 is
ready to charge the NC battery.
Order No. 9 2514 MP24
Order No. 9 2515 MP24
DUO
,If the word "READY" is still visible, the NC pack is either
discharged too deeply or protected against reverse polarity by
a built-in diode (sometimes used in transmitters). If you now
hold down the button "Unterspannung" (low voltage) you can
start the charging procedure with the "START" button as
described in step 4.
4. Start the charge process.
a.If the battery voltage appears in the display:
Start the charge process by pressing the "START" button
briefly. You can then set the charge current to the correct value
(4.c).
b.If the display still shows "READY":
Press and hold the "Unterspannung" (low voltage) button,
then start the charge process by pressing the "START" button
briefly.
c.Be sure to set a charge current which is suitable for the battery
connected to the unit. Refer to the battery manufacturer’s
information if you are not sure.
For MULTIPLEX batteries we recommend 2 x C as a starting
point, i.e. battery capacity in Ah x 2 = charge current in A.
The voltage indicated when the "Unterspannung" (low voltage)
button is pressed does not refer to the actual voltage of the NC
pack. When you release the "START" and "Unterspannung"
buttons the voltage of the NC pack is increased by the forward
voltage of the diode; it is this value which appears in the display.
Charging 4- or 5-cell
NiCd receiver batteries at 400 mA
MP 24 DUO only !
1.Connect the charger to a 12 V car battery.
Check that both clips are making good contact.
z RED = POSITIVE (+)
z BLACK = NEGATIVE (-)
When the 12 V car battery is connected you will see the
message "READY" in the display.
2.Connect the receiver battery to the output sockets on the left
hand side of the front panel of the charger. This will automati-
cally start the charging process.
z RED = POSITIVE (+)
z BLACK = NEGATIVE (-)
The red LED marked "Laden" (charge) should now light up and
a series of audible beeps indicates that the charging process
has started.
3.When the battery is fully charged a series of beeps sounds and
the green LED "Fertig" (complete) lights up. You can now
disconnect the battery from the charger.
, Safety notes
Do not touch any bare contacts or connections.
This unit is designed specifically for use with a 12V
DC battery (car battery). Do not connect it to any
other power source.
Dangerous voltages can be present at the output
sockets when NiCd batteries are faulty.
Always use insulated plugs.

Modellsport GmbH & Co. KG, Neuer Weg 2, D-75 223 NIEFERN
MP24/MP24 DUO Nr. 82 56 99
Fault: Nothing appears on the display when you connect
the charger to a 12 V car battery.
Cause: You have connected the battery clips the wrong way
round (reverse polarity).
Remedy: Check and correct polarity.
RED = POSITIVE (+) BLACK = NEGATIVE (-)
Fault: Nothing appears on the display even when you
connect the car battery the right way round.
Cause: Touching the battery terminals several times when
making the connections can cause the charger’s
micro-processor to “crash”.
Remedy: Disconnect the battery clips, then re-connect them.
Fault: You connect the NiCd battery, but the "START"
message does not appear in the display.
Cause: The NiCd battery is deep-discharged.
Remedy: Press and hold the "Unterspannung" (low voltage)
button, then start the charge process by pressing
the "START" button.
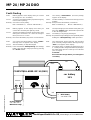
MP 24 / MP 24 DUO
Fault-Finding
COMPUTER-LADER MP 24 (DUO)
400 mA
-+ -+
receiver battery
4 or 5 NC cells
MP 24 DUO only!
+
-
black
red
red
black
black
red
car battery
12 V
Fault: The warning "FALSCHPOL!" (incorrect polarity)
appears in the display.
Cause: The NiCd battery is connected incorrectly (reverse
polarity).
Remedy: Swap over the NiCd battery connections.
RED = POSITIVE (+) BLACK = NEGATIVE (-)
Fault: The rapid-charge process finishes shortly after you
press the "START" button, but the NiCd pack is still
in the discharged state.
Cause: The battery is very deeply discharged.
Remedy: Repeat the charge starting process repeatedly whilst
holding the "Unterspannung" button pressed in.
Fault: The rapid-charge process finishes, but the NiCd
pack is not fully charged and the warning message
"KFZ!" (car) appears in the display.
Cause: The voltage of the car battery has fallen below 10.5
V. At this point the charger automatically interrupts
the rapid-charge process so that you can still start
your car engine.
CAUTION!
Disconnect the charger before you recharge the
car battery.
NiCd-battery
4 to 24 NC cells

Modellsport GmbH & Co. KG, Neuer Weg 2, D-75 223 NIEFERN
MP24/MP24 DUO Nr. 82 56 99
Chargeur automatique digital
MP 24 / MP 24 DUO
Notice d'utilisation
Le chargeur digital MP 24 pour accus NC est un appareil
commandé par un micro-processeur. Le MP 24 DUO possède
en plus une possibilité de charge d’accus de réception avec
4 ou 5 éléments.
Un écran LCD de 16 chiffres indique le courant de charge, le
temps de charge, la tension d’accu et la tension de fin de
charge (seulement sans diode de protection entre accu et
chargeur). A la fin du procédé de charge, l’appareil mémorise
la tension de fin de charge et la durée de charge tant que le
chargeur reste connecté sur la batterie de voiture et l’accu NC
sur le chargeur. Ce dernier indique également une mauvaise
polarisation ou une batterie de voiture trop déchargée.
Le MP 24 DUO est équipé de 2 LED qui indiquent l’état de
charge de I’accu de réception. Les états de: début de charge,
accu plein, mauvaise polarité et batterie de voiture trop
déchargée - sont indiqués par des signaux acoustiques
différents.
Le courant de charge est réglable de façon progressive de
0,4A à 3A. Pendant une charge de plus de 21 éléments le
courant de charge peut éventuellement diminuer pour éviter
ainsi une surcharge thermique de l’appareil qui détecte
automatiquement le nombre d’éléments connectés.
Le courant de charge pour accus de réception dans le MP 24
DUO est constant et s’élève à 400mA.
Toutes les connexions sont protégées contre une mauvaise
polarité. Un contrôle de surcharge et de température empêche
la surchauffe éventuelle de l’appareil (exposition directe au
soleil, charge d’accus de plus de 24 éléments).
Caractéristiques techniques
MP 24 et MP 24 DUO
z tension d’entrée: 12V DC (batterie de voiture)
z sortie pour 4 à 24 éléments NC
z courant de sortie: progressif de 0,4 à 3A
z courant d’entretien: 20 mA
z dimensions: environ 175 x 115 x 32 mm
z poids: environ 410g
ne concerne que le MP 24 DUO
z sortie: 4 ou 5 éléments NC
z courant de sortie: 400mA
Charger 4 à 24 éléments avec 0,4 à 3A
MP 24 et MP 24 DUO
1.Connecter le chargeur sur une batterie 12V de voiture.
S’assurer du bon contact!
z ROUGE = PLUS (+)
z NOIR = MOINS (-)
Après la connexion sur la batterie 12V l’écran indique READY
= prêt.
2.Tourner le régulateur jusqu’à sa butée gauche (= courant le
plus faible).
3.Connecter l’accu NC dans les douilles sur le côté droit de la
platine frontale.
z ROUGE = PLUS (+)
z NOIR = MOINS (-)
L’écran doit indiquer maintenant la tension actuelle de l’accu
et l’invitation de déclencher le procédé de charge (START).
,Si le mot READY se trouve toujours sur l’écran, l’accu connecté
est soit déchargé excessivement soit protégé par une diode
contre une mauvaise polarisation (intégrée dans certains
émetteurs). En appuyant de façon soutenue sur la touche
“Unterspannung” (sous-tension), il est possible de déclencher
le procédé de charge (décrit au paragraphe 4).
4. Déclencher le procédé de charge
a.L'écran indique la tension d’accu:
déclencher le procédé de charge en appuyant rapidement sur
START. Régler ensuite l'intensité du courant de charge (4c.).
b.L’écran indique toujours READY:
appuyer de façon soutenue sur la touche "Unterspannung"
(sous-tension) et déclencher le procédé de charge avec une
petite pression sur START.
c. Régler le courant de charge approprié à l'accu connecté. Suivez
les conseils du fabricant d’accu.
Nous recommandons comme valeur indicative pour les accus
à charge rapide MULTIPLEX 2 x C, c.à.d. capacité de l'accu en
Ah x 2 = courant de charge en A.
La tension indiquée après avoir appuyé sur la touche "Unter-
spannung” (sous-tension) ne représente pas la tension d’accu
réelle. Après avoir relâché les touches “Unterspannung“
(sous-tension), l'écran indique la somme de la tension d’accu
et de la tension directe de la diode.
Charger des accus de réception de 4
ou 5 éléments avec 400mA
ne concerne que le MP 24 DUO
1.Connecter le chargeur sur une batterie de voiture 12V.
S'assurer du bon contact!
z ROUGE = PLUS (+)
z NOIR = MOINS (-)
Après la connexion sur la batterie de voiture 12V l'écran indique
READY = prêt.
2.Connecter l'accu de réception dans les douilles sur le côté
gauche de la platine frontale. Le procédé de charge est
déclenché automatiquement à la connexion.
z ROUGE = PLUS (+)
z NOIR = MOINS (-)
Le LED rouge "Laden" (charger) s’allume, un trille sonore
signalise la mise en route du procédé de charge.
3.La fin du procédé de charge est signalisée également par un
trille et le LED vert "Fertig" (termine) s’allume. Déconnecter
l'accu du chargeur.
, Consignes de sécurité!
Ne pas toucher des contacts/connexions dénudés!
Cet appareil ne convient que pour l'utilisation sur
une batterie de voiture 12V DC. Ne pas connecter sur
d’autres sources de courant.
Un écoulement accidentel des accus NC peut
provoquer des tensions dangereuses à la sortie.
N'utiliser que des connecteurs isolés.
réf. 9 2514 MP24
réf. 9 2515 MP24 DUO

Modellsport GmbH & Co. KG, Neuer Weg 2, D-75 223 NIEFERN
MP24/MP24 DUO Nr. 82 56 99
MP 24 / MP 24 DUO
panne: après la connexion du chargeur sur la batterie de
voiture 12V l'écran reste vide
cause: la polarité des pinces de raccordement n'a pas été
respecté
remède: vérifier la polarité!
ROUGE = PLUS (+) NOIR = MOINS (-)
panne: même après la connexion exacte du chargeur sur la
batterie de voiture l'écran reste vide
cause: le micro-processeur du chargeur peut "chuter" en
touchant de façon répétée les pôles de la batterie
pendant la connexion
remède: retirer les pinces et connecter de nouveau
panne: après la connexion de l'accu NC l'écran n'indique
pas START
cause: l'accu NC est trop déchargé
remède: appuyer de façon soutenue sur la touche "Unter-
spannung" (sous-tension) et déclencher le procédé
de charge avec la touche START
panne: l'écran avertit: "FALSCHPOL !" (mauvaise polari-
sation)
cause: la polarité de l'accu NC a été inversée
remède: interchanger les connexions de l'accu NC
ROUGE = PLUS (+) NOIR = MOINS (-)
panne: le procédé de charge rapide s'arrête peu de temps
après avoir appuyé sur la touche START bien que
l'accu NC soit encore déchargé
cause: l'accu est déchargé excessivement
remède: déclencher le début de charge en appuyant plusieurs
fois sur la touche "Unterspannung" (sous-tension)
panne: le procédé de charge rapide s'arrête bien que l'accu
NC ne soit pas encore entièrement chargé, l'écran
indique "KFZ" (voiture)
cause: la tension de la batterie de voiture a chuté en-
dessous de 10,5V. Le procédé de charge rapide est
interrompu pour permettre encore un démarrage de
la voiture
ATTENTION!
Déconnecter le chargeur avant de recharger la
batterie de voiture!
Dépistage de pannes
400 mA
-+ -+
+
-
batterie de
voiture 12V
accu NC
4 à 24 éléments
COMPUTER-LADER MP 24 (DUO)
rouge
noir
noir
noir
rouge
rouge
accu de réception
4 ou 5 éléments
ne concerne que le MP 24 DUO!
-
 1
1
-
 2
2
-
 3
3
-
 4
4
-
 5
5
-
 6
6


MULTIPLEX Automatiklader Mp 24 Duo Bedienungsanleitung
- Kategorie
- Autobatterieladegeräte
- Typ
- Bedienungsanleitung