Zanussi ZOB65301XK Benutzerhandbuch
- Kategorie
- Mikrowellen
- Typ
- Benutzerhandbuch


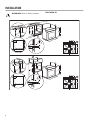
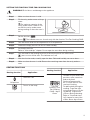
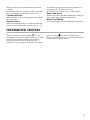
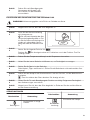
INSTALLATION
WARNING! Refer to Safety chapters.
BUILDING IN
18
594
589
114
21548
595
+-1
min. 550
20
600
min. 560
3
5
60
20
80
520
60
198
523
(*mm)
min. 550
20
595
+-1
18
590
min. 560
594
589
114
21548
3
5
70
60
520
60
20
198
523
(*mm)
2

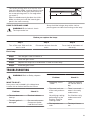
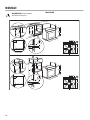
SECURING THE OVEN TO THE CABINET
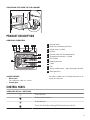
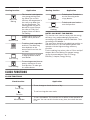
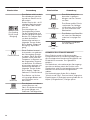
PRODUCT DESCRIPTION
GENERAL OVERVIEW
9
8
12
5
4
1
2
3
4 7631 52
10
11
1
Control panel
2
Knob for the heating functions
3
Power lamp / symbol
4
Display
5
Control knob (for the temperature)
6
Temperature indicator / symbol
7
Plus Steam
8
Heating element
9
Lamp
10
Fan
11
Cavity embossment - Aqua cleaning container
12
Shelf positions
ACCESSORIES
• Wire shelf
For cookware, cake tins, roasts.
• Combi pan
For cakes and biscuits. To bake and roast or as
a pan to collect fat.
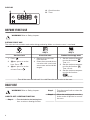
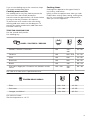
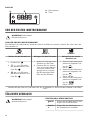
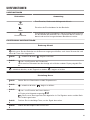
CONTROL PANEL
SENSOR FIELDS / BUTTONS
To set the time.
To set a clock function.
To set the time.
To turn the True Fan Cooking PLUS function on and off.
3

DISPLAY
A B
A. Clock functions
B. Timer
BEFORE FIRST USE
WARNING! Refer to Safety chapters.
BEFORE FIRST USE
The oven can emit an odour and smoke during preheating. Make sure that the room is ventilated.
Step 1 Step 2
Step 3
Set the clock Clean the oven Preheat the empty oven
1. Press: .
2. , - press to set the
hour. Press: .
3. , - press to set the
minutes. Press: .
1. Remove all accessories
from the oven.
2. Clean the oven and the ac-
cessories with a soft cloth,
warm water and a mild de-
tergent.
1. Set the maximum tempera-
ture for the function: .
Time: 1 h.
2. Set the maximum tempera-
ture for the function: .
Time: 15 min.
3. Set the maximum tempera-
ture for the function:
.
Time: 15 min.
Turn off the oven and wait until it is cold. Place the accessories in the oven.
DAILY USE
WARNING! Refer to Safety chapters.
HOW TO SET: HEATING FUNCTION
Step 1 Turn the knob for the heating func-
tions to select a heating function.
Step 2 Turn the control knob to select the
temperature.
Step 3 When the cooking ends, turn the
knobs to the off position to turn off
the oven.
4

SETTING THE FUNCTION: TRUE FAN COOKING PLUS
WARNING! Risk of burns and damage to the appliance.
Step 1 Make sure that the oven is cold.
Step 2 Fill the cavity embossment with tap
water.
The maximum capacity of the
cavity embossment is 250 ml. Do
not refill the cavity embossment
during cooking or when the oven is
hot.
Step 3
Set the function: .
Press: . The indicator turns on. It works only with the function: True Fan Cooking PLUS.
Step 4 Turn the control knob for the temperature to set temperature.
Step 5 Preheat the empty oven for 10 min to create humidity.
Step 6 Put food in the oven.
Refer to "Hints and tips" chapter. Do not open the oven door during cooking.
Step 7 Turn the knob for the heating functions to the off position to turn off the oven.
- press to turn off the oven. The indicator turns off.
Step 8 After the function ends, carefully open the door. Released humidity can cause burns.
Step 9 Make sure that the oven is cold. Remove the remaining water from the cavity emboss-
ment.
HEATING FUNCTIONS
Heating function Application
Off position
The oven is off.
Light
To turn on the lamp.
Heating function Application
True Fan
Cooking / True
Fan Cooking
PLUS / Aqua
Clean
To bake on up to three shelf
positions at the same time
and to dry food.
Set the temperature 20 -
40 °C lower than for Con-
ventional Cooking.
To add humidity during the
cooking. To get the right
colour and crispy crust dur-
ing baking. To give more
juiciness during reheating.
Refer to "Care and clean-
ing" chapter for more infor-
mation about: Aqua Clean.
5

Heating function Application
Moist Fan
Baking
This function is designed to
save energy during cook-
ing. When you use this
function, the temperature in
the cavity may differ from
the set temperature. The
heating power may be re-
duced. For more informa-
tion refer to "Daily Use"
chapter, Notes on: Moist
Fan Baking.
Bottom Heat
To bake cakes with crispy
bottom and to preserve
food.
Defrost
To defrost food (vegetables
and fruit). The defrosting
time depends on the
amount and size of the fro-
zen food.
Fast Grilling
To grill thin pieces of food
in large quantities and to
toast bread.
Turbo Grilling
To roast large meat joints or
poultry with bones on one
shelf position. To make gra-
tins and to brown.
Heating function Application
Pizza Function
To bake pizza. To make in-
tensive browning and a
crispy bottom.
Conventional
Cooking
To bake and roast food on
one shelf position.
NOTES ON: MOIST FAN BAKING
This function was used to comply with the energy
efficiency class and ecodesign requirements
according to EU 65/2014 and EU 66/2014. Tests
according to EN 60350-1.
The oven door should be closed during cooking so
that the function is not interrupted and the oven
operates with the highest energy efficiency
possible.
For the cooking instructions refer to "Hints and tips"
chapter, Moist Fan Baking. For general energy
saving recommendations refer to "Energy
Efficiency" chapter, Energy Saving.
CLOCK FUNCTIONS
CLOCK FUNCTIONS
Clock function Application
Time of Day
To set, change or check the time of day.
Duration
To set how long the oven works.
Minute Minder
To set a countdown. This function has no effect on the operation of
the oven. You can set this function at any time, also when the oven
is off.
6

HOW TO SET: CLOCK FUNCTIONS
How to change: Time of Day
- flashes when you connect the oven to the electrical supply, when there was a power cut or when
the timer is not set.
Step 1
- press repeatedly. - starts to flash.
Step 2
, - press to set the time.
After approximately 5 sec., the flashing stops and the display shows the time.
- press repeatedly to change the time of day. - starts to flash.
How to set: Duration
Step 1 Set an oven function and the temperature.
Step 2
- press repeatedly. - starts to flash.
Step 3
, - press to set the duration.
The display shows: .
- flashes when the set time ends. The signal sounds and the oven turns off.
Step 4 Press any button to stop the signal.
Step 5 Turn the knobs to the off position.
How to set: Minute Minder
Step 1
- press repeatedly. - starts to flash.
Step 2
, - press to set the time.
The function starts automatically after 5 sec.
When the set time ends, the signal sounds.
Step 3 Press any button to stop the signal.
Step 4 Turn the knobs to the off position.
How to cancel: Clock functions
Step 1
- press repeatedly until the clock function symbol starts to flash.
Step 2
Press and hold: .
The clock function turns off after few seconds.
7

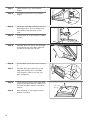
USING THE ACCESSORIES
WARNING! Refer to Safety chapters.
INSERTING ACCESSORIES
Wire shelf:
Push the shelf between the guide bars of
the shelf support and make sure that the
feet point down.
Deep pan:
Push the tray between the guide bars of the
shelf support.
ADDITIONAL FUNCTIONS
COOLING FAN
When the oven operates, the cooling fan turns on
automatically to keep the surfaces of the oven cool.
If you turn off the oven, the cooling fan can continue
to operate until the oven cools down.
SAFETY THERMOSTAT
Incorrect operation of the oven or defective
components can cause dangerous overheating. To
prevent this, the oven has a safety thermostat which
interrupts the power supply. The oven turns on
again automatically when the temperature drops.
HINTS AND TIPS
Refer to Safety chapters.
COOKING RECOMMENDATIONS
The oven has five shelf positions.
Count the shelf positions from the bottom of the
oven floor.
Your oven may bake or roast differently to the oven
you had before. The below tables provide you with
the standard settings for temperature, cooking time
and shelf position.
If you cannot find the settings for a special recipe,
look for the similar one.
The oven has a special system which circulates the
air and constantly recycles the steam. With this
system you can cook in a steamy environment and
keep the food soft inside and crusty outside. It
decreases the cooking time and energy
consumption.
Baking cakes
Do not open the oven door before 3/4 of the set
cooking time is up.
8

If you use two baking trays at the same time, keep
one empty level between them.
Cooking meat and fish
Use a deep pan for very fatty food to prevent the
oven from stains that can be permanent.
Leave the meat for approximately 15 minutes before
carving so that the juice does not seep out.
To prevent too much smoke in the oven during
roasting, add some water into the deep pan. To
prevent the smoke condensation, add water each
time after it dries up.
Cooking times
Cooking times depend on the type of food, its
consistency, and volume.
Initially, monitor the performance when you cook.
Find the best settings (heat setting, cooking time,
etc.) for your cookware, recipes and quantities
when you use this appliance.
TRUE FAN COOKING PLUS
Use the second shelf position.
Use a baking tray.
CAKES / PASTRIES / BREADS
(ml) (°C) (min)
Cookies / Scones / Croissants 100 150 -
180
10 - 20
Focaccia 100 200 - 210 10 - 20
Pizza 100 230 10 - 20
Bread rolls 100 200 20 - 25
Bread 100 180 35 - 40
Plum cake / Apple pie / Cinnamon rolls, baked in a cake
mould
100 - 150 160 -
180
30 - 60
Use 150 ml of water unless specified otherwise.
FROZEN READY MEALS
(°C) (min)
Pizza 200 - 210 10 - 20
Croissants 170 - 180 15 - 25
Lasagne, use 200 ml 180 - 200 35 - 50
Use 100 ml of water.
Set the temperature to 110 °C.
9

FOOD REGENERATION
(min)
Bread rolls 10 - 20
Bread 15 - 25
Focaccia 15 - 25
Meat 15 - 25
Pasta 15 - 25
Pizza 15 - 25
Rice 15 - 25
Vegetables 15 - 25
Use 200 ml of water.
Use a glass baking dish.
ROASTING
(°C) (min)
Roast beef 200 50 - 60
Chicken 210 60 - 80
Roast pork 180 65 - 80
CARE AND CLEANING
WARNING! Refer to Safety chapters.
NOTES ON CLEANING
Cleaning
Agents
Clean the front of the oven with a soft cloth with warm water and a mild detergent.
Clean and check the door gasket around the frame of the cavity.
Use a cleaning solution to clean metal surfaces.
Clean stains with a mild detergent.
10

Everyday
Use
Clean the cavity after each use. Fat accumulation or other residue may cause fire.
Moisture can condense in the oven or on the door glass panels. To decrease the
condensation, let the oven work for 10 minutes before cooking. Do not store the
food in the oven for longer than 20 minutes. Dry the cavity with a soft cloth after
each use.
Accessories
Clean all accessories after each use and let them dry. Use a soft cloth with warm
water and a mild detergent. Do not clean the accessories in a dishwasher.
Do not clean the non-stick accessories using abrasive cleaner or sharp-edged ob-
jects.
HOW TO CLEAN: CAVITY EMBOSSMENT
Clean the cavity embossment to remove limestone
residue after cooking with steam.
Step 1 Step 2 Step 3
Pour: 250 ml of white vinegar
into the cavity embossment.
Use maximum 6% vinegar
without any additives.
Let the vinegar dissolve the
limestone residue at the ambi-
ent temperature for 30 mi-
nutes.
Clean the cavity with warm wa-
ter and a soft cloth.
For the function: True Fan Cooking PLUS clean the oven for every 5 - 10 cooking cycles.
HOW TO USE: AQUA CLEAN
This cleaning procedure uses humidity to remove
remaining fat and food particles from the oven.
Step 1 Pour water into the cavity emboss-
ment: 200 ml.
Step 2
Set the function: .
Press: .
Step 3 Set the temperature to 90 °C.
Step 4 Let the oven work for 30 min.
Step 5 Turn off the oven.
Step 6 Wait until the oven is cold. Dry the
cavity with a soft cloth.
HOW TO REMOVE AND INSTALL: DOOR
The oven door has two glass panels. You can remove the oven door and the internal glass panel to clean it.
Read the whole "Removing and installing door" instruction before you remove the glass panels.
CAUTION! Do not use the oven without the glass panels.
11

Step 1 Open the door fully and hold both
hinges.
Step 2 Lift and turn the levers fully on both
hinges.
Step 3 Close the oven door halfway to the first
opening position. Then lift and pull for-
ward and remove the door from its
seat.
Step 4 Put the door on a soft cloth on a stable
surface.
Step 5 Hold the door trim (B) on the top edge
of the door at the two sides and push
inwards to release the clip seal.
Step 6 Pull the door trim to the front to remove
it.
1
2
B
Step 7 Hold the door glass panel by its top
edge and carefully pull it out. Make
sure the glass slides out of the sup-
ports completely.
Step 8 Clean the glass panels with water and
soap. Dry the glass panels carefully. Do
not clean the glass panels in the dish-
washer.
Step 9 After cleaning, install the glass panel
and the oven door.
12

The screen-printing zone must face the inner
side of the door. Make sure that after the instal-
lation the surface of the glass panel frame on
the screen-printing zones is not rough when
you touch it.
When installed correctly the door trim clicks.
Make sure that you install the internal glass
panel in the seats correctly.
A
HOW TO REPLACE: LAMP
WARNING! Risk of electric shock.
The lamp can be hot.
Always hold the halogen lamp with a cloth to
prevent grease residue from burning on the lamp.
Before you replace the lamp:
Step 1 Step 2 Step 3
Turn off the oven. Wait until the
oven is cold.
Disconnect the oven from the
mains.
Put a cloth on the bottom of
the cavity.
Back lamp
Step 1 Turn the glass cover to remove it.
Step 2 Clean the glass cover.
Step 3 Replace the lamp with a suitable 300 °C heat-resistant lamp.
Step 4 Install the glass cover.
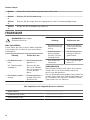
TROUBLESHOOTING
WARNING! Refer to Safety chapters.
WHAT TO DO IF...
In any cases not included in this table please
contact with an Authorised Service Centre.
Problem Check if...
The oven does not
heat up.
The fuse is blown.
The door gasket is
damaged.
Do not use the oven.
Contact an Author-
ised Service Centre.
Problem Check if...
The display shows
"12.00".
There was a power
cut. Set the time of
day.
The water leaks out
of the cavity emboss-
ment.
There is too much
water in the cavity
embossment.
Unsatisfying cooking
performance of the
function: True Fan
Cooking PLUS .
You filled the cavity
embossment with
water.
The lamp does not
work.
The lamp is burnt
out.
13

SERVICE DATA
If you cannot find a solution to the problem yourself,
contact your dealer or an Authorised Service
Centre.
The necessary data for the service centre is on the
rating plate. The rating plate is on the front frame of
the oven cavity. Do not remove the rating plate from
the oven cavity.
We recommend that you write the data here:
Model (MOD.) .........................................
Product number (PNC) .........................................
Serial number (S.N.) .........................................
ENERGY EFFICIENCY
PRODUCT INFORMATION AND PRODUCT INFORMATION SHEET*
Supplier's name Zanussi
Model identification ZOB65301XK 949499037
Energy Efficiency Index 95.2
Energy efficiency class A
Energy consumption with a standard load, conventional
mode
0.89 kWh/cycle
Energy consumption with a standard load, fan-forced mode 0.80 kWh/cycle
Number of cavities 1
Heat source Electricity
Volume 68 l
Type of oven Built-In Oven
Mass 26.7 kg
* For European Union according to EU Regulations 65/2014 and 66/2014.
For Republic of Belarus according to STB 2478-2017, Appendix G; STB 2477-2017, Annexes A and
B.
For Ukraine according to 568/32020.
Energy efficiency class is not applicable for Russia.
EN 60350-1 - Household electric cooking appliances - Part 1: Ranges, ovens, steam ovens and grills
- Methods for measuring performance.
ENERGY SAVING
The oven has features which help you
save energy during everyday cooking.
Make sure that the oven door is closed when the
oven operates. Do not open the oven door too
often during cooking. Keep the door gasket clean
and make sure it is well fixed in its position.
Use metal cookware to improve energy saving.
14

When possible, do not preheat the oven before
cooking.
Keep breaks between baking as short as possible
when you prepare a few dishes at one time.
Cooking with fan
When possible, use the cooking functions with fan
to save energy.
Residual heat
When the cooking duration is longer than 30 min,
reduce the oven temperature to minimum 3 - 10
min before the end of cooking. The residual heat
inside the oven will continue to cook.
Use the residual heat to warm up other dishes.
Keep food warm
Choose the lowest possible temperature setting to
use residual heat and keep a meal warm.
Moist Fan Baking
Function designed to save energy during cooking.
ENVIRONMENTAL CONCERNS
Recycle materials with the symbol . Put the
packaging in relevant containers to recycle it. Help
protect the environment and human health by
recycling waste of electrical and electronic
appliances. Do not dispose of appliances marked
with the symbol with the household waste.
Return the product to your local recycling facility or
contact your municipal office.
15

MONTAGE
WARNUNG! Siehe Kapitel
Sicherheitshinweise.
MONTAGE
18
594
589
114
21548
595
+-1
min. 550
20
600
min. 560
3
5
60
20
80
520
60
198
523
(*mm)
min. 550
20
595
+-1
18
590
min. 560
594
589
114
21548
3
5
70
60
520
60
20
198
523
(*mm)
16

BEFESTIGUNG DES OFENS AM MÖBEL
GERÄTEBESCHREIBUNG
GESAMTANSICHT
9
8
12
5
4
1
2
3
4 7631 52
10
11
1
Bedienfeld
2
Einstellknopf für die Ofenfunktionen
3
Betriebskontrolllampe/-symbol
4
Display
5
Einstellknopf (für die Temperatur)
6
Temperaturanzeige/-symbol
7
Plus Dampf
8
Heizelement
9
Lampe
10
Ventilator
11
Garraumvertiefung - Behälter für die Aqua-
Reinigungsfunktion
12
Einschubebenen
ZUBEHÖR
• Kombirost
Für Kochgeschirr, Kuchenformen, Braten.
• Universalblech
Für Kuchen und Plätzchen. Zum Backen und
Braten oder zum Auffangen von abtropfendem
Fett.
BEDIENFELD
SENSORFELDER/TASTEN
Einstellen der Zeit.
Einstellen einer Uhrfunktion.
Einstellen der Zeit.
Ein- und Ausschalten der Funktion Heißluft mit Dampf.
17

DISPLAY
A B
A. Uhrfunktionen
B. Timer
VOR DER ERSTEN INBETRIEBNAHME
WARNUNG! Siehe Kapitel
Sicherheitshinweise.
VOR DER ERSTEN INBETRIEBNAHME
Der Backofen kann während des Vorheizens Geruch und Rauch verströmen. Stellen Sie sicher, dass der
Raum belüftet ist.
Schritt 1 Schritt 2
Schritt 3
Stellen Sie die Uhrzeit ein Reinigen Sie den Backofen Heizen Sie den leeren
Backofen vor
1. Drücken Sie: .
2. , - zum Einstellen
der Stunde drücken. Drü-
cken Sie: .
3. , - zum Einstellen
der Minuten drücken. Drü-
cken Sie: .
1. Nehmen Sie das gesamte
Zubehör aus dem Ofen.
2. Feuchten Sie ein weiches
Tuch mit warmem Wasser
und etwas mildem Reini-
gungsmittel an, und reini-
gen Sie damit den Back-
ofen und das Zubehör.
1. Stellen Sie die Höchsttem-
peratur für folgende Funk-
tion ein: .
Dauer: 1 Std.
2. Stellen Sie die Höchsttem-
peratur für folgende Funk-
tion ein: .
Dauer: 15 Min.
3. Stellen Sie die Höchsttem-
peratur für folgende Funk-
tion ein: .
Dauer: 15 Min.
Schalten Sie den Ofen aus und warten Sie, bis er abgekühlt ist. Setzen Sie das Zubehör in den Back-
ofen.
TÄGLICHER GEBRAUCH
WARNUNG! Siehe Kapitel
Sicherheitshinweise.
EINSTELLUNG: OFENFUNKTION
Schritt
1
Drehen Sie den Backofen-Einstell-
knopf auf eine Ofenfunktion.
Schritt
2
Drehen Sie den Wahlknopf, um
die Temperatur auszuwählen.
18

Schritt
3
Drehen Sie nach Beendigung des
Garvorgangs die Knöpfe in die
Aus-Position, um den Backofen
auszuschalten.
EINSTELLEN DER FUNKTION:TRUE FAN COOKING PLUS
WARNUNG! Verbrennungsgefahr sowie Risiko von Schäden am Gerät.
Schritt
1
Vergewissern Sie sich, dass der Ofen abgekühlt ist.
Schritt
2
Füllen Sie die Garraumvertiefung
mit Leitungswasser.
Die maximale Kapazität der Gar-
raumvertiefung beträgt 250 ml. Fül-
len Sie die Garraumvertiefung nicht
wieder auf, während der Garvor-
gang läuft oder der Backofen heiß
ist.
Schritt
3
Stellen Sie die folgende Funktion ein: .
Drücken Sie: . Die Anzeige leuchtet auf. Funktioniert nur mit der Funktion: True Fan
Cooking PLUS.
Schritt
4
Drehen Sie den Temperaturwahlknopf, um die Temperatur einzustellen.
Schritt
5
Heizen Sie den leeren Backofen 10 Minuten vor, um Feuchtigkeit zu erzeugen.
Schritt
6
Stellen Sie die Speise in den Backofen.
Siehe Kapitel „Tipps und Hinweise“. Öffnen Sie die Backofentür nicht während des Gar-
vorgangs.
Schritt
7
Drehen Sie den Knopf für die Ofenfunktionen in die Aus-Position, um den Backofen aus-
zuschalten.
- Zum Ausschalten des Ofens drücken. Die Anzeige erlischt.
Schritt
8
Öffnen Sie die Tür nach Beendigung der Funktion vorsichtig. Freigesetzte Feuchtigkeit
kann Verbrennungen verursachen.
Schritt
9
Vergewissern Sie sich, dass der Ofen abgekühlt ist. Entfernen Sie das restliche Wasser
aus der Garraumvertiefung.
OFENFUNKTIONEN
Ofenfunktion Anwendung
Stellung Aus
Der Backofen ist ausge-
schaltet.
Ofenfunktion Anwendung
Backofenbe-
leuchtung
Einschalten der Lampe.
19

Ofenfunktion Anwendung
Heißluft / True
Fan Cooking
PLUS / Aqua
Reinigung
Zum Backen auf bis zu drei
Einschubebenen gleichzei-
tig und zum Dörren von Le-
bensmitteln.
Stellen Sie eine 20 - 40 °C
niedrigere Backofentempe-
ratur als bei Ober-/Unter-
hitze ein.
Zum Hinzufügen von
Feuchtigkeit beim Garen.
Für die richtige Farbe und
eine knusprige Kruste beim
Backen. Für saftigere Spei-
sen beim Aufwärmen.
Weitere Informationen zu
folgenden Themen finden
Sie im Kapitel „Pflege und
Reinigung“: Aqua-Reini-
gung.
Feuchte Umluft
Diese Funktion ist entwi-
ckelt worden, um während
des Garvorgangs Energie
zu sparen. Wenn Sie diese
Funktion nutzen, kann die
Temperatur im Garraum von
der eingestellten Tempera-
tur abweichen. Die Wärme-
leistung kann geringer sein.
Weitere Informationen zu
folgenden Themen finden
Sie im Kapitel „Täglicher
Gebrauch“: Feuchte Umluft.
Unterhitze
Zum Backen von Kuchen
mit knusprigen Böden und
zum Einkochen von Le-
bensmitteln.
Auftauen
Zum Auftauen von Lebens-
mitteln (Gemüse und
Obst). Die Auftauzeit hängt
ab von der Menge und
Größe der Tiefkühlgerichte.
Ofenfunktion Anwendung
Grillstufe 2
Zum Grillen dünner Le-
bensmittel in größeren
Mengen und zum Toasten
von Brot.
Heißluftgrillen
Zum Braten großer Fleisch-
stücke oder von Geflügel
mit Knochen auf einer Ebe-
ne. Zum Gratinieren und
Überbacken.
Pizzastufe
Zum Backen von Pizza. Für
ein intensives Überbacken
und einen knusprigen Bo-
den.
Ober-/Unter-
hitze
Zum Backen und Braten
auf einer Ebene.
HINWEISE ZU: FEUCHTE UMLUFT
Diese Funktion wurde zur Bestimmung der
Energieeffizienzklasse und den Anforderungen an
die umweltgerechte Gestaltung EU 65/2014 und
EU 66/2014 verwendet. Tests gemäß EN
60350-1.
Die Backofentür sollte während des Garvorgangs
geschlossen bleiben, damit die Funktion nicht
unterbrochen wird. So wird gewährleistet, dass der
Backofen mit der höchsten Energieeffizienz
arbeitet.
Die Kochanleitungen finden Sie im Kapitel
"Hinweise und Tipps", Feuchte Umluft. Allgemeine
Empfehlungen zur Energieeinsparung finden Sie im
Kapitel „Energieeffizienz“, Energie sparen.
20
Seite laden ...
Seite laden ...
Seite laden ...
Seite laden ...
Seite laden ...
Seite laden ...
Seite laden ...
Seite laden ...
Seite laden ...
Seite laden ...
Seite laden ...
Seite laden ...
-
 1
1
-
 2
2
-
 3
3
-
 4
4
-
 5
5
-
 6
6
-
 7
7
-
 8
8
-
 9
9
-
 10
10
-
 11
11
-
 12
12
-
 13
13
-
 14
14
-
 15
15
-
 16
16
-
 17
17
-
 18
18
-
 19
19
-
 20
20
-
 21
21
-
 22
22
-
 23
23
-
 24
24
-
 25
25
-
 26
26
-
 27
27
-
 28
28
-
 29
29
-
 30
30
-
 31
31
-
 32
32


Zanussi ZOB65301XK Benutzerhandbuch
- Kategorie
- Mikrowellen
- Typ
- Benutzerhandbuch
in anderen Sprachen
- English: Zanussi ZOB65301XK User manual