Seite wird geladen ...
Seite wird geladen ...

Mi 2240Mi 2240
- 3 -
changing 1
st
code of the relay 1
- key in the number from 2 to 6 digits (from
01 to 999999)
- press key A
changing 2
nd
code of the relay 1
- key in the number from 2 to 6 digits (from
01 to 999999)
- press key A
changing 3
rd
code of the relay 1
- key in the number from 2 to 6 digits (from
01 to 999999)
- press key A
changing 4
th
code of the relay 1
- key in the number from 2 to 6 digits (from
01 to 999999)
- press key A
changing 1
st
code of the relay 2
- key in the number from 2 to 6 digits (from
01 to 999998 or 999999 to activate the relay
2 only pressing the key A)
- press key A
changing 2
nd
code of the relay 2
- key in the number from 2 to 6 digits (from
01 to 999999)
- press key A
changing 3
rd
code of the relay 2
- key in the number from 2 to 6 digits (from
01 to 999999)
- press key A
changing 4
th
code of the relay 2
- key in the number from 2 to 6 digits (from
01 to 999999)
- press key A
changing activation time of relay 1
- key in a two digit number (from 01 to 99 or
00 for bistable operation mode)
- press key A
changing activation time of relay 2
- key in a two digit number (from 01 to 99) or
00 for 130 seconds.
- press key A
An acoustic signal confirms that the pro-
gramming has been ended and the red LED
goes off (2 second).
Note:
- As memorandum, fill in the enclosed table
with master programming code and relay
access codes.
- Only the user who knows the master pro-
gramming code can change the relay ac-
cess codes.
- An acoustic sound will confirm the pres-
sure of the keys.
- If a wrong code is keyed in, a warring signal
will be heard and at the same time key pad
will be inhibited for a period of 2 seconds.
- During the programming, if key A is pressed
this will lead to the successive phase with-
out changing the code.
- The master programming code and the
relay access code must be different to each
other.
- It is possible to cancel the last code en-
tered by pressing key B.
- By pressing B twice, the programming
phase is exited, without altering any code.
Changing of a single relay access code
To change only one relay access code,
without modifying the others, the following
procedure should be followed:
- press the master programming code
- press key A. The red LED lights up
- press many times the key A up to reach the
code to be changed
- key in the new number from 2 to 6 digits
(from 01 to 999999)
- press many times the key A up to reach the
end of the programming. The red LED goes
off.
Example
To change only the 3
rd
relay access code of
the relay 1:
- press the master programming code
- press key A. The red LED lights up
- press key A twice
- key in the new number from 2 to 6 digits
(from 01 to 999999)
- press key A 8 time. The red LED goes off.
How to delete the programming code
If you forget the programming code, you can
replace it with a new code with the following
procedure:
- remove the plastic protective frame from
the back of the keypad
- short-circuit the J1 2 poles until you hear a
beep sound. The programming code resets
(000000)
- enter the new programming code as illus-
trated in chapter “how to change the pro-
gramming code”.
If necessary, perform the complete program-
ming for the device.
OPERATING MODE
- Key in the access code of the relay to be
activated.
- Press key A. The green LED lights up and
the selected relay will be activated for the
programmed time.
Note:
- It is possible to clear the last code keyed in,
but not entered by pressing key B.
- To reset the relay, before the programmed
time is over, press twice the key B.
- If a wrong code is entered, a deterring
signal will be heard and at the same time the
key pad will be inhibited for a period of 2
seconds. This time increases to a maximum
of 25 seconds every time a wrong code is
entered.
- The numbers keyed in, but non entered by
the key A (or cleared by the key B) are
automatically cleared after 30 sec. after the
last key pressed.
BISTABLE OPERATING MODE
Whether the activation time of the relay is
set to 00, the relay is activated for an indefi-
nite period of time. To reset the relay it is
necessary to press twice the key B.
DIRECT ACTIVATION
To activate directly the relay 2 only by press-
ing the key A, it is necessary to program the
first code of the relay 2 with the code 010101.
DOOR-OPENER BUTTON
Connect a button to terminals 9 and 10 to
activate relay 1 for the programmed time
and mode.
EMERGENCY
In case of power failure all the data are
recorded in a nonvolatile memory and will
not be lost.
VERY IMPORTANT
To comply with the European Standards on
Electromagnetic Compatibility and to in-
crease the reliability of the product, it is
necessary to connect a suppression device
when switching inductive loads i.e. electric
releases and electric locks.
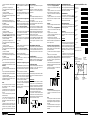
The enclosed suppression devices (transil)
must be connected as close as possible to
the loads (ideally across the terminals. See
figure).
- 10 -
- Wenn Sie das Relais vor Ablauf der pro-
grammierten Zeit abschalten möchten betä-
tigen Sie zweimal die Taste B.
- Sollte ein falscher Code eingeben worden
sein wird nach Betätigung der Taste A ein
Warnton eingeschaltet. Gleichzeitig werden
die Tasten für eine Zeit von 2 Sekunden für
weitere Eingaben gesperrt. Die Sperrzeit
wird bei jedem nachfolgenden Versuch bis
auf eine Max. Zeit von 25 Sekunden stufen-
weise verlängert.
- Eingegebene Zutrittscodes die nicht mit
der Taste A quittiert oder mit der Taste B
gelöscht worden sind, werden automatisch
nach 30 Sekunden ab der letzte Tasten-
betätigung gelöscht.
EIN/AUS BETRIEB
Mit der Programmierung der Schließ-
ungszeit des Relais 1 auf 00 wird das Relais
nach Eingabe des Zutrittscodes für eine
unbestimmte Zeit eingeschaltet.
Mit der zweimaligen Betätigung der Taste B
wird das Relais wieder ausgeschaltet.
AKTIVIERUNG OHNE ZUTRITTSCODE
Mit der Programmierung des ersten Zutritts-
codes des Relais 2 mit der Nummer 010101
wird das Relais mit der einfachen Betäti-
gung der Taste A für die programmierte
Schließungszeit eingeschaltet.
TÜRÖFFNERTASTE
Eine an die Klemmen 9 und 10 angeschlos-
sene Taste aktiviert das Relais 1 für die
programmierten Zeiten und Modalitäten.
NETZAUSFALL
Bei Netzausfall bleiben alle programmierte
Daten auf unbestimmte Zeit gespeichert.
WICHTIG!
Gemäß den Europäischen Richtlinien zur
elektromagnetischen Kompatibilität und zur
Erhöhung der Zuverlässigkeit des Produkts
muß bei induktiver Belastung, z. B. bei Be-
tätigung eines Türschlosses, eine
Entstörvorrichtung angeschlossen werden.
Die mitgelieferten Entstörer (Transil) müs-
sen so nahe wie möglich an der Last (theo-
retisch direkt an den End-Verschlüssen der-
selben) angeschlossen werden.
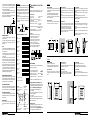
Rote LED.
Anzeige
Programmierebene.
Grüne LED.
Anzeige positive
Codeeingabe.
Taste A.
Eingabetaste und
Aktivierungstaste ohne Code für
Relais 2 (wenn programmiert)
Taste B.
Löchtaste.
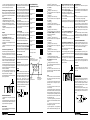
Übersichttabelle der
programmierten Codes
Programmiercode
Schließung Relais 1
- 1° Code
Schließung Relais 1
- 2° Code
Schließung Relais 1
- 3° Code
Schließung Relais 1
- 4° Code
Schließung Relais 2
- 1° Code
Schließung Relais 2
- 2° Code
Schließung Relais 2
- 3° Code
Schließung Relais 2
- 4° Code
Schließungszeit Relais 1
Schließungszeit Relais 2
2- bis 6stellige Nummer
2stellige Nummer
- Mit der zweimaligen Betätigung der B
Taste wird die Programmierebene verlas-
sen ohne Änderungen zu speichern.
Änderung eines einzigen Zutrittscodes
Wenn Sie einen bestimmten Zutrittscode
ändern möchten ohne gleich alle anderen
zu programmieren, folgen Sie folgende Pro-
zedur:
- Programmiercode eingeben
- Taste A betätigen. Rote LED leuchtet
- Taste A so oft betätigen bis Sie den ge-
wünschten Zutrittscode erreicht haben
- Eingabe einer 2- bis 6stellige Nummer (01
bis 999999)
- Taste A so oft betätigen bis die rote LED
erlöscht.
Beispiel
Sie möchten den dritten Zutrittscode vom
Relais 1 ändern:
- Programmiercode eingeben
- Taste A betätigen. Rote LED leuchtet
- Taste A 2 mal betätigen
- Eingabe einer 2- bis 6stellige Nummer (01
bis 999999)
- Taste A 8 mal betätigen bis die rote LED
erlöscht.
Löschen des Programmiercodes
Sollte der Programmiercode vergessen wor-
den sein, kann dieser durch einen neuen
Code ersetzt werden. Hierzu ist wie folgt
vorzugehen:
- Rückseite der Türstation durch Lösen der
oberen Schraube des Modulträgerrahmens
und der 2 Schrauben des Deckels öffnen
- Die beiden Pole des J1 kurzschließen bis
ein akustischer Warnton (Piepsen) zu hören
ist. Der Zugangscode für den Programmier-
modus ist nun gelöscht bzw. auf Null gestellt
worden (d.h. 000000)
- Neuen Programmiercode eingeben. Hier-
zu ist gemäß Kapitel “Austausch des
Programmiercodes “ vorzugehen.
Falls notwendig ist die Vorrichtung vollstän-
dig zu programmieren.
BETRIEBSANLEITUNGEN
- Zutrittscode für das gewünschte Relais
eingeben
- Taste A betätigen. Die grüne LED leuchtet
und das entsprechende Relais wird für die
programmierte Zeit eingeschaltet.
Bitte beachten:
- Mit der Taste B können Sie falsch eingege-
bene Codes löschen.

Mi 2240Mi 2240
- 4 -
Les claviers permettent la commande de 2
relais.
Données techniques
Alimentation 12Vca/cc ± 10%
Consommation au repos 15mA
Consommation maxi 0,1A
Tension des relais 12Vca - 5A
Numéro de codes relais 1 4
Numéro de codes relais 2 4 ou activation
direct
Temps de fermeture du relais da 1 a 99 sec.
(ou bistable relais 1)
Température de fonctionnement 0° ÷ +40°C
Humidité maximale consentie 85% HR
Bornier de raccordement
1 entrée repos du relais 2
2 entrée travail du relais 2
3 commun du relais 2
4 entrée repos du relais 1
5 entrée travail du relais 1
6 commun du relais 1
7 masse d'alimentation
8 entrée positive d'alimentation
9-10 bouton-poussoir ouvre porte
PROGRAMMATION
Le clavier est programmé en usine de la
façon suivante:
Code d'accès programmation: 11
Code du relais 1: 123456
Temporisation du relais 1: 01 (1 second)
Code du relais 2: 7890
Temporisation du relais 2: 01 (1 second)
Tous ces codes peuvent être modifiés.
Changement seulement du code de pro-
grammation
- composer le code de programmation
- appuyer sur la touche A. La LED rouge
s'allume.
- appuyer sur la touche B
- composer un numéro de 2 à 6 chiffres (de
01 à 999999)
- appuyer sur la touche A
- un signal sonore averti que vous avez
effectué correctement la programmation et
la LED rouge s'éteint.
Changement des codes
Pour la modification du code ouverture du
relais, il est nécessaire de procéder de la
manière suivante:
- composer le code de programmation
- appuyer sur la touche A. La LED rouge
s'allume.
CLAVIERS À CODES DE CONTRÔLE D'ACCÈS
changement I° code du relais 1
- composer un numéro de 2 à 6 chiffres (de
01 à 999999)
- appuyer sur la touche A
changement II° code du relais 1
- composer un numéro de 2 à 6 chiffres (de
01 à 999999)
- appuyer sur la touche A
changement III° code du relais 1
- composer un numéro de 2 à 6 chiffres (de
01 à 999999)
- appuyer sur la touche A
changement IV° code du relais 1
- composer un numéro de 2 à 6 chiffres (de
01 à 999999)
- appuyer sur la touche A
changement I° code du relais 2
- composer un numéro de 2 à 6 chiffres (de
01 à 999998 ou 999999 pour activer le relais
2 appuyer seulement sur la touche A)
- appuyer sur la touche A
changement II° code du relais 2
- composer un numéro de 2 à 6 chiffres (de
01 à 999999)
- appuyer sur la touche A
changement III° code du relais 2
- composer un numéro de 2 à 6 chiffres (de
01 à 999999)
- appuyer sur la touche A
changement IV° code du relais 2
- composer un numéro de 2 à 6 chiffres (de
01 à 999999)
- appuyer sur la touche A
changement temporisation du relais 1
- composer un numéro de 2 chiffres (de 01
à 99 ou 00 pour le fonctionnement bistable)
- appuyer sur la touche A
changement temporisation du relais 2
- composer un numéro de 2 chiffres (de 01
à 99) ou 00 pour un temps de 130 sec.
- appuyer sur la touche A.
Un signal sonore averti que vous avez effec-
tué correctement la programmation et la
LED rouge s'éteint.
Note:
- Indiquer dans le tableau récapitulatif le
nouveau code de programmation et tous le
codes d'ouverture du relais.
- Si l'on compose un code erroné, on entend
un signal d'erreur pendant 2 secondes.
- Pendant la programmation, le fait d'ap-
puyer sur la touche A fait passer à la phase
suivante sans modifier le code.
- Si pendant l'utilisation on veut corriger un
terme frappé par erreur, il faut appuyer sur la
touche B.
- En appuyant deux fois sur B on sort de la
phase de programmation sans modifier le
code.
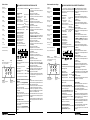
Red LED.
Indication of program-
ming mode.
Green LED.
Indication of code
accepted.
Key A.
Enter and direct activation of
relay 2 (if programmed).
Key B.
Clear.
Table of codes
Master pro-
gramming code
Relay 1
- 1
st
code
Relay 1
- 2
nd
code
Relay 1
- 3
rd
code
Relay 1
- 4
th
code
Relay 2
- 1
st
code
Relay 2
- 2
nd
code
Relay 2
- 3
rd
code
Relay 2
- 4
th
code
Activation time relay 1
Activation time relay 2
2 to 6 digits numbers
2 digits numbers
Français
- 9 -
LED vermelho
Indicação ambiente
de programação.
LED verde
Indicação de códi-
go aceito.
Botão A.
Teclado de confirmação
e ativação direta do relé
2 (se programado).
Botão B.
Teclado de cancela-
mento.
Tabela resumida dos códigos
Código de
programação
Abertura do relé 1
- I° código
Abertura do relé 1
- II° código
Abertura do relé 1
- III° código
Abertura do relé 1
- IV° código
Abertura do relé 2
- I° código
Abertura do relé 2
- II° código
Abertura do relé 2
- III° código
Abertura do relé 2
- IV° código
Tempo de fechamento relè 1
Tempo de fechamento relè 2
Números de 2 a 6 algarismos
Números de 2 algarismos
Des Codeschlossen ermöglicht dienen
Steuerung von zwei Relaiskontakte mittels
der Eingabe der entsprechend program-
mierten Zutrittcode.
Technische Daten
Stromversorgung 12Vac/dc ±10%
Stromverbrauch 0.015A
Max. Stromverbrauch 0.1A
Max. ....Spannung 12Vac - 5A
Anzahl Code für Relais 1 4
Anzahl Code für Relais 2 4 oder codefreie
Aktivierung
Schließungszeit 1 bis 99 Sekunden
(oder Ein/Aus Betrieb Relais 1)
Betriebstemperatur 0° bis +40°C
Max. Luftfeuchtigkeit 85% RH
Anschlußklemmen
1 N/C Kontakt Relais 2
2 N/O Kontakt Relais 2
3 Eingang Relais 2
4 N/C Kontakt Relais 1
5 N/O Kontakt Relais 1
6 Eingang Relais 1
7 Erde oder Eingang Wechselstrom
8 Eingang plus Spannung oder Wechselstrom
9-10 Türöffnertaste
PROGRAMMIERUNG
Die Einrichtung wird ab Werk mit folgenden
Einstellung geliefert:
Programmiercode: 11
1° Zutrittscode Relais 1: 123456
Schließungszeit Relais 1: 01 (1 Sekunde)
1° Zutrittscode Relais 2: 7890
Schließungszeit Relais 2: 01 (1 Sekunde)
Alle Einstellungen können vom Kunde belieb
geändert werden.
Änderung des Programmiercodes
Um den Programmiercode zu ändern
fogende Prozedur folgen:
- Aktueller Programmiercode eingeben
- Taste A betätigen. Rote LED leuchtet
- Taste B betätigen
- Neuer Programmiercode eingeben.
2- bis 6stellige Nummer (01 bis 999999)
- Taste A betätigen
- Quittungston und Erlöschen der roten LED
abwarten (ca. 2 Sekunden).
Änderung der Zutrittscode
Um den Zutrittscode der Relais zu ändern
fogende Prozedur folgen:
- Programmiercode eingeben
CODESCHLÖSSER FÜR DIE ZUTRITTSKONTROLLE
- Taste A betätigen. Rote LED leuchtet
Änderung des Zutrittscodes 1 Relais 1
- Eingabe einer 2- bis 6stellige Nummer (01
bis 999999)
- Taste A betätigen
Änderung des Zutrittscodes 2 Relais 1
- Eingabe einer 2- bis 6stellige Nummer (01
bis 999999)
- Taste A betätigen
Änderung des Zutrittscodes 3 Relais 1
- Eingabe einer 2- bis 6stellige Nummer (01
bis 999999)
- Taste A betätigen
Änderung des Zutrittscodes 4 Relais 1
- Eingabe einer 2- bis 6stellige Nummer (01
bis 999999)
- Taste A betätigen
Änderung des Zutrittscodes 1 Relais 2
- Eingabe einer 2- bis 6stellige Nummer (01
bis 999998 oder 999999 für die Aktivierung
des Relais mit Betätigung der Taste A ohne
Codeeingabe)
- Taste A betätigen
Änderung des Zutrittscodes 2 Relais 2
- Eingabe einer 2- bis 6stellige Nummer (01
bis 999999)
- Taste A betätigen
Änderung des Zutrittscodes 3 Relais 2
- Eingabe einer 2- bis 6stellige Nummer (01
bis 999999)
- Taste A betätigen
Änderung des Zutrittscodes 4 Relais 2
- Eingabe einer 2- bis 6stellige Nummer (01
bis 999999)
- Taste A betätigen
Änderung der Schließungszeit Relais 1
- Eingabe eine 2stelligen Nummer (01 bis
99 oder 00 für den Ein/Aus Betrieb)
- Taste A betätigen
Änderung der Schließungszeit Relais 2
- Zweistellige Zahl (von 01 bis 99) oder 00
für einen Zeitraum von 130 Sekunden ein-
geben.
- Taste A betätigen
- Quittungston und Erlöschen der roten LED
abwarten (ca. 2 Sekunden).
Bitte beachten:
- Alle neue Zutrittscodes in der hierfür vor-
gesehenen Tabelle eintragen.
- Nur mit dem Programmiercode ist es mög-
lich Änderungen durchzuführen.
- Jede Tastenbetätigung wird von einem Ton
quittiert.
- Bei fehlerhaften Eingabe wird ein Warnton
eingeschaltet. Gleichzeitig werden die Ta-
sten für eine Zeit von ca. 2 Sekunden für
weitere Eingaben gesperrt.
- Code die nicht geändert werden sollen
können mit der Betätigung der A Taste ein-
fach übersprungen werden.
- Der Programmiercode und die Zutritts-
code müssen unterschiedlich sein.
- Um eine Eingabe zu löschen Taste B
betätigen.
Deutsch
Seite wird geladen ...
Seite wird geladen ...
-
 1
1
-
 2
2
-
 3
3
-
 4
4
-
 5
5
-
 6
6


ACI Farfisa FC32P Bedienungsanleitung
- Typ
- Bedienungsanleitung
- Dieses Handbuch eignet sich auch für
in anderen Sprachen
- English: ACI Farfisa FC32P Owner's manual
- français: ACI Farfisa FC32P Le manuel du propriétaire
- español: ACI Farfisa FC32P El manual del propietario
- italiano: ACI Farfisa FC32P Manuale del proprietario
- português: ACI Farfisa FC32P Manual do proprietário