Roadstar HIF-1902HP Benutzerhandbuch
- Kategorie
- CD-Spieler
- Typ
- Benutzerhandbuch

www.roadstar.com
HIF-1902HP
User manual
Bedienungsanleitung
Manuel d’instructions
Manuale d’istruzioni
Manual de instrucciones
Gebruiksaanwijzing

INDEX
English Page 1
Deutsch Seite 7
Français Page 13
Italiano Pagina 19
Español Página 25
Nederlands Pagina 31
Your new unit was manufactured and assem-
bled under strict ROADSTAR quality control.
Thank-you for purchasing our product for
your music enjoyment. Before operating the
unit, please read this instruction manual ca-
refully. Keep it also handy for further future
references.
Votre nouvel appareil a été fabriqué et monté
en étant soumis aux nombreaux tests ROAD-
STAR. Nous espérons que cet appareil vous
donnera entière satisfaction. Avant de vous
adonner à ces activités, veuillez lire attentive-
ment ce manuel d’instructions. Conservez-le
à portée de main à fin de référence ultérieu-
re.
Vuestro nuevo sistema ha sido construido
según las normas estrictas de control de cali-
dad ROADSTAR. Le felicitamos y le damos
las gracias por su elección de este aparado.
Por favor leer el manual antes de poner en
funcionamiento el equipo y guardar esta do-
cumentación en case de que se necesite
nuevamente.
Ihr neues Gerät wurde unter Beachtung der
strengen ROADSTAR Qualitätsvorschriften ge-
fertigt. Wir danken Ihnen für den Kauf unseres
Produktes und wünschen Ihnen optimalen Hör-
genuss. Bitte lesen Sie diese Bedienungsanlei-
tung durch, und heben Sie sie auf, um jederzeit
darin nachschlagen zu können.
Il vostro nuovo apparecchio é stato prodotto ed
assemblato sotto lo stretto controllo di qualità
ROADSTAR. Vi ringraziamo di aver acquistato
un nostro prodotto per il vostro piacere d’ascol-
to. Prima di procedere all'utilizzo dell'apparec-
chio, leggete attentamente il manuale d’istru-
zioni e tenetelo sempre a portata di mano per
futuri riferimenti.
Seu novo aparelho foi construido e montado
sob o estrito controle de qualidade da ROAD-
STAR. Agradecemos por ter comprado nosso
produto para a sua diversão. Antes de usar
esta unidade é necessário ler com atençâo
este manual de instruções pare que possa ser
usada apropriadamente; mantenha o manual
ao seu alcance para outras informações.

HIF-1902HP

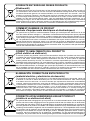
This marking shown on the product or its literature, indicates that it should not be disposed with
other household wastes at the end of its working life. To prevent possible harm to the environ-
ment or human health from uncontrolled waste disposal, please separate this from other types of
wastes and recycle it responsibly to promote the sustainable reuse of material resources. House-
hold users should contact the retailer where they purchased this product, or their local govern-
ment office, for details of where and how they can take this item for environmentally safe recy-
cling. Business users should contact their supplier and check the terms and conditions of the
purchase contract. This product should not be mixed with other commercial wastes for disposal.
CORRECT DISPOSAL OF THIS PRODUCT
(Waste Electrical & Electronic Equipment)
HIF-1902HP - REMOTE

Die Kennzeichnung auf dem Produkt bzw. auf der dazugehörigen Literatur gibt an, dass es nach sei-
ner Lebensdauer nicht zusammen mit dem normalen HaushaltsmüIl entsorgt werden darf. Entsorgen
Sie dieses Gerat bitte getrennt von anderen Abfallen, um der Umwelt bzw. der menschl i chen Ge-
sundhei t ni cht durch unkontrol l i erte Mül l besei ti gung zu schaden. Recycel n Si e das Gerät, um
di e nachhaltige Wiederverwertung von stofflichen Ressourcen zu fördern. Private Nutzer sollten den
Händler, bei dem das Produkt gekauft wurde, oder die zuständigen Behörden kontaktieren, um in
Erfahrung zu bringen, wie sie das Gerät auf umweltfreundliche Weise recyceln können. Gewerbliche
Nutzer sollten sich an Ihren Lieferanten wenden und die Bedingungen des Verkaufsvertrags konsul-
tieren. Dieses Produkt darf nicht zusammen mit anderem Gewerbemüll entsorgt werden.
KORREKTE ENTSORGUNG DIESES PRODUKTS
(Elektromüll)
Ce symbole sur le produit ou sa documentation indique qu'il ne doit pas être éliminé en fin de vie
avec les autres déchets ménagers. L' élimination incontrôlée des déchetspouvant porter préjudice
a l'environnement ou a la santé humaine, veuillez le séparer des autres types de déchets et le re-
cycler defaçon responsable. Vous favoriserez ainsi la réutilisation durable desressources matériel-
les. Les particuliers sont invites a contacter le distributeur leur ayant vendu le produit ou a se ren-
seigner auprès de leur mairie pour savoir ou et comment ils peuvent se débarrasser de ce produit
afin qu'il soit recycle en respectant l'environnement. Les entreprises sont invitées a contacter leurs
fournisseurs et aconsulter les conditions de leur contrat de vente. Ce produit ne doit pas être élimi-
né avec les autres déchets commerciaux.
COMMENT ÉLIMINER CE PRODUIT
(déchets d'équipements électriques et électroniques)
II marchio riportato sul prodotto e sulla sua documentazione indica che il prodotto non deve esse-
re smaltito can altri rifiuti domestici al termine del ciclo di vita. Per evitare eventuali danni all'am-
biente o alla salute causati dall'inopportuno smaltimento dei rifiuti, si invita l'utente a separare
questo prodotto da altri tipi di rifiuti e di riciclarlo in maniera responsabile per favorire il riutilizzo
sostenibile delle risorse materiali. Gli utenti domestici sono invitati a contattare il rivenditore pres-
so il quale e stato acquistato il prodotto a l'ufficio locale preposto per tutte le informazioni relative
alla raccolta differenziata e al riciclaggio per questo tipo di prodotto. Gli utenti aziendali sono invi-
tati a contattare il proprio fornitore e verificare i termini e le condizioni del contratto di acquisto.
Questo prodotto non deve essere smaltito unitamente ad altri rifiuti commerciali.
CORRETTO SMALTIMENTO DEL PRODOTTO
(rifiuti elettrici ed elettronici)
La presencia de esta marca en el producto o en el materiál informativo que lo acompaña, indica que
al finalizar su vida útil no deberá eliminarse junto con otros residuos domésticos. Para evitar los posi
bl es daños al medi o ambi ente o a l a sal ud humane que representa la eliminación incontrolada de
residuos, separe este producto de otros tipos de residuos y reciclelo correctamente para promover
la reutilización sostenible de recursos materiales. Los usuarios particulares pueden contactar con el
establecimiento donde adqui ri eron el producto, o con l as autori dades l ocal es pertinentes, para
informarse sobre cómo y dónde pueden lIevario para que sea sometido a un reciclaje ecológico y
seguro. Los usuarios comerciales pueden contactar con su proveedor y consultar las condiciones
del contrato de compra. Este produco no debe eliminarse mezclado con otros residuos comerciales.
ELIMINACIÓN CORRECTA DE ESTE PRODUCTO
(material electrico y electrónico de descarte)
Dit symbool dat staat weergegeven op het product en in de documentatie ervan, duidt erop dat het
product niet kan worden weggegooid met het gewone huisvuil aan het einde van de levensduur.
Om schade aan het milieu of aan de gezondheid door ongepaste afvalverwijdering te voorkomen,
dient de gebruiker dit product te scheiden van andere soorten afval op verantwoorde wijze ter be-
vordering van duurzaam hergebruik van de materiële hulpbronnen. De thuisgebruiker dient contact
op te nemen met de verkoper van het apparaat of met de lokale gemeente voor informatie met be-
trekking tot het scheiden en recyclen van dit type product. Zakelijke gebruikers dienen contact op
te nemen met hun leverancier en de algemene voorwaarden van de verkoopovereenkomst te
raadplegen. Dit product dient niet te worden gemengd met ander bedrijfsafval voor de verwijdering.
CORRECTE AFVALVERWERKING VAN HET PRODUCT
(elektrisch en elektronisch afval)

1 English
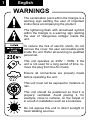
WARNINGS
The exclamation point within the triangle is a
warning sign alerting the user of important
instructions accompanying the product.
The lightening flash with arrowhead symbol
within the triangle is a warning sign alerting
the user of “dangerous voltage” inside the
unit.
To reduce the risk of electric shock, do not
remove the cover. No user serviceable parts
inside the unit. Refer all servicing to qualified
personnel.
This unit operates on 230V ~ 50Hz. If the
unit is not used for a long period of time, re-
move the plug from the AC mains.
Ensure all connections are properly made
before operating the unit.
This unit must not be exposed to moisture or
rain.
This unit should be positioned so that it is
properly ventilated. Avoid placing it, for
example, close to curtains, on the carpet or
in a built-in installation such as a bookcase.
Do not expose this unit to direct sunlight or
heat radiating sources.

2 English
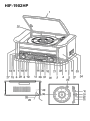
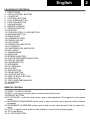
LOCATION OF CONTROLS
1. DUST COVER
2. CD PLAY/PAUSE BUTTON
3. CD SKIP UP
4. CD DOWN BUTTON
5. PLAY MODE BUTTON
6. FUNCTION BUTTON
7. VOLUME KNOB
8. REMOTE SENSOR
9. RECORD BUTTON
10. CD DOOR
11. CD DOOR OPEN / CLOSE BUTTON
12. MW BAND BUTTON
13. USB SOCKET
14. FM BAND BUTTON
15. POWER ON/ OFF
16. CUE LEVER
17. POWER LED INDICATOR
18. LCD DISPLAY
19. FM STEREO LED INDICATOR
20. DIAL SCALE
21. TUNING KNOB
22. ARM LOCK
23. SPINDLE ADAPTOR
24. 33/45/78 RPM SPEED SELECTOR
25. PICK-UP HOLDER
26. CD/USB BUTTON
27. SPEAKERS
28. FM ANTENNA
29. AC CORD
30. TAPE BUTTON
31. PHONO BUTTON
32. CD STOP BUTTON
33. TAPE FF/EJECT BUTTON
34. TAPE SLOT-IN
35. TOP COVER MECHANISM
36. TURNTABLE
49. AUX-IN
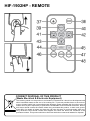
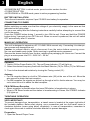
REMOTE CONTROL
37. OPEN / CLOSE CD DOOR
38. REC: in cd or phono mode, press to active recording function.
39. REPEAT BUTTON
40. PLAY/PAUSE: in cd/usb mode, press once to start playback. Press again to enter pause
mode.
41. SKIP/SEARCH BACKWARD: press once to skip to previous track.press & hold for search
backward.
42. SKIP/SEARCH FORWARD: press once to skip to next track, press & hold for search for-
ward.
43. STOP: in cd/usb mode, press to stop playback or cancel the stored program.
44. 10+ Track Button
45. 10- TRACK BUTTON

3 English
46. RANDOM BUTTON: in cd/usb mode, press to active random function.
47. DELETE BUTTON
48. PROGRAM: in CD/USB mode, press to active programming function.
BATTERY INSTALLATION
The infra-red transmitter requires 2 pcs CR-2025 size battery for operation.
CONNECTING TO POWER
Before switching on make sure that the voltage of your electricity supply is the same as that
indicated on the rating plate.
For your own safety read the following instructions carefully before attempting to connect this
unit to the mains.
Press the POWER button during 1 second to turn ON the unit. Press and hold the POWER
button during 3 seconds to turn OFF the unit. When no sound is produced, the unit will switch
OFF automatically after 15 minutes.
MAINS (AC) OPERATION
This unit is designed to operate on AC 110-240V 50Hz current only. Connecting it to other po-
wer sources may damage the unit.
Caution: to prevent electric shock disconnect from the mains before removing cover.
No user serviceable parts inside. Refer servicing to qualified service personnel.
Remove the stereo carefully from the box, retaining the packaging for future use. Connect the
plug to a mains power inlet 110 - 240V AC ~ 50 Hz.
MW/FM TUNER
Operation
1. Switch ON the Power Switch (15). The red Power Indicator (17) will light up.
2. Select the desired frequency band with the Band Selector (14) for FM or (12) for MW band.
3. Tune to the desired radio station by turning the Tuning control (21).
Antenna
For FM reception there is a built-in FM antenna wire (28) at the rear of the unit. Move the
wire around to obtain the best reception.
For MW reception the signals are picked up through a built-in ferrite antenna. Your may ha-
ve to orient the unit to obtain the best reception.
FM & FM-Stereo Reception
Stereo reception is possible when the tuned FM station is broadcasting in stereo.
When in FM Stereo mode and the station is broadscasting in Stereo, the STEREO indicator
(19) lights up.
TURNTABLE OPERATION
VERY IMPORTANT!
To prevent damages from transportation, a transit screw is located at the upper right side of
the turntable platform. Before start playing, use a screwdriver and turn the transit screw in
clockwise direction (screw going down) completely. In case of transportation, remember to
clock again this screw in counter-clockwise direction to prevent damages.
Preparation
1. Open the Record Player Cover.

4 English
2. Release the Tonearm Clamp, and remove the stylus protector.
Listening to Records
1. Press the PHONO button (31) to select the TURNTABLE function.
2. Place a record on the turntable, over the central spindle. Place the EP adapter over the
central spindle when playing 17cm EP records.
3. Set the Speed Selector (24) to 33/78 or 45 rpm according to the record.
4. Release the tonearm clamp, and remove the protective cap from the stylus.
5. Lift the Tonearm with the Tonearm Lift Lever.
6. Move the tonearm to the beginning of the record, or to the start of a particular track.
7. Gently lower the tone arm onto the record with the Tonearm Lift lever to start playing.
8. When the record is finished the tonearm will automatically stop. Lift the tonearm from the
record and return it to the rest.
9. To stop manually, lift the tonearm from the record and return it to the rest.
Notes: Do not stop or turn the platter manually. Moving or jarring the turntable without
securing the Tonearm clamp could result in damage to the Tonearm. Replace the protective
cap on the stylus when not in use.
PLAYING COMPACT DISC
To start
1. Press function selector (26) to select “ CD/USB“ mode.
2. Press “open/close” button (11) to open the cd door (10).
3. Place a cd with the printed side facing up inside the tray & then close the co door.
4. Focus search is performing, the first track will start playback.
5. To interrupt, press the “ STOP “ button (32) once, the total number of tracks compare on
the lcd display (18). Press again PLAY/PAUSE to resume normal playback.
Skip/search mode (skip/search up / skip/search down)
During play or pause mode, if “skip up” button (3) is pressed. it will go to next track and di-
splay the track no. and then remain the play or pause mode.
During play or pause mode, if “skip down” button (3) is pressed. it will go back to the begin-
ning of the track, original track number is display and remain the play or pause mode.
After step 2, press “skip down” button (3) again will go to the previous track and remain the
play or pause mode.
If press and hold the “ skip up/down button “ (3) during cd/mp3 playabck, the playing track
will go fast forward or backward until the button being released.
To skip 10 tracks UP or DOWN press the TRACK +10 or TRACK -10 button on Remote
Control.
REPEAT/RANDOM MODE
Press the REPEAT button from Remote Control or PLAY MODE from main unit to activate
this function. All the tracks can be played in difference mode as follow:
Repeat play: you can listen the desired tracks or folder repeatedly by this function.
Random play: you can listen all the tracks or folder in a random order by this function
CD DISC PROGRAMMING
Up to 99 tacks can be programmed for mp3 (20 in CD) and play in any order. before use, be
sure the system is at stop mode before programming:
1. Press cd/usb mode & stop the cd playback.
2. Press the “PLAY MODE” button, “ P “ will appear on lcd display (18). Moreover, it will indi-
cate program no. and digits for track no. to be programmed.

5 English
3. Select a desired track by pressing skip or buttons (3).
4. Press the “ PLAY MODE “ button to store the trace into memory.
5. Repeat steps 3 and 4 to enter additional tracks into the memory if necessary.
6. When all the desired tracks have been programmed, press cd “ play/pause (2) to play the
disc in assigned order.
7. To cancel the programmed file, press “stop” button.
PLAYBACK OF MP3/WMA SONG VIA USB STORAGE MEDIA
The system is able to decode and playback all mp3 /wma file which stored in the memory me-
dia with usb connecting port.
1. Set function selector (15) at cd/usb mode and then press FUNCTION button (6) to select
usb.
2. Plug-in the usb plug with the face up & make sure it going into completely.
3. The system will start reading the storage media automatically after connecting, and lcd di-
splay (18) will show the total number of mp3/wma files
4. Repeat the same playback procedure as playing cd/mp3 disc as above.
REMARKS:
The system can detect and read the file under mp3 and wma format only though the usb
port.
If connect the system to mp3 player via the usb socket, due to variances in mp3 encoding
format, some mp3 player may not be able to play via the usb socket. this is not a maul-
function of the system.
Connecting the usb upside down or backwards could damage the audio system or the sto-
rage media (usb thumb drive). Check to be sure the direction is correct before connection.
LISTENING TO TAPE
1. Set the Function button (6) to “ TAPE “ mode. The system will start playback automatically
after inserting the cassette tape.
2. Press “ TAPE FORWARD / EJECT “ Button (33) half inwards during playback mode. The
tape will wind forward.
3. Slightly press the “ TAPE FORWARD / EJECT “ Button (33) again to resume playback.
4. Press the“ TAPE FORWARD / EJECT “ Button (33) completely inwards and the cassette
tape will be ejected through the cassette door cover (34).
AUX IN FUNCTION
You can put the other audio products through the Aux in jack (49). Press the function button
to “TAPE“.
ENCODING OF CD/PHONO INTO MP3 FILE
The system is able to encode normal cd, cassette or turntable to mp3 format and recording at
memory media with usb connecting port.
CD ENCODING
Encoding 1 track:
1. Perform normal playback of the cd track you want to encode & record,
2. Press “ record “ button (9) twice during the playback of the desire track, unit will display.
Encoding is performing now.
3. Press the STOP button to finish recording the track.

6 English
Encoding 1 disc:
1. Place a cd with the printed side facing up inside the tray & then close the co door
2. Press the RECORD button (9) twice after focus search completed. unit will display “REC”.
Encoding is performing now.
3. After completing of encoding, unit will stop playback automatically.
Remarks:
The recording speed is 1:1 and according to the actual plying time of the cd track.
The system will creat a “ RECORD “ folder and then store the encoding track in it.
The recording format is preset at – mp3 bit rate: 128 kbps, sampling rate: 44.1khz.
No song title will be recorded during encoding mode.
To interrupt the recroding, press the “ record “ button again during record mode.
Recording will be completed only entire song being encoded, if terminate the encoding pro-
cess intermediately, there is no track being recorded nor stored to the usb.
Copying of MP3/WMA file
If putting a mp3/wma disc instead of a cd-disc, the system will copy the files to the usb or sd
card if press the “ record “ button (9). The operation procedures is same as cd encoding as
stipulate on above, and the system will switch to copying mode only if mp3/wma file being
read.
PHONO ENCODING
1. Insert the USB device.
2. Press the function button to “ phono “.
3. Start playback at phono for the track which you want to record to usb.
4. Press the RECORD button two times to start encoding.
5. The display show REC.
6. After finish of recoding, press the STOP button to stop recording.
CASSETTE ENCODING
1. Insert the USB device.
2. Press the function button to “TAPE“.
3. Start playback at TAPE for the track which you want to record to USB.
4. Press the RECORD button two times to start encoding.
5. The display show REC.
6. After finish of recoding, press the STOP button to stop recording.
REMOVING OF USB / MEMORY CARD
To remove the usb, turn off the power or switch the function mode to either cd, aux or tuner
first. Un-plug it by pulling out the usb socket directly.
DELETE TRACKS FROM USB
1. Insert the USB device.
2. Press the function button to “CD/USB “.
3. Press the button FUNCTION to select USB device.
4. During playback or STOP condition, press the button DELETE from Remote Control to de-
lete the current track.
SPECIFICATIONS
AC: 110-240V ~ 50Hz
FM: 87.5 - 108MHz
MW: 520 - 1620kHz
Design and specifications are subject to change without notice.

7 Deutsch
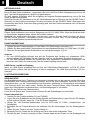
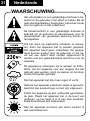
SICHERHEITSHINWEISE
Das Ausrufszeichen im Dreieck weist den Benu-
tzer auf wichtige Bedienungs- und Wartung-
sanweisungen (Service) in diesem Handbuch
hin, die unbedingt zu befolgen sind.
Um die Gefahr elektrischer Schläge
auszuschliessen, Gehäuse auf keinen Fall ab-
nehmen.
Im Innem befinden sich keine vom Benutzer sel-
bst instandsetz-baren Teile. Reparaturen dürfen
nur von einer autorisierten Fachwerkstatt dur-
chgeführt werden.
Dieses Gerät ist für 230V ~ 50Hz Netzspannung
ausgelegt. Bei längerer Nichtbenutzung des
Geräts ziehen Sie den Stecker aus der Steckdo-
se.
Setzen Sie das Gerät weder Feuchtigkeit noch
Regen aus.
Schalten Sie das System erst dann ein, wenn
Sie alle Verbindungen genau geprüft haben.
Stellen Sie das Gerät so auf, dass immer eine
ungestörte Frischluftzufuhr sichergestellt ist. Es
ist zum beispiel keinesfalls auf Teppiche und in
der Nähe von Gardinen zu stellen oder in
Bücherregale einzubauen.
Setzen Sie das Gerät weder direkter Sonnenein-
strahlung noch Wärmequellen aus.

8 Deutsch
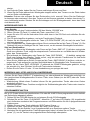
LAGE DER BEDIENUNGSELEMENTE
1. SCHUTZDECKEL
2. TASTE CD PLAY/PAUSE/STOP
3. TASTE CD SKIP UP
4. TASTE CD SKIP DOWN
5. TASTE PLAY MODE
6. TASTE FUNKTION
7. LAUTSTÄRKEREGLER (VOLUME)
8. FERNBEDIENUNGSSENSOR
9. TASTE RECORD
10. CD-FACH
11. TASTE OPEN/CLOSE
12. TASTE MW RADIO
13. USB-PORT
14. TASTE UKW RADIO
15. POWER ON/OFF SCHALTER
16. STICHWORT-HEBEL
17. POWER-LED-ANZEIGE
18. LCD-DISPLAY
19. LED-ANZEIGE FÜR FM-STEREO
20. RADIO DIAL SCALE
21. TUNING-REGLER
22. ARM-SCHLOß
23. SINGLE-ADAPTER
24. GESCHWINDIGKEITSWAHLSCHALTER 33/45 U/MIN
25. TONARMABLAGE
26. TASTE CD/USB
27. LAUTSPRECHER (L/R)
28. FM-ANTENNE
29. WECHSELSTROMKABEL
30. KASSETTENFACH
31. PLATTENSPIELER-TASTE
32. CD-STOP TASTE
33. KASSETTEN-EJECT TASTE
34. KASSETTENSCHLITZ
35. COVER- MECHANISMUS
36. PLATTENSPIELER
49. AUX-IN
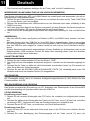
FERNBEDIENUNG
37. CD TASTE OPEN/CLOSE-TASTE
38. Enkodierung-taste: im CD/Phono/Kassette-Modus zur Aktivierung der Aufzeichnungsfunktion.
39. Wiederholung-taste (CD/USB)
40. Play/pause-taste (CD/USB)
41. Skip/search-TASTE (CD/USB)
42. Skip/search-TASTE (CD/USB)
43. STOP-TASTE (CD/USB)
44. +10 SKIP TASTE (CD/USB)
45. -10 SKIP TASTE (CD/USB)
46. ZUFALLSWIEDERGABE TASTE
47. LÖSCHEN-TASTE (NUR USB)
48. PROGRAM-TASTE (CD/USB)
BATTERIE
Die Infrarot-Fernbedienung erfordert zum Betrieb zwei Batterien vom Typ CR-2025.

9 Deutsch
NETZANSCHLUSS
Bevor Sie das Gerät einschalten, vergewissern Sie sich, daß Ihre örtliche Netzspannung mit der auf
dem Typenschild angegebenen Spannung übereinstimmt.
Zu Ihrer eigenen Sicherheit lesen Sie sorgfältig die folgende Bedienungsanleitung, bevor Sie das
Gerät ans Netz anschließen.
Schließen Sie das AC-Netzkabel an Ihr AC-Haushaltstromnetz an Drücken Sie die POWER-Taste 1
Sekunde, um das Gerät einzuschalten. Drücken und halten Sie die POWER-Taste 3 Sekunden zum
Ausschalten des Gerät. Wenn kein Klang erzeugt wird, wird das Gerät automatisch nach 15 Minuten
ausgeschalten.
NETZBETRIEB (AC)
Dieses Gerät funktioniert nur mit einer Spannung von AC 110-240V 50Hz. Wird das Gerät an ande-
re Stromquellen angeschlossen, könnte es Schaden nehmen.
Vorsicht: Um elektrischen Schlägen vorzubeugen, trennen Sie das Gerät vom Netz ab, bevor
Sie den Deckel entfernen. Verwenden sie keine nutzbaren inneren Teile. Für die Wartung wenden
Sie sich an qualifiziertes Kundendienstpersonal.
RUNDFUNKEMPFANG
1. Drüken Sie den Funktionschalter (15) auf Radio. Die EIN-Anzeige erleuchtert (17).
2. Wählen Sie das gewünschte Frequenzband mit dem Bandwahlschalter (14) UKW oder (12) MW.
3. Stimmen Sie die gewünschte Radiostation mit dem Abstimmregler (21) ab.
Antenne
Für den UKW-Empfang befindet sich auf der Rückseite des Gerätes ein eingebauter UKW-
Antennendraht (28). Bewegen Sie den Draht hin und her, bis der beste Empfang erreicht wird.
Für den MW-Empfang werden die Signale über eine eingebaute Ferritantenne empfangen. Sie
brauchen das Gerät nur auszurichten, bis der beste Empfang erreicht wird.
UKW-Stereo- und Mono-Empfang
Wenn ein UKW-Signal eingestellt wird und Sie den UKW-Modus-Wahlschalter auf FM ST (UKW-
Stereo) stellen, können Sie die Sendung in Stereo empfangen. Die UKW-Stereo-Anzeige (19) leu-
chtet auf.
PLATTENSPIELERBETRIEB
SEHR WICHTIG!
Um Beschädigungen beim Transport zu vermeiden, befindet sich an der oberen rechten Seite des
Plattentellers eine Transportsicherungs-Schraube. Bevor Sie Musik abspielen, benützen Sie einen
Schraubenzieher, um die Transportsicherungs-Schraube vollständig im Uhrzeigersinn einzudrehen
(Die Schraube dreht sich nach unten). Denken Sie beim Transport daran, diese Schraube wieder
gegen den Uhrzeigersinn herauszudrehen, um Beschädigungen zu vermeiden.
Öffnen Sie den Deckel des Plattenspielers.
Lösen Sie die Sperre des Tonarms und entfernen Sie die Schutzkappe von der Nadel.
Plattenspielerbetrieb
1. Druken Sie den Funktionschalter (31) auf PHONO.
2. Legen Sie eine Schallplatte auf die mittlere Spindel des Plattentellers. Legen Sie den EP-Adapter
auf die mittlere Spindel, wenn Sie 17 cm EP-Platten abspielen.
3. Stellen Sie die Drehzahl-Wahlschalter (24) auf 33/78 oder 45 U./Min., entsprechend der
Schallplatte.
4. Entriegeln Sie die Tonarm-Klemme und entfernen Sie die Schutzklappe von der Wiedergabena-
del.
5. Heben Sie den Tonarm mit dem Tonarm-Hebel an.
6. Bewegen Sie den Tonam an den Anfang der Plane oder eines bestimmten Titels.
7. Senken Sie den Tonarm vorsichtig mit dem Tonarm-Hebel auf die Platte, um die Wiedergabe zu

10 Deutsch
starten.
8. Am Ende der Platte, heben Sie den Tonarm und bringen Sie es zum Rest.
9. Wenn Sie die Platte während der Wiedergabe stoppen wollen, den Tonarm von der Platte heben
und zur Ruhe zurückbringen.
Hinweise: Drehen oder stoppen Sie den Plattenteller nicht manuell. Wenn Sie den Plattentel-
ler bewegen oder anstossen, ohne den Tonarm mit der Klemme gesichert zu haben, konnte der To-
narm beschadigt werden Stecken Sie die Schutzkappe auf die Wiedergabenadel, wenn das Gerät
nicht benutzt wird.
WIEDERGABE EINER CD
Erste Schritte
1. Drücken Sie mit dem Funktionschalter (26) den Modus „CD/USB” aus.
2. Öffnen Sie das CD-Fach (11) mittels der Taste „open/close” (10).
3. Legen Sie eine CD mit der bedruckten Seite nach oben in das CD-Fach und schließen Sie die-
ses wieder.
4. Die CD wird daraufhin eingelesen, und erste Track beginnt Playback.
5. Starten Sie die Wiedergabe mittels der Taste „CD PLAY/PAUSE” (32) ein mal; der erste Track
wird nun abgespielt.
6. Zum Unterbrechen der Wiedergabe drücken Sie ein weiteres Mal auf die Taste „CD stop” (2). Die
Spielzeit hält nun an. Betätigen Sie die Taste erneut, um die normale Wiedergabe fortzusetzen.
Skip und Suchfunktion
Wenn Sie während der Wiedergabe oder Pause auf die Taste „SKIP UP” (3) drücken, springt das
Gerät zum nächsten Track, zeigt die entsprechende Tracknummer an und bleibt dann im Wieder-
gabe- bzw. Pausenmodus.
Wird während der Wiedergabe oder Pause die Taste „SKIP DOWN” (3) betätigt, springt das
Gerät zum Anfang des aktuellen Tracks zurück, zeigt die aktuelle Tracknummer an und bleibt
dann im Wiedergabe- bzw. Pausenmodus.
Wenn Sie im Anschluss an Schritt 2 erneut auf die Taste „SKIP DOWN” (3) drücken, wird der vo-
rangehende Track aufgerufen und das Gerät bleibt dann im Wiedergabe- bzw. Pausenmodus.
Halten Sie die Taste „SKIP UP/DOWN” (3) während der CD/MP3-Wiedergabe gedrückt, erfolgt
der schnelle Vor- bzw. Rücklauf, bis Sie die Taste wieder loslassen.
Drüken Sie die Taste +10 oder -10 vom fernbedienung zu springen die track.
WIEDERHOLUNG, INTRO UND ZUFALLSWIEDERGABE
Drücken Sie die Taste „REPEAT” (Fernbedienung) vor oder während der Wiedergabe mehrfach, um
den gewünschten Wiedergabemodus für einen Track, einen Ordner (nur bei MP3) oder alle Tracks
auszuwählen:
Wiederholung: Mittels dieser Funktion können Sie die gewünschten Tracks oder einen Ordner
wiederholt anhören.
Zufallswiedergabe: Diese Funktion ermöglicht die Zufallswiedergabe aller Tracks oder eines be-
stimmten Ordners.
PROGRAMMIERFUNKTION
Bis zu 20 Tracks können bei gewöhnlichen CDs oder 99 IN MP3-Discs programmiert und in beliebi-
ger Reihenfolge abgespielt werden:
1. Drüken Sie den CD/USB-Modus ein und stoppen Sie die CD-Wiedergabe.
2. Drücken Sie auf die Taste „PLAY/MODE”, woraufhin „P” auf dem LCD-Display (18) eingeblendet
wird. Außerdem erscheinen die Programmnummer und Ziffernstellen für die zu programmierende
Tracknummer.
3. Wählen Sie nun einen Track mittels der SKIP-Tasten (3) aus.
4. Speichern Sie den Track durch Drücken der Taste „PLAY MODE”.
5. Wiederholen Sie die Schritte 3 und 4 gegebenenfalls zum Speichern weiterer Tracks.
6. Nachdem Sie alle gewünschten Tracks programmiert haben, drücken Sie auf die Taste „CD play/
pause” (2), um die Tracks in der programmierten Reihenfolge abzuspielen.

11 Deutsch
7. Zum Löschen des Programms betätigen Sie die Taste „stop” auf der Fernbedienung.
WIEDERGABE VON MP3/WMA-TRACKS VON USB-SPEICHERMEDIEN
Das System ist in der Lage, MP3- und WMA-Dateien zu entschlüsseln und abzuspielen, die auf an-
geschlossenen USB-Speichermedien.
1. Drüken Sie den Funktionschalter (15) cd/usb ein und drücken Sie dann auf die Taste FUNCTION
(6), um den Modus „usb” auszuwählen.
2. Stecken Sie anschließend den USB-Anschluss mit der Oberseite nach oben vollständig in den
USB-Port ein bzw.
3. Nach dem Anschluss beginnt das System automatisch mit dem Einlesen des Speichermediums,
und das LCD-Display (18) zeigt die Gesamtzahl der mp3/wma-Dateien.
4. Gehen Sie bei der Wiedergabe entsprechend der obigen Beschreibung für Cds und MP3-Discs
vor.
ANMERKUNG:
Uber den USB-Port kann das System nur Dateien im MP3- und WMA-Format erfassen und einle-
sen.
Wird das System über den USB-Port an einen MP3-Player angeschlossen, kann es bei einigen
MP3-Playern passieren, dass aufgrund von Unterschieden im MP3-Kodierformat die Wiedergabe
über den USB-Port nicht möglich ist. Hierbei handelt es sich nicht um eine Fehlfunktion des Sy-
stems.
Werden Speichermedien falsch angeschlossen, können Schäden am Audiosystem oder an den
Speichermedien (USB) entstehen. Achten Sie daher bitte unbedingt darauf, dass Sie Speicher-
medien stets richtig herum einstecken.
KASSETTEN BETRIEB
1. Drüken Sie den Funktionschalter (30) auf den Modus „TAPE”.
2. Das Gerät wird die Wiedergabe automatisch beginnen, nachdem sie die Kassette eingelegt ha-
ben.
3. Drücken Sie die Taste zur Hälfte ein, läuft die Kassette im schnellen Vorlauf vor. Ein erneuter lei-
chter Druck lässt den Vorlauf ausrasten.
4. Drücken Sie sich die SCHNELLVORLAUF/AUSWURF-TASTE (33) vollständig nach innen. Die
Kassette wird durch die Kassette-Deckel (22) ausgestoßen.
AUX-FUNKTION
Die Tonausgabe erfolgt, wenn ein externes Audiogerät angeschlossen ist (49). Drüken Sie den
Funktionschalter „AUX-IN”.
MP3-ENCODIERUNG VON CD/PHONO
Das System ermöglicht die Encodierung von CD, Kassetten oder Plattenspieler in das Format MP3
und die Aufzeichnung auf Speichermedien über den USB-Port.
CD-ENCODIERUNG
Encodierung eines Tracks
1. Starten Sie die normale Wiedergabe des CD-Tracks, der encodiert und aufgezeichnet werden
soll.
2. Drücken Sie während der Wiedergabe des Tracks auf die Taste „record” (9) zwei mal, woraufhin
die Anzeige “REC“. Dies bedeutet, dass der Encodiervorgang nun ausgeführt wird.
3. Drücken Sie den STOP-Taste, um aufzuhören, die Fährte aufzuzeichnen.
Encodierung einer Disc
1. Legen Sie eine CD mit der bedruckten Seite nach oben in das CD-Fach und schließen Sie die-
ses dann.
2. Drücken Sie nach Beendigung des Einlesevorgangs auf die Taste „record” (9) zwei mal,

12 Deutsch
woraufhin die Anzeige “REC“. Dies bedeutet, dass der Encodiervorgang nun ausgeführt wird.
3. Nach Abschluss der Encodierung wird die Wiedergabe automatisch gestoppt.
ANMERKUNG:
Die Aufzeichnungsgeschwindigkeit ist 1:1 und entspricht der Spielzeit des CD-Tracks.
Das System erstellt einen „RECORD”-Ordner, in dem die encodierten Tracks gespeichert wer-
den.
Das Aufzeichnungsformat ist auf eine MP3-Bitrate von 128 kbps und eine Abtastrate von 44,1
kHz voreingestellt.
Während des Encodiermodus werden keine Liedtitel aufgezeichnet.
Zum Unterbrechen der Aufzeichnung drücken Sie während des Vorgangs erneut auf die Taste
„record”.
Die Aufzeichnung wird nur abgeschlossen, wenn ein vollständiger Track encodiert wird. Wenn
Sie den Encodiervorgang vor seiner Beendigung abbrechen, wird kein Track aufgezeichnet oder
auf dem USB-Speichermedium bzw.
KOPIEREN EINER MP3/WMA-DATEI
Wenn Sie eine mp3/wma-Disc anstelle einer normalen CD eingelegt haben, kopiert das System die
Dateien bei Betätigung der Taste „RECORD” (9) auf das USB-Speichermedium bzw. Die Vorgehen-
sweise entspricht der für die zuvor beschriebene CD-Encodierung. Beachten Sie bitte, dass das Sy-
stem nur in den Kopiermodus schaltet, wenn die MP3/WMA-Datei gelesen wird.
PHONO-ENCODIERUNG
1. Legen Sie das USB-Gerät ein.
2. Drüken Sie den Funktionschalter „phono”.
3. Starten Sie nun unter PHONO die Wiedergabe des Tracks.
4. Drücken Sie dann direkt auf die Taste „record” (9) zwei mal.
5. Auf dem LCD-Display wird die Anzeige „REC” eingeblendet, Das System startet nun den Enco-
diermodus.
KASSETTE-ENCODIERUNG
1. Legen Sie das USB-Gerät ein.
2. Drüken Sie den Funktionschalter „TAPE”.
3. Starten Sie nun unter Kassette die Wiedergabe des Tracks.
4. Drücken Sie dann direkt auf die Taste „record” (9) zwei mal.
5. Auf dem LCD-Display wird die Anzeige „REC” eingeblendet, Das System startet nun den Enco-
diermodus.
LÖSCHEN SIE LIED VON USB-GERÄT:
1. Legen Sie das USB-Gerät ein.
2. Drüken Sie den Funktionschalter „CD/USB”.
3. Drüken Sie die Taste “FUNCTION” um auszuwählen die USB-Funktion.
4. Drüken die Taste DELETE zwei mal während des Playbacks.
ENTFERNEN VON USB
Zum Entfernen eines USB-Speichermediums bzw. Sie das Gerät zunächst aus oder stellen Sie den
Funktionsmodus auf KASSETTE,PHONO oder TUNER. Im Falle eines USB-Speichermediums
können Sie dieses einfach direkt aus dem USB-Port ziehen.
ECHNISCHE DATEN
Netzbetrieb (AC): 110-240V ~ 50Hz
UKW: 87,5 - 108 MHz
MW: 520 - 1620 kHz
Auf Grund ständiger Verbesserungen bleibt die Änderung der technischen Daten und des Designs
ohne Vorankündigung vorbehalten.

13 Français
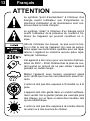
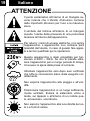
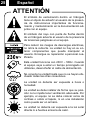
ATTENTION
Le symbole “point d’exclamation” à l’intérieur d’un
triangle avertit l’utilisateur que d’importantes in-
structions d’utilisation et de maintenance sont con-
tenues dans le mode d’emploi.
Le symbole “éclair” à l’intérieur d’un triangle sert à
avertir l’utilisateur de la présence du courant à l’in-
térieur du l’appareil qui pourrait constituer un ri-
sque.
Afin de minimiser les risques, ne pas ouvrir le boî-
tier ni ôter le dos de l’appareil. En case de panne,
faites appel aux techniciens qualifiés pour les répa-
rations. L’appareil ne renferme aucune pièce repa-
rable par l’utilisateur.
Cet appareil a été conçu pour une tension d’alimen-
tation de 230V ~ 50Hz. Débranchez la prise de cou-
rant quand on prévoit de ne pas utiliser l’appareil
pendant un certain temps.
Mettez l’appareil sous tension seulement après
avoir vérifié que tous les raccordements soient cor-
rects.
L’unité ne doit pas être exposée à l’humidité ou à la
pluie.
L’appareil doit être gardé dans un endroit suffisam-
ment ventilé. Ne le gardez jamais par exemple près
des rideaux, sur un tapis ou dans des meubles, tels
qu’une bibliothèque.
L’unité ne doit pas être exposée à la lumière directe
du soleil ou à des sources de chaleur.

14 Français
POSITIONNEMENT DES COMMANDES
1. COUVERCLE DE PROTECTION
2. TOUCHE CD PLAY/PAUSE/STOP
3. TOUCHE CD SKIP UP
4. TOUCHE CD DOWN
5. TOUCHE MODALITÉ REPRODUCTION (REPEAT/RANDOM)
6. TOUCHE FONCTIONNE
7. CONTROLLE VOLUME
8. CAPTEUR INFRAROUGE
9. TOUCHE RECORD
10. COMPARTIMENT CD
11. TOUCHE D’OUVERTURE DU COMPARTIMENT CD
12. TOUCHE BANDE MW
13. PRISE USB
14. TOUCHE BANDE FM
15. SÉLECTEUR DE FONCTION/ ÉTEINDRE
16. LÈVE SOULÈVEMENT BRAS TOURNE-DISQUES
17. LED D’ALIMENTATION
18. ÉCRAN LCD
19. LED DEL FM STEREO
20. SCALE DE SYNTONIE
21. BOUTON DE SYNTONISATION
22. BLOQUE BRAS TOURNE-DISQUES
23. ADAPTATEUR BROCHE TOURNEDISQUE
24. SÉLECTEUR DE VITESSE 78/33/45 TR/MIN
25. SUPPORT DE LA TÊTE DE LECTURE
26. TOUCHE CD/USB
27. HAUT-PARLEURS (D/G)
28. ANTENNE FM
29. CORDON AC
30. TOUCHE CASSETTE
31. TOUCHE TOUREDISQUE
32. TOUCHE STOP (CD-USB)
33. TOUCHE NSERTION EXTRACTION CASSETTE
34. GUICHET CASSETTE
35. MECANISME OUVERDURE COUVERCLE
36. TOUNEDISQUE
49. AUX-IN
TÉLÉCOMMANDE
37.OUVERTURE FERMETURE GUICHET CD
38.TOUCHE ENREGISTREMENT USB
39.TOUCHE RÉPÉTITION PISTE DU DISQUE
40.TOUCHE REPRODUCTION PAUSE CD
41.TOUCHE SAUTE TRACE EN ARRIÈRE
42.TOUCHE SAUTE TRACE AVANT
43.TOUCHE STOP CD
44.TOUCHE SAUTE TRACE AVANT +10
45.TOUCHE SAUTE TRACE EN ARRIÈRE -10
46.TOUCHE REPRODUCTION CASUEL
47.TOUCHE ANNULATION
48.TOUCHE PROGRAMMATION

15 Français
INSTALLATION DES PILES
La télécommande nécessite 1 pile CR-2025.
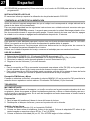
BRANCHEMENT A LA SOURCE D’ALIMENTATION
Avant l’utilisation, vérifier que la tension électrique de votre source d’alimentation corresponde à
celle indiquée sur la plaque des caractéristiques techniques de l’appareil.Avant de brancher l’ap-
pareil au réseau, il faut lire attentivement les instructions suivantes pour des raisons de sécurité.
Appuyez sur le bouton POWER pendant 1 seconde pour mettre l'appareil en marche. Appuyez et
maintenez enfoncé le bouton POWER pendant 3 secondes pour éteindre l'appareil. L’appareil
s’éteint de lui-même après environ 15 minutes si aucun son n’est produit.
UTILISATION DU RESEAU (CA)
L’appareil est conçu pour fonctionner sur une tension de CA 230V, 50Hz seulement. S’il est bran-
ché à d’autres sources d’alimentation cela peut endommager l’appareil.
Danger: pour éviter tout risque de décharge électrique, débrancher l’appareil avant d’enlever
la protection. A l’intérieur il n’y a pas de parties utilisables. S’adresser au personnel qualifié pour
toute opération d’entretien.
Enlever le stéréo de son emballage avec attention et garder la boîte en cas d’utilisation future.
Brancher le cordon d’alimentation CA à votre prise murale CA et alimenter le réseau. S’assurer
que la tension est compatible, 110-240V 50 Hz.
ECOUTE DE LA RADIO
1. Presser le Sélecteur de arrêt marche (15). L’indicateur de Marche (17) s’allume.
2. Choisir la bande de fréquence souhaitée avec le Sélecteur de Bandes (14) pour FM ou (12)
pour MW.
3. A l’aide du Sélecteur de Recherche des Stations (21), intercepter la station émettrice souhai-
tée.
4. Régler le Volume (7) pour obtenir le niveau de son souhaité.
Antenne
Pour la réception en FM il y a une antenne FM incorporée (28) dont le câble est placé à l’arriè-
re de l’appareil. Orienter le câble de manière à ce que la qualité de la réception soit la meilleu-
re possible.
Pour la réception en MW les signaux sont interceptés par une antenne en ferrite incorporée.
Pour que la réception soit la meilleure possible, il faut orienter l’appareil.
Réception FM en Stéréophonie et Monophonie
Quand un signal FM est intercepté, si l’on place le sélecteur de BANDES sur la position FM il est
possible d’écouter la station émettrice en stéréophonie. L’indicateur FM Stéréo (19) s’allume.
TOURNE-DISQUES
TRES IMPORTANT !
Pour éviter les dégâts dus au transport, l’appareil dispose d’une vis de transit située du côté su-
périeur droit de la platine. Avant d’enclencher l’appareil, faites tourner entièrement la vis de transit
dans le sens horaire à l’aide d’un tournevis (vissez vers le bas). Si vous devez déplacer l’appareil,
n’oubliez pas de revisser la vis dans le sens antihoraire pour éviter les dégâts.
Préparation
1. Ouvrir le couvercle de la platine Tourne-disques.
2. Ouvrir le couvercle du tourne-disques. Relâcher le crochet du bras de lecture.
3. Débloquer le blocage du bras et enlever la protection de la pointe.
Seite wird geladen ...
Seite wird geladen ...
Seite wird geladen ...
Seite wird geladen ...
Seite wird geladen ...
Seite wird geladen ...
Seite wird geladen ...
Seite wird geladen ...
Seite wird geladen ...
Seite wird geladen ...
Seite wird geladen ...
Seite wird geladen ...
Seite wird geladen ...
Seite wird geladen ...
Seite wird geladen ...
Seite wird geladen ...
Seite wird geladen ...
Seite wird geladen ...
Seite wird geladen ...
Seite wird geladen ...
Seite wird geladen ...
Seite wird geladen ...
Seite wird geladen ...
Seite wird geladen ...
-
 1
1
-
 2
2
-
 3
3
-
 4
4
-
 5
5
-
 6
6
-
 7
7
-
 8
8
-
 9
9
-
 10
10
-
 11
11
-
 12
12
-
 13
13
-
 14
14
-
 15
15
-
 16
16
-
 17
17
-
 18
18
-
 19
19
-
 20
20
-
 21
21
-
 22
22
-
 23
23
-
 24
24
-
 25
25
-
 26
26
-
 27
27
-
 28
28
-
 29
29
-
 30
30
-
 31
31
-
 32
32
-
 33
33
-
 34
34
-
 35
35
-
 36
36
-
 37
37
-
 38
38
-
 39
39
-
 40
40
-
 41
41
-
 42
42
-
 43
43
-
 44
44


Roadstar HIF-1902HP Benutzerhandbuch
- Kategorie
- CD-Spieler
- Typ
- Benutzerhandbuch
in anderen Sprachen
- français: Roadstar HIF-1902HP Manuel utilisateur
- español: Roadstar HIF-1902HP Manual de usuario
- italiano: Roadstar HIF-1902HP Manuale utente
- Nederlands: Roadstar HIF-1902HP Handleiding
- português: Roadstar HIF-1902HP Manual do usuário
Verwandte Artikel
-
Roadstar HIF-1937TUMPK Benutzerhandbuch
-
Roadstar HIF-1893TUMPK Benutzerhandbuch
-
Roadstar HIF-1899TUMPK Bedienungsanleitung
-
Roadstar HIF-1993BT Bedienungsanleitung
-
-
Roadstar HIF-8892EBT Benutzerhandbuch
-
Roadstar HIF-1993D+BT Benutzerhandbuch
-
Roadstar HIF-8888TUMPN Benutzerhandbuch
-
Roadstar HIF-8892D+BT Benutzerhandbuch
-
Andere Dokumente
-
Lenco TCD-2550 Benutzerhandbuch
-
Lenco Classic Phono TCD-2570WD Bedienungsanleitung
-
Ricatech RMC400 Benutzerhandbuch
-
 FAIR MATE DR-1471 Bedienungsanleitung
-
-
Auna 10000109 Bedienungsanleitung
-
Sylvania SRCD824 Benutzerhandbuch
-
-
Ricatech RMC350 Benutzerhandbuch
-
Ricatech RMC200 Benutzerhandbuch
