Indesit HGM 30 Bedienungsanleitung
- Kategorie
- Öfen
- Typ
- Bedienungsanleitung

HGM 30 K.C
HGM 30 K.C IX
HGM 300 K.C
HGM 300 K.C IX
Built-in cooker
Installation and use
Cuisinière à encastrer
Installation et emploi
Elektrische inbouw-oven
Installatie en gebruik
Elektro Einbauherde
Installation und Gebrauch
EntoicizÕmenh kouzna
Egkat£stash kai cr¾shj

3
16
28
41
54
Multifunction built-in cooker
Instructions for installation and use
Cuisinière de encastrer multifonction
Instruction pour l’installation et l’emploi
Multifunktionele Inbouwfornuis
Gebruiksaanwijzingen voor de plaatsing en gebruik
Multifunktions-Einbauherde
Informationen für installation un gebrauch
EntoicizÕmenh kouzna
Egkat£stash kai cr¾shj

3
Congratulations on choosing an Indesit appliance, which you will find is dependable and easy to use. We recommend
that you read the instructions in this owner’s manual carefully before use for the best performance and to extend the life
of your appliance, as it will provide you with all the instructions you require to ensure its safe installation, use and
maintenance. Always keep this owner’s manual close to hand since you may need to refer to it in the future. Thank you.
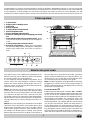
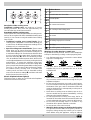
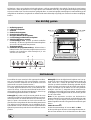
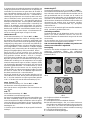
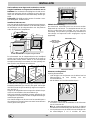
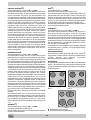
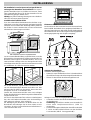
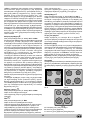
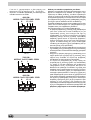
Close-up view
A. Control Panel
B. Dripping Pan or Baking Sheet
C. Oven Rack
D. Electric hotplate
E. Cooking mode selection knob
F. Electric hotplate knobs
G. Electric hotplate indicator light
H. Guides for sliding the racks or dripping pan in and
out
I. Oven indicator light (only on certain models) - When
lit, it indicates the oven is heating up to the temperatu-
re set.
L. Cooking temperature selection knob
M. Electronic programmer - Allows you to programme
the desired cooking mode by selecting the cooking time
and the end cooking time. It can also be used as a
timer.
How to use your oven
This multi-function oven combines the advantages of tra-
ditional convection ovens with those of the more modern
fan assisted models in a single appliance.
It is an extremely versatile appliance that allows you to
choose easily and safely between 5 different cooking
modes. The various features offered by the oven are se-
lected by means of selector knob “E” and thermostat “L”
situated on the control panel.
Notice: The first time you use your appliance, we recom-
mend that you set the thermostat to the highest setting
and leave the oven on for about half an hour with nothing
in it, with the oven door shut. Then, open the oven door
and let the room air. The odour that is often detected dur-
ing this initial use is due to the evaporation of substances
used to protect the oven during storage and until it is in-
stalled.
Notice: Place the dripping pan provided on the bottom
shelf of the oven to prevent any sauce and/or grease from
dripping onto the bottom of the oven only when grilling
food or when using the rotisserie (only available on cer-
tain models). For all other types of cooking, never use the
bottom shelf and never place anything on the bottom of
the oven when it is in operation because this could dam-
age the enamel. Always place your cookware (dishes, alu-
minium foil, etc. etc.) on the grid provided with the appli-
ance inserted especially along the oven guides.
Nota: Should the appliance be equipped with an electronic
programmer, to use the electric oven, just press button (
(the m symbol will appear on the display) before selecting
the desired cooking function.
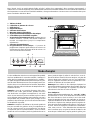
Convection Mode a
Position of thermostat knob “L”: between 60°C and Max.
On this setting, the top and bottom heating elements come
on. This is the classic, traditional type of oven which has
been perfected, with exceptional heat distribution and re-
duced energy consumption. The convection oven is still
unequalled when it comes to cooking dishes made up of
several ingredients, e.g. cabbage with ribs, Spanish style
cod, Ancona style stockfish, tender veal strips with rice,
etc. Excellent results are achieved when preparing veal
or beef-based dishes as well (braised meats, stew, gou-
lash, wild game, ham etc.) which need to cook slowly and
require basting or the addition of liquid. It nonetheless re-
mains the best system for baking cakes as well as fruit
C
A
B
H
D
D
E MLF
IG
3
6
7
10
2
4
5
8
9
11
12
0
3
6
7
10
2
111 1
4
5
8
9
11
12
0
3
6
7
10
2
4
5
8
9
11
12
0
3
6
7
10
2
4
5
8
9
11
12
0

4
and cooking using covered casserole dishes for oven bak-
ing. When cooking in convection mode, only use one drip-
ping pan or cooking rack at a time, otherwise the heat
distribution will be uneven. Using the different rack heights
available, you can balance the amount of heat between
the top and the bottom of the oven. Select from among
the various rack heights based on whether the dish needs
more or less heat from the top.
Fan Assisted Mode b
Position of thermostat knob “L”: Between 60°C and Max.
The heating elements, as well as the fan, will come on.
Since the heat remains constant and uniform throughout
the oven, the air cooks and browns food uniformly over its
entire surface. With this mode, you can also cook various
dishes at the same time, as long as their respective cook-
ing temperatures are the same. A maximum of 2 racks
can be used at the same time, following the instructions in
the section entitled: “Cooking On More Than One Rack”.
This fan assisted mode is particularly recommended for
dishes requiring a gratin finish or for those requiring con-
siderably prolonged cooking times, such as for example:
lasagne, pasta bakes, roast chicken and potatoes, etc…
Moreover, the excellent heat distribution makes it possi-
ble to use lower temperatures when cooking roasts. This
results in less loss of juices, meat which is more tender
and a decrease in the loss of weight for the roast. The fan
assisted mode is especially suited for cooking fish, which
can be prepared with the addition of a limited amount of
condiments, thus maintaining their flavour and appear-
ance.
Desserts: the fan assisted mode is also perfect for baking
leavened cakes.
Moreover, this mode can also be used to thaw quickly
white or red meat and bread by setting the temperature to
80 °C. To thaw more delicate foods, set the thermostat to
60°C or use only the cold air circulation feature by setting
the thermostat to 0°C.
“Top” oven c
Position of thermostat knob “L”: Between 60°C and Max.
The top heating element comes on.
This mode can be used to brown food at the end of cook-
ing.
Grill d
Position of thermostat knob “L”: Max
The top central heating element comes on.
The extremely high and direct temperature of the grill
makes it possible to brown the surface of meats and roasts
while locking in the juices to keep them tender. The grill is
also highly recommended for dishes that require a high
temperature on the surface: beef steaks, veal, rib steak,
filets, hamburgers etc...
Some grilling examples are included in the “Practical Cook-
ing Advice” paragraph.
Fan Assisted Grill e
Position of thermostat knob “L”: between 60°C and 200°C.
The top central heating element and the fan come on. This
combination of features increases the effectiveness of the
unidirectional thermal radiation of the heating elements
through forced circulation of the air throughout the oven.
This helps prevent food from burning on the surface, al-
lowing the heat to penetrate right into the food. Excellent
results are achieved with kebabs made with meats and
vegetables, sausages, ribs, lamb chops, chicken in a spicy
sauce, quail, pork chops, etc.
This mode is also ideal for cooking fish steaks, like sword-
fish, tuna, grouper, stuffed cuttlefish etc.
The oven light
Set knob “E” to the 3 symbol to turn it on. It lights the
oven and stays on when any of the electrical heating ele-
ments in the oven come on.
Cooling ventilation
In order to cool down the exterior of the appliance, some
models are equipped with a cooling fan which comes on
automatically when the oven is hot.
When the fan is on, a normal flow of air can be heard
exiting between the oven door and the control panel.
Note: When cooking is done, the fan stays on until
the oven cools down sufficiently.
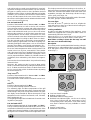
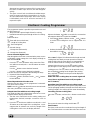
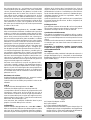
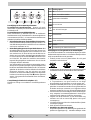
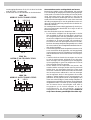
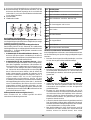
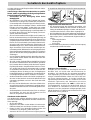
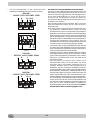
Description
The cooker can be combined with hobs featuring 4 electric
hotplates (Fig. A), with traditional glass ceramic hobs (Fig.
B) or with glass ceramic hobs with extendable cooking
zones (Fig. C).
Fig. A Fig. B
Fig. C
A Cast iron electric hotplates
B Radiant cooking zones
C Extendable radiant cooking zones
D Residual heat indicator lights, one for each cooking
zone: these indicate that the temperature of the
corresponding zone is above 60°C, even if the cooking
zone itself is switched off (only available on certain
models)
E Special control knobs
F Traditional control knobs
AA
A
A
D
B
B
B
B
D
B
B
C
C

5
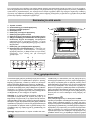
Description of the cooking zones
Traditional cooking zones are made up of circular
heating elements. They turn red approximately ten
seconds after they have been turned on.
Extendable radiant cooking zones.
These operate in a similar way to traditional cooking zones,
and can be recognised for their extendable heating zone
(see Fig. C). You can turn on only the smaller inner cooking
zone or both.
l Traditional cooking zone control knobs. Each
cooking zone is fitted with a control knob allowing you
to select from 12 different temperature settings from a
minimum of 1 to a maximum of 12.
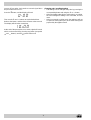
l Special cooking zone control knobs. These control
knobs allow you to choose from two different power
levels, both adjustable from a minimum setting of 1 to
a maximum setting of 12. Turn the knob clockwise from
1 to 12 to set the lower power level. Turn the knob to
the travel limit stop (A), which is indicated by a slight
click, to enable the maximum power level, which in turn
can be adjusted between 12 and 1 by turning the knob
anticlockwise. To restore the minimum power level,
turn the knob and set it back to the zero setting. With
glass ceramic hobs featuring extendable cooking zones
(see Fig. C), the first part of the knob travel enables
the smaller (inner) cooking zone, to enable both
cooking zones and thus have an extended cooking
zone, turn the knob to setting (A) and then select the
desired power level from 12 to 1.
Electric hotplate indicator light (G)
This light comes on when any of the electrical hotplates
on the hob have been turned on.
Warnings for using the glass ceramic hob
To get the best from your hob, here are a few helpful tips
to keep in mind during cooking or when preparing food.
l Use flat-bottomed pans to ensure the same adhere
fully to the cooking zone.
l Use pans whose diameter is sufficient to cover the
hotplate fully, so as to guarantee the use of all the
available heat.
l Make sure the bottom of the pan is always clean and
dry, to ensure correct contact and a long life for your
hotplates and pans.
l Do not use the same pans you used on gas burners.
The concentration of heat on gas burners may deform
the bottom of the pan, and so the desired effect will
never be obtained if you subsequently use the pan on
the glass ceramic hob.
l Never leave a cooking zone on without a pan on it, as
the zone would heat up almost immediately, causing
damage to the heating elements.
l Do not forget that the cooking zone stays hot for at
least half an hour after it has been turned off, take care
not to inadvertently place pans or items on the hot zone.
l Do not turn the cooking zones on if there is any
aluminium foil or plastic material on the hob.
l Do not get too close to the hot hob.
l Warnings before using your hob for the first time:
The glue used for the seals leaves greasy streaks on
the glass during storage. We advise you to remove
these before using the appliance, using an ordinary
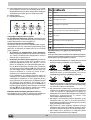
Set. Radiant Burner
0
Off
1
To melt butter and chocolate.
2
To heat liquids.
3
4
For creams and sauces.
5
6
For cooking at the boiling point.
7
8
For roasts.
9
10
For boiling large pieces of meat.
11
12
For frying.
A
For utilising both cooking areas.
F
E
F
E
3
6
7
10
2
4
5
8
9
11
12
0
3
6
7
10
2
111 1
4
5
8
9
11
12
0
3
6
7
10
2
4
5
8
9
11
12
0
3
6
7
10
2
4
5
8
9
11
12
0

6
detergent (non abrasive cream polish). You may detect
the smell of rubber upon first use; this will disappear
quickly.
l The glass ceramic hob can withstand sudden tempe-
rature changes and shocks. Nevertheless, it may bre-
ak if you strike it with a sharp object. In this case, unplug
it immediately and call for technical assistance to
request its repair.
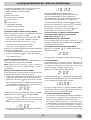
The programmer makes it possible to preset the oven and
the grill in terms of:
• delay start with a preset length of time for cooking;
• immediate start with a preset length of time for cooking;
• timer.
Button functions:
H : Timer with hour and minutes;
$
: Length of cooking time;
%
: End cooking time;
(
: Manual change;
)
: Change time (backwards);
*
: Change time (forwards).
How to Reset the Digital Clock
After the appliance has been connected to the power source
or following a power outage, the clock display will begin to
blink and read: 0:00
• Press the
$
and
%
buttons at the same time. Then
use (within 4 seconds) the
)
and
*
buttons to set the
exact time.
Use the
*
button to move the time forwards.
Use the
)
button to move the time backwards.
The time can also be changed in the following two ways:
1. Repeat all of the foregoing steps.
2. Press the
(
button, and then use the
)
and
*
buttons
to reset the time.
Manual Operation Mode for the Oven
After the time has been set, the programmer is automati-
cally set to manual mode.
Note: Press the
(
button to return the oven to manual mode
after every “Automatic” cooking session.
Delayed Start Time with Preset Cooking Length
The length and the end cooking times must be set. Let us
suppose that the display shows 10:00.
1. Turn the oven control knob to the cooking setting and
temperature desired (example: convection oven at
200°C).
2. Press the
$
and the use (within 4 seconds) the
)
and
*
buttons to set the length of the cooking time. Let us
suppose that 30 minutes was set for the length of the
cooking time. In this case, the display will show:
+
Release the button, and within 4 seconds, the current time
will reappear with the
m
symbol and “auto.”
3. Press the
%
button, and then use the
)
and
*
buttons
to set the end cooking time. Let us suppose that it is
13:00
=
4. Release the button and the display will show the current
time within 4 seconds:
?
When “auto” is lighted, it indicates that the length and end
cooking time have been preset to operate in automatic
mode. At this point, the oven will turn on automatically at
12:30 in order to finish the cooking session within 30
minutes. When the oven is on, the
m
symbol (cooking
pot) will appear on the display for the entire length of the
cooking process. The
$
button can be pressed at any
time to display the setting for the length of the cooking
time, while the
%
button can be pressed to display the
end cooking time.
At the end of the cooking time, an acoustic signal will
sound. Press any button it turn it off (except the
)
and
*
buttons).
Immediate Start Time with Preset Cooking Length
When only the length of the cooking time is set (points 1 and
2 of the paragraph entitled, “Delayed Start Time with Preset
Cooking Length”), the cooking session starts immediately.
Cancelling a Preset Cooking Time
Press the
$
button, and use the
)
button to set the time
to:
,
Then press the manual cooking mode button
(
.
Timer Feature
The timer can be used to count down from a given length of
time. This feature does not control when the oven comes on
Electronic Cooking Programmer

7
or turns off, but, rather, it only emits an acoustic signal when
the preset time has run out.
Press the
H
button, and the display will read:
,
Then use the
*
and
)
buttons to set the desired time.
Release the button, and the timer will start at that second.
The display will show the current time.
.
At the end of the preset time, an acoustic signal will sound,
which can be turned off by pressing any button (except the
*
and
)
buttons), and the
H
symbol will turn off.
Changing and Cancelling Settings
• The settings can be changed at any time by pressing the
corresponding button and using the
*
or
)
button.
• When the length setting for the cooking time is cancelled,
the end cooking time setting is also cancelled, and vice
versa.
• When in automatic cooking mode, the appliance will not
accept end cooking times prior to the start cooking time
proposed by the appliance itself.

8
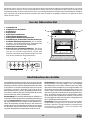
How to Keep Your Oven in Shape
Before cleaning your oven, or performing maintenance,
disconnect it from the power supply.
To extend the life of your oven, it must be cleaned
frequently, keeping in mind that:
• Do not use steam equipment to clean the appliance.
• the enamelled or stainless steel parts should be
washed with lukewarm water without using any abra-
sive powders or corrosive substances which could ruin
them; Stainless steel could get stained. If these stains
are difficult to remove, use special products available
on the market. After cleaning, it is advisable to rinse
thoroughly and dry.
• the inside of the oven should preferably be cleaned
immediately after use, when it is still warm, with hot
water and soap; the soap should be rinsed away and
the interior dried thoroughly. Avoid using abrasive de-
tergents (for example cleaning powders, etc…) and
abrasive sponges for dishes or acids (such as
limescale-remover, etc…) as these could damage the
enamel. If the grease spots and dirt are particularly
tough to remove, use a special product for oven clean-
ing, following the instructions provided on the packet.
• if you use your oven for an extended period of time,
condensation may form. Dry it using a soft cloth.
• there is a rubber seal surrounding the oven opening
which guarantees its perfect functioning. Check the
condition of this seal on a regular basis. If necessary,
clean it and avoid using abrasive products or objects
to do so. Should it become damaged, please contact
your nearest After-sales Service Centre. We recom-
mend you avoid using the oven until it has been re-
paired.
• never line the oven bottom with aluminium foil, as the
consequent accumulation of heat could compromise
the cooking and even damage the enamel.
• clean the glass door using non-abrasive products or
sponges and dry it with a soft cloth.
• the electric hotplates should be cleaned with a damp
cloth and lubricated with a little oil while still warm;
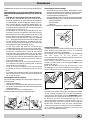
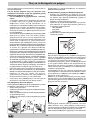
How to remove the oven door
For a more thorough clean, you can remove the oven
door. Proceed as follows:
• open the door fully;
• lift up and turn the small levers situated on the two
hinges;
• grip the door on the two external sides, shut it slowly
but not completely;
• pull the door towards you, pulling it out of its seat;
Reassemble the door by following the above procedures
backwards.
Replacing the Oven Lamp
• Disconnect the oven from the power supply by means
of the omnipolar switch used to connect the appliance
to the electrical mains; or unplug the appliance if the
plug is accessible;
• Remove the glass cover of the lamp-holder;
• Remove the lamp and replace with a lamp resistant to
high temperatures (300°C) with the following charac-
teristics:
- Voltage: 230/240 V
- Wattage 25W
- Type E14
• Replace the glass cover and reconnect the oven to
the mains power supply.
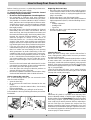
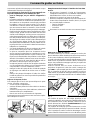
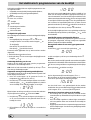
Cleaning the hob
Before you start cooking, make sure the hob surface is
clean, wiping it with a damp cloth if necessary to remove
any dust or food residue.
The hob surface must be cleaned regularly with a solution
of warm water and a non-abrasive cleaner. You should
clean glass ceramic hob surfaces regularly, using a special
product. First remove all grease and spills from the hob
surface with an appropriate scraper, such as B (see
Fig. A.) (not provided).
Clean the hob while still warm; use a special cleaning
product and some kitchen roll (see Fig. B). Then rub with
a damp cloth and dry thoroughly.
Fig. A Fig. B
Aluminium foil, plastic or synthetic items that may have
been accidentally melted, as well as sugar or highly sugary
food should be removed immediately from the hot cooking
zone using a scraper. Special cleaning products leave a
clear surface layer which prevents dirt from adhering to
the hob. This layer also protects the surface from any
damage caused by highly sugary foodstuffs. In no case
whatsoever should abrasive sponges or products be used,
nor chemically aggressive cleaning products such as oven
cleaner sprays or stain removers.
123

9
Glass ceramic hob
cleaners
Available from
Window scraper Razor blade
scrapers
DIY Stores
Replacement blades DIY Stores,
supermarkets,
chemists
COLLO luneta
HOB BRITE
Hob Clean
SWISSCLEANER
Boots, Co-op stores,
department stores, Regional
Electricity Company shops,
supermarkets
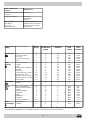
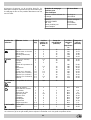
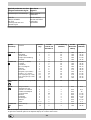
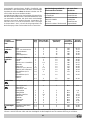
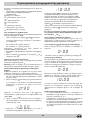
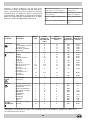
Selector knob
setting
Food to be cooked
Weight
(in kg)
Cooking rack
position from
bottom
Preheating time
(minutes)
Thermostat
knob
setting
Cooking
time
(minutes)
1 Convection
a
Duck
Roast veal or beef
Pork roast
Biscuits (short pastry)
Tarts
1
1
1
-
1
3
3
3
3
3
15
15
15
15
15
200
200
200
180
180
65-75
70-75
70-80
15-20
30-35
2 Fan
assisted
b
Pizza (on 2 racks)
Lasagne
Lamb
Roast chicken + potatoes
Mackerel
Plum-cake
Cream puffs (on 2 racks)
Biscuits (on 2 racks)
Sponge cake (on 1 rack)
Sponge cake (on 2 racks)
Savoury pies
1
1
1
1
1
1
0.5
0.5
0.5
1.0
1.5
2-4
3
2
2-4
2
2
2-4
2-4
2
2-4
3
15
10
10
10
10
10
10
10
10
10
15
220
200
180
180
180
170
190
180
170
170
200
15-20
30-35
50-60
60-75
30-35
40-50
20-25
10-15
15-20
20-25
25-30
3 Top Oven
c
Browning food to perfect
cooking
- 3/4 15 220 -
4 Grill
d
Soles and cuttlefish
Squid and prawn kebabs
Cod filet
Grilled vegetables
Veal steak
Cutlets
Hamburgers
Mackerels
Toasted sandwiches
1
1
1
1
1
1
1
1
n.° 4
4
4
4
3/4
4
4
4
4
4
5
5
5
5
5
5
5
5
5
Max
Max
Max
Max
Max
Max
Max
Max
Max
8-10
6-8
10
10-15
15-20
15-20
7-10
15-20
2-3
5 Fan
assisted grill
e
Grilled chicken
Cuttlefish
1.5
1.5
3
3
5
5
200
200
55-60
30-35
NB: cooking times are approximate and may vary according to personal taste. When cooking using the grill or fan
assisted grill, the dripping pan must always be placed on the 1st oven rack from the bottom.

10
Practical Cooking Advice
The oven offers a wide range of alternatives which allow
you to cook any type of food in the best possible way. With
time you will learn to make the best use of this versatile
cooking appliance and the following directions are only a
guideline which may be varied according to your own per-
sonal experience.
Preheating
If the oven must be preheated (this is generally the case
when cooking leavened foods), the “fan assisted” mode
b / b can be used to reach the desired temperature as
quickly as possible in order to save on energy.
Once the food has been placed in the oven, the most
appropriate cooking mode can then be selected.
Cooking on More Than One Rack
If you have to cook on more than one rack at the same
time, use only the “fan assisted mode” b / b which is
the only one that is appropriate for this type of cooking.
• The oven is fitted with 5 racks. During fan assisted
cooking, use two of the three central racks; the lowest
and highest racks receive the hot air directly and
therefore delicate foodstuffs could be burnt on these
racks.
• As a general rule, use the 2nd and 4th rack from the
bottom, placing the foodstuffs that require greater heat
on the 2nd rack from the bottom. For example, when
cooking meat roasts together with other food, place
the roast on the 2nd rack from the bottom and the more
delicate food on the 4th rack from the bottom.
• When cooking foodstuffs that require differing times
and temperatures, set a temperature that is somewhere
between the two temperatures required, place the more
delicate food on the 4th rack from the bottom and take
the food requiring less time out of the oven first.
• Use the dripping pan on the lower rack and the grid on
the upper;
Using the Grill
This multi-function oven offers you 2 different grilling
modes only and exclusively with the oven door shut.
Use the “grill” mode d / d, placing the food under the
centre of the grill (situated on the 3rd or 4th rack form the
bottom) because only the central part of the top heating
element is turned on.
Use the bottom rack (1st from the bottom), placing the
dripping pan provided to collect any sauce and/or grease
and prevent the same from dripping onto the oven bottom.
When using this mode, we recommend you set the
thermostat to the highest setting. However, this does not
mean you cannot use lower temperatures, simply by
adjusting the thermostat knob to the desired temperatu-
re.
Setting e / e, “fan assisted grill”, is extremely useful for
grilling foods rapidly, as the distribution of heat makes it
possible not only to brown the surface, but also to cook
the bottom part.
Moreover, it can also be used for browning foods at the
end of the cooking process, such as adding that gratin
finish to pasta bakes, for example.
When using this mode, place the grid on the 2nd or 3rd
oven rack from the bottom (see cooking table) then, to
prevent fat and grease from dripping onto the bottom of
the oven and thus smoke from forming, place a dripping-
pan on the 1st rack from the bottom.
Important: always use the grill with the oven door shut.
This will allow you both to obtain excellent results and to
save on energy (approximately 10%).
When using this mode, we advise you to set the thermostat
to 200°C, as it is the most efficient way to use the grill,
which is based on the use of infrared rays. However, this
does not mean you cannot use lower temperatures, simply
by adjusting the thermostat knob to the desired tempera-
ture.
Therefore the best results when using the grill modes
are obtained by placing the grid on the lower racks
(see cooking table) then, to prevent fat and grease
from dripping onto the bottom of the oven and smoke
from forming, place a dripping-pan on the 1st oven
rack from the bottom.
Baking Cakes
When baking cakes, always place them in a preheated
oven. Make sure you wait until the oven has been
preheated thoroughly (the red light “I” will turn off). Do not
open the oven door during baking to prevent the cake from
dropping. In general:
Pastry is too dry
Increase the temperature by 10°C and reduce the
cooking time.
Cooked well on the inside but sticky on the
outside
Use less liquid, lower the temperature, and increase
the cooking time.
The pastry sticks to the pan
Grease the pan well and sprinkle it with a dusting of
flour or use greaseproof paper.
Pastry dropped
Use less liquid or lower the temperature by 10°C.
Pastry is too dark on top
Place it on a lower rack, lower the temperature, and
increase the cooking time.
I used more than one level (in the function
"ventilated oven") and they are not all at the same
cooking point
Use a lower temperature setting. It is not necessary to
remove the food from all the racks at the same time.

11
Cooking Pizza
For best results when cooking pizza, use the “fan
assisted “ b / b mode:
• Preheat the oven for at least 10 minutes;
• Use a light aluminium pizza pan, placing it on the grid
supplied with the oven. If the dripping pan is used, this
will extend the cooking time, making it difficult to get a
crispy crust;
• Do not open the oven door frequently while the pizza
is cooking;
• If the pizza has a lot of toppings (three of four), we
recommend you add the mozzarella cheese on top
halfway through the cooking process.
• When cooking pizza on two racks, use the 2nd and
4th with a temperature of 220°C and place the pizzas
in the oven after having preheated it for at least 10
minutes.
Cooking Fish and Meat
When cooking white meat, fowl and fish, use temperature
settings from 180 °C to 200 °C.
For red meat that should be well done on the outside while
tender and juicy in the inside, it is a good idea to start with
a high temperature setting (200°C-220°C) for a short time,
then turn the oven down afterwards.
In general, the larger the roast, the lower the temperature
setting. Place the meat on the centre of the grid and place
the dripping pan beneath it to catch the fat.
Make sure that the grid is inserted so that it is in the centre
of the oven. If you would like to increase the amount of
heat from below, use the low rack heights. For savoury
roasts (especially duck and wild game), dress the meat
with lard or bacon on the top.

12
Safety Is A Good Habit To Get Into
• When handling the appliance, we recommend you
always use the purpose provided handles recessed
into the sides of the oven to prevent harming
people or damaging the appliance itself.
• This appliance is designed for non-professional, house-
hold use and its functions must not be changed.
• These instructions are only valid for the countries
whose symbols appear on the manual and the serial
number plate.
• The electrical system of this appliance can only be used
safely when it is correctly connected to an efficient
earthing system in compliance with current safety
standards.
• When the appliance is in use, the heating elements
and some parts of the oven door become extremely
hot. Make sure you don’t touch them and keep chil-
dren well away.
The following items are potentially dangerous, and
therefore appropriate measures must be taken to
prevent children and the disabled from coming into
contact with them:
- Controls and the appliance in general;
- Packaging (bags, polystyrene, nails, etc.);
- The appliance itself, immediately after use of the oven
or grill due to the heat generated;
- The appliance itself, when no longer in use (potentially
dangerous parts must be made safe).
Avoid the following:
- Touching the appliance with wet parts of the body;
- Using the appliance when barefoot;
- Pulling on the appliance or the supply cable to unplug
it from the electrical outlet;
- Improper or dangerous operations;
- Obstructing the ventilation or heat dissipation slots;
- Allowing power supply cables of small appliances to
come into contact with the hot parts of the appliance;
- Exposing the appliance to atmospheric agents such
as rain, or sunlight;
- Using the oven for storage purposes;
- Using flammable liquids near the appliance;
- Using adapters, multiple sockets and/or extension
leads;
- Attempting to install or repair the appliance without the
assistance of qualified personnel.
Qualified personnel must be contacted in the
following cases:
- Installation (following the manufacturer’s instructions);
- When in doubt about operating the appliance;
- Replacing the electrical socket when it is not compat-
ible with the appliance plug.
Service Centres authorised by the manufacturer
must be contacted in the following cases:
- If in doubt about the soundness of the appliance after
removing it from its packaging;
- If the power supply cable has been damaged or needs
to be replaced;
- If the appliance breaks down or functions poorly; ask
for original spare parts.
It is a good idea to do the following:
- Only use the appliance to cook food and nothing else;
- Check the soundness of the appliance after it has been
unpacked;
- Disconnect the appliance from the electrical mains if it is
not functioning properly and before cleaning or perform-
ing maintenance;
- When left unused, unplug the appliance form the elec-
tricity mains and turn off the gas tap (if foreseen);
- Use oven gloves to place cookware in the oven or when
removing it;
- Always grip the oven door handle in the centre as the
extremities of the same may be hot due to any hot air
leaks;
- Make sure the knobs are in the “•”/”o” position when the
appliance is not in use.
- Cut the power supply cable after disconnecting it from
the mains when you decide not to use the appliance any
longer.
• The manufacturer may not be held responsible for any
damage due to: incorrect installation, improper, incorrect
and irrational use.
To maintain the efficiency and safety of this appliance, we recommend that you do the following:
• only call the Service Centres authorised by the manufacturer
• always use original spare parts

13
Instalation
The appliance must be installed only by a qualified
person in compliance with the instructions provided.
The manufacturer declines all responsibility for improper
installation which may harm persons and animals and
damage property.
Important: The power supply to the appliance must be
cut off before any adjustments or maintenance work is
done on it.
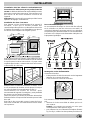
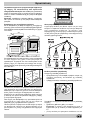
Installation of Built-in Ovens
In order to ensure that the built-in appliance functions prop-
erly, the cabinet containing it must be appropriate. The
figure below gives the dimensions of the cut-out for instal-
lation under the counter or in a wall cabinet unit.
In order to ensure adequate ventilation, the back panel of
the cabinet unit must be removed. Installing the oven so
that it rests on two strips of wood is preferable. If the oven
rests on a continuous, flat surface, there must be an ap-
erture of at least 45 x 560 mm.
The panels of the adjacent cabinets must be made of heat-
resistant material. In particular, cabinets with a veneer ex-
terior must be assembled with glues which can withstand
temperatures of up to 100 °C.
In compliance with current safety standards, contact with
the electrical parts of the oven must not be possible once
it has been installed.
All parts which ensure the safe operation of the appliance
must be removable only with the aid of a tool.
To fasten the oven to the cabinet, open the door of the
oven and attach it by inserting the 4 wooden screws into
the 4 holes located on the perimeter of the frame.
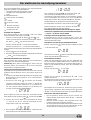
Electrical Connection
The cooker must be connected to the mains electricity
supply. The hob is connected to the cooker using a special
connector. The cookers are designed to operate on
alternating current featuring the supply voltage and
frequency indicated on the appliance data plate.
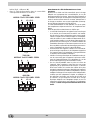
Fitting on a Power Supply Cable
Opening the terminal board:
• Using a screwdriver, prise on the side tabs of the
terminal board cover;
• Pull open the cover of the terminal board.
To install the cable, proceed as follows:
• unscrew the wire clamp screw and the contact screws
Note: the jumpers are factory-set for a three-phase
400V connection (fig. D).
• to make the electrical connections illustrated in fig. F
and fig. G, use the two jumpers housed in the box (fig.
E - reference “P”)
• fasten the supply cable in place with the clamp and
close the cover of the terminal board.
560 mm.
45 mm.
595
558
min
45
min
575-585
min
560
+4 -0
480
+4 -0
555
580
500
39
15
595
23
572
543545
N.B.: Installation in compliance with the consumption declaration
BUILT-IN HOB
BUILT-IN COOKER
WHITE RED YELLOWBLUE GREEN
Only on
certain models

14
Fig. D
Fig. E
Fig. F
Fig. G
Connecting the supply cable to the mains
Install a standardised plug corresponding to the load indi-
cated on the data plate. When connecting the cable di-
rectly to the mains, install an omnipolar circuit-breaker with
a minimum contact opening of 3 mm between the appli-
ance and the mains. The omnipolar circuit breaker should
be sized according to the load and should comply with
current regulations (the earth wire should not be inter-
rupted by the circuit breaker).
The supply cable should be positioned so that it does not
reach a temperature of more than 50°C with respect to
the room temperature, anywhere along its length.
Before making the connection, check that:
• The electrical safety of this appliance can only be guar-
anteed if the cooker is correctly and efficiently earthed,
in compliance with regulations on electrical safety. Al-
ways ensure that the earthing is efficient; if you have
any doubts call in a qualified technician to check the
system. The manufacturer declines all responsibility
for damage resulting from a system which has not been
earthed.
• Before plugging the appliance into the mains, check
that the specifications indicated on the date plate (on
the appliance and/or packaging) correspond to those
of the electrical mains system of your home.
• Check that the electrical capacity of the system and
sockets will support the maximum power of the appli-
ance, as indicated on the data plate. If you have any
doubts, call in a qualified technician.
• If the socket and appliance plug are not compatible,
have the socket replaced with a suitable model by a
qualified technician. The latter, in particular, will also
have to ensure that the cross section of the socket
cables are suitable for the power absorbed by the ap-
pliance. The use of adapters, multiple sockets and/or
extensions, is not recommended. If their use cannot
be avoided, remember to use only single or multiple
adapters and extensions which comply with current
safety regulations. In these cases, never exceed the
maximum current capacity indicated on the single
adapter or extension and the maximum power indicated
on the multiple adapter. The plug and socket must
be easily accessible.
NL
230V 1N~
H07RN-F 3x4 CEI-UNEL 35364
1
3
2
4
5
NL2L1
400V 2N~
H05RR-F 4x2.5 CEI-UNEL 35363
1
3
2
4
5
NL3L1L2
400V 3N~
H05RR-F 5x2.5 CEI-UNEL 35363
1
3
2
4
5
N
L2
L3
L1
P

15
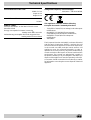
Technical Specifications
Inner dimensions of the oven:
Width 43.5 cm
Depth 40 cm
Height 32 cm
Inner Volume of the Oven:
56 litres
ENERGY LABEL
Directive 2002/40/EC on the label of electric ovens
Norm EN 50304
Energy consumption for Natural convection
heating mode: a Convection
Declared energy consumption for Forced convection Class
heating mode: b Fan assisted
Voltage and Frequency of Power Supply:
230V/400V ~ 3N 50Hz 8850W
7
This appliance conforms with the following
European Economic Community directives:
- 73/23/EEC of 19/02/73 (Low Voltage) and subsequent
modifications;
- 89/336/EEC of 03/05/89 (Electromagnetic
Compatibility) and subsequent modifications;
- 93/68/EEC of 22/07/93 and subsequent
modifications.
- 2002/96/EC
The European Directive 2002/96/EC on Waste Electrical
and Electronic Equipment (WEEE), requires that old
household electrical appliances must not be disposed of
in the normal unsorted municipal waste stream. Old
appliances must be collected separately in order to
optimise the recovery and recycling of the materials they
contain and reduce the impact on human health and the
environment. The crossed out “wheeled bin” symbol on
the product reminds you of your obligation, that when you
dispose of the appliance it must be separately collected.
Consumers should contact their local authority or retailer
for information concerning the correct disposal of their old
appliance.

16
Merci d’avoir choisi un produit Indesit, fiable et facile à utiliser. Pour apprendre à bien connaître votre appareil, à
l’utiliser et à le conserver longtemps, lisez attentivement cette notice avant toute utilisation car elle contient des instructions
très importantes concernant sa sécurité d’installation, d’usage et d’entretien. Conservez avec soin cette brochure pour
toute consultation ultérieure. Merci.
Vu de près
Le four multifonction réunit en un seul appareil les qualités
des fours traditionnels à convection naturelle : “statiques” à
celles des fours modernes à convection forcée : “ventilés”.
Il s’agit d’un appareil extrêmement performant qui vous per-
met de choisir facilement et sans vous tromper parmi 5 mo-
des de cuisson. Pour sélectionner les fonctions disponibles,
utilisez le sélecteur «E» et le sélecteur de températures «L»
du tableau de bord.
Attention : Lors de son premier allumage, faites fonc-
tionner le four à vide, porte fermée, pendant au moins
une demi-heure en réglant la température à son maxi-
mum. Ouvrez ensuite la porte et ventilez la pièce. L’odeur
qui se dégage parfois pendant cette opération est due à
l’évaporation des produits utilisés pour protéger le four
pendant le laps de temps qui s’écoule entre la fabrication
et l’installation du produit.
Attention : Installez la lèchefrite sur le premier gradin du
bas pour recueillir les graisses et les jus uniquement en
cas de cuissons au gril ou au tournebroche (ce dernier
n’est présent que sur certains modèles). Pour les autres
modes de cuisson n’utilisez jamais le gradin du bas et ne
posez jamais d’objets à même la sole du four, vous ris-
queriez d’abîmer l’émail. Enfournez toujours vos plats de
cuisson (plats pyrex, papier alu, etc. etc.) sur la grille four-
nie avec l’appareil et montée dans les gradins de la cré-
maillère à l’intérieur de l’enceinte du four.
Remarque: Pour utiliser le four électrique équipant les
appareils dotés de programmateur électronique, appuyez
sur la touche ( (affichage du symbole m) avant de
sélectionner la fonction de cuisson désirée.
Four Statique a
Position sélecteur des températures «L» : entre 60°C et Max.
En effectuant ce choix, vous obtiendrez le branchement
des deux résistances (sole et voûte) C’est le four tradi-
tionnel de grand-mère revu pour atteindre un niveau ex-
ceptionnel de diffusion de la chaleur et d’économie d’élec-
tricité. Rien n’égale le four statique quand il s’agit de cui-
siner des plats garnis traditionnels tels que : côtes de porc
au chou, morue à l’espagnole, stockfisch à la mode d’An-
cône, veau au riz etc... Vous obtiendrez des résultats tout
aussi excellents pour vos plats de viande de bœuf ou de
veau tels que : bœuf braisé, ragoût, goulasch, gibier, jam-
Mode d’emploi
C
A
B
H
D
D
A. Tableau de bord
B. Lèchefrite ou plateau de cuisson
C. Grille du four
D. Plaque électrique
E. Sélecteur de fonctions
F. Manettes plaques électriques
G. Voyant fonctionnement plaques électriques
H. Crémaillères pour lèchefrites et grilles
I. Voyant de fonctionnement du four (n’existe que sur
certains modèles) - Quand il est allumé il indique la
montée en température jusqu’à la température
sélectionnée.
L. Sélecteur de températures
M. Programmateur électronique - Il permet de
programmer n’importe quelle fonction de cuisson en
sélectionnant la durée et l’heure de fin de cuisson. Il a
aussi une fonction de minuterie.
E MLF
IG
3
6
7
10
2
4
5
8
9
11
12
0
3
6
7
10
2
111 1
4
5
8
9
11
12
0
3
6
7
10
2
4
5
8
9
11
12
0
3
6
7
10
2
4
5
8
9
11
12
0

17
bon et longe de porc etc... qui exigent une cuisson lente
et de fréquents ajouts de liquides. C’est aussi le mode de
cuisson recommandé pour les gâteaux, les fruits et les
plats mijotés dans des cocottes avec couvercle. Lorsque
vous utilisez le four statique, ne cuisez que sur un seul
niveau pour avoir une meilleure diffusion de la chaleur.
Choisissez le niveau qui vous permettra de mieux équili-
brer la quantité de chaleur provenant de la voûte et de la
sole. Enfournez, au choix, sur les gradins du haut ou du
bas selon que vous désirez plus de chaleur provenant de
la voûte ou de la sole.
Four Ventilé b
Position sélecteur de températures «L» : entre 60°C et Max.
Mise en marche des éléments chauffants ainsi que de la
turbine. La chaleur est constante et bien répartie à l’inté-
rieur du four, l’air cuit et dore de façon uniforme et en tous
points. Vous pouvez ainsi procéder à une cuisson grou-
pée en enfournant plusieurs plats ensemble à condition
qu’ils cuisent à la même température. Pour cuire simulta-
nément sur 2 niveaux, suivez les conseils fournis dans le
paragraphe «Cuisson groupée sur plusieurs niveaux».
C’est la fonction qui convient le mieux à des plats grati-
nés ou à la cuisson prolongée tels que : lasagnes, gra-
tins de pâtes, poulet rôti et pommes de terre au four etc...
Le choix de températures plus basses, possible grâce à
une meilleure répartition de la chaleur, vous permettra
d’obtenir des rôtis de viande plus juteux et tendres à sou-
hait avec une moindre perte de poids. Cette fonction con-
vient aussi à merveille à la cuisson du poisson qui ne
subit aucune altération de son aspect et de son goût car il
exige un moindre apport de condiment.
Desserts: vous réussirez à coup sûr vos gâteaux levés.
La fonction «ventilé», réglée à une température de 80 °C
sert aussi à décongeler rapidement la viande, rouge ou
blanche, le pain. Pour décongeler des mets plus délicats,
sélectionnez une température de 60°C ou n’utilisez que
la circulation d’air froid en amenant le sélecteur de tem-
pératures sur 0°C.
Résistance de voûte c
Position sélecteur de températures «L» : entre 60°C et Max.
L’élément chauffant supérieur est branché.
Cette fonction est conseillée pour parfaire la cuisson des
aliments.
Grill d
Position sélecteur de températures «L»: Max.
L’élément chauffant supérieur central est branché.
La température élevée et directe du gril permet de saisir
l’aliment en surface pour qu’il ne perde pas son jus et
reste tendre à souhait. La cuisson au gril est particulière-
ment recommandée pour les plats qui exigent une tem-
pérature élevée à leur surface : côtes de veau et de boeuf,
entrecôtes, filet, hamburgers, etc....
Vous trouverez des exemples d’utilisation dans le para-
graphe «Conseils utiles pour la cuisson».
Gril Ventilé e
Position sélecteur de températures «L» : entre 60°C et 200°C.
Mise en marche de l’élément chauffant supérieur central
ainsi que de la turbine. L’irradiation thermique unidirec-
tionnelle s’ajoute au brassage de l’air pour une répartition
uniforme de la chaleur dans l’enceinte du four. Plus de
risques de brûler vos aliments en surface et plus grande
pénétration de la chaleur. C’est l’idéal pour cuire: brochet-
tes de viande et de légumes, saucisses, côtelettes de porc,
côtelettes d’agneau, poulet à la crapaudine, cailles à la
sauge, filet de porc etc...
Quant aux poissons, le gril ventilé n’a pas son pareil pour
la cuisson de tranches de mérou, de thon, d’espadon, de
sépioles farcies etc...
Eclairage du four
Pour l’allumer, amenez le bouton «E» en face du symbole
3. La lampe s’allume et reste allumée chaque fois qu’une
résistance électrique du four se met en marche.
Système de refroidissement
Pour réduire la température à l’extérieur du four, certains
modèles sont équipés d’un ventilateur de refroidissement
qui se met automatiquement en marche quand le four est
chaud.
Pendant son fonctionnement, le ventilateur envoie de l’air
à l’extérieur par une fente située entre le bandeau et la
porte du four.
Remarque : le ventilateur continue à tourner après
l’arrêt du four jusqu’à ce que ce dernier se soit
suffisamment refroidi.
Description
La cuisinière peut être combinée à des plans de cuisson à 4
plaques électriques (Fig. A), à des plans en vitrocéramique
traditionnels (Fig. B) ou à des plans vitrocéramique avec des
foyers doubles (Fig.C).
Fig. A Fig. B
Fig. C
A Plaques électriques en fonte
B Foyers radiants
C Foyers radiants double diamètre
D Voyants de chaleur résiduelle, un pour chaque foyer : ils
indiquent que le foyer correspondant a une température
de plus de 60°C, même après extinction de l’élément de
chauffe (n’existe que sur certains modèles)
AA
A
A
D
B
B
B
B
D
B
B
C
C

18
E Boutons de commande spéciaux
F Boutons de commande traditionnels
Description des éléments de chauffe
Les éléments radiants sont formés par des résistances
circulaires. Ils deviennent rouges quelques dizaines de
secondes à peine après leur allumage.
Les éléments radiants double diamètre
Semblables aux éléments radiants traditionnels, on les
reconnaît à la présence d’une zone de chauffe (voir Fig. C).
Vous pouvez n’allumer que la zone à l’intérieur ou les deux.
l Les boutons de commande des foyers traditionnels.
Chaque foyer est équipé d’un bouton de commande
permettant de sélectionner 12 températures au choix
allant d’un minimum de 1 à un maximum de 12.
l Les boutons de commande des foyers spéciaux. Le
bouton de commande permet de choisir entre deux
niveaux de puissance, tous deux réglables du minimum
1 au maximum 12. Tournez le bouton dans le sens des
aiguilles d’une montre pour sélectionner le niveau de
puissance le plus bas. Tournez le bouton à fond (A),
jusqu’au déclic pour sélectionner la puissance maximum,
cette dernière peut à son tour être réglée entre 12 et 1 en
tournant le bouton dans le sens inverse des aiguilles d’une
montre. Pour rétablir le niveau de puissance minimum,
ramenez le bouton à la position zéro. En cas de plans
vitrocéramique avec foyers double puissance (voir Fig.
C), la première partie de la course branche la zone de
cuisson plus petite (interne), pour les brancher toutes les
deux et disposer ainsi d’un foyer plus grand, amenez le
bouton sur (A) puis sélectionnez le niveau de puissance
souhaité entre 12 et 1.
Voyant fonctionnement plaques électriques (G)
Il s’allume chaque fois qu’une résistance électrique du plan
de cuisson se met en marche.
Conseils d’utilisation du plan vitrocéramique
Pour obtenir des résultats optimums de votre plan de cuisson,
suivez certaines règles fondamentales au moment de
préparer ou de cuire les aliments.
l N’utilisez que des casseroles à fond plat pour qu’elles
adhèrent bien à la zone de cuisson.
l Utilisez des casseroles dont le diamètre couvre
entièrement la plaque de cuisson pour utiliser à plein toute
la chaleur disponible.
l Veillez à ce que le dessous des casseroles soit bien sec
et propre pour garantir un bon contact avec les plaques
et la longévité de ces dernières et de vos casseroles.
l N’utilisez pas les mêmes casseroles que sur les brûleurs
à gaz. Il y a une telle concentration de chaleur sur les
brûleurs à gaz que le fond des casseroles peut se
déformer, vous n’obtiendrez par conséquent jamais le
résultat souhaité en les utilisant ensuite sur des plan de
cuisson en vitrocéramique.
l Ne laissez jamais un foyer allumé sans casserole dessus
car vous obtiendriez un réchauffement maximum en très
peu de temps avec risque d’endommagement des
éléments de chauffe.
l N’oubliez pas que le foyer est encore chaud une demi-
heure au moins après son arrêt; attention à ne pas poser
par mégarde des récipients ou des objets sur la zone
encore chaude.
Pos Plaque automatique
0
Éteint
1
Pour faire fondre le beurre, le chocolat
2
Pour réchauffer les liquides
3
4
Pour crèmes et sauces
5
6
Pot au feu - Blanquette - Entremets
7
8
Pâtes - Riz
9
10
Steaks - Poissons - Omelettes
11
12
Fritures
A
Allumage des deux zones de cuisson
F
E
F
E
3
6
7
10
2
4
5
8
9
11
12
0
3
6
7
10
2
111 1
4
5
8
9
11
12
0
3
6
7
10
2
4
5
8
9
11
12
0
3
6
7
10
2
4
5
8
9
11
12
0

19
Le programmmateur de cuissson électronique
Il permet de programmer le four ou le gril comme suit:
• départ cuisson différé avec durée établie;
• départ immédiat avec durée établie;
• minuteur.
Fonction des touches :
H
: minuteur heures, minutes
$
: durée cuisson
%
: fin de cuisson
(
: commutation manuelle
)
: sélection temps à rebours
*
: sélection temps en avant
Comment remettre à l’heure l’horloge digitale
Après raccordement à la ligne ou après une coupure de
courant, l’afficheur clignote sur: 0.00
• Appuyez simultanément sur les touches
$
et
%
puis, (dans les 4 secondes suivantes), remettez
l’heure exacte à l’aide des touches
)
et
*
.
La touche
*
sert à augmenter le temps.
La touche
)
sert à diminuer le temps.
Des mises à l’heure éventuelles peuvent être effectuées
de deux façons différentes:
1. Refaire complètement les opérations susmentionnées
2. Appuyer sur la touche
(
puis, à l’aide des touches
)
et
*
, mettre à l’heure.
Fonctionnement manuel du four
Après la sélection de l’heure, le programmateur va
automatiquement sur la position manuelle.
Note: Appuyez sur la touche
(
pour rétablir le
fonctionnement manuel après chaque cuisson
“Automatique”.
Départ cuisson différé avec durée établie
Il faut sélectionner la durée et l’heure de fin de cuisson.
Supposons que l’afficheur indique 10 heures
1. Tournez les manettes de commande du four sur la
température désirée (exemple: four statique, 200°C)
2. Appuyez sur la touche
$
puis, (dans les 4 secondes
qui suivent) programmez à l’aide des touches
)
et
*
la durée désirée. Supposons une sélection de cuisson
de 30 minutes; il y a affichage de:
+
En lâchant la touche, 4 secondes après, l’heure courante
réapparaît avec le symbole
m
et l’inscription auto
3. Appuyez sur la touche
%
puis, sur les touches
)
et
*
jusqu’à la sélection de l’heure de fin de cuisson
désirée, supposons que ce soit 13 heures
=
4. En lâchant la touche, l’afficheur indique au bout de 4
secondes l’heure courante:
?
L’inscription auto allumée rappelle qu’il y a
programmation de la durée et de l’heure de fin de
cuisson en automatique. Le four s’allume alors
automatiquement à 12h30 pour s’éteindre ensuite au
bout de 30 minutes. Quand le four est allumé, la
casserole allumée
m
apparaît pendant toute la durèe
de cuisson. En appuyant sur la touche
$
à n’importe
quel moment, vous pouvez afficher la durée
programmée, en appuyant sur la touche
%
vous
pouvez afficher l’heure de fin de cuisson.
En fin de cuisson, un signal acoustique retentit;
pour l’interrompre, appuyez sur une touche
quelconque sauf sur
)
et
*
.
Départ immédiat avec durée établie
En ne programmant que la durée (points 1 et 2 du
paragraphe “Départ de cuisson différé avec durée établie”)
la cuisson démarre aussitôt.
Pour annuler une cuisson déjà programmée
Appuyez sur la touche
$
et à l’aide de la touche
)
ramenez le temps à
,
puis appuyez sur la touche de fonctionnement manuel
(
.
Fonction minuteur
Le fonctionnement du minuteur prévoit la sélection d’un
temps qui fait partir un compte à rebours. Cette fonction
ne contrôle ni l’allumage ni l’arrêt du four, il n’y a qu’un
signal acoustique une fois le temps écoulé.
Appuyez sur la touche
H
il y a affichage de:
,
A l’aide des touches
*
et
)
sélectionnez le temps désiré.
En lâchant la touche le temps commence immédiatement
à courir, l’afficheur indique l’heure courante.
.
Une fois le temps écoulé, un signal acoustique retentit,
pour l’arrêter appuyez sur une touche quelconque (sauf
touches
*
et
)
) et le symbole
H
s’éteint.
Correction effacement des données
• les données sélectionnées peuvent être modifiées à
tout moment, en appuyant tout simplement sur la
touche correspondante et sur la touche
*
ou
)
.
• En effaçant la durée de cuisson, il y a aussi effacement
automatique de la fin du fonctionnement et vice versa.
• En cas de fonctionnement programmé, l’appareil
n’accepte pas des temps de fin de cuisson antécédents
à ceux du départ de cuisson proposés par l’appareil.

20
Comment le garder en forme
Avant toute opération de nettoyage ou d’entretien coupez
l’alimentation électrique de l’appareil.
Pour prolonger la durée de vie de votre appareil, net-
toyez-le fréquemment, en n’oubliant pas que:
• pour le nettoyage, ne pas utiliser d’appareils à
vapeur
• les parties extérieures émaillées ou inox doivent être
lavées à l’eau tiède en évitant toute utilisation de pou-
dres abrasives ou de produits corrosifs qui pourraient
les abîmer. L’acier inox peut se tacher. Si les taches
sont difficiles à enlever, utilisez des produits spéciaux
que vous trouverez dans le commerce. Il est conseillé
de rincer abondamment et d’essuyer après le nettoyage.
• l’intérieur du four doit être nettoyé, de préférence après
chaque usage, quand il est encore tiède avec de l’eau
chaude et du détergent, en rinçant et en essuyant en-
suite soigneusement avec un chiffon doux. Evitez d’uti-
liser des produits abrasifs (des poudres par exemple),
des éponges récurantes ou des acides (détartrants par
ex.) qui pourraient abîmer l’émail. En cas d’incrusta-
tions particulièrement difficiles à enlever, utilisez un net-
toyant spécial four en suivant à la lettre les instructions
indiquées sur l’emballage.
• si la durée d’utilisation du four se prolonge, de la buée
peut se former. Essuyez-la avec un chiffon doux.
• un joint en caoutchouc placé sur l’ouverture du four
assure son bon fonctionnement. Contrôlez par consé-
quent périodiquement l’état de ce joint. Au besoin, net-
toyez-le en évitant d’utiliser des produits ou des objets
abrasifs. S’il est abîmé, adressez-vous au service après-
vente le plus proche de votre domicile. Mieux vaut ne
pas utiliser le four tant qu’il n’est pas réparé.
• ne tapissez jamais la sole du four de papier aluminium
car l’accumulation de chaleur qui s’en suivrait pourrait
compromettre la cuisson et détériorer l’émail.
• nettoyez la vitre de la porte du four à l’aide de produits
et d’éponges non abrasifs et séchez avec un chiffon
doux.
• nettoyez les plaques électriques à l’aide d’un chiffon
humide et graissez-les avec un peu d’huile quand elles
sont encore tièdes;
Dépose de la porte du four
Pour nettoyer plus à fond, vous pouvez déposer la porte
du four. Procédez comme suit :
• ouvrez la porte complètement ;
• soulevez et faites pivoter les leviers situés sur les deux
charnières ;
• saisissez la porte par les côtés extérieurs, refermez-la
lentement mais pas complètement ;
• tirez-la vers vous en la sortant de son logement;
Remontez la porte en refaisant en sens inverse les opéra-
tions indiquées ci-dessus.
Remplacement de la lampe à l’intérieur de l’enceinte
du four
• Déconnectez l’appareil à l’aide de l’interrupteur
omnipolaire reliant le four à l’installation électrique ou
bien débranchez la fiche, si elle est accessible;
• Dévissez le couvercle en verre de la douille;
• Dévissez l’ampoule, remplacez-la par une ampoule ré-
sistant à des températures élevées (300°C) et ayant
les caractéristiques suivantes:
- Tension 230/240 V
- Puissance 25W
- Culot E14
• Remontez le couvercle en verre et connectez l’appa-
reil.
Nettoyage du plan de cuisson
Avant de commencer à cuisiner, nettoyez la surface du
plan à l’aide d’un chiffon humide pour enlever la poussière
ou les restes d’aliments cuisinés précédemment.
La surface du plan doit être nettoyée régulièrement à l’eau
tiède et avec un produit non abrasif. Utilisez, de temps en
temps, des produits de nettoyage spéciaux pour plans de
cuisson vitrocéramique.
Enlevez d’abord tous les restes d’aliments et les
projections de graisse à l’aide d’un racloir à nettoyer du
type B par exemple (pas fourni avec l’appareil) (voir
Fig. A). Nettoyez le plan de cuisson quand il est encore
tiède; utilisez un produit de nettoyage adéquat et du papier
cuisine (voir Fig. B). Frottez ensuite avec un chiffon humide
et essuyez.
Fig. A Fig. B
Des feuilles de papier alu, des objets plastique ou du
matériel synthétique, qui auraient accidentellement fondu,
tout comme du sucre ou des aliments à teneur en sucre
élevée doivent être éliminés immédiatement du foyer
encore chaud à l’aide d’un racloir.
Les produits de nettoyage spéciaux forment une couche
superficielle transparente qui repousse la saleté. Cela sert
aussi à protéger la surface contre les dommages causés
par des aliments à haute teneur en sucre. N’utilisez jamais
123
Seite wird geladen ...
Seite wird geladen ...
Seite wird geladen ...
Seite wird geladen ...
Seite wird geladen ...
Seite wird geladen ...
Seite wird geladen ...
Seite wird geladen ...
Seite wird geladen ...
Seite wird geladen ...
Seite wird geladen ...
Seite wird geladen ...
Seite wird geladen ...
Seite wird geladen ...
Seite wird geladen ...
Seite wird geladen ...
Seite wird geladen ...
Seite wird geladen ...
Seite wird geladen ...
Seite wird geladen ...
Seite wird geladen ...
Seite wird geladen ...
Seite wird geladen ...
Seite wird geladen ...
Seite wird geladen ...
Seite wird geladen ...
Seite wird geladen ...
Seite wird geladen ...
Seite wird geladen ...
Seite wird geladen ...
Seite wird geladen ...
Seite wird geladen ...
Seite wird geladen ...
Seite wird geladen ...
Seite wird geladen ...
Seite wird geladen ...
Seite wird geladen ...
Seite wird geladen ...
Seite wird geladen ...
Seite wird geladen ...
Seite wird geladen ...
Seite wird geladen ...
Seite wird geladen ...
Seite wird geladen ...
Seite wird geladen ...
Seite wird geladen ...
Seite wird geladen ...
Seite wird geladen ...
-
 1
1
-
 2
2
-
 3
3
-
 4
4
-
 5
5
-
 6
6
-
 7
7
-
 8
8
-
 9
9
-
 10
10
-
 11
11
-
 12
12
-
 13
13
-
 14
14
-
 15
15
-
 16
16
-
 17
17
-
 18
18
-
 19
19
-
 20
20
-
 21
21
-
 22
22
-
 23
23
-
 24
24
-
 25
25
-
 26
26
-
 27
27
-
 28
28
-
 29
29
-
 30
30
-
 31
31
-
 32
32
-
 33
33
-
 34
34
-
 35
35
-
 36
36
-
 37
37
-
 38
38
-
 39
39
-
 40
40
-
 41
41
-
 42
42
-
 43
43
-
 44
44
-
 45
45
-
 46
46
-
 47
47
-
 48
48
-
 49
49
-
 50
50
-
 51
51
-
 52
52
-
 53
53
-
 54
54
-
 55
55
-
 56
56
-
 57
57
-
 58
58
-
 59
59
-
 60
60
-
 61
61
-
 62
62
-
 63
63
-
 64
64
-
 65
65
-
 66
66
-
 67
67
-
 68
68


Indesit HGM 30 Bedienungsanleitung
- Kategorie
- Öfen
- Typ
- Bedienungsanleitung
in anderen Sprachen
- English: Indesit HGM 30 Owner's manual
- français: Indesit HGM 30 Le manuel du propriétaire
- Nederlands: Indesit HGM 30 de handleiding
- slovenčina: Indesit HGM 30 Návod na obsluhu
Verwandte Artikel
-
Indesit HGM 20.B (BK) Bedienungsanleitung
-
-
-
Whirlpool HGK 20.B (BK) Benutzerhandbuch
-
-
-
-
-