Westfalia 823870 Electric Mini Drill and Milling Machine Benutzerhandbuch
- Typ
- Benutzerhandbuch

Elektrisches Mini Bohr- und Fräswerkzeug
mit 40tlg. Zubehör im Koffer
Artikel Nr. 82 38 70
Electric Mini Drill and Milling Machine with
40 Pcs. Accessories in Tool Case
Article No. 82 38 70
Originalanleitung
Original Instructions

II
Sehr geehrte Damen und Herren
Dear Customers
Bedienungsanleitungen enthalten wichtige Hinweise für den Umgang mit
Ihrem neuen Produkt. Sie ermöglichen Ihnen, alle Funktionen zu nutzen, und
sie helfen Ihnen, Missverständnisse zu vermeiden und Schäden vorzubeugen.
Bitte nehmen Sie sich die Zeit, diese Bedienungsanleitung in Ruhe durchzule-
sen und bewahren Sie diese für späteres Nachlesen gut auf.
Instruction manuals provide valuable hints for using your new device. They
enable you to use all functions, and they help you avoid misunderstandings
and prevent damage.
Please take the time to read this manual carefully and keep it for future
reference.

III
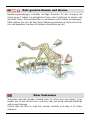
1
Werkzeugaufnahme
Tool Holder
2
Abschlusskappe
End Cap
3
Arretierknopf
Locking Button
4
EIN/AUS-Schalter
ON/OFF Switch
5
Drehzahlregler
Rotation Speed Regulator
6
Aufhänger
Hanger
7
Flexible Welle
Flexible Shaft
Übersicht | Overview
1
3
2
5
4
6
7
Übersicht | Overview

IV
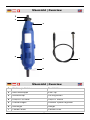
A
Spannzangenfutterschlüssel
Collet Chuck Key
B
Polierfilz
Polishing Felt
C
Abziehstein
Whetstone
D
Arretierungswerkzeug (flexible Welle)
Locking Tool (flexible shaft)
E
Schleifscheiben
Grinding Wheels
F
Schleifstifte
Grinding Pins
G
Drahtbürsten
Wire Brushes
H
Spanndorn für Schleif- und
Trennscheiben
Clamping Spindle for Grinding and
Cutting Disks
I
Trennscheiben
Cutting Disks
J
Schleifblätter
Sanding Disks
K
Aufsätze für Schleifwalze
Grinding Head Caps
L
Schleifwalze
Grinding Head
M
Halter für Filzpolierteller
Holder for Polishing Felts
N
Gravierstift
Engraving Pin
O
Bürsten
Brushes
P
HSS-Bohrer
HSS Drill Bit
Q
Fräser
Cutter
R
Spannhülse
Sleeve
Zubehör | Accessory
B
C
B
A
K
E
B
D
F
G
H
I
J
R
O
N
P
Q
M
L

1
Table of Contents
Inhaltsverzeichnis
Sicherheitshinweise ............................................................................. Seite 2
Vor der ersten Benutzung ................................................................... Seite 6
Bestimmungsgemäße Verwendung .................................................... Seite 6
Beschreibung der Zubehörteile ........................................................... Seite 6
Werkzeugaufnahme ............................................................................ Seite 7
Inbetriebnahme ................................................................................... Seite 7
Montage der flexiblen Welle ................................................................ Seite 8
Wartung und Reinigung....................................................................... Seite 9
Technische Daten ............................................................................... Seite 10
Nützliches Zubehör ............................................................................. Seite 10
Safety Notes ........................................................................................ Page 3
Before first Use .................................................................................... Page 11
Intended Use ....................................................................................... Page 11
Description of the Accessories ............................................................ Page 11
Tool Fitting ........................................................................................... Page 12
Initial Operation ................................................................................... Page 12
Installing the flexible Shaft................................................................... Page 13
Maintenance and Cleaning ................................................................. Page 14
Technical Data .................................................................................... Page 15
Useful Accessory ................................................................................. Page 15

2
Sicherheitshinweise
is
▪ Entsorgen Sie nicht benötigtes Verpackungsmaterial oder verwahren Sie
dieses an einem für Kinder unzugänglichen Ort. Es besteht Erstickungsgefahr!
▪ Überzeugen Sie sich, dass die Netzspannung mit den Angaben auf dem
Typenschild übereinstimmt.
▪ Personen mit eingeschränkten physischen, sensorischen oder geistigen
Fähigkeiten dürfen das Gerät nicht benutzen, es sei denn sie werden durch
eine Betreuerin/einen Betreuer beaufsichtigt und unterwiesen.
▪ Ziehen Sie erst den Netzstecker bevor Sie das Werkzeug einsetzen oder das
Gerät reinigen bzw. warten.
▪ Benutzen Sie keine Schleifscheiben mit einem Durchmesser über 25,1 mm!
▪ Überlasten Sie Ihr Elektrowerkzeug nicht.
▪ Sichern Sie das Werkstück, mit Hilfe einer Spannvorrichtung oder einen
Schraubstock.
▪ Der Gebrauch anderer als die in der Gebrauchsanweisung empfohlenen
Zubehörteile kann eine Verletzungsgefahr für Sie bedeuten!
▪ Vermeiden Sie eine Berührung des sich drehenden Bohrfutters und des darin
enthaltenen Werkzeuges, da dies zu Schnittwunden oder Verbrennungen
führen kann!
▪ Halten Sie die Mini Bohr- und Fräsmaschine immer fest in der Hand. Das
eingesetzte Werkzeug kann sich plötzlich festsetzen und evtl. zu Verletzungen
führen.
▪ Tragen Sie bei allen Arbeiten eine Schutzbrille und
gegebenenfalls Gehörschutz sowie eine Atemschutz
maske, je nach welches Material bearbeitet wird.
▪ Halten Sie die Bohr- und Fräsmaschine von Kindern fern. Das Gerät ist kein
Spielzeug.
▪ Betätigen Sie nicht den Arretierknopf während das Gerät läuft!
▪ Verwenden Sie das Gerät nur in trockenen Innenräumen oder in vor
Feuchtigkeit geschützter Umgebung.
▪ Das Gerät ist für den Einsatz bis 2000 m über Meereshöhe ausgelegt.
▪ Spannen Sie das Kabel nicht. Knicken Sie das Kabel nicht und halten Sie es
von heißen und scharfen Oberflächen fern. Wickeln Sie das Kabel nicht um
das Gerät.
▪ Halten Sie Ihren Arbeitsbereich in Ordnung. Tragen Sie geeignete Kleidung.
▪ Falls am Gerät Schäden auftreten, benutzen Sie das Gerät nicht mehr und
lassen es durch einen Fachmann instand setzen oder wenden Sie sich an
unsere Kundenbetreuung. Zerlegen Sie das Gerät nicht und unternehmen Sie
keine eigenen Reparaturversuche.
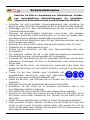
Beachten Sie bitte zur Vermeidung von Fehlfunktionen, Schäden
und gesundheitlichen Beeinträchtigungen die beigefügten
Allgemeinen Sicherheitshinweise sowie die folgenden Hinweise:

3
Safety Notes
is
▪ Dispose of used packaging material carefully or store it out of the reach of
children. There is a danger of suffocation!
▪ Make sure the voltage corresponds to the type label on the unit.
▪ Persons with limited physical, sensorial or mental abilities are not allowed to
use the unit, unless they are supervised and briefed for their safety by a
qualified person.
▪ Disconnect the machine from the power supply before inserting the tool,
cleaning or servicing it.
▪ Do not use grinding discs with a diameter larger than 25.1 mm!
▪ Do not force the tool.
▪ Use clamps or a vice to hold the workpiece.
▪ The use of any accessory or attachment other than those recommended in this
instruction manual may present a risk of personal injury.
▪ Do not touch the rotating chuck and the tool bit in it, as this may cause cuts or
burns.
▪ Always hold the drill and milling machine firmly in your hand. The tool bit can
suddenly get stuck, which may cause injuries.
▪ During operation always wear safety goggles and if
necessary ear protectors and a face mask, depending on
the used material.
▪ Keep the drill and milling machine out of reach of children. The machine is not
a toy.
▪ Do not press the locking button while the machine is running!
▪ Operate the unit only indoors or in dry areas.
▪ The unit is designed for operation in altitudes of up to 2000 m above sea level.
▪ Do not stress the cord. Do not bend the cord and keep it away from hot and
sharp surfaces. Do not wind the cord around the unit.
▪ Keep the work area clean. Dress appropriately.
▪ Should the unit become damaged do not use it and have it repaired by a
professional or contact our customer support department. Do not disassemble
the unit or try repairing it yourself.
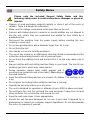
Please note the included General Safety Notes and the
following safety notes to avoid malfunctions, damages or physical
injuries:

4
Consignes de sécurité
▪ Eliminer les matériaux d'emballage mis au rebut, ou de garder ce hors de
portée des enfants. Il ya danger d'asphyxie!
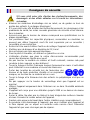
▪ S'il vous plaît noter afin d'éviter des dysfonctionnements, les dommages et les
problèmes de santé, les notes annexes générales de sécurité et les informa-
tions suivantes:
▪ Assurez-vous que la tension du réseau correspond aux spécifications sur la
plaque signalétique.
▪ Les personnes dont les capacités physiques, sensorielles ou mentales ne
peuvent pas utiliser l'appareil, sauf s'ils sont supervisés par un conseiller /
conseillère et une instruction.
▪ Retirez la fiche avant d'utiliser l'outil ou de nettoyer l'appareil et d'attendre.
▪ N'utilisez pas de disques d'un diamètre de 25,1 mm!
▪ Ne surchargez pas votre appareil électrique.
▪ Fixer la pièce à travailler, en utilisant un gabarit ou un vice.
▪ L'utilisation d'autres que dans la notice d'accessoires recommandés peut
causer des blessures signifie pour vous!
▪ Ne pas toucher le mandrin en rotation et l'outil contenait, comme cela peut
conduire à des coupures ou des brûlures!
▪ Tenez le forage et la Mini Fraiseuse toujours fermement en main. L'outil utilisé
peut s'attacher à une soudaine et causer des blessures.
▪ Porter des lunettes de sécurité lors de l'exécution des
travaux et de toute protection d'oreille et un respirateur
masque, en fonction de ce matériel est en cours.
▪ Tenez le forage et la fraiseuse loin des enfants. Le périphérique n'est pas un
jouet.
▪ Ne pas appuyer sur le bouton de verrouillage alors que l'appareil est en
marche!
▪ Utilisez l'appareil uniquement dans l'intérieur sec ou dans l'humidité ambiante
protégés.
▪ L'appareil est conçu pour une utilisation jusqu'à 2000 m au dessus du niveau
de la mer.
▪ Serrer le câble. Ne pliez pas le câble et le tenir éloigné des surfaces chaudes
et vives. Enroulez le cordon autour de l'appareil.
▪ Gardez votre espace de travail dans l'ordre. Habillez-vous convenablement.
▪ Se produire si les dommages à l'appareil, que vous n'utilisez plus l'appareil et
le faire réparer par un expert ou contacter notre service client. Démonter
l'appareil et que vous n'essayez pas de réparer.
S'il vous plaît noter afin d'éviter des dysfonctionnements, des
dommages et des effets néfastes sur la santé les informations
suivantes:

5
Informazioni sulla sicurezza
▪ Smaltimento di materiale da imballaggio scartati, o tenere questo fuori dalla
portata dei bambini. C'è pericolo di soffocamento!
▪ Si prega di notare in modo da evitare malfunzionamenti, danni e problemi di
salute, le note allegate generali di sicurezza e le seguenti informazioni:
▪ Assicurarsi che la tensione di rete sia conforme alle specifiche sulla targhetta.
▪ Persone con ridotte capacità fisiche, sensoriali o mentali non possono
utilizzare il dispositivo meno che non siano sotto la supervisione di un consu-
lente / consigliere e un istruito.
▪ Staccare la spina prima di utilizzare lo strumento o si pulisce l'unità e
attendere.
▪ Non utilizzare dischi con un diametro di 25,1 millimetri!
▪ Non sovraccaricare il dispositivo elettrico.
▪ Fissare il pezzo da lavorare, con una giga o un vizio.
▪ L'utilizzo di diverso da quello nelle istruzioni per gli accessori raccomandati
può causare lesioni significa per te!
▪ Non toccare la rotazione mandrino e lo strumento contenute, in quanto ciò
potrebbe portare a tagli o bruciature!
▪ Tenere la foratura e Mini Fresatrice sempre saldamente in mano. Lo strumento
utilizzato si può collegare ad un improvviso e causare lesioni.
▪ Indossare occhiali protettivi quando si eseguono i lavori e
tutte le protezioni auricolari e un respiratore maschera, a
seconda di quale materiale è in fase di elaborazione.
▪ Tenere la foratura e fresatura macchina lontano dalla portata dei bambini. Il
dispositivo non è un giocattolo.
▪ Non premere il bottone di bloccaggio mentre il dispositivo è in esecuzione!
▪ Usare il dispositivo solo in interni a secco o in ambiente protetto dall'umidità.
▪ Il dispositivo è progettato per l'utilizzo fino a 2000 m al di sopra del livello del
mare.
▪ Stringere il cavo. Non piegare il cavo e tenerlo lontano da superfici calde e
nitide. Avvolgere il cavo attorno al dispositivo.
▪ Mantenere l'area di lavoro in ordine. Vestito in modo corretto.
▪ Se si verificano danni al dispositivo, non è più utilizzare il dispositivo e farlo
riparare da un esperto o contattare il nostro servizio clienti. Smontare l'unità e
non tentare di riparare.
Si prega di notare in modo da evitare malfunzionamenti, danni e
effetti negativi sulla salute seguenti informazioni:

6
Bedienung
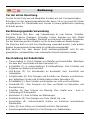
Vor der ersten Benutzung
Packen Sie alle Teile aus und überprüfen Sie diese auf evtl. Transportschäden.
Entsorgen Sie das Verpackungsmaterial oder lagern Sie es an einem für Kinder
unzugänglichen Ort. Plastikbeutel usw. können zu einem gefährlichen Spielzeug
für Kinder werden.
Bestimmungsgemäße Verwendung
Das Elektrische Mini Bohr- und Fräswerkzeug ist zum Bohren, Schleifen,
Entgraten, Polieren, Gravieren, Schneiden, Fräsen, Reinigen von Holz, Metall
und Kunststoffen im Modellbau, Werkstatt und Haushalt ausgelegt. Verwenden
Sie das Werkzeug und das Zubehör nur für die beschriebenen Anwendungen.
Die Maschine darf nur nach ihrer Bestimmung verwendet werden. Jede weitere
darüber hinausgehende Verwendung ist nichtbestimmungsgemäß.
Bitte beachten Sie, dass dieses Gerät bestimmungsgemäß nicht für den
gewerblichen, handwerklichen oder industriellen Einsatz konstruiert wurde.
Beschreibung der Zubehörteile
▪ Trennscheiben (I): Zum Schneiden von Metallen und Kunststoffen. Befestigen
Sie dazu die Trennscheibe auf dem Spanndorn (H).
▪ Schleifstifte (F): In unterschiedlichen Schleifkopfformen. Zum Schleifen und
Entgraten von Metall und Kunststoff.
▪ HSS-Bohrer (P): Für Bohrarbeiten an Buntmetall, Holz, Kunststoff und
Leiterplatten.
▪ Schleifscheibe (E): Zum Reinigen und Schärfen von Messern und Werkzeu-
gen. Befestigen Sie dazu die Schleifscheibe auf dem Spanndorn (H).
▪ Schleifblätter (J): Zum Schleifen und Entgraten von Holz und Kunststoffen.
▪ Gravierstift (N) : Zum Gravieren von Glas und Metall zur Dekoration und
Kennzeichnung.
▪ Polierfilze (B): Zum Polieren von Messing, Zinn, Kupfer usw. - auch in
Verbindung mit Polierpasten.
▪ Abziehstein (C): Zum Schärfen von Werkzeugen.
▪ Drahtbürsten (G): Zum Reinigen von Stein, Metall, Alu, usw.
▪ Spannhülsen (R): Unterschiedliche Größen zur Aufnahme verschiedener
Zubehörteile.
▪ Fräser (Q): Zum Fräsen von Kunststoff und Holz, Weichmetall.
▪ Spannzangenfutterschlüssel (A): Zur Montage von Zubehörteilen.

7
Bedienung
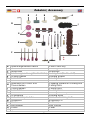
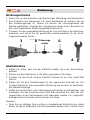
Werkzeugaufnahme
1. Ziehen Sie vor dem Einsetzen oder Wechsel des Werkzeugs den Netzstecker!
2. Zum Einsetzen des Werkzeugs, z.B. einer Drahtbürste (G) drücken Sie auf
den Arretierungsknopf (3). Drehen Sie danach die Sicherungsmutter der
Werkzeugaufnahme (1) gegen den Uhrzeigersinn etwas locker. Benutzen Sie
dazu den mitgelieferten Spannzangenfutterschlüssel (A).
3. Schieben Sie das ausgewählte Werkzeug bis zum Anschlag in die Werkzeug-
aufnahme, und ziehen Sie bei gedrücktem Arretierungsknopf (3) die Siche-
rungsmutter wieder fest an.
Inbetriebnahme
1. Stellen Sie sicher, dass sich der EIN/AUS-Schalter (4) in der „Aus-Stellung“
befindet.
2. Stecken Sie den Netzstecker in die dafür vorgesehene Steckdose.
3. Schalten Sie das Gerät mit dem EIN/AUS-Schalter (4) ein. Das Gerät läuft
jetzt an.
4. Stellen Sie mit dem Drehzahlregler (5) die gewünschte Drehzahl ein. Die
richtige Drehzahl ist vom eingesetzten Werkzeug und von dem zu bearbeiten-
den Material abhängig.
5. Halten Sie die Mini Bohr- und Fräsmaschine mit Daumen und Zeigefinger, und
handhaben Sie das Gerät wie einen Stift. Bitte beachten Sie, dass die Lüf-
tungsschlitze an der Gehäuseseite nicht zugehalten werden. Ein „singendes“
Anlaufgeräusch ist normal und kein Anlass zur Sorge.
Hinweise:
▪ Üben Sie nur mäßigen Druck auf das zu bearbeitende Werkstück aus, damit
dieses mit gleich bleibender Drehzahl bearbeitet werden kann. Starker Druck
G
A
3
Sicherungs-
mutter
R

8
Bedienung
beschleunigt den Arbeitsvorgang nicht, sondern führt zum Abbremsen bzw.
Stillstand der Antriebseinheit und somit zur Überlastung des Motors.
▪ Sichern Sie kleine Werkstücke zur eigenen Sicherheit mit einer Schraubzwin-
ge oder mit einem Schraubstock.
▪ Bei Verwendung der flexiblen Welle sollte das Werkzeug an einem Stativ
hängend betrieben werden. Knicken und biegen Sie die flexible Welle nicht zu
stark.
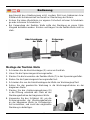
Montage der flexiblen Welle
1. Schrauben Sie die Abschlusskappe (2) vorne am Gerät ab.
2. Lösen Sie die Spannzangensicherungsmutter.
3. Stecken Sie die Innenachse der flexiblen Welle (7) in das Spannzangenfutter.
4. Ziehen Sie die Spannzangensicherungsmutter fest.
5. Schrauben Sie nun die Abschlusskappe der Welle am Werkzeugkopf fest.
6. Setzen Sie das gewünschte Werkzeug in die Werkzeugaufnahme an der
biegsamen Welle.
7. Stecken Sie das Arretierungswerkzeug (D)
in die Öffnung unterhalb des Pfeils an der
Werkzeugaufnahme der biegsamen Welle.
8. Verwenden Sie den Schlüssel (A), um die
Sicherungsmutter der Werkzeugaufnahme
an der biegsamen Welle im Uhrzeigersinn
fest anzuziehen, und somit das eingesetzte
Werkzeug zu befestigen.
7
Sicherungs-
mutter
Abschlusskappe
der Welle
D
A

9
Bedienung
Wartung und Reinigung
▪ Ziehen Sie immer erst den Netzstecker bevor Sie das Gerät reinigen oder
warten.
▪ Bei übermäßiger Funkenbildung lassen Sie die Kohlebürsten durch eine
Elektrofachkraft überprüfen. Achtung! Die Kohlebürsten dürfen nur von einer
Elektrofachkraft ausgewechselt werden.
▪ Verwenden Sie einen Pinsel zur Reinigung der Lüftungsschlitze.
▪ Reinigen Sie das Gehäuse nur mit einem trockenen oder leicht befeuchteten
Tuch. Benutzen Sie keine aggressiven Chemikalien oder Waschbenzin zur
Reinigung.
▪ Tauchen Sie das Gerät niemals in Wasser!
▪ Lagern Sie die Mini Bohr- und Fräsmaschine und das Zubehör an einem
trockenen und vor Staub und Schmutz geschützten Ort.

10
Technische Daten
* Geräusch- und Schwingungsbelastungen können im Gebrauch je nach Benutzungsweise des
Gerätes von den angegebenen Werten abweichen.
Nützliches Zubehör
Unter der Artikelnummer 65 57 20 erhalten Sie bei Westfalia einen geeigneten
Werkzeughalter/Stativ.
Nennspannung
230 V~ 50 Hz
Nennleistung
135 W
Leerlaufdrehzahl
10.000 – 32.000 min-1
Gewicht
Ca. 0,66 kg
Abmessung
Ca. 25 x 5 x 7 cm
Schutzklasse
II
Schalldruckpegel*
LpA = 75,7 dB(A)
Unsicherheit
KpA = 3 dB
Schallleistungspegel*
LWA = 86,7 dB(A)
Unsicherheit
KWA = 3 dB
Hand-Arm-Vibration*
1,732 m/s2
Unsicherheit
K = 1,5 m/s2

11
Operation
Before first Use
Unpack all parts of the mini drill and milling machine set and check all parts for
any damage in transit.
Dispose of packaging materials or store it out of reach of children. Plastic bags
etc. may become a deadly toy for children.
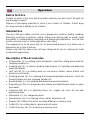
Intended Use
The mini drill and milling machine set is designed to perform drilling, grinding,
deburring, polishing, engraving, cutting, milling and cleaning jobs on wood, metal
and plastic in model-making, workshop and household applications. Use the tool
and accessories only for those applications described.
The equipment is to be used only for its prescribed purpose. Any other use is
deemed to be a case of misuse.
Please note that this device has not been designed for use in commercial, trade
or industrial applications.
Description of the Accessories
▪ Cutting disks (I): For cutting metal and plastic. Insert the cutting wheel onto the
clamping spindle (H).
▪ Grinding pins (F): In various grinding head shapes. For grinding and deburring
metal and plastic.
▪ HSS drill bit (P): For drilling work on non-ferrous metals, wood, plastic and
printed circuit-boards.
▪ Grinding wheels (E): For cleaning and sharpening blades and tools. Insert the
grinding wheel onto the clamping spindle (H).
▪ Sanding disks (J): For grinding and deburring wood and plastic.
▪ Engraving pin (N): For engraving decorations and identification marks in glass
and metal.
▪ Polishing felts (B): For polishing brass, tin, copper, etc. Also for use with
polishing pastes.
▪ Whetstone (C): For sharpening tools.
▪ Wire brushes (G): For cleaning stone, metal, aluminium, etc.
▪ Sleeves (R): Different sizes for mounting different accessory tools.
▪ Cutter (Q): For cutting plastic, wood and soft metal.
▪ Collet chuck key (A): For mounting accessory tools.

12
Operation
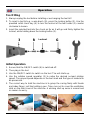
Tool Fitting
1. Always unplug the tool before installing or exchanging the tool bit!
2. To insert a tool bit e.g. a wire brush (G), press the locking button (3). Use the
provided collet chuck key (A) to turn the locknut of the tool holder (1) counter
clockwise to loosen.
3. Insert the selected tool into the chuck as far as it will go and firmly tighten the
locknut, while holding down the locking button (3).
Initial Operation
1. Ensure that the ON/OFF switch (4) is switched off.
2. Then plug in the tool.
3. Use the ON/OFF switch to switch on the tool. The unit starts up.
4. Use the rotation speed regulator (5) to setup the desired no-load rotation
speed. The proper speed depends on the tool used and the type of material to
be processed.
5. The correct way to hold the machine is to grasp the casing firmly with thumb
and index finger, just like holding a pen. Take care not to cover the ventilation
slots on the side cover of the machine. A whining start up noise is normal and
no reason to worry.
G
A
3
Locknut
R

13
Operation
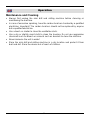
Notes:
▪ Exert only moderate pressure on the workpiece and allow it to be processed at
uniform speed. You will not finish your work sooner by exerting heavy pres-
sure. On the contrary, heavy pressure will cause the drive unit to slow down or
stop. This may overload the motor.
▪ For your own safety, use a vice or screw clamp to secure small workpieces.
▪ If possible, hang the tool on a support stand if you are using the flexible shaft.
Do not kink or bend the flexible shaft very much while working.
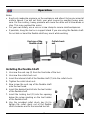
Installing the flexible Shaft
1. Unscrew the end cap (2) from the front side of the tool.
2. Unscrew the collet chuck nut.
3. Insert the internal shaft of the flexible shaft (7) into the collet chuck.
4. Tighten the collet chuck nut.
5. Now screw the end cap of the flexible shaft
onto the tool head.
6. Insert the desired tool bit into the tool holder
of the flexible shaft.
7. Insert the locking tool (D) into the opening
below the arrow marking on the tool holder
of the flexible shaft.
8. Use the provided collet chuck key (A) to
tighten the collet chuck nut of the flexible
shaft clockwise and fix the inserted tool bit.
7
Collet chuck
nut
End cap of the
flexible shaft
D
A

14
Operation
Maintenance and Cleaning
▪ Always first unplug the mini drill and milling machine before cleaning or
maintaining the machine.
▪ In case of excessive sparking, have the carbon brushes checked by a qualified
electrician. Important! The carbon brushes should not be replaced by anyone
but a qualified electrician.
▪ Use a brush or similar to clean the ventilation slots.
▪ Use a dry or slightly moist cloth to clean the housing. Do not use aggressive
chemicals such as bleach or solvents such as benzine to clean the machine.
▪ Never immerse the unit in water!
▪ Store the mini drill and milling machine in a dry location and protect it from
dust and dirt. Store the device out of reach of children.

15
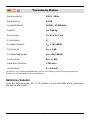
Technical Data
* Sound and vibration emissions may differ from the declared values during use depending on the
ways in which the tool is used.
Useful Accessory
You can order a suitable support stand from Westfalia under Art. 65 57 20.
Nominal Voltage
230 V~ 50 Hz
Nominal Power
135 W
No-Load Speed
10000 – 32000 min-1
Weight
Approx. 0.66 kg
Dimensions
Approx. 25 x 5 x 7 cm
Protection Class
II
Sound Pressure Level*
LpA = 75.7 dB(A)
Uncertainty
KpA = 3 dB
Sound Power Level*
LWA = 86.7 dB(A)
Uncertainty
KWA = 3 dB
Hand Arm Vibration*
1.732 m/s2
Uncertainty
K = 1.5 m/s2

16
Notizen | Notes
Seite wird geladen ...
Seite wird geladen ...
-
 1
1
-
 2
2
-
 3
3
-
 4
4
-
 5
5
-
 6
6
-
 7
7
-
 8
8
-
 9
9
-
 10
10
-
 11
11
-
 12
12
-
 13
13
-
 14
14
-
 15
15
-
 16
16
-
 17
17
-
 18
18
-
 19
19
-
 20
20
-
 21
21
-
 22
22


