
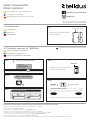
2. Connect sensor to TellStick
1. Installation
Koppla sensor till TellStick
Installation
Ovianturin käyttöopas
Liitää anturi TellStick:iin
Asennus
Bedienungsanleitung für Türsensor
You can also read the manual online.
Just follow the link: telld.us/m15110
Sensor mit TellStick verbinden
Installation
Control
Devices
Log into live.telldus.com
Add a new device
Requires a TellStick and a Telldus Live account
Select your device type:
Add new device wizard
Secure
Group
433,92 MHz receivers
Next >><< Back
Press button to
remove back piece
1.1
2.3
2.1 2.4
2.5
2.2
User manual for
Door sensor
Användarmanual för Dörrsensor
Insert the included batteries
into the sensor.
Connect sensor by pressing
3 times on the button
Name: Magnet sensor
Enter name:
facebook.com/telldus
@telldus
3xclick
Press next and then the installation is done.
Specications/Specikationer/Spezikationen/Tekniset tiedot
Article number/Artikelnummer/Artikkelinumero: 15110
Product size: 40x70x18mm
Battery/Batteri/Batterie/Paristo: 2XAAA 1.5V
Range/Räckvidd/Soveltamisala/Aktionsradius: 0-30m
Protection class/Skyddsklass/Schutzklasse/Suojausluokka: IP20
Frequency/Frekvens/Frequenz/Taajuus: 868.42MHz (EU)
Protocol/Protokoll/ Pöytäkirja: Z-Wave 500 plus
Operating temperature/Användningstemperatur/Betriebstemperatur/Käyttölämpötila: 0– +40

Read this before installation
• This sensor may not be installed outdoors.
• For rough surfaces: Fix magnet sensor into frame by
using the included screws.
For smooth surfaces: You may use double adhesive
tape for fastening the sensor.
Läs detta innan installation
• Denna sensor får inte installeras utomhus.
• För ojämna ytor: Fixera sensorn med de medföljande
skruvarna.
För släta ytor: Du kan även använda dubbelhäftande
tejp för att fästa sensorn.
Lue tämä ennen asennusta
• Tätä anturia ei saa asentaa ulos.
• Epätasaiset pinnat: Kiinnitä magneettianturi kehyk-
seen mukana toimitetuilla ruuveilla.
Tasaiset pinnat: Anturin kiinnittämiseen voidaan
käyttää kaksinkertaista teippiä.
Lesen Sie dies vor der Installation
• Dieser sensor darf nicht im Freien angebracht
werden.
• Bei rauen Oberächen: Befestigen Sie den Mag-
netsensor mit den mitgelieferten Schrauben im
Rahmen.
Bei glatten Oberächen: Zum Befestigen des Sen-
sors können Sie doppeltes Klebeband verwenden.
Proove Distribution AB
Birger Svensson Väg 34 B
432 40 Varberg, Sweden
www.telldus.com • support.telldus.com
Within the European Union, this symbol indicates that the products must not be disposed in the
household waste. Devices contain valuable recyclable materials that should be recycled for reuse and
uncontrolled waste disposal may cause harm to the environment and human health. Please dispose the
old products via suitable collection systems or send the unit to the ofce where you bought it. This will
make the product recycling.
Correct disposal of the products
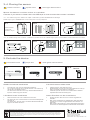
3.1 – 3.3 Mounting with adhesive tape / Montering med dubbelhäftande tejp
Befestigung mit klebeband / Asentaminen kiinnitysteipillä
4.1 – 4.3 Mounting with screws / Montering med skruvar / Befestigung mit schrauben / Asentaminen ruuveilla
3-4. Placing the sensor
5. Exclude the device
Placera sensorn
Exkludera enhet
Sijoita anturi
Sulje laite
Anbringen des sensors
TDas gerät ausschliessen
3.1
4.1
5.1 5.2 5.3 5.4
3.2
4.2
3.3
4.3
Mount the sensor on either a door or a window.
Choose if you want to fasten with the M3 tape or the screws that comes included.
OBS! Make
sure the
arrows align.
Magnet sensor
3xclick
-
 1
1
-
 2
2


in anderen Sprachen
- English: Telldus 15110 User manual
Andere Dokumente
-
Trust AWST-6000 Wireless Motion Sensor Benutzerhandbuch
-
Dometic TankMate Bedienungsanleitung
-
Medtronic OxiMax sensors Benutzerhandbuch
-
 Oregon Scientific RRM320PU Benutzerhandbuch
-
Oregon STATION MÉTÉO FORMAT CD Benutzerhandbuch
-
Denver ASA-60 Benutzerhandbuch
-
Garmin GRF 10 -perasinpalauteanturi Installationsanleitung
-
Hitachi THM-R2AE Installationsanleitung
-
Oregon EXCLUSIVITÉ WEB-RADIO RÉVEIL PROJECTEUR COULEUR ROUGE Benutzerhandbuch
