Korg EC-150 Benutzerhandbuch
- Kategorie
- Digitale Klaviere
- Typ
- Benutzerhandbuch
Dieses Handbuch ist auch geeignet für

User’s manual
Mode d’emploi
Bedienungseinleitung
Manuale di istruzioni
PART NUMBER: MAN0001091
Address
KORG ITALY Spa
Via Cagiata, 85
I-60027 Osimo (An)
Italy
Web servers
www.korg.co.jp
www.korg.com
www.korg.co.uk
www.jam-ind.com
www.korgfr.net
www.korg.de
www.korg.it
www.letusa.es
© KORG Italy 2003. All rights reserved
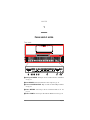
Digital Piano
Piano Numérique
Digital-Piano
Pianoforte Digitale
ENGLISH
FRANÇAIS
DEUTSCH
ITALIANO
2


English
User’s Manual
Français
Mode d’emploi
Deutsch
Bedienungseinleitung
Italiano
Manuale di istruzioni

Seite laden ...
Seite laden ...
Seite laden ...
Seite laden ...
Seite laden ...
Seite laden ...
Seite laden ...
Seite laden ...
Seite laden ...
Seite laden ...
Seite laden ...
Seite laden ...

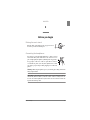
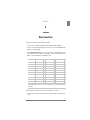
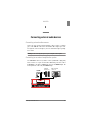
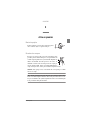
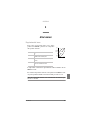
Before you begin
15
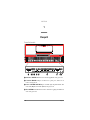
1
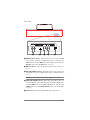
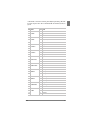
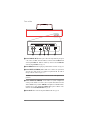
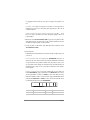
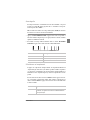
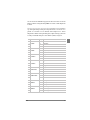
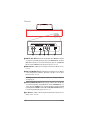
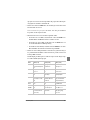
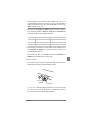
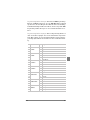
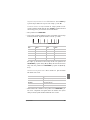
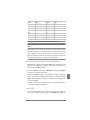
First of all, you must select one of the three demo song banks.
• To select the first bank (1-10), press the DEMO button once. The LEDs will
blink sequentially, from left to right.
• To select the second bank (11-20), press the DEMO button a second time. All
LEDs will blink at the same time.
• To select the third bank (21-30), press the DEMO button a third time. Adjacent
LEDs will blink alternatively
2
Press one of the sound selection buttons to select the corresponding song in the
selected bank. The LED on the selected demo button will stay on, while the other
LEDs will turn off.
After the end of the selected song, all the songs of the selected bank will be played
back in cycle.
3
Press the DEMO button to stop the playback and exit the demo mode.
Button Bank 1 (1-10) Bank 2 (11-20) Bank 3 (21-30)
PIANO 1 F. Mendelssohn-Bar-
tholdy: Prelude Op.104a,
no.2
Korg Original (M. Tem-
pia): Reflection
C.A. Debussy:
Arabesque no.1
PIANO 2 F. Chopin: Nocturne
Op.9, no.2
S. Joplin: The Enter-
tainer
J.S. Bach: Two-voice
invention no.13
E.PIANO 1 C.A. Debussy: Clair de
lune
Korg Original (M. Tem-
pia): Jumper
F. Chopin: Fantasie-
Impromptu Op.66
E.PIANO 2 Korg Original (M. Tem-
pia): Lullaby for a Little
Star
Korg Original (M. Tem-
pia): All the Ones You
Don’t Know
J.S. Bach: Prelude in C
major (from Das Wohl-
temeperierte Klavier)
HARPSI
/CLAV
L. van Beethoven: Für
Elise
J.S. Bach: Italian Con-
cert
Korg Original (M. Tem-
pia): Rubber Bob
VIBES
/GUITAR
F. Chopin: Etude Op.10,
no.3
Korg Original (M. Tem-
pia): Jazz in Spain
R. Schumann: Trauma-
rei, Op.15, no.7
ORGAN 1 W.A. Mozart: A la turque
(from the Sonata in A-
major K.331)
Korg Original (M. Tem-
pia): Cool “B”
F. Mendelssohn-Bar-
tholdy: Spring Song,
Op.62, no.6
ORGAN 2 F. Chopin: Valse no.6 in
D
-major Op.64, no.1
F. Mendelssohn-Bar-
tholdy: Wedding March
Korg Original (M. Tem-
pia): Sunflowers
STRINGS
/PAD
Korg Original (M. Tem-
pia): Old Feather Blues
J.S. Bach: Air on the G
string
P.D. Paradisi: Toccata in
A major
CHOIR Korg Original (M. Tem-
pia): Noise of time
Korg Original (M. Tem-
pia): Voice Texture
Korg Original (M. Tem-
pia): Wet Raccoon Rag
Seite laden ...

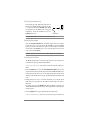
Basic functions 17
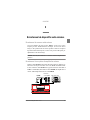
CHAPTER
3
Basic functions
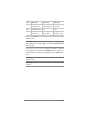
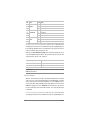
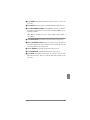
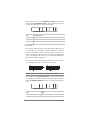
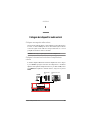
Playing a single sound (Single mode)
You can select a sound from the thirty sounds supplied with the instrument.
1 Press one of the sound selection buttons in order to select a sound. The LED on the
button you pressed will light.
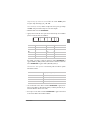
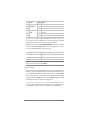
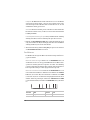
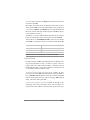
2 Use the SOUND BANK button to select one of the three available banks (1-10, 11-
20, 21-30). Pressed a first time it selects Bank 2; pressed a second time it selects
Bank 3; pressed a third time it selects Bank 1 again.
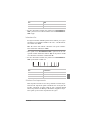
Playing two sounds at the same time (Layer mode)
You can play two sounds at the same time on the keyboard. This is called the Layer
mode.
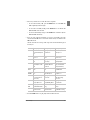
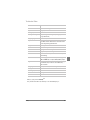
Button Bank 1 # Bank 2 # Bank 3 #
PIANO 1 Grand Piano 1 2 Bright Piano 2 Grand Piano 2 1
PIANO 2 Classic Piano 2 Honky-Tonky 2 E.Grand Piano 1
E.PIANO 1 Stage E.Piano 1 Club E.Piano 2 Thin E.Piano 2
E.PIANO 2 Digital E.Piano 1 60’s E.Piano 1 Vintage E.Piano 2
HARPSI/CLAV Harpsichord 1 Clav. 1 Wah Clav. 1
VIBES/GUITAR Vibraphone 1 Marimba 1 Acoustic Guitar 1
ORGAN 1 Jazz Organ 1 2 Jazz Organ 2 2 Jazz Organ 3 2
ORGAN 2 Church Organ 1 3 Church Organ 2 1 Church Organ 3 1
STRINGS/PAD Strings 1 Slow Strings 2 Warm Pad 2
CHOIR Choir Hoo 1 Choir Doo 2 Choir Pad 2
(#) These columns show the number of oscillators per voice used by each sound. If this does
not mean anything to you, don’t worry – there is an explaination on oscillators and polyphony
on page 45.
Seite laden ...
Seite laden ...
Seite laden ...
Seite laden ...
Seite laden ...
Seite laden ...
Seite laden ...
Seite laden ...
Seite laden ...
Seite laden ...
Seite laden ...
Seite laden ...
Seite laden ...
Seite laden ...
Seite laden ...

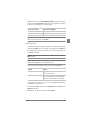
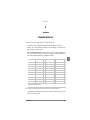
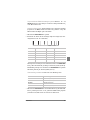
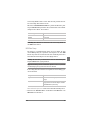
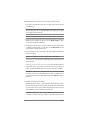
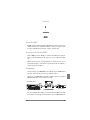
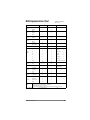
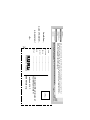
MIDI 33
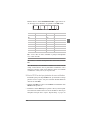
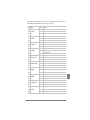
on the EC150, as shown in the following table. Only Program Change (PC) num-
bers in the range 0–29 have effect on the EC150, while other numbers (30-127) are
ignored.
PC# Button Bank Sound
0
PIANO 1
1 Grand Piano 1
1 2 Bright Piano
2 3 Grand Piano 2
3
PIANO 2
1 Classic Grand Piano
4 2 Honky-Tonky
5 3 E.Grand Piano
6
E.PIANO 1
1 Stage E.Piano
7 2 Club E.Piano
8 3 Thin E.Piano
9
E.PIANO 2
1 Digital E.Piano
10 2 60’s E.Piano
11 3 Vintage E.Piano
12
HARPSI/CLAV
1 Harpsichord
13 2 Clav.
14 3 Wah Clav.
15
VIBES/GUITAR
1 Vibraphone
16 2 Marimba
17 3 Acoustic Guitar
18
ORGAN1
1 Jazz Organ 1
19 2 Jazz Organ 2
20 3 Jazz Organ 3
21
ORGAN2
1 Church Organ 1
22 2 Church Organ 2
23 3 Church Organ 3
24
STRINGS/PAD
1 Strings
25 2 Slow Strings
26 3 Warm Pad
27
CHOIR
1 Choir Hoo
28 2 Choir Doo
29 3 Choir Pad
Seite laden ...
Seite laden ...
Seite laden ...
Seite laden ...

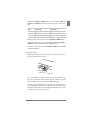
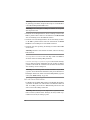
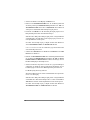
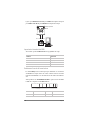
38 Chapter 7
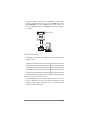
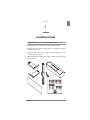
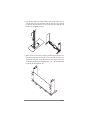
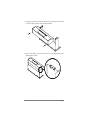
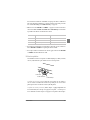
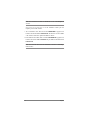
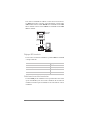
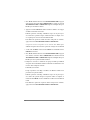
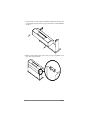
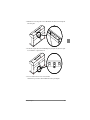
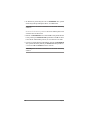
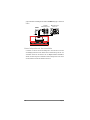
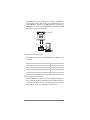
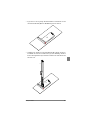
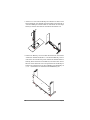
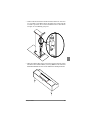
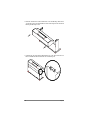
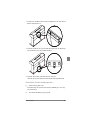
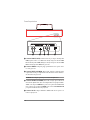
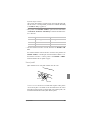
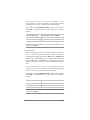
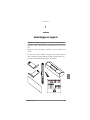
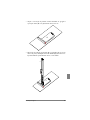
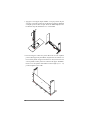
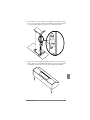
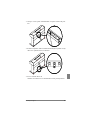
NB: You will need a Philliìps screwdriver for assembly.
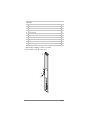
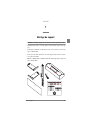
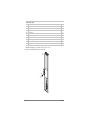
2 Insert the adjuster (d) into the pedal beam (C).
List of parts
A Leg panel - Right × 1
B Leg panel - Left × 1
C Pedal “beam” × 1
D Rear panel × 1
E Piano (main body) × 1
F Power Supply × 1
a Wood Screws × 9
b Long bolts × 4
c Short bolts × 4
d Adjuster (supporting the pedal beam) × 1
d
C
Seite laden ...
Seite laden ...
Seite laden ...
Seite laden ...
Seite laden ...
Seite laden ...
Seite laden ...

46 Chapter 8
Technical specifications
Sounds processed with INFINITY™.
Korg reserves the right to change the specifications without notice.
Specifications EC150
Keyboard 88 notes, velocity sensitive, with hammer-action simulation
Keyboard modes Single, Layer
Touch selection Light, Normal, Heavy
Tuning Transpose, Fine tuning, Temperament (Equal, Kirnberger,
Werckmeister)
Sound generation Stereo PCM System
Polyphony 60 notes (max). The use of 2-oscillator sounds, the Layer
mode and/or the reverb or chorus reduces the maximum
number of simultaneous notes.
Sounds 30 sounds in ROM
Effects Reverb, Chorus (3 levels each)
Demo 30 incorporated demos
Metronome Tempo, Time signature, Accent and Volume controls
Pedals Damper, Soft, Sostenuto. (Damper and Soft support half-
pedaling)
Connections Audio output (OUTPUT L/MONO, R), Audio input (INPUT L/
MONO, R), 2 × Headphones, MIDI (IN, OUT), Pedals
Controls Power switch, Master Volume, Reverb, Chorus, Touch, Trans-
pose/Function, Bank, Sound selectors, Tempo, Metronome,
Demo
Amplification 2 × 25 Watt amplifier, 2 × 13cm dual-cone speakers
Power supply AC/DC 21V, 1.5A adapter (included)
Power consumption 28 Watt
Dimensions (W × H × D) 54” × 32.5” × 17.2” (1370 × 827 × 437 mm), excluding music
stand
Weight 88.8 lbs (40.3 kg)
Color Dark Rosewood, Cherry

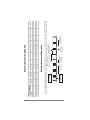
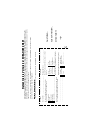
Control panel shortcuts 47
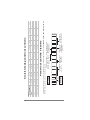
Control panel shortcuts
Control panel and keyboard
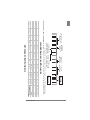
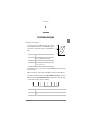
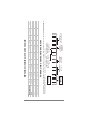
The following diagram shows the various functions you can access by holding the METRONOME or TRANSPOSE/
FUNCTION button down, while pressing one of the notes on the keyboard.
…while pressing this one
PIANO 1 PIANO2 E.PIANO 1 E.PIANO 2 HARPSI/CLAV
VIBES/GUITAR
ORGAN 1 ORGAN 2 STRINGS/PAD CHOIR
Keep this button pressed…
REVERB Depth = Low Depth = Medium Depth = High
CHORUS Depth = Low Depth = Medium Depth = High
TOUCH Light Normal Heavy Werckmeister Kirnberger
METRONOME Time: 2/4 Time: 3/4 Time: 4/4 Time: 6/4 Accent Bell sound Metro Vol. Dec. Metro Vol. Inc.
TRANSPOSE/FUNCTION Local On/Off
Prg.Change Rx/Tx
Crl.Change Rx/Tx Data Dump
METRONOME
TRANSPOSE
/FUNCTION
MIDI Channels
C2 = Ch 01
…
D#3 = Ch 16
Tuning
B5 = Down (-)
C6 = Up (+)
(Press both
for Reset)
Transpose
F#6…B6 = -6…-1 st.
C7 = Standard
C#7…F7 = +1…+5 st.
(Press both for Reset)
Metronome Volume
B5 = Decrease (-)
C6 = Increase (+)
Numeric Tempo Input
C5 = 0 C#5 = 1 D5 = 2
D#5 = 3 E5 = 4 F5 = 5
F#5 = 6 G5 = 7 G#5 = 8
A5 = 9
Touch Setting
B3 = Light
C4 = Normal
D4 = Heavy
Demo Start
Seite laden ...
Seite laden ...
Seite laden ...
Seite laden ...
Seite laden ...
Seite laden ...
Seite laden ...
Seite laden ...
Seite laden ...
Seite laden ...
Seite laden ...
Seite laden ...
Seite laden ...

A lire en premier 61
3 Appuyez sur DEMO pour arrêter la reproduction et quitter le mode de démonstra-
tion.
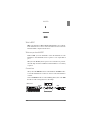
Reproduire un morceau individuel. Vous pouvez sélectionner un morceau spé-
cifique et le reproduire.
1 D’abord, vous devez sélectionner l’une des trois banques de timbres disponibles.
• Pour sélectionner la première banque (1-10), appuyez une fois sur le bouton
DEMO. Les témoins clignotent l’un après l’autre, de gauche à droite.
• Pour sélectionner la deuxième banque (11-20), appuyez de nouveau sur le bou-
ton DEMO. Tous les témoins clignotent simultanément.
• Pour sélectionner la troisième banque (21-30), appuyez une troisième fois sur le
bouton DEMO. Les témoins adjacents clignotent de manière alternée.
2 Appuyez sur le bouton de sélection des timbres correspondant à la banque sélec-
tionnée. Le témoin du bouton de démonstration sélectionné reste allumé, tandis que
les autres s’éteignent.
A la fin de la reproduction du morceau sélectionné, tous les morceaux de la banque
sélectionnée seront reproduits en cycle.
Bouton Banque1 (1-10) Banque 2 (11-20) Banque 3 (21-30)
PIANO 1 F. Mendelssohn-Bar-
tholdy: Prelude Op.104a,
no.2
Korg Original (M. Tem-
pia): Reflection
C.A. Debussy:
Arabesque no.1
PIANO 2 F. Chopin: Nocturne
Op.9, no.2
S. Joplin: The Entertai-
ner
J.S. Bach: Two-voice
invention no.13
E.PIANO 1 C.A. Debussy: Clair de
lune
Korg Original (M. Tem-
pia): Jumper
F. Chopin: Fantasie-
Impromptu Op.66
E.PIANO 2 Korg Original (M. Tem-
pia): Lullaby for a Little
Star
Korg Original (M. Tem-
pia): All the Ones You
Don’t Know
J.S. Bach: Prelude in C
major (from Das Wohl-
temeperierte Klavier)
HARPSI
/CLAV
L. van Beethoven: Für
Elise
J.S. Bach: Italian Con-
cert
Korg Original (M. Tem-
pia): Rubber Bob
VIBES
/GUITAR
F. Chopin: Etude Op.10,
no.3
Korg Original (M. Tem-
pia): Jazz in Spain
R. Schumann: Trauma-
rei, Op.15, no.7
ORGAN 1 W.A. Mozart: A la turque
(from the Sonata in A-
major K.331)
Korg Original (M. Tem-
pia): Cool “B”
F. Mendelssohn-Bar-
tholdy: Spring Song,
Op.62, no.6
ORGAN 2
F. Chopin: Valse
no.6 in D-major
Op.64, no.1
F. Mendelssohn-Bar-
tholdy: Wedding March
Korg Original (M. Tem-
pia): Sunflowers
Seite laden ...

Fonctions de base 63
CHAPITRE
3
Fonctions de base
Jouer un timbre (mode Single)
Sélectionner l’un des trente timbres à disposition.
1 Appuyez sur l’un des boutons de sélection des timbres. Le témoin du bouton
enfoncé s’allume.
2 Appuyez sur le bouton SOUND BANK pour sélectionner l’une des trois banques
disponibles (1-10, 11-20, 21-30). En appuyant une fois sur ce bouton, c’est la Ban-
que 2 qui est sélectionnée ; en l’appuyant deux fois, c’est la Banque 3 qui est sélec-
tionnée ; en l’appuyant trois fois, c’est la Banque 1 qui est de nouveau sélectionnée.
Jouer deux timbres à la fois (mode Layer)
Vous pouvez jouer deux timbres ensemble sur le clavier. C’est le mode Layer.
Bouton Banque 1 # Banque 2 # Banque 3 #
PIANO 1 Grand Piano 1 2 Bright Piano 2 Grand Piano 2 1
PIANO 2 Classic Piano 2 Honky-Tonky 2 E.Grand Piano 1
E.PIANO 1 Stage E.Piano 1 Club E.Piano 2 Thin E.Piano 2
E.PIANO 2 Digital E.Piano 1 60’s E.Piano 1 Vintage E.Piano 2
HARPSI/CLAV Harpsichord 1 Clav. 1 Wah Clav. 1
VIBES/GUITAR Vibraphone 1 Marimba 1 Acoustic Guitar 1
ORGAN 1 Jazz Organ 1 2 Jazz Organ 2 2 Jazz Organ 3 2
ORGAN 2 Church Organ 1 3 Church Organ 2 1 Church Organ 3 1
STRINGS/PAD Strings 1 Slow Strings 2 Warm Pad 2
CHOIR Choir Hoo 1 Choir Doo 2 Choir Pad 2
(#) Cette colonne détaille le nombre d’oscillateurs par voix exploités par chaque timbre
Seite laden ...
Seite laden ...
Seite laden ...
Seite laden ...
Seite laden ...
Seite laden ...
Seite laden ...
Seite laden ...
Seite laden ...
Seite laden ...
Seite laden ...
Seite laden ...
Seite laden ...
Seite laden ...
Seite laden ...

MIDI 79
l’un des sons internes du EC150 en appuyant sur l’un des boutons de sélection des
timbres, un numéro de Program Change MIDI sera transmis, comme indiqué dans
le tableau.
Réception des messages de Program Change. Lorsque vous recevez un mes-
sage de Program Change transmis par un dispositif externe, le son interne corres-
pondant sera sélectionné sur votre EC150, comme indiqué dans le tableau.
Uniquement les numéros de Program Change (PC) compris dans la plage 0–29 sont
reconnus par le EC150, tandis que les autres numéros (30-127) sont ignorés.
PC# Bouton Banque Timbre
0
PIANO 1
1 Grand Piano 1
1 2 Bright Piano
2 3 Grand Piano 2
3
PIANO 2
1 Classic Grand Piano
4 2 Honky-Tonky
5 3 E.Grand Piano
6
E.PIANO 1
1 Stage E.Piano
7 2 Club E.Piano
8 3 Thin E.Piano
9
E.PIANO 2
1 Digital E.Piano
10 2 60’s E.Piano
11 3 Vintage E.Piano
12
HARPSI/CLAV
1 Harpsichord
13 2 Clav.
14 3 Wah Clav.
15
VIBES/GUITAR
1 Vibraphone
16 2 Marimba
17 3 Acoustic Guitar
18
ORGAN1
1 Jazz Organ 1
19 2 Jazz Organ 2
20 3 Jazz Organ 3
21
ORGAN2
1 Church Organ 1
22 2 Church Organ 2
23 3 Church Organ 3
Seite laden ...
Seite laden ...
Seite laden ...
Seite laden ...

84 Chapitre 7
NB: Un tournevis à croix est nécessaire pour l’assemblage.
2 Insérer le petit pied (d) dans la barre des pédales (C).
Eléments
A Pied droit × 1
B Pied gauche × 1
C Barre des pédales × 1
D Panneau face arrière × 1
E Piano × 1
F Alimentation × 1
a Vis × 9
b Boulons longs × 4
c Boulons courts × 4
d Petit pied pour la barre des pédales × 1
d
C
Seite laden ...
Seite laden ...
Seite laden ...
Seite laden ...
Seite laden ...
Seite laden ...
Seite laden ...
Seite laden ...

Appendice 93
Spécifications techniques
Sons élaborés avec INFINITY™.
Korg se réserve le droit de modifier les spécifications sans préavis.
Spécifications EC150
Clavier 88 notes lestées, sensibles à la dynamique du toucher, avec
simulation de marteau
Modes clavier Single, Layer
Réglage du toucher Léger, Normal, Lourd
Accordage Transposition, Accordage fin, Tempérament (Egal, Kirnber-
ger, Werckmeister)
Génération de sons Stereo PCM System
Polyphonie 60 notes (max). L’utilisation de timbres à 2 oscillateurs, du
mode Layer et/ou des effets de réverbération ou chorus
réduit le nombre maximum de notes jouées simultanément.
Timbres 30 timbres en ROM
Effets Réverbération, Chorus (chacun avec 3 niveaux)
Démo 30 morceaux de démonstration incorporés
Métronome Réglages du Tempo, de la Time signature (métrique), de
l’Accent et du Volume
Pédales Damper, Soft, Sostenuto. (Mi-pédale Damper et Soft fournie).
Connexions Sorties Audio (OUTPUT L/MONO, R), Entrées Audio (INPUT
L/MONO, R), 2 × Casques, MIDI (IN, OUT), Pédales
Contrôles Interrupteur, Master Volume, Reverb, Chorus, Touch, Trans-
pose/Function, Sound Bank, sélecteurs de timbres, Tempo,
Métronome, Démo
Amplification 2x25 Watts amplifiés, 2x13 cm double haut-parleurs
Alimentation Adaptateur AC/DC 21V, 1,5A (fourni)
Consommation 28 Watts
Dimensions (L x P x H) 1370 × 827 × 437 mm, pupitre exclu
Poids 40,3 kg
Couleurs Palissandre foncé, cerisier

94
Détails du tableau de commande
Tableau de commande et clavier
Le diagramme suivant indique les diverses fonctions accessibles en maintenant enfoncé le bouton METRONOME ou
TRANSPOSE/FUNCTION et en appuyant sur l'une des touches du clavier.
…pendant que vous appuyez sur celui-ci
PIANO 1 PIANO2 E.PIANO 1 E.PIANO 2 HARPSI/CLAV
VIBES/GUITAR
ORGAN 1 ORGAN 2 STRINGS/PAD CHOIR
Maintenez ce bouton enfoncé…
REVERB Prof = Grave Prof = Moyen Prof = Aigu
CHORUS Prof = Grave Prof = Moyen Prof = Aigu
TOUCH Léger Normal Lourd Werckmeister Kirnberger
METRONOME Tempo: 2/4 Tempo: 3/4 Tempo: 4/4 Tempo: 6/4 Accent Bell sound Metro Vol. Dec. Metro Vol. Inc.
TRANSPOSE/FUNCTION Local On/Off
Prg.Change Rx/Tx
Crl.Change Rx/Tx Data Dump
METRONOME
TRANSPOSE
/FUNCTION
MIDI Channels
C2 = Ch 01
…
D#3 = Ch 16
Tuning
B5 = Down (-)
C6 = Up (+)
(Press both
for Reset)
Transpose
F#6…B6 = -6…-1 st.
C7 = Standard
C#7…F7 = +1…+5 st.
(Press both for Reset)
Metronome Volume
B5 = Decrease (-)
C6 = Increase (+)
Numeric Tempo Input
C5 = 0 C#5 = 1 D5 = 2
D#5 = 3 E5 = 4 F5 = 5
F#5 = 6 G5 = 7 G#5 = 8
A5 = 9
Touch Setting
B3 = Light
C4 = Normal
D4 = Heavy
Demo Start

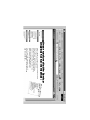
Bedienungsanleitung
Digital-Piano

96
VORSICHTSMASSNAHMEN
Aufstellungsort
Bei Benutzung des Instruments an folgenden
Orten kann es zu Funktionsstörungen kommen.
• In direktem Sonnenlicht
• bei hohen Temperaturen oder hoher Luft-
feuchtigkeit
• in sehr staubigen oder schmutzigen Räumen
• bei starken Vibrationen
Stromversorgung
Schließen Sie den Wechselstromstecker des
Instruments an eine WS-Steckdose mit der richti-
gen Spannung an. Schließen Sie das Instrument
keinesfalls an eine WS-Steckdose mit einer ande-
ren als der angegebenen Spannung an.
Interferenzen mit anderen elektrischen Gerä-
ten
Das Instrument ist mit einem Computer ausgestat-
tet. In der Nähe des Instruments befindliche
Radio- und Fernsehgeräte können Empfangsstö-
rungen erleiden. Stellen Sie das Instrument des-
halb in einem gewissen Abstand von diesen
Geräten auf.
Handhabung
Zur Vermeidung von Beschädigungen sind Schal-
ter und Regler des Instruments ohne übertriebe-
nen Kraftaufwand zu bedienen.
Pflege
Wenn die Außenseite des Instruments schmutzig
ist, wischen Sie sie mit einem trockenen, sauberen
Tuch ab. Verwenden Sie weder Flüssigreiniger
wie Benzin oder Verdünner, noch Reinigungs-
oder brennbare Poliermittel. Achtung: Verwen-
den Sie keinen Alkohol zur Reinigung des Noten-
ständers. Bei hartnäckigem Schmutz können Sie
einen milden Haushaltsreiniger für Glas und emp-
findliche Oberflächen verwenden.
Aufbewahrung des Handbuches
Nach Durchlesen des Handbuches ist dieses sorg-
fältig aufzubewahren, um jederzeit eingesehen
werden zu können.
Vermeidung von Fremdkörpern im Instru-
ment
• Stellen Sie keine Behältnisse mit Flüssigkei-
ten auf dem Instrument ab. Eindringende Flüs-
sigkeiten können einen Geräteausfall, Brand
oder Stromschlag verursachen.
• Achten Sie darauf, dass keine Metallgegen-
stände ins Innere des Instruments geraten.
Sollte dies dennoch einmal geschehen, ziehen
Sie sofort den Stecker aus der Steckdose und
wenden Sie sich an Ihren Korg Händler, bei
dem Sie das Instrument gekauft haben.
CE-ZEICHEN ZUR VEREINHEIT-
LICHUNG DER EUROPÄISCHEN
STANDARDS
Das bis 31. Dezember 1996 vergebene CE-Zei-
chen, das unsere mit Wechselstrom betriebenen
Produkte tragen, zeigt an, dass diese Instrumente
der EMC Richtlinie (89/336/EWG) und der CE-
Zeichen-Richtlinie (93/68/EEC) entsprechen.
Das nach dem 1. Januar 1997 vergebene CE-Zei-
chen zeigt an, dass die Instrumente der EMC
Richtlinie (89/336/EEC), der CE-Zeichen-Richt-
linie (93/68/EEC) und der Niederspan
nungs-
richtlinie (73/23/EEC) entsprechen
Das CE-Zeichen auf unserern batteriegespeisten
Instrumenten zeigt an, dass diese der EMC Richt-
linie (89/336/EEC) und der CE-Zeichen-Richtli-
nie (93/68/EEC) entsprechen.
HAFTUNGSAUSSCHLUSS
Die im vorliegenden Handbuch enthaltenen Infor-
mationen wurden mit großer Sorgfalt geprüft und
überarbeitet. Aufgrund des Bemühens, unsere
Produkte ständig zu verbessern, können die tech-
nischen Daten jedoch von den Beschreibungen
des Handbuches abweichen. Korg ist nicht verant-
wortlich für eventuelle Abweichungen zwischen
den technischen Daten und den im Handbuch ent-
haltenen Beschreibungen. Technische Daten kön-
nen jederzeit ohne Vorankündigung geändert
werden.

97
HAFTUNG
Alle KORG Produkte werden entsprechend den in
den verschiedenen Ländern geltenden Spezifika-
tionen und erforderlichen Spannungen hergestellt.
Sie unterliegen den Garantiebestimmungen der
KORG Vertriebsfirmen in den einzelnen Ländern.
KORG Produkte, die ohne Garantiekarte und
Seriennummer verkauft wurden, sind von Garan-
tieleistungen und Haftungsansprüchen durch den
Hersteller/Händler ausgeschlossen. Diese Vor-
schrift dient zu Ihrer eigenen Sicherheit.
SERVICE UND KUNDENDIENSTLEI-
STUNGEN FÜR MUSIKER
Wenden Sie sich zwecks Kundendienstleistungen
bitte an das nächste KORG Kundendienstzen-
trum. Ausführliche Informationen über KORG
Produkte sowie über Software und Zubehör für
Ihr Klavier erhalten Sie bei Ihrem KORG Händ-
ler.
KORG IM INTERNET
Korg & More: www.korg.de
Korg Inc.: www.korg.co.jp
Korg USA: www.korg.com
Korg UK: www.korg.co.uk
Jam Industries (Canada): www.jam-ind.com
Gaffarel Musique (France): www.korgfr.net
Syncro (Italy): www.korg.it
Letusa (Spain): www.letusa.es
DATEN-RESET
Wenn das Instrument ausgeschaltet wird, werden
alle Parameter zurückgesetzt.
© 2003 Korg Italy Spa. Printed in Italy.

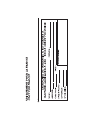
98 Inhaltsverzeichnis
INHALTSVERZEICHNIS
Einführung . . . . . . . . . . . . . . . . . . . . . . . . . . . . . . . . . . . . . . . . . . . . . . . . . . . . . . . . .100
Hauptfunktionen . . . . . . . . . . . . . . . . . . . . . . . . . . . . . . . . . . . . . . . . . . . . . . . . . . . . . . . . . . .100
1 Paneele . . . . . . . . . . . . . . . . . . . . . . . . . . . . . . . . . . . . . . . . . . . . . . . . . . . . . . . . . . .102
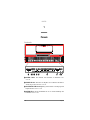
Vorderseite . . . . . . . . . . . . . . . . . . . . . . . . . . . . . . . . . . . . . . . . . . . . . . . . . . . . . . . . . . . . . . .102
Rückseite . . . . . . . . . . . . . . . . . . . . . . . . . . . . . . . . . . . . . . . . . . . . . . . . . . . . . . . . . . . . . . . . .104
2 Bevor Sie beginnen . . . . . . . . . . . . . . . . . . . . . . . . . . . . . . . . . . . . . . . . . . . . . . . . . .105
Notenständer aufstellen . . . . . . . . . . . . . . . . . . . . . . . . . . . . . . . . . . . . . . . . . . . . . . . . . . . . . .105
Kopfhörer anschließen . . . . . . . . . . . . . . . . . . . . . . . . . . . . . . . . . . . . . . . . . . . . . . . . . . . . . . .105
Instrument einschalten . . . . . . . . . . . . . . . . . . . . . . . . . . . . . . . . . . . . . . . . . . . . . . . . . . . . . . .106
Lautstärke einstellen . . . . . . . . . . . . . . . . . . . . . . . . . . . . . . . . . . . . . . . . . . . . . . . . . . . . . . . .106
Demos abspielen . . . . . . . . . . . . . . . . . . . . . . . . . . . . . . . . . . . . . . . . . . . . . . . . . . . . . . . . . . .106
3 Basisfunktionen . . . . . . . . . . . . . . . . . . . . . . . . . . . . . . . . . . . . . . . . . . . . . . . . . . . . .109
Mit nur einem Klang spielen (Single Modus) . . . . . . . . . . . . . . . . . . . . . . . . . . . . . . . . . . . . .109
Mit zwei Klängen gleichzeitig spielen (Layer Modus) . . . . . . . . . . . . . . . . . . . . . . . . . . . . . .109
Hall- und Chorus-Effekt wählen . . . . . . . . . . . . . . . . . . . . . . . . . . . . . . . . . . . . . . . . . . . . . . .110
Pedale benutzen . . . . . . . . . . . . . . . . . . . . . . . . . . . . . . . . . . . . . . . . . . . . . . . . . . . . . . . . . . . .111
Das Metronom . . . . . . . . . . . . . . . . . . . . . . . . . . . . . . . . . . . . . . . . . . . . . . . . . . . . . . . . . . . . .112
4 Weitere Funktionen . . . . . . . . . . . . . . . . . . . . . . . . . . . . . . . . . . . . . . . . . . . . . . . . . .115
Einstellung des Anschlags . . . . . . . . . . . . . . . . . . . . . . . . . . . . . . . . . . . . . . . . . . . . . . . . . . . .115
Transponierung . . . . . . . . . . . . . . . . . . . . . . . . . . . . . . . . . . . . . . . . . . . . . . . . . . . . . . . . . . . .116
Feinstimmung . . . . . . . . . . . . . . . . . . . . . . . . . . . . . . . . . . . . . . . . . . . . . . . . . . . . . . . . . . . . .117
Temperierung selektieren . . . . . . . . . . . . . . . . . . . . . . . . . . . . . . . . . . . . . . . . . . . . . . . . . . . .117
5 Externe Audiogeräte anschließen . . . . . . . . . . . . . . . . . . . . . . . . . . . . . . . . . . . . . . .119
Externe Audioquellen anschließen . . . . . . . . . . . . . . . . . . . . . . . . . . . . . . . . . . . . . . . . . . . . .119
An externe Verstärkungssysteme anschließen . . . . . . . . . . . . . . . . . . . . . . . . . . . . . . . . . . . .119
Interne Lautsprecher ein- bzw. ausschalten . . . . . . . . . . . . . . . . . . . . . . . . . . . . . . . . . . . . . . .120
6 MIDI . . . . . . . . . . . . . . . . . . . . . . . . . . . . . . . . . . . . . . . . . . . . . . . . . . . . . . . . . . . . .121
Was ist MIDI? . . . . . . . . . . . . . . . . . . . . . . . . . . . . . . . . . . . . . . . . . . . . . . . . . . . . . . . . . . . . .121
Was leistet MIDI? . . . . . . . . . . . . . . . . . . . . . . . . . . . . . . . . . . . . . . . . . . . . . . . . . . . . . . . . . .121
Anschlüsse . . . . . . . . . . . . . . . . . . . . . . . . . . . . . . . . . . . . . . . . . . . . . . . . . . . . . . . . . . . . . . . .121
Standard MIDI Einstellungen . . . . . . . . . . . . . . . . . . . . . . . . . . . . . . . . . . . . . . . . . . . . . . . . .122
Übertragungskanal selektieren . . . . . . . . . . . . . . . . . . . . . . . . . . . . . . . . . . . . . . . . . . . . . . . .122
EC150 als multitimbraler Tongenerator . . . . . . . . . . . . . . . . . . . . . . . . . . . . . . . . . . . . . . . . .123
Local On/Off . . . . . . . . . . . . . . . . . . . . . . . . . . . . . . . . . . . . . . . . . . . . . . . . . . . . . . . . . . . . . .124
Program Change . . . . . . . . . . . . . . . . . . . . . . . . . . . . . . . . . . . . . . . . . . . . . . . . . . . . . . . . . . .124
Control Change . . . . . . . . . . . . . . . . . . . . . . . . . . . . . . . . . . . . . . . . . . . . . . . . . . . . . . . . . . . .126
MIDI Data Dump . . . . . . . . . . . . . . . . . . . . . . . . . . . . . . . . . . . . . . . . . . . . . . . . . . . . . . . . . .127
7 Montage des Ständers . . . . . . . . . . . . . . . . . . . . . . . . . . . . . . . . . . . . . . . . . . . . . . .129
Kontrollieren Sie nach der Montage, dass… . . . . . . . . . . . . . . . . . . . . . . . . . . . . . . . . . . . . . .135
Vorsichtsmaßnahmen . . . . . . . . . . . . . . . . . . . . . . . . . . . . . . . . . . . . . . . . . . . . . . . . . . . . . . .136
8 Anhang . . . . . . . . . . . . . . . . . . . . . . . . . . . . . . . . . . . . . . . . . . . . . . . . . . . . . . . . . . .137
Fehlerbeseitigung . . . . . . . . . . . . . . . . . . . . . . . . . . . . . . . . . . . . . . . . . . . . . . . . . . . . . . . . . .137
Polyphonie . . . . . . . . . . . . . . . . . . . . . . . . . . . . . . . . . . . . . . . . . . . . . . . . . . . . . . . . . . . . . . . .137
Seite laden ...
Seite laden ...
Seite laden ...
Seite laden ...
Seite laden ...
Seite laden ...
Seite laden ...
Seite laden ...
Seite laden ...
Seite laden ...
Seite laden ...
Seite laden ...
Seite laden ...
Seite laden ...
Seite laden ...
Seite laden ...
Seite laden ...
Seite laden ...
Seite laden ...
Seite laden ...
Seite laden ...
Seite laden ...
Seite laden ...
Seite laden ...
Seite laden ...
Seite laden ...
Seite laden ...
Seite laden ...
Seite laden ...
Seite laden ...
Seite laden ...
Seite laden ...
Seite laden ...
Seite laden ...
Seite laden ...
Seite laden ...
Seite laden ...
Seite laden ...
Seite laden ...
Seite laden ...
Seite laden ...
Seite laden ...
Seite laden ...
Seite laden ...
Seite laden ...
Seite laden ...
Seite laden ...
Seite laden ...
Seite laden ...
Seite laden ...
Seite laden ...
Seite laden ...
Seite laden ...
Seite laden ...
Seite laden ...
Seite laden ...
Seite laden ...
Seite laden ...
Seite laden ...
Seite laden ...
Seite laden ...
Seite laden ...
Seite laden ...
Seite laden ...
Seite laden ...
Seite laden ...
Seite laden ...
Seite laden ...
Seite laden ...
Seite laden ...
Seite laden ...
Seite laden ...
Seite laden ...
Seite laden ...
Seite laden ...
Seite laden ...
Seite laden ...
Seite laden ...
Seite laden ...
Seite laden ...
Seite laden ...
Seite laden ...
Seite laden ...
Seite laden ...
Seite laden ...
Seite laden ...
Seite laden ...
Seite laden ...
Seite laden ...
Seite laden ...
Seite laden ...
Seite laden ...
Seite laden ...
Seite laden ...
Seite laden ...
Seite laden ...
Seite laden ...
Seite laden ...
Seite laden ...
Seite laden ...
-
 1
1
-
 2
2
-
 3
3
-
 4
4
-
 5
5
-
 6
6
-
 7
7
-
 8
8
-
 9
9
-
 10
10
-
 11
11
-
 12
12
-
 13
13
-
 14
14
-
 15
15
-
 16
16
-
 17
17
-
 18
18
-
 19
19
-
 20
20
-
 21
21
-
 22
22
-
 23
23
-
 24
24
-
 25
25
-
 26
26
-
 27
27
-
 28
28
-
 29
29
-
 30
30
-
 31
31
-
 32
32
-
 33
33
-
 34
34
-
 35
35
-
 36
36
-
 37
37
-
 38
38
-
 39
39
-
 40
40
-
 41
41
-
 42
42
-
 43
43
-
 44
44
-
 45
45
-
 46
46
-
 47
47
-
 48
48
-
 49
49
-
 50
50
-
 51
51
-
 52
52
-
 53
53
-
 54
54
-
 55
55
-
 56
56
-
 57
57
-
 58
58
-
 59
59
-
 60
60
-
 61
61
-
 62
62
-
 63
63
-
 64
64
-
 65
65
-
 66
66
-
 67
67
-
 68
68
-
 69
69
-
 70
70
-
 71
71
-
 72
72
-
 73
73
-
 74
74
-
 75
75
-
 76
76
-
 77
77
-
 78
78
-
 79
79
-
 80
80
-
 81
81
-
 82
82
-
 83
83
-
 84
84
-
 85
85
-
 86
86
-
 87
87
-
 88
88
-
 89
89
-
 90
90
-
 91
91
-
 92
92
-
 93
93
-
 94
94
-
 95
95
-
 96
96
-
 97
97
-
 98
98
-
 99
99
-
 100
100
-
 101
101
-
 102
102
-
 103
103
-
 104
104
-
 105
105
-
 106
106
-
 107
107
-
 108
108
-
 109
109
-
 110
110
-
 111
111
-
 112
112
-
 113
113
-
 114
114
-
 115
115
-
 116
116
-
 117
117
-
 118
118
-
 119
119
-
 120
120
-
 121
121
-
 122
122
-
 123
123
-
 124
124
-
 125
125
-
 126
126
-
 127
127
-
 128
128
-
 129
129
-
 130
130
-
 131
131
-
 132
132
-
 133
133
-
 134
134
-
 135
135
-
 136
136
-
 137
137
-
 138
138
-
 139
139
-
 140
140
-
 141
141
-
 142
142
-
 143
143
-
 144
144
-
 145
145
-
 146
146
-
 147
147
-
 148
148
-
 149
149
-
 150
150
-
 151
151
-
 152
152
-
 153
153
-
 154
154
-
 155
155
-
 156
156
-
 157
157
-
 158
158
-
 159
159
-
 160
160
-
 161
161
-
 162
162
-
 163
163
-
 164
164
-
 165
165
-
 166
166
-
 167
167
-
 168
168
-
 169
169
-
 170
170
-
 171
171
-
 172
172
-
 173
173
-
 174
174
-
 175
175
-
 176
176
-
 177
177
-
 178
178
-
 179
179
-
 180
180
-
 181
181
-
 182
182
-
 183
183
-
 184
184
-
 185
185
-
 186
186
-
 187
187
-
 188
188
-
 189
189
-
 190
190
-
 191
191
-
 192
192
-
 193
193
-
 194
194
-
 195
195
-
 196
196
-
 197
197
-
 198
198
-
 199
199
-
 200
200


Korg EC-150 Benutzerhandbuch
- Kategorie
- Digitale Klaviere
- Typ
- Benutzerhandbuch
- Dieses Handbuch ist auch geeignet für
in anderen Sprachen
- English: Korg EC-150 User manual
- français: Korg EC-150 Manuel utilisateur
- italiano: Korg EC-150 Manuale utente