DGM LTV-1914WHTC Benutzerhandbuch
- Kategorie
- LCD-Fernseher
- Typ
- Benutzerhandbuch


1
English
1
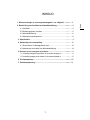
CONTENTS
1. Safety Warnings and Cautions..........................................................................................2
2. Descriptions of Main Unit and Remote-Control Unit.......................................................5
2.1 Main Unit........................................................................................................................5
2.2 Front Panel Control .......................................................................................................5
2.3 Remote-Control Unit......................................................................................................6
2.4 Illustration of t
he Interface Panel
................... ...........................................................8
3. Specifications...................................................................................................................9
4. Connection and Preparation.............................................................................................10
4.1 Connect Antenna or Video Facility...............................................................................10
4.2 Battery Installation of Remote-Control Unit..................................................................10
5. The OSD Menus............................................................................ .....................................11
5.1
OSD Adjustment in ATV mode……….…………
..................................................11
5.2
OSD adjustment in
D
TV mode…………………..……..
.............................................17
6. PC display mode
.................................................................................................................20
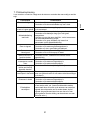
7. Trouble Shooting.....................………………….................................................................21
1
CONTENTS
1. Safety Warnings and Cautions..........................................................................................2
2. Descriptions of Main Unit and Remote-Control Unit.......................................................5
2.1 Main Unit........................................................................................................................5
2.2 Front Panel Control .......................................................................................................5
2.3 Remote-Control Unit......................................................................................................6
2.4 Illustration of t
he Interface Panel
................... ...........................................................8
3. Specifications...................................................................................................................9
4. Connection and Preparation.............................................................................................10
4.1 Connect Antenna or Video Facility...............................................................................10
4.2 Battery Installation of Remote-Control Unit..................................................................10
5. The OSD Menus............................................................................ .....................................11
5.1
OSD Adjustment in ATV mode……….…………
..................................................11
5.2
OSD adjustment in
D
TV mode…………………..……..
.............................................17
6. PC display mode
.................................................................................................................20
7. Trouble Shooting.....................………………….................................................................21

2
English
2
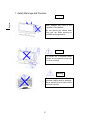
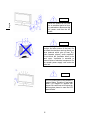
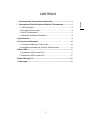
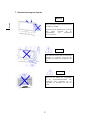
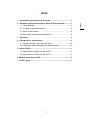
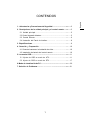
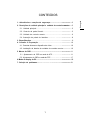
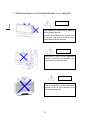
1. Safety Warnings and Cautions
Warning
High voltages are used in the
operation of this product.
Do not remove the cabinet back
from your set. Refer servicing to
qualified service personnel.
Warning
To prevent fire or electrical shock
hazard, do not expose the main unit
to rain or moisture.
Warning
Do not drop or push objects into the
television cabinet slots or openings.
Never spill any kind of liquid on the
television receiver.

3
English
3
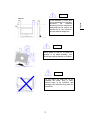
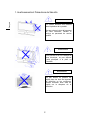
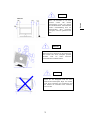
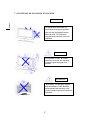
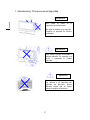
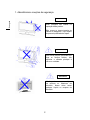
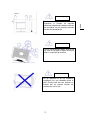
Caution
Caution
If the television is to be built
into a compartment or similarly
enclosed, the minimum
distances must be maintained.
Heat build-up can reduce the
service life of your television,
and can also be dangerous.
Never stand on, lean on, or push the
product or its stand suddenly. You
should pay special attention to children.
Caution
Do not place the main unit on an
unstable cart stand, shelf or table.
Serious injury to an individual, and
damage to the television may result if it
should fall.

4
English
4
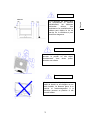
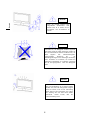
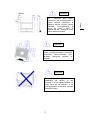
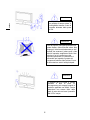
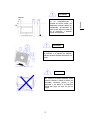
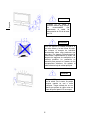
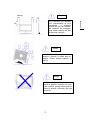
Caution
When the product is not used
for an extended period of time,
it is advisable to disconnect the
AC power cord from the AC
outlet.
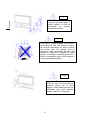
Caution
Avoid exposing the main unit to direct
sunlight and other source of the heat. Do
not stand the television receiver directly on
other products which give off heat. E.g.
video cassette players, audio amplifiers.
Do not block the ventilation holes in the
back cover. Ventilation is essential to
prevent failure of electrical component. Do
not squash power supply cord under the
main unit.
Caution
The LCD panel used in this product is
made of glass. Therefore, it can break
when it is dropped or applied with
impact. Be careful not to be injured by
broken glass pieces in case the LCD
panel breaks.

5
English
5
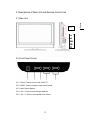
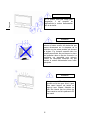
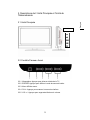
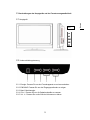
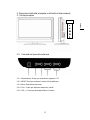
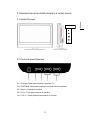
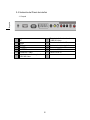
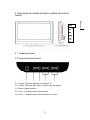
2. Descriptions of Main Unit and Remote-Control Unit
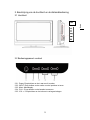
2.1 Main Unit
2.2 Front Panel Control
2.2.1. Power: Press to turn on and off the TV.
2.2.2. INPUT: Press to show the input source mode.
2.2.3. Menu: Menu display.
2.2.4. CH+/-: Press to scan thought channels.
2.2.5. VOL +/-: Press to turn up/down the volume
DVD

6
English
6
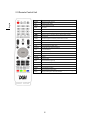
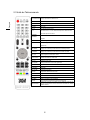
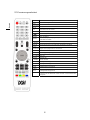
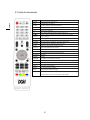
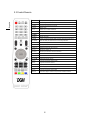
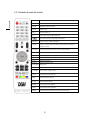
2.3 Remote-Control Unit
1.P
O
WER Pr
ess
t
o
t
u
rn
o
n
a
n
d o
ff th
e
TV
2. EP
G
El
ec
tr
o
ni
c
Pr
og
r
a
m
Gu
i
de
3
.
S
LEEP A
u
t
o
m
a
ti
c do
rm
a
n
cy
tim
e se
t
4. M
U
TE M
u
t
e
v
o
i
ces
5
.
0
~
9
TV
c
h
a
nn
e
l
u
n
de
r th
e c
h
o
i
ce
6
. -
/
--
U
n
de
r TV t
o
1
0
fr
eque
n
cy c
h
a
nn
e
l
s abo
v
e
fr
eque
n
cy c
h
a
nn
e
l
qu
i
c
kl
yc
h
o
i
ce
7
U
n
de
r th
e cu
rr
e
nt TV
c
h
a
nn
e
l t
o
r
e
t
u
rn t
o
th
e
l
as
t
c
h
a
nn
e
l t
o
w
a
t
c
h
8
.A
S
PE
C
T Z
oo
m
a p
i
c
t
u
r
e
.
9
. NI
C
AM Wh
e
n
s
t
e
r
eo p
r
og
r
a
m i
s
r
ece
iv
ed, p
r
ess
thi
s bu
tt
o
n t
o se
l
ec
t
1
0
. PM
O
DE Pr
ess
thi
s bu
tt
o
n t
o se
l
ec
t th
e des
ir
ed p
i
c
t
u
r
e
m
ode
.
11.
S
M
O
DE Pr
ess
thi
s bu
tt
o
n t
o se
l
ec
t th
e des
ir
ed sou
n
d
m
ode
.
12.+V
O
L- V
o
l
u
m
e dec
r
ease o
r in
c
r
ease c
h
o
i
ce
1
3
.DI
S
PLA
Y
S
h
o
w th
a
t th
e cu
rr
e
nt m
ode o
f inf
o
rm
a
ti
o
n
14.+
C
H- TV
c
h
a
nn
e
l
se
l
ec
ti
o
n
1
5
. INP
U
T
S
within
g cu
rr
e
nt
s
in
ga
l
sou
r
ce se
l
ec
ti
o
n
1
6
.L
C
D MEN
U
M
e
n
u osd
17.ENTER Ent
e
r
/O
K
1
8
. Ÿ
źŻŹ
U
p do
wn l
e
ft ri
g
ht
1
9
.FAV+ F
a
v
o
rit
e
t
e
l
e
vi
s
i
o
n
p
r
og
r
a
m
s
up
2
0
.FAV F
a
v
o
rit
e
t
e
l
e
vi
s
i
o
n
p
r
og
r
a
m
s
21.TEXT
s
t
a
rt
s a
n
d e
xit
s
T
e
l
e
t
e
xt
22.INDEX B
ac
k t
o
t
e
l
e
t
e
xt h
o
m
e page
2
3
.FAV- F
a
v
o
rit
e
t
e
l
e
vi
s
i
o
n
p
r
og
r
a
m
s do
wn
24HOLD.
Press this button to hold the Teletext page on display to prevent the page from
changing. Press again to release the hold state.

7
English
7
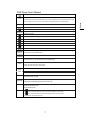
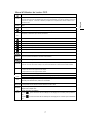
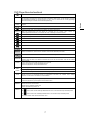
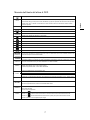
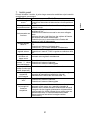
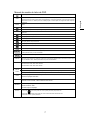
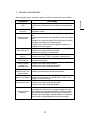
DVD Player User’s Manual
Press to open and close the disc tray.
GOTO
Allow you to search forward/backward through a disc. When the key is pressed for the first time, the current title will
be highlight. After users press the ENTER/OK key, the program specified by the key value will be played. Pressing
“LEFT” or “RIGHT” can move HL to the current chapter or the region where show current playing time.
ENTER
enter
ŸźŻŹ
Up down left right
Press of the button again to advance the picture one frame at a time
.DVDSETUP
Brings up the DVD player’s Setup Menu. Use “UP”, “DOWN”, “LEFT”, “RIGHT” to select setup item, and use enter”
to affirm then execute.
Press to start the playback of a DVD or to resume playback from pause.
Skip to the previous track/title/chapter.
fast reverse
Stops disc play. the present point.
Skip to the next track/title/chapter.
Fast forward
Accesses the A–B Repeat function to repeat selected parts of a disc.
You can select a desired language quickly and easily with the AUDIO button. If a menu is encoded on the disc, you
can also select by using the MENU button.
Use to access various camera angles on a DVD.
SUBTITLE
When a DVD is recorded with subtitles, you can use the Subtitle feature to view the subtitles on screen. If a menu is
encoded on the disc, you can also select by using the D.MENU button.
D.MENU
1.When CDDA/MP3/JPEG/GAME is played, it is invalid.
2.When VCD is played, brings up the Disc menu.
3.When DVD is played, brings up the Root Menu.
TITLE
When DVD is played, brings up the Title Menu.
Displays the current disc info, when the key is pressed for the first time.
D.DISP
When the key is pressed again, the secondary info will be shown.
.PROG
Allow you to program a specific order. You can use “UP”, “DOWN”, “LEFT”, “RIGHT” to select
the position where you edit.
RETURN
1.When VCD is played with PBC ON, the player will return to MENU.
2.When DVD is played the player returns to root menu.
REPEAT
Repeat one track / chapter.
Repeat the whole disc / title.
Cancel repeat function.
PRVIEW
At “ ” state, preview the whole disc function when pressing this button at the first time.
At “ ” state, scan the whole disc function when pressing this button at the second time.
At “ENTER” state, preview the single track.

8
English
8
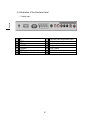
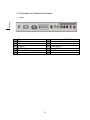
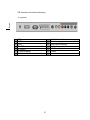
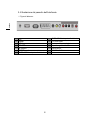
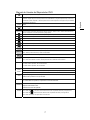
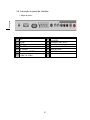
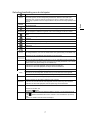
2.4
Illustration of the Interface Panel
.1.
Sketch map
˖
1
DC
8
CVBS &S-Video Right Audio Input
2
HDMI
9
PC Audio Input
3
VGA
10
Audio Earphone Output
4
SCART
11
TV signal Input
5
S-VIDEO
12
SPDIF Output
6
CVBS input
13
CI CARD
7
CVBS &S-Video Left Audio Input

9
English
9
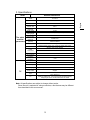
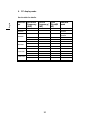
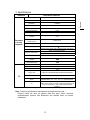
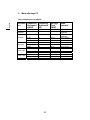
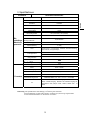
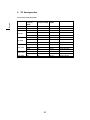
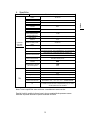
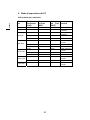
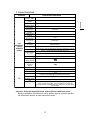
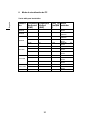
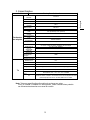
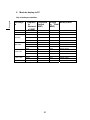
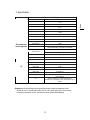
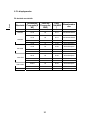
3. Specifications
Items Relevant illustrations
Screen size,
visible
19 LCD TV
Screen format 16:10
Resolution 1440X900
Maximum
contrast ratio
900:1
Maximum
bri
g
htness
300 cd/m²
Dis
p
la
y
colors 16.7M
Maximum
viewin
g
an
g
le
160° (Horizontal) / 160° (Vertical)
Maximum
res
p
onse time
5 ms
Maximum
lifetime of
50,000 hours
Dimension
(p
acked
)
532X212X466mm
Weight (NET) 4.85Kg
Accessories
Remote-Control, Power cord, Component Cable, User Guide,
Warrant
y
Card
,
Power ada
p
ter
AC 100̚240V, 50/60Hz
Power
requirement
DC:12V; 5A
Power mode Normal, Standby
Normal Power
Dissi
p
ation
60W
The whole
machine
parameters
Standby Power
Dissi
p
ation
˘4W
TV system PAL
Stereo BTSCǃNICAM
Audio Output 2×5W
OSD language
English/François
/Italian/Spanish/German/Portuguese
CCD/V-CHIP Support
Local control
ke
y
s
INPUT,MENU ,VOL-, VOL+ ,Pro-, Pro +,POWER
TV
AV
VGA, HDMI input
VIDEO, S-VIDEO inputˈUse one-road input of audio frequency
totally(L/R),PC Audio, SCART,SPDIF OUT CI CARD
Note: All specifications are subject to change without notice.
Since the unit is marketed in various countries, a few features may be different
than described in this user manual”.

10
English
10
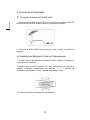
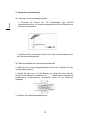
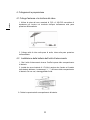
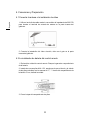
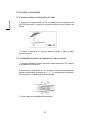
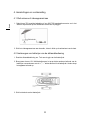
4. Connections and Preparation
4.1 Connect Antenna or Video Facility
1. Use 75ȍ coaxial cable plug or 300-75ȍ impedance converter to plug
in antenna input terminal on the rear of the cabinet.
2. Connect the video facility to the audio, video in jack on the rear of
the cabinet.
4.2 Battery Installation of Remote-Control Unit
1. Turn the remote-control unit upside down. Scratch the grip of the
battery compartment
2. Install two new 1.5V AAA batteries, make sure the anode and cathode
of the batteries matches the “+”, “–” marks inside the battery compartment.
Or not it would damage the unit.
3. Close the battery compartment cover.

11
English
11
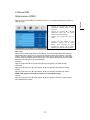
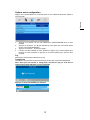
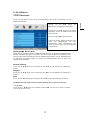
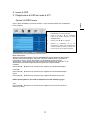
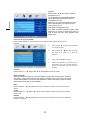
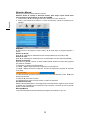
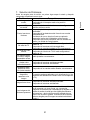
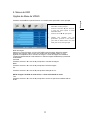
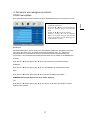
5. The OSD Menus
VIDEO menu options
Press the MENU button on the front panel or on the remote control to display the main menu.
Picture Mode
6HOHFW3LFWXUH0RGHLQ3,&785(PHQX$YDLODEOHSLFWXUHPRGH6WDQGDUG
3HUVRQDO0RYLH6SRUW0LOG*DPH,I\RXFKDQJHWKHYDOXHRI&RQWUDVW
%ULJKWQHVV&RORU7LQW6KDUSQHVVRU&RORUWHPSHUDWXUHRQWKHSLFWXUHPHQX
WKHSLFWXUHPRGHZLOOEHFKDQJHGWR3HUVRQDODXWRPDWLFDOO\<RXPD\VHOHFW
WKHSLFWXUHPRGHGLUHFWO\E\SUHVVLQJ302'(EXWWRQ
Contrast
Press ͩ / Ʒ button and then use Ż / Ź to adjust the contrast of the picture.
Brightness
Press ͩ / Ʒ button and then use Ż / Ź to adjust the brightness of the picture.
Color
Press ͩ / Ʒ button and then use Ż / Ź to adjust the color saturation.
NOTE: This option is invalid in PC mode, and it will be shown in gray.
Tint
Press ͩ / Ʒ button and then use Ż / Ź to adjust the tone of color when your system is in
NTSC.
1. Press Ż / Ź button to select
PICTURE in the main menu.
2. Press ͩ / Ʒ button to select the
option that you want to adjust in the
PICTURE menu.
3. Press Ż / Ź button to adjust
4. When you are satisfied with your
adjustment, press the MENU button to
return to the previous menu or press
the EXIT button to exit the main
menu.

12
English
12
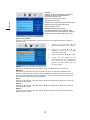
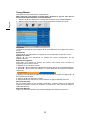
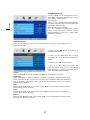
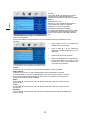
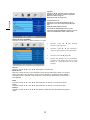
AUDIO menu options
Press the MENU button on the front panel or on the remote control to display the main menu.
Volume
Press ͩ / Ʒ button and then use Ż / Ź to adjust the sound level.
Sound Mode
Select Sound Mode in SOUND menu. (Available sound mode: Peraonal, Voice, Music,
Theatre.)If you change the value of Bass and Treble on the Sound menu, the sound mode will
be changed to "Personal" automatically.You may select the sound mode directly by pressing
SMODE button .
Bass
Press ͩ / Ʒ button and then use Ż / Ź to increase or decrease the level of the
lower-pitched sounds.
Treble
Press ͩ / Ʒ button and then use Ż / Ź to increase or decrease the level of the
higher-pitched sounds.
Balance
Press ͩ / Ʒ button and then use Ż / Ź to adjust the audio output between left and right
speakers.
Sharpness
Press Ż / Ź to select the sharpness mode of
your
TV. (Available Sharpness Mode: Normal,Sharp,
Sharpest, Softest, Soft.)
Color temperature
Select an optimum color temperature mode to
suit your
eyes for viewing among Normal, Warm and Cold.
DNR (Digital Noise Reduction)
If the broadcast signal received is weak, you can
select
the DNR option to reduce the video noise level
between Off, Low,Mid and High
1. Press the Ż / Ź button to select SOUND in
the main menu.
2. Press the ͩ / Ʒ button to select the option
that you want to adjust in the SOUND menu
3. Press the Ż / Ź button to adjust
4. When you are satisfied with your adjustment,
press the MENU button to return to the
previous menu or press the EXIT button to exit
the main menu.

13
English
13
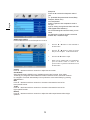
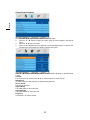
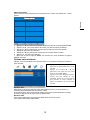
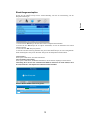
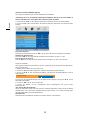
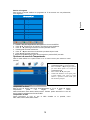
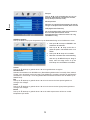
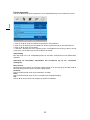
Setup menu options
Press the MENU button on the front panel or on the remote control to display the main menu.
1. Press the Ż / Ź button to select SETUP in the main menu
2. Press the ͩ / Ʒ button to select your option what you want to adjust in the SETUP
menu.
3. Press the Ż / Ź button to adjust.
4. When you are satisfied with your adjustment, press the MENU button to return to the
previous menu or press the EXIT button to exit the main menu.
5.
Country
This option allows you to select the country.
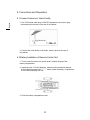
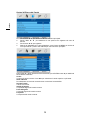
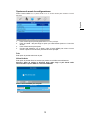
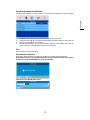
Auto tuning
This option allows you to tune the channels that can be received automatically.
Note: Before you perform Auto Tuning, you must choose the country where you are by
selecting COUNTRY option in the FUNCTION menu.
Press ENTER key to start.
Auto tuing
Searching
6
exit
MENU
ATV 815.00MHz

14
English
14
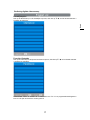
Manual Tuning
This option allows you to perform Manual Tuning.
Note: Before you perform Manual Tuning, you must choose the country where you are
by selecting Country option in the FUNCTION menu.
1. Press Ż / Ź to select Manual tuning in SETUP menu
2. Press and to perform your selection, the menu of Manual tuning will display on the
screen.
Program
The current program number. Press Ż / Ź to select the upper or lower program.
Sound System
Press Ż / Ź to select a corresponding sound system, such as DK,L/L’,BG.
Color System
Press Ż / Ź to select a corresponding color system, such as Auto,PAL,SECAM.
Program Label
This option allows you to name a channel, you can also rename the program which you have
named.
1. Select a channel to be named.
2. Pressͩ / Ʒ select Program Label in SETUP menu.
3. Pressͩ / Ʒ to perform your selection. The menu of program label will display as below:
Program Label
4. Press the numeric buttons to input the numbers directly or pressͩ / Ʒ to select the
letters.
5. Press Ż / Ź to move the cursor.
6. Press MENU to return to previous menu or press EXIT to exit.
AFT (Auto Fine Tune)
Due to weak signals or a wrong antenna configuration, some of the channels may not be
turned to the best reception condition. AFT function allows you to fine tune channel selected.
Manual Search
Manual search option allows you to preset channels one by one.

15
English
15
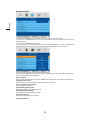
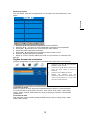
Program Edit
This function allows you to sort the TV programs according to your preferences, as following:
Flags ATV
Favorite Move
Skip
Lock
1.
2.
3.
4.
5.
6.
7.
8.
1. Press ͩ / Ʒ to select Program Edit in SETUP menu.
2. Press Ż / Ź to enter into the sub menu, a channel list will display.
3. Press ͩ / Ʒ to select the channel in the list which you would like to sort.
4. Press Ź to perform your selection.
5. Press ͩ / Ʒ to select the location you would like to place the channel.
6. Press Ż to perform you selection.
7 . After completed, press MENU to return to the previous menu or press EXIT to exit
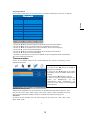
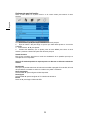
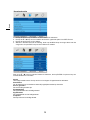
Timer menu options
Press the MENU button on the front panel or on the remote control to display the main menu.
Sleep Timer
Select the sleep time to put automatically the TV in standby mode. Timer can be selected as
0min, 15min, 30min,45min,60min,75min,90min,105min,120min. Also you can select the sleep
time by pressing SLEEP button repeatedly.
OSD Timer
You can select the time when the OSD display on the screen such as:
5Sec,10Sec,15Sec,20Sec,25Sec,30Sec
1. Press the Ż / Ź button to select TIMER
in the main menu.
2. Press the ͩ / Ʒ button to select your
option what you want to adjust in the
TIMER menu.
3. Press the Ż / Ź button to adjust.
4. When you are satisfied with your
adjustment, press the MENU button to
return to the previous menu or press the
EXIT button to exit the main menu.

16
English
16
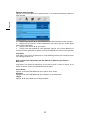
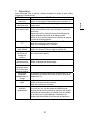
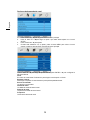
Function menu options
Press the MENU button on the front panel or on the remote control to display the main menu.
1. Press the Ż / Ź button to select FUNCTION in the main menu.
2. Press the ͩ / Ʒ button to select your option what you want to adjust in the
FUNCTION menu.
3. Press the Ż / Ź button to adjust.
4. When you are satisfied with your adjustment, press the MENU button to return to the
previous menu or press the EXIT button to exit the main menu.
Video Size
This option allows you to select the screen display mode which best corresponds to your
viewing requirements.
Note: The available aspect mode may be different in different input signal.
Bluscreene
This option allows you to select the blue background on or off. If on, the screen background
will turn blue at very weak or no signal condition.
Child Lock
Press ENTER or Ź button to set the child lock.
Reset
Press ENTER or Ź button to reset the TV to the factory default.
Language
Press Ż / Ź to select the language of the OSD

17
English
17
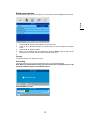
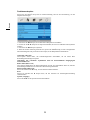
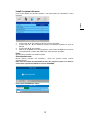
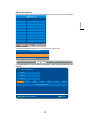
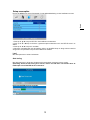
DVB Operation
Channel List options
Press ENTER button to open the Channel List, then Press ͩ / Ʒ to select the channel you
want to watch.
Favorite List options
Press FAV button to open the Favorite List, then Press ͩ / Ʒ to select the channel you
want to watch.
NOTE: Only the channels that you selected to FAV in Program Edit Menu could be displayed
in Favorite List.

18
English
18
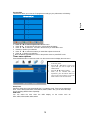
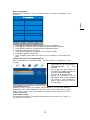
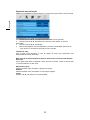
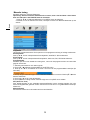
Channel Search options
1. Press the Ż / Ź button to select SETUP in the main menu.
2. Press the ͩ / Ʒ button to select your option what you want to adjust in the SETUP
menu.
3. Press the Ż / Ź button to adjust
4. When you are satisfied with your adjustment, press the MENU button to return to the
previous menu or press the EXIT button to exit the main menu.
Press ͩ / Ʒ button to select Manual Search, Press ENTER or Ź button to set the Manual
Tuning
Channel
The current channel number. Press Ż / Ź to select the upper or lower channel.
Start Search
To select whether to start searching in begin/searching/finished.
Service Found
The services be found.
Signal Quality
The signal quality of current channel.
Signal Strength
The signal strength of current channel.
Frequency
The frequency of current channel

19
English
19
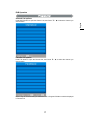
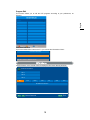
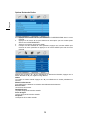
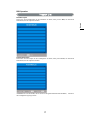
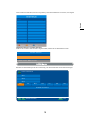
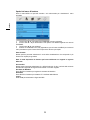
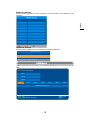
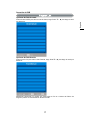
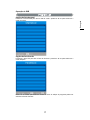
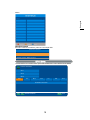
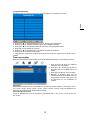
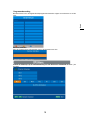
Program Edit
This function allows you to edit the DTV programs according to your preferences, as
following:
Common Interface
If you have inserted the CI card to the TV, you can see the information of the it.
Common Interface
'ENTER' to select; 'MENU' to return
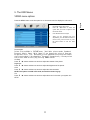
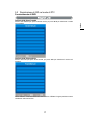
Use EPG button on the remote control to display the EPG menu directly as below:
Tue Mon Thu Fri Sat SunMon
No EPG Information
GD-1
GD-2
GD-3
Select Channel
Exit
MENUCH+ CH-
Channel Schedule
Seite wird geladen ...
Seite wird geladen ...
Seite wird geladen ...
Seite wird geladen ...
Seite wird geladen ...
Seite wird geladen ...
Seite wird geladen ...
Seite wird geladen ...
Seite wird geladen ...
Seite wird geladen ...
Seite wird geladen ...
Seite wird geladen ...
Seite wird geladen ...
Seite wird geladen ...
Seite wird geladen ...
Seite wird geladen ...
Seite wird geladen ...
Seite wird geladen ...
Seite wird geladen ...
Seite wird geladen ...
Seite wird geladen ...
Seite wird geladen ...
Seite wird geladen ...
Seite wird geladen ...
Seite wird geladen ...
Seite wird geladen ...
Seite wird geladen ...
Seite wird geladen ...
Seite wird geladen ...
Seite wird geladen ...
Seite wird geladen ...
Seite wird geladen ...
Seite wird geladen ...
Seite wird geladen ...
Seite wird geladen ...
Seite wird geladen ...
Seite wird geladen ...
Seite wird geladen ...
Seite wird geladen ...
Seite wird geladen ...
Seite wird geladen ...
Seite wird geladen ...
Seite wird geladen ...
Seite wird geladen ...
Seite wird geladen ...
Seite wird geladen ...
Seite wird geladen ...
Seite wird geladen ...
Seite wird geladen ...
Seite wird geladen ...
Seite wird geladen ...
Seite wird geladen ...
Seite wird geladen ...
Seite wird geladen ...
Seite wird geladen ...
Seite wird geladen ...
Seite wird geladen ...
Seite wird geladen ...
Seite wird geladen ...
Seite wird geladen ...
Seite wird geladen ...
Seite wird geladen ...
Seite wird geladen ...
Seite wird geladen ...
Seite wird geladen ...
Seite wird geladen ...
Seite wird geladen ...
Seite wird geladen ...
Seite wird geladen ...
Seite wird geladen ...
Seite wird geladen ...
Seite wird geladen ...
Seite wird geladen ...
Seite wird geladen ...
Seite wird geladen ...
Seite wird geladen ...
Seite wird geladen ...
Seite wird geladen ...
Seite wird geladen ...
Seite wird geladen ...
Seite wird geladen ...
Seite wird geladen ...
Seite wird geladen ...
Seite wird geladen ...
Seite wird geladen ...
Seite wird geladen ...
Seite wird geladen ...
Seite wird geladen ...
Seite wird geladen ...
Seite wird geladen ...
Seite wird geladen ...
Seite wird geladen ...
Seite wird geladen ...
Seite wird geladen ...
Seite wird geladen ...
Seite wird geladen ...
Seite wird geladen ...
Seite wird geladen ...
Seite wird geladen ...
Seite wird geladen ...
Seite wird geladen ...
Seite wird geladen ...
Seite wird geladen ...
Seite wird geladen ...
Seite wird geladen ...
Seite wird geladen ...
Seite wird geladen ...
Seite wird geladen ...
Seite wird geladen ...
Seite wird geladen ...
Seite wird geladen ...
Seite wird geladen ...
Seite wird geladen ...
Seite wird geladen ...
Seite wird geladen ...
Seite wird geladen ...
Seite wird geladen ...
Seite wird geladen ...
Seite wird geladen ...
Seite wird geladen ...
Seite wird geladen ...
Seite wird geladen ...
Seite wird geladen ...
Seite wird geladen ...
Seite wird geladen ...
Seite wird geladen ...
Seite wird geladen ...
Seite wird geladen ...
Seite wird geladen ...
Seite wird geladen ...
Seite wird geladen ...
Seite wird geladen ...
Seite wird geladen ...
Seite wird geladen ...
Seite wird geladen ...
-
 1
1
-
 2
2
-
 3
3
-
 4
4
-
 5
5
-
 6
6
-
 7
7
-
 8
8
-
 9
9
-
 10
10
-
 11
11
-
 12
12
-
 13
13
-
 14
14
-
 15
15
-
 16
16
-
 17
17
-
 18
18
-
 19
19
-
 20
20
-
 21
21
-
 22
22
-
 23
23
-
 24
24
-
 25
25
-
 26
26
-
 27
27
-
 28
28
-
 29
29
-
 30
30
-
 31
31
-
 32
32
-
 33
33
-
 34
34
-
 35
35
-
 36
36
-
 37
37
-
 38
38
-
 39
39
-
 40
40
-
 41
41
-
 42
42
-
 43
43
-
 44
44
-
 45
45
-
 46
46
-
 47
47
-
 48
48
-
 49
49
-
 50
50
-
 51
51
-
 52
52
-
 53
53
-
 54
54
-
 55
55
-
 56
56
-
 57
57
-
 58
58
-
 59
59
-
 60
60
-
 61
61
-
 62
62
-
 63
63
-
 64
64
-
 65
65
-
 66
66
-
 67
67
-
 68
68
-
 69
69
-
 70
70
-
 71
71
-
 72
72
-
 73
73
-
 74
74
-
 75
75
-
 76
76
-
 77
77
-
 78
78
-
 79
79
-
 80
80
-
 81
81
-
 82
82
-
 83
83
-
 84
84
-
 85
85
-
 86
86
-
 87
87
-
 88
88
-
 89
89
-
 90
90
-
 91
91
-
 92
92
-
 93
93
-
 94
94
-
 95
95
-
 96
96
-
 97
97
-
 98
98
-
 99
99
-
 100
100
-
 101
101
-
 102
102
-
 103
103
-
 104
104
-
 105
105
-
 106
106
-
 107
107
-
 108
108
-
 109
109
-
 110
110
-
 111
111
-
 112
112
-
 113
113
-
 114
114
-
 115
115
-
 116
116
-
 117
117
-
 118
118
-
 119
119
-
 120
120
-
 121
121
-
 122
122
-
 123
123
-
 124
124
-
 125
125
-
 126
126
-
 127
127
-
 128
128
-
 129
129
-
 130
130
-
 131
131
-
 132
132
-
 133
133
-
 134
134
-
 135
135
-
 136
136
-
 137
137
-
 138
138
-
 139
139
-
 140
140
-
 141
141
-
 142
142
-
 143
143
-
 144
144
-
 145
145
-
 146
146
-
 147
147
-
 148
148
-
 149
149
-
 150
150
-
 151
151
-
 152
152
-
 153
153
-
 154
154
-
 155
155


DGM LTV-1914WHTC Benutzerhandbuch
- Kategorie
- LCD-Fernseher
- Typ
- Benutzerhandbuch
in anderen Sprachen
- English: DGM LTV-1914WHTC User manual
- français: DGM LTV-1914WHTC Manuel utilisateur
- español: DGM LTV-1914WHTC Manual de usuario
- italiano: DGM LTV-1914WHTC Manuale utente
- Nederlands: DGM LTV-1914WHTC Handleiding
- português: DGM LTV-1914WHTC Manual do usuário
Andere Dokumente
-
Megasat Royal Line 32 Benutzerhandbuch
-
Haier LT22R1CBW Benutzerhandbuch
-
Haier LE40B650CF Bedienungsanleitung
-
-
-
Megasat CTV 16 Plus Benutzerhandbuch
-
Lenco dvt 2246 Benutzerhandbuch
-
-
Haier LET39Z18HF Benutzerhandbuch
-
Haier LES32T1000HFM Benutzerhandbuch