
Quick Start Guide
Operating Instructions
Anleitung zur schnellen Inbetriebnahme
Bedienungsanleitung
Guide de mise en route
Mode d’emploi
Beknopte gebruiksgids
Gebruiksaanwijzing
Before operating the TV, please read the “Safety Information” section of this
manual. Retain this manual for future reference.
Lesen Sie vor der Inbetriebnahme des Fernsehgeräts bitte den Abschnitt
„Sicherheitsinformationen“ in dieser Anleitung. Bewahren Sie die Anleitung
zum späteren Nachschlagen auf.
Avant d’utiliser le téléviseur, lisez la section « Consignes de sécurité » de ce
mode d’emploi. Conservez ce mode d’emploi pour vous y référer
ultérieurement.
Lees het hoofdstuk "Veiligheidsinformatie" van deze gebruiksaanwijzing
alvorens de TV in gebruik te nemen. Bewaar deze gebruiksaanwijzing zodat
u ze achteraf nog kunt raadplegen.
4-096-790-11(1)
KLV-17HR2
KLV-15SR2
2003 Sony Corporation
GB
DE
FR
NL
LCD Colour TV


1
GB
Quick Start Guide
Operating Instructions

2
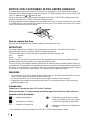
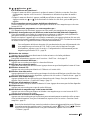
NOTICE FOR CUSTOMERS IN THE UNITED KINGDOM
A moulded plug complying with BS1363 is fitted to this equipment for your safety and convenience.
Should the fuse in the plug supplied need to be replaced, a 5 AMP fuse approved by ASTA or BSI to BS
1362 (i.e. marked with or ) must be used.
When an alternative type of plug is used it should be fitted with a 5 AMP FUSE, otherwise the circuit
should be protected by a 5 AMP FUSE at the distribution board.
If the plug supplied with this equipment has a detachable fuse cover, be sure to attach the fuse cover after
you change the fuse. Never use the plug without the fuse cover. If you should lose the fuse cover, please
contact your nearest Sony service station.
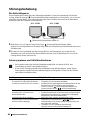
How to replace the fuse
Open the fuse compartment with a blade screwdriver, and replace the fuse.
IMPORTANT
If the plug supplied is not suitable for the socket outlets in your home, it should be cut off and an
appropriate plug fitted in accordance with the following instructions:
The wires in this mains lead are coloured in accordance with the following code:
Blue Neutral
Brown Live
As the colours of the wires in the mains lead of this apparatus may not correspond with the coloured
markings identifying the terminals in your plug, proceed as follows:
The wire which is coloured blue must be connected to the terminal which is marked with the letter N or
coloured black. The wire which is coloured brown must be connected to the terminal which is marked with
the letter L or coloured red. Do not connect either wire to the earth terminal in the plug which is marked
by the letter E or by the safety earth symbol I or coloured green or green and yellow.
WARNING
• To prevent the risk of electric shock, do not insert the plug cut off from the mains lead into a socket
outlet. This plug cannot be used and should be destroyed.
• To prevent the risk of fire or electric shock, do not expose the unit to rain or moisture.
• Dangerously high voltages are present inside the unit. Do not open the cabinet. Refer servicing to
qualified personnel only.
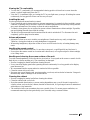
Introduction
Thank you for choosing this Sony LCD Colour Television.
Before operating the TV, please read this manual thoroughly and retain it for future reference.
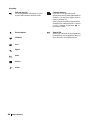
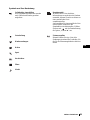
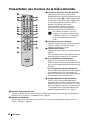
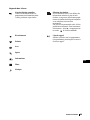
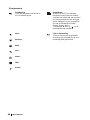
Symbols used in the manual
FUSE
........Important information.
........Information on a feature.
1
, 2.......... Sequence of instructions.
......Shaded buttons on the remote control
show you the buttons you have to press
to follow the sequence of instructions.
.........Informs you of the result of instructions
followed.
* The illustrations used in this manual are of the KLV-17HR2 unless otherwise stated.

3
Table of Contents
GB
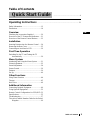
Table of Contents
Quick Start Guide .............................................................4
Operating Instructions ................................................................................................12
Safety Information ...........................................12
Precautions .......................................................18
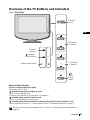
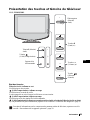
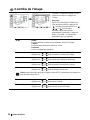
Overview
Checking the Accessories Supplied .................20
Overview of the TV Buttons and Indicators ....21
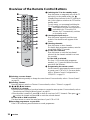
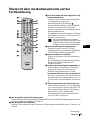
Overview of the Remote Control Buttons ....... 22
Installation
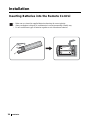
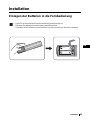
Inserting Batteries into the Remote Control ....24
Removing the Rear Cover ...............................25
Connecting an Aerial and a VCR ....................26
First Time Operation
Switching On the TV and Tuning the TV
Automatically ...........................................29
Menu System
Introducing and Using the Menu System ........ 31
Picture Adjustment ..........................................32
Sound Adjustment ...........................................34
Screen Control .................................................36
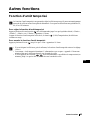
Features ............................................................39
Set Up ..............................................................40
Other Functions
Sleep Timer Function ......................................44
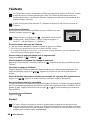
Teletext ............................................................45
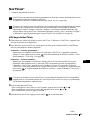
NexTView .......................................................46
Additional Information
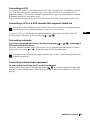
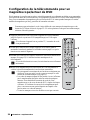
Connecting Optional Equipment .....................49
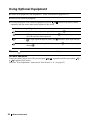
Using Optional Equipment ..............................52
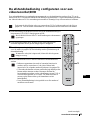
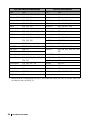
Remote Control Configuration for VCR/DVD 53
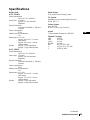
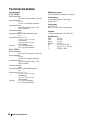
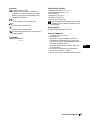
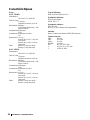
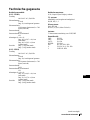
Specifications ...................................................55
Troubleshooting ...............................................57
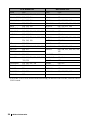
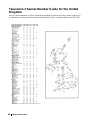
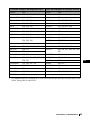
Television Channel Number Guide for the United
Kingdom ...................................................60

4
Quick Start Guide
Thank you for purchasing this Sony product.
After following this step by step guide you will be able to:
– Insert batteries into the remote control.
– Remove the rear cover.
– Connect an aerial, VCR, and mains lead to your TV.
– Select the language of the menu screens.
– Select the country/region in which you want to operate your TV.
– Tune your TV.
– Change the broadcast channels into a different order.
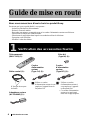
Quick Start Guide
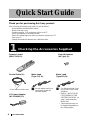
1
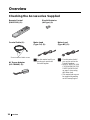
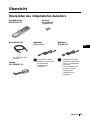
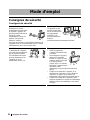
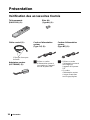
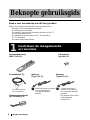
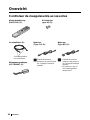
Checking the Accessories Supplied
Remote Control
(RM-Y1101) (1)
:
Size AA Batteries
(R6 Type) (2):
Coaxial Cable (1):
Mains Lead
(Type C-6) (1):
Use this mains lead if you
use the unit outside the
United Kingdom.
Mains Lead
(Type BF) (1):
• Use this mains lead if you
use the unit in the United
Kingdom.
• Refer to “NOTICE FOR
CUSTOMERS IN THE
UNITED KINGDOM” on
page 2 when using this
mains lead.
• This mains lead may not
be supplied depending on
the country/region.
AC Power Adaptor
(AC-FD004E) (1):
Do not remove ferrite cores.

5
Quick Start Guide
GB
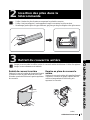
Quick Start Guide
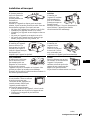
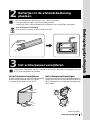
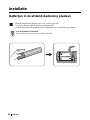
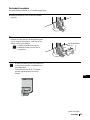
When you connect the cables, remove the rear cover of the TV. Be sure to attach the rear cover
back on the TV after you finish connecting the cables.
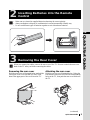
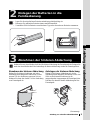
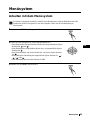
2
Inserting Batteries into the Remote
Control
• Make sure you insert the supplied batteries observing the correct polarity.
• Always remember to dispose of used batteries in an environmentally friendly way.
• Do not use different types of batteries together or mix old and new batteries.
3
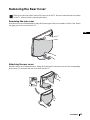
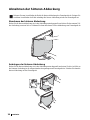
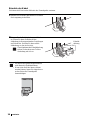
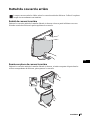
Removing the Rear Cover
Removing the rear cover
Hold the rear cover as illustrated below and pull the
lower part of the cover towards you first. Then,
detach the upper part of the cover from the TV.
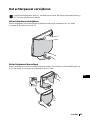
Attaching the rear cover
Hold the rear cover as illustrated below, fitting the
four detents on the rear cover into the corresponding
holes on the TV, then push the rear cover back onto
the TV.
(continued)

6
Quick Start Guide
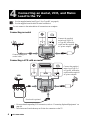
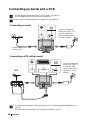
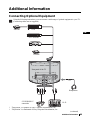
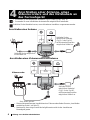
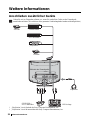
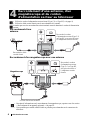
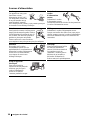
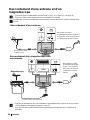
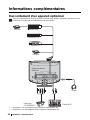
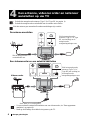
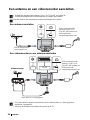
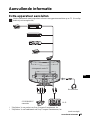
4
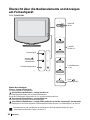
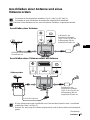
Connecting an Aerial, VCR, and Mains
Lead to the TV
• Use the supplied mains lead (Type C-6 or Type BF, see page 4).
• Use the supplied coaxial cable for aerial connection.
Do not connect to the mains before all connections are complete.
OUT IN
• For more details regarding VCR connection, refer to “Connecting Optional Equipment” on
page 49.
• Note that some Scart leads may not fit into the connector on the TV.
VCR
Connect the supplied
coaxial cable.
Connect the supplied
mains lead (Type C-6
or Type BF, with safety
earth) and the supplied
AC power adaptor.
Scart lead is optional.
Connecting an aerial
Connecting a VCR with an aerial
Connect the supplied
mains lead (Type C-6
or Type BF, with safety
earth) and the supplied
AC power adaptor.

7
Quick Start Guide
GB
Quick Start Guide
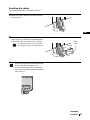
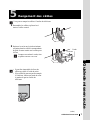
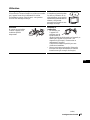
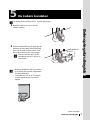
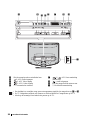
You can store the cables in the back of the TV.
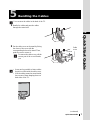
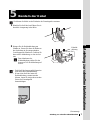
5
Bundling the Cables
1 Bundle the cables and pass the cables
through the centre hole.
2 Put the cable cover on the stand by fitting
the claws of the cover with the
corresponding holes on the stand. Then,
push the cover to secure it.
To remove the cable cover, pull the
convex part of the cover towards
you.
• It may not be possible to fasten cables
that are too thick with the cable cover.
• If all the cables cannot be stored inside,
leave some of them hanging down on
both sides of the TV.
Convex
Cable
cover
(continued)

8
Quick Start Guide
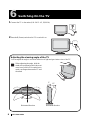
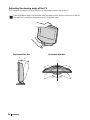
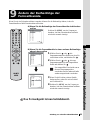
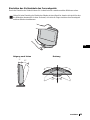
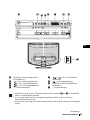
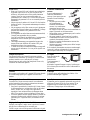
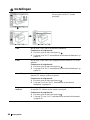
Adjusting the viewing angle of the TV
You can adjust the angle to avoid the reflection of light and get a better view of the TV.
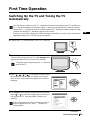
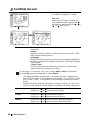
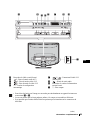
6
Switching On the TV
1Connect the TV to the mains (100–240 V AC, 50/60 Hz).
2Press the & (Power) switch on the TV to switch it on.
I
25°
3°
15°
Backward direction
Horizontal direction
When adjusting the angle, hold the
stand with your hand so that it does not
come loose or fall off. Be careful not to
catch your fingers between the TV and
the stand.
25°

9
Quick Start Guide
GB
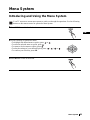
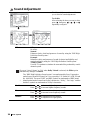
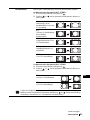
Quick Start Guide
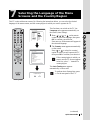
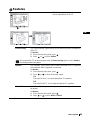
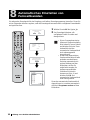
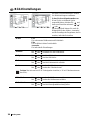
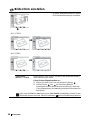
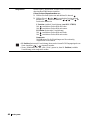
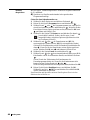
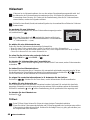
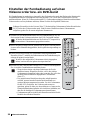
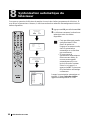
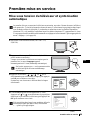
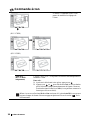
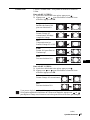
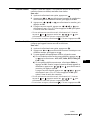
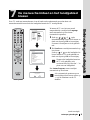
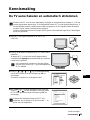
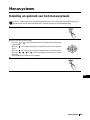
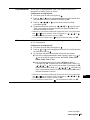
This TV works with menu screens. By following the instructions below, you can select the desired
language of the menu screens, and the country/region in which you want to operate the TV.
The first time you switch on the TV, the
Language menu appears automatically on
the screen (Auto Startup).
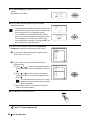
1 Press / / or on the remote
control to select the language, then press
OK to confirm your selection.
From now on, all the menus will appear in
the selected language.
2 The Country menu appears automatically
on the screen.
Press or to select the country/
region in which you will operate the TV,
then press OK to confirm your selection.
The Auto Tuning menu appears
automatically on the screen.
7
Selecting the Language of the Menu
Screens and the Country/Region
If the country/region in which you
want to use the TV does not appear
in the list, select “–” instead of a
country/region.
To perform Auto Startup later, press
0 on the rear panel of the TV.
Country
Select country
–
United Kingdom
Ireland
Nederland
België/Belgique
Luxembourg
France
Italia
Schweiz/Suisse/Svizzera
Deutschland
Österreich
Language
Select language
English
Nederlands
Français
Italiano
Deutsch
Türkçe
Español
Português
Polski
Magyar
Suomi
Dansk
Svenska
Norsk
Do you want to start
automatic tuning ?
Ye s No
m
m
(continued)

10
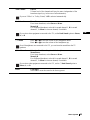
Quick Start Guide
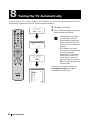
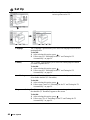
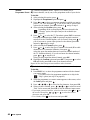
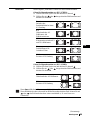
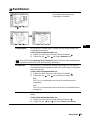
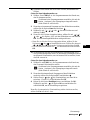
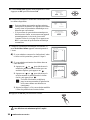
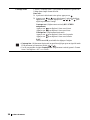
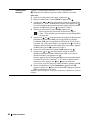
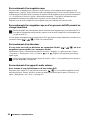
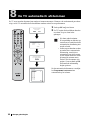
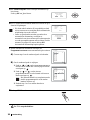
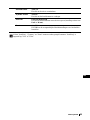
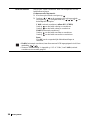
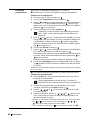
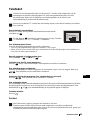
You must tune the TV to receive channels (TV Broadcast). If you follow the instructions below, the TV
automatically searches and stores all available broadcast channels.
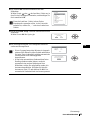
1 Press OK to select Yes.
2 The TV starts searching and storing all
available broadcast channels.
When the auto tuning is finished, the
Programme Sorting menu appears
automatically on the screen.
8
Tuning the TV Automatically
• This procedure could take
some minutes. Please be
patient and do not press any
buttons, otherwise the auto
tuning will not be completed
properly.
• If no channels are found
during the auto tuning process,
a new menu appears
automatically on the screen
asking you to connect the
aerial. Please connect the
aerial (see page 6) and press
OK. The auto tuning process
will start again.
Do you want to start
automatic tuning ?
Ye s No
No channel found.
Please connect aerial
Confirm
Auto Tuning
Programme :
System :
Channel :
Searching...
01
I
C23
Programme Sorting
Select channel
01
02
03
04
05
06
07
08
09
10
11
TVE
TVE2
TV3
C33
C27
C58
S02
S06
S08
S12
S14
Exit:
MENU
m
m
m

11
Quick Start Guide
GB
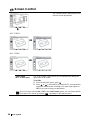
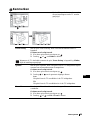
Quick Start Guide
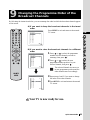
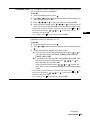
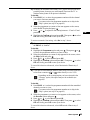
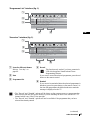
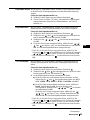
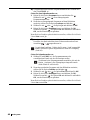
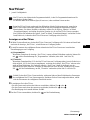
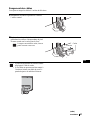
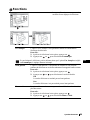
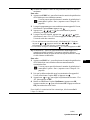
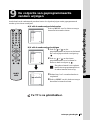
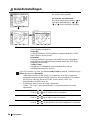
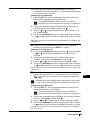
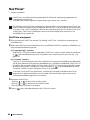
By following the instructions below, you can rearrange the order in which the broadcast channels appear
on the screen.
9
Changing the Programme Order of the
Broadcast Channels
A) If you want to keep the broadcast channels in the tuned
order
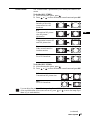
B) If you want to store the broadcast channels in a different
order
Your TV is now ready for use.
Press MENU to exit and return to the normal
TV screen.
Programme Sorting
Select channel
01
02
03
04
05
06
07
08
09
10
11
TVE
TVE2
TV3
C33
C27
C58
S02
S06
S08
S12
S14
Exit:
MENU
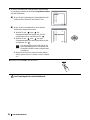
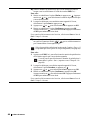
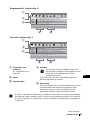
1Press or to select the programme
number with the channel you want to
rearrange, then press .
2Press or to select the new
programme number position for your
selected channel, then press .
3Repeat steps 1 and 2 if you want to change
the order of the other channels.
4Press MENU to exit and return to the normal
TV screen.
The selected channel now moves to
its new programme position and the
other channels move accordingly.
Programme Sorting
Select channel
01
02
03
04
05
06
07
08
09
10
11
TVE
TVE2
TV3
C33
C27
C58
S02
S06
S08
S12
S14
Exit:
MENU
Programme Sorting
Select channel
TVE
TVE2
TV3
C33
C27
C58
S02
S06
S08
S12
S14
01 TVE
01
02
03
04
05
06
07
08
09
10
11
Exit:
MENU
m

12
Safety Information
Safety Information
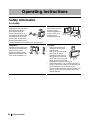
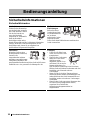
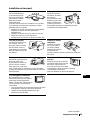
For Safety
Operating Instructions
Mains lead
Unplug the mains lead when
moving the unit. Do not
move the unit with the
mains lead plugged in. It
may damage the mains lead
and result in fire or electric
shock. If the unit has been
dropped or damaged, have it
checked immediately by qualified service personnel.
Medical institutions
Do not place this unit
in a place where
medical equipment is
in use. It may cause
malfunction of
medical instruments.
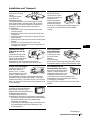
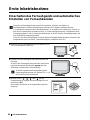
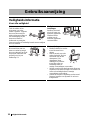
Installation
Installation of the unit on the
wall should be carried out by
qualified servicemen.
Improper installation may
render the unit unsafe in the
event of an earthquake, etc.
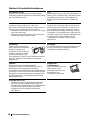
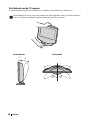
Carrying
• Before carrying the unit,
disconnect all the cables
from the unit.
• When you carry the unit by
hand, hold the unit as
illustrated on the right. Do
not hold the rear cover only.
As the rear cover comes off
easily, the unit may fall and
be damaged or cause serious injury.
• When transporting it, do not subject the unit to
shocks or excessive vibration. The unit may fall
and be damaged or cause serious injury.
• When you carry the unit in for repair or when you
move it, pack it using the original carton and
packing material.

13
Safety Information
GB
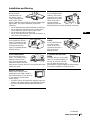
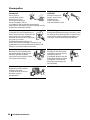
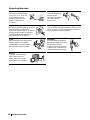
Installation and Moving
Ventilation
Never cover the
ventilation holes in
the cabinet. It may
cause overheating and
result in fire. Unless
proper ventilation is provided, the unit may gather dust
and get dirty. For proper ventilation, observe the
following:
• Do not install the unit turned backwards or sideways.
• Do not install the unit turned over or upside down.
• Do not install the unit on a shelf or in a closet.
• Do not place the unit on a rug or bed.
• Do not cover the unit with cloth, such as curtains, or
items such as newspapers, etc.
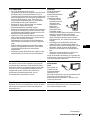
Outdoor use
Do not install this unit
outdoors. If the unit is
exposed to rain, it may
result in fire or electric
shock. If the unit is
exposed to direct
sunlight, the unit may
heat up and this may result in damage to the unit.
Vehicle or ceiling
Do not install this unit in a
vehicle. The motion of the
vehicle may cause the unit
to fall down and cause
injury. Do not hang this unit
from the ceiling.
Ships and other
vessels
Do not install this unit
on a ship or other
vessel. If the unit is
exposed to seawater, it
may cause fire or
damage the unit.
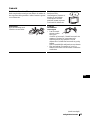
Water and moisture
Do not use this unit near
water – for example, near a
bathtub or shower room.
Also do not expose to rain,
moisture or smoke. This may
result in fire or electric shock. Do not use this unit where
insects may enter.
To prevent the unit from
falling
Place the unit on a secure, stable
stand. Do not hang anything on
the unit. If you do so, the unit
may fall from the stand or wall-
mount bracket, causing damage or serious injury.
Do not allow children to climb on the unit.
Optional accessories
Observe the following when
installing the unit using a stand or
wall-mount bracket. If you do not do
so, the unit may fall and cause
serious injury.
• Be sure to follow the instructions supplied with your
stand or wall-mount bracket when installing the unit.
• Be sure to attach the brackets supplied with your
stand.
(continued)

14
Safety Information
Power Sources
Overloading
This unit is designed to
operate on a 100–240 V AC
supply only. Take care not to
connect too many appliances
to the same mains socket as
this could result in fire or electric shock.
Mains lead
protection
Pull out the mains lead
by the plug. Do not
pull on the mains lead
itself.
Mains
Do not use a poor fitting mains socket.
Insert the plug fully into the mains. If it
is loose, it may cause arcing and result in
fire. Contact your electrician to have the
mains socket changed.
Wiring
Unplug the mains lead when wiring cables. Be sure
to unplug the mains lead for your safety, when
hooking up.
Moisture
Do not touch the mains lead with a
wet hand. If you plug/unplug the
mains lead with a wet hand, it may
cause electric shock.
Cleaning
Clean the mains plug regularly.
If the plug is covered with dust
and it picks up moisture, its
insulation may deteriorate and
result in fire. Unplug the mains
plug and clean it regularly.
Lightning storms
For your own safety, do not
touch any part of the unit,
mains lead, or aerial lead
during lightning storms.

15
Safety Information
GB
Use
Damage requiring service
If the surface of the unit cracks, do not touch it until you
have unplugged the mains lead. Otherwise electric shock
may result.
Ventilation holes
Do not insert anything in the
ventilation holes. If metal or
something flammable is
inserted in these holes, it may
result in fire or electric shock.
Servicing
Do not open the cabinet.
Entrust the unit to qualified
service personnel only.
Moisture and
flammable objects
• Do not let this
unit get wet.
Never spill liquid
of any kind on
the unit. If any liquid or solid object does fall
through openings in the cabinet, do not operate
the unit. It may result in electric shock or damage
to the unit.
Have it checked immediately by qualified
service personnel.
• To prevent fire, keep flammable objects or naked
lights (e.g. candles) away from the unit.
(continued)

16
Safety Information
Additional Safety Information
Electric shock
Do not touch the unit with wet hands. Doing so may cause
electric shock or damage the unit.
Oils
Do not install this unit in restaurants that use oil.
Dust absorbing oil may enter the unit and damage
the unit.
Protruding location
Do not install the unit in locations where it may protrude.
If you install the unit in the following locations, it may
result in injury.
• Do not install the unit in a location where the unit
protrudes, such as on or behind a pillar.
• Do not install the unit in a location where you might
bump your head on it.
Corrosion
If you use this unit near the seashore, salt may
corrode metal parts of the unit and cause internal
damage or fire. It may also shorten the life of the
unit. Steps should be taken to reduce the humidity
and temperature of the area where the unit is located.
Placement
Never place the unit in hot,
humid or excessively dusty
places. Do not install the unit
where insects may enter. Do not
install the unit where it may be
exposed to mechanical vibration.
Cleaning
Unplug the mains lead when cleaning this unit. If
you do not do so, it may result in electric shock.
Accessories
Secure the unit properly.
If the unit is not secured properly, it may fall and cause
injury. Take measures to prevent this by using a stand or
other apparatus on the floor or wall in the specified
manner, referring to the operating instructions supplied
with your stand.
Recommended place for
the unit
Place the unit on a stable, level
surface. Otherwise, the unit
may fall and cause injury.
Disposal of the unit
• Do not dispose of the unit with general household
waste.
• The LCD contains a small amount of liquid crystal
and mercury. The fluorescent tube used in this unit
also contains mercury. Follow your local ordinances
and regulations for disposal.

17
Safety Information
GB
LCD Screen
• Although the LCD screen is made with high-precision
technology and 99.99% or more of the pixels are
effective, black dots may appear or bright points of
light (red, blue, or green) may appear constantly on
the LCD screen. This is a structural property of the
LCD panel and is not a malfunction.
• Do not expose the LCD screen surface to the sun.
Doing so may damage the screen surface.
• Do not push or scratch the front filter, or place objects
on top of this unit. The image may be uneven or the
LCD panel may be damaged.
• If this unit is used in a cold place, a smear may occur
in the picture or the picture may become dark.
This does not indicate a failure. These phenomena
disappear as the temperature rises.
• Ghosting may occur when still pictures are displayed
continuously. It may disappear after a few moments.
• The screen and cabinet get warm when this unit is in
use. This is not a malfunction.
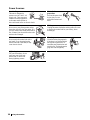
Mains lead
If you damage the
mains lead, it may result
in fire or electric shock.
• Do not pinch, bend,
or twist the mains
lead excessively.
The core lines may
be exposed or cut,
causing a short-
circuit which may
induce fire or
electric shock.
• Do not convert or
damage the mains
lead.
• Do not put anything heavy on the mains lead. Do
not pull the mains lead.
• Keep the mains lead away from heat sources.
• Be sure to grasp the plug when disconnecting the
mains lead.
If the mains lead is damaged, stop using it and ask
your dealer or Sony service centre to exchange it.
Fluorescent lamp
This unit uses a special fluorescent lamp as its light
source. If the screen image becomes dark, flickers, or
does not appear, the fluorescent lamp has run down and
should be replaced. For replacement, consult qualified
service personnel.
When not in use
For environmental
and safety reasons,
it is recommended
that the unit be
switched off when
not in use – not left
in standby mode. Disconnect it from the mains.
Heat
Do not touch the surface of the unit. It remains hot, even
after the unit has been turned off for some time.
Cable wiring
Take care not to catch your feet on the cables. It may
damage the unit.
Cleaning the screen surface
The screen surface is finished with a special coating to
prevent strong light reflections. Be sure to observe the
following precautions to avoid damaging the finish.
• To remove dust from the screen surface, wipe gently
with a soft cloth. If dust is persistent, wipe with a soft
cloth slightly moistened with a diluted mild detergent
solution. You can wash and repeatedly use the soft
cloth.
• Never use any type of abrasive pad, alkaline/acid
cleaner, scouring powder, or strong solvent such as
alcohol, benzine or thinner.
Installation
Do not install optional components too close to the
unit. Keep optional components at least 30 cm away
from the unit. If a VCR is installed in front of the
unit or beside the unit, the picture may become
distorted.
Adjusting the viewing angle of the TV
When adjusting the angle, hold the stand with your hand
so that it does not come loose or fall off.
Be careful not to catch your fingers between the TV and
the stand.

18
Precautions
Precautions
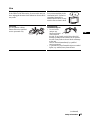
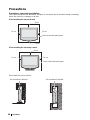
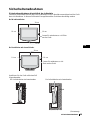
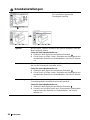
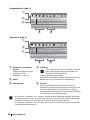
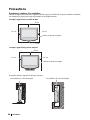
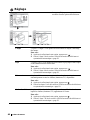
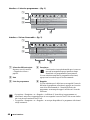
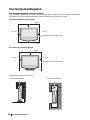
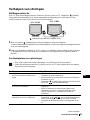
Precautions concerning ventilation
Leave space around the unit. Otherwise, adequate air-circulation may be blocked causing overheating,
which may cause fire or damage to the unit.
When installing the unit on the wall
When installing the unit using a stand
Never install the unit as follows:
Leave at least this much space.
10 cm
30 cm
10 cm
10 cm
Leave at least this much space.
10 cm
30 cm
10 cm
Air circulation is blocked.
Air circulation is blocked.
Wall
Wall
Seite wird geladen ...
Seite wird geladen ...
Seite wird geladen ...
Seite wird geladen ...
Seite wird geladen ...
Seite wird geladen ...
Seite wird geladen ...
Seite wird geladen ...
Seite wird geladen ...
Seite wird geladen ...
Seite wird geladen ...
Seite wird geladen ...
Seite wird geladen ...
Seite wird geladen ...
Seite wird geladen ...
Seite wird geladen ...
Seite wird geladen ...
Seite wird geladen ...
Seite wird geladen ...
Seite wird geladen ...
Seite wird geladen ...
Seite wird geladen ...
Seite wird geladen ...
Seite wird geladen ...
Seite wird geladen ...
Seite wird geladen ...
Seite wird geladen ...
Seite wird geladen ...
Seite wird geladen ...
Seite wird geladen ...
Seite wird geladen ...
Seite wird geladen ...
Seite wird geladen ...
Seite wird geladen ...
Seite wird geladen ...
Seite wird geladen ...
Seite wird geladen ...
Seite wird geladen ...
Seite wird geladen ...
Seite wird geladen ...
Seite wird geladen ...
Seite wird geladen ...
Seite wird geladen ...
Seite wird geladen ...
Seite wird geladen ...
Seite wird geladen ...
Seite wird geladen ...
Seite wird geladen ...
Seite wird geladen ...
Seite wird geladen ...
Seite wird geladen ...
Seite wird geladen ...
Seite wird geladen ...
Seite wird geladen ...
Seite wird geladen ...
Seite wird geladen ...
Seite wird geladen ...
Seite wird geladen ...
Seite wird geladen ...
Seite wird geladen ...
Seite wird geladen ...
Seite wird geladen ...
Seite wird geladen ...
Seite wird geladen ...
Seite wird geladen ...
Seite wird geladen ...
Seite wird geladen ...
Seite wird geladen ...
Seite wird geladen ...
Seite wird geladen ...
Seite wird geladen ...
Seite wird geladen ...
Seite wird geladen ...
Seite wird geladen ...
Seite wird geladen ...
Seite wird geladen ...
Seite wird geladen ...
Seite wird geladen ...
Seite wird geladen ...
Seite wird geladen ...
Seite wird geladen ...
Seite wird geladen ...
Seite wird geladen ...
Seite wird geladen ...
Seite wird geladen ...
Seite wird geladen ...
Seite wird geladen ...
Seite wird geladen ...
Seite wird geladen ...
Seite wird geladen ...
Seite wird geladen ...
Seite wird geladen ...
Seite wird geladen ...
Seite wird geladen ...
Seite wird geladen ...
Seite wird geladen ...
Seite wird geladen ...
Seite wird geladen ...
Seite wird geladen ...
Seite wird geladen ...
Seite wird geladen ...
Seite wird geladen ...
Seite wird geladen ...
Seite wird geladen ...
Seite wird geladen ...
Seite wird geladen ...
Seite wird geladen ...
Seite wird geladen ...
Seite wird geladen ...
Seite wird geladen ...
Seite wird geladen ...
Seite wird geladen ...
Seite wird geladen ...
Seite wird geladen ...
Seite wird geladen ...
Seite wird geladen ...
Seite wird geladen ...
Seite wird geladen ...
Seite wird geladen ...
Seite wird geladen ...
Seite wird geladen ...
Seite wird geladen ...
Seite wird geladen ...
Seite wird geladen ...
Seite wird geladen ...
Seite wird geladen ...
Seite wird geladen ...
Seite wird geladen ...
Seite wird geladen ...
Seite wird geladen ...
Seite wird geladen ...
Seite wird geladen ...
Seite wird geladen ...
Seite wird geladen ...
Seite wird geladen ...
Seite wird geladen ...
Seite wird geladen ...
Seite wird geladen ...
Seite wird geladen ...
Seite wird geladen ...
Seite wird geladen ...
Seite wird geladen ...
Seite wird geladen ...
Seite wird geladen ...
Seite wird geladen ...
Seite wird geladen ...
Seite wird geladen ...
Seite wird geladen ...
Seite wird geladen ...
Seite wird geladen ...
Seite wird geladen ...
Seite wird geladen ...
Seite wird geladen ...
Seite wird geladen ...
Seite wird geladen ...
Seite wird geladen ...
Seite wird geladen ...
Seite wird geladen ...
Seite wird geladen ...
Seite wird geladen ...
Seite wird geladen ...
Seite wird geladen ...
Seite wird geladen ...
Seite wird geladen ...
Seite wird geladen ...
Seite wird geladen ...
Seite wird geladen ...
Seite wird geladen ...
Seite wird geladen ...
Seite wird geladen ...
Seite wird geladen ...
Seite wird geladen ...
Seite wird geladen ...
Seite wird geladen ...
Seite wird geladen ...
Seite wird geladen ...
Seite wird geladen ...
Seite wird geladen ...
Seite wird geladen ...
Seite wird geladen ...
Seite wird geladen ...
Seite wird geladen ...
Seite wird geladen ...
Seite wird geladen ...
Seite wird geladen ...
Seite wird geladen ...
Seite wird geladen ...
Seite wird geladen ...
Seite wird geladen ...
Seite wird geladen ...
Seite wird geladen ...
Seite wird geladen ...
Seite wird geladen ...
Seite wird geladen ...
Seite wird geladen ...
Seite wird geladen ...
Seite wird geladen ...
Seite wird geladen ...
Seite wird geladen ...
Seite wird geladen ...
Seite wird geladen ...
Seite wird geladen ...
Seite wird geladen ...
Seite wird geladen ...
Seite wird geladen ...
Seite wird geladen ...
Seite wird geladen ...
Seite wird geladen ...
Seite wird geladen ...
Seite wird geladen ...
Seite wird geladen ...
Seite wird geladen ...
Seite wird geladen ...
Seite wird geladen ...
Seite wird geladen ...
Seite wird geladen ...
Seite wird geladen ...
Seite wird geladen ...
Seite wird geladen ...
Seite wird geladen ...
Seite wird geladen ...
Seite wird geladen ...
Seite wird geladen ...
Seite wird geladen ...
Seite wird geladen ...
Seite wird geladen ...
Seite wird geladen ...
Seite wird geladen ...
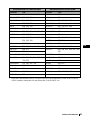
-
 1
1
-
 2
2
-
 3
3
-
 4
4
-
 5
5
-
 6
6
-
 7
7
-
 8
8
-
 9
9
-
 10
10
-
 11
11
-
 12
12
-
 13
13
-
 14
14
-
 15
15
-
 16
16
-
 17
17
-
 18
18
-
 19
19
-
 20
20
-
 21
21
-
 22
22
-
 23
23
-
 24
24
-
 25
25
-
 26
26
-
 27
27
-
 28
28
-
 29
29
-
 30
30
-
 31
31
-
 32
32
-
 33
33
-
 34
34
-
 35
35
-
 36
36
-
 37
37
-
 38
38
-
 39
39
-
 40
40
-
 41
41
-
 42
42
-
 43
43
-
 44
44
-
 45
45
-
 46
46
-
 47
47
-
 48
48
-
 49
49
-
 50
50
-
 51
51
-
 52
52
-
 53
53
-
 54
54
-
 55
55
-
 56
56
-
 57
57
-
 58
58
-
 59
59
-
 60
60
-
 61
61
-
 62
62
-
 63
63
-
 64
64
-
 65
65
-
 66
66
-
 67
67
-
 68
68
-
 69
69
-
 70
70
-
 71
71
-
 72
72
-
 73
73
-
 74
74
-
 75
75
-
 76
76
-
 77
77
-
 78
78
-
 79
79
-
 80
80
-
 81
81
-
 82
82
-
 83
83
-
 84
84
-
 85
85
-
 86
86
-
 87
87
-
 88
88
-
 89
89
-
 90
90
-
 91
91
-
 92
92
-
 93
93
-
 94
94
-
 95
95
-
 96
96
-
 97
97
-
 98
98
-
 99
99
-
 100
100
-
 101
101
-
 102
102
-
 103
103
-
 104
104
-
 105
105
-
 106
106
-
 107
107
-
 108
108
-
 109
109
-
 110
110
-
 111
111
-
 112
112
-
 113
113
-
 114
114
-
 115
115
-
 116
116
-
 117
117
-
 118
118
-
 119
119
-
 120
120
-
 121
121
-
 122
122
-
 123
123
-
 124
124
-
 125
125
-
 126
126
-
 127
127
-
 128
128
-
 129
129
-
 130
130
-
 131
131
-
 132
132
-
 133
133
-
 134
134
-
 135
135
-
 136
136
-
 137
137
-
 138
138
-
 139
139
-
 140
140
-
 141
141
-
 142
142
-
 143
143
-
 144
144
-
 145
145
-
 146
146
-
 147
147
-
 148
148
-
 149
149
-
 150
150
-
 151
151
-
 152
152
-
 153
153
-
 154
154
-
 155
155
-
 156
156
-
 157
157
-
 158
158
-
 159
159
-
 160
160
-
 161
161
-
 162
162
-
 163
163
-
 164
164
-
 165
165
-
 166
166
-
 167
167
-
 168
168
-
 169
169
-
 170
170
-
 171
171
-
 172
172
-
 173
173
-
 174
174
-
 175
175
-
 176
176
-
 177
177
-
 178
178
-
 179
179
-
 180
180
-
 181
181
-
 182
182
-
 183
183
-
 184
184
-
 185
185
-
 186
186
-
 187
187
-
 188
188
-
 189
189
-
 190
190
-
 191
191
-
 192
192
-
 193
193
-
 194
194
-
 195
195
-
 196
196
-
 197
197
-
 198
198
-
 199
199
-
 200
200
-
 201
201
-
 202
202
-
 203
203
-
 204
204
-
 205
205
-
 206
206
-
 207
207
-
 208
208
-
 209
209
-
 210
210
-
 211
211
-
 212
212
-
 213
213
-
 214
214
-
 215
215
-
 216
216
-
 217
217
-
 218
218
-
 219
219
-
 220
220
-
 221
221
-
 222
222
-
 223
223
-
 224
224
-
 225
225
-
 226
226
-
 227
227
-
 228
228
-
 229
229
-
 230
230
-
 231
231
-
 232
232
-
 233
233
-
 234
234
-
 235
235
-
 236
236
-
 237
237
-
 238
238
-
 239
239
-
 240
240
-
 241
241
-
 242
242
-
 243
243
-
 244
244
-
 245
245
-
 246
246
-
 247
247
-
 248
248


in anderen Sprachen
- English: Sony KLV-15SR2 User manual
- français: Sony KLV-15SR2 Manuel utilisateur
- Nederlands: Sony KLV-15SR2 Handleiding
Verwandte Artikel
-
Sony KLV-L23M1 Benutzerhandbuch
-
Sony KLV-W40A10E Benutzerhandbuch
-
Sony KD-100ZD9 Benutzerhandbuch
-
-
Sony KE-P42M1 Bedienungsanleitung
-
Sony KLV-L32M1 Bedienungsanleitung
-
Sony KLV-23HR2 Bedienungsanleitung
-
-
Sony KLV26HG2 Benutzerhandbuch
-
Sony KLV-15SR3E Benutzerhandbuch