Sachtler Artemis DV Benutzerhandbuch
- Kategorie
- Fahrradzubehör
- Typ
- Benutzerhandbuch

ARTEMIS DV
Manual
Bedienungsanleitung
Camera Stabilizing System
Kamera-Stabilisierungssystem
ArtemisDV.qxd 01.04.04 07:56 Seite 1

© by sachtler. All rights reserved / Alle Rechte vorbehalten
Version: 1.4/03/2004
Issue date / Ausgabedatum: 03/2004
Order no. / Bestellnr.: sbs14t0200
sachtler GmbH & Co. KG
Gutenbergstrasse 5 Postfach / P.O.BOX 1648
D-85716 Unterschleissheim D-85706 Unterschleissheim
Germany Germany
Telefon: (089) 32 15 82 00
Telefax: (089) 32 15 82 27
E-Mail: contact@sachtler.de
Homepage: http://www.sachtler.com
ArtemisDV.qxd 01.04.04 07:56 Seite 2

– I –
Table of contents / Inhaltsverzeichnis
Table of Contents
1 General . . . . . . . . . . . . . . . . . . . . . . . . . . . . . . . . . . . . .1
2 First steps . . . . . . . . . . . . . . . . . . . . . . . . . . . . . . . . . . .1
3 Camera plate . . . . . . . . . . . . . . . . . . . . . . . . . . . . . . . . .2
4 Docking stand . . . . . . . . . . . . . . . . . . . . . . . . . . . . . . . . .3
5 Counter weight . . . . . . . . . . . . . . . . . . . . . . . . . . . . . . . .4
6 Side to Side . . . . . . . . . . . . . . . . . . . . . . . . . . . . . . . . . .5
7 Balance . . . . . . . . . . . . . . . . . . . . . . . . . . . . . . . . . . . . .6
8 Monitor . . . . . . . . . . . . . . . . . . . . . . . . . . . . . . . . . . . . . .8
9 Technical data . . . . . . . . . . . . . . . . . . . . . . . . . . . . . . . .9
10 Warranty . . . . . . . . . . . . . . . . . . . . . . . . . . . . . . . . . . . . .9
Inhaltsverzeichnis
1 Grundsätzliches . . . . . . . . . . . . . . . . . . . . . . . . . . . . . .10
2 Erste Schritte . . . . . . . . . . . . . . . . . . . . . . . . . . . . . . . .11
3 Kameraplatte . . . . . . . . . . . . . . . . . . . . . . . . . . . . . . . .13
4 Docking Stand . . . . . . . . . . . . . . . . . . . . . . . . . . . . . . .14
5 Kontergewicht . . . . . . . . . . . . . . . . . . . . . . . . . . . . . . . .15
6 Side to Side . . . . . . . . . . . . . . . . . . . . . . . . . . . . . . . . .16
7 Balance . . . . . . . . . . . . . . . . . . . . . . . . . . . . . . . . . . . .17
8 Monitor . . . . . . . . . . . . . . . . . . . . . . . . . . . . . . . . . . . . .19
9 Technische Daten . . . . . . . . . . . . . . . . . . . . . . . . . . . . .20
10 Garantie . . . . . . . . . . . . . . . . . . . . . . . . . . . . . . . . . . . .20
ArtemisDV.qxd 01.04.04 07:56 Seite I

1 General
It’s all only physics, nothing else. In order to understand the
physical principle of an Artemis DV you best imagine a high-
wire acrobat riding a motorbike. In most of the cases, he is
accompanied by a most attractive young lady sitting on a trape-
ze below him. What happens exactly in this case? The young
lady is lighter than the motorbike with its driver. She is placed,
however, farther away from the wire i.e. from the center line of
gravity. The farther away the counterbalance is placed from the
head weight the lighter it can be.Thus, this combination is per-
fectly balanced. No matter how much the bike will be swaying
back and forth the biker always keep himself, his bike, and,
naturally, the young lady upright. In order to find this balance
with your Artemis DV, too, you should carefully read the follo-
wing instructions.
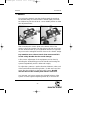
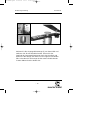
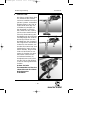
2 First steps
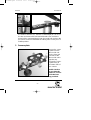
Open the box and take out the Artemis DV (1). Unfold the
Artemis and fix the upper and lower half of the bow by turning
– 1 –
ManualArtemis DV
1
3
5
2
ArtemisDV.qxd 01.04.04 07:56 Seite II

– 2 –
Manual Artemis DV
the fixation
the fixation clockwise (2).Take the counterweight pin (3) out of
the box and remove the red knurled thumb screw. Insert the
thread of the counterweight pin into the round hole and turn the
pin until it can be moved within the oblong hole. Fix the pin in a
middle position.
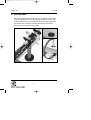
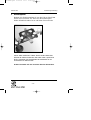
3 Camera plate
Remove the came-
ra plate from the
side-to-side unit:
turn the front and
rear knob at the
side-to-side unit in
opposite way.
Connect the came-
ra plate firmly to
the bottom side of
your camera.
Double check to
be sure that the
camera is connec-
ted in the best
way provided.
3
2
4
ArtemisDV.qxd 01.04.04 07:56 Seite III

– 3 –
ManualArtemis DV
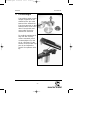
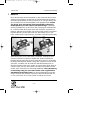
4 Docking stand
The round plastic plate with the pin (5) is called docking stand.
Place the docking stand on the edge of a table in such a way
that you will be able to insert the pin of the docking stand into
the handle of the Artemis DV. Now the Artemis DV should
dangle loose from the docking stand.
5
ArtemisDV.qxd 01.04.04 07:56 Seite IV

– 4 –
Manual Artemis DV
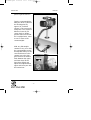
5 Counterweight
The stainless steel counter
weights supplied can be
slotted into the pin at the
bottom of the Artemis DV.
They have grooves on their
bottom side to fit into each
other. Through this maxi-
mum safety and noise
reduction is achieved.
To avoid the equipment til-
ting over with a heavy
camera mounted, put all
counterweights on to the
pin in a first step. Fix the
monitor to the monitor sup-
port (6) and adjust the
monitor for optimum visibi-
lity.
6
ArtemisDV.qxd 01.04.04 07:57 Seite V

– 5 –
ManualArtemis DV
6 Side-to-Side
The side-to-side unit is
used to hold the camera to
restore the balance of the
whole system.The balance
range of the side-to-side
unit is extended by the
movable handle and addi-
tional mounting holes (x).
If you should use a camera
with an extreme front or
back center of gravity, it
could be necessary to shift
the whole side-to-side unit.
To do this, remove the two
recessed head screws
from the bottom of the
side-to-side unit and fix it in
a more appropriate positi-
on.
Be sure to tighten the
screws firmly but without
extreme force.
X
ArtemisDV.qxd 01.04.04 07:57 Seite VI

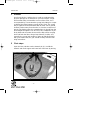
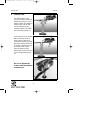
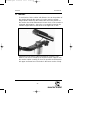
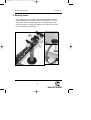
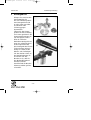
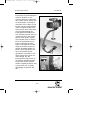
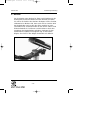
7 Balance
First, place the Artemis onto the docking stand. Be sure that
the knurled fixing nut of the handle is locked tightly.The front-
back balancing unit should be in a near middle position to allow
fine adjustment later.
After mounting the camera plate to the bottom side of the
camera, place the camera onto the side-to-side unit and screw
the two knurled knobs (A) (in longitudinal direction) in opposite
way to move the triangular brackets close to the camera wedge.
Pay attention not to release hands from camera until it is
locked safely! Double check to avoid damage!
A first coarse adjustment of the equipment can be done by
unlocking the knurled fixing nut of the handle and moving the
system longitudinally until it is balanced roughly.
To adjust the system to a perfect front-back balance, take each
of the both front-back balancing knobs ( A) with one hand, the
same direction relatively to the balancing system. Double
check to be sure the camera plate doesn´t come lose.
In a last step you have to restore the right-left balance of the
system. Use the right-left adjusting knobs (B) to achieve the
– 6 –
Manual Artemis DV
A
B
ArtemisDV.qxd 01.04.04 07:57 Seite VII

perfect right-left balance.
Test the counterweight by
tilting the whole system on
the docking plate by
approx. 20° and then
release it.The system will
swing back.The camera is
balanced correctly if it
comes back to upright
position after one second.
If it is upright faster, remo-
ve one or more of the
counterweights.
With very little weight
cameras it may occur that
the counterweight cannot
be adjusted exactly. In this
case the distance to the
camera has to be chan-
ged. Release the fixation
knob between the upper
and lower bow, lift the
lower bow slightly and
adjust the angle between
upper and lower part with
the knurled nut.
– 7 –
ManualArtemis DV
7
2
ArtemisDV.qxd 01.04.04 07:57 Seite VIII

8 Monitor
To avoid noise, fix the cables with ribbons. Due to the position of
the monitor beneath the camera, it is also used as counter-
weight. Before balancing the Artemis DV, the exact position of
the monitor should be determined. Please check, if the monitor is
equipped with batteries - they also act as weight. If turning the
monitor support either to the left or to the right side, a new
adjustment of the side-to-side unit might be necessary.The
balance can also be varied by turning the monitor support. Run
the monitor cables carefully as close as possible to the Artemis
DV upper and lower bow.The holes in the bows can be of help.
– 8–
Manual Artemis DV
ArtemisDV.qxd 01.04.04 07:57 Seite IX

– 9 –
Bedienungsanleitung
9 Technical data
Weight 1.05 kg/ 2.2 lb without camera, without counterweight
Payload 2.50 kg/ 5.5 lb
Height min. 22 cm/ 8.7 “
Height max. 38 cm/ 15 “
Length 38 cm/ 15 “
10 Warranty
Warranty expires if the camera stabilizing system was operated
improperly or not in line with the specified technical data.
We reserve the right to make changes based on technical
advances.
Artemis DV
ArtemisDV.qxd 01.04.04 07:57 Seite X

– 10 –
Bedienungsanleitung
1 Grundsätzliches
Alles ist nur Physik, nichts anderes. Um das physikalische
Prinzip des Artemis DV zu verstehen, stellen Sie sich am
besten einen Hochseilartisten auf einem Motorrad vor. Meistens
wird er begleitet von einer attraktiven jungen Dame, die auf
einem Trapez unter ihm sitzt. Was genau passiert in diesem
Fall? Die junge Dame ist leichter als das Motorrad mit Fahrer.
Sie sitzt aber, vom Seil ausgehend (Schwerpunktachse), weiter
von ihm weg. Denn je weiter das Gegengewicht vom
Kopfgewicht entfernt ist, um so leichter kann es sein. Dieses
Gespann ist also in Balance. Egal, wie sehr das Seil auch hin
und her schaukelt, der Motorradfahrer hält sich, sein Motorrad
und natürlich die junge Dame immer gerade. Um diese Balance
auch bei Ihrem Artemis DV zu finden, sollten Sie die folgende
Anleitung aufmerksam lesen.
Artemis DV
ArtemisDV.qxd 01.04.04 07:57 Seite XI

– 11 –
Bedienungsanleitung
2 Erste Schritte
Öffnen Sie den Koffer und nehmen Sie den Artemis DV (1) her-
aus. Klappen Sie den Artemis auseinander und drehen Sie die
Knaufschraube (2), welche die beiden Bügel verbindet, fest.
Artemis DV
5
3
2
1
ArtemisDV.qxd 01.04.04 07:57 Seite XII

– 12 –
Bedienungsanleitung Artemis DV
Nehmen Sie die Gegengewichtsstange (3) aus dem Koffer und
entfernen Sie die rote Rändelschraube. Führen Sie das
Gewinde der Gegengewichtsstange durch das Rundloch und
drehen Sie die Stange, bis diese sich im Langloch verschieben
läßt. Schrauben Sie die Stange mit der roten Rändelschraube
in etwa mittlerer Postion wieder fest.
5
2
3
ArtemisDV.qxd 01.04.04 07:57 Seite XIII

– 13 –
Bedienungsanleitung
3 Kameraplatte
Nehmen Sie die Kameraplatte (4) aus der Side to Side Platte
heraus. Dies erreichen Sie, wenn Sie die Konterung der
beiden Rändelschrauben vorne und hinten lösen und eine
Artemis DV
davon weiter aufdrehen. Halten Sie die andere dabei fest.
Welche der beiden Schrauben Sie weiter lösen, spielt keine
Rolle. Schrauben Sie die Keilplatte anschließend an der
Unterseite Ihrer Kamera fest.
Achten Sie dabei auf den korrekten Sitz der Schrauben.
4
ArtemisDV.qxd 01.04.04 07:57 Seite XIV

– 14 –
Bedienungsanleitung Artemis DV
4 Docking Stand
Als Docking Stand (5) wird der runde Kunststoffteller mit dem
Zapfen bezeichnet. Sie stellen den Docking Stand so auf eine
Tischkante, dass Sie den Zapfen des Docking Stands in den
Griff des Artemis DV einführen können. Nun sollte der Artemis
frei am Docking Stand hängen.
5
ArtemisDV.qxd 01.04.04 07:57 Seite XV

– 15 –
Bedienungsanleitung
5 Kontergewicht
Hängen Sie zunächst alle
Kontergewichte ein.
Die aus Edelstahl gedreh-
ten Kontergewichte sind
an einer Seite geschlitzt
und besitzen eine
Sicherung gegen
Herausfallen.
Führen Sie das Konter-
gewicht mit der Vertiefung
nach unten gerichtet in die
Gegengewichtsstange ein.
Sie sind gegen Heraus-
fallen im normalen
Betriebszustand gesichert,
wenn sie vollständig inein-
ander eingerastet sind.
Die Kontergewichte können
für den Anfang ruhig ein
wenig zu schwer für die
Balance sein. Befestigen
Sie den Monitor sicher an
der Monitorhalterung (6)
und richten Sie den
Monitor so ein, daß Sie
das Monitorbild optimal
erkennen können.
Anschließend die Monitor-
halterung wieder gut fest-
schrauben.
Artemis DV
6
ArtemisDV.qxd 01.04.04 07:57 Seite XVI

– 16 –
Bedienungsanleitung
6 Side-to-Side
Die Side to Side Einheit dient
zur Aufnahme der Kamera
und zum Ausbalancieren des
ganzen Systems. Unterstützt
wird die Balance der Side to
Side Einheit durch den ver-
schiebbaren Handgriff. Um
den Handgriff zu verschie-
ben, halten Sie das System
mit der einen Hand fest und
lösen Sie die Konterung des
Handgriffes mit dem Daumen
und Zeigefinger der anderen
Hand. Nun können Sie den
Handgriff bzw. das System in
der Längsachse verschieben.
Sollten Sie eine Kamera ver-
wenden die extrem kopf- bzw.
hecklastig ist, kann es erfor-
derlich werden, die gesamte
Side to Side Einheit zu ver-
setzen. Schrauben Sie dazu
die beiden unteren Innen-
sechskantschrauben (X)
komplett heraus und verset-
zen die Side to Side Einheit
in die von Ihnen gewünschte
Position.
Achten Sie beim
Zusammenbau auf den kor-
rekten Sitz und die sichere
Befestigung der
Schrauben.
Artemis DV
X
ArtemisDV.qxd 01.04.04 07:57 Seite XVII

– 17 –
BedienungsanleitungArtemis DV
7 Balance
Nach der Montage der Kameraplatte an der Unterseite der Kamera
setzen Sie die Kamera auf die Side to Side Einheit und schrauben
die beiden gerändelten Konterschrauben (A) (in Längsrichtung) wie-
der zusammen bis die Kameraplatte sicher gehalten wird. Achten
Sie darauf, dass die Kamera nicht herunterfällt, solange die
Kameraplatte lose in der Side-to-Side Einheit liegt. Schrauben
Sie den Handgriff nun so fest, dass das System grob ausbalanciert
ist. Zunächst wird das System durch die vor/zurück Schrauben in
Balance gebracht. Dazu halten Sie zunächst die vordere und hintere
Rändelschraube (A) fest und lösen eine der beiden um ca. eine
halbe Umdrehung. Sodann können Sie beide Schrauben gleichzeitig
gleichsinnig nach vorne oder hinten schrauben, solange bis das
System in Balance ist. Danach werden die vordere und hintere
Rändelschraube gekontert. Danach muß das System in rechts/links
Richtung ausbalanciert werden. Hängt das System nun nach rechts
oder links, verstellen Sie die seitlichen Rändelschrauben (B) so,
dass die Kamera weder nach rechts noch nach links hängt. Dies ge-
schieht, indem Sie eine der beiden Schrauben fest halten und die
andere nach rechts bis zum Anschlag festdrehen. Diese Konterung
ist unbedingt nötig, da sonst die Kamera unter unglücklichen
Umständen herausfallen kann. Um das Kontergewicht zu testen,
neigen Sie bitte das gesamte System auf dem Docking Stand um
ca. 20° und lassen es los. Das System schwingt nun zurück.
A
B
ArtemisDV.qxd 01.04.04 07:57 Seite XVIII
Seite wird geladen ...
Seite wird geladen ...
Seite wird geladen ...
-
 1
1
-
 2
2
-
 3
3
-
 4
4
-
 5
5
-
 6
6
-
 7
7
-
 8
8
-
 9
9
-
 10
10
-
 11
11
-
 12
12
-
 13
13
-
 14
14
-
 15
15
-
 16
16
-
 17
17
-
 18
18
-
 19
19
-
 20
20
-
 21
21
-
 22
22
-
 23
23


Sachtler Artemis DV Benutzerhandbuch
- Kategorie
- Fahrradzubehör
- Typ
- Benutzerhandbuch
in anderen Sprachen
- English: Sachtler Artemis DV User manual
Verwandte Artikel
Andere Dokumente
-
Icon Legend Series Studio Large Diaphragm Condenser Microphone Benutzerhandbuch
-
Massive 59333/17/10 Datenblatt
-
Fakir Artemis | TS 250 Cat & Dog Bedienungsanleitung
-
-
Pioneer HC-CP08 Bedienungsanleitung
-
Pioneer VM-80 Schnellstartanleitung
-
Panasonic SCPM25 Bedienungsanleitung